1
DVD-D360K
DVD-D530
DVD-D530K
DVD Player
User Manual
imagine the possibilities
Thank you for purchasing this Samsung product.
To receive more complete service, please register your product at
www.samsung.com/global/register
AK68-02088A
ENGLISH
Precautions
Table of contens
1. Setting up
- Refer to the identification label located on the rear of your player for its proper operat
ing voltage.
- Install your player in a cabinet with adequate ventilation holes. (7~10cm). Do not block ventilation holes on any of the components for air circulation.
- Do not push the disc tray in by hand.
- Do not stack components.
- Be sure to turn all components off before moving the player.
- Before connecting other components to this player, be sure to turn them off.
- Be sure to remove the disc and turn off the player after use, especially if you are not going to use it for a long time.
- The mains plug is used as a disconnect device and shall stay readily operable at any time.
2. For your safety
- This product utilizes a laser. Use of controls or adjustments or performance of
procedures other than those specified herein may result in hazardous radiation exposure.
- Do not open covers and do not repair your self. Refer servicing to qualified personal.
3. Caution
2
- Your player is not intended for industrial use but for domestic purposes. Use of this product is for personal use only.
- Apparatus shall not be exposed to dripping or splashing and no objects filled with liquids, such as vases, shall be placed on the apparatus.
- Exterior influences such as lightning and static electricity can affect normal operation of this player. If this occurs, turn theplayer off and on again with the POWER button, or disconnect and then reconnect the AC power cord to the AC power outlet. The player will operate normally.
- When condensation forms inside the player due to sharp changes in temperature, the player may not operate correctly. If this occurs, leave the player at room tempera-
ture until the inside of the player becomes dry and operational.
4. Disc
- Do not clean disc using record-cleaning sprays, benzene, thinner, or other volatile solvents that may cause damage to the disc surface.
- Do not touch the disc’s bottom. Hold by the edges or by one edge and the hole in the center.
- Wipe the dirt away gently; never wipe a cloth back and forth over the disc.
5. Environmental info
- The battery used in this product contains chemicals that are harmful to the environment.
- So, dispose the batteries in the proper- manner, according to federal, state, and local regulations.
The product unit accomparied this user manual is
licenced under certain intellectual property rights
of certain third parties. This licence is limited to
private non-commercial use by end-user consumers for licenced contents. No rights are granted
for commercial use. The licence does not cover
any product unit other than this product unit and
the licence does not extend to any unlicenced
product unit or pro-cess conforming to ISO/OUR
11172-3 or ISO/OUR 13818-3 used or sold in
combination with this product unit. The licence
only covers the use of this product unit to encode
and/or decode audio files conforming to the ISO/
OUR 11172-3 or ISO/OUR 13818-3. No rights are
granted under this licence for product features
or functions that do not conform to the ISO/OUR
11172-3 or ISO/OUR 13818-3.
CAUTION: USE OF ANY CONTROLS,
ADJUSTMENTS, OR PROCEDURES OTHER
THAN SPECIFIED HEREIN MAY RESULT IN
HAZARDOUS RADIATION EXPOSURE
Precautions. . . . . . . . . . . . . . . . . . . . . . . . . . . . . .
Setup
General Features . . . . . . . . . . . . . . . . . . . . . . . . .
Description . . . . . . . . . . . . . . . . . . . . . . . . . . . . . .
Tour of the Remote Control. . . . . . . . . . . . . . . . . .
Connections
Choosing a Connection . . . . . . . . . . . . . . . . . . . .
Basic Functions
Playing a Disc . . . . . . . . . . . . . . . . . . . . . . . . . . .
Using the Search and Skip Functions . . . . . . . . .
Using the Display Function . . . . . . . . . . . . . . . . .
Using the Disc and Title Menu . . . . . . . . . . . . . . .
Repeat Play . . . . . . . . . . . . . . . . . . . . . . . . . . . . .
Slow Play . . . . . . . . . . . . . . . . . . . . . . . . . . . . . . .
Advanced Functions
Adjusting the Aspect Ratio (EZ View). . . . . . . . . .
Selecting the Audio Language . . . . . . . . . . . . . . .
Selecting the Subtitle Language. . . . . . . . . . . . . .
Changing the Camera Angle. . . . . . . . . . . . . . . . .
Using the Bookmark Function . . . . . . . . . . . . . . .
Using the Zoom Function. . . . . . . . . . . . . . . . . . .
Clips Menu for MP3/WMA/JPEG/MPEG4/
CD Audio. . . . . . . . . . . . . . . . . . . . . . . . . . . . . . . .
Folder Selection . . . . . . . . . . . . . . . . . . . . . . . . . .
2
2
3
3
4
6
6
6
6
6
7
7
7
7
7
7
8
8
8
MP3/WMA/CD Audio Playback. . . . . . . . . . . . . . 8
MPEG4 Playback. . . . . . . . . . . . . . . . . . . . . . . . . . 8
Playing Media Files using the USB HOST
feature. . . . . . . . . . . . . . . . . . . . . . . . . . . . . . . . . . 9
CD Ripping. . . . . . . . . . . . . . . . . . . . . . . . . . . . . 10
Picture CD Playback. . . . . . . . . . . . . . . . . . . . . . 10
Picture CD Playback for HD-JPEG
(Only DVD-D530K/D530). . . . . . . . . . . . . . . . . . . 10
Karaoke Functions
(Only DVD-D360K/D530K)
Karaoke Functions . . . . . . . . . . . . . . . . . . . . . . . 11
Changing Setup Menu
Using the Setup Menu . . . . . . . . . . . . . . . . . . . . 11
Setting Up the Display Options. . . . . . . . . . . . . 11
Setting Up the Audio Options. . . . . . . . . . . . . . . 12
Setting Up the System Options . . . . . . . . . . . . . 12
Setting Up the Language Features. . . . . . . . . . . 12
Setting Up the Security Options. . . . . . . . . . . . . 13
Setting Up the General Options. . . . . . . . . . . . . 13
Setting Up the Support Options. . . . . . . . . . . . . 13
Reference
Troubleshooting. . . . . . . . . . . . . . . . . . . . . . . . . . 13
Specifications. . . . . . . . . . . . . . . . . . . . . . . . . . . 14
Setup
General Features
Excellent Sound
Dolby Digital, a technology developed by Dolby
Laboratories, provides crystal clear sound
reproduction.
Screen
Both regular and widescreen(16:9) pictures can
be viewed.
Slow Motion
An important scene can be viewed in slow
motion.
1080p Playback (Only DVD-D530K/
D530)
This player upconverts regular DVDs for playback
on 1080p TVs.
Parental Control (DVD)
The parental control allows users to set the
neces-sary level to prohibit children from viewing
harmful movies such as those with violence, adult
subject matter, etc.
Various On-Screen Menu
Functions
You can select various languages (Audio/Subtitle)
and screen angles while enjoying movies.
Progressive Scan
Progressive scanning creates an improved picture
with double the scan lines of a conventional interlaced picture
EZ VIEW (DVD)
Easy View enables picture adjustment to match
your TV’s screen size (16:9 or 4:3).
Digital Photo Viewer (JPEG)
You can view Digital Photos on your TV.
Repeat
You can repeat a song or movie simply by pressing the REPEAT button
MP3/WMA
This unit can play discs contain MP3/WMA files.
MPEG4
This unit can play MPEG4 formats within an avi file.
HDMI (High Definition Multimedia
Interface) (Only DVD-D530K/D530)
HDMI reduces picture noise by allowing a puredigital video/audio signal path from the player to
your TV.
CD Ripping
to copy audio files from disc to USB device into MP3
format. (Only Audio CD (CD DA)).
Note
- Discs which cannot be played with this
player.
• DVD-ROM • DVD-RAM
• CD-ROM • CDV
• CDI • CVD
- Ability to play back may depend on recording
conditions.
• DVD-R, +R
• CD-RW
• DVD+RW, -RW (V mode)
- The unit may not play certain CD-R, CD-RW
and DVD-R due to the disc type or recording
conditions.
COPY PROTECTION
Many DVD discs are encoded with copy protection. Because of this, you should only connect your DVD player directly to your TV, not to
a VCR. Connecting to a VCR results in a distorted picture from copy-protected DVD discs.
This item incorporates copy protection technology that is protected by U.S. patents and other
intellectual property rights of Rovi Corporation.
Reverse engineering and disassembly are
prohibited.
PROGRESSIVE SCAN OUTPUTS
(576p,720p,1080p)
“CONSUMERS SHOULD NOTE THAT NOT
ALL HIGH DEFINITION TELEVISION SETS
ARE FULLY COMPATIBLE WITH THIS
PRODUCT AND MAY CAUSE ARTIFACTS TO
BE DISPLAYED IN THE PICTURE, IN CASE
OF 576, 720, 1080 PROGRESSIVE SCAN
PICTURE PROBLEMS, IT IS RECOMMENDED
THAT THE USER SWITCH THE CONNECTION
TO THE ‘STANDARD DEFINITION’ OUTPUT. IF
THERE ARE QUESTIONS REGARDING YOUR
TV SET COMPATIBILITY WITH THIS MODEL
576p, 720p, 1080p DVD PLAYER, PLEASE
CONTACT SAMSUNG’S CUSTOMER SERVICE
CENTER.”
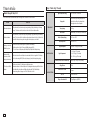
Disc Markings
~
PAL
Play Region Number
Description
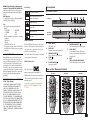
Front Panel Controls
PAL broadcast system in U.K,
France, Germany, etc.
7
DVD-D530
Dolby Digital disc
STEREO
STEREO
Stereo disc
DIGITAL
SOUND
Digital Audio disc
MP3 disc
7
DVD-D530K
DVD-D360K
Region Number
Both the DVD player and the discs are coded
by region. These regional codes must match in
order for the disc to play. If the codes do not
match, the disc will not play.
The Region Number for this player is described
on the rear panel of the player.
DivX Certification
DivX, DivX Certified, 1. DISC TRAY
Place the disc here.
2. DISPLAY
Operation indicators are displayed here.
3. OPEN/CLOSE ( )
Press to open and close the disc tray.
4. STOP ( )
Stops play.
5. PLAY/PAUSE ( )
Play or pause the disc.
8.
POWER ON/OFF (
)
Turn on/off and the player is turned on/off.
USB HOST
Connect digital still camera, MP3 player,
memory stick, Card reader other removable
storage devices.
MIC
(Only DVD-D530K/D360K)
Connect Microphone for karaoke functions.
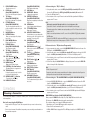
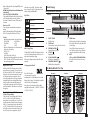
Tour of the Remote Control
and associated logos are trademarks of
DVD-D360K
DivXNetworks, Inc and are used under license.
DVD-D530
“DivX Certified to play DivX video, including
premium content.”
Covered by one or more of the following U.S
patents : 7,295,673; 7,460,668; 7,515,710;
7,519,274.
6.
7.
1
6
7
8
24
11
10
12
15
18
17
5
26
28
27
13
22
21
14
30
20
1
2
3
4
5
DVD-D530K
15
9
16
17
18
19
28
21
22
23
24
10
11
12
25
26
27
6
7
20
29
15
9
16
17
18
19
20
21
22
23
24
10
11
12
25
26
27
6
7
8
13
13
14
1
2
3
4
5
14
28
29
30
3
1. DVD POWER Button
Turns the power on or off.
2. DVD Button
(Only DVD-D530K/D530)
Use to select the DVD player for operation.
3. TV Button
(Only DVD-D530K/D530)
Use to select a Samsung TV for operation.
4. EZ VIEW Button
(Only DVD-D530K/D530)
Lets you easily adjust the aspect ratio of a
picture according to the screen size of your
TV (16:9 or 4:3).
5. MARKER Button
6. REPEAT Button
Allows you to repeat play a title, chapter,
track, or disc.
7. DISC MENU Button
Brings up the Disc menu.
8. RECORD Button
(Only DVD-D530K/D360K)
Use to Karaoke recording.
9. TV VOL (+, -) Buttons
(Only DVD-D530K/D530)
Controls volume.
10. SKIP Buttons ( / )
Use to skip the title, chapter or track.
11. STOP Button ( )
12. MENU Button
Brings up the DVD player’s menu.
13. ENTER/π/†,√/® Buttons
This button functions as a toggle switch.
14. TOOLS Button
Displays the current disc mode. It also lets
you access the Display function.
15. OPEN/CLOSE ( ) Button
To open and close the disc tray.
16. HDMI SEL. Button
17.
18.
19.
20.
21.
22.
23.
24.
25.
26.
27.
28.
29.
30.
(Only DVD-D530K/D530)
HDMI Output resolution setup.
USB Button
VIDEO SEL. Button
Changes video output mode.
REPEAT A-B Button
(Only DVD-D530K/D530)
Allows you to repeat play a chosen section
(A-B) on a disc.
INFO Button
Used to displays playback info banner.
TITLE MENU Button
Brings up the Title menu.
AUDIO/TV SOURCE Button
Use this button to access various audio
functions on a disc. Use this button to select
an available TV source (mode TV).
PAUSE Button ( )
(Only DVD-D530K/D530)
Pauses disc play.
SEARCH Buttons ( / )
Allows you to search forward/backward
through a disc.
TV CH ( ,
) Buttons
(Only DVD-D530K/D530)
Channel selection.
PLAY Button ( )/( )
Begins disc play.
RETURN Button
Returns to a previous menu.
SUBTITLE/(π) Button
EXIT Button
(Only DVD-D530K/D530)
Exits the on-screen menu.
KARAOKE (†) Button
(Only DVD-D530K/D360K)
To access karaoke menu (Keycon, mic volume, echo).
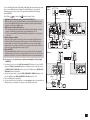
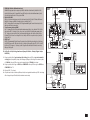
Connections
Choosing a Connection
The following shows examples of connections commonly used to connect the DVD player with a TV and
other components.
Before Connecting the DVD Player
- Always turn off the DVD player, TV, and other components before you connect or disconnect any cables.
- Refer to the user’s manual of the additional components you are connecting for more information on
those particular components.
4
A.Connecting to a TV (For Video)
1. Using video/audio cables, connect the VIDEO (yellow)/AUDIO (red and white) OUT terminals on
the rear of the DVD player to the VIDEO (yellow)/AUDIO (red and white) IN terminals of TV.
2. Turn on the DVD player and TV.
3. Press the input selector on your TV remote control until the Video signal from the DVD player
appears on the TV screen.
Note
- Noise may be generated if the audio cable is too close to the power cable.
- If you want to connect to an Amplifier, please refer to the Amplifier connection page.
- The number and position of terminals can vary depending on your TV set. Please refer to the user’s
manual of the TV.
- If there is one audio input terminal on the TV, connect it to the [AUDIO OUT][left] (white) terminal of
the DVD player.
- If you press the VIDEO SEL. button when DVD Player is in stop mode or no disc is inserted, the Video
Output mode changes in the following sequence: (I-SCAN ➝ P-SCAN)
B.Connection to a TV (Interlace/Progressive)
1. Using component video cables, connect the COMPONENT VIDEO OUT terminal on the rear of the
DVD player to the COMPONENT IN terminal of TV.
2. Using the audio cables, connect the AUDIO (red and white) OUT terminals on the rear of the DVD
player to the AUDIO (red and white) IN terminals of TV. Turn on the DVD player and TV.
3. Press the input selector on your TV remote control until the Component signal from the DVD player
appears on the TV screen.
4. Set the Video Output to I-SCAN/P-SCAN in the Display Setup menu. You can use the VIDEO SEL.
button to change the Video Output mode.
Note
- What is “Progressive Scan”?
Progressive scan has twice as many scanning lines as the interlace output method has. Progressive
scanning method can provide better and clearer picture quality.
C.Connecting to a TV with DVI/HDMI Jack (ONLY DVD-D530K/D530)
1. Using the HDMI-DVI/HDMI-HDMI cable , connect the HDMI OUT terminal on the rear of the DVD
player to the DVI/HDMI IN terminal of your TV.
2. Using the audio cables, connect the AUDIO (red and white) OUT terminals on the rear of the DVD
player to the AUDIO (red and white) IN terminals of your TV. Turn on the DVD player and TV.
3. Press the input selector on your TV remote control until the DVI/HDMI signal from the DVD player
appears on your TV screen.
HDMI VIDEO Specifications (ONLY DVD-D530K/D530)
When you press the HDMI SEL. button, 480p, 576p, 720p, 1080p, 1080i are selected in order.
The first press of the HDMI SEL. button brings up the current resolution.
The second press allows you to change the HDMI output resolution.
- Depending on your TV, certain HDMI output resolutions may not work.
- Please refer to the user’s manual of your TV.
- If HDMI or HDMI-DVI cable is plugged into TV, the DVD player’s output is set to HDMI/DVI within 10
seconds.
- If you set the HDMI output resolution 720p,1080p or 1080i, HDMI output provides better picture quality.
- If you connect an HDMI cable between Samsung TV and this DVD player, you can operate this
DVD player using your TV remote control. This is only available with Samsung TVs that support
Anynet+(HDMI-CEC).
- If your TV has an
logo, then it will
Supports the Anynet+ Function.
• HDMI (High Definition Multimedia Interface) (Only DVD-D530K/DVD-D530)
HDMI is an interface to enable the digital transmission of video and audio data with just a single
connector.Using HDMI, the DVD player transmits a digital video and audio signal and displays a
vivid picture on a TVhaving an HDMI input jack.
• HDMI connection description HDMI connector
- Both uncompressed video data and digital audio data (LPCM or Bit Stream data).- Though the player uses a HDMI cable, the player outputs only a pure digital signal to the TV.
- If TV does not support HDCP (High-bandwidth Digital content protection), snow noise appears on the screen.
• Why does Samsung use HDMI?
Analog TVs require an analog video/audio signal. However, when playing a DVD, the data transmitted to a TV is digital. Therefore either a digital-to-analog converter (in the DVD player) or an
analog-to-digital converter (in the TV) is required. During this conver-sion, the picture quality is
degraded due to noise and signal loss. DVI technology is superior because it requires no D/A conversion and is a pure digital sig-nal from the player to your TV.
• What is the HDCP?
HDCP (High-bandwidth Digital Content Protection) is a system for protecting DVD content outputted
via DVI from being copied. It provides a secure digital link between a video source (PC, DVD. etc) and a
display device (TV, projector . etc). Content is encrypted at the source device to prevent unauthorized.
DVD-D530K
DVD-D530
2-Channel stereo amplifier
or Dolby digital
D
Audio Cable
Coaxial Cable
WHITE
WHITE
BLUE
GREEN
RED
RED
RED
YELLOW
Audio Cable
RED
A
Video
Cable
Component
Cable
B
WHITE YELLOW
C
OR
HDMI-DVI cable
RED BLUE GREEN
HDMI cable
DVD-D360K
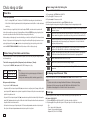
D.Connection to an Audio System (2 Channel Amplifier, Dolby Digital, or MPEG2 )
1. Using the audio cables, connect the AUDIO (red and white) OUT terminals on the rear of the DVD
player to the AUDIO (red and white) IN terminals of the Amplifier. If using a coaxial cable, connect
the DIGITAL AUDIO OUT (COAXIAL) terminal on the rear of the DVD player to the DIGITAL AUDIO
IN (COAXIAL) terminal of the Amplifier.
2. Using the video signal cable(s), connect the VIDEO, COMPONENT or HDMI OUT terminals on the
rear of the DVD player to the VIDEO, COMPONENT or DVI IN terminals of your TV
3. Turn on the DVD player, TV, and Amplifier.
4. Press the input select button of the Amplifier to select external input in order to hear sound from the
DVD player. Refer to your Amplifier's user manual to set the Amplifier's audio input.
WHITE
RED
D
COAXIAL CABLE
BLUE
2-Channel stereo ampilfier,
Dolby digital
RED
WHITE
GREEN
WHITE
WHITE
RED
RED
RED
YELLOW
VIDEO CABLE
AUDIO CABLE
RED
WHITE
A
B
YELLOW
COMPONENT CABLE
RED BLUE GREEN
5
Basic functions
Using the Display Function
When Playing a DVD/VCD/MPEG4
Playing a Disc
Before Play
- Turn on your TV and set it to the correct Video Input by pressing TV/VIDEO button on the TV remote control.
- If you connected an external Audio System, turn on your Audio System and set it to the correct Audio Input.
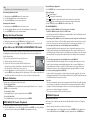
After plugging in the player, the first time you press the DVD POWER button, this screen comes up: If
you want to select a language, press the π/† button, and then press the ENTER button. (This screen
will only appear when you plug in the player for the first time.)If the language for the startup screen is
not set, the set-tings may change whenever you turn the power on or off. Therefore, make sure that you
select the language you want to use.Once you select a menu language, you can change it by pressing
the ®|| button on the front panel of the unit for more than 5 seconds with no disc in the unit. Then the
SELECT MENU LANGUAGE window appears again where you can reset your preferred language.
Using the Search and Skip Functions
1.
2.
3.
4.
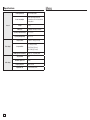
During play, press the TOOLS button on the remote control.
Press the π/† buttons to select the desired item.
Press the √/® buttons to make the desired setup.
To make the screen disappear, press the TOOLS button again.
The functions when using the Display function are listed in the table below.
To access the desired title when there is more than one in the disc. For example, if there
is more than one movie on a DVD, each movie will be identified.
Most DVD discs are recorded in chapters so that you can quickly find a specific passage.
Allows playback of the film from a desired time. You must enter the starting time as a
reference.The time search function does not operate on some disc.
Refers to the language of the film soundtrack. In the example, the soundtrack is played
in English 5.1CH. A DVD disc can have up to eight different soundtracks.
Refers to the subtitle languages available in the disc. You will be able to choose the
subtitle languages or, if you prefer, turn them off from the screen. A DVD disc can have
up to 32 different subtitles.
During play, you can search quickly through a chapter or track, and use the skip function to jump to the
next selection.
Searching through a Chapter or Track
EZ
User will be able to choose EZ-View type.
During play, press the SEARCH (k or K) button on the remote control for more than 1 second.
DVD
CD
VCD
2X, 4X, 8X, 16X, 32X
2X, 4X, 8X, 16X, 32X
4X, 8X
Note
- The speed marked in this function may be different from the
actual playback speed.
- No sound is hearing during search mode (Except CD).
Skipping Tracks
During play, press the SKIP (|k or K|) button.
- When playing a DVD, if you press the SKIP (K|) button, it moves to the next chapter. If you press the
SKIP (|k) button, it moves to the beginning of the chapter. One more press makes it move to the
beginning of the previous chapter.
- When playing a VCD, if you press the SKIP (K|) button, it moves to the next track. If you press the
SKIP (|k) button, it moves to the beginning of the track. One more press makes it move to the
beginning of the previous track.
- If a track exceeds 15 minutes when playing a VCD and you press the K| button, it moves forward 5
minutes. If you press the |k button, it moves to the beginning of the track. One more press makes
it move to the beginning of the previous track.
6
Press enter to activate the Zoom function.
To access the desired Angle function. Some DVD disc are have more than one recorded
angle.
Using the Disc and Title Menu
During the playback of a DVD disc, press the DISC MENU/TITLE MENU button on the remote control.
Note
- Depending on a disc, the Disc Menu/Title Menu may not work.
- You can also use the Disc Menu, using the DISC MENU button on the remote control.
- Title Menu will only be displayed if there are at least two titles in the disc.
Repeat Play
Repeat the current track, chapter, title, a chosen section (A-B), or all of the disc.
When playing a DVD/VCD
1.
2.
Press the REPEAT button on the remote control. Repeat screen appears.
Press the REPEAT or π/† button to change playback mode. DVD repeats play by chapter or title.
- Off.
- Title : repeats the title that is playing.
- Chapter : repeats the chapter that is playing.
- Repeat A-B (Only DVD-D360K)
Using the A-B Repeat function (Only DVD-D360K)
Note
This function may behave differently depending on the type of disc.
1.Press the REPEAT button on the remote control. The repeat screen appears.
2.Press the π/† button to select the REPEAT A-B and then press ENTER.
3.Press the ENTER at the point where you want repeat play to start (A).
4.Press the ENTER at the point where you want repeat play to start (B).
You can select a desired audio language quickly and easily with the AUDIO button.
Using the A-B Repeat function (Only DVD-D530K/D530)
Using the AUDIO/√ button (DVD/VCD/MPEG4)
1.Press the REPEAT A-B button on the remote control.
2.Press the REPEAT A-B button at the point where you want repeat play to start (A).
3.Press the REPEAT A-B button at the point where you want the repeat play to stop (B).
3. To return to normal play, press the REPEAT A-B button until the display shows Repeat : Off.
Note
- A-B REPEAT allows you to set point (B) directly after point (A) has been set.
- Depending on a disc, the Repeat function may not work.
1. During play, Press the AUDIO/√ button. Change the audio language by pressing the AUDIO or π/†
button.
- The audio languages are represented by abbreviations.
2. To remove the AUDIO icon, press the EXIT/RETURN button.
Note
- This function depends on audio languages are encoded on the disc and may not work.
- A DVD disc can contain up to 8 audio languages.
Selecting the Subtitle Language
Slow Play
You can select a desired subtitle quickly and easily with the SUBTITLE/(π) button.
This feature allows you slowly to repeat scenes con-taining sports, dancing, musical instruments
being played etc., so you can study them more closely.
When playing a DVD
1. During play, press the PAUSE ( )/PLAY ( ) button.
2. Press the SEARCH (k/K) button to choose the play speed between 1/2, 1/4, 1/8,1/16,1/2 and
so on. If you want to go normal play press PLAY button.
Advanced functions
Adjusting the Aspect Ratio (EZ View)
To play back using aspect ratio (DVD)
1. During play, press the EZ VIEW/TOOLS button on the remote control.
2. Press the EZ VIEW or π/† buttons to select the screen size. Each time you press the π/† or √/®
buttons, the screen size changes. For graphics of the screen sizes and lists of the sequences in
which the sizes change, see the next column.
3. Press the EXIT/RETURN button to exit EZ View.
If you are using a 16:9 TV
If you are using a 4:3 TV
For 16:9 aspect ratio discs
- WIDE SCREEN
- SCREEN FIT
- ZOOM FIT
For 16:9 aspect ratio discs
- 4:3 Letter Box
- 4:3 Pan Scan
- SCREEN FIT
- ZOOM FIT
For 4:3 aspect ratio discs
- Normal Wide
- SCREEN FIT
- ZOOM FIT
- Vertical Fit
Selecting the Audio Language
For 4:3 aspect ratio discs
- Normal Screen
- SCREEN FIT
- ZOOM FIT
Using the SUBTITLE/(π) button (DVD/MPEG4)
1. During play, Press the SUBTITLE/(π) button.
2. Press the SUBTITLE/(π) or π/† button to change the language. Each time you press the
SUBTITLE/(π) or π/† button, the language changes.
3. To remove the SUBTITLE icon, press the EXIT/RETURN button.
Note
- The subtitle languages are represented by abbreviations.
- You have to change the desired subtitle in the Disc Menu, according to discs. Press the DISC MENU
button.
- This function depends on what subtitles are encoded on the disc and may not work on all DVDs.
- A DVD disc can contain up to 32 subtitle languages.
Changing the Camera Angle
When a DVD contains multiple angles of a particular scene, you can use the ANGLE function.
Using the ANGLE function (DVD)
If the disc contains multiple angles, the ANGLE appears on the screen.
1. During play, press the TOOLS button on the remote control.
2. Press the π/† buttons to select
icon. When the angle screen is displayed, press the √/® buttons on the remote control to select the desired angle option.
Using the Bookmark Function
This feature lets you bookmark sections of a DVD or VCD (Menu Off mode) so you can quickly find
them at a later time.
Using the Bookmark Function (DVD/VCD)
1. During play, press the MARKER button on the remote control.
2. When you reach the scene you want to mark, press the √/® or π/† buttons, and then press
MARKER button. Up to 12 scenes may be marked at a time.
7
Repeat/Random playback
Note
- Depending on a disc, the Bookmark function may not work.
Press the REPEAT button to change the playback mode. There are four modes, such as Off, Track,
Folder 1and Random.
- Off ( ): Normal Playback
1
- Track ( 1 ): Repeats
the current song file.
- Folder ( ): Repeats the song files which have the same extension in the current folder.
1
- Random ( ): Song
files which have the same extension will be played in random order.
To resume normal play, press the REPEAT button until the Repeat : Off.
Recalling a Marked Scene
1. During play, press the MARKER button on the remote control.
2. Press the √/® orπ/† buttons to select a marked scene.
3. Press the PLAY () button to skip to the marked scene.
Clearing a Bookmark
CD-R MP3/WMA file
1. During play, press the MARKER button on the remote control.
2. Press the √/® orπ/† buttons to select the bookmark number you want to delete.
3. Press the ENTER button to delete a bookmark number.
Using the Zoom Function
Using the Zoom Function (DVD/VCD)
1. During play or pause mode, press the TOOLS buttons on the remote control.
2. Press the π/† buttons to select
icon, then press the ENTER button to zoom in X1,X2,X3,X4.
Clips Menu for MP3/WMA/JPEG/MPEG4/CD Audio
CD Audio or discs with MP3/WMA/JPEG/MPEG4 contain individual songs and/or pictures that can
be organized into folders as shown below. They are similar to how you use your computer to put
files into different folders.
To go access these folders and the files in them, follow these steps :
Videos \
1.
2.
3.
1/2
Pages
Open the disc tray. Place the disc on the tray.
Close the tray. The tray closes and the Parent Folder Menu screen
appears (top screen image.) Parent folders contain all the Peer folders that have the same kind of content: music, video, photos, etc.
Press the √/® buttons to select the Parent folder of your choice, and then
press the ENTER. A screen displaying the Peer folders appears. The Peer folders contain all the folders with the same kind of content (video, music, photos, etc.) that are in the Parent folder.
CD
Pages
Move
Return
Folder Selection
The folder can be selected both in Stop or Play mode.
- To select the Parent Folder
Press the RETURN button to go to parent folder, or press the π/† buttons to select “..” and press
ENTER to go to the parent folder.
- To select the Peer Folder
Press the π/† buttons to select the desired folder, then press ENTER.
- To select the Sub-Folder
Press the π/† buttons to select the desired folder, then press ENTER.
MP3/WMA/CD Audio Playback
1. Open the disc tray. Place the disc on the tray. Close the tray.
2. Press the √/® buttons to select a Music folder, and then press ENTER. Press the π/† buttons
to select a song file, and then press the ENTER to begin playback of the song.
8
When you record MP3 or WMA files on CD-R, please refer to the following.
- Your MP3 or WMA files should be ISO 9660 or JOLIET format.
ISO 9660 format and Joliet MP3 or WMA files are compatible with Microsoft’s DOS and Windows, and with
Apple’s Mac. This format is the most widely used.
- When naming your MP3 or WMA files, do not exceed 8 characters, and enter “.mp3, .wma” as the file extension.
General name format : Title.mp3. or Title.wma. When composing your title, make sure that you use 8 characters or less, have no spaces in the name, and avoid the use of special characters including: (.,/,\,=,+).
- Use a decompression transfer rate of at least 128 Kbps when recording MP3 files.
Sound quality with MP3 files basically depends on the rate of compression/decompression you choose.
Getting CD audio sound requires an analog/digital sampling rate, that is conversion to MP3 format, of at
least 128 Kbps and up to 160 Kbps. However, choosing higher rates, like 192 Kbps or more, only rarely give
better sound quality. Conversely, files with decompression rates below 128 Kbps will not be played properly.
- Use a decompression transfer rate of at least 64Kbps when recording WMA files.
Sound quality with WMA files basically depends on the rate of compression/decompression you choose.
Getting CD audio sound requires an analog/digital sampling rate, that is conversion to WMA format, of
at least 64Kbps and up to 192Kbps. Conversely, files with decompression rates below 64Kbps or over
192Kbps will not be played properly. Sampling rate that can be supported for WMA files is > 30Khz.
- Do not try recording copyright protected MP3 files.
Certain “secured” files are encrypted and code protected to prevent illegal copying. These files are of the
following types: Windows MediaTM (registered trade mark of Microsoft Inc) and SDMITM (registered trade mark
of The SDMI Foundation). You cannot copy such files.
- Important:
The above recommendations cannot be taken as a guarantee that the DVD player will play MP3 recordings,
or as an assurance of sound quality. You should note that certain technologies and methods for MP3 file
recording on CD-Rs prevent optimal playback of these files on your DVD player (degraded sound quality
and in some cases, inability of the player to read the files).
- This unit can play a maximum of 500 files and 500 folders per disc.
MPEG4 Playback
MPEG4 Play Function
AVI files are used to contain the audio and video data. Only AVI format files with the “.avi” extensions
can be played.
1. Open the disc tray. Place the disc on the tray. Close the tray.
2. Press the √/® buttons to select a Videos Menu , then press the ENTER. Press the π/† to select
an avi file (DivX/XviD) then press the ENTER. Press the π/† and then press the ENTER button.
This unit supports all resolutions up to maximum below.
Repeat and Repeat A-B playback
1.
Press the REPEAT button , then press REPEAT or π/† buttons to change playback mode. There are 3 modes, such as Off, Folder and Title.
- Off : No Repeat mode.
- Title : repeats the title that is playing.
- Folder : repeats the AVI files which have the same extension in the current folder.
Repeat A-B playback (Only DVD-D360K)
1.Press the REPEAT button on the remote control. The repeat screen appears.
2.Press the π/† button to select the REPEAT A-B and then press ENTER.
3.Press the ENTER at the point where you want repeat play to start (A).
4.Press the ENTER at the point where you want repeat play to start (B).
Repeat A-B playback (Only DVD-D530K/D530)
1.Press the REPEAT A-B button on the remote control.
2.Press the REPEAT A-B button at the point where you want repeat play to start (A).
3.Press the REPEAT A-B button at the point where you want the repeat play to stop (B)
- To return to normal play, press the REPEAT A-B button until the display shows Repeat : Off.
Note
- A-B REPEAT allow you to set point (B) directly after point (A) has been set.
Description
Skip
(|k or K|)
During play, press the |k or K| button, it moves to next or previous track.
Search
(k or K)
During play, press the SEARCH (k or K) button and press again to search at
a faster speed. Allows you to search at a faster speed in an AVI file. (2X, 4X, 8X,
16X, 32X)
Slow Motion Play
ZOOM
720 x 480 @30fps
720 x 576 @25fps:
Maximum bitrate : 4Mbps
Note
• The resolution that can be supported by
DVD-D530/D530K model up to 720 x 480
@30 frames/ 720 x 576 @25 frames.
• This unit supports CD-R/RW written in
MPEG4 in accordance with the “ISO9660
format”.
Playing Media Files Using the USB Host feature
You can enjoy the media files such as pictures, movies andtunes saved in an MP3 player, USB memory
or digital camera in high audio by connecting the storage device to the USB port of the DVD Player.
Using the USB HOST feature
1. Connect the USB device to the USB port on the front of the unit.
2. The USB Menu screen appears. Press the √/® button to select Menu, then press ENTER.
3. Press the π/† buttons to select a file in the USB device. Press ENTER to Open the file.
Note
• Each time the USB button on the remote control is pressed, a frame of the USB device selection
will appear.
• “USB Loading” appears on the display screen.
• Depends on the file size and clip duration, loading time on USB may take longer than using CD or DVD
media.
MPEG4 Function Description
Function
DivX5
• USB MENU screen appears on the TV screen and the saved file is played.
• If there is a Disc in the unit, pressing the DVD button (DVD-D530K/DVD-D530) or USB button (DVDD360K) will make the player exit the USB menu and load the disc
Safe USB Removal
1. Press the DVD button (DVD-D530K/DVD-D530) or USB button (DVD-D360K) to return to disc mode or the main screen.
2. Press the STOP (■) button
3. Remove the USB cable.
Allows you to search at a slower speed in an AVI file. (1/2, 1/4, 1/8, 1/16)
Skip Forward/Back
X1/X2/X3/X4/Normal in order
During playback, press the (|k/K|) button.
• When there is more than one file, when you press the K| button, the next file is selected.
• When there is more than one file, when you press the |k button, the previous file is selected.
- These functions may not work depending on MPEG4 file.
CD-R AVI fileThis
unit can play the following video compression
formats within the AVI file format:
- DivX 3.11 contents
- DivX 4 contents (Based on MPEG-4 Simple
Profile)
- DivX 5 contents (MPEG-4 simple profile plus
additional features such as bi-directional frames.
Qpel and GMC are also supported.)
- XviD MPEG-4 compliant Contents.
DVD-RW & DVD+R
Format that support for DivX file :
- Basic DivX format DivX3.11 / 4.12/ 5.x
- Xvid (MPEG-4 compliant video codec) and
DivX Pro
- File format : *.avi, *.div, *.divx.
Possible warning messages that may appear
when trying to play DivX/AVI files are :
1. No Authorization
- File with bad registration code.
2. Unsupported Codec
- Files with certain Codec Types, Versions
(ex. MP4, AFS and other proprietary
codecs) are not suppoerted by this player.
3. Unsupported Resolution
- Files containing resolutions higher than the player’s specification are not supported.
Fast playback
To play back the disc at a faster speed, press (k/K) during playback
• Each time you press either button, the playback speed will change as follows : 2X ➞ 4X ➞ 8X ➞ 16X
➞ 32X.
Compatible Devices
1. USB devices that support USB Mass Storage v1.0.(USB devices that operate as a removable disk in
Windows (2000 or later) without additional driver installation.)
2. MP3 Player: Flash type MP3 player.
3. Digital camera: Cameras that support USB Mass Storage v1.0.
• Cameras that operate as a removable disk in Windows (2000 or later) without additional driver
installation.
4. USB Flash Drive: Devices that support USB2.0 or USB1.1.
• You may experience a difference in playback quality when you connect a USB1.1 device.
5. USB card Reader: One slot USB card reader and Multi slot USB card reader
9
• Depending on the manufacturer. the USB card reader may not be supported.
• If you install multiple memory devices into a multi card reader, you may experience problems.
6. If you use a USB extension cable, the USB device might not be recognized.
• CBI (Control/Bulk/Interrupt) is not supported.
• Digital Cameras that use PTP protocol or require additional program installation when connected to a
PC are not supported.
• A device using NTFS file system is not supported. (Only FAT 16/32 (File Allocation Table 16/32) file
system is supported.)
• Some MP3 players, when connected to this product,may not operate depending on the sector size of
their file system.
• The USB HOST function is not supported if a product that transfers media files by its manufacturerspecific program is connected.
• Does not operate with Janus enabled MTP(Media Transfer Protocol) devices.
• The USB host function of this product does not support all USB devices.
• The USB Host does not support USB Hard Disc Drives (HDD).
CD Ripping
This feature allows you to copy audio files from a disc to a USB device in MP3 format.
Open the dics tray. Place the Audio CD(CD DA) disc on the tray, and close the tray. Connect the USB
device to the USB port on the front of the unit. Press the DVD button (DVD-D530K/DVD-D530) or USB button (DVD-D360K).
1.
2.
3.
Press the TOOLS button to display the Ripping screen.
Press the π/† buttons, then press the ENTER button to select files for ripping.
- To deselect files, press ENTER button again.
Press the √ and † button to select START, then press the ENTER button begin ripping.
The Ripping menu contain the following buttons :
- Mode (Fast/Normal)
- Bitrate, press ENTER to change : 128kbps ➞ 192kbps ➞ 128kbps.
• Standard : 128kbps
• Better Quality : 192kbps
- Device selection, press ENTER to change between partitions on the USB device (max 4).
- Select - Unselect, press ENTER to change from Select all (files) or Select none.
Note
-To cancel copying in progress, press the ENTER button.
-To return to the CDDA screen, press the TOOLS button again.
-While the CD is being ripped, the player will automatically enter stop mode.
-The ripping process is 2.6 times of normal speed.
-The DVD player can only rip Audio CD (CD DA) discs.
-The USB button does not work while you’re in the Ripping menu.
-CD ripping function may not supported for some MP3 players device.
Picture CD Playback
1. Select the desired folder.
2. Press the π/† buttons to select a Picture file in the clips menu and then press the ENTER button.
Note
- Press the STOP button to return to the clips menu.
- When playing a Kodak Picture CD, the unit displays the Photo directly, not the clips menu.
10
Rotation
Press the TOOLS button to select Rotate, and then press the ENTER button.
Each time the √/® buttons are pressed, the picture rotates 90 degrees clockwise.
Each time the π button is pressed, the picture will reverse to the upside down to show a mirror image.
Each time the † button is pressed, the picture will reverse to the right side to show a mirror image.
-
-
-
-
Zoom
- Press the TOOLS button to select Zoom, and then press the ENTER button.
- Each time ENTER button is pressed, the picture is enlarged. Zoom mode : X1-X2-X3-X4-X1.
Slide Show
- When youpress the PLAY at JPEG file, it will go to full screen mode and automatically slide
show.
Note
- Depending on a file size, the amount of time between each picture may be different from the manual.
- If you don’t press any button, the slide show will start automatically in about 10 seconds by default.
Picture CD Playback for HD-JPEG (Only DVD-D530K/
D530)
Must connect to HDMI. Resolution should be 720p/1080i/ 1080p, and HD-JPEG should be in HD mode.
1.
2.
Select the desired folder.
Press the π/† buttons to select a Picture file in the clip menu and then press the ENTER button.
• Press the STOP (■) button to return to the clips menu.
• When playing a Kodak Picture CD, the unit displays the Photo directly, not the clips menu.
• Rotation
Press the TOOLS button to select Rotate, and then press the ENTER button. Press the √/® button
to rotate the screen 90 degrees to the left/right.
• Zoom
Press the TOOLS button to select Zoom, and then press ENTER.
Each time ENTER button is pressed, the picture is enlarged. Zoom mode : X1-X2-X3-X4-X1.
• Skip Picture
Press the |k or K| button to select previous or next picture.
• Slide Show
Press the PLAY (®) button to start SLIDE function.
Press the PAUSE (∏∏) button to stop SLIDE function. To continue slide show press PLAY button.
Note
- Depending on a file size, the amount of time between each picture may be different from the set
interval time.
- The image may be displayed at a smaller size depending on the picture size when displaying images
in HD-JPEG mode.
- It is recommended to set the “BD Wise” to “Off” In case of playback JPEG image file bigger than
720 X 480 pixel size.
MP3-JPEG Playback
You can play JPEG using music as a backgound.
1. Press the π/† buttons to select an MP3 file in the clips menu and then press the ENTER button.
2.
3.
To return to the menu screen, Press the RETURN or MENU buttons.
Press the √/® buttons to select Photos Menu, and then press the ENTER button.
Press the π/† buttons to select a JPEG file in the clips menu and then press the ENTER button.
- Music will play from the beginning
Press Stop button when you want to stop the playback.
Note
MP3 and JPEG files have to be on the same disc.
CD-R JPEG Disc
- Only files with the “.jpg” and “.JPG” extensions can be played.
- If the disc is not closed, it will take longer to start playing and not all of the recorded files may be
played.
- Only CD-R discs with JPEG files in ISO 9660 or Joliet format can be played.
- The name of the JPEG file may not be longer than 8 characters and should contain no blank spaces
or special characters (. / = +).
- Only a consecutively written multi-session disc can be played. If there is a blank segment in the multisession disc, the disc can be played only up to the blank segment.
- A maximum of 500 images can be stored on a single CD.
- Kodak Picture CDs are recommended.
- When playing a Kodak Picture CD, only the JPEG files in the pictures folder can be played.
- Kodak Picture CD: The JPEG files in the pictures folder can be played automatically.
- Konica Picture CD: If you want to see the Picture, select the JPEG files in the clips menu.
- Fuji Picture CD: If you want to see the Picture, select the JPEG files in the clips menu.
- QSS Picture CD: The unit may not play QSS Picture CD.
- If the number of files in 1 Disc is over 500, only 500 JPEG files can be played.
- If the number of folders in 1 Disc is over 500, only JPEG files in 500 folders can be played.
Karaoke functions (Only DVD-D530K/D360K)
Karaoke Functions
Operation Sequence
1. Connect the terminals Mixed Audio Out to TV or Amplifier.
2. Connect the microphone plug to Mic (microphone) and set Karaoke score to On. When MIC is connected and Karaoke score is On, the karaoke functions can be used.
Echo/Microphone Volume/Key Control (Tone control)
1. Play the karaoke disc containing the songs you want.
‑ Press the KARAOKE (†) button, and then press π/† to select ECHO, VOL or KEY.
2. Press the √/® buttons to change the desired item.
will always appear.
3. Karaoke score will appear at the end of time for each chapter/title for about 6s.
Karaoke Sound Recording
1.
2.
3.
4.
Insert USB storage media into USB jack and then connected the microphone plug to Mic.
To star karaoke recording, choose one of VCD/DVD/SVCD file, then press RECORD button.
When recording, user can only press STOP button and PAUSE button to cancel the recording.
If user do cancelation, then file result will be saved.
Note
- If you hear feedback(squealing or howling) while using the karaoke feature, move the microphone
away from the speakers or turn down the microphone volume or the speaker volume.
- When playing MP3, WMA and LPCM disc, the karaoke functions will not operate.
- When the MIC is connected, Digital Out does not work.
- The MIC sound outputs only from Analog Audio Out.
- If MIC is connected to the MIC jack on the front panel, 5.1CH audio will be changed in to 2 CH audio
automatically, this condition can’t be change unless the MIC is plugged out.
Changing setup menu
Using the Setup Menu
The Setup menu lets you customize your DVD player by allowing you to select various language preferences, set up a parental level, even adjust the player to the type of television screen you have.
1. With the unit in Stop mode, press the MENU button on the remote control. Press the √/® buttons
to select SETTINGS, then press the ENTER button.
2. Press the π/† buttons to select a Setup Menu, then press the ® or ENTER to bring up the submenu.
3. Press the π/† buttons to select a sub-menu option, then press the ® or ENTER.
4. To make the setup screen disappear after setting up, press the RETURN button.
Setting Up the Display Options
Display options enable you to set various video functions of the player.
1. With the unit in Stop mode, press the MENU button. Press the √/® buttons to select SETTINGS,
then press the ENTER button.
2. Press the π/† buttons to select DISPLAY, then press the ® or ENTER button.
3. Press the π/† buttons to select the desired item, then press the ® or ENTER button.
Setting Up the BD Wise (Only DVD-D530K/D530)
Karaoke Scoring (Score)
When the player is connected to a SAMSUNG TV which supports “BD Wise”,you can enjoy optimized
Picture Quality by setting the “BD Wise” function as “On”.
The scoring will appear as :
1. The microphone is connected and Karaoke score is On.
2. At the end of each chapter/title of karaoke disc.
- If the DVD karaoke have any information on the scoring drive.
- In case of VCD, the device can not differentiate between hard karaoke or movies, then the scoring 1. With the unit in Stop mode, press the MENU button. Press the √/® buttons to select SETTINGS,
then press the ENTER button.
2. Press the π/† buttons to select DISPLAY, then press the ® or ENTER button.
3. Press the π/† buttons to select BD WISE, then press the ® or ENTER button.
Press the π/† buttons to select ON/OFF, then press the ENTER button.
11
Note
• This option can be changed only when TV support BD Wise.
• Consult your TV User’s Manual to find out if your TV supports Progressive Scan. If
Progressive Scan is supported, follow the TV User’s Manual regarding Progressive Scan settings in the TV’s menu system.
• If Video Output is set incorrectly, the screen may be blocked.
• The resolutions available for HDMI output depend on the connected TV or projector. For
details, see the user’s manual of your TV or projector.
• When the resolution is changed during playback, it may take a few seconds for a normal
image to appear.
• If you set the HDMI output resolution 720p,1080p or 1080i, HDMI output provides better picture quality.
• It is recommended to set the "BD Wise" to "Off" In case of playback JPEG image file bigger
than 720 X 480 pixel size.
Setting Up the Audio Options
Audio Options allows you to setup the audio device and sound status settings depending on the audio
system in use.
1. With the unit in Stop mode, press the MENU button. Press the √/® buttons to select SETTING,
then press the ENTER button.
2. Press the π/† buttons to select AUDIO, then press the ® or ENTER button.
3. Press the π/† buttons to select the desired item, then press the ® or ENTER button.
Note :
-When play a disc that has MPEG Audio and you have Bitstream selected in the Audio Options menu,
the Digital Audio jack may not output audio
-There is no analogue audio output when you play a sound disc.
-Even when PCM Down sampling is Off
•Some discs will only output down sampled audio through the digital outputs.
HDMI (Only DVD-D530K/D530)
- If your TV is not compatible with compressed multi-channel formats (Dolby Digital, MPEG), you
should set Digital Audio to PCM.
- If your TV is not compatible with LPCM sampling rates over 48kHz, you should set PCM Down
sam-pling to On.
Manufactured under license from Dolby Laboratories. “Dolby” and the double-D symbol are trademarks of Dolby Laboratories.
12
Setting Up the System Options
1. With the unit in Stop mode, press the MENU button. Press the √/® buttons to select SETTINGS,
then press the ENTER button.
2. Press the π/† buttons to select SYSTEM, then press the ® or ENTER button.
3. Press the π/† buttons to select the desired item, then press the ® or ENTER button.
Setting Up the Anynet+(HDMI-CEC) (Only DVD-D530K/D530)
Anynet+ is a function that can be used to operate the unit using a Samsung TV remote control, by
connecting the DVD D530/D530K to a SAMSUNG TV using a HDMI Cable. (This is only available with
SAMSUNG TVs that support Anynet+.
Select On when you connect the DVD D530/D530K with Samsung TV that support Anynet+.
1. With the unit in Stop mode, press the MENU button. Press the √/® buttons to select SETTINGS,
then press the ENTER button.
2. Press the π/† buttons to select SYSTEM, then press the ® or ENTER button.
3. Press the π/† buttons to select ANYNET+ (HDMI-CEC), then press the ® or ENTER button.
4. Set the Anynet+(HDMI-CEC) to “On” on your DVD Player, then press the ENTER button.
5. Set the Anynet+ function at your TV. (See the TV instruction manual for more information.).
Note
• By pressing the PLAY button of the unit while watching TV, the TV screen will change to the play
screen.
• If you play a DVD when the TV power is off, the TV will power On.
• If you turn the TV off , the DVD Player will power off automatically.
• If you change the HDMI to other sources (Composite,Component,... etc) in TV while playing the DVD
disc, the DVD Player will stop playing.
Setting Up the Language Features
If you set the player menu, disc menu, audio and subtitle language in advance, they will come up automatically every time you watch a movie.
1. With the unit in Stop mode, press the MENU button. Press the √/® buttons to select SETTINGS,
then press the ENTER button.
2. Press the π/† buttons to select LANGUAGE, then press the ® or ENTER button.
3. Press the π/† buttons to select the desired language, then press the ® or ENTER button.
Note
-The language is selected and the screen returns to Language Setup menu.
-To make the setup menu disappear, press the MENU button.
-If the selected language is not recorded on the disc, the original pre-recorded language is selected.
-Select “Original” if you want the defaultsoundtrack language to be the original language the disc is
recorded in.
-Select “Automatic” if you want the subtitle language to be the same as the language selected as the
audio language.
-Some discs may not contain the language you select as your initial language; in that case the disc will use
its original language setting.
Setting Up the Security Options
The Parental Control function works in conjunction with DVDs that have been assigned a rating, which
helps you control the types of DVDs that your family watches. There are up to 8 rating levels on a disc.
Setting Up the Rating Level and Changing the Password
1. With the unit in Stop mode, press the MENU button. Press the √/® buttons to select SETTINGS,
then press the ENTER button.
2. Press the π/† buttons to select SECURITY, and then press the ® or ENTER button.
Enter your password.
3. Press the π/† buttons to select PARENTAL/CHANGE PASSWORD, and then press the ® or
ENTER button.
4. Press the π/† buttons to select the rating level you want, and then press the ENTER button.
e.g) Setting up in KID SAFE
- For example, if you select the Kids Safe level, discs that contain level 2 or higher will not play.
5. Enter your password. If this is the first time, enter 0000. Then, enter a new password. The new password must be a number other than 0000 to activate the parental control function. Then, re-enter the
new password.
Security Levels :
❶ KID SAFE
❷ G (General Audiences) : All Ages Admitted
❸ PG (Parental Guidance suggested) : Some material may not be suitable for young children.
❹ PG 13 (PG-13 Parents strongly cautioned) : Some material may be inapproriate for children under
13.
❺ PGR (Parental Guidance Recommended) : These are not necessarily unsuitable for children, but
viewer discretion is advised, and parents and guardians are encouraged to supervise younger viewers.
❻ R (Restricted) : Under 17 requires accompanying adult
❼ NC17 (NC-17) : No one 17 and under admitted.
❽ ADULT
Note:
- If you have forgotten your password, see “Forgot Password” in the Troubleshooting Guide.
Reference
Troubleshooting
Before requesting service (troubleshooting), please check the following.
Problem
Action
The screen is blocked.
• Press the ®|| button (in front panel) for more than 5 seconds under no
disc inside. All setting will revert to factory settings.
Forgot password.
• Press the ®|| button (in front panel) for more than 5 seconds under no
disc inside. All setings including the password will revert to the factory
settings. Don't use this unless absolutely necessary.
No HDMI output
• Check the Video output is HDMI enabled.
• Check the connection between the TV and the HDMI jack of DVD player.
• See if the TV supports this 480p/ 576p/720p/1080i/1080p DVD player.
Abnormal HDMI output
screen.
• If snow noise appears on the screen, it means that TV does not
support HDCP (High-bandwidth Digital Content Protection).
HDMI output Jitter
• Check your TV system setup correctly.
• The screen Jitter phenomenon may occur when frame rate is converted from 50Hz to
60 Hz for 720p/1080i/ 1080p HDMI (High Definition Multimedia Interface) Output.
• Please refer to the user's manual of your TV.
Setting Up the General Options
1. With the unit in Stop mode, press the MENU button. Press the √/® buttons to select SETTINGS,
then press the ENTER button.
2. Press the π/† buttons to select GENERAL, then press the ® or ENTER button.
3. Press the π/† buttons to select the desired item, then press the ® or ENTER button.
Setting Up the Support Options
Support option enable you to check your DVD player information such as the model code, Software
Version, The serial and version numbers can be found on the back side of your DVD-Player.
1. With the unit in Stop mode, press the MENU button. Press the √/® buttons to select SETTINGS, then
press the ENTER button.
2. Press the π/† buttons to select SUPPORT, then press the ® or ENTER button.
3. Select PRODUCT INFORMATION, then press the ® or ENTER button.
13
Memo
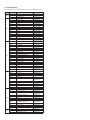
Spesifications
General
Power Requirements
AC110~240V, 50/60Hz
Power Comsumption
For the power supply and power
consumption, refer to the label attached
to the product
Weight
Dimensions
1.2 Kg
360mm(W) X 207mm(D) X 42mm(H)
Operating Temperature Range
+5ºC to +35ºC
Operating Humidity Range
10 % to 75 %
Composite Video
1 channel : 1.0 Vp-p (75 Ω load)
Y : 1.0 Vp-p (75 Ω load)
Video Output
Component Video
Pr : 0.70 Vp-p (75 Ω load)
Pb : 0.70 Vp-p (75 Ω load)
HDMI (Only DVD-D530K/D530)
Output terminal
Audio Output
Maximum Output Level
Frequency Response
Digital Audio Out
14
480p, 576p, 720p, 1080p, 1080i
RCA
2Vrms
20 Hz to 20 kHz
Coaxial terminal (S/PDIF)
Memo
Contact SAMSUNG WORLD WIDE
If you have any questions or comments relating to Samsung products, please contact the SAMSUNG customer care center.
Region
North America
Latin America
Europe
CIS
Asia Pacific
Area
Canada
Mexico
U.S.A
Argentine
Brazil
Chile
Nicaragua
Honduras
Costa Rica
Ecuador
El Salvador
Guatemala
Jamaica
Panama
Puerto Rico
Rep. Dominica
Trinidad & Tobago
Venezuela
Colombia
Contact Center
1-800-SAMSUNG (726-7864)
01-800-SAMSUNG (726-7864)
1-800-SAMSUNG (726-7864)
0800-333-3733
0800-124-421, 4004-0000
800-SAMSUNG (726-7864)
00-1800-5077267
800-7919267
0-800-507-7267
1-800-10-7267
800-6225
1-800-299-0013
1-800-234-7267
800-7267
1-800-682-3180
1-800-751-2676
1-800-SAMSUNG (726-7864)
0-800-100-5303
01-8000112112
Belgium
02 201 2418
Czech Republic
Denmark
Finland
France
Germany
Hungary
Italia
Luxemburg
Netherlands
Norway
Poland
Portugal
Slovakia
Spain
Sweden
U.K
Eire
Austria
800-SAMSUNG (800-726786)
8-SAMSUNG (7267864)
30-6227 515
01 4863 0000
01805-SAMSUNG (726-7864 € 0,14/Min)
06-80-SAMSUNG (726-7864)
800-SAMSUNG (726-7864)
02 261 03 710
0900-SAMSUNG (0900-7267864) (€ 0,10/Min)
3-SAMSUNG (7267864)
0 801 1SAMSUNG (172678), 022-607-93-33
80820-SAMSUNG (726-7864)
0800-SAMSUNG (726-7864)
902-1-SAMSUNG (902 172 678)
0771 726 7864 (SAMSUNG)
0845 SAMSUNG (7267864)
0818 717 100
0810-SAMSUNG (7267864, € 0.07/min)
Switzerland
0848-SAMSUNG (7267864, CHF 0.08/min)
Russia
Kazakhstan
Uzbekistan
Kyrgyzstan
Tadjikistan
8-800-555-55-55
8-10-800-500-55-500
8-10-800-500-55-500
00-800-500-55-500
8-10-800-500-55-500
Ukraine
8-800-502-0000
Belarus
Moldova
Lithuania
Latvia
Estonia
Australia
New Zealand
China
810-800-500-55-500
00-800-500-55-500
8-800-77777
8000-7267
800-7267
1300 362 603
0800 SAMSUNG (0800 726 786)
400-810-5858, 010-6475 1880
Hong Kong
3698-4698
India
Indonesia
Japan
Malaysia
3030 8282, 1800 110011, 1800 3000 8282
0800-112-8888
0120-327-527
1800-88-9999
1-800-10-SAMSUNG (726-7864), 1-800-3-SAMSUNG (726-7864),
1-800-8-SAMSUNG (726-7864), 02-5805777
1800-SAMSUNG (726-7864)
1800-29-3232, 02-689-3232
0800-329-999
1 800 588 889
444 77 11
0860-SAMSUNG (726-7864 )
800-SAMSUNG (726-7864), 8000-4726
Philippines
Middle East &
Africa
Singapore
Thailand
Taiwan
Vietnam
Turkey
South Africa
U.A.E
Web Site
www.samsung.com/ca
www.samsung.com/mx
www.samsung.com/us
www.samsung.com/ar
www.samsung.com/br
www.samsung.com/cl
www.samsung.com/latin
www.samsung.com/latin
www.samsung.com/latin
www.samsung.com/latin
www.samsung.com/latin
www.samsung.com/latin
www.samsung.com/latin
www.samsung.com/latin
www.samsung.com/latin
www.samsung.com/latin
www.samsung.com/latin
www.samsung.com/latin
www.samsung.com.co
www.samsung.com/be (Dutch)
www.samsung.com/be_fr (French)
www.samsung.com/cz
www.samsung.com/dk
www.samsung.com/fi
www.samsung.com/fr
www.samsung.de
www.samsung.com/hu
www.samsung.com/it
www.samsung.com/lu
www.samsung.com/nl
www.samsung.com/no
www.samsung.com/pl
www.samsung.com/pt
www.samsung.com/sk
www.samsung.com/es
www.samsung.com/se
www.samsung.com/uk
www.samsung.com/ie
www.samsung.com/at
www.samsung.com/ch
www.samsung.com/ch_fr/ (French)
www.samsung.ru
www.samsung.com/kz_ru
www.samsung.com/kz_ru
www.samsung.ua
www.samsung.com/ua_ru
www.samsung.com/lt
www.samsung.com/lv
www.samsung.com/ee
www.samsung.com/au
www.samsung.com/nz
www.samsung.com/cn
www.samsung.com/hk
www.samsung.com/hk_en/
www.samsung.com/in
www.samsung.com/id
www.samsung.com/jp
www.samsung.com/my
www.samsung.com/ph
www.samsung.com/sg
www.samsung.com/th
www.samsung.com/tw
www.samsung.com/vn
www.samsung.com/tr
www.samsung.com/za
www.samsung.com/ae
DVD-D360K
DVD-D530
DVD-D530K
Máy DVD
Höôùng daãn söû duïng
Hãy tưởng tượng khả năng
Cám ơn bạn đã mua sản phẩm này Samsung.
Để nhận thêm dịch vụ hoàn tất, xin vui lòng đăng ký
sản phẩm của bạn tại
www.samsung.com/global/register
VIETNAM
Höôùng daãn an toaøn
MuÏc luÏc
1. Caøi Ñaët
-
-
-
-
-
-
-
-
Nguoàn ñieän söû duïng phaûi phuø hôïp vôùi nguoàn ñöôïc chæ thò treân maët sau cuûa maùy.
Ñaët maùy treân moät maët phaúng naèm ngang vaø khoaûng khoâng gian xung quanh maùy caàn laø 7~10cm. Khoâng ñöôïc laøm bít caùc raõnh thoâng gioù treân maùy.
Khoâng ñöôïc ñaåy khay ñóa vaøo baèng tay.
Khoâng choàng caùc thieát bò leân laãn nhau.
Tröôùc khi di chuyeån maùy phaûi taét taát caû caùc thieát bò.
Phaûi taét taát caû caùc thieát bò tröôùc khi keát noái vôùi maùy.
Phaûi laáy dóa ra vaø taét maùy sau khi söû duïng, ñaëc bieät khi baïn khoâng söû duïng trong moät thôøi gian daøi.
OÅ caém Mains ñöôïc söû duïng laøm thieát bò ngaét keát noái vaø saün saøng hoaït ñoäng baát cöù luùc naøo.
2. An Toaøn
-
-
Tuyeät ñoái khoâng ñöôïc cho maét tieáp caän
vôùi tia laser vì noù gaây haïi cho maét.
Khi coù söï coá, khoâng ñöôïc töï môû maùy
vaø söûa chöõa. Caàn chuyeån ñeán ngöôøi
coù traùch nhieäm ñeå giaûi quyeát.
3. Caån thaän
-
-
-
-
2
Thieát bò naøy ñöôïc thieát keá duøng cho caù nhaân khoâng duøng cho muïc ñích coâng nghieäp, kinh doanh.
Khoâng ñöôïc ñeå nöôùc rôi hoaëc baén vaøo thieát bò vaø khoâng ñöôïc ñaët vaät chöùa nöôùc, chaúng haïn nhö bình nöôùc, leân treân thieát bò.
Caùc yeáu toá beân ngoaøi nhö seùt hay tónh ñieän cuõng coù theå aûnh höôûng ñeán hoaït ñoäng cuûa maùy. Trong tröôøng hôïp naøy, söû duïng nuùt POWER ñeå taét roài baät laïi maùy hoaëc loaïi boû roài keát noái laïi nguoàn ñieän. Maùy seõ hoaït ñoäng trôû laïi bình thöôøng.
Maùy coù theå khoâng hoaït ñoäng khi bò aåm öôùt do söï thay ñoåi nhieät ñoä quaù noùng hoaëc quaù laïnh. Trong tröôøng hôïp naøy, dôøi maùy ra khoûi nôi coù nhieät ñoä khoâng bình thöôøng ñeå cho maùy khoâ raùo, maùy seõ hoaït ñoäng laïi bình thöôøng.
4. Dóa
-
-
-
Khoâng ñöôïc veä sinh dóa baèng caùc chaát hoùa hoïc hay dung moâi ñeå traùnh laøm hoûng beà maët dóa.
Khoâng ñöôïc chaïm tay vaøo maët dóa. Caàm dóa baèng caùch caàm ôû caïnh dóa hay caàm moät ngoùn tay ôû caïnh dóa, moät ngoùn tay ôû vò trí loã trung taâm.
Lau dóa nheï nhaøng.
5. Thoâng tin moâi tröôøng
Pin söû duïng coù chöùa raát nhieàu caùc chaát hoùa hoïc raát nguy hieåm cho moâi tröôøng.
Do ñoù, baïn khoâng neân boû tröïc tieáp pin khoâng söû duïng vaøo thuøng raùc maø phaûi goùi laïi.
Maùy DVD vaø saùch höôùng daãn söû duïng ñi keøm
ñaõ ñöôïc ñaêng kí hôïp phaùp vôùi cô quan sôû höõu
trí tue cuûa caû 3 toå chöùc. Noäi dung vaø thoâng
ñieäp ñöôïc gôûi tôùi khaùch haøng laø nhöõng thoâng
tin khoâng mang tính thöông maïi vaø ñöôïc ñaêng
kyù hôïp phaùp. Moïi thoâng tin, thoâng ñieäp khoâng
ñöôïc söû duïng vaøo muïc ñích thöông maïi. Tuy
nhieân baûn quyeàn naøy khoâng ñöôïc môû roäng cho
caùc saûn phaåm DVD chöa ñöôïc ñaêng kyù, caùc
saûn phaåm saûn xuaát theo tieâu chuaån ISO/OUR
1172-3, 13818-3 ñöôïc söû duïng hay khuyeán maõi
keøm theo saûn phaåm DVD. Baûn quyeàn naøy chæ
chöùng nhaän saûn phaåm ñöôïc maõ hoùa vaø giaûi
maõ caùc tín hieäu aâm thanh, hình aûnh tuaân theo
tieâu chuaån ISO/OUR 1172-3, 13818-3. Caùc
ñaëc tính vaø caùc chöùc naêng ñaõ ñaêng kyù khoâng
tuaân theo tieâu chuaån ISO/OUR 1172-3, 13818-3
laø nhöõng saûn phaåm traùi pheùp.
CHUÙ YÙ: VIEÄC THÖÏC HIEÄN BAÁT KYØ SÖÏ KIEÅM
SOAÙT, ÑIEÀU CHÆNH HOAËC QUI TRÌNH NAØO
KHOÂNG ÑUÙNG THEO HÖÔÙNG DAÃN TREÂN COÙ
THEÅ SEÕ TAÏO RA CAÙC BÖÙC XAÏ RAÁT NGUY
HIEÅM.
Höôùng daãn an toaøn. . . . . . . . . . . . . . . . . . . . . .
Caøi ñaët
Ñaëc tính chung . . . . . . . . . . . . . . . . . . . . . . . . .
Hình daïng . . . . . . . . . . . . . . . . . . . . . . . . . . . . .
Boä Ñieàu Khieån Töø Xa (BÑKTX). . . . . . . . . . . .
Phöông thöùc keát noái
Choïn phöông thöùc keát noái. . . . . . . . . . . . . . . . .
Chöùc naêng cô baûn
Phaùt ñóa. . . . . . . . . . . . . . . . . . . . . . . . . . . . . . .
Chöùc naêng tìm kieám vaø boû qua. . . . . . . . . . . . .
Chöùc naêng hieån thò thoâng tin . . . . . . . . . . . . . .
Söû duïng muïc Disc vaø Title. . . . . . . . . . . . . . . .
Phaùt laëp . . . . . . . . . . . . . . . . . . . . . . . . . . . . . .
Phaùt laïi chaäm . . . . . . . . . . . . . . . . . . . . . . . . . .
Chöùc naêng môû roäng
Ñieàu chænh maøn hình hieån thò (EZ View). . . . . .
Choïn ngoân ngöõ aâm thanh. . . . . . . . . . . . . . . . .
Choïn ngoân ngöõ phuï ñeà. . . . . . . . . . . . . . . . . . .
Thay ñoåi goùc phaùt hình.. . . . . . . . . . . . . . . . . . .
Söû duïng chöùc naêng Bookmark. . . . . . . . . . . . .
Chöùc naêng phoùng aûnh. . . . . . . . . . . . . . . . . . .
Lieät keâ thö muïc MP3/WMA/JPEG /MPEG
CD Audio. . . . . . . . . . . . . . . . . . . . . . . . . . . . . .
Caøi ñaët
2
2
3
3
4
6
6
6
6
6
7
7
7
7
7
7
8
8
Choïn thö muïc . . . . . . . . . . . . . . . . . . . . . . . . . . 8
Phaùt MP3/WMA/CD Audio . . . . . . . . . . . . . . . . 8
Phaùt MPEG4 . . . . . . . . . . . . . . . . . . . . . . . . . . . 8
Mở các Tệp Media b ng tính năng USB Host. . . . 9
Sao lưu CD. . . . . . . . . . . . . . . . . . . . . . . . . . . . 10
Phaùt CD hình . . . . . . . . . . . . . . . . . . . . . . . . . . 10
Phaùt dóa CD hình trong cheá ñoä HD-JPEG
(Chỉ có DVD-D530K/DVD-D530). . . . . . . . . . . . 10
Chöùc naêng Karaoke
(Chæ coù DVD-D530K/D360K)
Chöùc naêng Karaoke . . . . . . . . . . . . . . . . . . . . 11
Thay ñoåi muïc caøi ñaët
Söû duïng muïc caøi ñaët. . . . . . . . . . . . . . . . . . . . 12
Caøi ñaët caùc muïc choïn hieån thò . . . . . . . . . . . . 12
Caøi ñaët caùc muïc choïn aâm thanh. . . . . . . . . . . 12
Thiết lập Tùy chọn Hệ thống. . . . . . . . . . . . . . . 12
Caøi ñaët chöùc naêng ngoân ngöõ . . . . . . . . . . . . . 13
Thiết lập Tùy chọn Bảo mật . . . . . . . . . . . . . . . 13
Thiết lập Tùy chọn Chung . . . . . . . . . . . . . . . . 13
Thiết lập Tùy chọn Hỗ trợ . . . . . . . . . . . . . . . . . 13
Tham khaûo
Giaûi quyeát söï coá . . . . . . . . . . . . . . . . . . . . . . . 14
Ñaëc tính kyõ thuaät. . . . . . . . . . . . . . . . . . . . . . . 14
Ñaëc Tính Chung
AÂm thanh chuaån xaùc
Kyõ thuaät Dolby Digital cung caáp cho baïn aâm
thanh thaät hoaøn haûo vaø soáng ñoäng.
Maøn hình
Baïn coù theå xem maøn hình döôùi daïng bình
thöôøng hay maøn aûnh roäng (16:9).
Toác ñoä chaäm
Baïn coù theå xem caùc hình caàn thieát ôû toác ñoä chaäm.
Mở lại 1080p
(Chæ coù DVD-D530K/D530)
Máy này chuyển ngược lại các DVD thông thường
để mở lại trên các TV 1080p.
Chöùc naêng khoùa treû em (DVD)
Chöùc naêng naøy cho pheùp ngöôøi söû duïng thieát
laäp möùc ñoä caàn thieát nhaèm ngaên caám treû em
xem caùc chöông trình nguy haïi nhö laø caùc phim
baïo löïc hoaëc phim chæ daønh cho ngöôøi tröôûng
thaønh.
Chöùc naêng hieån thò muïc luïc
Baïn coù theå choïn löïa caùc ngoân ngöõ (Tieáng/Phuï ñeà)
ôû goùc maøn hình trong khi ñang thöôûng thöùc phim.
Queùt toái öu
Chöùc naêng queùt toái öu taïo ra nhöõng hình aûnh
chaát löôïng hôn vôùi gaáp ñoâi soá ñöôøng queùt so
vôùi hình aûnh queùt xen keõ thoâng thöôøng.
Chöùc naêng EZ VIEW (DVD)
Chöùc naêng Easy View cho pheùp ñieàu chænh
hình aûnh cho phuø hôïp vôùi kích thöôùc maøn hình
TV cuûa baïn (16:9 hay 4:3).
Chöùc naêng xem aûnh soá (JPEG)
Baïn coù theå xem hình aûnh soá treân TV cuûa baïn.
Chöùc naêng laäp laïi
Baïn coù theå nghe hoaëc xem laïi moät baøi
haùt hay moät boä phim baèng caùch aán phím
REPEAT.
Chöùc naêng phaùt MP3/WMA
Thieát bò naøy coù theå phaùt caùc taäp tin döôùi daïng
MP3/WMA.
Chöùc naêng phaùt MPEG4
Maùy coù theå phaùt kieåu ñònh daïng MPEG4 cuûa
1 taäp tin AVI.
HDMI (High Definition Multimedia
Interface)
(Chæ coù DVD-D530K/D530)
Coâng ngheä HDMI giaûm nhieãu hình aûnh baèng
caùch cho pheùp truyeàn tín hieäu hình aûnh/
aâm thanh kyõ thuaät soá töø maùy DVD sang TV
cuûa baïn.
Sao lưu CD
Tính năng này cho phép bạn sao chép các
tệp âm
thanh từ đĩa sang thiết bị USB ở định dạng
MP3. (Chỉ dùng cho CD Audio (CD DA)).
Ghi chuù
-Maùy seõ khoâng phaùt ñöôïc caùc loaïi dóa sau:
•DVD-ROM
• DVD-RAM
•CD-ROM • • CDV
•CDI
•
• CVD
-Maùy coù theå phaùt ñöôïc caùc loaïi dóa sau tuøy thuoäc vaøo caùch ghi ñóa.
••DVD-R, +R
••CD-RW
••DVD+RW, -RW (cheá ñoä V)
-Maùy coù theå seõ khoâng phaùt ñöôïc caùc loaïi dóa CD-R, CD-RW vaø DVD-R tuøy thuoäc vaøo loaïi
dóa vaø phöông phaùp ghi.
Ngaên Sao Cheùp
Nhieàu loaïi dóa DVD ñaõ ñöôïc maõ hoùa nhaèm
ngaên chaën vieäc sao cheùp. Do vaäy, baïn neân
keát noái tröïc tieáp DVD tôùi TV, khoâng neân qua
ñaàu maùy. Hình aûnh seõ bò meùo leäch khi baïn
keát noái qua ñaàu maùy khi phaùt caùc dóa coù
chöùc naêng ngaên sao cheùp (Copy-protected).
Sản phẩm này đi kèm công nghệ bảo vệ sao
chép được bảo vệ theo các bằng sáng chế
của Hoa Kỳ và các quyền sở hữu trí tuệ khác
của Tập đoàn ROVI. Cấm tháo rời và kỹ thuật
đảo ngược.
Tín Hieäu Ra Queùt Toái Öu
(576p,720p,1080p)
“Baïn neân chuù yù raèng khoâng phaûi taát caû caùc
loaïi TV coù ñoä roõ neùt cao ñeàu hoaøn toaøn
töông thích vôùi saûn phaåm naøy, noù coù theå laø
nguyeân nhaân aûnh höôûng ñeán hình aûnh ñöôïc
hieån thò. Trong tröôøng hôïp hình aûnh Queùt toái
öu 576, 720 hoaëc 1080 coù vaán ñeà, baïn caàn
phaûi ngaét tín hieäu ra tieâu chuaån. Neáu coù baát
kyø caâu hoûi naøo veà söï töông thích giöõa TV
cuûa baïn vôùi maùy 576p, 720p hoaëc 1080p
baïn vui loøng lieân heä vôùi Trung taâm phuïc vuï
khaùch haøng cuûa SAMSUNG.”
PAL
7
DVD-D530
Kyù Hieäu
~
Hình Daïng
Baûng ñieàu khieån maët tröôùc
Maõ khu vöïc
Tín hieäu PAL
Dóa AÂm thanh voøm soá
STEREO
STEREO
Dóa Stereo
DIGITAL
SOUND
Dóa aâm thanh so
Dóa MP3
Maõ Vuøng Phaùt
Caû Maùy DVD vaø dóa DVD ñeàu ñöôïc ghi maõ khu
vöïc. Neáu dóa khoâng ñuùng vôùi maõ khu vöïc treân
maùy. Maùy seõ khoâng hoaït ñoäng.
Maõ vuøng söû duïng cuûa maùy ñöôïc theå hieän ôû
sau maùy.
Chöùng nhaän DivX
DivX, DivX Certified vaø kyù hieäu nhö beân caïnh laø
teân thöông hieäu cuûa DivXNetworks, Inc vaø ñaõ
ñaêng kyù khi söû duïng. “DivX Certified có thể phát
video DivX, kể cả nội dung trả phí.”
Ðược baûo veä bôûi một hoặc nhiều các bằng
sáng chế Hoa Kỳ sau đây : 7,295,673; 7,460,668;
7,515,710; 7,519,274
7
DVD-D530K
DVD-D360K
1. DISC TRAY
Nôi ñaët dóa vaøo.
2. DISPLAY
Caùc hoaït ñoäng cuûa maùy ñöôïc hieån thò ôû ñaây.
3. OPEN/CLOSE ( )
Duøng ñeå ñoùng môû khay dóa.
4. STOP ( )
Ngöng phaùt dóa.
5. PLAY/PAUSE ( )
Baét ñaàu hoaëc döøng phaùt dóa.
6. POWER ON/OFF (
)
Bật/tắt và đầu sẽ được bật/tắt.
7.
8.
USB Host
Kết nối máy ảnh kỹ thuật số, máy nghe nhạc
MP3, thẻ nhớ, Đầu đọc thẻ, hoặc các thiết bị
lưu trữ di động.
Duøng ñeå ñieàu chænh möùc aâm löôïng cuûa
microâ. Nhaán vaøo noù ñeå söû duïng. Quay nuùt
sang phaûi hay traùiñeå ñieàu khieån aâm löôïng.
MIC
(Chæ coù DVD-D530K/D360K)
Duøng ñeå keát noái microâ cho chöùc naêng
Karaoke.
Boä Ñieàu Khieån Töø Xa
DVD-D360K
1
6
7
8
24
11
10
12
DVD-D530
15
18
17
5
26
28
27
13
22
21
14
30
20
1
2
3
4
5
DVD-D530K
15
9
16
17
18
19
28
21
22
23
24
10
11
12
25
26
27
6
7
20
29
15
9
16
17
18
19
20
21
22
23
24
10
11
12
25
26
27
6
7
8
13
13
14
1
2
3
4
5
14
28
29
30
3
1.
2.
3.
4.
5.
6.
7.
8.
9.
10.
11.
12.
13.
14.
15.
Phím DVD POWER
Baät / Taét nguoàn DVD.
Phím DVD
(Chæ coù DVD-D530K/D530)
Bấm nút này khi bạn sử dụng đầu DVD.
Phím TV
(Chæ coù DVD-D530K/D530)
Bấm nút này để điều khiển TV Samsung.
Phím EZ VIEW
(Chæ coù DVD-D530K/D530)
Tæ leä hieån thò cuûa hình aûnh coù theå ñöôïc ñieàu
chænh deã daøng theo kích thöôùc maøn hình TV
cuûa baïn (16:9 hay 4:3).
Phím MARKER
Phím REPEAT
Cho pheùp baïn laëp laïi moät Title, Chapter,
Track hay moät dóa.
Phím DISC MENU
Hieån thò muïc luïc cuûa dóa.
Phím RECORD
(Chæ coù DVD-D530K/D360K)
Duøng ñe ghi karaoke.
Phím TV VOL (+, -)
(Chæ coù DVD-D530K/D530)
Điều khiển Âm lượng.
Phím SKIP (|k/K|)
Boû qua moät Title, Chapter hoaëc Track.
Phím STOP (■)
Phím MENU
Môû muïc luïc caøi ñaët cuûa maùy.
Phím ENTER/π/†,√/®
Ñaây laø caùc phím coù chöùc naêng nhö moät
coâng taét.
Phím TOOLS
Hieån thò cheá ñoä hieän taïi cuûa dóa. Được sử
dụng để hiển thị dải thông tin phát lại.
Phím OPEN/CLOSE ( )
Duøng ñeå môû hoaëc ñoùng khay dóa.
16.
17.
18.
19.
20.
21.
22.
23.
24.
25.
26.
27.
28.
29.
30.
Phím HDMI SEL.
(Chæ coù DVD-D530K/D530)
Caøi ñaët tín hieäu ra kieåu HDMI hoaëc DVI.
Phím USB
Phím VIDEO SEL.
Thay ñoåi daïng tín hieäu ngoõ ra.
Phím REPEAT A-B
(Chæ coù DVD-D530K/D530)
Phím INFO
Nó cũng cho phép bạn truy cập chức năng
Hiển thị (Display).
Phím TITLE MENU
Hieån thò muïc luïc cuûa tieâu ñeà.
Phím AUDIO/TV SOURCE
Duøng ñeå môû caùc chöùc naêng aâm thanh khaùc
nhau treân dóa. Bấm nút này để chọn nguồn TV
có sẵn (chế độ TV).
Phím PAUSE (∏∏)
(Chæ coù DVD-D530K/D530)
Taïm döøng phaùt dóa.
Phím SEARCH (k/K)
Cho pheùp baïn tìm kieám phaàn maø baïn caàn
tìm trong dóa.
Phím TV CH (P, Q)
(Chæ coù DVD-D530K/D530)
Lựa chọn kênh.
Phím PLAY ()/ ( )
Phaùt dóa.
Phím RETURN
Trôû veà muïc luïc tröôùc.
Phím SUBTITLE/(π)
Phím EXIT (THOAÙT)
(Chæ coù DVD-D530K/D530)
Thoaùt khoûi menu treân maøn hình.
Phím KARAOKE (†)
(Chæ coù DVD-D530K/D360K)
Ðể truy cập trình đơn karaoke (keycon, âm
lượng micrô, tiếng vọng).
Phöông thöùc keát noái
Choïn phöông thöùc keát noái
Döôùi ñaây trình baøy moät soá phöông thöùc keát noái tieâu bieåu cho baïn tham khaûo.
Tröôùc khi keát noái
- Phaûi taét nguoàn taát caû caùc thieát bò lieân quan ñeán vieäc keát noái tröôùc khi keát noái hay ngaét keát noái.
- Ñoïc saùch höôùng’ daãn keøm theo cuûa caùc thieát bò ñeå thöïc hieän ñuùng vieäc keát noái.
A.Keát noái vôùi Tivi (Video)
1. Keát noái ngoõ ra hình (vaøng) / tieáng (ñoû vaø traéng) cuûa maùy DVD vôùi ngoõ vaøo hình (vaøng) / tieáng (ñoû
vaø traéng) cuûa Tivi.
4
2. Baät nguoàn Tivi vaø maùy DVD.
3. AÁn phím TV/VIDEO treân BÑKTX cuûa Tivi cho ñeán khi tín hieäu Video treân maùy DVD xuaát hieän treân
maøn hình TV.
Chuù yù
- Maùy coù theå seõ bò nhieãu neáu caùp tín hieäu quaù gaàn so vôùi daây nguoàn.
- Neáu baïn muoán keát noái vôùi Ampli, tham khaûo phaàn keát noái vôùi Ampli.
- Soá ñieåm keát noái coù theå thay ñoåi tuøy thuoäc loaïi Tivi cuûa baïn. Xem höôùng daãn söû duïng cuûa Tivi ñeå
bieát theâm chi tieát.
- Neáu chæ coù moät ngoõ vaøo tieáng treân Tivi, keát noái vôùi ngoõ [AUDIO OUT][traùi] (maøu traéng) treân maùy DVD.
- Neáu baïn aán phím VIDEO SEL. khi maùy phaùt DVD ñang ôû cheá ñoä döøng hoaëc khoâng coù dóa, tín
hieäu Video ngoõ ra seõ thay ñoåi theo trình töï sau : (I-SCAN ➝ P-SCAN)
B.Keát noái vôùi TV (Cheá ñoä queùt xen keõ/Cheá ñoä queùt toái öu)
1. Duøng caùp Component keát noái ngoõ ra COMPONENT treân DVD vôùi ngoõ vaøo COMPONENT treân TV.
2. Söû duïng caùp tín hieäu keát noái ngoõ ra aâm thanh (ñoû vaø traéng) treân maùy DVD vôùi ngoõ vaøo aâm thanh
(ñoû vaø traéng) treân TV. Baät nguoàn TV vaø maùy DVD.
3. AÁn phím choïn tín hieäu vaøo treân BÑKTX cuûa TV cho ñeán khi tín hieäu Component treân maùy DVD xuaát
hieän treân maøn hình TV.
4. Muïc “Video Output” trong Setup Menu caøi ñaët laø I-SCAN/P-SCAN. Baïn coù theå duøng phím VIDEO
SEL. ñeå chuyeån ñoåi tín hieäu Video ngoõ ra.
Chuù yù
- "Cheá ñoä queùt toái öu laø gì"?
Cheá ñoä queùt toái öu coù gaáp ñoâi hoaëc gaáp nhieàu laàn soá ñöôøng queùt trong cheá ñoä queùt xen keõ.
Do ñoù, phöông phaùp queùt toái öu cho chaát löôïng hình aûnh toát hôn vaø roõ raøng hôn.
C.Keát noái vôùi TV baèng ngoõ DVI/HDMI (Chæ coù DVD-D530K/D530)
1. Söû duïng daây tín hieäu HDMI-DVI/HDMI-HDMI keát noái ngoõ ra HDMI treân maùy DVD vôùi ngoõ vaøo DVI/
HDMI treân TV.
2. Duøng caùp tín hieäu keát noái ngoõ ra aâm thanh (ñoû vaø traéng) treân maùy DVD vôùi ngoõ vaøo aâm thanh (ñoû
vaø traéng) treân TV. Baät maùy DVD vaø TV.
3. AÁn phím choïn tín hieäu vaøo treân BÑKTX cuûa TV cho ñeán khi tín hieäu DVI/HDMI töø maùy DVD xuaát hieän
treân maøn hình TV.
Ñaëc tính kyõ thuaät cuûa hình aûnh HDMI (Chæ coù DVD-D530K/D530)
Khi baïn aán phím HDMI SEL. caùc ñoä phaân giaûi 480p, 576p, 720p, 1080p, seõ laàn löôït ñöôïc choïn.
Khi aán phím HDMI SEL. laàn ñaàu maùy seõ chuyeån ñeán ñoä phaân giaûi hieän taïi.
AÁn phím HDMI SEL. laàn hai maùy seõ thay ñoåi ñoä phaân giaûi cuûa tín hieäu ra HDMI.
- Tuøy thuoäc vaøo loaïi TV, moät soá ñoä phaân giaûi cuûa tín hieäu ra HDMI coù theå khoâng hoaït ñoäng.
- Xem höôùng daãn söû duïng cuûa TV ñeå bieát theâm chi tieát.
- Neáu daây tín hieäu HDMI hoaëc HDMI-DVI ñöôïc gaén vôùi TV, t’ín hieäu ra cuûa maùy DVD seõ ñöôïc caøi ñaët laø HDMI/DVI trong voøng 10 giaây.
- Neáu baïn caøi ñaët ñoä phaân giaûi cuûa tín hieäu ra 720p,1080p hoaëc 1080i, tín hieäu ra HDMI seõ cho
chaát löôïng hình aûnh toát hôn.
- Nếu bạn cắm cáp HDMI với Ti vi Samsung, bạn có thể dễ dàng điều khiển được Đầu DVD sử dụng điều
khiển từ xa TV (chức năng này chỉ có sẵn với các ti vi Samsung hỗ trợ Anynet+(HDMI-CEC).)
- Hãy kiểm tra biểu tượng
(nếu ti vi của bạn có biểu tượng
thì nó có hỗ trợ chức
năng Anynet+.
• HDMI (High Definition Multimedia Interface)
HDMI laø moät ngoõ giao tieáp cho pheùp truyeàn döõ lieäu hình aûnh vaø aâm thanh kyõ thuaät soá chæ caàn
moät keát noái raát ñôn giaûn. Söû duïng HDMI, maùy DVD truyeàn tín hieäu hình aûnh/aâm thanh kyõ thuaät
soá vaø hieån thò hình aûnh treân TV coù ngoõ vaøo HDMI.
• Moâ taû keát noái HDMI
HDMI - döõ lieäu hình aûnh khoâng neùn vaø döõ lieäu aâm thanh kyõ thuaät soá (Döõ lieäu LPCM hoaëc Bit Stream).
- Maùy DVD söû duïng caùp HDMI chæ truyeàn tín hieäu kyõ thuaät soá ñeán TV.
- Neáu TV khoâng ñöôïc hoã trôï tính naêng HDCP High-bandwidth Digital Content Protection), tín hieäu
nhieãu seõ xuaát hieän treân maøn hình.
• Vì sao Samsung söû duïng HDMI?
Caùc TV Analog ñoøi hoûi tín hieäu hình aûnh/aâm thanh analog. Maëc duø vaäy, khi phaùt DVD, döõ lieäu
ñöôïc truyeàn ñeán TV laø digital. Vì vaäy, caàn coù moät söï chuyeån ñoåi töø digital sang analog (treân
TV). Trong quaù trình chuyeån ñoåi naøy, chaát löôïng hình aûnh giaûm ñi do nhieãu vaø maát tín hieäu.
Kyõ thuaät DVI laø toát hôn vì noù khoâng ñoøi hoûi söï chuyeån ñoåi D/A vaø truyeàn tín hieäu kyõ thuaät soá
töø maùy ñeán TV.
• HDCP laø gì?
HDCP (High-bandwidth Digital Content Protection) laø moät heä thoáng cho pheùp baûo veä noäi dung
cuûa DVD thoâng qua DVI. Noù baûo veä lieân keát kyõ thuaät soá giöõa nguoàn video (PC, DVD..) vaø thieát
bò hieån thò (TV, projector..). Noäi dung taïi thieát bò nguoàn ñöôïc baûo maät ñeå traùnh vieäc sao cheùp
khoâng coù baûn quyeàn.
D.Keát noái vôùi heä thoáng aâm thanh (Ampli 2 Keânh, Dolby Digital hoaëc
MPEG2)
1. Duøng caùp tín hieäu keát noái ngoõ ra aâm thanh (ñoû vaø traéng) treân maùy DVD vôùi ngoõ vaøo aâm thanh (ñoû
vaø traéng) treân boä khuyeách ñaïi (Ampli). Neáu söû duïng caùp ñoàng truïc keát noái ngoõ ra aâm thanh kyõ thuaät
soá (COAXIAL) treân maùy DVD vôùi ngoõ vaøo aâm thanh kyõ thuaät soá (COAXIAL) treân Ampli.
2. Duøng caùp tín hieäu keát noái ngoõ ra VIDEO hoaëc COMPONENT treân maùy DVD vôùi ngoõ vaøo VIDEO hoaëc
COMPONENT treân TV.
3. Baät maùy DVD, TV, vaø Ampli.
4. AÁn phím choïn tín hieäu vaøo treân Ampli ñeå choïn tín hieäu vaøo vaø nghe aâm thanh treân maùy DVD. Xem höôùng
daãn söû duïng cuûa Ampli ñeå caøi ñaët tín hieäu aâm thanh vaøo cho Ampli.
DVD-D530K
DVD-D530
Ampli 2 keânh stereo Hoaëc Dolby
Digital hay
khueách ñaïi DTS
ÑOÛ
D
TRAÉNG
TRAÉNG
DÖÔNG
LUÏC
ÑOÛ
ÑOÛ
VAØNG
Daây tieáng
ÑOÛ
TRAÉNG
Daây tieáng
Daây caùp Ñoàng truïc
ÑOÛ
Dâaây hình
A
TRAÉNG
Daây caùp
Component
B
VAØNG
ÑOÛ
DÖÔNG
C
Hoaëc
Daây Caùp HDMI-DVI
LUÏC
Daây caùp HDMI
DVD-D360K
D
Daây caùp Ñoàng truïc
BLUE
GREEN
TRAÉNG
Ampli 2 keânh stereo
Hoaëc Dolby Digital hay
khueách ñaïi DTS
ÑOÛ
TRAÉNG
TRAÉNG
ÑOÛ
ÑOÛ
VAØNG
Dâaây hình
Daây tieáng
ÑOÛ
RED
A
B
TRAÉNG
VAØNG
Daây caùp
Component
ÑOÛ BLUE GREEN
5
Chöùc naêng cô baûn
Phaùt Dóa
Tröôùc khi phaùt dóa
- Baät TV vaø duøng BÑKTX cuûa TV nhaán nuùt TV/VIDEO ñeå choïn ñuùng tín hieäu hình aûnh vaøo.
- Neáu keát noái vôùi heä thoáng aâm thanh, baät heä thoáng aâm thanh vaø caøi ñaët ñeå coù tín hieäu aâm thanh vaøo ñuùng.
Chöùc naêng hieån thò thoâng tin
Khi phaùt DVD/VCD/MPEG4
1. Trong khi phaùt, aán TOOLS treân Boä ÑKTX.
2. AÁn phím π/† ñeå choïn muïc moâ taû.
3. AÁn phím √/® ñeå choïn muïc moâ taû.
4. Ñeå thoaùt khoûi maøn hình hieån thò, aán phím TOOLS moät laàn nöõa.
Các chức năng khi sử dụng chức năng Hiển thị (Display) được nêu trong bảng dưới đây:
Ñeå vaøo muïc Title (tieâu ñeà), trong dóa cuûa baïn phaûi coù ít nhaát 02 Title. Ví duï: trong 01
dóa chöùa 02 phim.
Sau khi keát noái maùy vôùi nguoàn ñieän, ñaàu tieân baïn aán phím POWER, maøn hình nhö beân caïnh seõ xuaát
hieän: neáu baïn muoán choïn ngoân ngöõ, aán phím π/† sau ñoù aán phím ENTER töông öùng vôùi ngoân ngöõ maø
Haàu heát caùc loaïi dóa DVD ñeàu ñöôïc ghi döôùi daïng caùc Chapter (Phaàn). Vì vaäy, baïn coù
theå tìm nhanh choùng phaàn maø baïn muoán xem (töông töï nhö caùc baøi haùt treân dóa CD).
baïn muoán choïn. (Maøn hình beân chæ hieån thò khi baïn söû duïng maùy laàn ñaàu tieân).
Neáu baïn khoâng caøi ñaët ngoân ngöõ ôû maøn hình khôûi ñoäng, caùc caøi ñaët coù theå thay ñoåi moãi khi baïn baät hoaëc
Chieàu daøi cuûa phim ñöôïc moâ taû baèng thôøi gian. Baïn coù theå baét ñaàu phaùt ñoaïn phim
baèng caùch nhaäp vaøo thôøi gian töông öùng vôùi ñoaïn phim ñoù. Vôùi moät soá dóa chöùc
naêng naøy khoâng hoaït ñoäng.
taét maùy. Vì vaäy, baïn neân caøi ñaët ngoân ngöõ caàn söû duïng. Khi muoán thay ñoåi ngoân ngöõ, baïn choïn laïi muïc
ngoân ngöõ baèng caùch aán phím
treân maët tröôùc cuûa maùy khoaûng 5 giaây khi maùy khoâng coù dóa. Khi ñoù
maøn hình SELECT MENU LANGUAGE seõ xuaát hieän vaø baïn coù theå caøi ñaët laïi ngoân ngöõ.
Duøng ñeå vaøo ngoân ngöõ cuûa aâm thanh phim. Ví duï: khi maùy phaùt cheá ñoä aâm thanh
English 5.1CH. Moät dóa DVD coù theå chöùa tôùi 8 aûnh höôûng aâm thanh.
Chöùc Naêng Tìm Kieám vaø Boû Qua
Duøng ñeå vaøo ngoân ngöõ phuï ñeà cuûa dóa. Baïn coù theå hieån thò hoaëc taét ngoân ngöõ phuï
ñeà hieån thò treân maøn hình. Moät dóa DVD coù theå chöùa tôùi 32 ngoân ngöõ phuï ñeà.
Trong khi phaùt dóa baïn coù theå cho qua nhanh moät phaàn, moät baøi nhaïc hay duøng chöùc naêng boû qua ñeå
tôùi löïa choïn keá tieáp.
EZ
Tìm kieám trong moät phaàn (Chapter) hoaëc baøi nhaïc (Track)
Bâm ENTER (NHÂP) đê kích hoat chức năng Phóng to.
Trong khi phaùt, aán SEARCH (k hay K) treân Boä ÑKTX khoaûng hôn 1 giaây.
DVD
CD
VCD
2X, 4X, 8X, 16X, 32X
2X, 4X, 8X, 16X, 32X
4X, 8X,
Chuù yù
- Toác ñoä ñöôïc ghi chuù trong chöùc naêng naøy coù theå khaùc vôùi
toác ñoä phaùt thöïc söï.
- Khoâng coù aâm thanh trong cheá ñoä tìm kieám (ngoaïi tröø CD).
Boû qua moät baøi nhaïc
Trong khi phaùt, aán SKIP (|k hay K|).
- Khi phaùt dóa DVD, neáu baïn aán phím SKIP (K|) maøn hình seõ di chuyeån tôùi phaàn (Chapter) keá tieáp. Neáu
baïn aán phím SKIP (|k) maøn hình seõ phaùt trôû laïi phaàn ñaàu. Neáu baïn aán tieáp laàn nöõa maøn hình seõ phaùt
phaàn ñaàu cuûa phaàn tröôùc ñoù.
- Khi phaùt VCD, neáu baïn aán phím SKIP (K|) maøn hình seõ chuyeån ñeán baøi haùt keá tieáp. Neáu baïn aán
phím SKIP (|k) maøn hình seõ chuyeån veà ñaàu cuûa baøi haùt. Neáu baïn aán theâm laàn nöõa, maøn hình seõ
chuyeån veà ñaàu cuûa baøi haùt tröôùc ñoù.
- Neáu moät baøi haùt vöôït quaù 15 phuùt khi phaùt VCD vaø baïn aán phím K|, maøn hình seõ dòch chuyeån
ñeán 5 phuùt. Neáu baïn aán phím |k maøn hình seõ dòch chuyeån luøi laïi 5 phuùt.
6
Ñieàu Chænh Maøn Hình Hieån Thò EZ View.
Neáu ñóa ñöôïc ghi ôû nhieàu goùc ñoä, bieåu töôïng ANGLE seõ hieån thò treân
maøn hình
Söû duïng muïc Disc vaø Title
Trong quaù trình phaùt dóa DVD, aán phím DISC MENU/TITLE MENU treân Boä Ñieàu Khieån Töø Xa.
Chuù yù
- Tuøy thuoäc vaøo loaïi dóa, chöùc naêng Disc Menu/Title Menu coù theå khoâng hoaït ñoäng.
- Baïn cuõng coù theå söû duïng tröïc tieáp phím DISC MENU treân Boä Ñieàu Khieån Töø Xa.
- Title Menu chæ hoaït ñoäng neáu coù ít nhaát 02 tieâu ñeà ñöôïc löu treân dóa.
Phaùt laëp
Duøng ñeå laëp laïi moät track, chapter, title, choïn moät ñoaïn laëp (A-B) hoaëc laëp toaøn boä dóa.
Khi phaùt DVD/VCD
1.
2.
AÁn phím REPEAT treân Boä Ñieàu Khieån Töø Xa. Maøn hình laëp seõ hieån thò.
AÁn phím π/† ñeå thay ñoåi cheá ñoä phaùt. DVD phaùt laëp caùc chuû ñeà hoaëc caùc phaàn.
- Off.
- Title : laëp laïi chuû ñeà ñang phaùt.
- Chapter : laëp laïi phaàn ñang phaùt.
- Repeat A-B (Chæ co DVD-D360K).
Chöùc naêng laëp ñoaïn A-B (Chæ coù DVD-D360K)
1. AÁn phím REPEAT A-B treân Boä Ñieàu Khieån Töø Xa.
2.AÁn phímπ/† choïn muïc REPEAT A-B au ñoù aán phím ENTER.
3. AÁn phím ENTER taïi ñieåm maø baïn muoán baét ñaàu phaùt laëp (A).
4. AÁn phím ENTER taïi ñieåm maø baïn muoán keát thuùc phaùt laëp (B).
Chöùc naêng laëp ñoaïn A-B (Chæ coù DVD-D530K/D530)
1. AÁn phím REPEAT A-B treân Boä Ñieàu Khieån Töø Xa.
2. AÁn phím REPEAT A-B taïi ñieåm maø baïn muoán baét ñaàu phaùt laëp (A).
3. AÁn phím REPEAT A-B taïi ñieåm maø baïn muoán keát thuùc phaùt laëp (B).
3. Ñeå phaùt laïi bình thöôøng, aán phím REPEAT A-B cho đến khi màn hình hiển thị Repeat : Off.
Chuù yù
- A-B REPEAT cho phép bạn định điểm (B) ngay sau khi bạn đã định điểm (A).
Phaùt Laïi Chaäm
Khi phaùt DVD
1. AÁn phím PAUSE (∏∏)/PLAY( ) trong quaù trình phaùt dóa.
2. AÁn phím SEARCH (k/K) ñeå choïn toác ñoä phaùt 1/2, 1/4, 1/8 1/16 va 1/2 so vôùi bình thöôøng trong cheá
ñoä taïm ngöng (PAUSE). Nếu Muốn và mở bình thường, nhấn nút PLAY.
Chöùc naêng môû roäng
Ñieàu Chænh Maøn Hình Hieån Thò (EZ View)
Söû duïng chöùc naêng ñieàu chænh tæ leä maøn hình hieån thò (DVD)
1. AÁn phím EZ VIEW/TOOLS trong quaù trình phaùt dóa.
2. Nhấn các nút EZ VIEW hoặc π/† để chọn kích thước màn hình. Mỗi lần bạn nhấn các nút π/†
hoặc √/®, kích thước màn hình sẽ thay đổi. Để xem hình ảnh về kích thước màn hình và danh
sách thứ tự mà kích thước thay đổi, hãy xem cột tiếp theo.
3. Nhấn nút EXIT/RETURN để thoát khỏi chế độ xem EZ.
Neáu baïn söû duïng TV coù tæ leä 16:9
Khi baïn söû duïng TV coù tæ leä 4:3
Loaïi dóa ghi tæ leä 4:3
- Maøn hình roäng
- SCREEN FIT
- ZOOM FIT
- Vertical Fit
Söû duïng phím AUDIO/√ (DVD/VCD/MPEG4)
1. AÁn phím AUDIO/√ trong quaù trình phaùt dóa. Thay đổi ngôn ngữ âm thanh bằng cách nhấn nút AUDIO
hoặc π/†.
- Caùc ngoân ngöõ aâm thanh hieån thò vôùi chöõ vieát taét.
2. Ñeå loaïi boû bieåu töôïng AUDIO, nhaán phím EXIT/RETURN.
Chuù yù
- Chöùc naêng naøy phuï thuoäc vaøo ngoân ngöõ aâm thanh ñöôïc maõ hoùa treân dóa vaø coù theå khoâng hoaït ñoäng.
- Moät DVD coù theå chöùa ñöôïc 8 ngoân ngöõ aâm thanh.
Choïn Ngoân Ngöõ Phuï Ñeà
Baïn coù theå choïn ngoân ngöõ phuï ñeà deã daøng vaø nhanh choùng baèng phím SUBTITLE/(π).
Chöùc naêng phaùt laïi chaäm raát höõu duïng khi baïn xem caùc chöông trình theå thao, khieâu vuõ, aâm nhaïc
vì baïn coù theå xem laïi kyõ hôn.
Loaïi dóa ghi tæ leä 16:9
- MAØN HÌNH ROÄNG
- SCREEN FIT
- ZOOM FIT
Choïn Ngoân Ngöõ AÂm Thanh
Baïn coù theå choïn ngoân ngöõ aâm thanh mong muoán moät caùch deã daøng vaø nhanh choùng baèng phím
AUDIO/√.
Loaïi dóa ghi tæ leä 16:9
- Phaùt ôû tæ leä 4:3 (Letter Box)
- Phaùt ôû tæ leä 4:3 nôû roäng (Pan Scan)
- SCREEN FIT
- ZOOM FIT
Loaïi dóa ghi tæ leä 4:3
- Maøn hình chuaån
- SCREEN FIT
- ZOOM FIT
Chuù yù
Chöùc naêng naøy seõ thích öùng khaùc nhau tuøy thuoäc vaøo loaïi dóa.
Söû duïng phím SUBTITLE/(π) (DVD/MPEG4)
1. AÁn phím SUBTITLE/(π) trong quaù trình phaùt dóa.
2. Nhấn nút SUBTITLE/(π)hoặc π/ † để thay đổi ngôn ngữ. Mỗi lần bạn nhấn nút SUBTITLE/(π) hoặc
π/ †, ngôn ngữ sẽ thay đổi.
3. Ñeå thoaùt hieån thò SUBTITLE aán phím EXIT/RETURN.
Chuù yù
- Caùc ngoân ngöõ phuï ñeà hieån thò vôùi chöõ vieát taét.
- Tuøy loaïi dóa DVD, baïn coù theå thay ñoåi phuï ñeà mong muoán trong Dics Menu baèng caùch aán phím
DICS MENU.
- Chöùc naêng naøy phuï thuoäc vaøo ngoân ngöõ phuï ñeà ñöôïc maõ hoùa treân dóa vaø coù theå khoâng hoaït
ñoäng vôùi taát caû caùc dóa DVD.
- Moät DVD coù theå chöùa ñöôïc 32 ngoân ngöõ phuï ñeà.
Thay Ñoåi Goùc Phaùt Hình
Khi dóa DVD ñöôïc ghi nhieàu goùc ñoä cho moät caûnh, baïn coù theå söû duïng chöùc naêng ANGLE.
Söû duïng phím ANGLE (DVD)
Neáu ñóa ñöôïc ghi ôû nhieàu goùc ñoä, bieåu töôïng ANGLE seõ hieån thò treân maøn hình.
1. Trong luùc dóa ñang phaùt hình hay ôû cheá ñoä döøng, nhaán phím TOOLS treân boä ÑKTX.
2. Nhaán phím π/† choïn muïc
. Nhaán phím √/® hay baïn coù theå duøng phím soá treân boä ÑKTX ñeå
löïa choïn goùc ñoä mong muoán.
Söû Duïng Chöùc Naêng Bookmark
Chöùc naêng Bookmark cho pheùp baïn choïn caùc phaàn cuûa DVD hoaëc VCD (ôû cheá ñoä Menu Off) do ño
baïn coù theå tìm chuùng moät caùch nhanh choùng vaøo laàn sau.
Söû duïng chöùc naêng Bookmark (DVD/VCD)
1. Trong quaù trình phaùt, aán phím MARKER treân BÑKTX.
2. Khi tôùi caûnh baïn muoán ñaùnh daáu, AÁn phím π/† hoaëc √/® au ñoù aán phím MARKER Moät ñeán 12
caûnh coù theå ñöôïc ñaùnh daáu taïi cuøng moät thôøi ñieåm.
Chuù yù
- Tuøy thuoäc vaøo loaïi dóa, chöùc naêng Bookmark coù theå seõ khoâng hoaït ñoäng.
7
Chieáu laïi caûnh ñöôïc ñaùnh daáu
1. Trong quaù trình phaùt, aán phím MARKER treân BÑKTX.
2. Nhaán phím √/® hoaëc π/† ñeå choïn caûnh ñöôïc ñaùnh daáu.
3. Nhaán phím PLAY () ñeå boû qua caûnh ñöôïc ñaùnh daáu.
Phaùt Laëp/Phaùt Ngaãu Nhieân
1 REPEAT ñeå thay ñoåi cheá ñoä phaùt. Coù 4 cheá ñoä: Off, Track, Folder va Random.
AÁn phím
- Off ( ): Phaùt bình thöôøng.
1 t laëp baøi haùt hieän taïi.
- Track ( 1 ): Phaù
- Folder ( ): Phaùt laëp caùc baøi haùt coù phaàn ñuoâi môû roäng gioáng nhau trong cuøng moät thö muïc.
1
- Random ( ): phaù
t ngaãu nhieân caùc baøi haùt coù phaàn ñuoâi môû roäng gioáng nhau.
Xoùa moät Bookmark
1. Trong quaù trình phaùt, aán phím MARKER treân BÑKTX.
2. Nhaán phím √/® hoaëc π/† ñeå choïn thöù töï caûnh ñaùnh daáu maø baïn caàn xoùa.
3. Nhaán phím ENTER ñeå xoùa thöù töï ñoaïn ñaùnh daáu.
Ñeå trôû laïi cheá ñoä phaùt bình thöôøng, aán phím REPEAT cho đến khi Repeat : Off.
Taäp Tin CD-R MP3/WMA
Chöùc Naêng Phoùng AÛnh
Söû duïng chöùc naêng phoùng aûnh (DVD/VCD)
1. Trong quaù trình phaùt, aán phím TOOLS treân BÑKTX.
2. Nhaán phím π/† choïn muïc
, aán phím ENTER ñeå phoùng aûnh theo traät töï X1,X2,X3,X4.
Lieät Keâ Thö Muïc MP3/WMA/JPEG/MPEG4/CD Audio
Dóa chöùa taäp tin MP3/WMA/JPEG/MPEG4 ôû daïng baøi haùt hoaëc hình aûnh coù theå ñöôïc toå chöùc döôùi
daïng thö muïc nhö hình beân döôùi. Chuùng töông töï nhö khi baïn söû
duïng maùy tính ñeå cheùp moät taäp tin vaøo moät thö muïc.
Để truy cập các thư mục này và các tệp trong những thư mục đó, hãy làm
theo các bước sau:
1.
2.
3.
Videos \
1/2
Pages
Môû khay dóa. Ñaët dóa vaøo khay.
Ñoùng khay dóa. Khay đóng lại và màn hình Trình đơn Thư mục Chủ (Parent
Folder Menu) xuất hiện (hình ảnh trên đầu màn hình). Các thư mục chủ chứa
tất cả các thư mục ngang hàng chứa cùng loại nội dung: âm nhạc, video, ảnh
chụp, v.v...
Nhấn các nút √/® để chọn thư mục chủ mà bạn chọn rồi nhấn ENTER. Một màn hình hiển thị các thư
mục ngang hàng sẽ xuất hiện. Các thư mục ngang hàng chứa tất cả các thư mục chứa cùng loại nội dung
(video, âm nhạc, ảnh chụp, v.v...) có trong thư mục chủ.
CD
Pages
Move
Return
Choïn Thö Muïc
Baïn chæ coù theå choïn thö muïc trong cheá ñoä döøng hay phaùt
- Choïn thö muïc cha:
AÁn phím RETURN ñeå trôû veà thö muïc cha, hoaëc duøng phím π/† ñeå choïn “..” vaø aán phím ENTER ñeå
trôû veà thö muïc cha.
- Choïn thö muïc ñoàng caáp:
AÁn phím π/† ñeå choïn thö muïc caàn, sau ñoù aán phím ENTER.
- Choïn thö muïc con:
AÁn phím π/† ñeå choïn thö muïc caàn, sau ñoù aán phím ENTER.
Phaùt MP3/WMA/CD Audio
1. Môû khay dóa. Ñaët dóa vaøo khay. Ñoùng khay dóa.
2. AÁn phím √/® choïn muïc Trình đơn Âm nhạc, sau ñoù aán phím ENTER. AÁn phím π/† ñeå choïn baøi
haùt, và sau ñoù nhấn ENTER ñeå baét ñầu phát lại tập tin bài hát.
8
Khi baïn ghi caùc taäp tin MP3 hoaëc WMA leân dóa CD-R, caàn tham khaûo caùc löu yù sau.
- Caùc taäp tin MP3 hoaëc WMA phaûi ñöôïc ghi theo tieâu chuaån ISO 9660 hoaëc JOLIET.
Ñònh daïng ISO 9660 vaø taäp tin daïng Joliet MP3 hay WMA töông thích vôùi Microsolf’s DOS, Window vaø
Apple’s Mac. Hai kieåu ñònh daïng naøy ñang ñöôïc söû duïng roäng raõi nhaát.
- Khi ñaët teân cho taäp tin MP3 hoaëc WMA, khoâng ñöôïc vöôït quaù 8 kyù töï vaø ñaët phaàn ñuoâi môû roäng laø
“.mp3, .wma”.
Ñònh daïng teân thoâng thöôøng laø: teân.mp3 hoaëc teân.wma. Khi ñaët teân, ñoä daøi teân nhieàu nhaát laø 8 kyù töï,
khoâng coù khoaûng traéng vaø traùnh duøng caùc kyù töï ñaët bieät nhö : (.,/,\,=,+).
- Tæ soá giaûi neùn ít nhaát phaûi ñaït 128 Kbps khi ghi taäp tin MP3.
Chaát löôïng aâm thanh cuûa taäp tin MP3 cô baûn döïa treân tæ soá neùn/giaûi neùn maø baïn choïn. Khi taïo caùc dóa
CD, aâm thanh ñöôïc laáy maãu theo tæ leä nhaát ñònh ñeå chuyeån thaønh aâm thanh soá, do ñoù khi neùn thaønh taäp
tin MP3, baïn phaûi ñaûm baûo tæ leä laáy maãu 128 Kbps ñeán 160 Kbps. Neáu baïn laáy maãu cao hôn ví duï nhö
192 Kbps seõ taïo ra aâm thanh aâm thanh toát hôn chuùt ít. Caùc taäp tin coù tæ soá giaûi neùn nhoû hôn 128 Kbps
seõ khoâng phaùt ñöôïc.
- Tæ soá giaûi neùn ít nhaát phaûi ñaït 64 Kbps khi ghi taäp tin WMA.
Chaát löôïng aâm thanh cuûa taäp tin WMA cô baûn döïa treân tæ soá neùn/giaûi neùn maø baïn choïn. Khi taïo caùc dóa
CD, aâm thanh ñöôïc laáy maãu theo tæ leä nhaát ñònh ñeå chuyeån thaønh aâm thanh soá, do ñoù khi neùn thaønh
taäp tin WMA, baïn phaûi ñaûm baûo tæ leä laáy maãu 128 Kbps ñeán 160 Kbps. Caùc taäp tin coù tæ soá giaûi neùn nhoû
hôn 64 Kbps hoaëc lôùn hôn 192 Kbps seõ khoâng phaùt ñöôïc. Toác ñoä laáy maãu coù theå ñöôïc hoã trôï cho
caùc taäp tin WMA laø >30 Khz.
- Khoâng ñöôïc sao cheùp caùc taäp tin MP3 ñaõ ñaêng kyù baûn quyeàn.
Taát nhieân caùc taäp tin naøy ñöôïc baûo veä baèng caùch ghi maõ hoùa vaø maõ baûo veä nhaèm traùnh söï sao cheùp
baát hôïp phaùp. Ñoù laø caùc taäp tin daïng Windows MediaTM vaø SDMITM . Baïn khoâng theå sao cheùp daïng taäp
tin naøy.
- Quan troïng:
Taát caû caùc höôùng daãn treân khoâng bao haøm vieäc ñaûm baûo maùy DVD seõ phaùt ñöôïc taát caû caùc loaïi dóa
chöùa taäp tin MP3 cuõng nhö chaát löôïng aâm thanh. Baïn neân löu yù raèng caùc höôùng daãn treân (phöông
phaùp vaø kyõ thuaät ghi) cho caùc taäp tin MP3 nhaèm muïc ñích ñeå maùy coù theå phaùt ñöôïc. Maùy chæ coù theå
phaùt ñöôïc toái ña 500 taäp tin vaø khoâng quaù 500 thö muïc.
Phaùt MPEG4
Chöùc Naêng Phaùt MPEG4
Taäp tin AVI ñöôïc duøng ñeå löu döõ lieäu aâm thanh vaø hình aûnh. Maùy chæ coù theå phaùt ñöôïc caùc taäp tin
ñònh daïng AVI coù phaàn ñuoâi môû roäng laø “.avi”.
1. Môû khay dóa. Ñaët dóa vaøo khay. Ñoùng khay dóa.
2. AÁn phím √/® choïn muïc Trình đơn Video, sau ñoù aán phím ENTER. AÁn phím π/† ñeå choïn taäp tin
AVI (DivX/XviD), sau ñoù aán phíms ENTER. AÁn phím π/†, sau ñoù aán phíms ENTER.
Phaùt Laëp va Chöùc naêng laëp ñoaïn A-B
1.AÁn phím REPEAT, sau ñoù aán phím REPEAT hoaëc π/† ñeå thay ñoåi cheá ñoä phaùt. Coù 3 cheá ñoä phaùt:
Off, Title va Folder.
- Title : Phaùt laëp chuû ñeà hieän taïi.
- Folder : Phaùt laëp caùc taäp tin AVI coù phaàn ñuoâi môû roäng gioáng nhau trong cuøng moät thö muïc.
Chöùc naêng laëp ñoaïn A-B (Chæ coù DVD-D360K)
1. AÁn phím REPEAT A-B treân Boä Ñieàu Khieån Töø Xa.
2.AÁn phímπ/† choïn muïc REPEAT A-B au ñoù aán phím ENTER.
3. AÁn phím ENTER taïi ñieåm maø baïn muoán baét ñaàu phaùt laëp (A).
4. AÁn phím ENTER taïi ñieåm maø baïn muoán keát thuùc phaùt laëp (B).
Chöùc naêng laëp ñoaïn A-B (Chæ coù DVD-D530K/D530)
1. AÁn phím REPEAT A-B treân Boä Ñieàu Khieån Töø Xa.
2. AÁn phím REPEAT A-B taïi ñieåm maø baïn muoán baét ñaàu phaùt laëp (A).
3. AÁn phím REPEAT A-B taïi ñieåm maø baïn muoán keát thuùc phaùt laëp (B).
- Ñeå phaùt laïi bình thöôøng, aán phím REPEAT A-B cho đến khi màn hình hiển thị Repeat : Off.
Chuù y
- A-B REPEAT cho phép bạn định điểm (B) ngay sau khi bạn đã định điểm (A).
Chöùc Naêng Phaùt MPEG4
Chöùc naêng
Moâ ta
Boû qua
(|k hay K|)
Trong khi phaùt dóa, aán phím |k hoaëc K| chuyển sang bài hát sau hoặc trước.
Tìm kieám
(k hay K)
Trong khi phaùt dóa, aán phím SEARCH (k hoaëc K) vaø aán laïi ñeå tìm kieám vôùi toác ñoä nhanh
hôn. Cho pheùp baïn tìm kieám vôùi toác ñoä nhanh hôn treân taäp tin AVI. (2X, 4X, 8X, 16X, 32X)
Phaùt laïi chaäm
ZOOM
Cho pheùp baïn tìm kieám vôùi toác ñoä chaäm treân taäp tin AVI. (1/2, 1/4, 1/8, 1/16)
X1/X2/X3/X4/Bình thöôøng.
- Chöùc naêng naøy coù theå khoâng hoaït ñoäng tuøy thuoäc vaøo taäp tin MPEG4.
Taäp tin AVI treân dóa CD-R
Maùy coù theå phaùt caùc taäp tin video neùn ôû kieåu
ñònh daïng taäp tin AVI:
- DivX 3.11
- DivX 4 (Döïa treân taäp tin MPEG4 ñôn).
- DivX 5 (MPEG4 ñôn coäng vôùi caùc ñaëc tính
nhö laø nhöõng caáu truùc coù ñònh höôùng. Qpel
vaø GMC cuõng ñöôïc hoã trôï.))
- XviD MPEG4
DVD-RW & DVD+R
Ñònh daïng hoã trôï cho taäp tin DivX:
- Ñònh daïng DivX Cô baûn DivX3.11 / 4.12/ 5.x
- Xvid (boä giaûi maõ video töông thích MPEG4) vaø DivX Pro
- Ñònh daïng taäp tin : *.avi, *.div, *.divx.
Maùy coù hoã trôï xem caùc ñoä phaân giaûi cao nhaát
nhö sau.
DivX5
7720 x 480 @ 30fps
720 x 576 @ 25fps
: Toái ña : 4Mbps
Những cảnh báo có thể được đưa ra trong khi chạy
tệp DivX là :
1. Không được cấp phép
- Tệp được tạo với mã đăng ký sai.
2. Codec không được hỗ trợ
- Tệp với các Loại, Phiên bản Codec (vd: MP4, AFS và các codec độc quyền khác) không được đầu DVD này hỗ trợ.
3. Độ phân giải không được hỗ trợ
- Tệp có độ phân giải cao hơn các thông số của đầu không được hỗ trợ.
Chuù y
• Kieåu maùy DVD-D530/D530K/hoã trôï ñoä phaân giaûi leân tôùi 720 x 480 @30 khung hình/
720 x 576 @25 khung hình.
• Maùy coù hoã trôï phaùt caùc taäp tin MPEG4 ñöôïc cheùp treân CD-R/RW theo ñònh daïng ISO 9660.
Mở các Tệp Media b ng tính năng USB Host
Bạn có thể thưởng thức các tệp media như hình ảnh, phim và các giai điệu lưu có âm thanh chất lượng cao
trong máy nghe nhạc MP3, bộ nhớ USB hoặc máy ảnh kỹ thuật số bằng cách kết nối thiết bị lưu trữ với cổng
USB của đầu DVD.
Sử dụng tính năng USBHOST
1. Kết nối thiết bị USB với cổng USB ở mặt trước của thiết bị.
2. Màn hình Trình đơn USB xuất hiện. AÁn phím √/® choïn muïc Trình đơn, sau ñoù aán phím ENTER.
3. Bấm nút π/† để chọn một tệp trong USB. Bấm ENTER để Mở tệp.
Chú ý
• Mỗi lần bấm nút USB trên điều khiển từ xa, một khung lựa chọn thiết bị USB sẽ xuất hiện.
• “USB” sẽ xuất hiện trên màn hình.
• Phụ thuộc vào dung lượng tập tin và thời lượng đoạn phim, thời gian tải trên USB có thể lâu hơn so với
dùng phương tiện CD hoặc DVD.
• Màn hình USB MENU sẽ xuất hiện trên màn hình TV và tệp đã lưu sẽ được mở.
• Nếu có đĩa trong máy, nhấn nút DVD (DVD-D530K/D530) hoặc nút USB (DVD-D360K) sẽ làm cho máy hát
thoát khỏi menu USB và tải đĩa này.
Nhảy tới/lại
Trong lúc một tệp, hãy bấm nút (|k/K|).
•N
ếu có nhiều hơn một tệp, thì khi bạn bấm nút K|, tệp tiếp theo sẽ được chọn.
•N
ếu có nhiều hơn một tệp, thì khi bạn bấm nút |k, tệp trước đó sẽ được chọn.
Tháo USB an toàn.
1. Nhấn nút DVD (DVD-D530K/D530) hoặc nút USB (DVD-D360K)để quay lại chế độ đĩa hoặc màn
hình chính.
2. Bấm nút STOP (■)
3. Tháo cáp USB.
Mởnhanh
Để mở đĩa ở tốc độ nhanh hơn, hãy bấm (k/K) trong lúc m.
• Mỗi lần bạn bấm nút này, tốc độ mở sẽ thay đổi như sau : 2X ➞ 4X ➞ 8X ➞ 16X ➞ 32X.
Các thiết bị tương thích
1.Các thiết bị USB hỗ trợ USB Mass Storage v1.0.(là các thiết bị USB hoạt động như một ổ đĩa di động trong
Windows (phiên bản 2000 hoặc cao hơn) mà không cần phải cài đặt driver bổ sung.)
2. Máy nghe nhạc MP3: máy nghe nhạc MP3 loại.
3. Máy ảnh kỹ thuật số: Các máy ảnh hỗ trợ USB Mass Storagev1.0.
• Các máy ảnh hoạt động như một ổ cứng di động trong Windows (phiên bản 2000 hoặc cao hơn) mà không cần phải cài đặt driver bổ sung.
4. Flash USB : Các thiết bị hỗ trợ USB2.0 hoặc USB1.1.
• Bạn có thể tận hưởng một sự khác biệt trong chất lượng phát khi kết nối với một thiết bị USB1.1.
5. Đầu đọc thẻ USB: Đầu đọc thẻ USB một khe cắm và đầu đọc thẻ USB nhiều khe cắm.
• Tùy vào nhà sản xuất, đầu đọc thẻ USB có thể không được hỗ trợ.
9
• Nếu bạn cắm nhiều thiết bị nhớ vào một đầu đọc nhiều thẻ, bạn có thể gặp các sự cố.
6. Nếu bạn sử dụng cáp mở rộng USB, thiết bị USB có thể không được nhận dạng.
• Không hỗ trợ CBI (Điều khiển/Chặn/Ngắt).
• Không hỗ trợ Máy ảnh Kỹ thuật số có sử dụng giao thức PTP hoặc cần phải cài đặt chương trình bổ sung
khi kết nối với PC.
• Không hỗ trợ thiết bị sử dụng hệ thống tệp NTFS. (Chỉ hỗ trợ hệ thống tệp FAT 16/32 (Bảng Phân phối Tệp 16/32).)
• Một số máy nghe nhạc MP3, khi kết nối với sản phẩm này, có thể không hoạt động do kích thước bộ phận
hệ thống tệp của chúng.
• Không hỗ trợ chức năng USB HOST nếu kết nối sản phẩm truyền các tệp truyền thông bằng chương trình
riêng của nhà sản xuất.
• Không hoạt động với các thiết bị thiết bị MTP(Giao thức Truyền Media) có bật Janus.
• Chức năng USB host của sản phẩm này không hỗ trợ tất cả các thiết bị USB.
• USB Host không hỗ trợ các Ổ đĩa cứng (HDD) USB.
Sao lưu CD
Tính năng này cho phép bạn sao chép các tệp âm thanh từ đĩa sang thiết bị USB ở định dạng MP3.
Mở khay đĩa. Đặt một đĩa CD Audio (CD DA) vào khay, sau đó đóng khay lại. Kết nối thiết bị USB với USB host
ở mặt trước của đầu đĩa. nhấn nút DVD (DVD-D530K/D530) hoặc nút USB (DVD-D360K).
1. Khi thiêt bi ở chê đô dúng, bâm nút TOOLS đê hiên thi màn hình Sao lưu.
2. Bấm các nút π/† Đê chon các têp mong muôn, sau đó bấm nút ENTER (NHẬP) để đánh dấu tất cả tệp sẽ
sao chép.
- Để bỏ đánh dấu sao chép tất cả tệp, bấm nút ENTER (NHẬP) một lần nữa.
3. Bâm các nút √ † hoaëc đê chon menu sao lưu START, tsau đó bấm nút ENTER (NHẬP)trên tệp đã chọn.
Trình đơn Ripping gồm các nút sau:
- Mode (Fast/Normal)
- Bitrates, bâm ENTER đểthay đôi 128kbps ➞ 192kbps ➞ 128kbps...
- Device selection (Chon thiêt bi), bâm ENTER đê thay đôi giữa các thiêt bị (tôi đa 4)
- Select (Chon) - Unselect (Bo chon), bâm ENTER đê thay đôi Select all (Chon tât ca) hoặc Select none (Bo chọn tât ca).
- Start ripping (Bắt đâu sao lưu); bâm ENTER đêbắt đâu qua trình sao lưu.
Chú ý
- Để hủy sao chép đang diễn ra, hãy nhấn nút ENTER.
- Đê trở lai màn hình CDDA, bâm nút TOOLS lân nửa.
- Khi việc sao lưu CD đang được thực hiện, đầu sẽ tự động ở chế độ chạy.
- Vi tôc đô là 2,6 lân tôc đô thường.
- Chỉ có các đĩa CD Audio (CD DA) mới có thể sao lưu.
- Nút USB không hoạt động khi bạn đang ở trình đơn Ripping.
- Chức năng CD Ripping (Ghi lại CD) có thể không hỗ trợ cho một số thiết bị máy hát MP3.
Phaùt CD Hình
1. Choïn thö muïc caàn phaùt.
2. AÁn phím π/† ñeå choïn taäp tin hình trong muïc luïc lieät keâ vaø sau ñoù aán phím ENTER.
Chuù yù
- AÁn phím STOP ñeå trôû veà caây muïc luïc.
- Khi phaùt CD hình Kodak, maùy seõ phaùt hình aûnh tröïc tieáp, khoâng coù caây muïc luïc.
10
Xoay hình
-
-
-
-
AÁn phím TOOLS choïn muïc Rotate, sau ñoù aán phím ENTER.
Mỗi lần bấm nút √/® hình sẽ xoay 90 độ theo chiều kim đồng hồ.
Môi lân bâm nút π hình anh se đao ngược tử trên xuông dưới đê hiên thi môt hình anh đao ngược.
Môi lân bâm nút † hình anh se đao ngược theo chiêu phải đê hiên thi môt hình anh đao ngược.
Phoùng hình
- AÁn phím TOOLS choïn muïc Zoom, sau ñoù aán phím ENTER.
- Mỗi lần bấm nút số ENTER, hình sẽ được phóng to. Chế độ thu phóng: X1-X2-X3-X4-X1.
Ñoïc löôùt aûnh
- Khi chúng ta bấm nút PLAY ở tệp Jpeg, nó sẽ xuất hiện ở chế độ toàn màn hình và tự động chuyển sang chế độ trình chiếu.
Chuù yù
- Tuøy thuoäc vaøo kích thöôùc cuûa taäp tin maø thôøi gian thay ñoåi giöõa caùc hình aûnh coù theå khaùc nhau.
- Neáu baïn khoâng aán baát kyø phím naøo, cheá ñoä ñoïc löôùt aûnh s’ eõ töï ñoäng baét ñaàu sau 10 giaây.
Phaùt dóa CD hình trong cheá ñoä HD-JPEG
(Chæ coù DVD-D530K/D530)
Phaûi keát noái HDMI. Ñoä phaân giaûi neân la 720p/1080i/ 1080p, vaø HD-JPEG ôû cheá ñoä HD
1. Choïn thö muïc caàn phaùt.
2. AÁn phím π/† ñeå choïn taäp tin hình trong muïc luïc lieät keâ vaø sau ñoù aán phím ENTER.
• AÁn phím STOP (■) ñeå trôû veà caây muïc luïc.
• Khi phaùt CD hình Kodak, maùy seõ phaùt hình aûnh tröïc tieáp, khoâng coù caây muïc luïc.
• Xoay hình
AÁn phím TOOLS choïn muïc Rotate, sau ñoù aán phím ENTER. AÁn phím √/® ñeå xoay maøn hình 90 ñoä
sang traùi/phaûi.
• Phoùng hình
- AÁn phím TOOLS choïn muïc Zoom, sau ñoù aán phím ENTER.
- Mỗi lần bấm nút số ENTER, hình sẽ được phóng to. Chế độ thu phóng: X1-X2-X3-X4-X1.
• Nhaûy hình
AÁn phím |k hoaëc K| ñeå choïn khung hình tröôùc hoaëc keá tieáp.
• Chieáu Slide
AÁn phím PLAY (®) ñeå baét ñaàu chöùc naêng SLIDE.
AÁn phím PAUSE (∏∏) ñeå döøng chöùc naêng SLIDE. Nhấn nút PLAY ñeå tiếp tục Trình chiếu Slide.
Chuù y
- Tuøy thuoäc vaøo kích thöôùc cuûa taäp tin maø thôøi gian thay ñoåi giöõa caùc hình aûnh coù theå khaùc nhau.
- Khung hình coù theå ñöôïc phaùt ôû côõ nhoû hôn tuøy thuoäc vaøo kích thöôùc khung hình khi ñang phaùt
hình ôû cheá ñoä HD-JPEG.
- Chúng tôi khuyên nên cài đặt "BD Wise" thành Off" (“Tắt”) Trong trường hợp mở tệp hình ảnh JPEG lớn hơn kích thước 720x480 điểm ảnh."
Phaùt MP3-JPEG
Baïn coù theå phaùt JPEG söû duïng nhö nhaïc neàn.
1. AÁn phím π/† ñeå choïn taäp tin MP3 trong thö muïc aâm nhaïc vaø sau ñoù aán phím ENTER.
Để quay lại màn hình trình đơn, hãy nhấn các nút RETURN hoặc MENU.
2. AÁn phím √/® choïn muïc Trình đơn Ảnh chụp, sau ñoù aán phím ENTER.
AÁn phím π/† ñeå choïn taäp tin JPEG trong thö muïc aâm nhaïc vaø sau ñoù aán phím ENTER.
- AÂm nhaïc seõ chôi lai töø ñau
3. AÁn phím Stop Âm nhaïc seõ baét ñaàu ñöôïc phaùt.
Chuù yù
Taäp tin MP3 vaø JPEG phaûi ôû treân cuøng moät dóa.
Dóa CD-R JPEG
- Chæ phaùt ñöôïc caùc taäp tin coù phaàn ñuoâi môû roäng laø “.jpg” vaø “.JPG”.
- Neáu dóa khoâng ñoùng, noù seõ laøm maát thôøi gian khôûi ñoäng vaø khoâng phaûi taát caû caùc taäp tin
ñöôïc ghi treân dóa ñeàu ñöôïc phaùt.
- Chæ phaùt ñöôïc caùc dóa CD-R chöùa taäp tin JPEG theo ñònh daïng ISO 9660 vaø Joliet.
- Teân cuûa taäp tin JPEG khoâng ñöôïc vöôït quaù 8 kyù töï, khoâng coù khoaûng traéng vaø caùc kyù töï ñaëc
bieät (. / = + ).
- Maùy cuõng coù theå phaùt dóa ña phaàn ñöôïc cheùp moät caùch lieân tuïc. Neáu coù moät ñoaïn traéng treân
dóa thì maùy chæ coù theå phaùt ñöôïc caùc phaàn khaùc treân dóa.
- Moät dóa CD coù theå löu ñöôïc nhieàu nhaát laø 500 hình aûnh.
- Neân söû duïng caùc dóa CD hình Kodak.
- Khi phaùt dóa CD hình Kodak, chæ phaùt ñöôïc caùc taäp tin JPEG trong caùc thö muïc hình aûnh.
- Dóa CD hình Kodak: caùc taäp tin JPEG trong thö muïc hình aûnh coù theå ñöôïc phaùt töï ñoäng.
- Dóa CD hình Konica: neáu baïn muoán xem hình, choïn caùc taäp tin JPEG trong caây thö muïc.
- Dóa CD hình Fuji: neáu baïn muoán xem hình, choïn caùc taäp tin JPEG trong caây thö muïc.
- Dóa CD hình QSS: maùy coù theå khoâng phaùt ñöôïc dóa CD hình QSS.
- Neáu 1 dóa chöùa nhieàu hôn 500 taäp tin thì maùy chæ phaùt ñöôïc 500 taäp tin JPEG maø thoâi.
- Neáu 1 dóa coù hôn 500 thö muïc thì.
Chöù c naê n g Karaoke (Chæ coù DVDD530K/D360K)
Chöùc naêng Karaoke
Trình töï thöïc hieän
1. Kết nối thiết bị đầu cuối Âm Trộn Ra với TV hoặc bộ khuếch đại âm thanh.
2. Kết nối phích cắm micrô với Mic (micrô) và Bật điểm Karaoke. Khi MIC được kết nối và điểm Karaoke được
Bật, bạn có thể sử dụng chức năng karaoke.
Echo/Âm lượng Micrô/Điều khiển Phím (Điều khiển âm thanh)
1. Phát đĩa karaoke có bài hát bạn muốn.
- AÁn phím KARAOKE (†), sau ñoù aán phím π/† choïn muïc ECHO, VOL hoaëc KEY.
2. AÁn phím √/® choïn muïc caàn choïn.
Ghi điểm Karaoke (Điểm)
Ghi điểm sẽ xuất hiện khi :
1. Micrô được kết nối và điểm Karaoke Bật.
2. Vào cuối mỗi chương/tiêu đề của đĩa karaoke.
- Nếu DVD karaoke có bất kỳ thông tin nào về ổ đĩa ghi điểm.
- Trong trường hợp là VCD, thiết bị không thể phân biệt giữa karaoke hay phim, khi đó ghi điểm sẽ luôn xuất hiện.
3. Điểm Karaoke sẽ xuất hiện vào cuối của mỗi chương/tiêu đề trong khoảng 6 giây.
Ghi Âm thanh Karaoke :
1.
2.
3.
4.
Ðưa phương tiện lưu trữ USB vào giắc cắm USB và sau đó nối đầu cắm micro vào Mic. .
Ðể Bắt đầu ghi karaoke, con một tập tin VCD/DVD/SVCD, sau đó nhấn nút RECORD.
Khi ghi, người dùng chỉ có thể nhấn nút STOP và nút PAUSE để hủy việc ghi.
Nếu người dưng thực hiện việc hủy bỏ, khi đó kết quả tập tin sẽ được lưu lại .
Chuù y
- Neáu baïn nghe nhöõng aâm thanh khoù chòu (tieáng rít, tieáng reù) khi ñang haùt, baïn haõy di chuyeån
micro raxa ngöôøi haùt, hoaëc giaûm aâm löôïng cuûa micro, hoaëccuûa ngöôøi haùt.
- Khi phaùt caùc dóa chöùa caùc taäp tin MP3, WMA, DTSvaø LPCM chöùc naêng karaoke seõ khoâng hoaït ñoäng.
- Khi micro ñöôïc caém, ngoõ ra soá seõ khoâng coù taùc duïng.
- AÂm thanh töø micro chæ phaùt ra töø caùc thieát bò Analog Audio.
- Nếu MIC được cắm vào ổ MIC trên bảng phía trước thì âm thanh 5.1 CH sẽ được tự động chuyển thành âm
thanh 2 CH, trạng thái này sẽ không thay đổi trừ khi MIC được rút ra.
11
Thay ñoåi muïc caøi ñaët
Söû Duïng Muïc Caøi Ñaët
Muïc caøi ñaët cho pheùp baïn choïn löïa nhöõng ngoân ngöõ khaùc nhau theo sôû thích cuûa baïn, caøi ñaët chöùc
naêng khoùa treû em vaø ñieàu chænh maùy theo loaïi maøn hình TV maø baïn coù.
1. Khi maùy ñang ôû cheá ñoä döøng, aán phím MENU treân boä ñieàu khieån töø xa. Duøng phím √/® ñeå choïn
muïc setup, sau ñoù aán phím ENTER.
2. Duøng phím π/† ñeå choïn muïc setup, sau ñoù aán phím ® hoaëc ENTER.
3. AÁn phím π/† ñeå choïn caùc ñaëc tính khaùc nhau trong muïc ® hoaëc ENTER ñeå vaøo caùc ñaëc tính con.
4. Ñeå maøn hình caøi ñaët bieán maát sau khi caøi ñaët, aán phím RETURN moät laàn nöõa.
Caøi Ñaët Caùc Muïc Choïn Hieån Thò
Caùc muïc choïn hieån thò cho pheùp baïn caøi ñaët caùc chöùc naêng phim aûnh khaùc nhau cho maùy.
1. Khi maùy ñang ôû cheá ñoä döøng, aán phím MENU treân boä ñieàu khieån töø xa. Duøng phím √/® ñeå choïn
muïc setup, sau ñoù aán phím ENTER.
2. AÁn phímπ/† choïn muïc DISPLAY, au ñoù aán phím ® hoaëc ENTER.
3. AÁn phímπ/† choïn muïc caàn choïn, sau ñoùù aán phím ® hoaëc ENTER.
Cài đặte BD Wise (Chæ coù DVD-D530K/D530)
Khi kết nối đầu với một TV SAMSUNG hỗ trợ "BD Wise", bạn có thể thưởng thức Chất lượng Hình ảnh
được tối ưu hoá bằng cách cài đặt "BD Wise", chức năng là "On" (“Bật).
1. Khi maùy ñang ôû cheá ñoä döøng, aán phím MENU treân boä ñieàu khieån töø xa. Duøng phím √/® ñeå choïn
muïc setup, sau ñoù aán phím ENTER.
2. AÁn phímπ/† choïn muïc DISPLAY, au ñoù aán phím ® hoaëc ENTER.
3. AÁn phímπ/† choïn muïc BD WISE, au ñoù aán phím ® hoaëc ENTER.
AÁn phímπ/† choïn muïc ON/OFF, au ñoù aán phím ENTER.
Chuù yù
• Chỉ có thể thay đổi tuỳ chọn này khi TV hỗ trợ BD Wise.
• Kieåm tra xem TV cuûa baïn coù ñöôïc hoã trôï chöùc naêng queùt toái öu (Progessive Scan) hay
khoâng. Neáu coù vui loøng xem saùch höôùng daãn k eøm theo TV ñeå bieát caùch caøi ñaët chöùc
naêng naøy treân TV.
• Neáu tín hieäu hình ñöôïc caøi ñaët khoâng ñuùng, maøn hình coù theå bò khoùa.
• Ñoä phaân giaûi cuûa tín hieäu ra HDMI phuï thuoäc vaøo loaïi TV hoaëc Projector ñöôïc keát noái.
Xem höôùng daãn söû duïng cuûa TV hoaëc Projector ñeå bie át theâm chi tieát.
• Khi ñoä phaân giaûi ñöôïc thay ñoåi trong khi phaùt dóa, coù theå phaûi maát vaøi giaây ñeå hình aûnh
chuaån xuaát hieän.
• Neáu baïn caøi ñaët ñoä phaân giaûi ngoõ ra HDMI laø 720p, 1080i hoaëc 1080p, tín hieäu ra HDMI seõ
cho chaát löôïng hình aûnh toát hôn.
• Chúng tôi khuyên nên cài đặt "BD Wise" thành Off" (“Tắt”) Trong trường hợp mở tệp hình
ảnh JPEG lớn hơn kích thước 720x480 điểm ảnh."
Caøi Ñaët Caùc Muïc Choïn AÂm Thanh
1. Khi maùy ñang ôû cheá ñoä döøng, aán phím MENU treân boä ñieàu khieån töø xa. Duøng phím √/® ñeå choïn
muïc setup, sau ñoù aán phím ENTER.
2. AÁn phímπ/† choïn muïc AUDIO au ñoù aán phím ® hoaëc ENTER.
3. AÁn phímπ/† choïn muïc caàn choïn, sau ñoùù aán phím ® hoaëc ENTER.
Chuù yù:
-Khi phát đia có Âm thanh MPEG ở lựa chon bitstream, đâu ra âm thanh đông truc có thê không có, tuy thuôc vào Bô thu AV.
- Khoâng coù ngoõ ra aâm thanh analog khi baïn söû duïng dóa aâm thanh.
- Ngay caû khi PCM Down Sampling laø Off.
• Tín hieäu aâm thanh ngoõ ra cuûa moät soá dóa vaãn giaûm thoâng qua ngoõ ra soá.
HDMI (Chæ coù DVD-D530K/D530)
- Neáu TV cuûa baïn khoâng töông thích vôùi caùc ñònh daïng neùn ña keânh (Dolby Digital, MPEG),
baïn coù theå caøi ñaët aâm thanh kyõ thuaät soá ñeán PCM.
- Neáu TV cuûa baïn khoâng töông thích vôùi caùc tæ le maãu LPCM treân 48kHz, baïn coù theå caøi
ñaët maãu PCM Down laø On.
Saûn phaåm ñöôïc saûn xuaát döôùi baûn quyeàn töø Dolby Laboratories. “Dolby” vaø bieåu töôïng 2 chöõ
D laø nhaõn hieäu cuûa Dolby Laboratories.
Thiết lập Tùy chọn Hệ thống
1. Khi maùy ñang ôû cheá ñoä döøng, aán phím MENU treân boä ñieàu khieån töø xa. Duøng phím √/® ñeå choïn
muïc setup, sau ñoù aán phím ENTER.
2. AÁn phímπ/† choïn muïc SYSTEM, au ñoù aán phím ® hoaëc ENTER.
3. AÁn phímπ/† choïn muïc caàn choïn, sau ñoùù aán phím ® hoaëc ENTER.
Cài đặt Anynet+(HDMI-CEC) (Chæ coù DVD-D530K/D530)
Anynet+ là một chức năng có thể dùng để điều khiển thiết bị có sử dụng điều khiển từ xa của ti vi
Samsung, bằng cách nối DVD D530/D530K với ti vi SAMSUNG dùng Cáp HDMI. (Chức năng này chỉ có
sẵn với các ti vi SAMSUNG hỗ trợ Anynet+.). Các tùy chọn Anynet +(HDMI CEC) cho phép bạn cài đặt
chức năng HDMI của đầu.
Chọn On (Bật) khi bạn nối DVD D530/D530K với ti vi Samsung có hỗ trợ Anynet+.
1. Khi maùy ñang ôû cheá ñoä döøng, aán phím MENU treân boä ñieàu khieån töø xa. Duøng phím √/® ñeå choïn
muïc setup, sau ñoù aán phím ENTER.
2. AÁn phímπ/† choïn muïc SYSTEM, au ñoù aán phím ® hoaëc ENTER
3. AÁn phímπ/† choïn muïc ANYNET+(HDMI-CEC), sau ñoù aán phím ® hoaëc ENTER.
12
4. Chọn Anynet+(HDMI-CEC) ở chế độ “On” ("Bật") trên đầu DVD của bạn, sau đó bấm ENTER.
5. Cài đặt chức năng Anynet+ trên TV của bạn. (Xem hướng dẫn sử dụng TV để tìm hiểu chi tiết.).
Chú ý
• Bấm nút PLAY (CHẠY) của thiết bị khi đang xem TV, màn hình TV sẽ chuyển thành màn hình ở chế độ
chạy.
• Nếu bạn chạy DVD khi TV tắt nguồn điện, TV sẽ bật lên.
• Nếu bạn tắt TV, đầu DVD sẽ tự động tắt.
• Nếu bạn chuyển HDMI sang các nguồn khác (Hỗn hợp, Thành phần, …v.v.) trong khi TV khi đang chạy đĩa DVD, đầu DVD sẽ dừng chạy nhưng đầu DVD có thể vẫn chạy đĩa DVD phụ thuộc vào hướng đĩa DVD hỗ trợ.
Caøi Ñaët Chöùc Naêng Ngoân Ngöõ
Sau khi baïn ñaõ caøi ñaët ngoân ngöõ maùy, ngoân ngöõ dóa, ngoân ngöõ aâm thanh vaø ngoân ngöõ phuï ñeà, noäi
dung se hieån thò õ theo ngoân ngöõ baïn caøi ñaët khi baïn xem phim.
1. Khi maùy ñang ôû cheá ñoä döøng, aán phím MENU treân boä ñieàu khieån töø xa. Duøng phím √/® ñeå choïn
muïc setup, sau ñoù aán phím ENTER.
2. AÁn phímπ/† choïn muïc LANGUAGE, au ñoù aán phím ® hoaëc ENTER.
4. AÁn phím π/† ñeå choïn ngoân ngöõ caàn caøi ñaët, sau ñoù aán phím ® hoaëc ENTER.
Chuù y
- Ngoân ngöõ ñöôïc choïn vaø maøn hình trôû veà muïc Language Setup.
- Ñeå thoaùt khoûi maøn hình Setup, aán phím MENU.
- Neáu ngoân ngöõ baïn choïn khoâng ñöôïc ghi treân dóa ngoân ngöõ goác ñöôïc ghi seõ ñöôïc choïn.
- Choïn “Original” neáu baïn muoán phaùt nguyeân goác ngoân ngöõ aâm thanh ñaõ ñöôïc ghi treân dóa
- Choïn “Automatic” neáu baïn muoán ngoân ngöõ phuï ñeà hieån thò gioáng vôùi ngoân ngöõ aâm thanh ñaõ
ñöôïc caøi ñaët.
- Moät vaøi dóa coù theå khoâng chöùa ngoân ngöõ maø baïn choïn. Trong tröôøng hôïp ñoù, dóa seõ söû duïng
ngoân ngöõ caøi ñaët goác.
Thiết lập Tùy chọn Bảo mật
Chöùc naêng Khoùa treû em laøm vieäc vôùi caùc dóa DVD coù chöùa caùc möùc quaûn lyù, noù giuùp baïn kieåm soaùt
caùc loaïi ñóa DVD maø gia ñình baïn ñang xem. Thoâng thöôøng coù 8 möùc quaûn lyù treân moät dóa DVD.
Caøi ñaët caùc möùc quaûn lyù và thay Ñoåi Maõ Khoùa
- Ví duï: khi baïn choïn möùc ñoä Kids Safe, möùc ñoä 2 trở lên seõ khoâng hoaït ñoäng.
5. Nhaäp vaøo maõ khoùa. Nếu đây là lần đầu tiên, hãy nhập 0000. Sau đó hãy nhập mật khẩu mới.
Mật khẩu mới phải là một số khác với 0000 để kích hoạt chức năng kiểm soát dành cho cha mẹ.
Nhaäp maõ khoùa laïi laàn nöõa.
Các cấp độ bảo mật:
❶ KID SAFE
❷ G (Khán giả Nói chung) : Cho phép Mọi lứa tuổi
❸ PG (đề nghị Hướng dẫn của Cha mẹ) : Một số phim không phù hợp với trẻ em.
❹ PG 13(Cha mẹ cần đặc biệt chú ý) : Một số phim không phù hợp với trẻ em dưới 13 tuổi.
❺ PGR (Khuyến nghị Hướng dẫn của Cha mẹ ): Những phim này không hẳn là không thích hợp với
trẻ em, tuy nhiên người xem nên thận trọng, và các bậc cha mẹ và người giám hộ cần giám sát
những khán giả nhỏ tuổi hơn.
❻ R (Hạn chế) : Dưới 17 tuổi phải có người lớn đi kèm
❼ NC17 (NC-17) : Cấm trẻ em 17 tuổi và dưới 17 tuổi.
❽ ADULT
Chuù y
-Neáu baïn queân maõ khoùa, tìm muïc “Queân maõ khoùa” trong höôùng daãn giaûi quyeát söï coá.
Thiết lập Tùy chọn Chung
1. Khi maùy ñang ôû cheá ñoä döøng, aán phím MENU treân boä ñieàu khieån töø xa. Duøng phím √/® ñeå choïn
muïc setup, sau ñoù aán phím ENTER.
2. AÁn phímπ/† choïn muïc GENERAL, au ñoù aán phím ® hoaëc ENTER.
3. AÁn phímπ/† choïn muïc caàn choïn, sau ñoùù aán phím ® hoaëc ENTER.
Thiết lập Tùy chọn Hỗ trợ
Tùy chọn hỗ trợ cho phép bạn kiểm tra thông tin của máy phát DVD như mã model, phiên bản phần
mềm, số seri và các số phiên bản có thể tìm thấy ở mặt sau của Máy phát DVD.
1. Khi maùy ñang ôû cheá ñoä döøng, aán phím MENU treân boä ñieàu khieån töø xa. Duøng phím √/® ñeå choïn
muïc setup, sau ñoù aán phím ENTER.
2. AÁn phímπ/† choïn muïc SUPPORT, au ñoù aán phím ® hoaëc ENTER.
3. choïn muïc PRODUCT INFORMATION, sau ñoùù aán phím ® hoaëc ENTER.
1. Khi maùy ñang ôû cheá ñoä döøng, aán phím MENU treân boä ñieàu khieån töø xa. Duøng phím √/® ñeå choïn
muïc setup, sau ñoù aán phím ENTER.
2. AÁn phímπ/† choïn muïc SECURITY, sau ñoù aán phím ® hoaëc ENTER. Nhaäp vaøo maõ khoùa
3. AÁn phímπ/† choïn muïc PARENTAL/CHANGE PASSWORD, sau ñoù aán phím ® hoaëc ENTER.
4. AÁn phím π/† choïn muïc möùc quaûn lyù maø baïn muoán Sau ñoù, aán phím ENTER.
Ví duï: caøi ñaët möùc ñoä Kids Safe.
13
Tham khaûo
Ñaëc Tính Kyõ Thuaät
Giaûi Quyeát Söï Coá
Nguoàn ñieän söû duïng
Tröôùc khi lieân laïc traïm baûo haønh, baïn vui loøng kieåm tra tröôùc caùc vaán ñeà sau:
Vaán ñeà
Coâng suaát
Kieåm tra
Maøn hình bò khoùa.
• AÁn phím ®|| (ôû maët tröôùc maùy) trong khoaûng 5 giaây khi khoâng coù dó trong
maùy. Taát caû caùc cheá ñoä caøi ñaët seõ trôû veà cheá ñoä caøi ñaët ban ñaàu.
Queân maõ khoùa.
• AÁn phím ®|| (ôû maët tröôùc maùy) trong khoaûng 5 giaây khi khoâng coù dóa trong
maùy. Taát caû caùc cheá ñoä caøi ñaët bao goàm caû maõ khoùa seõ trôû veà cheá ñoä caøi ñaët
ban ñaàu. Khoâng söû duïng chöùc naêng naøy khi khoâng thöïc söï caàn thieát.
Khoâng coù tín hieäu
HDMI ôû ngoõ ra
• Kieåm tra tín hieäu Video ngoõ ra coù phaûi laø HDMI khoâng.
• Kieåm tra keát noái giöõa TV vaø ngoõ HDMI cuûa maùy DVD.
• TV coù hoã trôï caùc ñoä phaâm giaûi 480p/576p/720p/1080i/1080p khoâng.
Maøn hình hieån
thò tín hieäu HDMI
khoâng bình thöôøng
• Neáu tín hieäu nhieãu xuaát hieän treân maøn hình, ñieàu ñoù coù nghóa laø TV khoâng
hoã trôï tính naêng HDCP (Baûo veä noäi dung kyõ thuaät soá baêng thoâng roäng).
Tín hieäu ra HDMI
Jidder
• Kieåm tra heä thoáng TV ñaõ ñöôïc caøi ñaët ñuùng chöa
• Maøn hình Jidder coù theå xuaát hieän khi tæ leä khung hình ñöôïc chuyeån ñoåi töø 50Hz
ñeán 60Hz ñoái vôùi tín hieäu ra HDMI coù ñoä phaân giaûi 720P/1080i/1080p.
• Xem höôùng daãn söû duïng cuûa TV ñeå bieát theâm chi tieát.
TOÅNG QUAÙT
Troïng löôïng
Kích thöôùc
NGOÕ RA HÌNH
1.2 Kg
360mm (W) X 207mm (D) X 42mm (H)
+5°C to +35°C
Ñoä aåm yeâu caàu
10 % to 75 %
Ngoõ Composite
1 Keânh: 1.0 Vp-p (75 Ω load )
Ngoõ Component
Y: 1.0 Vp-p (75 Ω load)
Pr : 0.70 Vp-p (75 Ω load)
Pb : 0.70 Vp-p (75 Ω load)
Cổng Đầu ra
Mức Đầu ra Tối đa
Taàn soá
Cổng ra Âm thanh Số
14
Để biết về nguồn cung cấp điện và
mức tiêu thụ điện, hãy tham khảo
nhãn gắn kèm với sản phẩm.
Nhieät ñoä hoaït ñoäng
HDMI (Chæ coù DVD-D530K/D530)
NGOÕ RA TIEÁNG
AC 110-240V ~ 50/60 Hz
480p. 576p. 720p. 1080i, 1080p
RCA
2Vrms
20 Hz to 20 kHz
Cổng Đồng trục (S/PDIF)
Ghi chuù
DÒCH VUÏ BAÛO HAØNH HAÄU MAÕI
Neáu coù söï khaùc laï ñöôïc phaùt hieän khi maùy ñang hoaït ñoäng, xin quyù khaùch vui loøng lieân laïc
ngay vôùi ñaïi lyù phaân phoái hoaëc traïm baûo haønh gaàn nhaát ñeå ñöôïc yeâu caàu giuùp ñôõ.
Khu vöïc
Baéc Myõ
Chaâu Myõ
La Tinh
Chaâu AÂu
CIS
Chaâu AÙ
Thaùi Bình
Döông
Trung AÙ &
Chaâu Phi
Teân nöôùc
Soá ñieän thoaïi trung taâm
Canada
Mexico
U.S.A
Argentine
Brazil
Chile
Nicaragua
Honduras
Costa Rica
Ecuador
El Salvador
Guatemala
Jamaica
Panama
Puerto Rico
Rep. Dominica
Trinidad & Tobago
Venezuela
Colombia
1-800-SAMSUNG (726-7864)
01-800-SAMSUNG (726-7864)
1-800-SAMSUNG (726-7864)
0800-333-3733
0800-124-421, 4004-0000
800-SAMSUNG (726-7864)
00-1800-5077267
800-7919267
0-800-507-7267
1-800-10-7267
800-6225
1-800-299-0013
1-800-234-7267
800-7267
1-800-682-3180
1-800-751-2676
1-800-SAMSUNG (726-7864)
0-800-100-5303
01-8000112112
Belgium
02 201 2418
Czech Republic
Denmark
Finland
France
Germany
Hungary
Italia
Luxemburg
Netherlands
Norway
Poland
Portugal
Slovakia
Spain
Sweden
U.K
Eire
Austria
800-SAMSUNG (800-726786)
8-SAMSUNG (7267864)
30-6227 515
01 4863 0000
01805-SAMSUNG (726-7864 € 0,14/Min)
06-80-SAMSUNG (726-7864)
800-SAMSUNG (726-7864)
02 261 03 710
0900-SAMSUNG (0900-7267864) (€ 0,10/Min)
3-SAMSUNG (7267864)
0 801 1SAMSUNG (172678), 022-607-93-33
80820-SAMSUNG (726-7864)
0800-SAMSUNG (726-7864)
902-1-SAMSUNG (902 172 678)
0771 726 7864 (SAMSUNG)
0845 SAMSUNG (7267864)
0818 717 100
0810-SAMSUNG (7267864, € 0.07/min)
Switzerland
0848-SAMSUNG (7267864, CHF 0.08/min)
Russia
Kazakhstan
Uzbekistan
Kyrgyzstan
Tadjikistan
8-800-555-55-55
8-10-800-500-55-500
8-10-800-500-55-500
00-800-500-55-500
8-10-800-500-55-500
Ukraine
8-800-502-0000
Belarus
Moldova
Lithuania
Latvia
Estonia
Australia
New Zealand
China
810-800-500-55-500
00-800-500-55-500
8-800-77777
8000-7267
800-7267
1300 362 603
0800 SAMSUNG (0800 726 786)
400-810-5858, 010-6475 1880
Hong Kong
3698-4698
India
Indonesia
Japan
Malaysia
3030 8282, 1800 110011, 1800 3000 8282
0800-112-8888
0120-327-527
1800-88-9999
1-800-10-SAMSUNG (726-7864), 1-800-3-SAMSUNG (726-7864),
1-800-8-SAMSUNG (726-7864), 02-5805777
1800-SAMSUNG (726-7864)
1800-29-3232, 02-689-3232
0800-329-999
1 800 588 889
444 77 11
0860-SAMSUNG (726-7864 )
800-SAMSUNG (726-7864), 8000-4726
Philippines
Singapore
Thailand
Taiwan
Vietnam
Turkey
South Africa
U.A.E
Web Site
www.samsung.com/ca
www.samsung.com/mx
www.samsung.com/us
www.samsung.com/ar
www.samsung.com/br
www.samsung.com/cl
www.samsung.com/latin
www.samsung.com/latin
www.samsung.com/latin
www.samsung.com/latin
www.samsung.com/latin
www.samsung.com/latin
www.samsung.com/latin
www.samsung.com/latin
www.samsung.com/latin
www.samsung.com/latin
www.samsung.com/latin
www.samsung.com/latin
www.samsung.com.co
www.samsung.com/be (Dutch)
www.samsung.com/be_fr (French)
www.samsung.com/cz
www.samsung.com/dk
www.samsung.com/fi
www.samsung.com/fr
www.samsung.de
www.samsung.com/hu
www.samsung.com/it
www.samsung.com/lu
www.samsung.com/nl
www.samsung.com/no
www.samsung.com/pl
www.samsung.com/pt
www.samsung.com/sk
www.samsung.com/es
www.samsung.com/se
www.samsung.com/uk
www.samsung.com/ie
www.samsung.com/at
www.samsung.com/ch
www.samsung.com/ch_fr/ (French)
www.samsung.ru
www.samsung.com/kz_ru
www.samsung.com/kz_ru
www.samsung.ua
www.samsung.com/ua_ru
www.samsung.com/lt
www.samsung.com/lv
www.samsung.com/ee
www.samsung.com/au
www.samsung.com/nz
www.samsung.com/cn
www.samsung.com/hk
www.samsung.com/hk_en/
www.samsung.com/in
www.samsung.com/id
www.samsung.com/jp
www.samsung.com/my
www.samsung.com/ph
www.samsung.com/sg
www.samsung.com/th
www.samsung.com/tw
www.samsung.com/vn
www.samsung.com/tr
www.samsung.com/za
www.samsung.com/ae
AK68-02088A