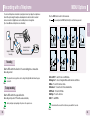
1
- Long Recording - MP3 and WMA Playback - TTS Function - Repeated Play Function - VOR (Voice Operating Recording) Function - FM Reception - Playback Speed Adjustment - Management of Recording Folders - Intro Scan Function - Voice Editing and E-mailing Functions AH68-01629L (Rev 0.0) Contents Contents Connection Connecting the player to your PC ........................................................................................ 11 Manual Installation of USB Driver.........................................................................................15 Using the removable storage(PC) ....................................................................................... 17 Installing Voice Manager ..................................................................................................... 20 Using Voice Manager ...........................................................................................................22 Installing TTS ....................................................................................................................... 25 Using TTS ............................................................................................................................ 27 Basic Usage Power On and Off ............................................................................................................... 31 Voice Recording .................................................................................................................. 32 Recording with a Telephone ................................................................................................ 33 MENU Options .................................................................................................................... 34 Playing a File ....................................................................................................................... 35 Loop Repeating ................................................................................................................... 36 Using Navigation ..................................................................................................................37 Deleting Files ....................................................................................................................... 38 Setting Bookmark ................................................................................................................ 39 FM Radio Settings ............................................................................................................... 40 1 FM Radio Settings/FM Recording ....................................................................................... 43 FM Recording ...................................................................................................................... 43 Setting the Advanced Functions .......................................................................................... 44 Record Settings .................................................................................................................. 45 Selecting the Play mode .......................................................................................................46 Sound Settings .................................................................................................................... 47 Play Speed Settings ............................................................................................................ 47 FM Region Settings ..............................................................................................................48 FM Search Level Settings ................................................................................................... 48 Screen Brightness Settings ................................................................................................. 49 Time Settings ....................................................................................................................... 49 Beep Settings ...................................................................................................................... 51 Language Settings .............................................................................................................. 51 Viewing System Information ................................................................................................ 51 ENG Preparations Safety Instructions ................................................................................................................. 3 Features ................................................................................................................................ 5 Location of Controls............................................................................................................... 7 Appendix MENU Table .........................................................................................................................52 Customer Support Troubleshooting ....................................................................................................................53 Specifications ...................................................................................................................... 55 2 Safety Instructions Safety Instructions Read and understand all the instructions to avoid injury to yourself and damage to the equipment. Avoid subjecting the main unit to severe impact or falling it at high place. Do not let any foreign matter spill into the device. ENG Earphones Do not expose to extreme temperatures (above 35°C or below -5°C). Do not expose to moisture. Follow Traffic Safety Instructions ● Do not use the earphones while driving an automobile or riding a bicycle. It’s not only dangerous, but also against the law. ● To avoid an accident, do not turn up the volume of the earphones too high while walking. Protect your ears Do not place heavy objects on top of the device. Do not expose to chemicals such as benzene and thinners. Remove batteries when the device is left unused for a long period of time. ● Do not turn up the volume too high. Doctors warn against prolonged exposure to high volume. ● Stop using the device or turn the volume down if you have ringing in your ears. Ambient operating conditions ● Ambient temperature : 5°C ~ 35°C (41°F ~ 95°F) ● Humidity : 10 ~ 75% Do not expose to direct sunlight or heat sources. 3 Do not try to disassemble and repair the device yourself. Environmental Information ✽ Please be aware that we claim no responsibility for damage from data loss due to breakdown, repair or other causes. ● Follow local guidelines for waste disposal when discarding packages, batteries, and old electronic appliances. ● Your player is packaged with cardboard, polyethylene etc., and does not use any unnecessary materials. 4 Features Features Mode SP HQ YV-120 H(128MB) 17 hours 30 minutes 8 hours 15 minutes 4 hours 15 minutes YV-120 V(256MB) 35 hours 17 hours 8 hours 30 minutes YV-120 X(512MB) 70 hours 34 hours Model SHQ 17 hours ■ MP3 and WMA Playback The player supports playback of MP3 and WMA. ■ TTS Function With the Text-to-Speech (TTS) program that converts text into voice, you can listen to a text file on a PC as the program converts it into a voice file. ■ Repeated Play Function You can select specific tracks for repeated play. ■ FM Reception Listening to an FM program is made easy with Auto Search and Frequency Memory functions. ENG ■ Long Recording ■ Playback Speed Adjustment The playback speed for music and voice files can be adjusted. ■ Management of Recording Folders Recordings can be organized into 5 folders: A, B, C, D and E. ■ Intro Scan Function You can listen to the first 10 seconds of all saved tracks. ■ Voice Editing and E-mailing Functions When connected to a PC, you can edit recordings and send an e-mail using Voce Manager. ■ VOR (Voice Operating Recording) Function You can set the product to activate when a sound or voice is detected. 5 6 Location of Controls Rear Display ENG Front Location of Controls Built-in Microphone External Microphone Jack Display Earphones Jack Hand Strap Hook Recording Folder indicator Record Switch Built-In Speaker FOLDER Button B/MARK Button Volume Buttons Move to Track/ Speed Search/ Volume Button Loop Repeating Button Recording indicator Current Track DEL Button Play/Pause Button HOLD Switch Battery Cover Recording Mode indicator A VOICE REC 003 V001. VYF REC 0 : 00 : 00 SHQ 0 : 00 : 00 Remaining Battery Power indicator Recording Time (hour, minute, second) Remaining Recording Time indicator MENU Button USB Cable Connection Port 7 8 Components Components Player User Manual Installation CD the battery cover in the 1 Slide direction of the arrow. up the battery cover, insert the batteries 2 Lift with their poles in +, - the correct position USB Cable ENG Inserting Batteries and close the cover. Connection Cable for External Devices External Microphone Earphones Hand Strap Battery Life The battery life is based on the AAA/LR03 alkaline battery. Telephone Cable Adapter AAA/LR03 Battery - The capacity of the useable built-in memory is less than indicated as the internal firmware uses part of the memory as well. Note Mode Life Recording (SP mode) 10hrs Voice Recording Mode MP3 Mode Earphone Play (based on VOL 20) Earphone Play (based on VOL 20) 10hrs 10hrs - Design of accessories is subject to change for improvement without notice. - Saved recording files will not be deleted when changing batteries. - Battery life may significantly vary depending on the type and duration of play Note and volume. 9 10 Connecting the player to your PC Connecting the player to your PC The PC system must meet the following specifications: ● Pentium 200MHz or greater ● Windows 98 SE/ME/2000/XP ● 200MB of available hard disk space ● CD-ROM drive (double speed or greater) ● USB port (1.1) supported ● Sound Card For Windows 98SE, please install the USB driver before connecting the player to the PC. ENG ❿ System Requirements. Installing software 1 Insert the Installation CD into the CD-ROM drive. Select [Install Player USB Driver]. 2 Follow the instructions in the window to complete the installation. Note - Log into your PC as an administrator (Main User) and install the supplied software for Windows 2000 or XP. Otherwise, the software may not install properly. 11 When software installation is completed, connect the player to PC as shown in the next page. 12 Connecting the player to your PC Connecting the player to your PC 1 2 Connect the USB cable to the USB port on your computer. Connect the other end of the USB cable to the USB cable jack at the bottom of the player. ● If you disconnect the USB cable from your PC while implementing a command or initializing during USB driver installation, your PC may not function correctly. 3 13 The USB driver is installed with a message saying that it is searching for a new device. You may not see the display screen during installation. Go to the device manager to check that installation has been successfully completed. 4 Upon installation of the USB driver "SAMSUNG YV-120 USB Device" will appear in the [System Properties] ➝ [Device Manager]. ENG Connecting the player to your PC with the USB cable How to check if USB driver is properly installed ● Windows 98: Control Panel ➝ System ➝ Device Manager ➝ Disk Drives ➝ SAMSUNG YV-120 ● Windows 2000/XP: Start ➝ Settings ➝ Control Panel ➝ System ➝ Hardware ➝ Device Manager ➝ Disk Drives ➝ SAMSUNG YV-120 USB Device 14 Manual Installation of USB Driver When an error occurs during installation of the USB driver 1 Check the device manager. Windows 98SE: Control Panel ➝ System ➝ Device Manager 2 Check if there is a device listed with an exclamation point or a question mark (displayed as unknown device or USB device). 3 Double click on the device listed with an exclamation point or a question mark. 4 After selecting the driver, click [Update Driver]. 5 Follow the instructions in the window to complete the installation. ENG For windows 98SE, follow these steps if the USB driver is not installed. Go to “Downloading/Uploading files” if the USB driver is installed. Manual Installation of USB Driver ❖ ❖ USB driver location [CD ROM]\Win98USB\Drivers ❖ : You must reboot your computer to complete the installation. Note - The installation method may vary depending on the type of PC or operating system. Contact your PC dealer or service center for installation information. - If errors occur continuously when you install the USB driver, reconnect the USB cable after rebooting your system. 15 Note - You cannot use it as a removable disc in Windows 98 if the YV-120 program is not installed. Make sure to install the USB driver file first. 16 Using the removable storage(PC) Using the removable storage(PC) 1 2 3 Connect the player to PC. Open Windows Explorer on PC. ● Removable Disc is displayed in Windows Explorer. Select the files to save. Drag and drop them into respective folders in the removable disc. - Disconnecting the USB cable while downloading or uploading files may cause malfunction of the player. For disconnecting the USB cable, see Notice “Disconnecting the USB Cable.” - The music file order displayed in Windows Explorer may differ from the play order on your player. - Name files using the format: ‘V001’, ‘V002’, . . . ‘V300’ when you download a voice file into folders A, B, C, D or E in the player, as the player can only recognize files using this name format. - The maximum number of MP3 files to be recognized for downloading is 1,500. Any more than this number can be downloaded but cannot be played. 17 Disconnecting the USB cable After completing the file transfer, you must disconnect the cable in the following way: 1 Double-click on the green arrow in the taskbar on the bottom right of the window. 2 When the [Stop a Hardware device] message appears, press the [OK] button and disconnect the USB cable. ENG Downloading/Uploading files 18 Using the removable storage(PC) Installing Voice Manager Voice Manager is a program that plays, converts and edits the voice files recorded in the palayer. 1 Select the removable disc icon and click the right mouse button to select [Format]. 2 Press the [Start] button. ● All saved files will be formatted. ● You can change the name of removable disc by selecting [Volume label]. 1 2 ENG Formatting on your PC Insert the Installation CD into CD-ROM drive. Select [Install Samsung Voice Manager]. Select language. - Care must be taken as formatted files can not be recovered. Notice Continued... 19 20 Using Voice Manager Installing Voice Manager ● Double click the Voice Manager icon on the desktop. Follow the instructions in the window to complete the installation. Converting Files Manager explorer window, select a VYF file to convert and 1 Atpressthe theVoice[Convert]. [Convert file] window, select the VYF mode and folder and press the 2 At[StarttheConversion]. ENG 3 ● The selected file will be saved as a WAV format file. WAV files generated are saved in units of 1GB. - SHQ (Super High Quality): Highest Quality - HQ (High Quality): High Quality - SP (Standard Play): Normal Quality - WAV files can also be converted to VYF files using the conversion function. 21 Note - Refer to Help for more information. 22 Using Voice Manager Using Voice Manager Sending E-mail the Voice Manager explorer window, select a file to send and press the 1 At[Send mail]. ● If a VYF file is selected, you will be asked whether to convert the file to a WAV file in case that the recipient may not have the Voice Manager program. the selected file appears as an attachment in the [New Message] 2 When window, enter the recipient’s e-mail address and compose the message and press the [Send]. Double click the Voice Manager icon on the desktop. Recording with PC 1 Connect a microphone to the PC. 2 Press a recording mode button to select SHQ, HQ or SP. 3 Press the Stop ( ) button to finish the recording. ENG Double click the Voice Manager icon on the desktop. ● Voice recording will start. ● The [Save VYF file] window will appear. Select a folder where the file will be saved and press the [Save] to save the file. ● The file will be saved in VYF format. ● To check the mailing setup: Internet Explorer→ Tools → Internet Options → Program → E-Mail (Microsoft Outlook, Outlook Express, Hotmail) - Refer to Help for more information. - Refer to Help for more information. Note Note 23 24 Installing TTS Installing TTS 1 25 Insert the installation CD into the CD-ROM drive. Select [Install TTS Manager]. 2 Follow the instructions in the window to complete the installation. ENG TTS (Text-to-Speech) is a program that converts texts to speech. TTS analyzes the texts entered by the user and reads it in a human voice. This is especially useful for language studies. 26 Using TTS Using TTS Œ ´ ˇ¨ ˆ Ø ∏ ” ’ ˝ Ô Press the [File] button. ENG ● Click the TTS icon on your desktop. ¯ 1. 2. 3. 4. 5. 6. 7. 8. 9. New: make new text. Open: open existing file. Save: save the text entered as a TXT file. Save As: save the file with another name. Cut: cut text. Copy: copy text. Paste: paste the cut or copied text. Option: set the language, volume and dictionary function. Generation: convert the text entered into a TS3 file that you can listen to in the player. 10. Print: print the file. 11. Help: show help related to the use of the program. 12. Voice Engine: view the language currently selected. 13. Play: listen to the text entered as speech. 14. Pause: pause the play. 15. Stop: stop the play. 16. REW (Backward): go to the previous part/track during play. 17. FF (Forward): go to the next part/track during play. 18. Textviewer: display the sentences and words currently being read. 27 New ( ): make new text. Open ( ): open an existing file. Save ( ): save the text entered as a txt file. Save As ( ): save the file with another name. Generation ( ): convert the text entered into a TS3 file that you can listen to in the player. Print ( ): print the file you want. Print Preview: preview the contents to be printed. Print Setup: change the printer setup. Exit: exit the program. - See Help for more details on how to use. Note 28 Using TTS Using TTS Press the [Edit] button. ENG Option Undo: cancel the last edit. Cut ( ): cut and move the text to another place. Copy ( ): copy the text. Paste ( ): paste the cut and copied text. - See Help for more details on how to use. Note Press the [Option] button. Speech Option ( ): set the language, volume and dictionary function. - See Help for more details on how to use. Note 1. Setting Language: select the language for the voice to read the text. Letter: read in units of letters. Word: read in units of words. Sentence: read in units of sentences. 2. Speech Control Volume: adjust the volume. Pitch: adjust the pitch of the voice. Rate: adjust the speed of the voice. 3. Dictionary You can “Define Reading” for the words in the Dictionary. For example, if you want the system to read the word ‘IT’ as 'Information Technology’, define the word ‘IT’ as ‘Information Technology’ in the relevant language dictionary. Source Text: window for entering the word that you want to define. Pronunciation: window for entering the ‘defined meaning’ words or sentences. ADD: add words to be newly defined. MOD: modify definitions of saved words. DEL: delete saved words. - See Help for more details on how to use. 29 Note 30 Power On and Off Voice Recording Make sure the earphones are connected. Press the √» button. ● The power will be turned on. Power Off Press and hold the √» button. ● The power will be turned off. Recording A VOICE Slide the REC switch in the direction of the arrow. 003 Stand by ... Note - Slide the REC switch in the direction of the arrow when the player is turned off to automatically turn the player on and start recording. SP 34:52:41 ● The recording number and time will appear and recording will commence. ● The recording numbers are assigned in sequential order. Each folder can save up to 300 files. ● Always point the microphone toward the sound source. ● Remaining time for the current recording mode will be displayed at the bottom of the screen. Hold Function This function will disable all buttons while maintaining the current operation. However, the recording function will operate when the Hold function is in use. Note A VOICE REC 003 V001. VYF REC 0 : 01:32 SHQ 0 : 00 : 00 ENG Power On You can record voices by using the built-in microphone or an external microphone. - By connecting the earphones during recording, you can listen to the recording as it occurs. - Beeps are disabled while recording. - Noise may be produced if the microphone and earphones are placed close together. Notice - Removing the batteries while recording may damage the file. Slide the switch in the direction of the arrow. ● When the button is pressed, the “HOLD” message will appear on the display. To Stop Recording Adjusting the Volume Press , Slide the REC switch in the opposite direction for recording. to adjust the volume from 00 to 40. ● Recording will stop and a VYF file will be saved automatically. 07 31 32 Recording with a Telephone Press the MENU button to switch to the menu mode. Use , to move and press the MENU button briefly to select the menu you want. ENG You can record telephone conversations in your player. Connect your player to a telephone as shown in the picture using the telephone cable,adapter and connection cable for external devices. Connection to digital devices such as mobile phones is not supported. (Use of an additional ear microphone is recommended) MENU Options Telephone Connection Cable Adapter for Telephone Recording Connection Cable for External Devices Voice REC Navigation Music FM Radio Settings Exit Bookmark Recording Slide the REC switch in the direction of the arrow during phone conversations. ● Recording will start. Note - The player will take a longer time to start recording if sliding the REC switch when the player is turned off. To stop recording Slide the REC switch in the opposite direction. ● Recording will stop and a VYF file will be saved automatically. ● Voice REC : To switch to the voice REC mode. ● Navigation : To move to Navigation Mode and browse files and folders. ● Music : To switch to the music mode. ● Bookmark : To view the list of the bookmarked files. ● FM Radio : To listen to FM radio. ● Settings : To set the functions. ● Exit : To exit MENU. - Audio quality may vary depending on the phone or the speaker’s voice. Note 33 - Menu mode will be cancelled if no buttons are pressed within 20 seconds. Note 34 Playing a File Playing a File 1 2 Press the MENU button to switch to the menu mode and select Voice REC. Press the FOLDER button in the voice mode to move to a folder and press the √» button. ● The files within the selected folder will be played. A VOICE 003/003 V001. VYF SHQ ENG To Play a Specific Track Playing Voice File - If you press and hold ❙œœ , √√❙ during playback, you can move backward or forward in the file played to find the area you want. Release the button you hold to play the file in normal status. - The longer you press ❙œœ , √√❙ , the faster the searching speed gets. NOR Loop Repeating ● Use ❙œœ , √√❙ to move to the previous or next file. Playing Music File Starting Point Press the MENU button to switch to the menu mode and select Music. ● Music files will be played. ● Use ❙œœ , √√❙ to move to the previous or next file. While playing music files, press the A↔B button briefly at the beginning of the loop you want to set. Sweet box Pausing Press the Play/Pause (√») button. ● Playback will be paused. Note 35 A VOICE 003/013 V002. VYF ● A↔ appears in the display. Ending Point Press the A↔B button briefly again to set the end of the loop. ● A↔B appears in the display. The loop is played repeatedly. - Press and hold the MENU button during playback and the progress bar will be changed to the current playtime. Note - Press the A↔B button briefly to cancel the loop. - Loop Repeat is automatically released if you Speed Search with ❙œœ, √√❙. - Press and hold the A↔B button to change the playback mode. SHQ A A VOICE 003/013 V002. VYF SHQ A B 36 Using Navigation Deleting Files the MENU button to move to the menu mode and select Navigation,or 1 Press press the FOLDER button to enter Navigation mode while playing or pausing a file. 2 Select the file or folder that you want to play. ● ❙œœ: To move to a higher-level folder. ● √√❙: To move to a lower-level folder. ● , : To move to a file or folder in the same directory. ● √» : To move to the next folder down. 1 Press the MENU button during pausing to select Navigation. 2 Select a file to delete. 3 Press the DEL button. ● The selected file will be deleted and the files remaining in the folder will be automatically rearranged. A VOICE ENG You can easily search for files or switch modes using the Navigation function. File Delete Are you sure Yes No - You can delete a voice or music file during pausing by pressing the DEL button. 3 Press the √» button. Note ● The selected file will be played. - Files can also be deleted in Windows Explorer on PC. FM Navigation Navigation VOICE MUSIC RADIO - Files previously bookmarked will not be deleted. FM VOICE A B C FM A V001. VYF V002. VYF V003. VYF - Press the MENU button in the navigation mode to cancel the navigation mode. Note 37 38 Bookmark Settings FM Radio Settings You can mark a point in a track while playback. 1 Press the MENU button to move to the menu mode and select FM Radio. Setting Bookmark Press and hold the B/MARK button during playback at the point where you want to set bookmark. ● The “IB” indicator will be displayed. ENG Make sure the earphones are connected first. A VOICE 003/003 V001. VYF IB SHQ Playing from the Bookmarked Location 1 2 FM Radio NOR 2 In the FM Radio menu, use , press the √» button to select. to move to the function you want, and then Press the MENU button to move to the menu mode and select Bookmark. ● The bookmarked files will be displayed. Use , to move to the file you want to play, and then press the √» button. ● The file will be played from the bookmarked location. ● Press the DEL button at a bookmarked file to remove the bookmark. FM Radio A VOICE FM FM Radio Normal Mod Preset Mo Auto Prese FM CH... 89.1 MHz ST Bookmark Bookmark 39 [00:25] VOO [00:00] VOO [00:30] [ME - Mono and stereo are automatically selected. Note - Earphones must be connected to the player in order to listen to FM radio. 40 FM Radio Settings FM Radio Settings 1 2 Use Searching Stored Frequencies At the FM Radio menu screen, select Normal Mode. FM ❙œœ , √√❙ to move to the frequency you want. CH... ● Manual Search : Push ❙œœ , √√❙ to change the frequency up or down. ● Automatic Search : Push and hold ❙œœ , √√❙ to automatically search for receiving frequencies. ST Preset Delete 1 At the FM Radio menu screen, select Preset Mode. 2 Move to a frequency to delete. 3 Press the DEL button. Manual Storage of a Frequency ● The saved Preset number will be deleted. 1 At the FM Radio menu screen, select Normal Mode. to move to the 2 Use frequency to save, and then press Automatic Storage of a Frequency ❙œœ , √√❙ the FOLDER button. ❙œœ , √√❙ ST FM At the FM Radio menu screen, select Auto Preset. FM FM to select the number Use 3 you want to assign to save ● The selected frequency will be saved. 91.9 MHz ST Note 41 FM PRESET 2 91.9 MHz - Press the MENU button to return to the FM Radio menu screen. the frequency, and then press the FOLDER button. 1 At the FM Radio menu screen, select Preset Mode. 2 Use ❙œœ, √√❙ to move to the desired frequency. ENG Listening to FM Radio CH... PRESET 91.9 MHz 91.9 MHz ST Save? 2 ● Frequencies within the range of 87.5MHz to 108.0MHz are automatically selected and stored. ● Frequencies are automatically stored, starting from 1. SEARCH 106.1 MHz ST 9 - You can store up to 20 frequencies. Note - FM frequency search level can be configured at [Settings] ➔ [FM Search Level]. 42 Setting the Advanced Functions Timer FM REC 1 , to select Off, Once or 2 Use Every day and press the button. , to select a frequency to record 3 Use and then press the button. At the FM Radio menu screen, select Timer FM REC. √√❙ √√❙ 4 FM FM Radio Auto Prese Timer FM RE Exit FM the MENU button to move to the menu mode and select 1 Press Settings. Settings, use , to move to the function you want and press the √» 2 Atbutton to select. ENG FM Radio Settings ● To move to a previous menu, use ❙œœ or select Return. Once 89. 50 MHz TIME After setting the FM rec start time and record finish time, move to ok and then press the √» button. - The player must be Off for a Timer Recording to occur. Voice REC Set Play Mode Equalizer Play Speed Voice REC Set Play Mode Equalizer Play Speed Voice REC Set Play Mode Equalizer Play Speed Voice REC Set Play Mode Equalizer Play Speed Voice FM Region FM Search Brightness Time Voice FM Region FM Search Brightness Time Voice FM Region FM Search Brightness Time Voice FM Region FM Search Brightness Time Voice Beep Language About Exit Voice Beep Language About Exit Voice Beep Language About Exit Note FM Recording 1 Slide the REC switch in the direction of the arrow during FM reception. 2 Slide the REC switch in the opposite direction. ● Recording of the currently transmitted FM broadcast begins. ● A file is created and the Recording stops. ● Files are recorded in the order F001, F002, F003... and saved as MP3 files in RADIO folder. You can store up to 300 files. FM REC 006 F006.MP3 REC 0 : 04:19 96 Kbps 3 : 35:31 - Beeps are disabled while recording. 43 Note 44 Selecting the Play mode At Settings, select REC Set. Voice Quality Use , to select the Voice Quality. ● SP: Voice is recorded in normal sound quality. ● HQ: Voice is recorded in high sound quality. ● SHQ: Voice is recorded in the highest sound quality. Voice Voice Qual SP HQ SHQ 1 At Settings, select Play Mode. Play Mode, use , to move to a wanted mode and press the √» 2 Atbutton. Voice Play Mode Normal Repeat O Repeat F Voice Play Mode Repeat O Repeat F Repeat A ENG Record Settings Voice Play Mode Shuffle Intro Return FM Bitrate Use , to select the FM bitrate. ● FM reception is recorded in the selected bitrate. ● Available bitrates are 96Kbps, 128Kbps, 160Kbps and 192Kbps. Voice FM Bitrate 96Kbps 128Kbps 160Kbps VOR Use 45 , to select VOR On or Off. ● The VOR (Voice Operating Recording) function automatically starts recording when the sound volume is high and pauses recording when the sound volume is low. ● On: Recording automatically pauses when the input sound volume is low. ● Off: Recording continues even when the input sound volume is low. ● Normal : To play all the files in order one time. ● Repeat One : To repeat one file. ● Repeat Folder : To repeat the current folder. ● Repeat All : To repeat all files. ● Shuffle All : To play files at random. ● Intro : To listen to the first 10 seconds of all the saved files. ● Return : To move to a previous menu. Voice VOR On Off Return 46 FM Region Settings 1 At Settings, select Equalizer. 2 Use , to move to the sound mode you want and press the √» button. ● If you want bass boost, select DBB. ● Select User EQ to set the EQ as desired. Use ❙œœ , √√❙ to move to right or left and use Voice , to adjust the level. Voice Voice MP3 1 At Settings, select FM Region. 2 Use , to select FM tuner region and press the √» button. ● Korea/US : Search FM frequencies between 87.5MHz to 108.0MHz in increments of 100 kHz. ● Other Country : Search FM frequencies between 87.5MHz to 108.00MHz in increments of 50 kHz. Voice FM Region Korea/Us Other Co ENG Sound Settings User EQ Rock Normal DB Classic DB Jazz DBB Rock DBB FM Search Level Settings - Player speed is set to 0 when adjusting equalizer. Note 1 At Settings, select FM Search Level. , to select FM tuner sensitivity and press the √» 2 Use button. Play Speed Settings 1 At Settings, select Play Speed. , to move to the desired playback speed and press 2 Use the √» button. ● Selections can be made between -25% and 25% in increments of 5%. ● Normal speed is 0%. The higher the number, the faster the speed of play, and the lower the number, the slower the speed of play. Voice Play Speed ● The higher the FM tuner sensitivity, the more stations it can receive . ● High → Middle → Low Voice FM Search High Middle Low -5% - Equalizer is set to Normal when adjusting play speed. 47 Note 48 Time Settings Screen Brightness Settings Voice ● Screen brightness can be set as 0, 5, 10, 15, 20, 25 or 30. Backlight Time Use , to set the backlight time from Off to 3 minutes. ● When set to On, the Light stays on continuously. ENG 1 At Settings, select Brightness. , to move to the brightness you want and press the 2 Use √» button. Voice Time Settings At Settings, select Time. Sleep Set Time Use Use the Set Time function to set the current time. Use , to set the clock time and press the √√❙ button to 1 move to the next stage. After setting the current time, press the √» button. 2 Voice Set Time , to set the sleep time from 30, 60, 90 minutes. ● The player will automatically turn off after the time you set. ● When Sleep set to Off, the function is disabled. Voice ● The current time will be displayed. Auto Off Time Use , to set Auto Off time from 20 seconds to 5 minutes. ● If no button is pressed after play stops, the player will automatically turn off after the time you set. ● When Auto Off Time is set to Off, the function is disabled. 49 Voice 50 Beep Settings MENU Voice ● On: The unit beeps when the buttons are pressed. ● Off: The unit does not beep. Voice REC Navigation Music FM Radio Settings ENG 1 At Settings, select Beep. 2 Use , to select Beep On or Off. MENU Table Exit Normal Mode Preset Mode Auto Preset Timer FM REC. Language Settings 1 At Settings, select Language. 2 Use , to select a language for menu display. ● English → Korean → Simp.Chinese → Trad.Chinese → Russian Exit Voice Engilsh Korean Simp.Chin REC Set Play Mode Equalizer Voice Quality Normal Normal FM Bitrate Repeat One Classic Auto Off Time VOR Repeat Folder Jazz Backlight Time Return Repeat All Rock Sleep Shuffle Normal DBB Return Intro Classic DBB Return Play Speed FM Region Brightness Time Beep Language About Exit Set Time Jazz DBB Rock DBB Viewing System Information User EQ Return At Settings, select About. ● If you select About, you can check the software version information, total memory and remaining memory. 51 ● Use the button to move and select. 52 Troubleshooting ● Refer to the System Requirements The player does not work and the LCD displays nothing. The player is automatically turned off. ● In Stop mode, the power is automatically turned off (changes depending on settings). ● Check to see if there are files saved in it. ● Check the battery level. ● Check to see if the battery in inserted properly. LCD window is dark In PLAY mode, music is not played after pressing the √» button The file name is not displayed correctly. ● Check that the files saved are in file formats supported by the player. ● Check to see if the HOLD button is locked. Files cannot be downloaded. ● Check to see if the driver is installed correctly in the computer. ● Check the USB connection between the computer and the player. ● Operating system limits the number of files you can save. Please save your music files by creating a subfolder. ● Check if the memory is full. Backlight does not work. ENG The software doesn’t work Troubleshooting ● Check Brightness. ● In the menu, move to [Settings] --> [Language] and change the language settings. There is a file saved in the player, but “No File” appears in the screen. ● Check that the files saved are in file formats supported by the player. I cannot properly connect the player to the PC. ● Win98SE : Try to connect again after installing Driver. ● WinME/2000/XP: Press Start in the desktop to execute Windows Update. After selecting important update and service pack, execute update all. Try to connect it again after rebooting PC. ● Check Backlight Time. The message “Filesystem Error! Format?” appears. Player does not respond when I press the buttons. ● If you select “Yes”, memory is formatted and all saved files are deleted. ● Check setting of Hold switch. ● Check the battery level. 53 54 Model Built-in Memory capacity YV-120 128MB(YV-120 H), 256MB(YV-120 V), 512MB(YV-120 X), 1GB(YV-120 Z) Voltage Playing time Dimensions/Weight 1.5V (AAA/LR03 Battery) lasts up to 10hours (MP3 128Kbps, Earphones, Vol level 20) 94.6 X 36.4 X 16.8 / 40g Case Plastic/Aluminum Noise Ratio 80dB with 20KHz Earphones Jack Output Power 10mW/CH (16 Ω) Output Frequency Range Operating Temperature Range FM Frequency FM Signal to Noise Ratio FM T.H.D FM Useable Sensitivity File Support Specifications The product unit accompanying this user manual is licensed under certain intellectual property rights of certain third parties. This license is limited to private non-commercial use by end-user consumers for licensed contents. No rights are granted for commercial use. The license does not cover any product unit other than this product unit and the license does not extend to any unlicensed product unit or process conforming to ISO/IEC 11172-3 or ISO/IEC 13818-3 used or sold in combination with this product unit. The license only covers the use of this product unit to encode and/or decode audio files conforming to the ISO/IEC 11172-3 or ISO/IEC 13818-3. No rights are granted under this license for product features or functions that do not conform to the ISO/IEC 11172-3 or ISO/IEC 13818-3. ENG Specifications 100Hz ~ 4KHz -5 ~ +35°C(23~95°F) 87.5 ~ 108.0 MHz 45dB 1% 10dB MPEG1/2/2.5 LAYER 3(8Kbps ~ 320Kbps, 8KHz ~ 48KHz) WMA (8Kbps ~ 192Kbps, 8KHz ~ 44.1KHz), VYF, TS3 55 56