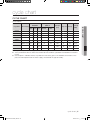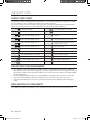
1
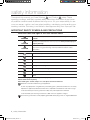
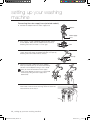
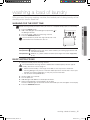
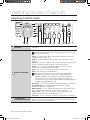
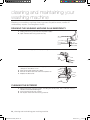
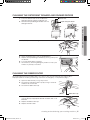
WD8122CVD WD8122CVB WD8122CVW WD8122CVC Washing Machine user manual imagine the possibilities Thank you for purchasing this Samsung product. To receive more complete service, please register your product at www.samsung.com/global/register WD8122CVD-02574E_EN.indd 1 2010-02-09 ø¿¿¸ 11:25:56 features of your new samsung washing machine Your new washing machine will change the way you feel about doing laundry. From its super-size capacity to its energy efficiency, the Samsung washing machine has all the features to turn a mundane chore into a pleasure. • Water Saving Designed to address concerns on water consumption. Less water is used per wash, while continuing to deliver a clean and effective washing performance. It has been certified from WELS(Water Efficiency Labelling and Standards) of Australia. Operates at 1200 rpm. • Diamond Drum - A More Powerful Wash Performance while Protecting your Fabric Provides a much better wash performance than normal drum washers, by using the wash board effect created by the waves of the inside drum. • Ball Balance - Enjoy the Silence! No Noise, No Vibrations Reduced vibrations and noise through the use of a Ball Balance system which maintains near perfect drum balance. • Customizable Economic Function - Water, Time and Power Saving Detects the laundry weight in 7 steps and reduces water, time and power consumption. • Air Refresh - Sterilization and Deodorization without Water! Refresh your favorite clothing simply by using air after you’ve been at a party or have gone out (food, cigarettes). Non-stained clothing no longer needs to be washed, simply refresh them using the 4 available cycles for different fabrics. • Silver Wash - Sterilization and Anti-bacteria Effect with Cold Water Only The winning combination! Samsung’s silver technology combines the sanitizing effect of silver with state-of-the-art science for the ultimate in clean. Two plates of pure silver are converted into silver ions through electrolysis. Even in cold, bleach-less water, the silver particles remove odor-causing bacteria for a “super clean” wash. So washing in cold water is energy efficient and better for your clothes. • Direct Drive Motor As the drum does not utilize belts or gears, vibrations are reduced significantly. This feature ensures that your washer machine is quieter and more durable. • Child Lock The Child Lock function ensures that curious little hands are kept out of your washing machine. This safety feature stops your children from playing with the washing machine, and alerts you when it is activated. 2_ features WD8122CVD-02574E_EN.indd 2 2010-02-09 ø¿¿¸ 11:25:58 • Delay End Delay a cycle for up to 19 hours in one-hour increments and increase the convenience of using your washing machine especially when you have to go out. • Wool Certified The machine has been tested and has passed the required Woolmark Company specifications for machine washable wool products. Fabrics should be washed according to the instructions on the garment label as specified by Woolmark and Samsung. • Digital Graphic Display The Digital Graphic Display (control panel) is clear and easy to use for minimum fuss and hassle. And while it is easy to use, the Digital Graphic Display enables you to make quick and accurate adjustments to your wash for excellent washing results. • Wide door Extra wide door aperture for convenient viewing! Easily add and remove laundry, especially for large sized laundry items such as bedding, towels etc. This manual contains important information on the installation, use, and care of your new Samsung washing machine. Refer to it for descriptions of the control panel, instructions on how to use the washing machine, and tips for making the most of its state-of-the-art features and functions. The Troubleshooting section on page 29 tells you what to do if something goes wrong with your new washing machine. features _3 WD8122CVD-02574E_EN.indd 3 2010-02-09 ø¿¿¸ 11:25:58 safety information Throughout this manual, you’ll see Warning and Caution notes. These warnings, cautions, and the important safety instructions that follow do not cover all possible conditions and situations that may occur. It’s your responsibility to use common sense, caution, and care when installing, maintaining, and operating your washing machine. Samsung is not liable for damages resulting from improper use. IMPORTANT SAFETY SYMBOLS AND PRECAUTIONS What the icons and signs in this user manual mean: WARNING Hazards or unsafe practices that may result in severe personal injury or death. CAUTION Hazards or unsafe practices that may result in minor personal injury or property damage. CAUTION To reduce the risk of fire, explosion, electric shock, or personal injury when using your washing machine, follow these basic safety precautions: Do NOT attempt. Do NOT disassemble. Do NOT touch. Follow directions explicitly. Unplug the power plug from the wall socket. Make sure the machine is grounded to prevent electric shock. Call the service center for help. Notice These warning signs are here to prevent injury to you and others. Please follow them explicitly. After reading this section, keep it in a safe place for future reference. Read all instructions before using the appliance. As with any equipment using electricity and moving parts, potential hazards exist. To safely operate this appliance, become familiar with its operation and exercise care when using it. Install and store your washing machine inside, away from exposure to weather. Install and level your washing machine on a floor that can support its weight. Your washing machine must be properly grounded. Never plug it into an ungrounded outlet. 4_ safety information WD8122CVD-02574E_EN.indd 4 2010-02-09 ø¿¿¸ 11:26:01 To reduce the risk of fire or explosion: CAUTION • Do not wash items that have been washed, soaked, or treated with gasoline, dry cleaning solvents, or other flammable or explosive substances. They give off vapors that could ignite or explode. Rinse by hand any material that has been exposed to cleaning solvent or other flammable liquids or solids before putting in your washing machine. Be sure that all traces of such liquids, solids, and fumes have been removed. Dangerous substances include acetone, denatured alcohol, gasoline, kerosene, certain liquid household cleaners and spot removers, turpentine, waxes, and wax removers. • Do not put gasoline, dry cleaning solvents, or other flammable or explosive substances into the washing machine. • Under certain conditions, hydrogen gas may be produced in a hot water system–such as your hot water heater -- that has not been used for two weeks or more. HYDROGEN GAS IS EXPLOSIVE. If your hot water system has not been used for two weeks or more, turn on all hot water taps in your home, and let the water flow for several minutes before using your washing machine. This will release any hydrogen gas build–up. Since hydrogen gas is flammable, do not smoke or light an open flame during this time. Ventilate immediately without touching the power plug if there is a gas leak. Unplug the power cord before servicing your washing machine. Before each wash, empty the pockets of your laundry. Small, irregularly shaped hard objects, such as coins, knives, pins, and paperclips could damage your washing machine. Do not wash clothing with large buckles, buttons, or other heavy metal metal. Do not open the door of the washing machine if you can still see water. Check that the water has drained before opening the door. Do not repair, replace, or service any part of your washing machine yourself unless you fully understand the recommended user–repair instructions and have the skills to carry them out. Work done by an unauthorized person may void your warranty. Connect the washing machine to the water mains using the new set of hoses. Do not reuse the old set of hoses. Water inlet hoses deteriorate over time. Check the hoses periodically for bulges, kinks, cuts, wear, and leaks, and replace them as needed and at least every five years. All packaging and shipping bolts must be removed before the appliance is used. Serious damage may occur if they are not removed. See page 12 “Removing the shipping bolts”. Before washing clothes for the first time, you must run a complete cycle without clothes. See “Washing for the first time”. If this appliance is supplied from a cord extension set or electrical portable outlet device, the cord extension set or electrical portable outlet device must be positioned so that it is not subject to splashing or ingress of moisture. safety information _5 WD8122CVD-02574E_EN.indd 5 2010-02-09 ø¿¿¸ 11:26:01 safety information The appliance is designed for home use only. WARNING Make sure that water and electrical connections are made by qualified technicians, observing the user manual (see “Installing your washing machine”) and local safety regulations. Before cleaning or carrying out maintenance, unplug the appliance from the electrical outlet. Always unplug the appliance and turn off the water after use. Make sure that the pockets of all clothing to be washed are empty. Hard, sharp objects, such as coins, safety pins, nails, screws, or stones can cause extensive damage to the appliance. Never allow pets and children to play on or in the appliance. It may cause injury or suffocate them. The glass door becomes very hot during the washing cycle. Never touch on the glass door while it is in use. Do not attempt to repair the appliance yourself. Repairs made by inexperienced or unqualified persons may cause injury and/or make more serious repairs to the appliance necessary. If the plug (power supply cord) is damaged, it must be replaced by the manufacturer or its service agent or a similarly qualified person in order to avoid a hazard. This appliance should only be serviced by our authorized service center, and only rated spare parts should be used. WARNING Do not let children (or pets) play on or in your washing machine. The washing machine door does not open easily from the inside, and children may be seriously injured if trapped inside. This appliance is not intended for use by persons (including children) with reduced physical, sensory or mental capabilities, or lack of experience and knowledge, unless they have been given supervision or instruction concerning use of the appliance by a person responsible for their safety. Children should be supervised to ensure that they do not play with the appliance. To use this appliance safely, the user should become familiar with the instructions for operation of the appliance and always take extra care when using it. This appliance should be positioned to be accessible to the power plug, the water supply tabs and the drain pipes. Packing materials can be dangerous to children; keep all packing material (plastic bags, WARNING polystyrene, etc.) well out of the reach of children. Do not use processed water containing oil, cream or lotion, which is usually found in skincare shops or massage clinics. • Otherwise this will cause the packing to be deformed, which causes a malfunction or water leak. A stainless washing tub does not usually rust. However if some metal such as a hair pin is left in the tub for an extended time, the tub could rust. • Do not leave water or bleach containing chlorine in the tub for an extended period of time. • Do not regularly use or leave water containing iron in the tub for an extended period of time. If rust starts appearing on the surface of the tub, apply a cleansing agent (neutral) to the surface and use a sponge or soft cloth to clean it. (Under no circumstances use a metal brush) For washing machines with ventilation openings in the base, ensure that the opening is not obstructed by carpet or any other obstacles. Use the new hose-sets and old hose-sets should not be reused. 6_ safety information WD8122CVD-02574E_EN.indd 6 2010-02-09 ø¿¿¸ 11:26:01 To minimize the risk of fire in a tumble dryer, the following should be observed: Items that have been spotted or soaked with vegetable or cooking oil constitute a fire hazard and sh ould not be placed in a tumble dryer. Oil-affected items can ignite spontaneously, especially when exposed to heat sources such as in a tumble dryer. The items become warm, causing an oxidation reaction in the oil. Oxidation creates heat. If the heat cannot escape, the items can become hot enough to catch fire. Piling, stacking or storing oil-affected items can prevent heat from escaping and so create a fire hazard. If it is unavoidable that fabrics that contain vegetable or cooking oil or have been contaminated by hair care products be placed in a tumble dryer they should first be washed in hot water with extra detergent – this will reduce, but not eliminate, the hazard. The ‘cool down’ cycle of tumble dryers should be used to reduce the temperature of the items. They should not be removed from the tumble dryer or piled or stacked while hot. Items that have been previously cleaned in, washed in, soaked in or spotted with petrol/ gasoline, dry-cleaning solvents or other flammable or explosive substances should not be placed in a tumble dryer. Highly flammable substances commonly used in domestic environments include acetone, denatured alcohol, petrol/gasoline, kerosene, spot removers(some brands), turpentine, waxes and wax removers. Items containing foam rubber(also known as latex foam) or similarly textured rubber. Like materials should not be dried in a tumble dryer on a heat setting. Foam rubber materials can, when heated, produce fire by spontaneous combustion. Fabric softeners or similar products should not be used in a tumble dryer to eliminate the effects of static electricity unless this practice is specifically recommended by the manufacturer of the fabric softener or product. Undergarments that contain metal reinforcements should not be placed in a tumble dryer. Damage to the tumble dryer can result if metal reinforcements come loose during drying. When available a drying rack could be used for such items. Plastic articles such as shower caps or babies’ waterproof napkin covers should not be placed in a tumble dryer. Rubber-backed articles, clothes fitted with foam rubber pads, pillows, galoshes and rubbercoated tennis shoes should not be placed in a tumble dryer. CAUTION Do not dry unwashed items in the tumble dryer(or washing machine drying mode,etc). Items that have been soiled with substances such as cooking oil, acetone, alcohol, petrol, Kerosene, spot removers, turpentine, waxes and wax removers should be washed in hot water with an extra amount of detergent before being dried in the tumble dryer. Items such as foam rubber(latex foam), shower caps, waterproof textiles, rubber backed articles and clothes or pillows fitted with foam rubber pads should not be dried in the tumble dryer. Fabric softeners, or similar products, should be used as specified by the fabric softener instructions. The final part of a tumble dryer cycle occurs without heat(cool down cycle) to ensure that the items are left at a temperature that ensures that the items will not be damaged. Oil-affected items can ignite spontaneously, especially when exposed to heat sources such as in a tumble dryer. The items become warm, causing an oxidation reaction in the oil. Oxidation creates heat. If the heat cannot escape, the items can become hot enough to catch fire. Piling, stacking or storing oil-affected items can prevent heat from escaping and so create a fir hazard. If it is unavoidable that fabrics that contain vegetable or cooking oil or have been contaminated by hare care products be placed in a tumble dryer they should first be washed in hot water with extra detergent - this will reduce, but not eliminate, the hazard. WARNING Never stop a tumble dryer before the end of the drying cycle unless all items are quickly removed and spread out so that the heat is dissipated. safety information _7 WD8122CVD-02574E_EN.indd 7 2010-02-09 ø¿¿¸ 11:26:02 contents SETTING UP YOUR WASHING MACHINE 9 10 10 10 11 11 11 11 11 16 Checking the parts and the control panel Meeting installation requirements Electrical supply and grounding Water Supply Drain Flooring Surrounding temperature Alcove or closet installation Installing your washing machine Environment WASHING A LOAD OF LAUNDRY 17 17 18 20 20 20 21 22 23 25 25 25 Washing for the first time Basic instructions Using the control panel Child lock Delay end Stop&Add Air Refresh Washing clothes using cycle selector Washing clothes manually Detergent and additives information Which detergent to use Detergent drawer CLEANING AND MAINTAINING YOUR WASHING MACHINE 26 27 28 28 28 Draining the washing machine in an emergency Cleaning the exterior Cleaning the detergent drawer and drawer recess Cleaning the debris filter Cleaning the water hose mesh filter Repairing a frozen washing machine Storing your washing machine TROUBLESHOOTING AND INFORMATION CODES 29 30 Check these points if your washing machine... Information codes CYCLE CHART 31 Cycle chart APPENDIX 32 32 32 33 Fabric care chart Protecting the environment Declaration of conformity Specifications 9 17 26 29 31 32 26 27 8_ contents WD8122CVD-02574E_EN.indd 8 2010-02-09 ø¿¿¸ 11:26:02 setting up your washing machine CHECKING THE PARTS AND THE CONTROL PANEL Carefully unpack your washing machine, and make sure you’ve received all of the parts shown below. If your washing machine was damaged during shipping, or if you do not have all of the parts, contact Samsung Customer Service or your Samsung dealer. 01 SETTING UP Be sure to have your installer follow these instructions closely so that your new washing machine works properly and so that you’re not at risk of injury when doing laundry. Option Work top Detergent drawer Control panel Plug Door Drain hose Adjustable feet Debris filter Emergency drain tube Filter Cover (use for the lower bolt hole) Spanner Bolt hole covers Water supply hose Hose guide Drain hose User manual setting up your new washing machine _9 WD8122CVD-02574E_EN.indd 9 2010-02-09 ø¿¿¸ 11:26:04 setting up your washing machine MEETING INSTALLATION REQUIREMENTS Electrical supply and grounding To prevent unnecessary risk of fire, electrical shock, or personal injury, all wiring and grounding must be done in accordance with the National Electrical Code ANSI/FNPA, No. 70 Latest Revision and local codes and ordinances. It is the personal responsibility of the appliance owner to provide adequate electrical service for this appliance. Never use an extension cord. Use only the power cord that comes with your washing machine. When preparing for installation, ensure that your power supply offers: • 220V~240V 50Hz 15 AMP fuse or circuit breaker • Individual branch circuit serving only your washing machine Your washing machine must be grounded. If your washing machine malfunctions or breaks down, grounding will reduce the risk of electric shock by providing a path of least resistance for the electric current. Your washing machine comes with a power cord having a three-prong grounding plug for use in a properly installed and grounded outlet. Never connect the ground wire to plastic plumbing lines, gas lines, or hot water pipes. Improperly connecting the equipment-grounding conductor can result electrical shock. Check with a qualified electrician or serviceman if you are unsure if the washing machine is properly grounded. Do not modify the plug provided with the washing machine. If it does not fit the outlet, have a proper outlet installed by a qualified electrician. Water Supply Your washing machine will fill properly when your water pressure is 50 kPa ~ 800 kPa. Water pressure less than 50 kPa may cause water valve failure, not allowing the water valve to shut off completely. Or, it may take the washing machine longer to fill than what the controls allow, resulting in your washing machine turning off. (A fill-time limit, designed to prevent overflows/ flooding if an internal hose becomes loose, is built into the controls.) The water taps must be within 4 feet (122cm) of the back of your washing machine for the provided inlet hoses provided to reach your washing machine. Most plumbing supply stores sell inlet hoses of various lengths up to 10 feet (305 cm) long. You can reduce the risk of leaks and water damage by: • Making water taps easily accessible. • Turning off taps when the washing machine is not in use. • Periodically checking for leaks at water inlet hose fittings. WARNING Before using your washing machine for the first time, check all connections at the water valve and taps for leaks. 10_ setting up your new washing machine WD8122CVD-02574E_EN.indd 10 2010-02-09 ø¿¿¸ 11:26:05 Drain Samsung recommends a standpipe height of 18 in (46 cm). The drain hose must be routed through the drain hose clip to the standpipe. The standpipe must be large enough to accept the outside diameter of the drain hose. The drain hose is attached at the factory. For best performance, your washing machine must be installed on a solidly constructed floor. Wood floors may need to be reinforced to minimize vibration and/or unbalanced loads. Carpeting and soft tile surfaces are contributing factors to vibrations and the tendency for your washing machine to move slightly during the spin cycle. Never install your washing machine on a platform or poorly supported structure. 01 SETTING UP Flooring Surrounding temperature Do not install your washing machine in areas where water may freeze, since your washing machine always retains some water in its water valve, pump, and hose areas. Frozen water in the lines can cause damage to belts, the pump, and other components. Alcove or closet installation To operate safely and properly, your new washing machine requires minimum clearances of: Sides – 25 mm Rear – 51 mm Top – 25 mm Front – 465 mm If both the washing machine and a dryer are installed together, the front of the alcove or closet must have at least 465 mm unobstructed air opening. Your washing machine alone does not require a specific air opening. INSTALLING YOUR WASHING MACHINE STEP 1 Selecting a location Before you install the washing machine, make sure the location: • • • • • • Has a hard, level surface without carpeting or flooring that may obstruct ventilation Is away from direct sunlight Has adequate ventilation Will not be freezing (below 32 ˚F or 0 ˚C) Is away from heat sources such as oil or gas Has enough space so that the washing machine doesn’t stand on its power cord setting up your new washing machine _11 WD8122CVD-02574E_EN.indd 11 2010-02-09 ø¿¿¸ 11:26:05 setting up your washing machine STEP 2 Removing the shipping bolts Before installing the washing machine, you must remove the five shipping bolts from the back of the unit. 1. Loosen all the bolts with the supplied wrench. Option 2. Hold the bolt with the spanner and pull it through the wide section of the hole. Repeat for each bolt. 3. Fill the holes with the supplied plastic covers. 4. Store the shipping bolts away safely in case you have to move the washing machine in the future. WARNING Packaging materials can be dangerous to children; keep all packaging material (plastic bags, polystyrene, etc.) well out of the reach of children. 12_ setting up your new washing machine WD8122CVD-02574E_EN.indd 12 2010-02-09 ø¿¿¸ 11:26:07 STEP 3 Adjusting the levelling feet When installing your washing machine, ensure that the power plug, the water supply and the drain are easily accessible. 01 SETTING UP 1. Slide the washing machine into position. 2. Level your washer by turning the adjustable nut, as shown in the figure. Locking nut Adjustable nut 3. When your washing machine is level, tighten the locking nut using the (-) screwdriver. STEP 4 Connecting the water and drain Connecting the water supply hose 1. Take the L-shaped arm fitting for the cold water supply hose and connect it to the cold water supply intake on the back of the machine. Tighten by hand. Option The water supply hose must be connected to the washing machine at one end and to the water tap at the other. Do not stretch the water supply hose. If the hose is too short, replace the hose with a longer, high pressure hose. 2. Connect the other end of the cold water supply hose to your sink’s cold water tap and tighten it by hand. If necessary, you can reposition the water supply hose at the washing machine end by loosening the fitting, rotating the hose, and retightening the fitting. For selected models with an additional hot water intake: 1. Take the red L-shaped arm fitting for the hot water supply hose and connect it to the hot water supply intake on the back of the machine. Tighten by hand. 2. Connect the other end of the hot water supply hose to your sink’s hot water tap and tighten it by hand. 3. Use a Y-piece if you only want to use cold water. setting up your new washing machine _13 WD8122CVD-02574E_EN.indd 13 2010-02-09 ø¿¿¸ 11:26:09 setting up your washing machine Connecting the water supply hose (selected models) 1. Remove the adaptor from the water supply hose. Adaptor Water supply hose 2. First, using a ‘+’ type screwdriver, loosen the four screws on the adaptor. Next, take the adaptor and turn part (2) following the arrow until there is a 5 mm gap. 1 5 mm 2 3. Connect the adaptor to the water tap by tightening the screws firmly while lifting the adaptor upwards. Turn part (2) following the arrow and connect (1) and (2). Water tap 1 2 4. Connect the water supply hose to the adaptor. When you release part (3), the hose automatically connects to the adaptor making a ‘click’ sound. After you have connected the water supply hose to the adaptor, ensure that it is connected correctly by pulling the water supply hose downwards. 5. Connect the other end of the water supply hose to the inlet water valve at the rear of the washing machine. Screw the hose clockwise all the way in. 3 Option 14_ setting up your new washing machine WD8122CVD-02574E_EN.indd 14 2010-02-09 ø¿¿¸ 11:26:11 6. Turn on the water supply and ensure that no water leaks from the water valve, tap or adaptor. If there is a water leaks, repeat the previous steps. • ✗ ✗ 01 SETTING UP WARNING Do not use your washing machine if there is a water leak. This may cause electrical shock or injury. If the water tap has a screw type tap, connect the water supply hose to the tap as shown. Use the most conventional type of tap for the water supply. In case the tap is square or too big, remove the spacing ring before inserting the tap into the adaptor. setting up your new washing machine _15 WD8122CVD-02574E_EN.indd 15 2010-02-09 ø¿¿¸ 11:26:13 setting up your washing machine Connecting the drain hose The end of the drain hose can be positioned in three ways: 1. Over the edge of a wash basin: The drain hose must be placed at a height of between 60 and 90 cm. To keep the drain hose spout bent, use the supplied plastic hose guide. Secure the guide to the wall with a hook or to the tap with a piece of string to prevent the drain hose from moving. 60 ~ 90 cm Drain hose Hose guide 2. ln a sink drain pipe branch: The drain pipe branch must be above the sink siphon so that the end of the hose is at least 60 cm above the ground. 3. ln a drain pipe: We recommend using a 65 cm high vertical pipe; it must be no shorter than 60 cm and no longer than 90 cm. STEP 5 Powering your washing machine Plug the power cord into a wall sockets, a 230 volt 50 Hz approved electrical outlet protected by a 15-amp fuse or comparable circuit breaker. (For more information on electrical and grounding requirements, see page 10.) ENVIRONMENT Please dispose of the packaging materials for this product in an “environmentally friendly” manner. For further detail, please contact your local area authority. 16_ setting up your new washing machine WD8122CVD-02574E_EN.indd 16 2010-02-09 ø¿¿¸ 11:26:15 washing a load of laundry With your new Samsung washing machine, the hardest part of doing laundry will be deciding which load to wash first. WASHING FOR THE FIRST TIME 1. Press the Power button. 2. Add a little detergent to the detergent compartment the detergent drawer. 3. Turn on the water supply to the washing machine. 4. Press the Start/Pause button. in This will remove any water that might be left over in the machine from the manufacturer’s test run. Compartment Compartment Compartment : Detergent for prewash, or starch. : Detergent for the main wash, water softener, pre-soaking agent, bleach and stain removal product. : Additives, e.g. fabric softener or former (fill no higher than lower edge (MAX) of “A”) 02 WASHING A LOAD OF LAUNDRY Before washing laundry for the first time, you must run a complete empty cycle (i.e. no laundry). BASIC INSTRUCTIONS 1. Load your laundry into the washing machine. WARNING Do not overload the washing machine. To determine the load capacity for each type of laundry, refer to the chart on page 24. • Make sure that laundry is not caught in the door, as this may cause a water leak. • Washing detergent may remain in the front rubber part of the washer after a wash cycle. Remove any remaining detergent, as they may cause a water leak. • Do not wash water-proofed items. 2. 3. 4. 5. Close the door until it latches. Turn the power on. Add detergent and additives to the dispenser drawer. Select the appropriate cycle and options for the load. The Wash Indicator light will illuminate and the estimated cycle time will appear in the display. 6. Press the Start/Pause button. washing a load of laundry _17 WD8122CVD-02574E_EN.indd 17 2010-02-09 ø¿¿¸ 11:26:18 washing a load of laundry USING THE CONTROL PANEL 1 1 2 DIGITAL GRAPHIC DISPLAY 3 4 1 5 6 7 8 9 10 11 12 Displays the remaining wash cycle time, all cycle information, and error messages. Select the tumble pattern and spinning speed for the cycle. For detailed information, refer to “Washing clothes using the cycle selector (see page 22)”. 2 CYCLE SELECTOR Cotton - For averagely or lightly soiled cottons, bed linen, table linen, underwear, towels, shirts, etc. Blanket - Cotton bedding, bed linen, bed sheet, duvet cover, pillow cover etc. Quick - This course is used for small amounts of laundry, relatively clean laundry, or frequently used laundry in a short period of time. Delicate - This course is used to wash delicate clothing, such as lingerie, that is easily deformed or damaged. Towel - This course is useful for washing towels effectively. Wool - Only for machine-washable wool. The wool wash cycle of this machine has been approved by Woolmark for the washing of machine-washable Woolmark products provided that the products are washed according to the instructions on the garment label and those issued by the manufacturer of this washing machine, M0509 (Certificate Number issued by IWS NOM INEE Co., Ltd.) Air Refresh - This course is useful for removing bad odors. Turning the Cycle Selector cycles through the following operating modes. Knit/Coat → Bedding → Allergy Free Water Saving - This is a specially designed course that enables you to wash laundry effectively with the minimum amount of water. Rinse + Spin - This is useful for laundry that only needs rinsing for adding fabric softener that is added during a rinse. Clean Tub - Use this function to maintain wash tub clean and sanitary. 3 SILVER WASH SELECTION BUTTON Silver Wash water is supplied during the wash cycle as well as during the last rinse cycle, removing bacteria as well as giving protection from bacterial growth for up to one month. 18_ washing a load of laundry WD8122CVD-02574E_EN.indd 18 2010-02-09 ø¿¿¸ 11:26:19 Press this button repeatedly to cycle through the available Delay End options (max 19 hours in one hour increments). The hour displayed indicates the time when the wash cycle will be finished. 5 TEMPERATURE SELECTION BUTTON Press this button repeatedly to cycle through the available water temperature options: (Cold Water , 30 ˚C, 40 ˚C, 60 ˚C, 75 ˚C and 95 ˚C). 6 RINSE SELECTION BUTTON Press this button to add additional rinse cycles. The maximum number of rinse cycles is five. 7 SPIN SELECTION BUTTON Press the button repeatedly to cycle through the available speeds for the spin cycle. “No spin ” - The laundry remains in the drum and no spin cycle is performed after the final drain. 8 DRY SELECTION BUTTON Pressing the button cycles through the following options. Normal → Extra → Iron → Light → Time (30min → 1:00min → 1:30min → 2:00min → 2:30min) “Normal ” - Select to dry laundry automatically by detecting the amount and weight of the laundry. Select this to dry cotton clothing such as cotton trousers, T-shirts, and cotton underwear. “Extra ” - Select this to dry cotton clothing completely. (Thick clothes such as blue jeans, towels, sports clothes, etc.) “Iron ” - Finishes the dry cycle in a moist state appropriate for Ironing. “Light ” - Dry clothing which may become deformed at high temperatures at a low temperature. (Mixed fabrics and synthetic fibers such as polyester and nylon.) “Time ” - Dry the laundry for the specified period of time. 02 WASHING A LOAD OF LAUNDRY 4 DELAY END SELECTION BUTTON • You must avoid washing laundry that may not be dried as it may be deformed even at low temperatures. • The Normal, Extra, Iron and Light Dry options detect the weight of the laundry in order to display an accurate drying time and dry them more completely. • The drying conditions may differ depending on the type and the amount of laundry. 9 STOP&ADD SELECTION BUTTON Select this to add the laundry amid the process (See “Stop&Add” on page 20). 10 PREWASH SELECTION BUTTON Press this button to select pre-wash. Pre-wash means a preliminary wash that is performed for 10 minutes before the main wash. Pre-wash is effective for highly soiled laundry. Pre-wash is only available for: Cottons, Blanket and Towel. 11 START/PAUSE SELECTION BUTTON Press to pause and restart a cycle. POWER BUTTON Press it once to turn your washing machine on, press it again to turn your washing machine off. If the washing machine is left on for more than 10 minutes without any buttons being touched, the power automatically turns off. 12 washing a load of laundry _19 WD8122CVD-02574E_EN.indd 19 2010-02-09 ø¿¿¸ 11:26:24 washing a load of laundry Child lock The Child Lock function allows you to lock the buttons so that the wash cycle you’ve chosen can’t be changed. Activating/Deactivating If you want to activate or deactivate the Child Lock function, press the Temp. and Rinse buttons at the same time for 3 seconds. “Child Lock ” will be lit when this feature is activated. When the Child Lock function is activated, only the Power button works. The Child Lock function remains on even after the power is turned on and off or after the disconnecting and reconnecting the power cord. 3 SEC. Delay end You can set the washing machine to finish your wash automatically at a later time, choosing a delay of max 19 hours (in 1 hour increments). The hour displayed indicates the time at which the wash will be finished. 1. Manually or automatically set your washing machine according to the type of laundry you are washing. 2. Press the Delay End button repeatedly until the delay time is set. 3. Press the Start/Pause button. The “Delay End” indicator will be lit, and the clock will begin counting down until it reaches the set time. 4. To cancel a Delay End function, press the Power button and then turn the washing machine on again. Stop&Add When the washing machine is working, the door is locked, and the “Stop&Add” lamp is off, you will not be able to add laundry. You can only add laundry when the Stop&Add lamp is illuminated. 1. Press the Stop&Add button. The washing machine will automatically pause. 2. Wait about 30 seconds and check the state of “Stop&Add” lamp. • Blinking: The water in the washing machine is drained down to the safety level for the additional laundry to be added. • Off: Adding laundry is possible. 3. Add the laundry. 4. Press the Start/Pause button. • Avoid adding laundry when the machine has foamed up or is filled with water. Otherwise, the foam or water may leak from the door. Check before opening the door. • We recommend that you select the Stop&Add function 5 minutes before a cycle is performed. • If the internal temperature is higher than 55 ˚C during the wash cycle or 70 ˚C during the drying cycle, the Stop&Add function cannot be selected. • Do not open the door by force as it may result in injury or damage the washer. WARNING 20_ washing a load of laundry WD8122CVD-02574E_EN.indd 20 2010-02-09 ø¿¿¸ 11:26:26 Air Refresh MODE CYCLE TIME Knit/Coat 26 min Bedding 40 min Allergy Free 1:18 min Allergy Free: Select this program to sterilize your laundry, for example against ticks. Since the temperature rises above 90 ˚C, clothes susceptable to heat may be deformed or damaged. • Bedding: This program includes cotton bedding. However, nylon laundry may become deformed or damaged. • You may experience heat when touching laundry after the Air Refresh course is complete. (Average 40 ˚C ~ 48 ˚C) • When one of these options has been selected, no other button can be selected and you can only select a maximum delay end time of 19 hours. 4. Close the door and press the Start/Pause button. • 02 WASHING A LOAD OF LAUNDRY Air Refresh can refresh laundry without using water owing to its powerful airing system. Clothing that can be refreshed includes woolen coats, cotton or down jumpers, sweaters and suits. (Two items or less (less then 1 kg)) 1. Open the door, place the laundry into the washer and close the door. 2. Press the Power button. 3. Select Air Refresh by turning the Cycle Selector. • Turn the Cycle Selector to cycle through the following programs: Knit, Coat, Bedding, Allergy Free, ... • When there is water in the tub, Air Refresh cannot be selected. Drain the water and select Air Refresh. • Press the Start/Pause or Power button to remove the laundry. • Fragrance or dryer sheets can be used with Air Refresh programs to add fragrance to your refreshed laundry (one sheet per one or two items). Avoid Air Refreshing the following clothes: • Sensitive clothes made of leather, mink, fur, silk, etc. • Underwear trimmed with lace, ‘glued’ doll cushions, and dress suits may have their decorations loosened. • Clothes trimmed with buttons can cause them to break. • Starchy clothes can become deformed. Avoid using the following clothes for the Allergy Free program: • Hard bedding such as a wooden pillows (neck-rest) - Pillows or blankets filled with plastic or starch rather than cotton - Electric blankets • Furry blankets • Bulky blankets washing a load of laundry _21 WD8122CVD-02574E_EN.indd 21 2010-02-09 ø¿¿¸ 11:26:28 washing a load of laundry Washing clothes using cycle selector Your new washing machine makes washing clothes easy, using Samsung’s “Fuzzy Control” automatic control system. When you select a wash program, the machine will set the correct temperature, washing time, and washing speed. 1. 2. 3. 4. 5. 6. Turn on your sink’s water tap. Press the Power button. Open the door. Load the articles one at a time loosely into the drum, without overfilling it. Close the door. Add detergent, softener, and pre-wash detergent (if necessary) into the appropriate compartments. Pre-wash is only available when selecting the Cottons, Towel, and Blanket cycles. It is only necessary if your clothing is heavily soiled. 7. Use the Cycle Selector to select the appropriate cycle according to the type of material: Cottons, Blanket, Quick, Delicate, Towel, Wool, Water Saving, Rinse+Spin, Clean Tub. The relevant indicators will illuminate on the control panel. 8. At this time, you can control the wash temperature, the amount of rinses, the spinning speed, and the delay time by pressing the appropriate option button. 9. Press the Start/Pause button and the wash will begin. The process indicator will light up and the remaining time for the cycle will appear in the display. Pause Option Within 5 minutes of starting a wash, it is possible to add/remove laundry items. 1. Press the Start/Pause button to unlock the door. The door cannot be opened when the water is too HOT or the water level is too HIGH. 2. After closing the door, press the Start/Pause button to restart the wash. When the cycle is finished: After the total cycle has finished, the power will turn off automatically. 1. Open the door. 2. Remove laundry. 22_ washing a load of laundry WD8122CVD-02574E_EN.indd 22 2010-02-09 ø¿¿¸ 11:26:28 Washing clothes manually 02 WASHING A LOAD OF LAUNDRY You can wash clothes manually without using the Cycle Selector. 1. Turn the water supply on. 2. Press the Power button on the washing machine. 3. Open the door. 4. Load the articles loosely into the drum one at a time, without overfilling it. 5. Close the door. 6. Add detergent and, if necessary, softener or prewash detergent, into the appropriate compartments. 7. Press the Temp. button to select the temperature. (Cold water, 30 ˚C, 40 ˚C, 60 ˚C, 75 ˚C, 95 ˚C) 8. Press the Rinse button to select the required number of rinse cycles. The maximum number of rinse cycles is five. The wash duration is increased accordingly. 9. Press the Spin button to select the spin speed. The rinse hold function allows you to remove items that are still wet from the washing machine. ( : Rinse hold, : No spin) 10. Press the Delay End button repeatedly to cycle through the available Delay End options (max 19 hours in one hour increments). The hour displayed indicates the time at which the wash will be finished. 11. Press the Start/Pause button and the machine will begin the cycle. washing a load of laundry _23 WD8122CVD-02574E_EN.indd 23 2010-02-09 ø¿¿¸ 11:26:29 washing a load of laundry LAUNDRY GUIDELINES Follow these simple guidelines for the cleanest laundry and the most efficient wash. Always check the Care label on clothing before washing. Sort and wash your laundry according to the following criteria: • Care Label: Sort laundry into cottons, mixed fibres, synthetics, silks, wools and rayons. • Colour: Divide whites and colours. Wash new colour items separately. • Size: Placing items of different sizes in the same load will improve the wash action. • Sensitivity: Wash delicate items separately, using the Wool cycle for pure, new woollen items, curtains and silk articles. Check the labels on the items you are washing or refer to the fabric care chart in the appendix. Emptying pockets Before each wash, empty all the pockets of your laundry. Small, irregularly shaped hard objects, such as coins, knives, pins, and paperclips could damage your washing machine. Do not wash clothing with large buckles, buttons, or other heavy metal objects. Metal on clothing may damage your clothing as well as the tub. Turn clothing with buttons and embroidered clothes inside out before washing them. If zips of pants and jackets are open while washing, the spin basket may be damaged. Zips should be closed and fixed with a string before washing. Clothing with long strings may become entangled with other clothes damaging them. Be sure to fix the strings before starting the wash. Prewashing cotton Your new washing machine, combined with modern detergents, will give perfect washing results, thus saving energy, time, water and detergent. However, if your cotton is particularly dirty, prewash with a protein-based detergent. Determining the load capacity Do not overload the washing machine or your laundry may not wash properly. Use the chart below to determine the load capacity for the type of laundry you are washing. Fabric Type Load Capacity Model WD8122CVC/ WD8122CVD/ WD8122CVB/ WD8122CVW Cotton 10.0 kg Delicate 3.0 kg Towel / Quick 5.0 kg Blanket 1 sheet [Within 3 kg] Wool 4.0 kg Dry 6.0 kg When the laundry is unbalanced (“UE” lights up on the display), redistribute the load. 24_ washing a load of laundry WD8122CVD-02574E_EN.indd 24 2010-02-09 ø¿¿¸ 11:26:30 DETERGENT AND ADDITIVES INFORMATION Which detergent to use Do not use detergent that has hardended or solidified as the detergent may remain in the rinse cycle. It may cause your washing machine to not rinse properly or result in the overflow becoming blocked. Detergent drawer Your washing machine has separate compartments for dispensing detergent and fabric softener. Add all laundry additives to the correct compartment before starting your washing machine. Do NOT open the detergent drawer when your washing machine is running. 1. Pull out the detergent drawer on the left side of the control panel. 2. Add the recommended amount of laundry detergent directly into the detergent compartment before starting your washing machine. 3. Add the recommended amount of fabric softener into the softener compartment if required. 4. When using the Prewash option, add the recommended amount of laundry detergent into the prewash compartment . 02 WASHING A LOAD OF LAUNDRY The type of detergent you should use is based on the type of fabric (cotton, synthetic, delicate items, wool), colour, wash temperature, and degree of soiling. Always use “low suds” laundry detergent, which is designed for automatic washing machines. Follow the detergent manufacturer’s recommendations based on the weight of the laundry, the degree of soiling, and the hardness of the water in your area. If you do not know how hard your water is, enquire at your local water authority. When washing large items do NOT use the following detergent types. • Tablet and capsule type detergents • Detergents using a ball and net Concentrated or thick fabric softener and conditioner must be diluted with a little water before being poured into the dispenser (prevents the overflow from becoming blocked.) MAX washing a load of laundry _25 WD8122CVD-02574E_EN.indd 25 2010-02-09 ø¿¿¸ 11:26:31 cleaning and maintaining your washing machine Keeping your washing machine clean improves its performance, wards off unnecessary repairs, and lengthens its life. DRAINING THE WASHING MACHINE IN AN EMERGENCY 1. Unplug the washing machine from the power supply. 2. Open the filter cover using a coin or a key. Filter cover 3. Unscrew the emergency drain cap by turning it to the left. Emergency drain cap 4. Hold the cap on the end of the emergency drain tube and slowly pull it out about 15 cm. 5. Allow all the water to flow into a bowl. 6. Reinsert the drain tube and screw the cap back on. 7. Replace the filter-cover. Emergency drain tube CLEANING THE EXTERIOR 1. Wipe the washing machine surfaces, including the control panel, with a soft cloth using a nonabrasive household detergent. 2. Use a soft cloth to dry the surfaces. 3. Do not pour water onto the washing machine. 26_ cleaning and maintaining your washing machine WD8122CVD-02574E_EN.indd 26 2010-02-09 ø¿¿¸ 11:26:32 CLEANING THE DETERGENT DRAWER AND DRAWER RECESS 1. Press the release lever on the inside of the detergent drawer and pull the drawer out. 2. Remove the liquid detergent divider from the detergent drawer. Release lever Liquid detergent divider 03 CLEANING AND MAINTAINING 3. Wash all parts under running water. 4. Clean the drawer recess with an old toothbrush. 5. Replace the liquid detergent divider by pushing it firmly into the drawer. 6. Push the drawer back into place. 7. To remove any remaining detergent, perform a rinse cycle without any laundry in the drum. CLEANING THE DEBRIS FILTER We recommend cleaning the debris filter 5 or 6 times a year, or when the error message of “5E” is displayed. (Refer to “Draining the washing machine in an emergency” in the previous page.) 1. Open the filter cover by using a key or coin. 2. Unscrew the emergency drain cap by turning it to the left and drain off all the water. 3. Unscrew the debris filter cap. Debris filter cap 4. Wash any dirt or other material from the debris filter. Make sure the drain pump propeller behind the debris filter is not blocked. 5. Replace the debris filter cap. 6. Replace the filter cover. cleaning and maintaining your washing machine _27 WD8122CVD-02574E_EN.indd 27 2010-02-09 ø¿¿¸ 11:26:34 cleaning and maintaining your washing machine CLEANING THE WATER HOSE MESH FILTER You should clean the water hose mesh filter at least once a year, or when the error message of “4E” is displayed: 1. Turn off the water supply to the washing machine. 2. Unscrew the hose from the back of the washing machine. To prevent water from gushing out due to the air pressure in the hose, cover the hose with a cloth. 3. Gently pull out the mesh filter from the end of the hose using a pair of pliers and rinse it under water until clean. Also clean inside and outside the threaded connector. 4. Push the filter back into place. 5. Screw the hose back onto the washing machine. 6. Make sure the connections are watertight and turn on the tap. REPAIRING A FROZEN WASHING MACHINE If the temperature drops below freezing and your washing machine is frozen: 1. 2. 3. 4. 5. Unplug the washing machine. Pour warm water over the tap to loosen the water supply hose. Remove the water supply hose and soak it in warm water. Pour warm water into the washing machine drum and let it sit for 10 minutes. Reconnect the water supply hose to the water tap and check if the water supply and drain are operating normal. STORING YOUR WASHING MACHINE If you need to store your washing machine for an extended time, it’s better to drain and disconnect it. Washing machines can be damaged if water is left in the hoses and internal components before storage. 1. Select the Quick cycle and add bleach to the bleach compartment. Run your washing machine through the cycle without a load. 2. Turn the water taps off and disconnect the inlet hoses. 3. Unplug your washing machine from the electrical outlet, and leave your washing machine door open to allow air to circulate inside the tumbler. If your washing machine has been stored in below-freezing temperatures, allow time for any leftover water in your washing machine to thaw out before using it. 28_ cleaning and maintaining your washing machine WD8122CVD-02574E_EN.indd 28 2010-02-09 ø¿¿¸ 11:26:34 troubleshooting and information codes CHECK THESE POINTS IF YOUR WASHING MACHINE... 04 TROUBLESHOOTING PROBLEM SOLUTION Will not start • • • • Make sure your washing machine is plugged in. Make sure the door is firmly closed. Make sure the water source tap(s) are turned on. Make sure to press the Start/Pause button. Has no water or not enough water • • • • Turn the water tap on fully. Make sure the water source hose is not frozen. Straighten the water intake hoses. Clean the filter on the water intake hose. Has detergent remains in the detergent drawer after the wash cycle is complete • Make sure your washing machine is running with sufficient water pressure. Make sure the detergent is added to the center of the detergent drawer. Vibrates or is too noisy • • • • • Make sure your washing machine is on a level surface. If the surface is not level, adjust the washing machine feet to level the appliance. Make sure that the shipping bolts are removed. Make sure your washing machine is not touching any other object. Make sure the laundry load is balanced. The washing machine does not drain and/or spin • • Straighten the drain hose. Eliminate kinked hoses. Make sure the debris filter is not clogged. Door is locked shut or will not open. 1. 2. 3. 4. Disconnect the power plug from the power supply. Open the filter cover using a coin. Remove the water from the washing machine. Locate the orange plastic tab and pull it forward to open the door. If the problem persists, contact your local Samsung Customer Service. troubleshooting and information codes _29 WD8122CVD-02574E_EN.indd 29 2010-02-09 ø¿¿¸ 11:26:34 troubleshooting and information codes INFORMATION CODES When your washing machine malfunctions, you may see an information code on the display. If that happens, check this table and try the suggested solution before calling Customer Service. CODE SYMBOL SOLUTION dE • Close the door. 4E • • Make sure the source water tap is turned on. Check the water pressure. 5E • • Clean the debris filter. Make sure the drainage hose is installed correctly. • The laundry load is unbalanced. Redistribute the load. If only one item of clothing needs washing, such as a bathrobe or pair of jeans, the final spin result might be unsatisfactory and an “UE” error message will be shown in the display window. • Call the after-sales service. UE 3E PoF After the power is turned off and on again by the power failure of the moment, an “PoF” error message will blink: • If you press the Start/Pause button, the operation restarts from the cycle that was automatically stored due to the power failure. • If you turn off the washing machine, the stored cycle will be removed. For any codes not listed above, or if the suggested solution doesn’t fix the problem, call your Samsung Service Centre or local Samsung dealer. 30_ troubleshooting and information codes WD8122CVD-02574E_EN.indd 30 2010-02-09 ø¿¿¸ 11:26:34 cycle chart CYCLE CHART ( user option) Max load (kg) Prewash Temperature (MAX) °C wash Softener Default Max Spin rpm (max) Delay end Water (ℓ) Electricity (kWh) Cottons 10 yes 40 60 800 (1200) 106 2.37 Water Saving 10 yes 40 60 800 (1200) 86 1.15 Delicate 3 - yes cold 40 400 62 0.06 Quick 5 - yes 40 40 800 (1200) 70 0.68 Towel 5 yes 40 95 600 (800) 110 0.85 Blanket 1 sheet (Within 3 kg) yes 30 40 800 90 0.18 Wool 4 - yes 30 40 600 80 0.42 Clean Tub - - yes - 40 40 600 56 0.91 05 CYCLE CHART Programme DETERGENT AND ADDITIVES 1. A cycle with a prewash takes approx. 15 minutes longer. 2. The cycle duration data has been measured under the conditions specified in Standard IEC 60456/EN 60456. 3. Consumption in individual homes may differ from the values given in the table due to variations in the pressure and temperature of the water supply, the load and the type of laundry. cycle chart _31 WD8122CVD-02574E_EN.indd 31 2010-02-09 ø¿¿¸ 11:26:35 appendix FABRIC CARE CHART The following symbols provide garment care directions. The care labels include four symbols in this order: washing, bleaching, drying and ironing, and dry cleaning when necessary. The use of symbols ensures consistency among garment manufacturers of domestic and imported items. Follow the care label directions to maximize garment life and reduce laundering problems. Resistant material Can be ironed at 100 ˚C max Delicate fabric Do not iron Item may be washed at 95 ˚C Can be dry cleaned using any solvent Item may be washed at 60 ˚C Dry clean with perchloride, lighter fuel, pure alcohol or R113 only Item may be washed at 40 ˚C Dry clean with aviation fuel, pure alcohol or R113 only Item may be washed at 30 ˚C Do not dry clean Item may be hand washed Dry flat Dry clean only Can be hung to dry Can be bleached in cold water Dry on clothes hanger Do not bleach Tumble dry, normal heat Can be ironed at 200 ˚C max Tumble dry, reduced heat Can be ironed at 150 ˚C max Do not tumble dry PROTECTING THE ENVIRONMENT • • • • This appliance is manufactured from recyclable materials. If you decide to dispose of this appliance, please observe local waste disposal regulations. Cut off the power cord so that the appliance cannot be connected to a power source. Remove the door so that animals and small children cannot get trapped inside the appliance. Do not exceed the detergent quantities recommended in the detergent manu-facturers’ instructions. Use stain removal products and bleaches before the wash cycle only when strictly necessary. Save water and electricity by only washing full loads (the exact amount depends upon the program used). DECLARATION OF CONFORMITY This appliance complies with European safety standards, EC directive 93/68 and EN Standard 60335. 32_ appendix WD8122CVD-02574E_EN.indd 32 2010-02-09 ø¿¿¸ 11:26:41 SPECIFICATIONS TYPE FRONT LOADING WASHER W 650 mm X D 770 mm X H 940 mm DIMENSIONS 50 ~ 780 kPa WEIGHT 97 kg / 104 kg 10.0 kg [DRY LAUNDRY] WASH AND SPIN CAPACITY DRY CAPACITY POWER CONSUMPTION WATER VOLUME SPIN REVOLUTIONS 06 APPENDIX WATER PRESSURE 6.0 kg WASHING 150 W WASHING AND HEATING 2200 W DRYING 2100 W Cotton 106 ℓ Water Saving 86 ℓ MODEL WD8122CVC, WD8122CVD, WD8122CVB, WD8122CVW rpm 1200 rpm The appearance and specifications of the product are subject to change without prior notice for purposes of product enhancement. appendix _33 WD8122CVD-02574E_EN.indd 33 2010-02-09 ø¿¿¸ 11:26:42 memo WD8122CVD-02574E_EN.indd 34 2010-02-09 ø¿¿¸ 11:26:42 memo WD8122CVD-02574E_EN.indd 35 2010-02-09 ø¿¿¸ 11:26:42 QUESTIONS OR COMMENTS? Country CALL OR VISIT US ONLINE AT AUSTRALIA 1300 362 603 www.samsung.com Code No. DC68-02574E-01_EN WD8122CVD-02574E_EN.indd 36 2010-02-09 ø¿¿¸ 11:26:42