1
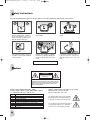
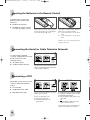
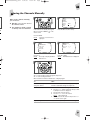
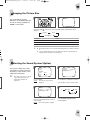
AA68-00658A-Eng_0624
6/24/05
10:01 AM
Page 1
COLOUR
TELEVISION
Owner’s Instructions
Before operating the unit,
please read this manual thoroughly,
and retain it for future reference.
REMOTE CONTROL
MENU CONTROL
TELETEXT FUNCTION
ENG
AA68-00658A-Eng_0624
6/24/05
10:01 AM
Page 2
S afety Instructions
The following illustrations represent the precautions to be taken when using and moving your television.
10%
75%
35°
H
H
5°
Do NOT expose the television to
extreme temperature conditions
(below 5°C and above 35°C) or to
extreme humidity conditions (less
than 10% and more than 75%).
Do NOT expose the television to
direct sunlight.
Do NOT expose the television to any
liquids.
If the television is broken, do not try
to repair it yourself. Contact qualified
service personnel.
During a storm conditions (especially
when there is lightning) unplug the
television from the mains socket and
aerial.
If the remote control is not used for a
long period of time, remove the
batteries and store it in a cool, dry
place.
NEVER OPEN THE TELEVISION
C aution
CAUTION
RISK OF ELECTRIC SHOCK
DO NOT OPEN
CAUTION:
TO REDUCE THE RISK OF ELECTRIC SHOCK, DO NOT
REMOVE THE REAR COVER, NO USER-SERVICEABLE
PARTS INSIDE. REFER SERVICING TO QUALIFIED
SERVICE PERSONNEL.
Mains voltage: 220V/230V/240V~, 50Hz.
Control range of mains section: 100V-260V~ (option)
or “indicated on the rear of the TV set”.
Mode
CB
CI
CX
CK
CII
CW
CF
CS
CD
2
System
PAL-B/G
PAL-I (UHF ONLY)
PAL-B/G, SECAM-B/G
PAL-B/G, D/K, SECAM-B/G, D/K
PAL-I (WITH VHF BAND)
PAL-B/G, D/K, SECAM-B/G, D/K, NTSC4.43MHz
PAL-B/G, SECAM-B/G, SECAM-L/L’
PAL-B/G, D/K, SECAM-B/G, D/K, NTSC4.43/3.58MHz
PAL-I, D/K
Beware of high voltage. Live parts are accessible
when the rear cover is removed.
Do not remove the rear cover.
The lightning flash and arrowhead within
the triangle is a warning sign alerting you
to dangerous voltage inside the product.
The exclamation point within the triangle is
a warning sign alerting you to important
instructions accompanying the product.
AA68-00658A-Eng_0624
6/24/05
10:01 AM
Page 3
GB
You have just purchased
a SAMSUNG television.
Please take the time to read these
instructions, as they will enable you
to set up your television easily.
Contents
◆ CONNECTING AND PREPARING YOUR TELEVISION
■
■
■
■
■
■
■
■
■
■
Safety Instructions .........................................................................................
Caution ..........................................................................................................
Inserting the Batteries in the Remote Control................................................
Connecting the Aerial (or Cable Television Network)....................................
Connecting a VCR.........................................................................................
Switching Your Television On and Off...........................................................
Placing the Television in Standby Mode........................................................
Selecting the Language.................................................................................
Becoming Familiar With the Remote Control and Menus..............................
Using the Front Panel Controls .....................................................................
2
2
4
4
4
5
5
5
6
6
◆ SETTING THE CHANNELS
■
■
■
■
Storing the Channels Manually......................................................................
Storing the Channels Automatically...............................................................
Skipping Unwanted Channels .......................................................................
Fine-tuning Channel Reception .....................................................................
7
8
9
9
◆ USING YOUR TELEVISION
■
■
■
■
■
■
■
■
Adjusting the Picture......................................................................................
Choosing the Picture Standard......................................................................
Changing the Picture Size .............................................................................
Selecting the Sound System (Option) ...........................................................
Adjusting the Volume.....................................................................................
Switching the Sound Off Temporarily ............................................................
Setting the Sleep Timer .................................................................................
Viewing Pictures from External Sources .......................................................
10
10
11
11
12
12
13
13
◆ USING THE TELETEXT FUNCTION
■
■
■
■
■
Teletext function ............................................................................................
Displaying the Teletext Screen......................................................................
Selecting a Page by Number.........................................................................
Using FLOF to Select a Page........................................................................
Storing Teletext Pages ..................................................................................
14
14
15
16
16
◆ USEFUL TIPS AND RECOMMENDATIONS
■
■
■
■
■
Connections to the AV Inputs ........................................................................
Problems and Solutions.................................................................................
Removing Colour Patches (Automatic Degaussing) .....................................
Front and Rear Panels ..................................................................................
Infrared Remote Control ................................................................................
Symbols
Press
☛
➢
Important
Note
17
18
18
19
19
3
AA68-00658A-Eng_0624
6/24/05
10:01 AM
Page 4
I nserting the Batteries in the Remote Control
1
2
S
ES
You must insert or replace the
batteries in the remote control
when you:
T
re
so
m
PR
◆ Purchase the television
◆ Find that the remote control is
no longer operating correctly
◆
Remove the cover of the remote control by
pressing the symbol ( PRESS ) and pulling the
cover in the direction of the arrow.
Insert AA or equivalent type batteries,
taking care to respect the polarities:
◆ + on the battery with + on the remote
control
◆ - on the battery with - on the remote
control
◆
Replace the cover by pushing it in the
direction of the arrow.
C onnecting the Aerial (or Cable Television Network)
Aerial
1
To view television channels
correctly, a signal must be received
by the set from one of the
following sources:
19
14
16
18
20
21
17
15
6
8
10
12
13
4
7
9
11
◆
2
3
5
1
Cable
Television
Network
Rear of the TV
(depending on the model)
◆ An outdoor aerial
◆ A cable television network
Y
st
or
◆
T
w
v
m
Plug the aerial or cable network input cable
into the socket (marked 75 Ω) at the bottom
of the television’s rear panel.
T
m
yo
C onnecting a VCR
Aerial
1
Depending on your model, you can
connect a VCR to the television
using a:
or
20
20
◆ SCART audio/video cable
◆ RCA audio/video cable
18
16
14
12
6
8
10
4
19
17
15
13
11
9
7
5
18
16
14
12
6
8
10
4
2
2
21
21
◆ Coaxial cable
Rear of the TV
(depending on the model)
2
3
19
17
15
13
11
9
7
5
3
1
1
Rear of the TV
(depending on the model)
Cable
Television
Network
Plug the aerial input cable into the appropriate socket on the VCR.
Connect a coaxial cable to the:
◆ VCR aerial output socket
◆ Television aerial input socket
(marked 75 Ω)
1
To obtain better picture quality and simplify
the setting up of the VCR, you can connect
an audio/video cable between:
◆ The AV (SCART or RCA) output socket
on the VCR
and
◆ The AV (SCART or RCA) input socket
on the rear of the television
Follow the instructions supplied with your
VCR to tune the VCR to your television.
4
P
R
AA68-00658A-Eng_0624
6/24/05
10:01 AM
Page 5
GB
S witching Your Television On and Off
1
2
The mains lead is attached to the
rear of the television. Use a wall
socket with, depending on the
model, a:
MENU
C/P.
STAND BY
◆ Voltage of 220V/230V/240V~
or 100V-260V~
s,
◆ Frequency of 50Hz or 50/60Hz
Plug the mains lead into an appropriate wall
socket.
te
Press the On/Off button (POWER) on the
front panel to switch the television on.
te
e
ur
Then you will see...
Already stored
channels
The channel selected
when you last switched
your television off.
Not yet stored
any channels
No clear picture.
You must now store
the channels.
Press the On/Off button (POWER) again to
switch the television off.
P lacing the Television in Standby Mode
2
1
You can place your television in
standby mode in order to reduce:
MENU
C/P.
◆ Power consumption
STAND BY
◆ Wear of the cathode ray tube
The standby mode can be useful
when you wish to interrupt
viewing temporarily (during a
meal, for example).
The television is placed automatically in standby mode when
you turn it on.
Press the POWER ( ) on the remote
control.
Result: The screen is turned off and the
green indicator on the front of
the television lights up.
☛
Do not leave your television in
standby mode for long periods of
time (when you are away on holiday,
for example). In this case, you
should switch it off completely.
To switch the screen back on, press the
POWER ( ) again.
S electing the Language
2
1
1
fy
ct
t
If you have...
1
Press the MENU.
Result: The main on-screen menu is
displayed.
3
Menu
Picture
Setup
Function
Select
Enter
Exit
Function
Language
: English
:▼ ▲
:
: MENU
Press the ▼ to select the “Function”.
Press the +.
Result: The “Function” is displayed.
Press the + until the required language is
displayed.
Press the MENU repeatedly until the
menus disappear.
5
AA68-00658A-Eng_0624
6/24/05
10:01 AM
Page 6
B ecoming Familiar With the Remote Control and Menus
1
2
The remote control is used to:
W
yo
1
◆ Change channels and adjust the
sound and picture while
viewing programmes
?
◆ Set up the television using the
on-screen menu system
The table opposite presents the
most frequently used buttons and
their functions.
◆
Button
Viewing Function
Menu Function
Used to display the
next stored channel.
Used to display the
previous stored channel.
Used to select the previous menu option.
+
Used to increase the
volume.
–
Used to reduce the
volume.
Used to:
◆ Display a submenu containing
selections that you can make for the
current menu option
◆ Search forwards manually for
channels
◆ Increase the value of a menu option
Used to:
◆ Display a submenu containing
selections that you can make for the
current menu option
◆ Search backwards manually for
channels
◆ Reduce the value of a menu option
▲
▼
Used to select the next menu option.
MENU
Used to display the
on-screen menu system.
Used to exit the on-screen menus and
return to normal viewing.
0~9
Used to display the
corresponding channels.
Used to exit the menu system and display
the corresponding channel directly.
-/--
Used to enter a two-digit channel number. Press this button a second time
to enter one-digit numbers again.
Example: To select channel 42, press 4, followed by 2.
U sing the Front Panel Controls
1
MENU
C/P.
STAND BY
If your remote control no longer works or you have lost it, you can use the
controls on the front panel of the television to:
◆ Change channels
◆ Adjust the volume
◆ Select options from the on-screen menus
◆ Choose the Video mode:
):
Press the C/P. ▲/ ▼ to switch to the video mode (
... 99 ↔ 0 ↔
↔ 1 ↔ 2 ...
The symbols representing the controls on the front panel are the same as
those used on the remote control.
6
◆
1
AA68-00658A-Eng_0624
6/24/05
10:01 AM
Page 7
GB
S toring the Channels Manually
1
2
When storing channels manually,
you can choose:
Menu
Picture
Setup
Function
1
◆ Whether or not to store each of
the channels found
◆ The number by which you wish
to identify each stored channel
Select
Enter
Exit
:▼ ▲
:
: MENU
1
If the television is in standby mode (green
light on), press the POWER ( ) on the
remote control.
Press the ▼ to select the “Setup”.
Press the MENU.
Result:
The main on-screen menu is
displayed.
3
4
Setup
Manual store
Auto store
CH. skip
Fine tune
Sort
Manual store
Search
: /
Prog. No. : P 1
Store
: ?
Press the +.
Result: The “Setup” is displayed with the
“Manual store”.
Press the + again.
Result: The “Manual store” is displayed.
5
y
1
e
e
1
Press:
◆ + to start searching forwards through the frequencies
◆ – to start searching backwards
When a channel is found, the “Manual store” is displayed again.
To...
Then...
Continue searching without
storing this channel
Press the + or – to continue searching respectively
forwards or backwards through the frequencies.
Store this channel
1
2
3
4
5
Stop searching for channels
Press the ▼ to select the “Prog. No.”.
Press the + or – until the number by which you wish
to identify the channel is displayed.
Press the ▼ to select the “Store”.
Press the + or – to store the channel.
Result: “OK” is displayed.
Press the ▼ select the “Search” and press the + or
– to start the search again.
Press the MENU repeatedly until the menus disappear.
7
AA68-00658A-Eng_0624
6/24/05
10:01 AM
Page 8
S toring the Channels Automatically
1
2
You can scan the frequency ranges
available on your television and in
your country and store all the
channels found automatically.
The channels are stored in the
order in which they appear in the
frequency bands. It is possible that
the automatically allocated
numbers may not correspond to
those by which you wish to
identify the channels. If this is the
case, you can then sort them
manually.
Menu
Picture
Setup
Function
1
Select
Enter
Exit
:▼ ▲
:
: MENU
1
Press the ▼ to select the “Setup”.
If the television is in standby mode (green
light on), press the POWER ( ) on the
remote control.
Press the +.
Result: The “Setup” is displayed.
Y
yo
o
th
h
d
A
sp
d
Press the MENU.
Result: The main on-screen menu is
displayed.
4
3
Setup
Manual store
Auto store
CH. skip
Fine tune
Sort
Sort
From :
To
:
Store :
Press the ▼ to select the “Auto store”.
1
3
?
Press the + or – until the channel number
that you wish to change is displayed.
Press the +.
Result: When searching and storing is
complete, the “Sort” is displayed
with the “From”.
Result:
The selected channel’s picture is
displayed.
5
1
1
Press the ▼ to select the “To”.
Press the + or – until the new number by which you wish to identify the channel is displayed.
Result: The selected channel is exchanged with the one specified.
Example: If you select “3” for the “From” and “1” for the “To”:
◆ Channel 3 becomes Channel 1
◆ Channel 1 becomes Channel 3
To...
Then...
Confirm the “Store” exchange
1
2
Cancel this change but
continue sorting the channels
Press the ▼ to select the “Store”.
Press the + or –.
Result: “OK” is displayed. You can exchange
other channel numbers by selecting
the “From” and returning to Diagram 4.
Select the “From” and return to Diagram 4.
When you have finished sorting the channels, press the MENU until the menus disappear.
8
If
h
th
th
If
d
tu
➢
AA68-00658A-Eng_0624
6/24/05
10:01 AM
Page 9
GB
S kipping Unwanted Channels
1
All channels that you do not
specifically choose to skip are
displayed during scanning.
2
Menu
Picture
Setup
Function
You can exclude the channels of
your choice from the channel scan
operation. When you scan through
the stored channels, those that you
have chosen to skip are thus not
displayed.
Select
Enter
Exit
Setup
Manual store
Auto store
CH. skip
Fine tune
Sort
:▼ ▲
:
: MENU
Press the MENU.
Result: The main on-screen menu is
displayed.
Use the ▼ and + to display the “CH. skip”.
Result: All the channels are listed in
numerical order.
Use the ▼ and + to display the “Setup”.
3
4
CH. skip
P 0 : Added
P 1 : Added
P 2 : Added
P 3 : Added
CH. skip
P 0 : Added
P 1 : Added
P 2 : Erased
P 3 : Added
The list displays only four channels at a time.
er
s
To display the...
Press...
Next four channels
▼, when the selection bar is on the last channel listed.
Previous four channels
▲, when the selection bar is on the first channel listed.
To...
Press...
The channel is...
▼/▲
Select the channel
Highlighted.
Erase a channel so that it will be skipped over
during scanning
–
Erased.
Add a previously erased channel so that it will be
displayed during scanning
+
Added.
When you have finished, press the MENU repeatedly until the menus disappear.
F ine-tuning Channel Reception
d.
1
If reception is clear, you do not
have to fine-tune the channel, as
this is done automatically during
the search and store operation.
If however the signal is weak or
distorted, you may have to finetune the channel manually.
.
fine-tuning of a stored
➢ The
channel cannot be stored.
2
Setup
Manual store
Auto store
CH. skip
Fine tune
Sort
Press the MENU.
Result: The main on-screen menu is
displayed.
Use the ▼ and + to display the “Setup” and
then select the “Fine tune”.
Result: The channel number and
frequency band are displayed
above a horizontal cursor.
P 4
UHF
Use the + and – to move the fine-tuning
cursor until you obtain a sharp, clear picture
and good sound quality.
➢
If you do not press either button
within two seconds, the fine-tuning
cursor disappears and the “Setup” is
redisplayed. If this happens, reselect
the “Fine tune”.
When you have finished, press the MENU
repeatedly until the menus disappear.
9
AA68-00658A-Eng_0624
6/24/05
10:01 AM
Page 10
A djusting the Picture
1
◆ Contrast (
)
◆ Sharpness (
)
◆ Colour (
◆ Tint (
option
)
) - for NTSC signal;
:▼ ▲
:
: MENU
Select
Enter
Exit
)
◆ Brightness (
2
Menu
Picture
Setup
Function
Several settings are available on
your television to enable you to
control the quality of the picture:
Option
Press the MENU.
Result: The main on-screen menu is
displayed with the “Picture”.
Picture
Contrast
Brightness
Sharpness
Colour
Tint
90
50
50
50
50
Y
d
in
Z
Press the + to display the “Picture”.
Press the ▼ or ▲ to select the required
option.
3
Your settings are only memorised
if you have selected the “Custom”
picture standard (for details,
refer to “Choosing the Picture
Standard”).
Otherwise they are lost when:
◆ You switch the television off
using the On/Off button
(POWER) on the front panel
◆ There is a power failure
91
To move the on-screen cursor...
Press...
Left and reduce the value of the selected option
Right and increase the value of the selected option
–
+
When you have finished, press the MENU repeatedly until the menus disappear.
➢
Your television contains an automatic degaussing system that is activated when the
picture colours are affected by magnetic interference. To degauss your television
screen, turn the set off by pressing the On/Off button (POWER) and leave it turned
off for at least two hours. Refer to page 18 for further details.
If
so
b
a
C hoosing the Picture Standard
➢
2
1
?
Custom
You can use your remote control
to select the type of picture that
best corresponds to your viewing
requirements:
◆ Custom
◆ Standard
Press the P.STD
◆ Dynamic
Custom
◆ Movie
◆ Mild
on the remote control repeatedly until the required mode is displayed:
Mild
Result:
➢
Standard
Movie
Dynamic
Each time you press this button, the name of the selected picture standard is
displayed for five seconds.
◆ The contrast, brightness, sharpness, colour and tint(option) settings of the first
five modes are preset and any changes that you make will be lost when the
television is switched off by the On/Off button (POWER) on the front panel.
◆ Changes made to these settings while the Custom mode is selected are
memorised and are recalled when you switch the television back on.
10
AA68-00658A-Eng_0624
6/24/05
10:01 AM
Page 11
GB
C hanging the Picture Size
1
2
Normal
You can modify the vertical
dimensions of the displayed picture
in order to watch programmes in
ZOOM or 16:9 format.
1
1
Press the P.SIZE
displayed:
on the remote control repeatedly until the required picture size is
Normal
Zoom
16:9 (Option)
To view in...
Select...
Standard format
Normal
ZOOM video format
Zoom
16:9 format
16:9
➢
◆ The “Normal” picture size is selected automatically when you switch the television
on.
◆ If you are watching pictures from your VCR via the Video mode (AV input), the
“16:9” picture size cannot be selected (option).
S electing the Sound System (Option)
1
➢
B/G, D/K, I and M are sound
signal broadcast systems
applicable to different
countries.
2
Menu
Picture
Setup
Function
If you cannot obtain clear, sharp
sound when receiving a television
broadcast, you may need to select
a different sound system.
Select
Enter
Exit
Function
Language
: English
Sound system : ?
:▼ ▲
:
: MENU
Press the MENU.
Result: The main on-screen menu is
displayed.
3
Use the ▼ and + to display the “Function”.
Press the ▲ to select the “Sound system”.
4
Function
Language
: English
Sound system : B/G
?
B/G
D/K
I
(Option)
Press the + repeatedly until the sound is of
the best quality.
Result: The sound system is changed.
Press the MENU repeatedly until the
menus disappear.
11
AA68-00658A-Eng_0624
6/24/05
10:01 AM
Page 12
A djusting the Volume
1
2
Y
b
w
sw
The volume setting is memorised:
1
◆ When you place the television
in standby mode
18
◆ When you switch the television
off using the On/Off button
(POWER) on the front panel
◆ If there is a power failure
1
To adjust the volume, press the:
◆ + to move the on-screen cursor right and increase the volume
◆ – to move the on-screen cursor left and reduce the volume
S witching the Sound Off Temporarily
1
2
You can switch the sound off
temporarily (during a telephone
conversation, for example).
1
1
Y
w
◆
1
Press the MUTE
.
Result: The sound is switched off and
the
symbol is displayed.
1
To switch the sound back on, press the
MUTE
again, + or –.
◆
T
eq
th
a
m
R
In
o
p
12
AA68-00658A-Eng_0624
6/24/05
10:01 AM
Page 13
GB
S etting the Sleep Timer
1
?
You can select a time period of
between 15 and 180 minutes after
which the television automatically
switches to standby mode.
Press the SLEEP
Result:
on the remote control.
If the sleep timer is...
The screen displays a clock symbol and the...
Already set
Time remaining before the television will be placed in
standby mode.
Not yet set
Word “0”.
Press the SLEEP repeatedly until the appropriate length of time is displayed.
Result: The television is placed automatically in standby mode when the timer reaches 0.
To cancel the Sleep Timer function, press the SLEEP
displayed.
repeatedly until the word “0” is
V iewing Pictures from External Sources
Rear of the TV
(depending on the model)
1
2
You can use your television to
watch pictures recorded on a:
◆ Video cassette recorder
20
21
18
19
16
17
14
15
12
13
6
8
10
11
9
7
4
5
2
3
1
◆ Camcorder
To connect different types of video
equipment to your television, use
the input connectors on the front
and rear panels (depending on the
model).
Connect the AV cable as explained on
page 4.
Refer to “Connections to the AV
Inputs” (page 17) for a description
of the various connection
possibilities.
Start playing the cassette on the VCR or
camcorder.
Result: The recorded pictures appear on
the television screen.
Switch your television on.
To watch television programmes while a
cassette is playing, press the TV
on the
remote control.
Result: The most recently watched
channel is displayed.
To return to viewing the cassette, press the
VIDEO
on the remote control.
Result: The picture recorded on the VCR
or camcorder cassette is
displayed.
13
AA68-00658A-Eng_0624
6/24/05
10:01 AM
Page 14
T eletext Function
1
A
Most television channels provide a
written information service via
Teletext. They provide such
information as:
B
C
D
Y
d
b
E
◆ Television programme times
F
◆ News bulletins
◆ Weather forecasts
Part
◆ Sports results
◆ Subtitles for the hard of
hearing
This information, which you cannot
modify, is divided into numbered
pages laid out as follows:
Contents
A
Selected page number.
B
Broadcasting channel identity.
C
Current page number or search indications.
D
Date and time.
E
Text.
F
Status information.
➢
There may appear different language on the screen from every rolling on the
satellite broadcasting.
D isplaying the Teletext Screen
2
1
You can display Teletext
information at any time on your
television screen.
☛
For Teletext information to
be displayed correctly,
channel reception must be
good; otherwise:
◆
Information may be
missing.
◆
Some pages may not be
displayed.
To activate the Teletext mode and
display the contents page, follow
the instructions.
14
1
1
Select the channel providing the Teletext
service, using the ▲ ( 1 ) or ▼ ( 1 ).
Press the TTX/MIX (
) to activate the
Teletext mode.
Result: The contents page (page 100) is
displayed. It can be redisplayed
at any time by pressing the
INDEX (
).
If you wish to display the actual broadcast
on the selected channel at the same time
as the Teletext page, press the TTX/MIX
(
) once.
When you have finished, press the TV
to continue viewing normally.
st
e
X
AA68-00658A-Eng_0624
6/24/05
10:01 AM
Page 15
GB
S electing a Page by Number
1
2
?
You can enter the page number
directly by pressing the numeric
buttons on the remote control.
?
Enter the three-digit page number given in
the contents, by pressing the corresponding
numeric buttons.
Result:
The current page counter is
incremented and the page is
then displayed.
3
If the selected page is linked with several
secondary pages, the secondary pages are
displayed in sequence. To freeze the
display on a given page, press the HOLD
(
). Press the HOLD again to resume.
4
1
?
1
Using the various display options:
To display...
Press...
◆ Both the Teletext information and the normal broadcast
TTX/MIX (
◆ Hidden text
(answers in questionnaire once games, for example)
RECALL (
?
)
◆ The screen normally again
RECALL (
?
) again
◆ A secondary page, by entering its 4-digit number
SUB-PAGE (
◆ The next page
PAGE UP (
◆ The previous page
PAGE DOWN (
◆ Double-height letters in the...
• Upper half of the screen
• Lower half of the screen
SIZE (
)
◆ Once
◆ Twice
◆ The screen normally
◆ Three times
) twice
)
1
)
1
)
15
AA68-00658A-Eng_0624
6/24/05
10:01 AM
Page 16
U sing FLOF to Select a Page
1
2
The different topics covered on a
Teletext page are colour-coded
and can be selected by pressing
the coloured buttons on the
remote control.
1
Display the Teletext contents page by
pressing the TTX/MIX (
).
Press the coloured button corresponding to
the topic that you wish to select; the
available topics are given on the status line.
Result:
The page is displayed with other
coloured information that can be
selected in the same way.
To display the...
Press the...
Previous page
Red button
Next page
Green button
When you have finished, press the TV
to return to your normal broadcast.
S toring Teletext Pages
1
2
You can store up to four Teletext
pages to display them later at
leisure.
?
?
Select the LIST mode.
Result: Four 3-digit numbers are
displayed in different colours at
the bottom of the screen.
➢
3
The LIST (
) button is used to
switch between the:
◆ LIST mode
◆ FLOF mode
?
Press the STORE (
) to store the
corresponding pages until the corresponding
blocks are displayed in white.
16
Press the coloured button corresponding to
the page that you wish to replace.
Enter the new page number using the
numeric buttons.
➢
Repeat step 2 for each page to be
stored, using a different coloured
button each time.
AA68-00658A-Eng_0624
6/24/05
10:01 AM
Page 17
GB
C onnections to the AV Inputs
➢
The AV connector on the rear of the television is used for equipment with an
RGB output (such as video games, video disc players and personal computers).
Rear of the TV
AV Cable
VCR
(depending on the model)
RCA type
20
21
18
19
16
17
14
15
12
13
6
8
10
11
9
7
4
5
SCART type
2
3
Decoder/Video game
Video disc
1
Front of the TV (Option)
RCA type
Camcorder
AV Cable
Camcorder
RCA type
VIDEO-IN-AUDIO
Video disc
➢
to
◆ The AV connector on the front of the television is used for equipment,
such as camcorders, video disc players and certain video games.
Decoder/Video game
◆ When both the front and rear connectors are connected to external
equipment, the front AV has the priority.
e
be
d
17
AA68-00658A-Eng_0624
6/24/05
10:01 AM
Page 18
P roblems and Solutions
Before contacting the after-sales service, perform the following simple checks. If you cannot solve the problem
using the instructions below, note the model and serial number of the television and contact your local dealer.
Problem
Checks/Explanation/Solution
No sound or picture
◆ Check that the mains lead has been connected to a wall socket and the wall
socket is switched on.
◆ Check that you have pressed the On/Off button (POWER) on the front panel.
◆ Check the picture contrast and brightness settings.
◆ Check the volume.
Normal picture but no sound
◆ Check the volume.
◆ Check that the MUTE
has not been pressed on the remote control (if it has,
the
symbol is displayed on the screen).
No picture or black and white picture
◆ Adjust the colour settings.
◆ Press the P.STD
.
Sound and picture interference
◆ Try to identify the electrical appliance that is affecting the television and move it
further away.
◆ Plug your television into a different mains socket.
Blurred or snowy picture, distorted sound
◆ Check the direction, location and connections of your aerial. This interference is
often due to the use of an indoor aerial.
Remote control malfunctions
◆
◆
◆
◆
Irregular colour (purity problem)
◆ See below.
Replace the remote control batteries.
Clean the upper edge of the remote control (transmission window).
Check the battery terminals.
Check that the remote control sensor on the front of the television is not
obstructed.
◆ Check that there is not a bright lamp close to the television that is attenuating the
remote control signal and preventing it from being detected by the television.
R emoving Colour Patches (Automatic Degaussing)
A degaussing coil is mounted around the picture tube, so you do not normally need to degauss the television
manually.
If you move the television to a different position and colour patches appear on the screen, you must:
◆ Switch the television off by pressing the On/Off button (POWER) on the front panel
◆ Unplug the television from the wall socket
◆ Leave the television for two hours to allow the automatic degauss function to take effect
☛
18
Always make sure that the television is switched off by pressing the On/Off button (POWER) if it is to be left
unattended.
AA68-00658A-Eng_0624
6/24/05
10:01 AM
Page 19
GB
F ront and Rear Panels
➢
Front of the TV
Rear of the TV
Buttons and markings are subject to change without notice.
MENU
C/P.
(depending on the model)
STAND BY
VIDEO-IN-AUDIO
20
21
EARPHONE
SOCKET
(Option)
MENU BUTTON
CHANNEL
ADJUSTMENT
BUTTONS
ON/OFF BUTTON
18
19
16
17
14
15
12
13
6
8
10
11
9
7
4
5
2
3
1
SCART INPUT
CONNECTOR
RCA INPUT
CONNECTORS
STANDBY INDICATOR
A/V INPUT SOCKETS
(Option)
VOLUME ADJUSTMENT
BUTTONS
AERIAL INPUT SOCKET
REMOTE CONTROL SENSOR
I nfrared Remote Control
TELETEXT DISPLAY/MIX
STANDBY
TUNER/CABLE NETWORK SELECTION
DIRECT CHANNEL SELECTION
EXTERNAL INPUT SELECTION/
TELETEXT MODE (LIST/FLOF) SELECTION
?
ON-SCREEN DISPLAY/TELETEXT REVEAL
AUTOMATIC SWITCH-OFF/TELETEXT STORE
ONE/TWO-DIGIT CHANNEL SELECTION/
TELETEXT HOLD
PICTURE MODE SELECTION/
TELETEXT SUB-PAGE
FASTEXT TOPIC SELECTION
TEMPORARY SOUND SWITCH-OFF
NEXT CHANNEL/
TELETEXT NEXT PAGE
1
PICTURE SIZE/
TELETEXT SIZE
VOLUME INCREASE
VOLUME DECREASE
1
PREVIOUS CHANNEL/
TELETEXT PREVIOUS PAGE
➢
MENU DISPLAY/
PROGRAMME SELECTION BY NAME
Operation of remote control may
be affected by bright artificial
light near to the TV set.
19
AA68-00658A-Eng_0624
6/24/05
10:01 AM
Page 20
_ AFTER SALES SERVICE
_
Do not hesitate to contact your retailer or service agent
if a change in the performance of your product indicates
that a faulty condition may be present.
❑ IMPORTANT NOTICE (United Kingdom)
The mains lead on this equipment is supplied with a moulded plug incorporating a
fuse. The value of the fuse is indicated on the pin face of the plug and, if it requires
replacing, a fuse approved to BSI1362 of the same rating must be used.
Never use the plug with the fuse cover omitted if the cover is detachable.
If a replacement fuse cover is required, it must be of the same colour as the pin
face of the plug. Replacement covers are available from your dealer. lf the fitted
plug is not suitable for the power points in your house or the cable is not long
enough to reach a power point, you should obtain a suitable safety approved
extension lead or consult your dealer for assistance.
However, if there is no alternative to cutting off the plug, remove the fuse and then
safely dispose of the plug.
DO NOT connect the plug to a mains socket as there is a risk of electric shock
from the bared flexible cord.
❑ IMPORTANT
The wires in the mains lead are coloured in accordance with the following code:
BLUE - NEUTRAL - BROWN - LIVE
As these colours may not correspond to the coloured markings identifying the
terminals in your plug, proceed as follows:
The wire coloured BLUE must be connected to the terminal marked with the letter
N or coloured BLUE or BLACK. The wire coloured BROWN must be connected to
the terminal marked with the letter L or coloured BROWN or RED.
WARNING: DO NOT CONNECT EITHER WIRE TO THE EARTH TERMINAL,
WHICH IS MARKED WITH THE LETTER E OR THE EARTH SYMBOL
,
OR COLOURED GREEN OR GREEN AND YELLOW.
AA68-00658A (ENG)