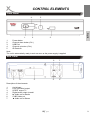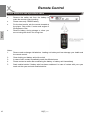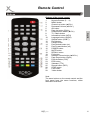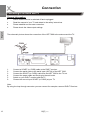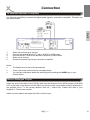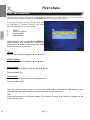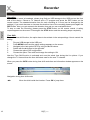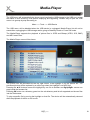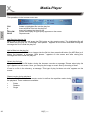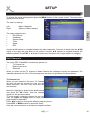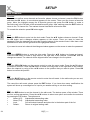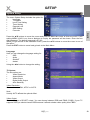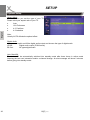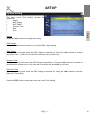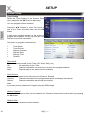
1
MPEG-4 SD DVB-T Receiver with PVR Ready,
Time Shift & Media-Player
HRT 7000
User Manual
Uporabniški priroènik
Table of Content
4
7
8
8
8
Control Elements
Front Panel
Rear Panel
9
9
Remote Control
Insert battery and operation
Buttons
10
11
Connection
TV / Aerial
HiFi system
12
13
First time installation
14
Important Keys & Functions
List / Subtitles / Audio / Aspect Ratio
Info / Teletext / Volume / Resolution
EPG / Favorite
15
15
16
17
Recorder
Timer / Recording
Recording List
18
19
Multimedia Player
USB
Photos
Music
Movie
20
21
22
23
Settings
Program
Picture Setting
Channel Search
Time
Options
System
USB
24
24
26
27
28
28
29
30
Troubleshooting
Specification
Glossary
32
33
34
HRT 7000
English
Safety information
Recycling Information
Accessories
Features
Default Setting
3
SAFETY INFORMATION
English
The lightning flash with an arrowhead symbol within an equilateral triangle is
intended to alert the user of the presence of un-insulated "dangerous voltage"
within the product's enclosure that may be of sufficient magnitude to constitute a
risk of electric shock to persons.
The exclamation point within an equilateral triangle is intended to alert the user of
the presence of important operating and maintenance (servicing) instructions in the
literature accompanying the appliance.
User Manual
1.
All the safety and operating instructions should be read before the product is operated.
2.
Retain Instructions - The safety and operating instructions should be retained for future
reference.
3.
All warnings on the product and in the operating instructions should be adhered to.
4.
All operating and use instructions should be followed.
Power Supply
1.
Never touch the plug with wet hands.
2.
If you want to pull the plug out of the plug socket, always pull directly on the plug. Never pull
on the cable as it could tear.
3.
Make sure that the power cable is not bent, caught or run over and that it does not come
into contact with heat sources.
4.
Make sure that the power cable is not wound around the device while in operation.
5.
Never place the machine on the power cable while it is being operated.
6.
Only use extension cables that are designed for the power consumption level of the
machine.
7.
Keep the appliance away from rain and any moisture.
8.
Only operate the machine if the electrical voltage stated on the type plate beneath the
machine agrees with the voltage on your plug socket. The wrong voltage can destroy the
machine.
9.
Do not stand vases etc. on the appliance. Water could seep into the appliance.
10.
Do not open the appliance.
11.
Pull out the mains plug if the appliance is not to be used over a longer period of time.
12.
Take care that nobody can trip over the power supply cable.
4
HRT 7000
SAFETY INFORMATION
Use for...
1.
Reception of digital channels via antenna (DVB-T).
2.
Recording of DVB-T broadcast on USB storages.
3.
Playback of recorded content from USB storage.
4.
Playback of supported picture and audio files from USB storage.
English
Operation and Position
1.
Do not connect accessories on the player which are not defined by the manufacture.
2.
Do not place this product on an unstable cart, stand, tripod, bracket, or table. The product
may fall, causing serious injury to a child or adult, and serious damage to the product. Use
only with a cart, stand, tripod, bracket, or table recommended by the manufacturer, or sold
with the product. Any mounting of the product should follow the manufacturer's instructions,
and should use a mounting accessory recommended by the manufacturer.
3.
A product and cart combination should be moved with care. Quick stops, excessive force,
and uneven surfaces may cause the product and cart combination to overturn.
4.
The device is able to show a still image on the TV screen or monitor over an unlimited
period of time. This can cause damage to the screen. It is therefore advisable to activate the
screen saver. Or switch the player off, if the device is not in use.
5.
Do not use the device permanent in the 4:3 mode. This can cause damage to the TV
screen.
6.
Do not increase the volume when the player is just playing very quiet sections. This cold
damage the speaker if very loud passages starts all of a sudden after the quiet section.
7.
Switch the player off by the Off/On switch if it is not going to used for a longer period of time.
8.
Disconnect the main plug during thunderstorms.
9.
Slots and openings in the cabinet are provided for ventilation and to ensure reliable
operation of the product and to protect it from overheating, and these openings must not be
blocked or covered.
10.
The openings should never be blocked by placing the product on a bed, sofa, rug, or other
similar surface.
11.
This product should not be placed in a built-in installation such as a bookcase or rack
unless proper ventilation is provided or the manufacturer's instructions have been adhered
to.
12.
Protect the device against weather influences, moistures and high temperature.
13.
Never spill liquid of any kind on the product.
14.
Do not expose the device and the remote control to direct sunlight.
USB Port
Due to the legal requirements of CE-conformity, the customer is asked to only connect USB-Sticks
to the USB port.
HRT 7000
5
SAFETY INFORMATION
English
Antenna
The device can be connected to an antenna.
1.
Unplug the power cord cable from the mains outlet before connecting or disconnecting the
DVB-T to/from the antenna, otherwise both might be damaged.
2.
If an outside antenna or cable system is connected to the product, be sure the antenna or
cable system is grounded so as to provide some protection against voltage surges and
built-up static charges.
Defect
1.
Servicing - Do not attempt to service this product yourself as opening or removing covers
may expose you to dangerous voltage or other hazards. Refer all servicing to qualified
service personnel.
2.
Damage Requiring Service - Unplug this product from the wall outlet and refer servicing to
qualified service personnel under the following conditions:
a.
When the power-supply cord or plug is damaged.
b.
If liquid has been spilled, or objects have fallen into the product.
c.
If the product has been exposed to rain or water.
d.
If the product does not operate normally by following the operating instructions.
Adjust only those controls that are covered by the operating instructions as an improper
adjustment of other controls may result in damage and will often require extensive work by a
qualified technician to restore the product to its normal operation.
e.
If the product has been dropped or damaged in any way, and
3.
When the product exhibits a distinct change in performance this indicates a need for
service.
4.
When replacement parts are required, be sure the service technician has used replacement
parts specified by the manufacturer or have the same characteristics as the original part.
Unauthorized substitutions may result in fire, electric shock, or other hazards.
5.
Nicotine can damage the electronic components. In case of service regarding too much
nicotine, than the warranty/guarantee expired.
6.
Please read in the section Troubleshooting our service address and phone number.
Dolby
Manufactured under license from Dolby Laboratories. “Dolby” and the double-D symbol are
trademarks of Dolby Laboratories. Confidential Unpublished works. 1992-1997 Dolby Laboratories,
Inc. All ►s reserved.
6
HRT 7000
Recycling Informationen
Recycling of paper and carton
The material recycling symbol on the carton and user manual denotes that they are
recyclable. Dispose them not with the normal household waste.
English
Recycling of electronic devices
This product is designed and manufactured with high quality materials and
components which can be recycled and reused.
This symbol means that electrical and electronic equipment, at their end-of-life,
should be disposed of separately from your household waste.
Please, dispose of this equipment at your local community waste collection/recycling
centre. In the European Union there are separate collection systems for used
electrical and electronic product. Please, help us to conserve the environment we live
in!
Recycling of plastic parts
The material recycling symbol on the plastic parts denotes that they are
recyclable. Dispose them not with the normal household waste.
Green Dot
The “Grüne Punkt” denotes that the MAS Elektronik AG pays a duty to the
“Gesellschaft für Abfallvermeidung und Sekundärrohstoffgewinnung“.
HRT 7000
7
Notes
Accessoires
When opening the package of this Portable-DVD player please make sure that the following
accessories are included:
•
HRT 7000
English
•
•
•
•
Remote Control
Batteries for the Remote Control
User Manual
International Warranty Card
Notes:
•
•
•
•
If any item should be damaged or missing, please contact your dealer without delay.
Keep the packaging materials, you may need them to transport your player in the future.
Always transport or send the player in its original packing.
Do not change or modify any components of the device or accessories.
Features
•
•
•
•
•
•
•
•
Standard Definition DVB-T Receiver
Supports DVB-T for MPEG-4 (H.264) and MPEG-2
Electronic program guide (EPG) and teletext
USB 2.0 High Speed connection
Supporting multiple audio-containers (MP3)
Supporting image-containers (JPEG)
RGB video out (SCART)
SCART Audio/Video-IN
Default settings
OSD language
Aspect ratio
Video out
8
English
AUTO
RGB
HRT 7000
CONTROL ELEMENTS
Front Panel
5.
4.
1.
2.
3.
4.
5.
2.
English
1.
3.
Power button
Channel down button (CH-)
USB Port
Channel up button (CH+)
IR Receiver
Note:
The unit is automatically ready to work as soon as the power supply is applied.
Rear Panel
6.
1.
2.
3.
4.
7.
5.
Description of the elements:
1.
2.
3.
4.
5.
6.
7.
Aerial Input
Loop Out Aerial output
SCART output TV
Digital audio output (coaxial
► Audio out for Stereo
CVBS Video out
◄ Audio out for Stereo
HRT 7000
9
Remote Control
Insert batteries and operationradius
•
•
•
English
•
Remoce the safety tab from the battery to
make the remote control working.
Please uses only CR2025 battery
For the best results, aim the remote towards at
the player. Stay within 6 meter and angles of
60 degrees or less.
Remove battery during storage or when you
are not using the device for a long time.
Notes:
1.
Remove and exchange old batteries. Leaking out battery acid can damage your health and
the remote control.
2.
Clean leaking out battery acid with a cloth
3.
In case of skin contact immediately wash the affected area.
4.
Please contact a medic after swallowing the battery or battery acid immediately
5.
Seek medical advice if battery acid has been swallowed. In case of contact with your eyes
wash out the eyes and seek medical advice.
10
HRT 7000
Remote Control
Buttons
Buttons of the remote control
Numeric Buttons (0 … 9)
MENU button
Channel up button (S/CH+)
Decreases Volume (W/VOL–)
OK button
Page Up button (PgUp)
Channel down button (T/CH-)
TV / Radio button
Information button (INFO)
Language button (AUDIO)
Subtitle button (SUB-T)
PLAY button
PAUSE button
Fast Rewind button (<<)
Fast Forward button (>>)
POWER button
MUTE button
RECALL button
Exit button
Increase Volume button (X/VOL+)
Page Down button (PgDn)
Favorite Button (FAV)
EPG button
Videotext (TTX)
Record button (REC)
STOP button
PVR button
Yellow button
English
1.
2.
3.
4.
5.
6.
7.
8.
9.
10.
11.
12.
13.
14.
15.
16.
17.
18.
19.
20.
21.
22.
23.
24.
25.
26.
27.
28.
Note:
The same buttons on the remote control and the
front panel have the same functions; either
alternative shall work.
HRT 7000
11
Connection
Connecting to an Aerial and TV
General information
English
•
•
•
•
Assure that the device is switched off and unplugged.
Read the manual of your TV and attend to the safety instructions.
Please establish an accurate connection.
Please check the video output settings.
The schematic picture shows the connection of the HRT 7000 to the antenna and the TV:
1.
2.
3.
4.
5.
6.
Connect a SCART (or CVBS) cable to the DVB-T receiver.
Connect the aerial cable to the aerial input (ANT IN) of the HRT 7000.
Connect the SCART (or CVBS) cable from the HRT 7000 to the TV set.
Connect the power cable and the plug to the wall outlet.
Switch on your DVB-T receiver and the TV
Choose the correct input SCART (or CVBS) at your TV
Note:
By using the loop through connector you can connect for example a second DVB-T Receiver.
12
HRT 7000
Connection
To external decoder or amplifier
You have the possibility to transmit the digital audio signal to a decoder or amplifier. Therefore use
the coaxial output.
English
1.
2.
3.
4.
5.
Switch off and unplug all devices
Connect the receiver and the TV with a SCART or HDMI cable
Connect the HRT 7000 to the decoder or amplifier (coaxial cable)
Switch on all devices
Activate the coaxial input at your decoder or amplifier
Notes:
•
•
•
The Cables are not part of the accessories
There a just a few channels which use digital audio.
You can gain information about the audio signal by pressing the AUDIO key on your
remote control
Stereo Analogue Output
Insert one end of the audio (Cinch [RCA]) cable into the white/red Cinch [RCA] socket L/R AUDIO
OUT at the back of the device and the other end into the audio input socket (usually white/red) on
the amplifier set or TV set (usually labelled “AUX IN” / “Stereo IN”). Please also refer to your
Amplifier or TV sets user manual.
Switch on the Amplifier and select the AUX or Stereo input.
HRT 7000
13
First steps
First Time Installation
After all connections have been made properly, switch on TV and make sure the receiver is
connected to the Main Power. Press POWER button to switch receiver on.
English
If you are using the receiver for the first time
or restored to Factory Default, the Main
Menu will appear on your TV screen.
1.
2.
3.
4.
Region
OSD Language
Display Mode
Aspect Mode
Navigate with the arrow keys UP and DOWN to
each settings and change the options by
pressing the ◄ and ► button. Press the EXIT
button to leave the setup menu.
Region
Choose the country by using the ◄ and ► button.
OSD Language
Choose a language by using the ◄ and ► button.
Display Mode
Choose a display mode by using the ◄ and ► button.
Recommended: PAL
Aspect Ratio
Choose a aspect ratio by using the ◄ and ► button.
Recommended: AUTO
Once the setting is over, move to OK field with ▲/▼ button and press the OK button to start
automatically scan. All founded TV channel are stored into the channel list.
Note:
Please pay attention on the Region setting. If the setting is wrong, than maybe no channel can be
find during the scan.
14
HRT 7000
Functions
Important keys and functions
Program list
Retrieve the program list by pressing OK or CH.LIST button.
▲/▼
PgDn/PgUp
◄/►
OK
EXIT
Next/previous program
Next/previous page
Change to favourite list
Activating the chosen program
Exit the program list
English
Note:
TV and Radio list are very similar to handle.
Subtitles
Pressing SUB-T enables subtitles. If subtitles are available for this program you can enable them
with OK
Audio settings of TV programs
Access the audio settings by pressing AUDIO. Change language (only
certain programs), choose another audio track (if available) or choose
between the audio settings (◄ / ► channel, stereo)
Note:
Selecting AC-3 audio track will not work via SCART. When AC-3 is
selected the audio is put out via the coaxial output.
Information
Pressing INFO shows a lot of information. By pressing the INFO button the first time the overview
shows up: TV program name, active TV programs, availability of teletext, etc.
Press the INFO button again and the device shows the information of the current TV channel about
frequency of the TV programs, bandwidth and signal quality.
HRT 7000
15
Functions
Important keys and functions
English
Teletext
The teletext is activated via the TTX button.
Navigation:
•
Numeric for entering teletext sites
•
◄/► Next/previous page
•
RED, GREEN, BLUE and YELLOW for
the shown sites
•
EXIT for closing teletext
Volume
Change the volume by pressing the ◄ (VOL-)/► (VOL+) button.
TV and Radio List
To switch from TV to the Radio list, please press the TV/RADIO button.
Change Program
To switch program please press the ▲ (CH+)/▼ (CH-) button.
Navigation in the Setup Settings
With the Navigate in settings please use the buttons of the navigation cross (◄/►/▲/▼).
Numeric buttons
You can change during the live picture the channel by pressing the numeric buttons. Press 2 to
change to the second channel in the list, or press 13 to change to thirteen channel in the list. Please
confirm every channel input with the OK button.
Favourite
Press the FAV button during the live picture and the favourite group
window appears on the screen. Select a favourite group by using the ▲/
▼ button and confirm with OK button.
The selected favourite group opens on the screen. Navigation into the
favourite window:
OK
▲/▼
PgDn/PgUp
◄/►
EXIT
16
Starting chosen TV program
Next/previous program
Next/previous page in the channel list
Next/previous favourites group
Exit favourites list
HRT 7000
Functions
Important keys and functions
EPG
The EPG is an on-screen TV guide that shows
scheduled programs seven days in advance
for every tuned channel. Press the EPG
button on the Remote Control to access
guide.
English
Additional buttons are for navigation:
OK
Apply to detailed EPG information
RED
Exit of the sub-window or navigate in the Time Bar
of the EPG window
▲/▼
Next/previous channel
GREEN Start the Timer programming
◄/►
Change program
EXIT
Exit EPG
Navigation in the Timer Bar:
Use the ◄/► buttons to select one of the option
for quick navigation in the time bar. You see the
different option in the bottom line of the EGP
windows. The symbols are in order (left to right
side):
•
Back
•
Current Time
•
Last Program
•
Next Program
•
2 hours backward
•
2 hours forward
•
Last day
•
Next day
Choose a symbol and press the OK button to action the operation.
Timer programming from EPG
If you chosen a program and press the GREEN button
the timer programming appears on the screen. Here
you can set or modify different options like Timer
Mode, Timer Service, Wakeup Channel, Wakeup
Date, Wakeup Time and Duration.
HRT 7000
17
Recorder
English
Recording
If you want to record a broadcast, please plug firstly an USB storage to the USB port on the front
side of the device. Choose a TV channel and a TV program and press the REC button on the
remote control. The standard duration time for each recording is 2 hours (can be changed by the
settings). If you want decrease or increase the duration time of the recording please press again the
REC button. Now, you get access to the duration time and you can manipulate them.
To stop or ends the recording, please press the STOP button on the remote control. A safety
request appears on the screen. Press again the STOP button and the recording stops completely.
Time Shift
To use the time shift function, the option have to be activate in the setup settings. How to control the
setting:
1.
2.
3.
4.
5.
6.
Plug an USB storage to the USB port
Press MENU button and the setup settings appears on the screen
Navigate to the last symbol REC by using the ▲/▼ buttons.
Switch with the ► button to the right side
Choose the option DVR configuration
Choose the option Time shift and change the setting to ON.
Now the Time Shift function is activated and runs the whole time during the live picture. If you
change the TV channel than the time shift starts new for the new TV channel.
When you press the INFO button during time shift mode than an information window appears on the
screen.
Navigation during time shift mode:
◄/►
18
Move the slide inside the time bar. Press OK to jump them.
HRT 7000
Media-Player
The USB menu will automatically be shown once inserting the USB storage to the USB port, except
the status of auto scanning, multi picture displaying and upgrading. Another way to open the USB
menu is to go step by step according to:
Menu —> Tools —> USB Device
The USB menu will be disabled when the USB device is unplugged. Media-Player list will not be
saved after unplugging the USB storage and/or going to Stand-By mode or Power Off mode.
The Media-Player menu will be shown:
English
The Media-Player supports the playback of picture files in JPEG and Bitmap (JPEG, JPG, BMP)
and MP3 music files.
The picture can be previewed at the top right corner if the highlight is on the picture file. The
previewed picture will be replaced by a music logo when the highlight is on MP3 files.
Pressing the ▲/▼ buttons moves the highlight by one file to another and PgUp/PgDn moves one
page inside the browser list.
Pressing OK button on a directory goes into the sub-directory and list all supported and known files
into the file browser.
To play a specific file by moving the highlight on that file. The device will be automatically returned
after the playback of the file or list is over.
HRT 7000
19
Media-Player
English
The operations in the browser menu are:
FAV
0
1
YELLOW
BLUE
Added a highlighted file into the play list.
Insert all Music files into the play list
Insert all images into the play list
Please select play list type query appears on the screen
Repeat mode
Add files into the play list
Mark a file in the browser and press the FAV button on the remote control. The highlighted file will
be added into the play list. A message “Wait please..” appears on the screen and after closing this
message the file is inside the play list.
Add all files into the play list
If you want to add all MP3 files or images into the file list, than press the 0 button (for MP3 files) or 1
button (for images). A message “Wait please..” appears on the screen and after closing this
message the file is inside the play list.
Select play list type
If you press the YELLOW button during the browser overview a message “Please select play list
type” appears on the screen. Now, you can play the image or music files by choosing of them.
If here is no file in the directory, a message “This type of play list does not exist” appears on the
screen.
Repeat modes during playback
Press the BLUE button on the remote control to define the repetition mode during
the playback. Three modes are available:
•
•
•
20
Folder
Random
Single
HRT 7000
Media-Player
Music playback
If you want to listen music by the device, please choose the files or create a play list with the music
files which are you wishes.
In case of a play list, all selected files are shown. You can
start the playback of the play list or manage the list by
operations.
Delete one file
If you want to delete one file from the play list, lease select them by using the ▲/▼ buttons. If the
file is highlighted press the YELLOW button and the selected file will be deleted from the play list.
English
Start the playback
Press the RED button on the remote control to start the
playback of the play list.
Delete all files
If you want to delete all files from the play list, press the BLUE button on the remote control. All files
from the list will be deleted after you confirm the safety query “Are you sure to save?”. After
confirmation the operation is execute and the play list will be closed.
Image playback
If you want to playback image files with the HRT 7000, you
can define some operations of them. Press the INFO button
on the remote control and you can access to settings Image
Size, Show Time and Repetition Mode. After changing the
setting you shall store them by pressing the OK button on the
SAVE field.
Show Image Size
Here you can define the displaying of the images on the screen. The option FULL produces every
time a fill screen picture, independent from the aspect ratio of the image. The option REAL displays
the images in order to there aspect ratio on the screen. The default setting is FULL.
Slide Show Time
Here you can define the displaying time of each image. The default setting is 2 sec.
Slide Show Repeat
Here you can define a loop function, when you activate (ON) this option. The Slide Show can only
break by EXIT, STOP or POWER button.
If the setting is OFF, than the slide show runs only one times.
HRT 7000
21
Media-Player
If you want to watch image by the device, please choose
the files or create a play list with the image files which are
you wishes.
English
In case of a play list, all selected files are shown. You can
start the playback of the play list or manage the list by
operations.
Start the playback
Press the RED button on the remote control to start the playback of the play list.
Delete one file
If you want to delete one file from the play list, lease select them by using the ▲/▼ buttons. If the
file is highlighted press the YELLOW button and the selected file will be deleted from the play list.
Delete all files
If you want to delete all files from the play list, press the BLUE button on the remote control. All files
from the list will be deleted after you confirm the safety query “Are you sure to save?”. After
confirmation the operation is execute and the play list will be closed.
22
HRT 7000
SETUP
To access the setup setting please press the MENU button on the remote control. The setup menu
appears on the screen.
The menu is build-up:
Left
Right
Major Categories
Options of each category
English
The major categories are:
•
Edit Channel
•
Installation
•
System Setup
•
Tools
•
Game
•
REC
Use the ▲/▼ buttons to navigate between the major categories. Press the to switch with the ►/OK
button to the right side and enter to the options. Use the ▲/▼ buttons to navigate between the
different options. Press EXIT or ◄ button to enter from the option to the upper options or category.
Edit Channels
The menu EDIT CHANNELS contains the options for:
•
TV Channel list
•
Radio Channel list
•
Delete All
When you enter into the TV channel or Radio Channel list a dialogue inquires the password. The
standard password is 0 0 0 0. Enter the password and than you get access to these options.
TV Channel List
When you get access to the menu TV Channel
list, than you see the channel list. Here you can
define favourites, can lock, skip, move and edit
the channels.
Move the highlight by pressing the ▲/▼ buttons
and press the OK button, than the channel
appears in the preview window.
To move quickly inside the channel list you can
uses the PgDn and PgUp button to scroll one
page forward or backward.
Press ◄/► buttons to change the different program groups.
Press EXIT or MENU button to cancel this menu.
Uses the coloured buttons to activate the related functions.
HRT 7000
23
SETUP
Edit Channels
Favourite
If you want to define some channels as favourite, please choose a channel, press the FAV button
and than the OK button. A new window appears on the screen. There you can choose a favourite
group. Move the highlight among the 8 favourite groups and press the OK button to make a
favourite mark in the left side of the selected favourite group. After marking press the EXIT button to
return to the TV channel list. The marked channel has beside a favourite mark.
English
To unmark the selection press OK button again.
Lock
Press the RED button to enter into the lock mode. Press the ▲/▼ buttons choose a channel. Press
the OK button and a dialogue window appears on the screen. There you need to insert the
password. Enter the password by using the numeric buttons of the remote control. After than a lock
marked can be seen on the right side of the highlighted channel.
If you want to see a lock channel the dialogue window appears on the screen to enter the password.
Skip
Press the GREEN button to enter the skip mode. Press the ▲/▼ buttons to choose a channel.
Press the OK button to make a skip mark on the right side of the channel. Press EXIT and the
changes are saved. The channel will be skipped while user change in the live picture.
Move
Press the YELLOW button on the remote control to enter the move mode. Press the ▲/▼ buttons
to choose a channel. Press the OK button to make a moving mark on the right side of the channel.
Move the channel by using of the ▲/▼ buttons to the position that you want to place. Press OK
button to confirm the position.
Edit
Press the BLUE button on the remote control to enter the edit mode. In the edit mode you can sort,
rename or delete the channels.
The cancel the edit mode, please press the EXIT button. If you have done some modification the
system will show up a message box to inquire you weather saving or not when exiting.
Sort
Press the RED button to sort the channel in the edit mode. The device opens a Sort window. There
are four sorting approaches. Press the ▲/▼ buttons to select one option and confirm the selection
by pressing the OK button. The options are:
•
Name (A-Z):
Alphabetical descending order
•
Name (Z-A):
Alphabetical ascending order
•
Lock:
Sort all locked channels and place the in the bottom part of the list
•
Default:
Return to original setting order
24
HRT 7000
SETUP
Edit Channels
Rename
Press the GREEN button to sort the channel in
the edit mode. Press the ▲/▼ buttons to choose
a channel. Press the OK button to open the
rename window. Here you can define a new name
for the channel by using the On Screen Keyboard.
Further options are:
•
•
RED: Switch to capitals and back
GREEN: Delete the character on the
cursor position
YELLOW: Save the changes
BLUE: Exit the rename mode
English
•
•
Delete
Press the BLUE button to sort the channel in the edit mode. Press the ▲/▼ buttons to choose a
channel. Press the OK button to mark the selected channel with a delete mark on the right side.
After saving and exit the Edit Channel menu, the marked channel will be deleted.
Radio Channels
Basically, the operation in Radio Channel List are
the same as those of the TV Channel List, except
there is no video information. So the Radio logo
will always be displayed in the right side of the
preview window.
Delete All
Press OK button to delete all channels and a warning
message appears on the screen. Move the cursor to
YES or NO and press the OK button to execute the
operation.
•
•
YES:
NO:
All channels will be deleted
Cancel the function
HRT 7000
25
SETUP
Installation
Installation
When you enter the Installation menu you can
find the option for:
English
•
•
•
•
AUTO SCAN
CHANNEL SCAN
AERIAL ADJUSTMENT
LCN
Press the ▲/▼ buttons to move the cursor and
press the OK or ► button to enter the
INSTALLTION menu. If the setting MENU LOCK is on, then a dialogue to inquiry the password will
be shown. Enter the four digit password. The default password is 0 0 0 0.
When you get access to the installation menu, press the ▲/▼ buttons to move the cursor to one of
the option.
Press the EXIT button to cancel and go back to the Main Menu.
AUTO SCAN
When you enter to AUTO SCAN menu, there
you can find two sub-options:
•
•
FTA Only
Search
FTA Only
Here you can choose to search only Free-to-Air
(FTA) or including the PAY-TV (encrypted)
channels.
Change the sub-option by pressing the ◄/► buttons.
Search
Press the OK button on the sub-option Search and the device starts the channel search run.
To abort the search run, press the EXIT button.
26
HRT 7000
SETUP
Installation
Channel Scan
When entering to Channel scan menu, you will
see the different sub-options. The sub-options
are:
Scan Mode
Scan Band
Ch No
Frequency
Bandwidth
Search
English
•
•
•
•
•
•
Scan Mode
There are two choices of Scan Mode. You can scan channel by channel or frequency. If you choose
by scan by channel, than the sub-options Scan Band and Channel number (CH No) are editable.
The sub-options Frequency and Bandwidth can not changed. The parameters for frequency and
bandwidth are given from the region or country selection.
Scan Band
Here you can choose between UHF and VHF band. The frequency range by VHF band is between
174 to 230 MHz and by the UHF band between 470 to 862 MHz.
In case of the setting Frequency by Scan mode the option Scan Band disappears and can not
changed.
Channel Number (CH No)
Here you can choose one of 56 channels. If you choose a channel number than automatically
based on the country selection the parameters for frequency and bandwidth are given.
In case of the setting Frequency by Scan mode the option CH NO disappears and can not changed.
Frequency
This option are only than available, when you chosen the option Frequency by the Scan mode.
If this option is available than you can enter directly the frequency. Please pay attention that on the
selected frequency you can receive any signal. Helpfully to control this point is, to observe the
parameters Signal Intensity and Signal Quality.
Bandwidth
Here are three different settings to choose. You can uses 6, 7 or 8 MHz for the bandwidth.
Note:
Please uses the two option Frequency and Bandwidth when you are a professional. Otherwise, the
device can not find any channel.
HRT 7000
27
SETUP
Installation
Search
When you complete your modification, move the cursor to Search and press the OK button to start
the channel scan.
English
To cancel the scan you can press the EXIT button.
Aerial Adjustment
With this option you can control the Signal
Intensity and Signal quality of each Channel
Number.
If one channel has a too low strength, you may
adjust the aerial new and can try also to switch
on the Tuner Power.
With this option you can activate voltage at the
antenna output on or off.
LCN
With this option you can display the logical
channel numbers (LCN). Using the ◄ / ► button
to activate the option on or off.
28
HRT 7000
SETUP
System Setup
The menu System Setup includes the option for:
•
Language
•
TV System
•
Local Time Setting
•
Timer Setting
•
Parental Lock
•
OSD Setting
•
Favourite
English
Press the ▲/▼ buttons to move the cursor and press the OK or ► button to enter the menu. If the
setting MENU LOCK is on, then a dialogue to inquiry the password will be shown. Enter the four
digit password. The default password is 0 0 0 0.
When you get access to the installation menu, press the ▲/▼ buttons to move the cursor to one of
the option.
Press the EXIT button to cancel and go back to the Main Menu.
Language
Here you can change the language setting for
•
OSD
•
Audio
•
SubtitleT
•
eletext.
Using the ◄/► button to change the setting.
TV System
The sub-option are:
•
Video Resolution
•
Aspect Mode
•
Video Output
•
Digital Audio Output
•
Auto Stand-By
Video Resolution
Choose between PAL, NTSC or AUTO.
Note:
Usually AUTO affords the optimal effect.
Video Output
Choose the type of SCART output. You can choose between RGB and FBAS (CVBS). If your TV
supports RGB you should choose RGB because it affords a better video quality than FBAS.
HRT 7000
29
SETUP
System Setup
Aspect Mode
With this menu you set the type of your TV.
Please mind your aspect ratio of your TV.
•
Auto
English
•
•
•
16:9 Fullscreen
4:3 PanScan
4:3 Letterbox
Note:
Usually AUTO affords the optimal effect.
Digital Audio
Here you can switch on/off the digital audio output and choose the type of digital audio.
LPCM:
Digital audio output (PCM format)
BS Out:
All types digital audio
Auto Stand-By
The device will be automatically switched into standby mode after three hours in active mode
following the last user interaction and/or a channel change. An alert message will show 2 minutes
before going into standby mode.
30
HRT 7000
SETUP
System Setting
The menu Local Time Setting includes the
options for:
•
Region
•
GMT Usage
•
GMT Offset
•
Summer Time
•
Date
•
Time
English
Region
Using the ◄/► buttons to change the country.
GMT Usage
Using the ◄/► buttons to switch on or off the GMT usage setting.
GMT Offset
This option is only valid, when the GMT Usage is switched on. Using the ◄/► buttons to change
the values from –11:30 to 12:00 with the increment unit by half a hour.
Summer Time
This option is only valid, when the GMT Usage is switched on. Using the ◄/► buttons to activate or
deactivate the summer time. If on, than the current time will be added by one hour.
Date and Time
This option is only valid, when the GMT Usage is switched off. Using the ◄/► buttons to edit the
Date and Time setting.
Press the EXIT button to draw back from the Local Time Setting.
HRT 7000
31
SETUP
System Setup
Timer Setting
Select the Timer Setting in the System Setup
menu and press the OK button to start them.
You can program 8 timer schedule.
English
Press the ▲/▼ buttons to move the cursor to
one of the Timer and start them with the OK
button.
A new popup window appears on the screen to
program the schedule. On the top side you can
find the current time information.
The option to program a schedule are:
•
•
•
•
•
•
Timer Mode
Timer Service
Wakeup Channel
Wakeup Date
Wakeup Time
Duration
Timer Mode
There are several modes for the Timer (Off, Once, Daily, ect.)
Off:
No activation for the Timer
Once:
Starts the schedule only one time in order to the programmed time
Daily:
Repeats daily to the same time the schedule
Timer Service
There are two modes for the Service to set (Channel, Record).
Channel:
Starts the schedule to the programmed option and display the channel
Record:
Starts the schedule and records the channel.
Note:
If you want record, please don’t forget to plug an USB storage.
Wakeup Channel
Press the OK button to enter into the channel list. Choose a channel and confirm them by pressing
the OK button.
Wakeup Date
Use the numeric buttons to enter the date.
32
HRT 7000
SETUP
System Setting
Wakeup Time
Use the numeric buttons to enter the time.
Once the time’s up, no matter what the system is
in standby or in playing, the device will
automatically switch to the channel you want to
watch and start to play.
English
Duration
Use the numeric buttons to enter the duration of
the timer.
After setting a timer for duration item, once the time’s up, the device will automatically switch to
standby mode. If you want to disable this function, set the duration to be 00:00.
Move the cursor to the Save field and press the OK button to save the programming. Select the
Cancel field or press the EXIT button to abort the operation.
Parental Lock
By pressing the OK button on the option Parental
Lock item, a dialogue will be popup on the
screen. Now you need to insert the password.
The default password is 0 0 0 0. Once the user
mane the password correct, a new window
appears on the screen.
The options are:
•
Menu Lock
•
Channel Lock
•
New Password
•
Confirm Password
Menu Lock
Determining the user’s interaction to block the following menus with password: Edit Channels,
Installation and Tools.
Channel Lock
Determining the user’s intention to play or lock channels with password. If the setting is Yes, than
the password will be asked to play the channels with lock mark.
HRT 7000
33
SETUP
System Setup
English
New Password
This option is for revising password. Please
insert a four digit password. The option Confirm
password is now active and required to insert the
new password again.
If the password is correct, the screen will show
up a message of “Saving Data, Please Wait…”
After finishing saving and drawing back to
System Setup menu, the revising is completed.
Press the EXIT button to draw back from the Parental Lock menu into the System Setup menu.
OSD Setting
The OSD Setting includes the options for:
•
OSD Timeout
•
OSD Transparency
•
Load Default OSD Setting
OSD Timeout
To set the duration of showing up for the program
banner which contains some information about the channel and show up once the channel is
changed. Using the ◄/► buttons to set the time, ranging from 1 second to 10 seconds.
OSD Transparency
To set the transparency of OSD. Using the ◄/► buttons to set the transparency level from 10% to
40% and off. If the transparency is off, the OSD is opaque.
Load Default OSD Setting
By pressing the OK button to restore the default OSD setting.
Press the EXIT button to draw back from the OSD Setting menu into the System Setup menu.
34
HRT 7000
SETUP
System Setting
Favourite
When entering the Favourite menu, than you can
see 8 groups of favourites. The default
description of each are “Favgroup”. You can
rename the description by pressing the OK
button on a Favgroup.
To make capitals, press the YELLOW button on
the remote control.
English
An On Screen Keyboard appears on the screen.
Move the highlight with the ◄/► buttons to the
character and press the OK button to set them.
To delete the character on the cursor, press the
RED button.
To save the modification, press the BLUE button.
HRT 7000
35
SETUP
Tools
English
The Tools menu includes the options for:
•
Information
•
Load factory Setting
•
Upgrade by RS232
•
S/W Upgrade by OTA
•
Upgrade by USB
•
USB Device
•
Remove USB device safely
Press the ▲/▼ buttons to move the cursor and press the OK or ► button to enter the menu. If the
setting MENU LOCK is on, then a dialogue to inquiry the password will be shown. Enter the four
digit password. The default password is 0 0 0 0.
When you get access to the tools menu, press the ▲/▼ buttons to move the cursor to one of the
option.
Press the EXIT button to cancel and go back to the Main Menu.
Information
When entering the Information menu, a new
window appears on the screen. There you can
find different information's about the device.
Press the EXIT button to cancel into the Tools
menu.
Load Factory Setting
With this option you can restore all settings.
A warning inquiry will be shown with the
message:
“This operation will load the default and erase
all the channels that user added, the system will
reboot, continue?”
Once the YES option is chosen, the all revised
parameters of the device will be reset to the
default. Please use this function carefully.
Once the NO option is chosen, the device cancel the operation. No default settings are loaded.
36
HRT 7000
SETUP
Tools
Upgrade by RS232
This option is fading out, because the device has no RS232 port.
S/W Upgrade by OTA
This option is fading out, because no upgrade are supported by OTA.
All detailed information about the progress will be
given, when an upgrade is necessary.
English
Upgrade by USB
This function is only valid when the USB device
has been plugged-in and attached to the device.
Game
The HRT 7000 includes three games, Tetris, Othello and Soduko.
HRT 7000
37
SETUP
REC
The REC menu contains the settings for:
English
•
•
•
•
Record Manager
DVR HDD Information
HDD Format
DVR Configuration
Press the ▲/▼ buttons to move the cursor and
press the OK or ► button to enter the menu. If
the setting MENU LOCK is on, then a dialogue
to inquiry the password will be shown. Enter the
four digit password. The default password is 0 0 0 0.
When you get access to the REC menu, press the ▲/▼ buttons to move the cursor to one of the
option.
Press the EXIT button to cancel and go back to the Main Menu.
Record Manager
The Record Manager shows all recorded
contents in a list. Here you can start the playback
of them, can lock the content, can delete the
recording or rename them.
Playback
Press the ▲/▼ buttons to move the cursor on a
recorded file and press the PLAY button. The
playback starts.
Lock
Press the ▲/▼ buttons to move the cursor on a recorded file and press the GREEN button to lock
them. If you want to cancel the lock mark for a program, press the GREEN button again. It will ask
you to input the password. Once you input the correct password, it will cancel the lock feature for
the program.
Delete
Press the ▲/▼ buttons to move the cursor on a recorded file and press the BLUE button to make a
delete mark.
If you want to cancel the delete operation, press the BLUE button again to cancel the delete mark.
When you exit the Record Manager the marked file will be deleted.
38
HRT 7000
Rename
Press the ▲/▼ buttons to move the cursor on a
recorded file and press the RED button to display
the On Screen Keyboard.
Move the highlight with the ◄/► buttons to the
character and press the OK button to set them.
To delete the character on the cursor, press the
RED button.
English
To make capitals, press the YELLOW button on
the remote control.
To save the modification, press the BLUE button.
DVR HDD Information
Move the highlight to HDD Information and press
the OK button on the remote control. It will
display the information about the connected
storage.
HDD Format
Move the highlight to HDD Format and press the
OK button on the remote control. The HDD
Format menu appears on the screen.
When you press OK button again, there are three
choices listed as:
•
FAT
•
NTFS
•
Cancel
If you select FAT or NTFS, the device will format the storage by the corresponding format.
Note:
Please use this function carefully. All data will be lost by formatting the storage.
If you select Cancel, than the device abort this function.
HRT 7000
39
Troubleshooting
Check the following guide for the possible cause of a problem before contacting service.
Technical Support of Xoro/MAS:
•
Tel.: +49 40 77 11 09 17
English
•
•
Fax: +49 77735515
Internet: www.xoro.de/support.htm
Symptom
Correction
No DVB-T reception /
serious distortion by
mosaics or artefacts/
freeze pictures
•
•
No power
•
Plug the power cord into the outlet tightly and turn on
the power.
Can not scan programs
•
•
Adjust the dish
Refer settings for searching
No
picture
/
coloured pictures
•
•
•
no
•
•
•
Control the connection to the TV set.
Control the video output mode in the setup.
Press DTV/VCR button. Maybe you sets the second
SCART (VCR) into the input mode.
TV channel or program is scrambled
Remote control does
not work
•
•
•
Change the batteries.
Operate within normal range (max. 5 meters, 30 °)
The sensor is pointed to by b► light.
No sound
•
•
•
Cancel Mute. Press MUTE button
Increase volume. Press VOL+ button
Pay attention to connection to TV set or amplifier.
Audio / Subtitle without
function or can no
choose
•
•
•
•
Change audio track (press AUDIO button)
Change subtitle track (press SUBTITLE button)
Other audio track is not supported
Subtitles are not supported by broadcaster
No Recording
•
•
No USB is connected.
No free space on the storage.
Recording has jerkings
or other mal functions
•
The connected storage is too slow. Please use only
USB-Sticks with 8 GB or higher.
Please control the reception quality of the antenna and
align them for getting better quality.
•
40
No DVB-T reception in your region.
Realign the antenna. Please pay attention to the
direction of the antenna.
Please use a bigger antenna or an aerial antenna.
Retry the Auto Scan.
HRT 7000
Specification
174 — 230 MHz (Kanal 5—12)
470 — 862 MHz (Kanal 21—69)
6 or 7 or 8MHz
-70 - -10 dBm
75 Ω
Demodulation Mode
Waveform:
Demodulation:
Transmission Mode:
Guard interval:
Code rate:
COFDM(Code Orthogonal Frequency Division Multiplexing)
QPSK, QAM16, QAM64
2K, 8K, FFT, SFN und MFN
1/4, 1/8, 1/16, 1/32
1/2, 2/3, 3/4 ,5/6 ,7/8
Video, Audio Decoding
Video Standard:
Video Resolution:
Aspect Ratio:
Teletext:
Audio Standard:
Audio Sample rate:
ISO/IEC13818-2
MPEG2 (MP@ML)
MPEG-4 (H.264) High Profile Level 3
576i (480i), 576p(480p)
4:3 PS & LB, 16:9
Support DVB-ETS300472
ISO/IEC 11172 Layer I & II
32, 44.1, 48 KHz
Power
Input:
Consumption:
Consumption in Stand-By:
AC 220—240 Volt, 50/60 Hz
< 5 Watt
< 1 Watt (without in waiting for recording)
Ambient condition
Temperature:
Humidity:
0—40° Celsius
90%
Connector
USB Port:
Video:
Audio:
USB 2.0 High Speed
SCART, CVBS RCA
Coaxial RCA, Stereo RCA
Device
Weight:
Dimensions:
0,80 Kg (inclusive remote control)
220 x 160 x 43 mm
English
High Frequency Tuner
VHF:
UHF:
Bandwidth:
Input Signal Level:
Impedance:
Note:
Weight and dimensions are not absolutely exact values. Specifications are subject to change
HRT 7000
41
Glossary
English
5.1
5.1-multichannel encoding means, that 5 audio channels with full frequency response are present
(◄, center, ►, surround ◄, surround ►) plus a subwoofer channel (represented by the „.1”)
providing deep humming frequencies you are used to know from modern cinemas. Both Dolby
Digital® (including AC3) and DTS® support 5.1-coding and –decoding.
Aspect ratio: 4:3 and 16:9
Full Frame refers to programs developed for TV display with an aspect ratio of 4:3. Widescreen
refers to programs developed for screens with an aspect ratio of 16:9.
If a widescreen program is displayed on a 4:3 screen, the picture will have black borders on top and
bottom.
Coaxial
Coaxial is a digital transmission standard for audio data transfer. Coaxial can transmit digital audio
tracks from one source to another without having to leave the digital transmission, which would
result in worse quality.
CVBS
Composite Video Interface. The video signal is transmitted via a single signal line. CVBS should
only be used, if your playback device does not offer other interfaces for connection with you Xoro
TV set, as CVBS due to technical reasons delivers worst quality of all available interfaces (please
also refer to YUV, S-Video, SCART and RGB). The CVBS interface can easily be identified from the
yellow colour of the RCA jack.
Dolby Digital 5.1
Dolby Digital 5.1 is a system for transmission and storage of 5.1 channel sound on digital media as
DVD, digital TV and satellite transmission. Different from the codecs Dolby Surround® and Pro
Logic® who do not work with channel separation to encode the surround sound in a stereo
recording, Dolby Digital® is a discrete system where the different audio channels keep completely
separated during encoding and decoding. Dolby Digital 5.1 is industry standard for coding of DVD
movies with surround sound.
DVB MPEG-2
DVB is the abbreviation of Digital Video Broadcasting, which is a standardization group. DVB-T is
one type of DVB mode (T=Terrestrial). MPEG is the abbreviation of Motion Picture Experts Group, a
working group which defines international standards for audio and video digital compression. The
MPEG-2 standards are mainly applied in digital TV signals.
DVB-T
DVB-T is the transmission of digital TV via terrestrial transmitter chains in the VHF or rather the
UHF domain.
FEC
FEC stands for Forward Error Correction, applied to correct signal transmission errors between
antennas and the receiver.
42
HRT 7000
Glossary
NTSC
Widespread TV standard, especially in US and Asia. 525 (480 viewable) Lines and 60 Hz refresh
rate. Describes the way the video information (b►ness, colour, refresh rate etc.) is transmitted.
Within Europe, this video standard only appears on imported media (like US DVDs).
OSD
The OSD (On Screen Display) is all the menus and options shown on the screen.
English
PAL
European TV standard. PAL stands for Phase Alternation Line; refresh rate: 50 Hz, vertical line
resolution: 625 Lines, 576 visible lines. Describes the way the video information (b►ness, colour,
refresh rate etc.) is transmitted.
PID
The PID code (Packed Identification) is the identification number of audio and video signals in the
digital data flow/stream of DVB MPEG-2 signals. With this code, the receiver transmits audio and
video signals to a specific address.
RGB
Red Green Blue. Describes the way of transmission and display of video signals. The three in TV
systems used colours red, green and blue are transmitted separately. When used for connection
between playback device and TV set, it delivers a quality similar to YUV.
Subtitles
There are printed lines appearing at the bottom of the screen which are the translation or
transcription of the dialogues.
HRT 7000
43
English
44
HRT 7000