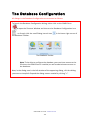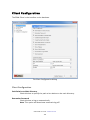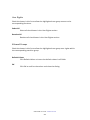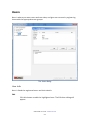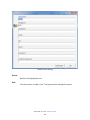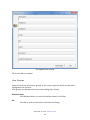
1
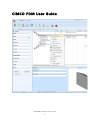
CIMCO PDM User Guide CIMCO PDM User Guide -‐ www.cimco.com 1 License information Information in this document is subject to change without notice and does not represent a commitment on the part of CIMCO Integration. The software described in this document may be used or copied only in accordance with the terms of the license. The purchaser may make one copy of the software for a backup, but no part of this user manual may be reproduced, stored in a retrieval system, or transmitted in any form or by any means electronic or mechanical, including photocopying and recording for any purpose other than the purchaser's personal use, without prior written permission from CIMCO Integration. TERMS OF USE FOR: Software: CIMCO PDM Version: 1.x.x Date: September 2011 Copyright (c) 2011 by CIMCO Integration Notice: CIMCO Integration reserves the right to make changes to the CIMCO PDM Software at any time and without notice. Software License You have the right to use the number of licenses of the enclosed program, which you have bought from CIMCO Integration. You may not distribute copies of the program or related documentation to any persons or companies. You may not modify the program or related documentation without the prior written consent of CIMCO Integration. Disclaimer of all Warranties and Liability CIMCO Integration makes no warranties, either express or implied, with respect to the software, its quality, performance, merchantability, or fitness for any particular purpose. The entire risk as to its quality and performance is with the buyer. Should the CIMCO PDM software prove defective following its purchase, the buyer (and not CIMCO Integration, its distributor, or its retailer) assumes the entire cost of all necessary servicing, repair, of correction and any incidental or consequential damages. In no event will CIMCO Integration be liable for direct, indirect, or consequential damages resulting from any defect in the software, even if CIMCO Integration has been advised of the possibility of such damages. Some jurisdictions do not allow the exclusion or limitation of implied warranties or liability for CIMCO PDM User Guide -‐ www.cimco.com 2 incidental or consequential damages, so the above limitation or exclusion may not apply to you. CIMCO PDM User Guide -‐ www.cimco.com 3 Notice: The accompanying software is confidential and proprietary to CIMCO Integration. No use or disclosure is permitted other than as expressly set forth by written license with CIMCO Integration. Copyright (c) 2011 CIMCO Integration. All rights reserved. THIS SOFTWARE CONTAINS CONFIDENTIAL INFORMATION AND TRADE SECRETS OF CIMCO INTEGRATION. USE, DISCLOSURE, OR REPRODUCTION IS PROHIBITED WITHOUT THE PRIOR EXPRESS WRITTEN PERMISSION OF CIMCO INTEGRATION. The CIMCO Logo is a trademark of CIMCO Integration. Microsoft, Windows, and Windows NT are registered trademarks of Microsoft Corporation. Other brand and product names are trademarks or registered trademarks of their respective holders. Contacting CIMCO Integration Address: CIMCO Integration I/S Vermundsgade 38A, 3 2100 Copenhagen Ø. Denmark Phone: +45 4585 6050 Fax: +45 4585 6053 E-‐mail: [email protected] Web: http://www.cimco.com CIMCO PDM User Guide -‐ www.cimco.com 4 Contents What is CIMCO PDM? .......................................................................................... 6 Installation and first run .................................................................................... 7 Program Overview ................................................................................................ 9 Menus and toolbars ......................................................................................... 9 Explorer .............................................................................................................. 12 The Database Configuration ........................................................................... 13 Client Configuration ...................................................................................... 14 Search Fields .................................................................................................... 17 External Applications ..................................................................................... 19 Level Settings ................................................................................................... 21 Database Fields ............................................................................................... 23 Level File Handling ......................................................................................... 24 Applications ...................................................................................................... 27 Predefined Fields ............................................................................................. 29 Level Sync ......................................................................................................... 31 Status Configuration ....................................................................................... 33 Machines ............................................................................................................ 36 Directories ......................................................................................................... 38 CAM Files ........................................................................................................... 40 NC Files .............................................................................................................. 42 Program Format ............................................................................................... 45 Associated Files .............................................................................................. 46 Other Files ......................................................................................................... 48 Auto-Import ....................................................................................................... 50 Advanced ........................................................................................................... 52 Transfer .............................................................................................................. 53 User Groups ...................................................................................................... 54 Users ................................................................................................................... 57 Database Configuration ................................................................................. 60 Database Server .............................................................................................. 62 Show Columns ................................................................................................. 64 CIMCO PDM User Guide -‐ www.cimco.com 5 What is CIMCO PDM? CIMCO PDM is a data management tool for organizing and managing CAM-‐files and related production documents. It is highly customizable and can be configured exactly to match your existing production workflow. With CIMCO PDM you get all the functionality you would expect from a modern information management system and then some. It allows you to gather, structure and centralize your production documents. Transfer production documents e.g. setup sheets, tool lists, pictures and other essential information directly to the shop floor. Manage permissions for users and groups and centralize the backup and recovery of documents from previous versions. Structuring production documents in CIMCO PDM works similar to how you structure files in e.g. Microsoft Windows -‐ with folders and sub-‐folders. CIMCO PDM, however, allows you to specify exactly what types of files can be added to your folders and who has permission to do so. This ensures that your files will always be placed in the right folders in your structure. CIMCO PDM, however, works with the concept of “levels” instead of folders. Levels can contain sub-‐levels and production documents can be associated with levels in several ways, such as physically copying or simply linking to documents in their existing location on a hard disk or network share. You can associate all types of production documents to a level such as images, tool lists, setup sheets, inspection notes, etc. or create them automatically by letting CIMCO PDM analyze the data contained in e.g. your CNC program. CIMCO PDM has a lot more to offer than what has been outlined above. Its flexible and highly configurable nature makes it adaptable to any existing setup or workflow. CIMCO PDM User Guide -‐ www.cimco.com 6 Installation and first run Under the hood CIMCO PDM utilizes the powerful CIMCO NC-‐Base Database Server and CIMCO PDM Server as an intermediate layer for handling the communication between CIMCO PDM and the NC-‐Base Database Server. CIMCO PDM | CIMCO PDM Server | CIMCO Database Server In order to get CIMCO PDM up and running you need to install both CIMCO PDM and CIMCO Database Server. Both are available for download at www.cimco.com, but require a valid activation keyfile to run. CIMCO Database Server is installed as part of CIMCO Software Version 6. Once you have completed installation and activation of CIMCO PDM and CIMCO NC-‐Base Database Server you need to start both the NC-‐Base Database Server and CIMCO PDM Server. It is important you do this in the right order as described below: Note: In Windows 7 and Vista you need to right-‐click and select “Run as Administrator”. 1. Navigate to folder CIMCO, then to folder NCBase6. Run NCBaseServer and click the “Start” button to start the server. 2. Navigate to folder CIMCO, then to folder PDM6. Run PDMSetup and click “Start Server”. 3. In folder PDM6, run CIMCO-‐PDM The first time you run the above you will be prompted for an activation keyfile. If you do not have a keyfile please contact your local reseller or CIMCO Integration directly. CIMCO PDM User Guide -‐ www.cimco.com 7 When you run CIMCO PDM you will be presented with the following screen. The upper part contains the “Database” toolbar and menus and the lower part contains a blank area reserved for the PDM “Explorer”. 1. Click on “Explorer” in the “Database” toolbar 2. Logon as “ADMIN” and leave the password field empty If logon was successful you will see the following screen and can start using CIMCO PDM. CIMCO PDM User Guide -‐ www.cimco.com 8 Program Overview In CIMCO PDM the screen is divided into two areas containing the “Menus and toolbars” and the “Explorer”. The topmost area contains the menus and toolbars. These are dynamic and change depending on what is selected in the Explorer. The large area underneath contains the Explorer with its Search panel (left), Explorer View (top, right) and Database Preview (bottom, right). Menus and toolbars CIMCO PDM Icon Clicking this opens a small window with a shortcut to the Explorer and Database Configuration. Database and Help (top menu) Positioned at the very top of the screen the “Database” and “Help” menus provide easy access to adding new projects, managing customers, accessing the Online Help and the About dialog. CIMCO PDM User Guide -‐ www.cimco.com 9 Explorer By clicking the “Explorer” icon you can logon to the Explorer. In the Logon dialog you first select the user you want to logon with and then supply the correct password. The Explorer will open once logon is successful. Add By clicking the “Add” icon you can add a new root-‐level entry to the Explorer View. By default the root-‐level entry is called “Project”, but this can easily be re-‐configured if you have different naming requirements. Clicking “Add” by default brings up the Project dialog where Project name, Customer and Status is entered. In the Database Configuration under Level Se1ngs you can add more database fields if needed and these will show in the Project dialog as well. Logoff Clicking the “Logoff” icon closes the Explorer and logs off the user. Find next If a search, using the Search panel, results in more than one result, the “Find next” icon will show the next result in the Explorer View. That way you can easily move through your search results. Info Clicking the “Info” icon brings up a dialog with the information and database fields for the level or document selected in the Explorer View. This can also be achieved by double-‐clicking a level in the Explorer View. You can change the information if needed and save/close the information by clicking the “OK” button. Copy Clicking the “Copy” icon makes a copy of the level or document selected in the Explorer View. Insert the copy by right-‐clicking the level in the Explorer View to which it should be inserted and click “Insert”. CIMCO PDM User Guide -‐ www.cimco.com 10 Backup Clicking the “Backup” icon makes a backup of the selected level and its sub-‐levels in the Explorer View. Verify that the backup has been performed by clicking the “Restore” icon. This brings up the Restore dialog with a list of the backups. Restore Clicking the “Restore” icon opens the Restore dialog. This shows the backups that have been created for the selected level in the Explorer View. Select the backup you wish to restore and click “Restore”. Send Clicking the “Send” icon transfers the selected document in the Explorer View to a predefined machine. Machines can be configured in the Database Configuration dialog. Lock / Unlock Clicking the “Lock” or “Unlock” icon locks/unlocks the selected level or document for editing by other users. Delete Clicking the “Delete” icon deletes the selected level or document and everything associated with it. CIMCO PDM User Guide -‐ www.cimco.com 11 Explorer Search panel The Search panel is positioned in the left side of the Explorer. Fill out any or all of the fields available and click the “Search” button. The search results will show in the Explorer View and you can navigate through them using the “Find next” icon in the toolbar. Click the “Delete” button to clear all the search fields. The available search fields can be customized in the Database Configuration dialog. The “Advanced Search” checkbox at the bottom shows the date fields for searching by dates or time periods. Explorer view The Explorer View is positioned in the top-‐right side of the Explorer. The first column in the Explorer View shows your root-‐level entries. By default these are called Projects and can be expanded by clicking the small (+) icon next to a project name. This reveals any sub-‐level documents and these can again have sub-‐level documents beneath them. There is no limit as to how many levels can exist. The Explorer View also contains a number of additional columns with details for the documents in the first column e.g. Customer name, Machine group and Status. The columns shown can be configured in the Database Configuration dialog. Double-‐clicking a level in the Explorer View brings up a dialog with the information and database fields for that level. Double-‐clicking a document opens it in an external program e.g NC-‐programs open in CIMCO Edit while CAD files open in Mastercam -‐ this is completely configurable. Right-‐clicking a document in the Explorer View brings up a contextual menu with relevant functions for that document. Many of the functions in the contextual menu have already been explained above. Database Preview The Database Preview is positioned in the bottom-‐right side of the Explorer. It provides a dynamic preview of the selected level or document in the Explorer View. The amount of information depends on the selected level or document in the Explorer View. The left side of the Database Preview shows the related database fields and information. The right side shows a preview of the contents of the selected document. It also provides an overview of the documents associated with the selected document (documents in sub-‐levels). Finally it provides a Log with history tracking of changes to the particular document. CIMCO PDM User Guide -‐ www.cimco.com 12 The Database Configuration All dialogs in the Database Configuration are accessed as follows: To launch the Database Configuration dialog, either click on the CIMCO Icon to open the Shortcut Window and then on the Database Configuration Icon , or directly click the small Dialog Launch Icon the Database Toolbar. in the lower right corner of The Database Toolbar Note: To be able to configure the database you must have access to the PC where the PDM Client is installed, as well as administrator access to the database. Now, in the dialog tree in the left window of the appearing dialog, click the dialog you want to view/edit. Expand the dialog tree as needed by clicking "+". CIMCO PDM User Guide -‐ www.cimco.com 13 Client Configuration The PDM Client is the interface to the database. The Client Configuration dialog Client Configuration Path Relative to Main Directory Check this box to specify the path to be relative to the main directory. Remember Password Check this box to log on automatically. Note: This option will deactivate automatic log-‐off. CIMCO PDM User Guide -‐ www.cimco.com 14 Open Information on Double-‐Click When this box is checked, double-‐clicking a level will show its details. If the object is a file, the double-‐clicking will cause the associated program to open it. Associated programs can be set in the Default Program control panel. Create Backup Before Open Checking this box will automatically create a back-‐up of a file before it is opened. Create a Backup Before Delete Checking this box will automatically create a back-‐up of a file before it is deleted. Open PDM Explorer on Start-‐up Check this box to have the PDM Explorer automatically open on start-‐up. Show File Extensions Check this box to show file name extensions in the Explorer. Show File Type Check this box to show file type in the Explorer. Show CAM Preview If this box is checked a preview of the associated machine is shown. Use Windows Login Name Use same login name as for Windows. CAD/CAM Setting Select which application is used to show CAD/CAM images. Max. Search Results Enter a number here to limit the maximum number of search results presented in the explorer. Auto-‐Logoff Time Specifies the time in minutes that you will stay logged-‐in without keyboard entries or mouse movements. Zero (0) de-‐activates Auto-‐ Logoff. Note: This option is not available when the option "Remember Password" is active. CIMCO PDM User Guide -‐ www.cimco.com 15 Language From the list, select the language that you want CIMCO PDM to use. Preview Picture Size Defines the width of the pictures pre-‐viewed from levels. Default Values Click this button to return to default values. OK Click OK to accept settings. CIMCO PDM User Guide -‐ www.cimco.com 16 Search Fields This dialog is where you customize your Search Panel to show the search fields you want to use. In the dialog the search fields have been divided into two groups, Global and Level. All refer to what is shown in the Explorer View, depending on your Explorer View settings. The Search Fields dialog Global Search Fields Customer Check this field to activate the Customer search field in the Explorer Search Panel. CIMCO PDM User Guide -‐ www.cimco.com 17 Status Check this field to activate the Status search field in the Explorer Search Panel. Machine Group Check this field to activate the Machine Group search field in the Explorer Search Panel. Level Search Fields Level From the scroll-‐down menu, select a level. In the pane below, one or more boxes within each level can be checked to make the corresponding sub-‐level searchable from the Search Panel. CIMCO PDM User Guide -‐ www.cimco.com 18 External Applications This is where you determine, which external applications should be executable from within CIMCO PDM, and which external applications you want to be able to open your files when right-‐clicking levels (the "Open with..." function). The External Applications dialog CIMCO PDM User Guide -‐ www.cimco.com 19 External Applications Application 1, 2, and 3 Enables easy start of up to 3 external applications from inside CIMCO PDM's menu. Enter path or browse for the executable file of the preferred application. An icon of the application will be placed in the toolbar section next time you run CIMCO PDM. Level Specific Applications Applications 1 through 6 Enter path or browse for the executable file of the preferred application. Ext. / Level In the first field, type your name for the application. In the second field, type which file extensions are allowed to be opened using the specified application (nc, txt, jpg, ...). From the list in the third field, select at which levels the application can be executed. CIMCO PDM User Guide -‐ www.cimco.com 20 Level Settings This dialog is where you define levels – their names, icons, how they are related, and where they are found. The Level Settings/Level Configuration dialog Level Configuration Level From the list, select the level to be configured. Caption Icon Write/edit the name of the level. CIMCO PDM User Guide -‐ www.cimco.com 21 Click on the icon to select a new one from file. Icon Static/Icon Dynamic Toggles if the icon is allowed to move, change shape, style, form, position, or colour. Allowed Sub-‐levels The sub-‐levels assigned to this level, as selected from: Available levels The pool of levels that have not already been selected for the "Allowed Sub-‐levels" group. Level Description Select parent level and level type. Level Directory Here is default entered the variables for Root and Levelname, but an absolute placement can be browsed by clicking the Folder icon , or you can check Prefer Machine Directories, which will use the directories configured in the machine configuration. CIMCO PDM User Guide -‐ www.cimco.com 22 Database Fields Database fields can be used to set up user defined database fields for the selected level. The Database Fields/User-‐defined fields dialog Level Level Select level from the list. Database Fields Database Fields CIMCO PDM User Guide -‐ www.cimco.com 23 Enter field names in database fields. OK Click OK to accept settings. Level File Handling For all levels that contain a file you can configure how the filename should be generated, assign a default file template, and define the standard behaviour when the file is added. The Level File Handling dialog Level CIMCO PDM User Guide -‐ www.cimco.com 24 Level Select the level file name from the list. File Name File Name Prefix In this field you enter the prefix to the file name. Digits The number of digits in the file name. If you enter the value "5" the file names – between the prefix and extension entered – will be 00001, 00002, etc. Note: This function is used for the generation of file names and is only active when "Generate File Name" is selected in the field "Default File Name" of the below section "Default Settings". Extension The file name extension you want to be default. Steps The number with which you want each new file name -‐ as generated using the number of digits specified under "Digits" – to be higher than the preceding file name. An increment value of 5 would cause the file names to be created as 00005, 00010, 00015, etc. Next Number Enter the next number to be generated. File Template Default Template The template directory for this machine. Click on the folder icon to specify a directory. Default Settings CIMCO PDM User Guide -‐ www.cimco.com 25 Default File Action Select from the list what should happen to Level files when stored in the database. Default File Name Select from the list how Level files should be named when stored in the database. Default Path The default path from which files should be opened. Click on the folder icon to specify a directory. Default Values Click this button to insert the default values in all fields. OK Click OK to confirm the values and close the dialog. CIMCO PDM User Guide -‐ www.cimco.com 26 Applications For every level that contains a file, a default application can be set up that is used to open the file on double click. The Applications/Default Application on Double-‐Click dialog Level Level Select the level file name from the list. Default Application on Double-‐Click Application CIMCO PDM User Guide -‐ www.cimco.com 27 Enter the path of the preferred application, or click on the folder icon to browse for it. Create Datafile Check this box to automatically have a datafile created. Datafile Template When "Create Datafile" is checked, in this field enter the path of the preferred template, or click on the folder icon to browse for it. Destination Directory When "Create Datafile" is checked, in this field enter the path of the destination directory, or click on the folder icon to browse for it. Default Values Click this button to insert the default values in all fields. OK Click OK to confirm the values and close the dialog. CIMCO PDM User Guide -‐ www.cimco.com 28 Predefined Fields Once a database field is set up predefined values can be configured. The Predefined Fields dialog Level Level Field Select level from list. Select field from list. CIMCO PDM User Guide -‐ www.cimco.com 29 Values Value Select predefined value or write a new one in the bottom field, enter by clicking on the check mark button . Default Values Click this button to insert the default values in all fields. OK Click OK to confirm the values and close the dialog. CIMCO PDM User Guide -‐ www.cimco.com 30 Level Sync If there are two or more database fields with the same meaning in different levels, these can be synchronised to avoid unnecessary manual entries. The Level Sync dialog Level Level Select level from list. This is the destination level for the selections made below. CIMCO PDM User Guide -‐ www.cimco.com 31 Values Select from lists to enter the values for Destination Field, Source Level, and Source Field respectively. Dest. Field Select destination field. Source Level Select source level. Source Field Select source field. Enter selections by clicking on the check mark button . Default Values Click this button to insert the default values in all fields. OK Click OK to confirm the values and close the dialog. CIMCO PDM User Guide -‐ www.cimco.com 32 Status Configuration For every single level an unlimited count of status can be set up, each containing actions like locking NC files or set a transfer limit. It is also possible to send emails when a status changes. The Status Configuration/Level Status dialog Status Configuration Level Select level from list. CIMCO PDM User Guide -‐ www.cimco.com 33 Status Group Select status group from list. Delete Delete selected status group. Add Add a status group. Status Select a status from list. Status Name Create status name. Status Following Allowed status to change to. Status Available List of available status for the selected level. NC File Lock Lock NC file when status gets active. NC File Unlock Unlock NC file when status gets active. Enable Transfer Limit Enable transfer limit for NC file when status gets active. Disable Transfer Limit Disable transfer limit for NC file when status gets active. NC-‐Base Status Change NC-‐Base status for NC file when status gets active. Send E-‐mail Select from list the user group to receive emails on status changes. Delete Delete status. CIMCO PDM User Guide -‐ www.cimco.com 34 Add Add status. Default Values Click this button to insert the default values in all fields. OK Click OK to confirm the values and close the dialog. CIMCO PDM User Guide -‐ www.cimco.com 35 Machines The Machines dialog offers functions to connect a defined group of machines to a DNC interface (DNC-‐Max). In CIMCO PDM you can dedicate projects, CAD files, CAM files, NC programs to a certain group of machines, which again is tied to a DNC interface. Directly from the control, you can then store NC programs in the database as well as request them (only possible with the DNC-‐Max functions Auto-‐Receive and Remote Request). The Machines dialog Machines A list of the machines stored in the database. CIMCO PDM User Guide -‐ www.cimco.com 36 Machine The name of the machine group. Data Directory Shows the path of the Data Directory. Delete Click this button to delete the machine group highlighted in the list. Add Click this button to add a machine group to the list. The following dialog appears: OK The Add New Machine dialog Give the machine group an indicative name and complete by clicking "Add". The Add New Machine dialog will disappear and your new machine group is added to the Machines dialog. Click OK to confirm the new Machines set-‐up and close the Database Configuration dialog. CIMCO PDM User Guide -‐ www.cimco.com 37 Directories In this dialog you define the environment variables for storing CAM-‐, NC-‐, and other files. The Directories dialog Main-‐ and Backup Directories Machine A list of the machine groups stored in the database. Select a machine group to specify the corresponding directories. Machine Directory The start directory for this machine interface. CIMCO PDM User Guide -‐ www.cimco.com 38 The $MACHINENAME variable will take the value entered here. All other variables for interface directories are default defined in relation to the $MACHINENAME variable. The initial value is $ROOT\$MACHINEGROUP. Click on the folder icon to specify a directory. Backup Directory Default value is $MACHINENAME\BACKUP. Click on the folder icon to specify a directory. CAM Files Directory Default value is $MACHINENAME\CAM. Click on the folder icon to specify a directory. NC Files Directory Default value is $MACHINENAME\NC. Click on the folder icon to specify a directory. Other Files Directory Default value is $MACHINENAME\OTHER. Click on the folder icon to specify a directory. Real Path When the cursor is placed in any of the directory variable fields, Real Path shows which actual path the variable refers to. Default Values Click Default Values to insert the default values in all the directory fields. OK Click OK to confirm the Directories values and close the dialog. CIMCO PDM User Guide -‐ www.cimco.com 39 CAM Files In this dialog you define how the names of CAM files and their templates are handled. The CAM Files dialog File Name Machine Lists the machines stored in the database. Select a machine from the list to edit its CAM files set-‐up. File Name Prefix In this field you enter the prefix to the file name. CIMCO PDM User Guide -‐ www.cimco.com 40 Digits The number of digits in the file name. If you enter the value "5" the file names – between the prefix and extension entered – will be 00001, 00002, etc. Note: This function is used for the generation of file names and is only active when "Generate File Name" is selected in the field "Default File Name" of the below section "Default Settings". Extension The file name extension you want to be default. File Template Template The template directory for this machine. Click on the folder icon to specify a directory. Default Settings Default File Action Select from the list what should happen to CAM files when stored in the database. Default File Name Select from the list how CAM files should be named when stored in the database. Default Path The default path from which files should be opened. Click on the folder icon to specify a directory. Default Values Click Default Values to insert the default values in all fields. CIMCO PDM User Guide -‐ www.cimco.com 41 OK Click OK to confirm the values and close the dialog. NC Files In this dialog you define how the names of NC files and their templates are handled. The NC Files dialog CIMCO PDM User Guide -‐ www.cimco.com 42 File Name Machine Lists the machines stored in the database. Select a machine from the list to edit its NC files set-‐up. Use Level Settings Use the same settings as are stored under Level Settings/File Handling (see this dialog). File Name Prefix In this field you enter the prefix to the file name. Digits The number of digits in the file name. If you enter the value "5" the file names – between the prefix and extension entered – will be 00001, 00002, etc. Note: This function is used for the generation of file names and is only active when "Generate File Name" is selected in the field "Default File Name" of the below section "Default Settings". Extension The file name extension you want to be default. Increment The number with which you want each new file name -‐ as generated using the number of digits specified under "Digits" – to be higher than the preceding file name. An increment value of 5 would cause the file names to be created as 00005, 00010, 00015, etc. Next Number/Increment Enter the next number to be generated. File Template Template The template directory for this machine. Click on the folder icon to specify a directory. CIMCO PDM User Guide -‐ www.cimco.com 43 Default Settings Default File Action Select from the list what should happen to CAM files when stored in the database. Default File Name Select from the list how CAM files should be named when stored in the database. Default Path The default path from which files should be opened. Click on the folder icon to specify a directory. Default Values Click Default Values to insert the default values in all fields. OK Click OK to confirm the values and close the dialog. CIMCO PDM User Guide -‐ www.cimco.com 44 Program Format In this dialog you define how the names of NC files and their templates are handled. The Program Format dialog Field Configuration Machine Lists the machines stored in the database. Select a machine from the list to edit its NC files set-‐up. Insert after The line in the NC file, after which the contents of the selected database field should be inserted. CIMCO PDM User Guide -‐ www.cimco.com 45 Database Field Select from the list the database field, the contents of which should be inserted. Activate Trigger Check this box to activate the trigger specified in "Start Trigger"/"End Trigger" in the below sub-‐section. Associated Files In this dialog you define where the associated files and their templates are placed. The Associated Files dialog CIMCO PDM User Guide -‐ www.cimco.com 46 Associated Files Machine A list of the machine groups stored in the database. Select a machine group to specify the corresponding directories. Directory Other Files Default value is $MACHINENAME\OTHER. Click on the folder icon to specify a directory. Directory Tool Data Default value is $MACHINENAME\TOOL. Click on the folder icon to specify a directory. Tool List Template The template directory for this machine. Click on the folder icon to specify a directory. Directory Memo Data Default value is $MACHINENAME\MEMO. Click on the folder icon to specify a directory. Memo Template The template directory for this machine. Click on the folder icon to specify a directory. Real Path When the cursor is placed in any of the directory variable fields, Real Path shows which actual path the variable refers to. Default Values Click Default Values to insert the default values in all the directory fields. OK Click OK to confirm the Directories values and close the dialog. CIMCO PDM User Guide -‐ www.cimco.com 47 Other Files In this dialog you define how other files are named and handled. The Other Files dialog File Name Machine A list of the machine groups stored in the database. You specify Other Files for the machine group selected here. File Name Prefix In this field you enter the prefix to the file name. CIMCO PDM User Guide -‐ www.cimco.com 48 Digits The number of digits in the file name. If you enter the value "5" the file names – between the prefix and extension entered – will be 00001, 00002, etc. Note: This function is used for the generation of file names and is only active when "Generate File Name" is selected in the field "Default File Name" of the below section "Default Settings". Default Settings Move File Check this box to move files to the designated directory instead of copying them there. Default File Action Select from the list what should happen to other files when stored in the database. Default Path The default path to which files should be stored. Click on the folder icon to specify a directory. Default Values Click Default Values to insert the default values in all fields. OK Click OK to confirm the values and close the dialog. CIMCO PDM User Guide -‐ www.cimco.com 49 Auto-Import This dialog describes how to set up the auto-‐import of NC files. The Auto-‐Import dialog File Name Machine A list of the machine groups stored in the database. Select a machine group to specify its auto-‐import settings. Start Trigger This is where you define the CAM file's start trigger. Example: "(CAMFILE=" CIMCO PDM User Guide -‐ www.cimco.com 50 End Trigger This is where you define the CAM file's end trigger. Example ")" Import Delay Use this field to specify the time in milliseconds to wait before importing data. Allowed Extensions Extension names allowed for the files to be imported. Remove Trigger Remove trigger from file before storage. Generate Tool List Check this box to have a tool list generated on basis of the imported file. Tool List Extensions Extension names allowed for tool lists. Field Name List of all import directories defined for the chosen machine group. Move Move file to the import directory (as opposed to copy –> YES). Generate Check this option to generate a new filename on auto-‐import. Delete Delete the highlighted import directory. Change Change the highlighted import directory. Add Add an import directory. Default Values Click Default Values to insert the default values in all fields. CIMCO PDM User Guide -‐ www.cimco.com 51 OK Click OK to confirm the values and close the dialog. Advanced Advanced Machine Settings. The Advanced dialog Machine A list of the machine groups stored in the database. Select a machine group to specify its advanced settings. CIMCO PDM User Guide -‐ www.cimco.com 52 Comment Insert the start / end trigger for machine specific comments Tool Trigger Insert the tool trigger. Transfer Transfer Settings The Transfer dialog Machine A list of the machine groups stored in the database. Select a machine group to specify its transfer settings. CIMCO PDM User Guide -‐ www.cimco.com 53 Use CIMCO PDM Use CIMCO PDM to send files to the machine. Create WPD Folder Create a WPD Folder for Siemens controllers. Delete After Clear the send directory after selected time? Send Directory Specify the path of the send directory. User Groups This is where you set up user access. The definition of multiple users with different access rights has some advantages: 1. The number of individuals that can change settings in CIMCO PDM is limited. 2. The regular user cannot accidentally change important configuration settings, or – depending on the configuration – delete any project, CAD file, part, CAM file, etc. 3. Optional monitoring of program changes by individual users. 4. Optional assignment of individual access rights for selected users. CIMCO PDM User Guide -‐ www.cimco.com 54 The User Groups dialog User Groups Group Name List of all groups. Users List of members belonging to each group. Delete Deletes the highlighted user group. Add Adds a user group. A dialog will pop up, where you enter the name of the new group. CIMCO PDM User Guide -‐ www.cimco.com 55 User Rights Check the boxes in this list to allow the highlighted user group access to the corresponding functions. Select All Select all check boxes in the User Rights section. Deselect All Deselect all check boxes in the User Rights section. Allowed Groups Check the boxes in this list to allow the highlighted user group user rights within the corresponding machine group. Default Values Click Default Values to insert the default values in all fields. OK Click OK to confirm the values and close the dialog. CIMCO PDM User Guide -‐ www.cimco.com 56 Users Here is where you enter users and user data, and give users access by registering them with the appropriate user groups. The Users dialog User Info Here is listed the registered users and their details. Edit Click this button to edit the highlighted user. The Edit User dialog will appear. CIMCO PDM User Guide -‐ www.cimco.com 57 The Edit User dialog Delete Deletes the highlighted user. Add Click this button to add a user. The Append User dialog will appear. CIMCO PDM User Guide -‐ www.cimco.com 58 The Append User dialog Fill in the fields as needed. User Groups Check the box(-‐es) of the user group(-‐s), the access rights of which you want the highlighted user to have. User groups are edited under the parent dialog User Groups. Default Values Click Default Values to insert the default values in all fields. OK Click OK to confirm the values and close the dialog. CIMCO PDM User Guide -‐ www.cimco.com 59 Database Configuration In this dialog you define the environment variables for storing and handling the database and its files. The Database Configuration dialog Directories Main Directory The start directory for storing the database. The $ROOT variable will take the value entered here. All other variables for database directories are default defined in relation to the $ROOT variable. CIMCO PDM User Guide -‐ www.cimco.com 60 Click on the folder icon to specify a directory. Backup Directory This is where backups of the database are placed. Default value is $ ROOT\BACKUP. Click on the folder icon to specify a directory. Temp Directory The working directory of the database. Default value is $ROOT\TEMP. Click on the folder icon to specify a directory. Real Path When the cursor is placed in any of the directory variable fields, Real Path shows which actual path the variable refers to. Max. Backups The maximum number of backups you want CIMCO PDM to store in the backup directory. Options Delete files in NC-‐Base Check this box to also delete the NC files in CIMCO NC-‐Base. Allow Multiple Links for Main Programs Check this box to allow more than one link for main programs. Allow Multiple Links for Sub-‐Programs Check this box to allow more than one link for sub-‐programs. Default Values Click Default Values to insert the default values in all the directory fields. CIMCO PDM User Guide -‐ www.cimco.com 61 OK Click OK to confirm the Directories values and close the dialog. Database Server This is where you set up the database server. The Database Server dialog CIMCO PDM User Guide -‐ www.cimco.com 62 Database Server NC-‐Base Server Name In this field you enter the name and address of the computer where NC-‐ Base is installed. The server name can be specified either as the IP address or host name. Note: If the database runs on this computer, you can just enter 'localhost'. NC-‐Base Server Port Enter the port used by the NC-‐Base Server. Note: Normally, this port should not be changed. CIMCO PDM Server CIMCO PDM Server In this field you enter the name and address of the computer where CIMCO PDM is installed. The server name can be specified either as the IP address or host name. Note: If the database runs on this computer, you can just enter 'localhost'. CIMCO PDM Server Port Enter the port used by the CIMCO PDM Server. Note: Normally, this port should not be changed. CIMCO PDM User Guide -‐ www.cimco.com 63 Show Columns In this dialog you can add custom columns to the Database Explorer. The Visible Columns dialog Database Fields Field Name Lists the user-‐defined columns that can be shown in the Database Explorer, pending right-‐clicking the Database Explorer columns title bar and selecting via check boxes. New column names are written in the field below and entered using the green check mark button. CIMCO PDM User Guide -‐ www.cimco.com 64 OK Click OK to confirm the values and close the dialog. CIMCO PDM User Guide -‐ www.cimco.com 65 Index access, 52 access rights, 52 Activate Trigger, 44 Add, 8 add a user, 56 Add New Machine, 35 Advanced, 50 Advanced Machine Settings., 50 Allow Multiple Links for Main Programs, 59 Allow Multiple Links for Sub-‐ Programs, 59 Allowed Extensions, 49 Allowed Groups, 54 Allowed Sub-‐levels, 20 Append User, 56 Application, 18 Applications, 25 Associated Files, 44 Auto-Import, 48 Auto-‐Logoff Time, 13 Available levels, 20 Backup, 9 Backup Directory, 37, 59 CAD/CAM Setting, 13 CAM Files, 38 CAM Files Directory, 37 Caption, 19 CIMCO PDM Server, 62 Create a Backup Before Delete, 13 Create Backup Before Open, 13 Create Datafile, 26 Create WPD Folder, 52 Customer, 15 Data Directory, 35 Database Configuration, Client Configuration, 1 2 Comment, 51 Configuration, Contents, 2 1 1 , 58 Database Field, 44 Database Fields, 21, 63 Database Preview, 1 0 Database Server, 61 Datafile Template, 26 Default Application on Double-‐Click, 25 Default File Action, 24, 39, 42, 47 Default File Name, 24, 39, 42 Default Path, 24, 39, 42, 47 Default Settings, 24, 39, 42, 47 Default Template, 23 Default Values, 14, 24, 26, 28, 30, 37, 39, 42, 45, 47 Delay, 49 Delete, 9 Delete After, 52 Delete files in NC-‐Base, 59 Deselect All, 54 Dest. Field, 30 Destination Directory, 26 Dialog Launch Icon, 11 Digits, 23, 39, 41, 47 Directories, 36, 58 Directory Memo Data, 45 Directory Other Files, 45 Directory Tool Data, 45 Disable Transfer Limit, 32 1 1 Copy, 8 CIMCO PDM User Guide -‐ www.cimco.com 66 Edit User, 55 Enable Transfer Limit, 32 End Trigger, 49 environment variables, 58 Explorer, 8 , 1 0 Explorer view, 1 0 Ext. / Level, 18 Extension, 23, 39, 41 Extensions, 49 External Applications, 17 Field Configuration, 43 Field Name, 49, 63 Links, 59 Lock, 9 Logoff, 8 Machine, 38, 41, 43, 45, 46, 48, 50, 51 Machine Directory, 36 Machine Group, 16 Machines, 34 Main-‐ and Backup Directories, 36 Main Directory, 58 Max. Backups, 59 Max. Search Results, 13 Memo Data, 45 Memo Template, 45 File Name, 38, 41, 46, 48 File Name Prefix, 23, 38, 41, 46 File Template, 23, 39, 41 Find next, 8 Generate, 49 Generate Tool List, 49 Global Search Fields, 15 Group Name, 53 Icon Dynamic, 20 Icon Static, 20 Import, 48 Import Delay, 49 Increment, 41 Info, 8 Insert after, 43 Menus, 6 Move, 49 Move File, 47 Multiple Links, 59 NC File Lock, 32 NC File Unlock, 32 NC Files, 40 NC Files Directory, 37 NC-‐Base Server Name, 62 NC-‐Base Server Port, 62 NC-‐Base Status, 32 Next Number, 23, 41 Open Information on Double-‐Click, 13 Open PDM Explorer on Start-‐up, 13 Options, 59 Other Files, 46 Other Files Directory, 37 Path Relative to Main Directory, 12 PDM Server, 62 PDM Server Port, 62 Port, 62 Predefined Fields, 27 Preview Picture Size, 14 Program Format, 43 4 Installation, Language, 14 Level, 19, 21, 25, 27, 29, 31 Level Configuration, 19 Level Description, 20 Level Directory, 20 Level File Handling, 22 Level Search Fields, 16 Level Settings, 19 Level Specific Applications, 18 Level Sync, 29 CIMCO PDM User Guide -‐ www.cimco.com 67 Program Overview, 6 Steps, 23 Sub-‐levels, 20 Temp Directory, 59 Template, 39, 41 Tool Data, 45 Tool List, 45, 49 Tool List Extensions, 49 Tool List Template, 45 Tool Trigger, 51 Real Path, 37, 45, 59 Remember Password, 12 Remove Trigger, 49 Restore, 9 Search Fields, 15 Search panel, 1 0 Select All, 54 Send, 9 Send Directory, 52 Send E-‐mail, 32 send emails, 31 Server Port, 62 Show CAM Preview, 13 Show Columns, 63 Show File Extensions, 13 Show File Type, 13 Source Field, 30 Source Level, 30 Start Trigger, 48 Status, 16, 32 Status Available, 32 Status Configuration, 31 Status Following, 32 Status Group, 32 Status Name, 32 toolbars, 6 Transfer, 51 Transfer Settings, 51 Trigger, 44, 48, 49, 51 Unlock, 9 Use CIMCO PDM, 52 Use Level Settings, 41 Use Windows Login Name, 13 user access, 52 User Groups, 52, 53, 57 User Info, 55 User Rights, 54 Users, 53, 55 Values, 28, 30 WPD, 52 WPD Folder, 52 CIMCO PDM User Guide -‐ www.cimco.com 68