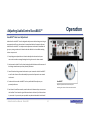
1
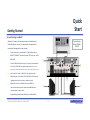
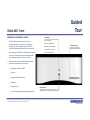
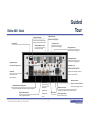
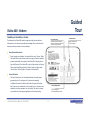
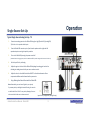
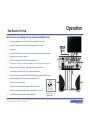
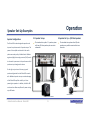
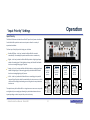
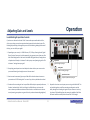
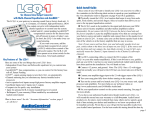
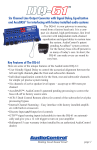
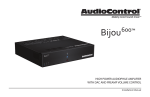
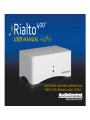
Quick Start Ge1ng Started Up and running in a flash! Welcome! It takes just a few steps to get your AudioControl Typical Single Source Digital Set-‐Up Rialto 400 up and running. The steps below are explained in more detail throughout this user manual. 1. Connect one source component (i.e. Digital Music Player, 1 SONOS™ CONNECT, Television, Receiver, CD Player etc.) to the Rialto 400. 2. From the Rialto 400 connect a pair of your favorite speakers. 3. Turn on the Rialto 400 using the power switch (Note: Whenever 5 3 6 changing inputs, switch the Rialto 400 off first, make changes and then switch it back on). 4. Set the Input Priority to ‘Digital’ for this typical set-‐up. 5. Adjust the gain on the back of the Rialto 400 to the desired 4 seZng to work with your source volume control. 6. Adjust the level on the AudioControl AccuBASS™ to the desired amount of bass response to add bass and 7 7 richness back to your music. 7. 2 Enjoy Making Good Sound Great from the Rialto 400. AudioControl User Manual – Rialto 400 2 Hello! Introduc;on and Contents Thank you and congratula;ons for purchasing your AudioControl Rialto 400. Contents Table Page No. This User Manual is your guide to installing and using the Rialto 400 Amplifier and DAC, Introduc;on and Contents………………………..……………….……….. 3 Ge1ng Started…………………………………………………………………… 2 including informa`on on its more advanced features. The Contents Table will help you navigate A Quick Look at the Rialto 400…………………………………..….……. 4 to the area of the manual you are looking for. It is a good idea to read the whole manual in Installa;on Guidelines……………………………………………...………… 5 Guided Tour -‐ Front………………………………………………….…………. 6 order to acclima`ze yourself with the full workings and features of the Rialto 400. Guided Tour -‐ Back……………………………………………….…………….. 7 Guided Tour – BoJom……..……………………………….……………….. 8 Established in Seable nearly four decades ago, we have always been dedicated to designing, Single Source Set-‐up…………………………………………………………… 9 engineering and building world-‐class audio products from the ground up. In the process, we’ve Two Source Set-‐up……………………………………………………………… 10 earned a reputa`on worldwide for opera`ng at the highest levels of reliability and performance with a mission of ‘Making Good Sound Great’. Speaker Set-‐Up…………………………………………………………………… 11 Input Priority Se1ngs………………………………………………………… 12 Adjus;ng Gain and Levels……………………….….……………………… 13 Adjus;ng AudioControl AccuBASS™……………………………..…… 14 We trust that you will get many years of sa`sfying and trouble-‐free opera`on from the Rialto Troubleshoo;ng & Service……………………………………………...... 15 400. If you require more informa`on about the Rialto 400 or any of AudioControl products, do Specifica;ons……………………………………………..…………..…..…….. 16 not hesitate to talk to our dealers worldwide or contact us directly at our Seable base in the Warranty……………………….……………..……………………………………. 17 What’s New at AudioControl…………………………………..…………. 18 rainforests of the Pacific Northwest, USA. The days can be rainy and cold but there is always a Important Safety Instruc;ons……………………………………...……. 19 warm welcome and a hot cup of coffee available all year round. Making Good Sound Great………………….........……………………... 20 AudioControl User Manual -‐ Rialto 400 3 Ready to Rumble! A Quick Look at the Rialto 400 AudioControl’s Rialto 400 is the first in a new class of compact, Equipped with AudioControl’s unique patent-‐pending AccuBASS™ high-‐powered amplifier with a built-‐in audiophile-‐grade DAC circuitry, the Rialto 400 also rejuvenates the bass response lost in most designed specifically to provide greater performance and higher digital compression schemes. This results in a richer and fuller audio sound quality for all analog and digital systems, including performance with beber bass and mid-‐bass response. The net effect is streaming audio components like Sonos® home entertainment. that you will enjoy a more complete listening experience and hear music with a richness and vibrancy much closer to the way the ar`st intended The Rialto 400 powerful amplifier delivers 100 wabs of power per their music to be enjoyed. channel into 8 ohms and 200 wabs per channel into 4 ohms. Addi`onally, the Rialto 400 can be bridged to perform as a mono-‐ block amplifier. The state of the art Rialto 400 features a built-‐in high-‐performance Wolfson® DAC (digital to analog converter) that drama`cally improves audio quality. Digital and analog audio-‐systems can now reach their full poten`al across the whole house whether the speakers are free-‐standing, in-‐wall, in-‐ceiling, invisible, desktop, gaming etc. AudioControl User Manual -‐ Rialto 400 4 Se1ng the Scene! Installa;on Guidelines Placing the Unit Placement Speakers " The Rialto 400 is a small yet high performance " Place the Rialto 400 on a level, firm surface, avoiding direct sunlight and sources of heat and damp. " The Rialto 400 is designed to work with all 8 ohm and 4 ohm speaker set-‐ups. The Rialto 400 is versa`le and flexible and works with the following speaker installa`ons and more! amplifier and audiophile DAC. As such, the Rialto 400 delivers incredible sound performance and will ohen be warm to the touch – similar to the touch of a hot cup of double shot, vanilla labe in a ceramic mug from one of Seable’s 9,368 coffee shops! " Care should be taken in finding the best loca`on to place the unit for op`mal performance. " The Rialto 400 loves speakers and can be situated to fit in with any speaker set up from the most powerful free-‐standing speakers to " Do not place the Rialto 400 on top of a power " Free-‐standing speakers. amplifier or other source of heat. " In-‐wall and in-‐ceiling speakers. " Do not place the Rialto 400 in an enclosed space such as a bookcase or closed cabinet " Invisible speakers – In-‐Wall and In-‐ceiling. unless there is good provision for ven`la`on. The Rialto 400 will run warm during normal " Extra zone speakers including outdoor. opera`on. " Televisions and sound bars. " Do not obstruct any of the ven`la`on vents " Desktop speakers and gaming set-‐ups. on the back or base of the unit. “It likes to breathe”. " And more……. The Rialto 400 loves speakers and speakers love the Rialto 400! " Do not place the unit on carpet or any thick material that could block the vents. " As with all products made in the USA by AudioControl, the Rialto 400 should not be deep fried or sautéed. the smallest desktop configura`on……. AudioControl User Manual -‐ Rialto 400 5 Cables " We recommend the use of high-‐quality analog and/or digital cables. All cables should be kept as short as prac`cably possible. Power cabling should be kept as far away as possible from audio cables. Guided Tour Rialto 400 -‐ Front Flexibility and Versa;lity at its Best LED Indicator The Rialto 400 has numerous inputs for a variety of entertainment sources. These sources can be digital or analog as there are a mul`tude of inputs for both. The source unit should normally have a built-‐in volume control. Blue -‐ Performing " When seZng up the Rialto 400, it should be located between the source unit and the speakers in a convenient and safe place following the guidelines in this user manual. Green – Coffee brewed " Sources that can connect to the Rialto 400 and have their performance drama`cally improved include: " " Digital Music Systems like SONOS " Televisions " Analog and Digital Audio Sources " Computers " Gaming Consoles " Any room requiring addi`onal/improved amplifica`on AudioControl User Manual -‐ Rialto 400 Dim Red – Standby Mode Bright Red -‐ Protec`on Mode AudioControl Logo Flashing Red –Current Limit Making Good Sound Great Headphone Jack Headphone jack for listening through headphones. 6 Guided Tour Rialto 400 -‐ Back Voltage Select Switch Digital Gain Level Ensure that the voltage selected Adjustment for digital gain matches your local power supply Power Switch Analog Gain Level Subwoofer/Mono Output Adjustment for analog gain RCA output for analog Analog Audio Input 1/8th inch stereo analog input Analog Audio Inputs RCA inputs for analog sources Digital Audio Input Input for op`cal digital input AccuBASS™ Level Adjust to rejuvenate the bass Power Inlet response increasing the richness of Connect the correct the music and bass level Power cable here Five-‐Way Gold Plated Binding Posts High performance gold plated speaker output binding posts Adjust to increase and decrease Speaker Level Inputs Standby Off Analog Priority Input for digital audio COAX All On speaker input level gain control Connect input speaker wires to these terminals Digital Priority Digital Audio COAX Input AudioControl User Manual -‐ Rialto 400 Speaker Level Gain Input Priority (Ac`ve = Down) Mono LED 7 12 Volt Trigger Output Guided Tour Rialto 400 -‐ BoJom Flexibility and Versa;lity at its Best Ground Lia Switch Switches the level of isola`on between the audio signal ground and your AC earth ground. The bobom of the Rialto 400 contains important safety and compliance informa`on. It also contains two adjustment seZngs that can be altered to improve performance under certain condi`ons. " Stereo/Mono Mode Switch " Under normal use condi`ons, this switch will be set to ‘Stereo’. When the Rialto 400 is used in Mono mode (i.e. using the Rialto to amplify a powered subwoofer), the output of the Rialto 400 is increased to as high as 400 wabs. If the Rialto 400 is used in Mono mode, the Stereo/ Mono switch should be switched to ‘Mono’. When in Mono mode, the red ‘Mono’ LED will light on the back of the Rialto 400. " Ground Lia Switch " This switch selects the level of isola`on between the audio signal ground and your AC earth ground. Under normal opera`ng condi`ons this switch should be switched to the ‘ground’ posi`on, but if you run into trouble with an AC ground hum, try the other two seZngs for the best opera`on. For your safety. The chassis is always connected to the earth ground regardless of the switch seZng. AudioControl User Manual -‐ Rialto 400 Mono Bridging Switch Used to bridge the Rialto 400 into Mono mode. 8 Ven;la;on Grills Keeps the Rialto 400 nicely ven`lated! Opera;on Single Source Set-‐Up Typical Single Source Analog Set-‐Up – TV 1. Connect one analog source to the Rialto 400 using the right (R) and leh (L) analog RCA, 1/8th inch mini or speaker level inputs. 2. From the Rialto 400 connect a pair of your favorite speakers to the right and leh 1 5 speaker outputs ensuring that polarity matches. 3. Turn on the Rialto 400 pressing the power on switch! (Note: Whenever changing inputs, switch the Rialto 400 off first, make changes and then switch it back on). 4. Set the Input Priority to Analog. 5. Adjust the gain on the back of the Rialto 400 adjus`ng the analog gain level to the 3 6 desired gain seZng to work with your source volume control. 6. 4 Adjust the level on the AudioControl AccuBASS™ to the desired amount of bass response to add bass and richness back to your music. 7. Enjoy Making Good Sound Great with the Rialto 400. 7 Note: Alterna`vely you can choose Digital as your priority 2 if you want priority to be digital instead of Analog. You can also set the Rialto 400 to ‘All On’ for no priority allowing all sources to be controlled via the source volume controls. AudioControl User Manual -‐ Rialto 400 7 4 Input Priority configura`on (Analog Priority) 9 Opera;on Two Source Set-‐Up Typical Two Source Analog/Digital Set-‐Up configured with Digital Priority 1. Connect one digital source to the Rialto 400 using the op`cal or COAX input. 2. Connect one analog source to the Rialto 400 using the right (R) and leh (L) analog inputs. 3. 4 outputs ensuring that polarity matches. 4. 1 From the Rialto 400 connect a pair of your favorite speakers to the right and leh speaker Turn on the Rialto 400 by pressing the ‘power’ switch to on! 6 2 7 (Note: Whenever changing inputs, switch the Rialto 400 off first, make changes and then switch it back on). 5. Set the Input Priority to ‘Analog or Digital’ depending on your preference or set the Input Priority to ‘All On’ for no priority between inputs 6. using the analog volume to the desired volume seZng to work with your source volume control. 7. 5 Adjust the volume on the back of the Rialto 400 using the digital volume and then repeat Adjust the level on the AudioControl AccuBASS™ to the desired 8 3 amount of bass response to add bass and richness back to your music. 8. Enjoy Making Good Sound Great with the Rialto 400. AudioControl User Manual -‐ Rialto 400 8 Input Priority (Digital Priority) 10 5 Opera;on Speaker Set-‐Up Examples Speaker Configura;on The Rialto 400 has been designed to equalize and improve the performance of all speaker set-‐ups. The 2.1 Speaker Set-‐up 4 Speaker Set Up – 4/8 Ohm Speakers " The standard set-‐up for a 2.1 speaker system with two 4/8 ohm speakers plus an ac`ve subwoofer. " The standard set-‐up where four 4/8 ohm speakers are parallel connected into two channels. power of the amplifier combined with the audio performance and quality of AudioControl’s Wolfson engineered, digital to analog converter (DAC) results in a drama`c improvement in the performance of all speaker set-‐ups throughout the house. On the right are just two of the many types of speaker configura`on that the Rialto 400 can work with. Addi`onal speaker set-‐ups can take advantage " 4/8 ohms " 4/8 ohms of the Rialto 400 amplifiers stability at 4 ohms powering four speakers. In addi`on, the Rialto 400 " 4/8 ohms " 4/8 ohms can be used as a Mono amplifier with power ra`ngs " 4/8 ohms " 4/8 ohms up to 400 wabs. Powered Subwoofer Powered Subwoofer AudioControl User Manual -‐ Rialto 400 11 Opera;on ‘Input Priority’ Se1ngs Input Priority The Rialto 400 features the AudioControl SMART Input Priority feature that allows for the Rialto 400 to priori`ze certain source inputs to allow for a variety of opera`onal condi`ons. The four Input Priority ‘dip switch’ seZngs are as follows: " Standby Off/Sleep – In the ‘on’ posi`on the Rialto 400 will not switch automa`cally into standby/sleep mode and will remain on con`nuously. " Digital – In the ‘on’ posi`on the Rialto 400 will priori`ze a digital signal input ahead of an analog signal. If the digital signal stops, the Rialto 400 will switch back to an incoming analog signal if present. " Analog – In the ‘on’ posi`on the Rialto 400 will priori`ze an analog signal input ahead of a digital signal. If the analog signal stops, the Rialto 400 will switch back to an incoming digital signal if present. " All On – In the ‘on’ posi`on the Rialto will have no overriding priority and all inputs will play. Play back should be controlled by the various sources as ‘All-‐On’ could result in both digital and analog sources being heard as no priori`za`on has been set. Example A Standby off & set to ‘DIGITAL’ priority Example C Standby off & set to inputs ‘ALL ON’ Example D Standby on & set to inputs ‘All ON’ OFF ON The op`mal set-‐up for the Rialto 400 is as a single-‐source or two-‐source set-‐up with one digital and/or one analog input allowing for priori`za`on between the two inputs depending on what is required for your desired set-‐up. AudioControl User Manual -‐ Rialto 400 Example B Standby off & set to ‘ANALOG’ priority 12 Opera;on Adjus;ng Gain and Levels Level Matching & Input Gain Controls If you have ever listened to a friend’s “killer” home audio system and heard lots of hiss, clicks or pops, then you may have experienced an improperly level-‐matched system. The following steps will help you through the process of level matching, although at the end of the day, your ears will be your guide! 1. Depending on your source (i.e. SONOS Connect, TV, CD Player, Gaming Console, Digital Player, Receiver, Preamp etc.) and the amount of gain you want to set, adjust one of the three ‘Gain SeZng knobs’ on the back of the Rialto 400 (Digital Volume, Analog Volume or Speaker Level Volume) to ‘minimum’ for the input you are adjus`ng the gain for. This is known as “turning down your gains”. Digital Gain Adjust for digital input gain Analog Gain 2. Start playing some dynamic music and adjust the volume level on your source unit to your normal listening level using the source’s volume control. Adjust for analog input gain Speaker Level Gain 3. Now increase the amount of gain on your Rialto 400 so that the volume increases to your maximum ‘LOUD’ listening level. For some of you, this may be louder than others! 4. Con`nue to fine tune the gain level on your Rialto 400 to adjust to personal preferences, ‘loudness’ and musicality! At this level of gain, it will s`ll allow you to increase the source volume up and down to achieve minimum levels or rock the houses in the next street (assuming your speakers are game for it and you have understanding neighbors!). AudioControl User Manual -‐ Rialto 400 Adjust for speaker level input gain 5. Repeat for the various source inputs you are using on the Rialto 400. The end result being that you will have amazing sounding music and the ability through level matching the ‘gains’ with your sources to ‘crank up the volume’ fully benefiZng from the power and capability of the Rialto 400 ‘wabs’ and the musicality of the internal DAC. It’s like magic! 13 Opera;on Adjus;ng AudioControl AccuBASS™ AccuBASS™ Bass Level Adjustment AudioControl's AccuBASS™ circuit is designed to help recover the bass that goes missing in compressed music files or when volume is increased and the bass frequencies roll away. AudioControl’s AccuBASS™ is a simple one-‐`me adjustment at the `me of installa`on to give your system great bass at all volume levels and add back in an incredible sounding richness to your music. 1. Start playing some dynamic bass-‐rich music and adjust the volume level on your source unit to an above average listening level using the source’s volume control. 2. Now increase AccuBass™ level by slowly turning the dial clockwise un`l the amount of bass being restored meets your own personal preferences. 3. You will hear bass being restored to the music as you increase the level of AccuBASS™ as well as the richness of the audio steadily improve as bass frequencies are restored to the music. AccuBASS™ 4. Con`nue to fine tune the AccuBASS™ level on your Rialto 400 to adjust to your personal preferences. Adjust to rejuvenate the bass level response increasing the richness of the music and bass level 5. You’re done! You will have smooth, seamless bass at all volumes and you can even use the AccuBass™ level control to give a lible extra boost to the bass if you like more bass in your music. It’s your music your way and the way the ar`st intended it to be heard! AudioControl User Manual -‐ Rialto 400 14 Troubleshoo;ng & Service Help! No Sound " Check the unit is plugged in and power LED is Blue. When Priority Switching " Service A delay of approximately 10 seconds is set for the LED is dim red, the unit is in standby and when bright the ‘input priority’ source (i.e. digital or red it is in protec`on. analog) to not see a priori`zed input before " Check all cables are securely connected. the switch back to the un-‐priori`zed input. " Check the source unit is on and playing. " Check the speaker connec`ons are secure. " Check the priority switch has been set correctly. In Protec;on " " During quiet passages, lengthy silent spaces in music or a TV program, the Rialto 400 may believe that the priori`zed signal has stopped AudioControl has a reputa`on for providing some of the best support and service in our industry. Our technical team takes pride in ensuring we respond to any customer needs providing support through our website and live on the phone from our base here in Seable, USA. If you need service, first contact your local dealer or interna`onal distributor for advice. You can also contact our tech support team either by email or phone from 8am-‐5pm Pacific Standard Time (PST). We will verify if there is anything that you can correct yourself. If we ask you to return a unit, please include the following. The amplifier in the Rialto 400 will protect itself if it and will switch back to the un-‐priori`zed " Copy of proof of purchase (No originals please) experiences an unusually large power surge, overheats or signal. This will correct immediately when the " A brief explana`on of the problem experiences a short. This is a circuit that protects the priority signal starts again. The Rialto 400 is set " A full return address (No P.O. Boxes please) Rialto 400 and speakers. Turn down the volume and the to automa`cally switch back to the non-‐ " A day`me phone number in case of ques`ons. Rialto 400 will normally resume playing aher a short priori`zed signal aher approximately 10 period of `me. A flashing red LED on the front of the unit seconds of quiet space/silence. indicates that the Rialto 400 is opera`ng at its ‘Current Limit’ and in danger of going into protec`on. In this situa`on you may have too many speakers abached, you are driving the amplifier too hard or speaker impedance is below 4 ohms and you may need to reduce the load. AudioControl User Manual -‐ Rialto 400 More Troubleshoo;ng For addi`onal troubleshoo`ng , support and technical advice, please visit our website at www.audiocontrol.com. 15 You will be responsible for freight charges to us, but we will pay the return freight back as long as the unit is under warranty. We Recommend United Parcel Service (UPS) for most shipments. Our repair services address is: Abn: Service Department 22410 70th Avenue West, Mountlake Terrace, WA, 98043, U.S.A. Phone: +1 425-‐775-‐8461 Email: [email protected] Web: www.audiocontrol.com Specifica;ons What’s Inside! Inputs & Outputs Minimum Voltage to Drive Max Power Product Assurance " 2 Channel Power Amplifier " RCA inputs: 230 mVolts " Country of Origin: USA " Digital Inputs: Op`cal Toslink & Coax SPDIF 75 ohms " Speaker inputs: 2.0 Volts " Engineered and Assembled in USA " Rainforest: Pacific Northwest " Limited Warranty: 5 Years " Patent Pending " For addi`onal specifica`ons and technical details visit www.audiocontrol.com " Analog Inputs: Stereo, Speaker levels & 1/8th Inch Power Output Signal Sense Trigger Minimum " RCA inputs: 10 mVolts " 100 wabs per channel into 8 ohms " Speaker inputs: 100 mVolts " 200 wabs per channel into 4 ohms " Digital: Bitstream " Minimum Speaker Load 4 ohms Power Consump;on " Typical Listening: 40 wabs Manual Bass Adjustment " AudioControl AccuBASS™ This manual was wriben, designed, printed and carefully placed right side up into the " Maximum: 520 wabs Dimensions box in the USA on a wet and rainy day in Seable by a Line Voltage " Weight 4.5lbs team of music lovers. " 100-‐120 VAC/200-‐240 VAC Switchable " Width 8.5 inches © AudioControl 2013, All Rights Reserved. " Depth 5.4 inches AudioControl®, Rialto 400™ and AccuBASS™ " Height 2.9 inches are registered trademarks of AudioControl Inc. Sound Measurement " Signal to Noise Ra`o: >95dB AudioControl Manual #: 9131200 " Total Harmonic Distor`on: 0.09% AudioControl User Manual -‐ Rialto 400 16 Warranty The Good Small Print! The Legalese Sec;on! Our Warranty People are confused by warran`es! Lots of fine print. Months of wai`ng around. Well, fear no more AudioControl is here. This warranty is designed to make you rave about AudioControl. It’s a warranty that looks out for our customers, plus helps you resist the tempta`on to have your friend, “who is good with electronics”, try to repair your AudioControl product. So go ahead, read this warranty, then register the informa`on at www.audiocontrolregistra`on.com. “Condi`onal” doesn’t mean anything ominous. The Federal Trade Commission tells all manufacturers to use the term to indicate that certain condi`ons have to be met before they’ll honor the warranty. If you meet all of these condi`ons, we will warrant all materials and workmanship on the Rialto 400 for five (5) years from the date you bought it, and we will fix or replace it, at our op`on, during that `me. Here are the condi;onal condi;ons: 1. You need to register your purchase of the Rialto 400 with us by going to the AudioControl web site www.audiocontrol.com and then go to the warranty registra`on page and follow the direc`ons. Op`onally, go to www.audiocontrolregistra`on.com. 2. You must keep your sales receipt for proof of purchase showing when and from whom the unit was purchased. We’re not the only ones who require this, so it’s a good habit to get into with any major purchase. 3. The Rialto 400 must have originally been purchased from an authorized AudioControl dealer. You do not have to be the original owner, but you do need a copy of the original sales slip. 4. You cannot let anybody who isn’t: (A) the AudioControl factory; or (B) somebody authorized in wri`ng by AudioControl to service the Rialto 400. If anyone other than (A), or (B) messes with the Rialto 400, that voids your warranty. 5. The warranty is also void if the serial number is altered or removed, or if The Rialto 400 has been used improperly. Now that sounds like a big loophole, but here is all we mean by it: Unwarranted abuse is: (A) physical damage (don’t use the Rialto 400 to level your dining room table); (B) improper connec`ons (120 volts into the RCA jacks can fry the poor thing); (C) sadis`c things! This is the best product we know how to build, but if you strap it to the front bumper of your Range Rover, something might break. Assuming you conform to 1 through 5, and it really isn’t all that hard to do, we get the op`on of fixing your old unit or replacing it with a new one. AudioControl User Manual -‐ Rialto 400 17 This is the only warranty given by AudioControl. This warranty gives you specific legal rights, and you may also have rights that vary from state to state. Promises of how well the Rialto 400 will work are not implied by this warranty. Other than what we’ve said we’ll do in this warranty, we have no obliga`on, express or implied. We make no warranty of merchantabilty or fitness for any par`cular purpose. Also neither we nor anyone else who has been involved in the development or manufacture of the unit will have any liability of any incidental, consequen`al, special or puni`ve damages, including but not limited to any lost profits or damage to other parts of your system by hooking up to the unit (whether the claim is one for breach of warranty, negligence of other tort, or any other kind of claim). Some states do not allow limita`ons of consequen`al damages. Failure to register your product negates any service claims. The warranty included with the unit shall supersede this plain-‐text version if there is any inconsistency between the two. More Making Good Sound Great at AudioControl Architect 210 EQ Making Good Sound Great Architect 1680 EQ Director Model D3400 & D4400 16 CHANNEL AMPLIFIER WITH SPEAKER EQ 16 CHANNEL NETWORK AMPLIFIER / SPEAKER EQ 2 CHANNEL HIGH-‐POWER AMPLIFIER WITH EQ The AudioControl Architect Model 210 EQ is a high power, 240 wabs into 2 ohms, amplifier that delivers superb sound quality while driving up to 8 speakers (stable into 2 ohms). A fully integrated six-‐band equalizer is engineered for op`mal performance from smaller and in-‐wall loudspeakers The Architect 210 EQ is also available with Energy Star Cer`fica`on as an op`on opera`ng at under 1 Wab in standby. 2 Channels High Current Design 240 Wabs Per Channel into 2 Ohms (8 Speakers) 6-‐Band Speaker Equaliza`on Cool Running LightDrive An` Clipping 2U Rack Space PFM Subsonic Filter for Speaker Protec`on Signal Sense Turn-‐on Blue LED AudioControl User Manual -‐ Rialto 400 The Architect Model 1680 EQ mul`-‐room amplifier squeezes 16-‐channels of cool running power with discrete zone equaliza`on controls into just three rack spaces. With power output levels of at least 65 wabs per channel into 8 ohms, and even more into lower impedances, the Architect Model 1680 EQ delivers robust power levels and pris`ne sonics 16 Channels 65 Wabs Per Channel, All Channels Driven Bridgeable for Increased Power Cool Running, Class H Topology 5-‐Band Speaker Equaliza`on Compact 3U Rack Space LightDrive An`-‐Clipping Protec`on Blue LED Less Than 1 Wab in Standby 18 Modern distributed audio systems demand high levels of audio performance and flexibility, which makes The Director Model D3400 and D4400 unique in their design. Delivering powerful and efficient amplifica`on of 60 or 100 wabs per channel, they are perfectly matched with a configurable DSP engine to maximize the sound performance of any mul`-‐ room system. The unique DSP design allows network access to graphic and parametric equaliza`on filters, digital crossover seZngs, subsonic filters, and allows remote monitoring and zone switching capabili`es. 16 Channel High Power Amplifier 16 x 65w (D3400) or 100w (D4400) per channel. Bridgeable for Increased Power Ethernet Port for Status Monitoring, Source Switching and 12 Volt Trigger Control Network Programmable Graphic & Parametric Equaliza`on with User Memories Be Safe! Important Safety Instruc;ons " Read these instruc`ons. " Keep these instruc`ons. " Heed all warnings. " Follow all instruc`ons. " Do not use this product near water. " Unplug this product during lightening storms or when unused for long periods of `me which we hope will be rarely! " " Do not block any ven;la;on openings. Install in accordance with manufacturers instruc;ons. Refer all servicing to qualified service personnel – Servicing is required when the apparatus has been damaged in any way, such as power-‐supply cord or plug is damaged, liquid has been spilled or objects have fallen into the apparatus, the apparatus has been exposed to rain or moisture, does not operate normally or has been dropped. " Do not install near heat sources such as radiators, " stoves or any other apparatus including amplifiers that produce heat. " Do not try to alter the safety purpose of the product or electrical safety plug Object or liquid entry – WARNING – take care that objects do not fall through any openings. The equipment shall not be exposed to dripping or splashing. Liquid filled objects such as vases should not be placed on the equipment. " Protect the power cord from being walked on, pinched or stretched " Climate – The equipment has been designed for use in moderate climates and in domes`c situa`ons. " Only use the product in ways specified by the manufacturer " " Do not ‘Hot Plug”. When changing inputs or outputs, switch the Rialto 400 off before making changes. Once changes have been made, then switch the Rialto 400 back on. Cleaning – Unplug the unit from the mains supply before cleaning. The case should normally only require a wipe with a soh, lint-‐free cloth. Do not use chemical solvents for cleaning the unit. " Abnormal Smell – If an abnormal smell or smoke is detected from the equipment, turn the power off immediately and unplug the equipment from the wall outlet. Contact your dealer & do not reconnect. AudioControl User Manual -‐ Rialto 400 19 FCC Compliance Statement (United States) Note: This equipment has been tested and found to comply with the limits for a Class B digital device, pursuant to part 15 of the FCC Rules. These limits are designed to provide reasonable protec`on against harmful interference in a Residen`al installa`on. This equipment generates, uses and can radiate radio frequency energy and, if not installed and used in accordance with the instruc`ons, may cause harmful interference to radio communica`ons. However, there is no guarantee that interference will not occur in a par`cular installa`on. If this equipment does cause harmful interference to radio or television recep`on, which can be determined by turning the equipment off and on, the user is encouraged to try to correct the interference by one or more of the following measures: Reorient or relocate the receiving antenna. Increase the separa`on between the equipment and receiver. Connect the equipment into an outlet on a circuit different from that to which the receiver is connected. Consult the dealer or an experienced radio/TV technician for help. Modifica`ons not expressly approved by the manufacturer could void the user's authority to operated the equipment under FCC rules AUDIO ENTHUSIASM AudioControl has always been dedicated to designing, engineering and building world-class audio products from the ground up. In the process, we’ve earned a decades building an incomparable team of truly passionate engineers. Day that will always be known for making good sound great. www.audiocontrol.com