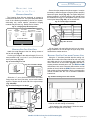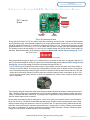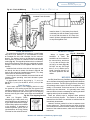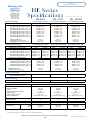
1
TM
Small Duct Heating, Cooling and
Indoor Air Quality Systems
www.hi-velocity.com
HE Series
Installation Manual
Includes:
Hi-Velocity Fan Coils
Heating Coils/Modules
Cooling Coils/Modules
Add-ons and Options
Product Specifications
Manufactured By
ESP 103.07 - Hi-Velocity Installation Manual 012010
Table of Contents
Parts & Introduction (3 Pgs)
Module INT Common
Components, Benefits, Applications, Quality Assurance, Warranty Terms
Pgs. 3-5
Outlet Installation (2 Pgs)
Module OTL Hi-Velocity
Locating and Installing Vents, Installing Rough-In Boot,
Pgs. 6-7
Coil Placement (2 Pgs)
Module FCP Fan
Location, Clearances, Hanging Strap Kit
Pgs. 8-9
Plenum and Branch Duct (9 Pgs)
Module DUC Installing
Location, Connections, Duct Reductions, Flexible Duct
Pgs. 10-18
Air Installation (2 Pgs)
Module RAI Return
Duct Sizing, Return Air Cutout, Dimensions
Pgs. 19-20
Module WIR
Module RPM
Wiring and Dip Settings (11 Pgs)
Wiring, Extended Diagrams, Controls, Dip Settings and
Air Flow Data
Refrigerant Module Installation (RPM-E) (4 Pgs)
Specifications, Mounting, Drain Connections, Piping, Brazing,
Evacuating, Charging, Heat Pumps, Trouble Shooting
Pgs. 21-31
Pgs. 32-35
Water Coil Installation (1 Pg)
Module WCM Chilled
Mounting, Piping, Specifications
Pg. 36
Water Coil Installation (1 Pg)
Module HWC Hot
Installation, Piping, Specifications
Pg. 37
Strip Coil Installation (4 Pgs)
Module ESH Electric
Placement, Configuration, Wiring Diagram
Pg. 38-41
Module TPA
Module CTS
Add-Ons and Third Party Options (2 Pgs)
Hi-Velocity Air Purification System, PWM Zone Controller, Turbo Meter,
Fresh Air Make-Up, Fire Stopping, Humidifiers
Checklist and Troubleshooting (4 Pg)
Installation Checklist, Troubleshooting: EPC Motor, Low Air Flow, 24V
Htg, 24V Clg. Outdoor Unit, Short Cycling,
Pgs. 42-43
Pgs. 44-47
and Sizing (2 Pg)
Module SPC Specifications
Standard, Metric, Quick Sizing Guide
Pgs. 48-49
and Performance Form (2 Pg)
Module SRV Service
Fill this Form out for Service Calls
Pg. 50-51
-2-
© 1995-2009 Energy Saving Products Ltd.
Module INT
Common Parts & Introduction (1/3)
Common Parts
*
Vent Plate
Elbow
Rough-In Boot
Joint Connector
Flexible Duct
End Cap
Cooling Options
RPM-E Pre-Piped
Cooling Module
Water Coil Module
Branch Take-Off
Heating Options
Plenum Duct
Connection Tee
Hot Water Coil
Electric Strip Coil
Other Options
PWM Zoning
Controller
Hi-Velocity Air
Purification System
Module INT Introduction to Hi-Velocity (1/3)
-3-
HE Fancoil
*Example
Configuration
Only
© 1995-2009 Energy Saving Products Ltd.
Module INT
Introduction to Hi-Velocity (2/3)
Hi-Velocity HE Series Installation Manual
Thank You for Purchasing the
Finest in Indoor Air Quality Systems.
The Hi-Velocity System is an energy efficient high
pressure air delivery system that can be designed
to provide heating, cooling, filtration, ventilation,
humidification and dehumidification.
Ease of Installation
The Hi-Velocity System can be installed in 25 per
cent less time than a traditional heating system and is
equally suitable for commercial and residential, in both
new construction and retrofit applications. For residential
applications where every cubic foot of area is critical, the
Hi-Velocity System is the solution to your heating and
cooling needs. Being able to run duct work into places
where standard duct work would not fit, allows heating,
cooling and ventilation to be installed in applications
where the options are very limited.
The Hi-Velocity System works on the principle of
pressure rather than air velocity. It is quite different than
a conventional furnace, the main difference being that
the supply duct work is all “small diameter” or “mini duct”.
With a pressurized small diameter duct we condition
the air differently than conventional forced air systems.
With the use of a high pressure area to low pressure
area, we continuously mix the room air, creating even
temperatures from floor to ceiling. Because the plenum
duct is pressurized, dust build-up within the duct work
is eliminated. With continuous air circulation from the
constant fan, airborne dust and other allergens can be
easily filtered out of the air, and conditions that promote
the growth of mold and mildew are reduced.
Our innovative fan coil and unique cooling module
technology helps create a healthier and more enjoyable
indoor living environment for the end-user, while saving
money on monthly operating costs.
Powered by a variable-speed EPC motor, the HiVelocity System can be used for heating, cooling, or a
combination of both. The EPC motor quietly drives the
system’s fan continuously, limiting wear and tear and
increasing the lifespan of the system.
We are confident that you will enjoy years of troublefree service from your Hi-Velocity System. As with any
product that requires installation and assembly, a good
understanding of ALL the components and the final
product is necessary to achieve the optimum result.
This manual has been designed to be as concise and
straightforward as possible.
Please
read
manual
ENTIRE
the
before
beginning
installation as this will help
avoid mistakes that may cost
time and money.
Primary Applications:
Heating Up
To provide heating, the system can be used in
conjunction with any water source (hot water tank,
boiler or geothermal). Unlike traditional heating and air
conditioning systems, it does not depend on the natural
laws of convection. A network of smaller, flexible ducts
operate under high pressure to continuously circulate
air and ensure even heat distribution. When using a
hot water tank, after going through the heating system,
the hot water is recycled for household use. With a
proper tank, the Hi-Velocity System can reduce energy
requirements by up to 50 per cent.
Cooling Down
For air conditioning, a cooling module, condensing
unit, chiller, heat pump or geothermal sytem can all
be used. The high pressure distribution network cools
each level of the structure evenly. Use of a lower CFM
across the cooling coil means that the Hi-Velocity System
can remove up to 30% more moisture from the air than
conventional systems, leaving a constant and comfortable
temperature on the skin surface. Breathing Right
IAQ is integral to the comfort and health of a building’s
occupants. The optional Hi-Velocity Air Purification
System (HE PS) was designed to complement the
heating and cooling system. It contains three powerful
technologies. First, an electrostatic MERV-11 filter
removes allergens. Photo-catalytic oxidation is then
used to destroy toxic chemicals and eliminate odours.
Finally, Ultraviolet Light is used to kill germs on contact.
The result is clean, purified air, and unsurpassed Indoor
Air Quality for your home or office. For all of your heating, cooling, and Indoor Air Quality
needs, the Hi-Velocity System is the right choice for you!
Module INT Introduction to Hi-Velocity (2/3)
-4-
© 1995-2009 Energy Saving Products Ltd.
Module INT
Introduction to Hi-Velocity (3/3)
Quality Assurance
Warranty
Fan coil units shall be a total indoor air quality system
complete with heating, cooling, air filtration, and possibility of
humidity control and fresh air make up. The fan coil must be
factory manufactured, assembled and tested.
One year limited warranty. The heat exchanger and
blower are free from defects in workmanship for one year
from date of purchase.
All equipment furnished under this specification shall
comply with the following standards:
ASHRAE American Society of Heating,
Refrigerating and Air-Conditioning Engineers
AHRI Air-Conditioning, Heating, and
Refrigeration Institute
CSA Canadian Standards Association
CE
European Conformity
DOE Department of Energy
UL Underwriters Laboratories
Refer to Module SPC - Specifications and Sizing
for system specifications, measurements, etc. For more
detailed specification pages please see our website,
www.hi-velocity.com.
Three year limited warranty. The EPC Motor, EPC
Controller, EPC Circuit Board and PWM Controller are free
from defects in workmanship for three years from date of
purchase.
Two year limited warranty. The electrical strip heater is
free from defects in workmanship for two years from date
of purchase.
This warranty applies only to the fan coil unit and does
not include connections, attachments, and other products
or materials furnished by the installer. This warranty applies
only to the first purchaser at retail and excludes any
damages caused by changes, relocation to, or installation
in a new site. This warranty does not cover any defects
caused by failure to follow the installation and operating
instructions furnished with the fan coil, local building codes,
and good industry standards. Failure to correctly install
the fan coil, or material related to the unit, may result in
improper system performance and/or damages and will
void this warranty.
Also available on our Website:
Terms and Conditions
• Installation Videos
• Promotional Video
• Engineering Specifications
• Applications
• Downloadable Installation Modules
• Performance Graphs
•
Any repair performed under warranty must be
approved by Energy Saving Products Ltd. for this
warranty to be valid.
•
The manufacturer is not liable for any other damages,
personal injury, or any other losses of any nature.
•
The liability of the manufacturer is limited to and shall
not exceed the cost of replacement parts and shall
not include transportation to and from the factory,
and field labour.
•
Inoperative parts must be returned with serial
number, purchase date, and a detailed description of
the entire problem with an ESP RMA Form.
•
This warranty replaces all other warranties expressed
or implied.
• Brochures and Marketing Tools
• Complete Parts List
• Complete list of Agents/Distributors
• News and Newsletters
• Case Studies
Disclaimer
Energy Saving Products Ltd. reserves the right to
The Hi-Velocity System
used
as
during
temporary
the
NOT to be
heating/cooling
is
construction
of
the
structure. If used in this capacity all
warranties will be null and void.
discontinue, make changes to, and add improvements
upon its products at any time without public notice
or obligatiion. The descriptions and specifications
contained in this manual were in effect at printing.
Some illustrations may not be applicable to your unit.
Module INT Introduction to Hi-Velocity (3/3)
-5-
© 1995-2009 Energy Saving Products Ltd.
Module OTL
Hi-Velocity Outlet Installation (1/2)
BEFORE YOU BEGIN INSTALLATION:
Fig. 02 - Six/Seven inches (152mm/178mm) on center
A heat load calculation and duct layout is required
before any installation can begin. See Module DES
- Designing the Hi-Velocity System, before you begin
installation. The layout is designed to provide you with
the maximum benefit from your Hi-Velocity System.
Small deviations may be necessary due to existing
construction. However, please contact your system
designer before proceeding if large deviations must be
made such as:
•
•
•
6/7”
(152/178mm)
6/7”
(152/178mm)
Elimination of a vent from a room
Moving a vent more than 10 feet (3.05m) from its
specified location
Re-routing the main plenum
Outlet Installation
With the venturi effect of the Hi-Velocity system, you
have more options in vent placement. Each vent has an
effective throw of 18’ (5.49m) and causes the air to constantly
circulate. (Fig. 01) This allows for vent placement in floors,
ceilings, or walls.
Constant circulation is very important to maintain
room comfort. Do not install vents under/beside/on-top
of objects that may hamper the cone of influence from
circulating the room air.
Please
note:
HE Flex Duct
outlets CANNOT be used
for 2” X 4” (51mm x 102mm)
sidewall applications.
Locating Vents
Outlets do not have to be located on an outside wall. Due
to the venturi action of the Hi-Velocity System, the air in
the entire room is gently circulated at all times. The outlets
should be located six inches (152mm) on centre from any
possible obstruction, seven inches (178mm) for HE outlets.
(Fig. 02).
Fig. 01 - Cone of Influence
Proper location is critical to the operation of the Hi-Velocity
System for optimum home comfort. The outlets should be
located where it is considered to be a “low traffic area”.
Typical areas are in the corner of a room, or to the side of
a window or door. When the vents are properly located, the
home owner can expect to have a nearly draft free home.
Vent placement in outside walls of the structure
should be avoided. Flexible duct that is run in outside
walls may receive a substantial heat loss/gain. This can
result in a higher operating cost for the structure while
delivering an inferior air quality.
Module OTL Hi-Velocity Outlet Installation (1/2)
-6-
© 1995-2009 Energy Saving Products Ltd.
Module OTL
Hi-Velocity Outlet Installation (2/2)
Installing the Rough-In Boot
Once a suitable unobstructed location has been
chosen for the vent placement, use a 3” (76mm) hole saw
to drill an opening large enough for the Rough-In Boot
with a Rough-In Cap (Fig. 03). For HE, use 3 3/4” (94mm)
hole saw.
Fig. 03 - Drill a 3”/3 3/4” (76mm/95mm) hole
Vent caps are used during construction to prevent
damage during construction from drywall dust, saw
dust, stipple ceiling, paint and other small particles
from clogging and damaging the and Rough-in Boot
and Fan coil unit.
In floor applications simply place the cap over the
boot before installing the boot. In ceilings or sidewall
applications it may be necessary to tape the cap on to
the Rough-in boot hold into place prior to installation.
To prevent damage during construction, do not cut out
the Rough-In Caps until the vent plates are ready to be
installed.
Installing Vents in Kick Spaces
Before securing the Rough-In Boot, make sure to
use a Rough-In Cap (Fig. 04).
Fig. 04 - Rough-In Cap Installation
4a
In kitchens and bathrooms, it is sometimes hard to find
a “low traffic area”, so an alternative is to locate the vents
in the kick space under the counters. Our Vent plates
have a 4” (102mm) and 5” (127mm) diameter, which may not
fit in all kick spaces without trimming. This can easily be
done by trimming the top and bottom of our vent plate so it
fits. HE outlets are not recommended for kick spaces.
The easiest way to install the round vent plates in the
kick space is to trim off two edges of the plate. (Fig. 05).
4b
Fig. 05 - Trim the edges for kick spaces
4c
4d
4a - Rough-In Cap fits on Rough-In Boot
4b - Rough-In Boot installed with a Rough-In Cap
4c - Floor installed Rough-In Boot
4d - Wall installed Rough-In Boot
By locating the vents in this position, there will now
be horizontal airflow. Caution should be exercised when
locating vents in the horizontal position. Avoid placing
vents directly below sinks or other locations people will be
for extended periods of time.
Module OTL Hi-Velocity Outlet Installation (2/2)
-7-
© 1995-2009 Energy Saving Products Ltd.
Module FCP
Hi-Velocity Fan Coil Placement (1/2)
Fan Coil Placement
Fig. 02 - Counter flow
The Hi-Velocity System fan coil is manufactured with
a direct drive permanently lubricated EPC Motor that is
mounted within the blower. All HE fan coils are single
side access. The blower assembly can easily be slid out
by removing the three mounted bolts that attach it to the
center plate. In some instances, the electrical box may
need to be removed.
Location
The fan coil unit is to be placed according to the layout
provided by the designer. As with vent placement, small
deviations can be made in fan coil placement. If the
fan coil has to be moved more than a few feet from
it’s pre-designed location, contact the designer before
proceeding.
When installing the fan coil keep these points in mind.
• Serviceability and access to the unit.
• Maximizing usable floor space.
• Location of heat/cool source to fan coil.
When placed in the Counter flow position, the supply air
delivery is from the bottom of the unit (Fig. 02).
Fig. 03 - Horizontal installation
The fan coil can be installed in many different
configurations. The fan coil can be located in a Hi-Boy,
Counter flow, or Horizontal position. In the Hi-Boy
position, the supply air is delivered from the top of the
unit (Fig. 01).
Fig. 01 - Hi-Boy
Quite often, the best location for the fan coil unit is
suspended from the ceiling of the mechanical room, in the
horizontal position (Fig. 03). This will allow for more floor
space in the room, and will minimize the duct work needed
to connect to the fan coil unit.
Clearances
Clearance is only needed on the access side of the units.
However, ensure that there is a small space between the
unit and any other surface to prevent vibration transfer. In
order to maintain and service the fan coil unit, minimum
clearances are required on the access side (Table 01).
Table 01 – Fan coil clearances
Unit
HE – 50/51/52
HE – 70/71
HE – 100/101
Inches
18” (457mm)
22” (559mm)
29”(737mm)
Add an additional 4” (102mm) for Electric Strip Coils
Module FCP Hi-Velocity Fan Coil Placement (1/2)
-8-
© 1995-2009 Energy Saving Products Ltd.
Module FCP
Hi-Velocity Fan Coil Placement (2/2)
Hanging the
Hi-Velocity Unit
Hanging Strap Kit
The Hanging Strap Kits are designed to suspend a
horizontal or vertical fan coil. The nylon straps will absorb
most of the vibration generated by the fan coil system,
eliminating any sound transfer. Alternative hanging
methods may be used, e.g. Reddy Rod or Unistrut.
Secure the nylon straps to the joist or support. It may be
necessary to install a support across the joists to properly
fasten the Nylon Straps (Fig. 05). The Nylon Straps are
always installed in a vertical position; they should never
be installed at an angle. It is acceptable to put a 90º twist
in the Nylon Straps (Fig. 05a), do not exceed 90º.
Fig. 05 - Install Support if Needed
Fig. 01 - Hanging Strap Kit Components
BOLT
5/16”
WASHER
(7.9mm)
5/16” X 3/4”
1/4” LOCK SELF TAPPING METAL
NUT (6.4mm) SCREW (12.7mm) FLANGE
X8
X8
X16
24” NYLON STRAP
X8
X8
Fig. 05a - 90° twist
X4
Hanging Fan Coil Unit Only
Attach the metal flanges to the four facing corners of
the fan coil unit (Fig. 02).
Cut the nylon straps to the desired length (4”/102mm or
more) and drill a 3/8” (7mm) hole 1” (25mm) from the end of
each nylon strap. (Fig. 03)
Fig. 02 - Attach flanges to Unit
Fig. 03 - Cut Hole in Straps
1”
(25mm)
X
Slide the 1 1⁄4” (32mm) bolt into the hole of the metal
flange then into the nylon strap, secure with washer
and nut. Repeat this at each end of the nylon straps
(Fig. 04a,04b).
Fig. 04 - Attach Flanges to all Straps
Lift the fancoil unit and slide the bolt into the metal
flange located on the unit through the nylon strap, and
finish with the washer and nut.
Hanging Fan Coil Unit with Cooling Coil
Using the “L” brackets provided with the cooling coil,
attach the module to the return side of fan coil unit, using
two sided tape for air seal between units. Assure that
drain controls are on the bottom (Fig 06), and that no
screws puncture the drain pan or coil. The WCM and WM
chilled water coils are a horizontal airflow with a vertical
position of the coil while the RPM-E is also a vertical coil
with multiple air flow capabilities. See the corresponding
manual included with the coil for detailed installation
instructions.
Fig. 06 Attach Cooling Coil to Fan Coil Unit
04a
Attach the metal flanges to the four facing corners
of the fan coil and cooling coil assembly.
04b
After attaching the metal flanges, follow the same
steps for hanging fan coil unit only.
Module FCP Hi-Velocity Fan Coil Placement (2/2)
-9-
© 1995-2009 Energy Saving Products Ltd.
Module DUC
Installing Plenum and Branch Duct (1/9)
Plenum Duct
Location
When locating the plenum duct, one of the main factors
to consider is the integration of the duct work into the
structure. The main supply duct can be located along the
main beam(s) in the basement (Fig. 01).
Fig. 01 - Basement installation
Main Plenum Connectors
There are five types of connections that are possible
with the Hi-Velocity System.
Fig. 03 - Connectors
1. Tee Connection
2. Elbow Connection
3. Reducers
4. End Cap
5. Straight Connection
Min. 18”
(457mm)
The main plenum can also be easily installed in the attic
space. (Fig. 02)
Fig. 02 - Attic Installation
18”
(457mm)
Insul-Sleeve
over plenum
IF THE DUCT IS LOCATED IN AN UNCONDITIONED
AREA, INSULATING SLEEVE IS REQUIRED ON
THE MAIN PLENUM. IF USED FOR COOLING, IT IS
ALSO RECOMMENDED TO INSULATE AND VAPOR
BARRIER THE MAIN PLENUM AND FLEX DUCT
FITTINGS. INSULSLEEVES ARE AVAILABLE AS AN
ACCESSORY IN R4.2 FOR 6’ (1.83m), 8’ (2.44m) FOR 10’
(3.05m) PLENUMS IN 10’ (3.05m) LENGTHS.
All the connections are done as follows. Place the joint
connector, cap, tee, or elbow inside the plenum you intend
to connect. Push the plenum over the fitting as tight as
possible. Use four screws on each side of the connector,
alternating the screw locations as indicated in Fig. 04.
Fig. 04 - Alternating screw locations
If the unit is installed in the attic, make sure that all ducts
in the attic are insulated with a vapour barrier (All A/C
systems main plenums need to be insulated and vapour
barriered, check with local codes for required R-Value).
This includes the Branch Take Off and the vent Rough-In
Boot. All main plenum and flex runs should be installed
under the attic insulation. If the duct work is run above
the attic insulation, an extra insulation sleeve may be
needed. Check your local building code for the ruling in
your area.
Flexible duct is NOT to be
used for supply air plenum.
Elbow and Tee Placement
Elbows and tees must not be placed any closer than 18”
from supply outlet on the air handling unit. A significant
loss of airflow can result if elbows or tees are installed
closer than 18” (457mm). Figs. 06 and Fig. 07 illustrate a
proper install with at least 18” of straight plenum after the
unit supply outlet. Fig. 05 shows the sigma velocity profile
of the first 18” (457mm) of the main plenum and why it’s
important to allow the system to equalize air flow.
For any duct runs over 75% of the maximum allowable
plenum length (Module SPC - Specifications and
Sizing Pgs. 1, 2), it is recommended to insulate the main
plenum. Insulating the main plenum will cut down on your
duct loss, and form a vapour barrier. The attic insulation
should be placed over all Hi-Velocity System ducts to
further reduce any duct losses.
Module DUC Installing Plenum and Branch Duct (1/9)
-10-
© 1995-2009 Energy Saving Products Ltd.
Module DUC
Installing Plenum and Branch Duct (2/9)
Fig. 05 - Sigma velocity profile
Bullhead Tees
Uniform
Velocity
Point
10% Loss
20% Loss
18”(457mm)
30% Loss
Bullhead tees are to be maintained as close to a 50/50
split as possible, with a maximum 60/40 split (Fig. 07). For
the best system performance, keep the number of elbows
and tees to a minimum.
After any connection is made, including the joints of
elbows and tees, foil duct tape or a duct sealant should be
used to eliminate any air leaks.
Fig. 08 - Seal all connections
ENSURE
plenum
runs a
minimum
of 18”
(457mm)
before
any tees,
elbows and
take-offs.
If elbows, tees, or Branch-Take Off’s are placed closer
than 18” (457mm) you may lose up to 30% of your airflow
as illustrated in Fig. 05.
Branch Tees
When branch tees are used, the plenum split is to be a
70/30 main/branch split (Fig. 06).
Fig. 09 - Use metal strapping
Fig. 06 - Branch Tee, 70/30 split
Fan Coil
18” Min.
EXAMPLE
20 VENTS
Joist and Trusses
When running the plenum duct between joists in
the basement, sheet metal strapping should be used
(supplied by the installer, not the factory) to secure the
plenum in place (Fig. 09).
70%
FLOW
14 Vents
(457mm)
30% FLOW
6 Vents
Fig. 07 - Bullhead Tee, 50/50 split
50% FLOW
(+/- 10%)
10 Vents
When located in ceiling spaces, the duct may be laid
upon ceiling trusses. Run the duct work low so that it can
be covered with the house insulation (Fig. 02).
Insulation Sleeve
EXAMPLE
20 VENTS
Fan Coil
18” Min.
(457mm)
50% FLOW
(+/- 10%)
10 Vents
Any time the duct will be run in an unconditioned space
(attic or crawl space) it must be insulated with a vapour
barrier. It’s also recommended to vapour barrier runs
that exceed 75% of the total allowable distance (Module
SPC - Specifications and Sizing Pgs. 1, 2).
Module DUC Installing Plenum and Branch Duct (2/9)
-11-
© 1995-2009 Energy Saving Products Ltd.
Module DUC
Installing Plenum and Branch Duct (3/9)
To install the insulation sleeve over the main
plenum, either tape the end of the duct or use an
end cap. This will allow the sleeve to slide on easier,
and prevent the insulation from catching on the sharp
metal ends of the duct (Fig. 10).
Fig. 10 - Use an End Cap or Reducer
Connecting Plenum to Fan Coil
After the main plenum duct and the fan coil unit
are in place, they can be fitted together. Do not
permanently fasten the two together yet, as the
plenum may need to be rotated in order to make
the branch take-off connections. Once rotated into
position, fasten and seal with duct sealant or foil
duct tape.
Duct Reductions
Branch Take-Off with Insulation Sleeve
After the insulation sleeve is installed, cut an X through
the vapour barrier and insulation. Peel it back enough
to allow you to drill your hole without ripping all of the
insulation. Install the branch take-off as described in the
Branch Take-Off section.
In some installations, it is necessary to reduce the
size of the main plenum. Caution must be used when
reducing plenum size, since smaller ducts can handle
less number of outlets. Also, when running the plenum
duct past 75% of max distance, it is best to keep full
size plenum duct to reduce restriction in the main
plenum. Keep in mind that once reduced, the main
plenum cannot be increased again. The Branch TakeOffs form easily to ducts in the 6” (152mm) to 8” (203mm)
range; extra care must be taken with smaller sized
ducts to ensure a proper air seal. For tee reductions,
keep the tee to the full duct size, if reducing the plenum
duct, reduce only after the tee. Keep the length of the
smaller duct sizes to a minimum, since the friction loss
is much higher. If a hole saw will be used to drill the
Branch Take-Off holes, metal ducts are recommended
to be 28 gauge steel.
Table 02 – Duct Reduction
Duct
Size
# of 2”
(51mm)
Vents
# of Vents
(HE)
Max
Length
4” (102mm)
4
N/A
30’(9.14m)
5” (127mm)
6
3
40’(12.19m)
6” (152mm)
12
6
50’(15.24m)
7” (178mm)
19
9
60’(18.29m)
8” (203mm)
29
14
70’ (21.33m)
10” (254mm)
48
24
100’ (30.48m)
Fig. 11 - BTO with insulation sleeve
Module DUC Installing Plenum and Branch Duct (3/9)
-12-
© 1995-2009 Energy Saving Products Ltd.
Module DUC
Installing Plenum and Branch Duct (4/9)
Flexible Branch Duct
With both the Main Plenum and Rough-In Boot installed,
there is now only the connection of the two. This is done with
the 2” (51mm) or HE Flexible Branch Duct. Keep in mind that
the minimum duct length is 10 feet, with a maximum length
of 25 feet (7.62m). Branch duct runs should be kept as short
as possible to maximize the airflow through these runs.
Energy Saving Products supplies the both the 2” (51mm) and
the HE flexible duct in three different configurations:
• 2” (51mm) x 10’ (3.05m) AFD (Assembled Flex Duct)
• 2” (51mm) x 15’ (4.57m) AFD (Assembled Flex Duct)
• 2” (51mm) x 25’ (7.62m) UFD (Unassembled Flex Duct)
• HE x 10’ (3.05m) AFD (Assembled Flex Duct)
• HE x 15’ (4.57m) AFD (Assembled Flex Duct)
• HE x 25’ (7.62m) UFD (Unassembled Flex Duct)
All configurations are available in both R4.2 and R8 R
Values.The 2” (51mm) and HE AFD come complete with the
necessary components for one complete ten foot or fifteen
foot branch run. The 25’ (7.62m) UFD is to be used only to
extend these runs if needed.
If extending branch runs longer than the minimum,
contact the system designer, or reference Table 03 for
branch duct losses on extended runs.
Outside Diameters of Flexible Duct:
2” - R4 = 4.5” (114mm)
2” - R8 = 6.5” (165mm)
HE - R4 = 5.5” (140mm)
HE - R8 = 7.5” (191mm)
Table 03: De-rating Values
HE Series
Tubing Length
Adjustment Factor
10’
0%
15’
10%
20’
20%
25’
35%
HE Duct
HE Duct is designed as a direct alternative for two 2”
(51mm) flex duct of the same length used in Hi-Velocity
Systems. No changes are required to fancoil selection and
main plenum duct sizing.
Example: If a 3 Ton Unit has 24 outlets of the normal 2”
X 10’ (51mm) flex duct, you can change to 12 HE X 10’ Duct
outlets, or 8 HE Duct and 8 2” (51mm) Duct outlets, or any
combination to give you the equivalent. See Specification
& Sizing Pgs 1,2 for Air Flow data.
Branch Take-Offs (BTO)
The locations for the Branch Take-Offs should be
determined before any drilling is done. Once all spots are
marked for the Branch Take-Offs, a hole saw is used to drill
the outlets - 3” (76mm) for HE Branch Take-Offs, and 2 1/4”
(57mm) for 2” (51mm) Branch Take-Offs (Fig. 12).
Fig. 12 - Drill hole
It is NOT recommended to connect any Branch Take-Offs
until all holes have been drilled, as it may be necessary to
rotate the plenum to drill the outlets.
After all the holes have been drilled in the main plenum,
the Branch Take-Offs are then installed. The Branch TakeOff is placed over the hole with the gasket in between
(Fig. 13a). The curvature of Branch Take-Off is aligned
so it matches the shape of the plenum. With the opening
fully over the hole push the BTO tight against the main
plenum and secure with four ¼” (7mm) self tapping screws
(Fig. 13b).
Fig. 13a - Branch Take-Off
HE Duct utilizes the same selecting process as the
standard 2” (51mm) flex duct, a complete and comprehensive
heat loss/gain must be completed in order to select fancoil,
plenum size, and outlet quantities. The HE Duct is designed
to directly replace two (2) standard 2” (51mm) outlets,
therefore when an area requires multiple outlets, a
single HE outlet can replace two of the standard 2”
(51mm) ducts. Any combination of 2” (51mm) ducting, HE
ducting, and drilled outlets can be used, following the
minimum and maximum outlets as per unit selection.
Fig. 13b - Securing
Flexible Duct
Duct Size
CFM Output
TWO 2” (51mm) Flex Duct
32 CFM X 2 (15 L/s X 2)
ONE HE Duct
65 CFM (31 L/s)
Module DUC Installing Plenum and Branch Duct (4/9)
-13-
© 1995-2009 Energy Saving Products Ltd.
Module DUC
Installing Plenum and Branch Duct (5/9)
Flexible Duct Placement
After the all the Branch Take-Offs have been installed,
the flexible duct can then be fastened to the joist with
strapping material. Staples may be used, as long as the
insulation sleeve isn’t damaged or torn.
Only use staples if local code allows. If the
insulation sleeve is damaged use foil duct tape to seal
the sleeve, do not use cloth style tapes as they will not
create a proper seal. Try to run the flexible duct parallel
to the joists whenever possible as this takes less space
(Fig. 14).
When larger holes (4”/102mm) can be drilled, then the
insulated flex duct may be pulled through whole. If code
or the designer only allow for a 2 ¼” (57mm) or 3” (76mm)
hole, the insulation must first be removed from the flexible
duct (Fig. 16a). The insulation is then cut into lengths that
correspond to the joist spacing. As the inner soft core of
the flexible duct is fed into each hole the insulation is slid
over the core (Fig. 16b).
Fig. 16a - 2 1⁄4” holes (57mm)
Fig. 14 - Use strapping to hold the Flexible duct
Fig. 16b - Add insulation at each joist
When installing the flexible duct in areas in which
you must run opposite to the direction of solid joists,
some drilling may be required. It is recommended
to drill the smallest hole possible (Fig. 15) in order
to maintain structural integrity. Check with local code
laws and ensure that it is allowable to drill holes
through the joists before proceeding. If possible, run
the flex duct under the joists and avoid drilling any
holes.
Fig. 15 - Through or under joists
If a T-Bar ceiling is going to be installed, it is far easier
to run the flexible duct in that space, rather than drilling
through several joists.
The flexible duct should never be cut shorter than 10’
in length. If the run to the outlet is less than 10’
the flexible duct can be coiled up. The bends in the
flexible duct shall have a minimum radius of 6” or 152mm
(7” or 178mm for HE Duct) (Fig. 17). Sharp bends in the
Flexible Duct will reduce airflow to that vent.
Fig. 17 - 6” (152mm) minimum radius on bends
(3.05m)
(3.05m)
MIN.
6” or
152mm
BEND
RADIUS (7”
or 178mm
for HE)
Module DUC Installing Plenum and Branch Duct (5/9)
-14-
© 1995-2009 Energy Saving Products Ltd.
Module DUC
Installing Plenum and Branch Duct (6/9)
Connecting to the Main Plenum
The Flexible Duct coupling is connected to the branch
Take-Off, then mechanically fastened with at least one ¼”
(6.7mm) self tapping screw. The connection then should be
sealed with foil duct tape or an approved sealant.
Fig. 20 - Fasten with tie straps
Fig. 18 - Secure to plenum with gentle bends
Unconditioned Spaces
SLIGHT
ANGLE
If the flexible duct is in an unconditioned space, then all
connections must be taped to ensure a continuous vapour
seal. This includes the Branch Take-Off and the vent
Rough-In Boot. Try not to damage the vapour barrier on
the flexible duct. If it is damaged, holes must be taped. If
possible, try to run the flexible duct between the insulation
and the vapour barrier.
Two Inch Metal Duct
SLIGHT ANGLE
Hard angles should never be used when connecting
to the main plenum or Rough-In Boot, keep the bends as
gentle as possible (Fig. 18). A hard bend should never be
created in the flexible duct as this will restrict airflow to the
outlet.
Connecting to Rough-In Boot
The Flexible Duct coupling is connected to the RoughIn Boot, then mechanically fastened with at least one ¼”
(6.7mm) self tapping screw (Fig. 19). The connection then
should be sealed with foil duct tape or an approved sealant.
The Rough-in Boot can be insulated and vapor barriered
using the insulation and vapor barrier that is around the
flex duct. Cut the cable tie on the flex duct and pull the
insulation and vapor barrier over the flange of the Rough-in
Boot and replace cable tie. Tighten the cable tie securely
around the boot, insulation and vapor barrier.
Fig. 19 - Mechanically Fasten
Flexible duct is not to be used in concrete applications.
Caution should be used when running metal or PVC pipe
under concrete, to ensure pipe is not crushed. For certain
applications in which hard pipe is needed, certain guidelines
must be followed. All metal ducts run in a concrete slab
must be sealed with an approved duct sealer. For vertical
runs out of the floor, it may be necessary to extend the
damper tube or vent plate collar (Fig. 23), to connect to
the AFD Kit.
Flexible Duct Termination
To complete the installation, cut out the Rough-In Cap
(Fig. 21) and install the vent plate by sliding the vent plate
into the end of the damper tube (Fig. 22). Ensure the vent
is in the fully open position.
Fig. 21
Fig. 22
Vent Plate Extensions
When the sub floor and floor finishing is too thick for
the connection of the vent plate, it may be necessary to
use an extension kit. Connect the vent plate extension
to the branch connector tube and vent plate. The branch
connector tube can be cut at different lengths so the vent
plate sits flush with the floor finishing.
Fig. 23 - Extension kit
Extending the AFD with a UFD kit
When connecting the UFD to the AFD, attach the
branch coupling into the inner core of the UFD with foil
duct tape, connect the two branch couplings with the
branch connector tube (Fig. 20). Now pull the insulation
and vapour barrier over the inner core and secure around
the outside of the vapour barrier with a cable tie. Tighten
the cable tie securely around the branch connector, inner
core, insulation, and vapour barrier.
TEST
SYSTEM
FOR
LEAKS
INSTALLATION OF DRYWALL.
Module DUC Installing Plenum and Branch Duct (6/9)
-15-
BEFORE
© 1995-2009 Energy Saving Products Ltd.
Module DUC
Installing Plenum and Branch Duct (7/9)
Installing 2” Vents in Retrofits
Fig. 27 - Secure flex to Rough-In Boot
For ease of installation, it is recommended to use the
2” (51mm) flexible duct and vents for retrofit applications.
With the proper preparations, installing vents into finished
walls and ceilings is quick and simple.
Fig. 24 - Dimensions
Using a 3” (76mm)
hole saw, drill a hole
where the vent outlet is
to be placed (Fig. 24).
The hole needs to be
enlarged in the direction
of the incoming flexible
duct. This is done by
creating a 2 1⁄4” (57mm)
x 1⁄2” (13mm) rectangle,
which will allow the
Rough-In Boot to slide
easily into the wall.
3” (76mm)
3 1/2”
Next the flex is fed back into the wall and Rough-In Boot
slid into the hole (Fig. 28).
Fig. 28 - Feed the flex back into the wall
(89mm)
Fig. 29 - The Top
2 1⁄4” (57mm)
Once the hole is finished, run the flexible duct
through the wall/ceiling to the vent outlet. If installed
in drywall, care must be taken when pulling the flex out
of the opening (Fig. 25). Too much force can result in
damage to the dry wall.
Fig. 25 - Run flex through opening
The Rough-In Boot is
placed at the top of the
hole; top is the opposite
side of the cut out
rectangle (Fig. 41).
If being installed in drywall, with the boot seated firmly
against the top, 3 pilot holes need to be drilled for 1/4”
(6.7mm) drywall anchors (Fig. 30).
In drywall applications, 3 drywall anchors (1/4” or 6.7mm)
should be used to secure the Rough-In Boot to the wall (Fig.
31).
Fig. 30 - Pre-drill for anchors
Fig. 31 - Anchors
The Rough-In Boot needs a little preparation before it
can be mounted to the flexible duct. The corners need to
be trimmed along the score lines of each corner (Fig. 26).
This will allow the Rough-In Boot to be completely hidden
with a beauty ring (Fig. 32).
Fig. 26 - Trim off the 4 corners
Once drywall anchors are installed, screw down the
Rough-In Boot and secure it in place.
The hole and Rough-In Boot can be completely hidden if a
beauty ring is used in conjunction with a vent plate (Fig. 32).
Fig. 32 - Beauty ring with Vent Plate
The Rough-In Boot is then connected to flexible duct and
mechanically attached with a self tapping screw (Fig. 27).
Module DUC Installing Plenum and Branch Duct (7/9)
-16-
© 1995-2009 Energy Saving Products Ltd.
Module DUC
Installing Plenum and Branch Duct (8/9)
Linear Grills
Installations in areas that have a high heat loss/gain
require multiple vents. Multiple vents can be installed
into linear grills for a more esthetically pleasing look.
Installing in a high sidewall/ceiling or floor makes little
difference (Fig. 33). A Straight Vane vent grill is the only
type of linear grill that can be used with the Hi-Velocity
System (Fig. 34). Linear grills must be purchased from
a third party vendor.
When installing multiple vents into linear grills, the 2”
must be a minimum of 6” (152.4mm) on center
from each other, 7” (178mm) for HE vents. (Fig. 35). Same
rules apply for vents in linear grills as a single outlet
installation; see Module OTL - Outlet Installation for
more information on vent placement.
Fig. 35 - 6”/7” Apart on Center (152mm/178mm)
(51mm) vents
6”/7” (152mm/177mm)
6”/7”
(152mm/177mm)
Fig. 33 - Linear Grills
The outlet of the Rough-In Boot must be no more than
2” (51mm) away from the grill (Fig. 36).
Fig. 36 - Outlet no more than 2” (51mm) from grill
Fig. 34 - Straight vanes only
6”/7”
(152mm/177mm)
2”
(51mm)
Installing the vents around the room will allow for the room
air to mix. This will give the room a more even air temperature and better distribution.
Module DUC Installing Plenum and Branch Duct (8/9)
-17-
© 1995-2009 Energy Saving Products Ltd.
Module DUC
Installing Plenum and Branch Duct (9/9)
Drilled Outlets
Caution must to be used when not using the flexible duct,
the air velocity from the drilled outlet may create noise.
Drilled Outlets CANNOT be installed in a residential
structure; too much noise may be generated from the
outlets. In commercial areas with large ceilings the
sound can be absorbed by the room or is not a concern
because of the ambient noises.
Drilled outlets are commonly used to supply a large
area with heating and cooling. Drilled outlets can also be
used to create a pressurized air curtain for bay doors, or
large openings to the outside environment. When drilled
outlets are used with the Hi-Velocity System a few points
to remember:
Plenum Runs on Ceiling
When drilled outlets are used in a ceiling install, drill the
outlets at a 45° angle to properly circulate the room air (Fig.
38).
Fig. 38 - Airflow 45° angle to floor
• When multiple 11⁄4” (32mm) or 2” (51mm) holes are used,
they need to be a minimum of 6” (152mm) apart on
center (Fig. 37).
• One 11⁄4” (32mm) drilled hole is equivalent to a single
2”x10’ AFD kit (2”/51mm Rough-In Boot attached to a
10’/3.05m piece of flex duct). With the 11⁄4” (32mm) drilled
outlet the throw from the outlet is up to 18’ (5.49m).
• One 2” (51mm) drilled outlet is equivalent to two - 2”x10’
AFD kits (2”/51mm Rough-In Boot attached to a
10’/3.05m piece of flex duct). With the 2” (51mm) drilled
outlet the throw from the outlet is up to 30’ (9.14m) in
distance.
Plenum Runs on Sidewall
For sidewall installations the outlets are drilled parallel
to the floor (Horizontal airflow). When the vents are in this
configuration, they can be used to create a pressurized air
curtain.
Fig. 39 - 6” (152mm) Airflow parallel to floor
• Using drilled outlets larger than 2” (51mm) is not
recommended; with too large of an opening in the
main plenum the static pressure may drop to an
unacceptable level.
Fig. 37 - 6” (152mm) Apart on center
If there is an air velocity noise coming from the drilled
outlets, a static pressure reading from the plenum duct
should be taken. This reading is to be taken no closer than
18” (457mm) from supply air outlet of fan coil. Static pressure
readings are taken from the inside edge of the plenum; do
not insert pitot tube deeper than 1⁄4”(6.7mm) from the inside
surface of the plenum.
If the static pressure is high, drilling more holes into the
main plenum will lower the static pressure and the noise
level of the system. The standard supply pressures for the
Hi-Velocity System runs between 0.7 H2O (174 pa) and 1.2
H2O (299 pa). Do not allow the static pressure to drop below
0.7 H2O (174 pa) as this can cause a low airflow.
Module DUC Installing Plenum and Branch Duct (9/9)
-18-
© 1995-2009 Energy Saving Products Ltd.
Module RAI
Return Air Installation (1/2)
Return Air
When designing the return air for a Hi-Velocity System,
there are a few things to consider. It is common to use
centralized return air with systems that have rooms that
are within a common area. Separate floors or rooms that
have high loads and require a large amount of supply air
flow should have their own return air, or be tied into the
centralized return air to allow the air to return back to the
fan coil. Rooms or areas that cannot be tied into the return
air should have an air transfer grill to allow the air to escape
the room and flow back to a centralized return air.
Table 01 has recommended return air sizes for
round and rectangular ducts. A variance of plus 20% is
allowable for sizing return ducts that connect to the
Hi-Velocity Systems unit.
Table 01 – Return Air Duct Sizes
Round
Duct
Unit
Rect. Duct Equiv. in
Sq. Inches (Sq. cm)
120
12”
HE-50/51/52
(305mm)
HE-70/71
(305mm)
HE-100/101
(356mm)
(774cm)
The Hi-Velocity System is a pressure supply duct system
that forces the air into rooms through supply outlets. A
closed room will pressurize, and air will escape through
the undercut of a door back to a centralized return air. (i.e.
a typical bedroom with two outlets will deliver 64 cfm into
the space, a 1/2” undercut door will provide 15 square
inches of r/a from the space at a transfer velocity of 4 fpm,
sufficient to provide comfortable r/a.) If more than four 2”
or two HE vents are installed in a room, or if there is a
sealed door in the room, an air transfer grill or return air
should be installed to allow the air back to the fan coil.
It is recommended to install a grill that is 10 - 20% larger
than specifications require, this will ensure that there is no
air velocity noise at the grill. Where allowed by local codes,
a single return air grill may be used.
The return air duct is not supplied with the Hi-Velocity
System. It is to be supplied and installed by the contractor.
The return air and fresh air make-up ducts are to be
installed according to local building code.
Important: When using flexible
duct for return air, use one duct
size larger due to the higher
friction loss.
The return air duct from the air handling units is to be
acoustically lined for sound absorption, for the first five
feet, or for the line of sight. This only applies on short return
air duct work of less than 10 feet (3.05m).
Duct Sizing
12”
120
(774cm)
168
14”
(1084cm)
Return Air Cutout
Once the placement of the return has been decided,
the return air knockout(s) can be cut. (Fig. 01) The premeasured guide cuts supplied with the fan coil should
always be used; this will guarantee maximum airflow
across the coil.
Fig. 01 - Return air cutout
The return air is to be sized on a 0.15 static pressure
as compared to 0.10 static pressure (25 pa) for
conventional forced air systems. The maximum length for
an individual return air duct is fifty feet (15.24m).
(37 pa)
Please note:
It is VERY
important NOT to undersize
the return air, as this can
create noise and increase
motor power consumption
Table 02 – Return Air Cutout Dimensions
Model
Dimensions
HE-50/51 H/BU
91/2” X 131/2”
HE-70/71 H/BU
14” X 13 ”
HE-100/101 H/BU
Module RAI Return Air Installation (1/2)
-19-
1/2
20” X 14”
(241mm X 343mm)
(356mm X 343mm)
(508mm X 356mm)
© 1995-2009 Energy Saving Products Ltd.
Module RAI
Return Air Installation (2/2)
Once the return air has been cut out, a transition will be
needed to attach the return air duct to the fan coil (Fig. 03).
Fig. 03 - Return Air Design
Two 11⁄8” (28.58mm) Rails (D) for fan coil
placement and Filter Holder
Fig. 02 – Return Air using a transition
11⁄8” Opening
(28.58mm)
EA
D
C
A round or square return air duct can be used; they must
be sized for the Hi-Velocity Systems according to Table
01. Before the return air can be attached to the transition,
the first five feet (from the fan coil) is to be acoustically
lined for sound absorption.
Return Air Base
Energy Saving Products manufactures a return air
base with a built in filter rack that matches up to the fan
coil units.
The return air base comes complete with a one-inch
filter and one-inch (25mm) filter rack. The filter is
a 3 medium filter approximately 14% efficient, and can
be replaced with any aftermarket filter. All the Return
Air bases come acoustically lined with half-inch sound
absorbing insulation.
(25mm)
B
For installation of Heating and Cooling Add-Ons, Refer
to:
• Module RPM - Refrigerant Module Installation
• Module HWC - Hot Water Coil Installation
• Module WCM - Chilled Water Coil Installation
• Module ESH - Electric Strip Coil Installation
These manuals are included with the coils, and are also
available online at www.hi-velocity.com.
Notes:
For filter options and other Add-Ons available from
Energy Saving Products, see Module OPT - Options
and Add-Ons.
Table 03 – Return Air Base dimensions
A
B
C
D
HE-50/51/52
HE-70/71
HE-100/101
24”
(610mm)
24”
(470mm)
24”
(470mm)
181⁄2”
(470mm)
181⁄2”
(470mm)
181⁄2”
(470mm)
141⁄2”
(368mm)
191⁄2”
(495mm)
251⁄2”
(648mm)
11⁄8”
(28.6mm)
11⁄8”
(28.6mm)
11⁄8”
(28.6mm)
E
213⁄4”
(552mm)
213⁄4”
(552mm)
213⁄4”
(552mm)
Module RAI Return Air Installation (2/2)
-20-
© 1995-2009 Energy Saving Products Ltd.
Module WIR
Hi-Velocity Wiring & Dip Settings (1/11)
Hi-Velocity Systems HE EPC Circuit Board
Energy Saving Products Ltd. now utilizes automatic voltage and frequency recognition circuitry designed for the
national and international market. This unique feature will automatically recognize and adjust to the voltage and
frequency input. It doesn’t matter if it is 115 or 230 volt, 50 or 60 cycle, our electronics will adjust to the input
automatically.
Auxiliary Relay
Connections
Line Voltage
Control Interface
Low Voltage
Control Interface
Anti-Ice
Control
EPC Circuit
Condensing
Board
Unit
Thermostat
Connections
Hot Water
Zone Valve
Timer Chip
Timer On/Off Switch
20 VA Transformer
Connections
The Hi-Velocity Circuit board makes wiring of the unit a quick and simple task. With clearly labeled connections,
it is easy to wire in the thermostat. The fan coil is prewired for both heating and cooling with no additional relays
typically required. The Circuit board works as a relay system to the heating and cooling components connected
within the system. The Circuit Board supplies the thermostat with 24v power, which works as a signal to the
circuit board to operate the EPC Control board to its designed variable fan speeds that controls the motor.
The Circuit board is pre-wired to send control signals to heating sources such as boilers, dual purpose hot
water heaters, heat pumps, and geothermal systems, as well our manufactured slide-in electric module (ESH).
The circuit board is also designed to send control signals to cooling sources such as condensing units, chillers,
heat pumps and geothermal systems.
The circuit board features an Auxiliary Relay with Dry Contact connections, so that any application requiring 24
volt, 110 volt, 230 volt, or dry contacts (boilers, hot water heaters, heat pumps, humidifiers) can be automatically
started when there is a call for heat. A dynamic pump duty cycle chip is also provided to prevent water stagnation
in potable water systems, and to provide pump rotor protection for water source heating and cooling.
The Circulator Timer Chip on our circuit board will energize the pump for 5 minutes every 24 hours. This timing
cycle starts when power is turned on to the fan coil unit, and will be engaged at the same time every day. If
you wish to have the timer cycle operate at a specific time of day, simply turn off power to the fan coil unit for
three seconds at that time, and then turn the power back on. If you do not need to use the timer circuit, move
the jumper header from the ON pins to the OFF pins and it will be disabled.
Module WIR Hi-Velocity Wiring & Dip Settings (1/11)
-21-
© 1995-2009 Energy Saving Products Ltd.
Module WIR
Hi-Velocity Wiring & Dip Settings (2/11)
Hi-Velocity Systems HE EPC Motor and Control Board
Low Voltage
Interface
EPC Control
Board
Dip Switch
Programmable
Settings
Line Voltage
Interface
Motor
Interface
Unit Configuration
Energy Saving Products Ltd. HE unit utilizes mass flow technology and will provide a constant CFM throughout
the programming range; environmental conditions will no longer dictate how the system will run, our new controller
will adjust voltage and frequency to maintain its programmed CFM (L/s). The Hi-Velocity HE Systems are field
programmable from 1.5 to 5 tons (5.3 to 17.6 kW) of cooling with the use of a single motor and controller assembly.
The tonnage is set by the pin settings 1,2,3 and 4 on the controller board, see the Dip Switch Control graphic for
reference. Detailed information on pin settings is supplied on Module WIR - Wiring and Dip Settings Pg. 7 of 8.
Dip Switch Control:
(Factory Setting, set for 1.5 tons/5.3kW)
Each programmed tonnage will have up to 5 adjustments for on-site fine tuning which is changed using pins 6,7
and 8. If you need to adjust the CFM (L/s) output of your selected tonnage reference Module WIR - Wiring and Dip
Settings Pg. 8 of 8 for pin settings to increase or decrease the output CFM (L/s).
The HE Fan Coil uses Single Phase Power and the Control Board converts the power from Single Phase to
3 Phase for the EPC Motor. The Heavy Duty 3 Phase Motor provides years of reliable service, as the heavy
duty construction and power limiting function of the EPC controller minimizes motor stress and wear. The new
inverter drive technology offered by the EPC motor and controller reduces power consumption by up to 70%,
with an average overall yearly reduction of 50% over standard PSC motors. Noise related to excess power
input is eliminated.
The mass flow program senses the airflow and changes voltage and phase to maintain constant pressure and
CFM. The EPC controller will compensate for long or short duct installation, filter condition, wet/dry coils and a
variety of variables that effect outlet CFM. The program also compensates for high static filters and other inline
devices. Airflow related noise is reduced.
Service parts are limited for ease of maintenance – there is one motor, one controller, and one circuit board for
all HE Fan Coil units. The add-on Pulse Width Modulating Input (PWM Controller) provides total motor control
making multiple zoning easy without the need of by-pass air flow. The pressure sensing PWM Controller will
adjust the motor performance to maintain constant pressure in supply plenum. Cooling, Heating, and Constant
fan mode to compensate for damper operation and changing airflow demands, all while maintaining peak
energy efficiency with the variable frequency drive technology.
Module WIR Hi-Velocity Wiring & Dip Settings (2/11)
-22-
© 1995-2009 Energy Saving Products Ltd.
Module WIR
Hi-Velocity Wiring & Dip Settings (3/11)
HE Fan Coil - EPC Wiring Diagram
This wiring diagram is included on all of the Hi-Velocity-HE models. The power inputs as well as the various connection
terminals are identified, helping you to quickly wire in the required devices.
FOR SINGLE STAGE OPERATION USE W2 & Y2 TERMINALS
CAUTION
N - neutral
L - line voltage
A1 - auxiliary normally open
A2 - auxiliary normally closed
A3 - auxiliary common
DISCONNECT THE ELECTRIC
POWER BEFORE SERVICING
ATTENTION
DECCONNECTER DU CIRCUIT
D’ALIMENTATION ELECTRIQUE
AVANT L’ENTRE-TIEN
X1 - freeze stat terminal
X2 - freeze stat terminal
H1 - condensing unit 24v output
C - condensing unit 24 vac common
Z1 - heating mode 24v output
C - heating mode 24v vac common
WARNING: HIGH VOLTAGE
tHIS
DEVICE
CONTAINS
CAPACITORS
WHICH STORE POTENTIALLY DANGEROUS
AMOUNTS OF ENERGY. ALLOW 5 MINUTES
AFTER DISCONNECTING POWER FROM THE
DRIVE BEFORE DISCONNECTING THE MOTOR.
AVERTISSEMENT: HAUT VOLTAGE
CET APPAREIL EST MUNI DE CONDENSATEURS
QUI EMMAGASINENT UN MONTANT D’ÉNERGIE
POTENTIELLEMENT
DANGEREUX.
AVANT
DE DÉCONNECTER LE MOTEUR, ATTENDRE
5 MINUTES APRÈS AVOIR DÉBRANCHÉ
L’ALIMENTATION ÉLECTRIQUE DE LA DRIVE.
minimum factory dip settings
black is dip switch setting
MINIMUM FACTORY DIP SETTINGS
(black indicates dip switch setting)
HE-50 5-15 kW
(2 Ton Dip Setting)
ON
1
3
4
5
6
7
8
1
2
3
4
5
6
ON
ON
ON
2
HE-100 10-23 kW
(5 Ton Dip Setting)
HE-100 10-20 kW
(4 Ton Dip Setting)
HE-70 5-18 kW
(3 Ton Dip Setting)
7
1
8
2
3
4
5
6
7
8
1
2
3
4
5
6
7
8
NOTES:
1) USE THERMOSTAT FAN SWITCH TO DISABLE/ENABLE
CONTINUOUS FAN.
2) ‘C’ TERMINAL ON THERMOSTAT (COMMON) IS NOT
NEEDED FOR SOME THERMOSTATS. CONSULT THERMOSTAT
INSTRUCTIONS FOR DETAILS.
3) A3 (AUXILIARY RELAY COMMON) CAN BE USED WITH A1 AND/
OR A2 AS DRY CONTACTS, ARMED 24v FROM THE ‘R’ TERMINAL,
OR ARMED FROM THE ‘L’ TERMINAL.
4) AUXILIARY RELAY TIMER ACTIVATES CIRCUIT FOR 5 MINUTES
EVERY 24 HOURS STARTING WHEN POWER IS APPLIED TO THE
UNIT. RED LIGHT IS ON WHEN AUXILIARY RELAY IS ACTIVATED.
5) SEE INSTALLATION MANUAL FOR MORE DETAILED WIRING
DIAGRAMS AND DIP SWITCH SETTINGS.
6) FAILURE TO READ AND FOLLOW ALL INSTRUCTIONS
CAREFULLY BEFORE INSTALLATION COULD CAUSE PERSONAL
INJURY AND/OR PROPERTY DAMAGE.
Module WIR Hi-Velocity Wiring & Dip Settings (3/11)
-23-
© 1995-2009 Energy Saving Products Ltd.
Module WIR
Hi-Velocity Wiring & Dip Settings (4/11)
HE Fan Coil - 24V Wiring Controls
W1
W1 input to 1st (low stage) heat calls. Active when R is applied. Activates 1st
stage heat fan and Auxiliary Relay.
(W1 operates at 60% of W2 Fan Speed)
W2
W2 input to 2nd (high/primary stage) heat calls. Active when R is applied.
Activates 2nd stage heat fan, Auxiliary Relay and 24V to Z1
(W2 operates at 200 CFM per ton (94 L/s), refer to dip setting)
C
24V supply common
G
G input for thermostat fan switch. Active when R is applied
(G operates at 50% of Y2 Fan Speed)
R
24V supply
Y2
Y2 input to 2nd (high/primary stage) cooling or heat pump call. Active when R is
applied. Activates 2 stage cooling fan speed, activates X1 with 24V for freeze stat
and condenser connections
(Y2 operates at 250 CFM per ton (118 L/s), refer to dip setting)
Y1
Y1 input to 1st (low stage) cooling or heat pump calls. Active when R is applied.
Activates 1 stage cooling fan speed.
(Y1 operates at 60% of Y2 Fan Speed)
D
O/B
24V input required from dehumidistat switch activates blower system to 200
CFM per ton (94 L/s) from dip setting. Y2 must be activated from thermostat.
(D operates at 200 CFM per ton (94 L/s), refer to dip setting)
Blind contact for condenser heat pump from thermostat
X1
24V Signal with calls from Y2, powers Freeze Stat
X2
Freeze Stat connection return signal
H1
24V Signal to Y on Condenser
C
Common for Condensing Unit
Z1
C
24V supply on W2 call
Common
*Note: X1 to X2 recommended to be wired to Freeze Stat (Anti-Ice Control) If Freeze Stat is not used, a jumper between X1 to X2 must be
installed to complete the H1 - 24V Signal to Y on Condenser (i.e. Chilled Water Systems)
v.03
Module WIR Hi-Velocity Wiring & Dip Settings (4/11)
-24-
© 1995-2009 Energy Saving Products Ltd.
Module WIR
Hi-Velocity Wiring & Dip Settings (5/11)
HE Fan Coil - Extended Wiring Diagrams
Extended wiring diagrams for the various applications the Hi-Velocity-HE model can be used for. If you don’t find the wiring
configuration you require, please call the technical department at Energy Saving Products Ltd. for further assistance.
G
R
Y
N
A1
A2
A3
L
ANTI-ICE
CONTROL
C
A1 AND A3 HEATING MODE
AUXILIARY CONTACT
W1 AND W2 ONLY
X1 AND X2 WIRES TO ANTI-ICE CONTROL,
CONDENSING UNIT “Y” AND “C”
SIGNAL FROM H1 AND C TO
COMPLETE SIGNAL
Y
CONDENSER
stageCooling
cooling
1 stage
heating
11Stage
1 Stage
Heating
C 24v
Z1 - HEATING MODE
24V OUTPUT
(W2 ONLY)
C Z1 C H1 X2 X1
AUXILIARY RELAY
(HEATING)
C
W1 W2 C G R Y2 Y1 D O/B
W
THERMOSTAT
C
G
R
Y
N
A1
A2
A3
L
ANTI-ICE
CONTROL
C
A1 AND A3 HEATING MODE
AUXILIARY CONTACT
W1 AND W2 ONLY
X1 AND X2 WIRES TO ANTI-ICE CONTROL,
CONDENSING UNIT “Y” AND “C”
SIGNAL FROM H1 AND C TO
COMPLETE SIGNAL
Y
CONDENSER
1 1stage
stageHeating
heating
Stagecooling
Cooling 22Stage
C 24v
AUXILIARY RELAY
(HEATING)
C Z1 C H1 X2 X1
W1 W2
W1 W2 C G R Y2 Y1 D O/B
Z1 - HEATING MODE
24V OUTPUT
(W2 ONLY)
E
THERMOSTAT
C
G
R
Y
THERMOSTAT
N
A1
A2
A3
L
ANTI-ICE
CONTROL
O/B
C
C
Y
O/B
Y1 O/B
R
A1 AND A3 HEATING MODE
AUXILIARY CONTACT
W1 AND W2 ONLY
X1 AND X2 WIRES TO ANTI-ICE CONTROL,
CONDENSING UNIT “Y” AND “C”
SIGNAL FROM H1 AND C TO
COMPLETE SIGNAL
11 stage
cooling
2 stage
heating
Stage Cooling
2 Stage
Heating
CONDENSER
Heatpump
heatpump
C 24v
AUXILIARY RELAY
(HEATING)
C Z1 C H1 X2 X1
W2
W1 W2 C G R Y2 Y1 D O/B
Z1 - HEATING MODE
24V OUTPUT
(W2 ONLY)
E
C
G
R
Y2
THERMOSTAT
Y1
O/B
N
A1
A2
A3
L
ANTI-ICE
CONTROL
A1 AND A3 HEATING MODE
AUXILIARY CONTACT
W1 AND W2 ONLY
L
C
R
L
A2
A3
L
115 VAC
RELAY WIRING
N
A1
A2
24 VAC
RELAY WIRING
N
A1
A3
SAMPLE AUXILIARY RELAY WIRING OPTIONS FOR HEATING (W1 OR W2)
A2
A3
N
A1
DRY CONTACTS
RELAY WIRING
C
G
D
O/B
N
A1
A2
A3
L
DRY CONTACT
TO BOILER T T
H1 X2 X1
R Y2 Y1
X1
X2
H1
C
Z1
C
EXTERNAL
SPDT RELAY
24 VAC COIL
L
A3
A2
N
A1
115 V TO
CIRCULATOR
115v
CIRCULATOR
SAMPLE AUXILIARY RELAY WIRING OPTIONS FOR HEATING (1 STAGE - W2 ONLY)
DRY CONTACT T
TO BOILER T
EXTERNAL
SPDT RELAY
24 VAC COIL
DRY CONTACTS AND 115 VAC
RELAY WIRING
Z1
SAMPLE AUXILIARY RELAY WIRING OPTIONS FOR HEATING
(W1 OR W2)
C
W1 W2 C
DRY CONTACTS AND 115 VAC
RELAY WIRING
12615-124 Street, Edmonton, AB T5L-0N8
ESP315.07
X1 - FREEZE STAT
X2 - FREEZE STAT
H1 - CONDENSING UNIT 24V OUTPUT (Y)
C - 24 VAC COMMON
Z1 - HEATING MODE 24V OUTPUT
C - 24 VAC COMMON
N - NEUTRAL
L - LINE VOLTAGE
A1 - AUXILIARY NORMALLY OPEN
A2 - AUXILIARY NORMALLY CLOSED
A3 - AUXILIARY COMMON
FOR SINGLE STAGE OPERATION
USE W2 & Y2 TERMINALS
Energy Saving Products
R - 24VAC OUTPUT
W1 - FIRST STAGE HEAT
W2 - SECOND STAGE HEAT
(OR SINGLE STAGE)
Y1 - FIRST STAGE COOLING
Y2 - SECOND STAGE COOLING
(OR SINGLE STAGE)
C - 24 VAC COMMON
G - THERMOSTAT FAN SWITCH
D - DEHUMIDIFICATION
O/B - HEATPUMP REVERSING VALVE
Y2 WIRE TO ANTI-ICE CONTROL
TO INTERRUPT THE
CONDENSERS “Y2” SIGNAL
2 Stagecooling
Cooling 3 Stage
2 stage
stageHeating
heating
CONDENSER
Heatpump
heatpump
R
Y2
C 24v
AUXILIARY RELAY
(HEATING)
C Z1 C H1 X2 X1
W3
W1 W2 C G R Y2 Y1 D O/B
Z1 - HEATING MODE
24V OUTPUT
(W2 ONLY)
E
© 1995-2009 Energy Saving Products Ltd.
Module WIR Hi-Velocity Wiring & Dip Settings (5/11)
-25-
Module WIR
Hi-Velocity Wiring & Dip Settings (6/11)
HEAT PUMP C/W CONDENSER DEFROST CYCLE
ELECTRIC BACK-UP
Heat Pump c/w Condenser Defrost Cycle
Electric BackUp
1 Stage
Cooling
2 Stageheating
Heating (Electric)
1 stage
cooling
2 stage
(electric)
Heat
pump
c/wcondenser
condenser defrost
cycle
heat
pump
c/w
defrost
cycle
OPTIONAL STAGING THE 15-23 KW UNITS
THROUGH THERMOSTAT
OPTIONAL STAGING THE 15-23 KW UNITS
THROUGH THERMOSTAT
ELECTRIC STRIP
24V TERMINALS
TWO
STAGE
2 Stage
Cooling
3 Stage
Heating (electric)
(Electric)
2 stage
cooling
3 stage
heating
Heat
pump
condenser defrost
defrost cycle
heat
pump
c/wc/w
condenser
cycle
ELECTRIC STRIP
24V TERMINALS
CONDENSER
C
1
2
Y
C
1
C Z1 C H1 X2 X1
Z1 - HEATING MODE
24V OUTPUT
(W2 ONLY)
R
TWO
STAGE
W1
A1 AND A3 HEATING MODE
AUXILIARY CONTACT
W1 AND W2 ONLY
A2
AUXILIARY RELAY
(HEATING)
C
A1
C Z1 C H1 X2 X1
C
G
R
Y
R
W1
L
A3
A1 AND A3 HEATING MODE
AUXILIARY CONTACT
W1 AND W2 ONLY
A2
AUXILIARY RELAY
(HEATING)
SET AUXILIARY TIMER
TO THE “OFF” POSITION
A1
N
W1 W2 C G R Y2 Y1 D O/B
W2
Y1 O/B
X1 AND X2 WIRES TO ANTI-ICE CONTROL,
CONDENSING UNIT “Y” AND “C”
SIGNAL FROM H1 AND C TO
COMPLETE SIGNAL
1
N
E
Y2
2
Z1 - HEATING MODE
24V OUTPUT
(W2 ONLY)
L
A3
SET AUXILIARY TIMER
TO THE “OFF” POSITION
CONDENSER
C
1
2
ANTI-ICE
CONTROL
X1 AND X2 WIRES TO ANTI-ICE CONTROL,
CONDENSING UNIT “Y” AND “C”
SIGNAL FROM H1 AND C TO
COMPLETE SIGNAL
ANTI-ICE
CONTROL
2
O/B
W1 W2 C G R Y2 Y1 D O/B
O/B
THERMOSTAT
HEAT PUMP C/W CONDENSER DEFROST CYCLE
BOILER BACK-UP
E
W3
C
G
R
Y2
Y1
O/B
THERMOSTAT
Heat Pump c/w Condenser defrost cycle
Boiler Back-Up
Stage Cooling
2 Stage
Heating
1 stage
cooling
2 stage
heating
pump
condenserdefrost
defrost cycle
heatHeat
pump
c/wc/w
condenser
cycle
2 Stagecooling
Cooling 33 Stage
2 stage
stageHeating
heating
Heat pump
c/w condenser
defrostcycle
cycle
heat pump
c/w condenser
defrost
CONDENSER
C
EXTERNAL
SPDT RELAY
24 VAC COIL
DRY CONTACT
TO BOILER
T T
ANTI-ICE
CONTROL
C Z1 C H1 X2 X1
Y
O/B
CONDENSER
R
W1
X1 AND X2 WIRES TO ANTI-ICE CONTROL,
CONDENSING UNIT “Y” AND “C”
SIGNAL FROM H1 AND C TO
COMPLETE SIGNAL
Energy Saving Products
EXTERNAL
SPDT RELAY
24 VAC COIL
DRY CONTACT
TO BOILER
T T
C
ANTI-ICE
CONTROL
A2
A1
A1 AND A3 HEATING MODE
AUXILIARY CONTACT
W1 AND W2 ONLY
C
G
R
Y
THERMOSTAT
X1 AND X2 WIRES TO ANTI-ICE CONTROL,
CONDENSING UNIT “Y” AND “C”
SIGNAL FROM H1 AND C TO
COMPLETE SIGNAL
A2
AUXILIARY RELAY
(HEATING)
A1
A1 AND A3 HEATING MODE
AUXILIARY CONTACT
W1 AND W2 ONLY
N
W1 W2 C G R Y2 Y1 D O/B
W2
W1
A3
N
E
R
L
A3
AUXILIARY RELAY
(HEATING)
Y1 O/B
12615-124 Street, Edmonton, AB T5L-0N
ESP315.0
C Z1 C H1 X2 X1
L
Y2
W1 W2 C G R Y2 Y1 D O/B
O/B
E
W3
THERMOSTAT
G R Y2
C
Y1
O/B
THERMOSTAT
Module WIR Hi-Velocity Wiring & Dip Settings (6/11)
-26-
© 1995-2009 Energy Saving Products Ltd.
Module
WIR
CHILLED
WATER
WIRING
Hi-Velocity Wiring & Dip Settings (7/11)
1 Stage Cooling (Only)
c/w chilled water circulator
Chilled Water Wiring
1 Stage Cooling
c/w chilled water circulator
w/o using “W” terminals
1 stage cooling
c/w chilled water circulator
w/o using “W” terminals
1 stage cooling (only)
c/w chilled water circulator
X1 AND X2 WIRES TO ANTI-ICE CONTROL,
CONDENSING UNIT “Y” AND “C”
SIGNAL FROM H1 AND C TO
COMPLETE SIGNAL. IF NO ANTIICE CONTROL NEEDED (IE CHILLED
WATER) INSTALL JUMPER WIRE
BETWEEN X1 AND X2
CHILLER
CONTACTS
C
Y
C Z1 C H1 X2 X1
A1 AND A3 Activates 110v
in cooling mode
with this wiring
schematic.
2 STAGE COOLING
WITH CHILLED WATER
C
G C
G
R
Y2
110v
C Z1 C H1 X2 X1
Y1
A2
A2
A1
A1
N
N
W1 W2 C G R Y2 Y1 D O/B
COOLING
CIRCULATOR
110v
CHILLER
CONTACTS
A3
AUXILIARY RELAY
(HEATING)
Chilled water
Circulator
FOR SINGLE STAGE
WIRE RELAY AND THE
THERMOSTAT TO “Y2”
L
THERMOSTAT
A3
2 STAGE COOLING
WITH CHILLED WATER
COOLING
CIRCULATOR
Y
W1 W2 C G R Y2 Y1 D O/B
L
AUXILIARY RELAY
(HEATING)
X1 AND X2 WIRES TO ANTI-ICE CONTROL,
CONDENSING UNIT “Y” AND “C”
SIGNAL FROM H1 AND C TO
COMPLETE
SIGNAL. IF NO ANTICHILLER
CONTACTS ICE CONTROL NEEDED (IE CHILLED
WATER) INSTALL JUMPER WIRE
BETWEEN X1 AND X2
L
Y
A3
C
A2
A1
N
W1 W2 C G R Y2 Y1 D O/B
W1 W2 C G R Y2 Y1 D O/B
G C
G
R
Y2
Y1
THERMOSTAT
E
W1 W2
C
G
R
Y2
Y
C
Y1
THERMOSTAT
G
R
Y
THERMOSTAT
CHILLED WATER WIRING
2 stage
chilled
water
cooling c/w chilled water
2 STAGE
CHILLED WATER
COOLING
C/W
CHILLED WATER
CIRCULATOR
ANDvalve
24V ZONE
VALVE OUTPUT
circulator
and
24v zone
output
2 STAGE HEATING
2
stage
heating
c/w
hot
water
C/W HOT WATER CIRCULATOR AND 24V ZONE VALVE OUTPUT
circulator and 24v valve output
Relay for
Heating
circulator and 24v valve output
Relay for
Heating
Energy Saving Products
Heating
Circulator
24v
1 stage
chilled
water cooling c/w chilled water
1 STAGE
CHILLED
WATER COOLING
C/W CHILLED
WATER CIRCULATOR
ANDzone
24V ZONE
VALVE
OUTPUT
circulator
and 24v
valve
output
2 STAGE HEATING
2
stage
heating
c/w
hot
water
C/W HOT WATER CIRCULATOR AND 24V ZONE VALVE OUTPUT
Circulator
24v
C
12615-124 Street, Edmonton, AB T5L-0N8
Heating
ESP315.07
C
24v Heating
24v Heating
C Z1 C H1 X2 X1
C Z1 C H1 X2 X1
L
A3
AUXILIARY RELAY
(HEATING)
L
A3
A2
AUXILIARY RELAY
(HEATING)
Chilled water
Circulator
A1
A2
Chilled water
Circulator
A1
N
N
W1 W2 C G R Y2 Y1 D O/B
W1 W2 C G R Y2 Y1 D O/B
Relay for
Cooling
E
W1 W2
C
G
R
Y2
Relay for
Cooling
E
Y1
THERMOSTAT
W1 W2
C
G
R
Y2
Y1
THERMOSTAT
C
C
24v
24v Cooling
24v
24v Cooling
Energy Saving Products
Module WIR Hi-Velocity Wiring & Dip Settings (7/11)
-27-
12615-124 Street, Edmonton, AB T5L-0N8
ESP315.07
© 1995-2009 Energy Saving Products Ltd.
Module WIR
Hi-Velocity Wiring & Dip Settings (8/11)
HEATING AND COOLING
C/W HIGH FAN SPEED FROM
c/w High Fan Speed from Thermostat Fan Switch
THERMOSTAT FAN SWITCH
1 Stage Cooling
1 stage
cooling
1 Stage
Heating
(Electric)
1 stageHigh
heating
(electric)
fan speed fromhigh fan speed
fromThermostat
thermostatFan
fan Switch
switch
1 Stage Cooling
1 stageHeating
cooling
1 Stage
1 stage
heating
high fan
speed
High fan speed
from
fan switch
from thermostat fan switch
CONDENSER
C
2
Manual Constant Fan
Switch can be locacted
close to the Fan Coil for
Constant Low Fan
Speed. Thermostats fan
switch will run the blower
at High Fan Speed
C
1
Y
C 24v
ANTI-ICE
CONTROL
Z1 - HEATING MODE
24V OUTPUT
(W2 ONLY)
Setting the thermostat to
Electric Heat will operate
the fan speed at the
highest level air flow with
“G” jumpered to “Y2”
CONDENSER
Y
C Z1 C H1 X2 X1
AUXILIARY RELAY
(HEATING)
Y WIRE FROM THE THERMOSTAT TO
ANTI-ICE CONTROL TO INTERRUPT
THE CONDENSERS “Y” SIGNAL
A2
A1
ANTI-ICE
CONTROL
C Z1 C H1 X2 X1
L
A3
Z1 - HEATING MODE
24V OUTPUT
(W2 ONLY)
A1 AND A3 HEATING MODE
AUXILIARY CONTACT
W1 AND W2 ONLY
A1 AND A3 HEATING MODE
AUXILIARY CONTACT
W1 AND W2 ONLY
AUXILIARY RELAY
(HEATING)
L
A3
A2
A1
N
W1 W2 C G R Y2 Y1 D O/B
W
C
G
R
Y
N
CONSTANT LOW
SPEED FAN
ON / OFF SWITCH
W1 W2 C G R Y2 Y1 D O/B
W C
G
R
Y
THERMOSTAT
THERMOSTAT
Energy Saving Products
Module WIR Hi-Velocity Wiring & Dip Settings (8/11)
-28-
12615-124 Street, Edmonton, AB T5L-0
ESP315.
© 1995-2009 Energy Saving Products Ltd.
Module WIR
Hi-Velocity Wiring & Dip Settings (9/11)
EPC Circuit Board Pin Settings and Air Flow Data (Standard)
BLACK INDICATES DIP SWITCH POSITION. A heat loss/gain must be done prior to selecting a Hi-Velocity-HE
unit. Once a heat loss/gain is known based upon tonnage and vents required, select the appropriate HE unit and the
correct pin settings. If further adjustments are required for the CFM please refer to the extended Pin Setting section.
Model: HE-50
Model: HE-50
# Outlets
Mode
Cooling: 1.5 Ton
12
16
20
Model: HE-50
24
Airflow in CFM
# Outlets
Mode
Cooling: 2.0 Ton
16
20
24
Airflow in CFM
Heating: 32 MBH
Hi Cooling (Y2)
375
410
415
420
Heating: 40 MBH
Hi Cooling (Y2)
490
505
520
ESH: 5-10 kW
Lo Cooling (Y1)
225
245
250
255
ESH: 5-15 kW
Lo Cooling (Y1)
295
305
315
ON
1
2
3
4
5
6
7
8
Pin Setting 0001-0100
Dehumid (D)
300
300
260
280
Hi Heating (W2)
340
355
340
360
Lo Heating (W1)
275
280
260
270
Constant (G)
185
215
250
265
# Outlets
20
24
28
Cooling: 2.5 Ton
Mode
Hi Cooling (Y2)
620
650
660
670
ESH: 5-18 kW
Lo Cooling (Y1)
375
390
400
405
Dehumid (D)
510
525
530
520
ON
3
4
5
6
2
3
4
5
6
7
8
Pin Setting 0011-0100
7
8
Pin Setting 0101-0100
Model: HE-70
32
Heating: 51 MBH
2
1
Dehumid (D)
410
415
420
Hi Heating (W2)
460
470
480
Lo Heating (W1)
355
340
300
Constant (G)
260
255
295
# Outlets
24
28
32
Model: HE-70
Model: HE-70
1
ON
Airflow in CFM
Hi Heating (W2)
570
600
610
605
Lo Heating (W1)
445
460
460
440
Constant (G)
310
350
370
370
Cooling: 3.0 Ton
Mode
Heating: 58 MBH
Hi Cooling (Y2)
755
770
770
ESH: 5-18 kW
Lo Cooling (Y1)
455
465
465
Dehumid (D)
600
610
605
ON
1
2
3
4
5
6
7
8
Pin Setting 0110-0100
Airflow in CFM
Hi Heating (W2)
680
695
690
Lo Heating (W1)
540
545
540
Constant (G)
370
385
380
# Outlets
32
36
40
Model: HE-100
Model: HE-100
# Outlets
28
32
Cooling: 3.5 Ton
Mode
Heating: 72 MBH
Hi Cooling (Y2)
885
895
920
ESH: 5-18 kW
Lo Cooling (Y1)
535
540
555
Dehumid (D)
700
700
710
ON
1
2
Airflow in CFM
Hi Heating (W2)
795
815
830
Lo Heating (W1)
625
625
625
Pin Setting 1000-0100
Constant (G)
520
440
465
Model: HE-100
# Outlets
36
40
44
3
4
5
6
7
8
Mode
Cooling: 5.0 Ton
Model: HE-100
36
Airflow in CFM
Hi Cooling (Y2)
1255
1250
1260
1260
Lo Cooling (Y1)
755
750
760
760
Dehumid (D)
1010
1005
1005
1000
Hi Heating (W2)
1120
1120
1120
1115
Lo Heating (W1)
920
900
900
890
Constant (G)
670
635
635
625
2
3
4
5
6
Pin Setting 1100-0100
7
8
1030
1030
ESH: 5-20 kW
Lo Cooling (Y1)
600
620
620
Dehumid (D)
800
820
800
2
3
4
5
6
7
8
Pin Setting 1010-0100
ESH: 5-23 kW
1
1000
1
48
Airflow in CFM
Hi Cooling (Y2)
ON
Heating: 94 MBH
ON
Mode
Cooling: 4 Ton
Heating: 80 MBH
Hi Heating (W2)
905
930
915
Lo Heating (W1)
720
735
710
Constant (G)
495
505
490
Minimum of eight 2” (51mm) outlets per ton of cooling
(HE Duct = Minimum four outlets per ton)
ESH = Electrical Strip Heaters, minimum of 7
outlets per 5kW is required
Black indicates dip switch position:
ON
OFF
Module WIR Hi-Velocity Wiring & Dip Settings (9/11)
-29-
© 1995-2009 Energy Saving Products Ltd.
Module WIR
Hi-Velocity Wiring & Dip Settings (10/11)
EPC Circuit Board Pin Settings and Air Flow Data (Metric)
BLACK INDICATES DIP SWITCH POSITION. A heat loss/gain must be done prior to selecting a Hi-Velocity-HE
unit. Once a heat loss/gain is known based upon tonnage and vents required, select the appropriate HE unit and the
correct pin settings. If further adjustments are required for the L/s please refer to the extended Pin Setting section.
Model: HE-50
Model: HE-50
# Outlets
12
Mode
Cooling: 5.3 kW
16
20
Model: HE-50
24
Airflow in L/s
# Outlets
16
Mode
Cooling: 7.0 kW
20
24
Airflow in L/s
Heating: 9.4 kW
Hi Cooling (Y2)
177
193
196
198
Heating: 11.7 kW
Hi Cooling (Y2)
231
238
245
ESH: 5-10 kW
Lo Cooling (Y1)
106
116
118
120
ESH: 5-15 kW
Lo Cooling (Y1)
139
144
149
ON
1
2
3
4
5
6
7
8
Pin Setting 0001-0100
Dehumid (D)
142
142
123
132
Hi Heating (W2)
160
168
160
170
Lo Heating (W1)
130
132
123
127
Constant (G)
87
101
118
125
# Outlets
20
24
28
Cooling: 8.8 kW
Mode
Hi Cooling (Y2)
293
307
311
316
ESH: 5-18 kW
Lo Cooling (Y1)
177
184
189
191
Dehumid (D)
241
248
250
245
ON
3
4
5
6
2
3
4
5
6
7
8
Pin Setting 0011-0100
7
8
Pin Setting 0101-0100
Model: HE-70
32
Heating: 15 kW
2
1
Dehumid (D)
193
196
198
Hi Heating (W2)
217
222
227
Lo Heating (W1)
168
160
142
Constant (G)
123
120
139
# Outlets
24
28
32
Model: HE-70
Model: HE-70
1
ON
Airflow in L/s
Mode
Cooling: 10.6 kW
Hi Heating (W2)
269
283
288
286
Lo Heating (W1)
210
217
217
208
Constant (G)
146
165
175
175
Airflow in L/s
Heating: 17 kW
Hi Cooling (Y2)
356
363
363
ESH: 5-18 kW
Lo Cooling (Y1)
215
219
219
Dehumid (D)
283
288
286
ON
1
2
3
4
5
6
7
8
Pin Setting 0110-0100
Hi Heating (W2)
321
328
326
Lo Heating (W1)
255
257
255
Constant (G)
175
182
179
# Outlets
32
36
40
Model: HE-100
Model: HE-100
# Outlets
28
32
Cooling: 12.3 kW
Mode
Heating: 21.1 kW
Hi Cooling (Y2)
418
422
434
ESH: 5-18 kW
Lo Cooling (Y1)
252
255
262
Dehumid (D)
330
330
335
ON
1
2
Airflow in L/s
Hi Heating (W2)
375
385
392
Lo Heating (W1)
295
295
295
Pin Setting 1000-0100
Constant (G)
245
208
219
Model: HE-100
# Outlets
36
40
44
3
4
5
6
7
8
Mode
Cooling: 17.6 kW
Model: HE-100
36
48
Airflow in L/s
Hi Cooling (Y2)
592
590
595
595
356
354
359
359
Dehumid (D)
477
474
474
472
Hi Heating (W2)
529
529
529
526
Lo Heating (W1)
434
425
425
420
Constant (G)
316
300
300
295
3
4
5
6
Pin Setting 1100-0100
7
8
486
486
ESH: 5-20 kW
Lo Cooling (Y1)
283
293
293
Dehumid (D)
378
387
378
2
3
4
5
6
7
8
Pin Setting 1010-0100
Lo Cooling (Y1)
2
472
1
ESH: 5-23 kW
1
Mode
Hi Cooling (Y2)
ON
Heating: 27.5 kW
ON
Cooling: 14.1 kW
Heating: 23.5 kW
Airflow in L/s
Hi Heating (W2)
427
439
432
Lo Heating (W1)
340
347
335
Constant (G)
234
238
231
Minimum of eight 2” (51mm) outlets per ton of cooling
(HE Duct = Minimum four outlets per ton)
ESH = Electrical Strip Heaters, minimum of 7
outlets per 5kW is required
Black indicates dip switch position:
ON
OFF
Module WIR Hi-Velocity Wiring & Dip Settings (10/11)
-30-
© 1995-2009 Energy Saving Products Ltd.
Module WIR
Hi-Velocity Wiring & Dip Settings (11/11)
EPC Dip Ranges & Extended Air Flow Adjustments
The extended pin settings show how to increase or decrease the required CFM on the Hi-Velocity-HE fan coil for fine tuning.
The chart illustrates the CFM difference achieved changing pins 6, 7, and 8. Only these three pins are modified to increase or
decrease the CFM based upon the selected tonnage of pins
through
4.
EPC1dip
ranges
EPC Dip Ranges
1400
1300
1200
1100
CFM output
1000
1.5 tonne
tons /dip
5.3range
kW
1.5
2
tons
/
7.0
kW
2 tonne dip range
2.5 tonne
tons /dip
8.8range
kW
2.5
900
800
tonsdip
/ 10.6
kW
33 tonne
range
3.5 tonne
tons /dip
12.3
kW
3.5
range
700
tonsdip
/ 14.1
kW
44 tonne
range
55 tonne
range
tonsdip
/ 17.6
kW
600
500
400
300
200
0
1
2
3
4
5
6
dip setting
Extended Air Flow Adjustments
The extended pin setting applies to all HE fancoils and can be used to lower or raise CFM output.
Only PIN’s 6,7,8 are changed in order to modify the CFM output
Pin Setting
ON
Decrease
1.
6
Result
7
8
7
8
7
8
7
8
7
8
ON
2.
6
ON
3.
Ideal (default)
6
ON
4.
6
ON
5.
6
Increase
Black indicates DIP switch position
Module WIR Hi-Velocity Wiring & Dip Settings (11/11)
-31-
© 1995-2009 Energy Saving Products Ltd.
Module RPM
Refrigerant Module Installation (RPM-E) (1/4)
Refrigerant Modules (rpm-e)
Configurations
When installing, any combination of A to B or B to A
can be used. For example, a horizontal application could
use A to B while highboy applications could use A to B1.
Do not use a combination of A to A1 or B to B1, as this
would bypass the cooling coil completely. The knockouts can be removed with a screw driver and hammer.
Ensure caution is used when opening the knock-outs,
as any extreme protrusion into the module may damage
the coil surface.
Rough Opening Sizes
The RPM-E series cooling module can be used with the
Hi-Velocity Fancoil, installed in many different positions. It
is pre-piped with an adjustable, heat pump ready, thermal
expansion valve and comes with a bleed port, sight glass,
suction and liquid line access ports, freeze-stat, and two L
brackets for mounting.
The RPM-E comes as a complete module and must be
installed in the vertical position on the return air side of
the fancoil; the unit cannot be turned on its side and is a
draw through unit only. The module offers multi-position
airflow configurations for horizontal, highboy, or counterflow configurations. (Fig. 01)
Fig. 01 - RPM-E Cooling Module
B1
A or B
A1 or B1
RPM-E 50
11 ”L X 13 ”H
RPM-E-70
163/4”L X 131/4”H
RPM-E-100
223/4”L X 131/4”H
3/4
113/4”L X 9”W
1/4
(298mm X 337mm)
(425mm X 337mm)
(578mm X 337mm)
(298mm X 229mm)
163/4”L X 9”W
(425mm X 229mm)
223/4”L X 9”W
(578mm X 229mm)
Mounting the RPM-E
Two L mounting brackets are shipped loose for
attaching the RPM-E to the fancoil, along with two
sided foam tape for an air seal between the units. When
mounting the cooling coil to the fancoil (Fig. 02), ensure
that no screws puncture the drain pan or coil. It is advised
that no screws be placed within 3 inches (76mm) from the
bottom of the coil. This will prevent the drain pan from
being accidentally pierced. It is also advised that care
be taken when placing screws in the top left side of the
cooling coil (when looking at the access hatch), as this is
where the top most extent of the cooling coil is located.
See Specification Pages for the dimensions of the
fan coil units and cooling modules.
Fig. 02 - Mounting Brackets
B
A
A1
The TXV (Thermal Expansion Valve), sight glass,
access ports, and freeze-stat are already installed
and are accessible through an easy to remove access
hatch. The liquid and suction lines have male solder
connections at a standard width making connections to
the condenser lines quick and easy.
(76mm)
Module RPM Refrigerant Module Installation (RPM-E) (1/4)
-32-
(76mm)
© 1995-2009 Energy Saving Products Ltd.
Module RPM
Refrigerant Module Installation (RPM-E) (2/4)
Secondary Drain Pan
Some building codes call for the use of a secondary drain
pan underneath the entire unit (Fig. 03). Any installation that
has the potential of property damage due to condensate
must have a secondary drain pan installed. If the unit is
installed in a high heat and/or high humidity location, extra
insulation around the unit casing may be required. This will
prevent excessive condensate from forming on the outer
surface of the casing.
Fig. 03 - Secondary drain pan
Wiring - Outdoor Unit
Make all connections to the outdoor unit with rain tight
conduit and fittings. Most building codes require a rain tight
disconnect switch at the outdoor unit as well (always check
local codes). Run the proper size copper wires to the unit,
and connect as per the manufacturer’s recommendations.
Ensure that the outdoor unit is setup for a TX system. If
not, a hard start kit may be required.
Pipe Sizing
When sizing refrigerant piping,
follow the outdoor unit
manufacturer’s recommendations.
Piping the RPM-E
P-Trap
Secondary drain pan
Drain Connections
All RPM-E modules come with a ¾” (19mm) primary
and secondary outlet. The condensate drain must have
a vented p-trap installed (Fig. 03), and run at a slope
of ¼” (6.7mm) per foot in the direction of the drain. When
installing the P-trap, one must be installed on both the
primary and secondary outlets. The P-traps must have
a minimum depth of two inches (51mm) . Due to the high
negative pressure of the blower system, the RPM-E
will hold some amount of water during operation. Once
this level has been achieved, condensate will flow
from the coil regularly. When the unit shuts down, or
lowers speed, the force is released, allowing the held
condensate to empty from the drain pan. During this
time, condensate may flow from both the primary AND
secondary drains.
Outdoor Unit Installation
Only refrigerant grade pipe and fittings are to be used
with Hi-Velocity Systems. Plumbing fittings may contain
wax or other contaminants which are detrimental to the
proper operation of the system. Insulate the suction line
with 3/8” (9.53mm) insulation such as Armaflex. In high heat
areas, 1/2” (12.7mm) insulation may be needed. If the lines
are run in an area where temperatures could exceed 120°F
(49°C) or runs longer than 50’ (15.24m), then the liquid line
may need to be insulated as well. Support the pipe every 5
feet (1.52m), or whatever local code states.
Run the pipes in the most direct route possible, taking
into account structural integrity and building details. If the
evaporator is located above the condenser, slope any
horizontal runs toward the condenser. If the condenser is
located above the evaporator, a P-trap must be installed
at the bottom of the vertical riser. For long vertical risers,
additional P-traps must be installed for every twenty
feet (6m). For lines running over 50’ (15m), a suction line
accumulator must be installed. Lines running over 100’
(30m) are not recommended. All lines should be piped
so as not to restrict access to the front panels, filter
section, or electrical enclosure.
Brazing & Pressure Testing
The RPM-E comes pre-piped with the coil assembly.
With the RPM-E, the Liquid and Suction lines are the
only brazing that need to be done at the fan coil. For
charging and brazing, remove the front access panel of
the RPM-E (Fig. 04). With the access panel removed, the
coil assembly will be accessible. Wet rag the liquid and
suction line (or use a heat dissipating paste) to ensure
no overheating occurs to the pre-piped coil assembly.
Excess heat may damage the RPM-E components.
Fig. 04 - Remove Front Access Panel
Locate the outdoor unit in a suitable location, as close
as possible to the fan coil. Maintain the clearances
recommended by the manufacturers of the outdoor unit, to
ensure proper airflow. The outdoor unit must be installed
level, in a properly supported location. A liquid line filter/
drier is recommended to be installed.
Module RPM Refrigerant Module Installation (RPM-E) (2/4)
-33-
© 1995-2009 Energy Saving Products Ltd.
Module RPM
Refrigerant Module Installation (RPM-E) (3/4)
Once the system has been brazed it must been pressure
tested. Pressure testing must be done with nitrogen and not
refrigerant. Typically, pressures are tested to the maximum
operating pressure that the system will see. Allow the
system to hold the nitrogen charge for at least 15 minutes
to ensure there are no leaks. Check with local codes for
proper testing procedures.
Evacuating
After the piping is installed and all components have been
brazed together, a vacuum pump must be used to evacuate
the system from both the low and high side to 1500 microns
(200 pa). Add pressure to the system to bring the pressure
above zero psig. After allowing the refrigerant to absorb
moisture, repeat the above procedure. Evacuate the system
to 500 microns (67 pa) on the second evacuation, and ensure
that the system holds at the vacuum pressure. If not, check for
leaks and evacuate again. At this point open service valves
on pre-charged condensing units, and add refrigerant to the
system if necessary.
The use of an electronic leak detector is recommended, as it
is more sensitive to small leaks under the low pressures.
Charging
Once the system has been determined clean and ready
for charging, refrigerant can be added. The access ports
on the condenser must be open at this point. Never leave
the system unattended when charging. With the system
running, slowly add refrigerant. The typical operating point
of an RPM-E coil is that of a saturated suction temperature
of 38-40°F (3-4°C) and a suction line temperature of 42-44°F
(6-7°C). In order to prevent overcharging during this stage,
refrigerant should be added in steps. This will allow time
for the system to settle and prevent ‘overshooting’ the ideal
charge. Condenser pressures and temperatures remain
similar to those in a conventional forced air system. It is
recommended that the coil be charged on a high load day
at the compressor’s highest speed.
Most system start ups require only an adjustment to the
refrigerant level of the system. Should further refinement be
required, the TXV may be adjusted. A clockwise turn of the
superheat valve (the direction in which the cap is screwed on)
will result in a closing of the valve while a counterclockwise
turn (the direction in which the cap was unscrewed) will result
in opening of the valve. Always note system conditions before
adjusting the valve and allow 5 minutes for the system to settle
before making any further adjustments. Never adjust the TXV
more than one quarter turn at a time.
The RPM-E coil can operate at a level that is different
from most other conventional system coils. Typically,
superheat level are low, two to four degrees of superheat.
Adjustment of the valve also differs somewhat. Rather than
having a large effect on the range of superheat, adjustment
of the valve has a larger effect on the system pressures;
superheat maintaining a fairly constant point. Opening the
valve will increase suction pressures and decrease liquid
pressures, while closing the valve will decrease suction
pressures and raise liquid pressures.
Heat Pumps
Due to the volume difference between indoor and
outdoor coils, as well as the lower airflow rates of SDHV
systems, issues regarding high head pressures may arise
in heating mode. The standard method for dealing with
this is to charge the system at an intermediate level. This
practice involves charging the system in cooling mode, as
normal, and then evaluating the system when switched
to heating mode. Should head pressures impinge on the
level of the high pressure safety switches, remove an
appropriate amount of refrigerant. Care should be taken
not to remove an excess amount of refrigerant, as this may
cause the evaporator to freeze in cooling mode. As the
cooling pressures will be lower, it is recommended that a
third party anti-ice control be used.
Freeze Stat
The RPM-E series cooling coil comes equipped with
an anti-freeze control mounted on the suction line. This
freeze control serves the purpose of preventing severe
icing of the coil in the event of an undercharge or low load
on the coil. This piece of equipment must be used at all
times. Lack of use of the freeze-stat will result in RPM-E
related warranty issues being voided. During start-up, it
is acceptable to jumper across the Freeze-Stat. This will
prevent the freeze-stat from shutting the system off while
charging a new system that may be low on refrigerant.
Once charged and running, this jumper must be removed
and the Freeze-Stat connected to the X1 and X2 terminals
on the Printed Circuit Board. Should wiring needs arise
in which the outdoor unit is controlled through another
means of wiring, the Freeze-Stat should be connected
in series on the supply side of the control wiring.
Module RPM Refrigerant Module Installation (RPM-E) (3/4)
-34-
© 1995-2009 Energy Saving Products Ltd.
Module RPM
Refrigerant Module Installation (RPM-E) (4/4)
Troubleshooting the TXV
and outdoor unit, on and off. This often takes the form of
very short and frequent on cycles. There are many factors
that may contribute to short cycling of the refrigerant
system. These issues can generally be broken down
between airflow related issues, refrigerant issues, and
installation issues.
When issues arise that bring the function of the TXV into
question, factors must be looked into before replacement.
Inspect the TXV for signs of damage. This may be from a
pinched equalizer line to a burnt valve. These issues will
have an adverse affect on the operation of the valve. Should
the equalizer line be pinched, the valve will no longer be
able to supply the proper amount of refrigerant to the coil.
A burnt valve may have an effect on the refrigerant charge
of the TXV bulb or the seal of the valve. This may again
cause an improper amount of refrigerant to be metered by
the valve or cause the valve head to become seized.
Low airflow rates are one of the most common causes
of short cycling. As the airflow rate is lowered across the
cooling coil, the coil pressure drops along with it. This lowers
the temperature of the coil and may cause the freeze-stat
to trip. As the system settles, the freeze-stat closes and the
cycle begins again, as the unit does not run long enough
for the space to become adequately conditioned. Ensure
that the proper amount of airflow is provided to the coil.
Check for proper dip-settings and return air practices.
The TXV bulb location and mounting should also be
inspected. The bulb should be securely mounted on the
top half of the suction line. If the bulb is loose or on the
lower half of the line, the bulb will not properly sense
the refrigerant temperature and will not meter the proper
amount of refrigerant. Ensure that the bulb is also properly
insulated, as a lack of insulation will expose the bulb to
conditions well outside those of the coil. This will cause an
overfeed of refrigerant to the system.
Should the installation of the valve be proper, and no
damage is evident, inspect the operation of the valve. If
the TXV bulb is removed and held in ones hand, the valve
should react accordingly. This sudden increase in heat will
open the valve. This will cause a rise in suction pressure
and a drop in liquid pressure. Should nothing happen, the
valve is likely seized and will need to be replaced.
Short Cycling
Short cycling is the unnecessary running of the indoor
Specifications
Improperly charged systems run the risk of short cycling
as well. An undercharged system will react much the same
as a system with low airflow. If the charge is low enough, it
may trip out on low pressure. If a system is overcharged, it
may trip out on high head pressure. Ensure that the system
charge is within the bounds described above.
System set-up and installation should be checked
as well. Piping practices should be within the bounds
described above and within the realms of the outdoor unit
manufacturer. Extreme and often unnecessary adjustment
of the TXV can create conditions similar to an undercharged
coil. A poorly placed T-stat, such as underneath a vent, can
cause short cycling. This happens due to the T-stat being
satisfied very shortly after the unit has begun to operate.
RPM-E-50
RPM-E-70
RPM-E-100
HE - 50 / 51 / 52
HE - 70 / 71
HE - 100 / 101
20090200050
20090200070
20090200100
Refrigerant Type
R-410A
R-410A
R-410A
TX Cooling MBH
18-24 (5.3-7.0 kW)
30-36 (8.8-10.6 kW)
42-60 (12.3-17.6 kW)
Latent Cooling MBH
6.8-8.9 (2.0-2.6 kW)
11.7-13.7 (3.4-4.0 kW)
16.0-22.2 (4.7-6.5 kW)
Aluminum
Aluminum
Aluminum
Tubing Material
Copper
Copper
Copper
Type of Fins
.006 Al
.006 Al
.006 Al
Matching Fan Coil
Part Number
1
Fin Material
Liquid Line (Lq)
3/8” (9.5mm)
3/8” (9.5mm)
3/8” (9.5mm)
Suction Line (S)
7/8” (22.3mm)
7/8” (22.3mm)
7/8” (22.3mm)
3/4” (19mm)
3/4” (19mm)
3/4” (19mm)
TXV with Built in Check Valve & Bypass
Yes
Yes
Yes
Site Glass
Yes
Yes
Yes
Access Ports
Yes
Yes
Yes
Freeze Stat
Yes
Yes
Yes
Connection
Sizes
Drain Connection
Shipping Weight (lbs)
Module Size (L x W x H)
Tons
2
MBH = Thousand British Thermal Units per Hour
48 (22kg)
59 (27kg)
74 (34kg)
191⁄4” x 145⁄8” x 181⁄2”
241⁄4” x 145⁄8” x 181⁄2”
32” x 145⁄8” x 181⁄2”
(489mm x 371mm x 470mm)
(616mm x 371mm x 470mm)
(813mm x 371mm x 470mm)
1.5 - 2.0 (5.3 - 7.0 Kw)
2.5 - 3.0 (8.8 - 10.6 Kw)
3.5 - 5.0 (12.3 - 17.6 Kw)
TX = Thermal Expansion
TXV = Thermal Expansion Valve
1) Smaller condensers may be matched to the fan coil when needed (match TXV to condenser size)
2) Minimum of 8 full 2” (51mm) outlets per ton of cooling needed (4 outlets for HE)
Module RPM Refrigerant Module Installation (RPM-E) (4/4)
-35-
© 1995-2009 Energy Saving Products Ltd.
Module WCM
Chilled Water Coil (WCM/WM) (1/1)
Chilled
Water Coil (WCM/WM)
Piping the WCM/WM
The WCM comes complete with 2 built-in 3/4” (19mm)
drain lines, primary and secondary. Ensure the primary
drain line is vented and P-trapped.
The use of a mixture of gylcol will reduce capacities;
refer to gylcol manufacture reduction charts.
The WCM/WM coil is a High Capacity Hydronic Water
Coil available as an add-on module to the Hi-Velocity
System. Mainly used in the chilled water applications for
cooling, this coil can also be used for heating with water
temperatures up to 130°F (54°C).
Installation
The coil comes as a module and must be installed in the
vertical position on the return air side of the fan coil. The
WCM/WM come supplied with two L mounting brackets
for connection to the fan coil (Fig. 01). When mounting
the cooling coil, ensure that no screws puncture the
drain pan or coil.
When the potential for gravity flow of the hot water
exists, check valves may be needed on both the
supply and return lines. All lines should be piped so as
not to restrict access to the front panels, filter section,
or electrical enclosure. Size your supply and return
lines according to Table 01.
Fig. 01 - Mounting the WCM/WM
Table 01 – WCM/WM pipe sizing
Zone BTUH
Heat loss
Pipe Size
up to 40 feet
Pipe Size
40 – 100 feet
0 - 35,000
5⁄8” (16mm)
3⁄4” (19mm)
35,001 - 70,000
3⁄4” (19mm)
1” (25mm)
(0 - 10.3 kW)
(10.4 - 20.5 kW)
Specifications
WCM - 50
Matching Fan Coil
WCM - 70
WM - 100
HE - 50 / 51 / 52
HE - 70 / 71
HE - 100 / 101
Part Number
10010201050
10010201070
10010201100
Fin Material
Aluminum
Aluminum
Aluminum
Copper
Copper
Copper
.006 Al (0.1524mm)
.006 Al (0.1524mm)
.006 Al (0.1524mm)
5 (0.32 L/s)
7 (0.44 L/s)
10 (0.63 L/s)
Supply Line
3/4” (19mm)
3/4” (19mm)
3/4” (19mm)
Return Line
3/4” (19mm)
3/4” (19mm)
3/4” (19mm)
3/4” (22.3mm)
3/4” (22.3mm)
3/4” (22.3mm)
3 (9.0 kPa)
6.5 (19.4 kPa)
6.8 (20.3 kPa)
Tubing Material
Type of Fins
Flow Rate (GPM)
Hydronic Connection Sizes
Drain Connection
Pressure Drop FT. H2O
Shipping Weight
Module Size (L x W x H)
BTUH
30 lbs (14 kg)
3
1
35 lbs (16 kg)
1
14 ⁄8” x 10 ⁄8” x 18 ⁄2”
3
1
40 lbs (18 kg)
1
19 ⁄8” x 10 ⁄8” x 18 ⁄8”
253⁄8” x 7” x 183⁄8”
(365mm x 257mm x 470mm)
(492mm x 257mm x 460mm)
(645mm x 257mm x 467mm)
18,000-24,000
30,000-36,000
42,000-60,000
(5.3-7.0 kW)
(8.8-10.6 kW)
Module WCM Chilled Water Coil (WCM/WM) (1/1)
-36-
(12.3-17.6 kW)
© 1995-2009 Energy Saving Products Ltd.
Module HWC
Hot Water Coil Installation (1/1)
Hot Water Coil Add-On
Table 01 – WCM/WM pipe sizing
Zone BTUH
Heat loss
Pipe Size
up to 40 feet
Pipe Size
40 – 100 feet
0 - 35,000
5⁄8” (16mm)
3⁄4” (19mm)
35,001 - 70,000
3⁄4” (19mm)
1” (25mm)
1” (25mm)
1 1⁄4” (32mm)
(0 - 10.3 kW)
(10.4 - 20.5 kW)
70,001 - 140,000
Installation
(20.6 - 41.0 kW)
Designed for the Hi-Velocity System, the HWC is a High
Capacity Hydronic Heating water coil that comes installed
in the “H” Series fan coils and can be field installed in the
“BU” Series fan coils. To install, simply remove the front
blower panels, and slide the coil into place on the supply air
side of the blower. (Fig. 01)
The water coil is designed with ¾” copper connections
with 6 internal rows of 3/8” copper tubing, for high heat
transfer ratings even when using low water temperature
sources. The coil is factory tested at 500 psi for leaks, and
is designed to have a low water pressure drop through the
coil reducing pump head loss.
Piping The Hot Water Coil
Size your supply and return lines according to Table 01.
Figs. 02 and 03 illustrated typical pipe runs from a dual
purpose hot water tank to a fan coil. These drawings are
only for reference as all piping has to be run according to
local codes.
Fig. 02 - Hot water tank: With side take-offs
SUPPLY
H
Domestic
hot water
mixing valve
(optional)
Fig. 01 - Hot Water Coil easily slides into the fan coil
C
RETURN
Fan Coil
Domestic
cold water
C
H
SUPPLY
Dual
Purpose
hot water
tank
The Fan Coil can be installed in upflow, counterflow or
horizontal positions, using the lowest water connection into
the coil as the supply line and the highest water connection
as the return line, to reduce possible air trapping within the
coil. Typical hot water heating sources used are dual purpose
hot water tanks (natural gas or oil), boilers (gas, oil, electric
or wood fired), and even solar heating systems. Geo-thermal
systems, water-to-water heat pumps or reverse cycle chillers
would use the WM or WCM coils, as they have a drain pan
incorporated within the coil casing, for condensate water
formed from the cooling cycle.
When used with dual purpose hot water tanks, be sure to
size the tank for both the domestic hot water usage as well
as the heating requirements.
Specifications
RETURN
Fig. 02 - Hot water tank: Without side take-offs
Incorporated
within
the circuit board there is
a timer that when turned
on will duty cycle the
circulation pump for 5
minutes every 24 hours
to ensure there is no
stagnate water within the
water coil. Spring check
valves are required to be
installed on the supply
and return to prevent
gravity flow from the hot
water source on a call for
cooling or constant fan.
SUPPLY
H
Domestic
hot water
mixing valve
(optional)
C
RETURN
Fan Coil
Domestic
cold water
C
H
Dual
Purpose
hot water
tank
RETURN
HE-50 6 Row Coil
HE-70 6 Row Coil
HE-100 6 Row Coil
HE/HV - 50 / 51*
6 Row/10 FPI
HE/HV - 70 / 71
6 Row/10 FPI
HE/HV - 100 / 101
6 Row/10 FPI
Part Number
20100100050
20100100070
20100100100
Fin Material
Aluminum
Aluminum
Aluminum
Copper
Copper
Copper
Matching Fan Coil
Coil Type
Tubing Material
Type of Fins
Hydronic Connection Sizes
Flow Rate (GPM)
Pressure Drop FT. H2O
.006 Al (0.1524mm)
.006 Al (0.1524mm)
.006 Al (0.1524mm)
Supply
3/4” (19mm)
3/4” (19mm)
3/4” (19mm)
Return
3/4” (19mm)
3/4” (19mm)
3/4” (19mm)
5 (0.32 L/s)
7 (0.44 L/s)
10 (0.63 L/s)
3 (9.0 kPa)
6.5 (19.4 kPa)
6.8 (20.3 kPa)
1
Coil Dimensions
1
⁄2
13 ” x 5 ” x 16”
(343mm x 140mm x 406mm)
⁄2
Shipping Weight
Max. BTUH @ 180°F E.W.T. (kW @ 82°C)
1
⁄2
19” x 5 ” x 16”
(483mm) x 140mm x 406mm)
1
25” x 5 ⁄2” x 16”
(635mm) x 140mm x 406mm)
17 lbs (8kg)
21 lbs (10kg)
28 lbs (13kg)
54,500 (16.0 kW)
81,800 (24.0 kW)
122,900 (36.0 kW)
Module HWC Hot Water Coil Installation (1/1)
-37-
© 1995-2009 Energy Saving Products Ltd.
Module ESH
Electrical Strip Heater Installation (1/4)
Fig. 01 - Do not install elements Vertically
Electrical Strip Heater
The Electrical Strip Heater (ESH) is an electric resistance
heater that slides into the fan coil on the leaving air side
(supply side) of the blower. This heater can be used for
primary heating or supplemental heat (auxiliary heating) for
heat pumps. The ESH has “0” clearance to combustibles,
and requires minimum clearances on the access side
for maintenance and servicing (see Fan Coil Placement:
Module FCP). Allow 18” minimum of straight plenum duct
from the supply of the air handler before any branch outlets,
tees or elbows.
There is a minimum air flow requirement for the electric
strip heater:
The HE-50 and the HE-70 require a minimum of six
2”x10’ AFD outlets per 5 kW.
The HE-100 requires a minimum of seven 2”x10’ AFD
outlets per 5 kW.
*One HE x 10’ AFD is equivalent to two - 2” x 10’ AFDs
Installation
Remove the shipping covers and inspect the heater
carefully. Check the ESH for any shipping damage, check
the heating elements for any loose connections and check
all porcelain insulators for any breaks. Report any damage
to the manufacturer. DO NOT INSTALL DAMAGED
HEATER.
The ESH is labeled with a directional airflow sticker;
when placing the ESH, the sticker shall be in the direction
of the air flow.
Install the ESH in the supply air side of the fan coil.
Remove the coil access door and simply slide the coil into
place. The heating elements (Fig. 01) must always be
installed horizontally. The ESH is labeled with a directional
air flow sticker. When placing the ESH, the sticker shall
be in the direction of the air flow. Seal the void between
the fan coil and the ESH with the foam tape supplied with
the unit or with a suitable sealant. Mount the ESH onto the
fan coil cabinet with 4 self tapping screws from inside the
ESH wiring access door. Seal any additional openings with
a suitable sealing compound.
Elements are to be installed
Horizontally, not Vertically
Wiring the Electrical Strip Heater
The air handler and the ESH must have independent
power supplies. Disconnect all power sources before
opening the control box and working within. Wires shall
be sized according to local electrical codes and ordinances.
All wires must be brought in through knock-outs. See Table
01 for feeder quantity of feeder ampacity.
Table 01
Kw
Volts/
Phase
# of
feeders
Circuit
Breakers
5
240/1
1 X 20.8
1 X 30A
10
240/1
1 X 41.6
1 X 60A’
15
240/1
1 X 20.8 1 X 41.6
1 X 30A 1 X 60A
18
240/1
1 X 31.2 1 X 41.6
1 X 40A 1 X 60A
20
240/1
2 X 41.6
2 X 60A
23
240/1
2 X 47.0
2 X 60A
PLEASE NOTE: THE ESH MUST BE WIRED TO
A DEDICATED BREAKER, SEPARATE FROM THE
FAN COIL.
The ESH elements are rated for 240V 60 Hz. Higher
voltages are not recommended. When lower voltages are
supplied, de-rate the capacity of the ESH accordingly.
230V = 92%, 220V= 84%, 208V = 75%. Use only wires
suitable for 167° F (75°C).
The ESH 5 and 10 kW units have one single 240V
breaker; the 15 kW to 23 kW units come complete with
two supply circuit breakers. These two circuits can
be joined together using a Jumper Bar (Square D® –
QOU14100JBAF, not supplied) designed to use one pair
of larger gauge wire instead of two smaller gauge wires.
Install as per manufacturers guide lines, and according
to code. A disconnect switch close to the heater will be
required.
Control circuit wiring between the heater terminals #1
and #2 on the ESH use Class 2 - 18 gauge wire to the zone
valve terminals in the fan control box.
Module ESH Electrical Strip Heater Installation (1/4)
-38-
© 1995-2009 Energy Saving Products Ltd.
Module ESH
Electrical Strip Heater Installation (2/4)
Operation
The low voltage signals that energize the ESH come
from the air handler’s zone valve terminals (Z1 and C).
These are to be connected to #1 and #2 of the ESH. Note:
This connection is polarity sensitive. The Z1 is energized
with 24v with a call for heat from a W2 call on the air
handler’s terminal board. W2 will also energize the heating
fan speed on the air handler. For air handler to ESH low
voltage wiring, see page __ of this manual. High voltage
wiring of the ESH can be viewed on the inside of the ESH
front panel.
On a demand for heat the TH-24 electronic sequencer
will energize the heating elements in sequence. When the
thermostat is satisfied, all the elements and blower will be
de-energized.
Within the ESH, there are automatic reset thermal cut-out
disc type safety devices at a fixed temperature that open
the control circuit when a set point is reached. When the
overheating conditions have disappeared, it automatically
resets and returns the heater to normal operating conditions.
The standard off the shelf ESH has a minimum of outlets
per kW that is required to be running for air flow. Energy
Saving Products Ltd. also offers a special electric strip
module for zoning capabilities. Please contact the factory
for additional information.
Maintenance
ESH heaters have been designed to operate long
term without issue. Those responsible for equipment and
maintenance should be aware of the following suggestions:
ESH - 650
Matching Fan Coil
Part Numbers
Electrical inspection: Two weeks after start up, all electric
connections to contactors should be re-checked and
tightened. Before each heating season, the following steps
are recommended:
•
Check all fuses
•
Check resistance to ground for each circuit
•
Check resistance phase to phase for each circuit
•
Check the tightness of connections at all contactors
and heating elements
•
Check all contactors
•
Check electrical connections to heating elements,
magnetic contactors, and main power plugs.
It is recommended that this inspection be performed
monthly for the first four months of operation. Following
that, two inspections per heating season is sufficient.
Zoning
Specifications
Periodic visual inspection: This precautionary step will
help to keep your unit operating properly. Inspect the unit
periodically and be on the lookout for any first signs of
problems: Accumulation of dust on the heating elements,
signs of overheating on the heater frame, traces of water or
rust on the control box.
Off Season Maintenance
Should a heater be shut off for a long period, we
recommend that you carefully check the resistance to
ground for each circuit. It is important not to power a heater
when too low a resistance to ground has been measured.
It is also recommended to pay attention to any other heater
operating in normal conditions. All control components
should be maintained and checked according to respective
manufacturer’s instructions. Any defective components
should be replaced only with identical origin parts.
ESH - 750
ESH - 1100
HE - 50 / 51
HE - 70 / 71
HE - 100 / 101
5kw - 10025650005
5kw - 10025750005
10kw - 10025110010
10kw - 10025650010
10kw - 10025750010
15kw - 10025110015
15kw - 10025650015
15kw - 10025750015
18kw - 10025110018
18kw - 10025750018
20kw - 10025110020
23kw - 10025110023
Volts
240
240
240
Phase
1
1
1
28 lbs (13kg)
Shipping Weight
Module Size
21 lbs (9.5kg)
27 lbs (12kg)
Length
20” (508mm)
24” (610mm)
31”(788mm)
Width
13” (330mm)
13” (330mm)
13” (330mm)
Height
18” (457mm)
18” (457mm)
18” (457mm)
Module ESH Electrical Strip Heater Installation (2/4)
-39-
© 1995-2009 Energy Saving Products Ltd.
Module ESH
Electrical Strip Heater Installation (3/4)
Electrical Strip Heater (ESH) Wiring Diagram
N - neutral
L - line voltage
A1 - auxiliary normally open
A2 - auxiliary normally closed
A3 - auxiliary common
CAUTION
DISCONNECT THE ELECTRIC
POWER BEFORE SERVICING
ATTENTION
DECCONNECTER DU CIRCUIT
D’ALIMENTATION ELECTRIQUE
AVANT L’ENTRE-TIEN
X1 - freeze stat terminal
X2 - freeze stat terminal
H1 - condensing unit 24v output
C - condensing unit 24 vac common
Z1 - heating mode 24v output
C - heating mode 24v vac common
minimum factory dip settings
black is dip switch setting
HE-50 5-10 kW
(1 1/2 Ton Dip Setting)
HE-50 5-15 kW
(2 Ton Dip Setting)
ON
1
2
3
4
5
ON
6
7
8
HE-70 5-15 kW
(2 1/2 Ton Dip Setting)
2
3
4
5
6
7
8
3
4
5
4
5
6
7
8
1
2
3
4
5
6
7
8
HE-100 10-20 kW
(4 Ton Dip Setting)
ON
2
3
ON
HE-100 10-18 kW
(3 1/2 Ton Dip Setting)
1
2
HE-70 5-18 kW
(3 Ton Dip Setting)
ON
1
1
ON
6
7
8
6
7
8
1
2
3
4
5
6
7
8
HE-100 10-23 kW
(5 Ton Dip Setting)
ON
1
2
3
4
5
NOTES:
1) USE THERMOSTAT FAN SWITCH TO DISABLE/ENABLE
CONTINUOUS FAN.
5) SEE INSTALLATION MANUAL FOR MORE DETAILED WIRING
DIAGRAMS AND DIP SWITCH SETTINGS.
2) ‘C’ TERMINAL ON THERMOSTAT (COMMON) IS NOT
NEEDED FOR SOME THERMOSTATS. CONSULT THERMOSTAT
INSTRUCTIONS FOR DETAILS.
6) FAILURE TO READ AND FOLLOW ALL INSTRUCTIONS
CAREFULLY BEFORE INSTALLATION COULD CAUSE PERSONAL
INJURY AND/OR PROPERTY DAMAGE.
3) A3 (AUXILIARY RELAY COMMON) CAN BE USED WITH A1 AND/
OR A2 AS DRY CONTACTS, ARMED 24v FROM THE ‘R’ TERMINAL,
OR ARMED FROM THE ‘L’ TERMINAL.
4) AUXILIARY RELAY TIMER ACTIVATES CIRCUIT FOR 5 MINUTES
EVERY 24 HOURS STARTING WHEN POWER IS APPLIED TO THE
UNIT. RED LIGHT IS ON WHEN AUXILIARY RELAY IS ACTIVATED.
HEAT PUMP NOTES:
DEPENDING ON THE REVERSING VALVE, SOME HEAT PUMP UNITS
REQUIRE ‘B’ INSTEAD OF ‘O’ CONNECTION ON BOTH THE THERMOSTAT AND THE OUTDOOR UNIT. CONSULT YOUR HEAT PUMP
MANUAL TO SEE IF THIS IS REQUIRED.
TIMER CIRCUIT CAN BE DISABLED WHEN USING A HEAT PUMP AND
ELECTRIC BACKUP HEAT.
Module ESH Electrical Strip Heater Installation (3/4)
-40-
© 1995-2009 Energy Saving Products Ltd.
Module ESH
Electrical Strip Heater Installation (4/4)
optional wiring for electrical strip heater (ESH)
CONDENSER
ELECTRIC STRIP
24V TERMINALS
1 Stage Heating (Electric Strip)
1 Stage Cooling
1 Constant Low Speed
2
For highest blower speed on the fan coil for heating
and cooling, set the thermostat to electric mode
instead of gas. Wire the G terminal from the thermostat
to the Y2 of the fan coil. When there is a call for heat or
cool the fan will run at its highest dip setting air flow.
For constant low fan speed control wire a switch (light
switch or a toggle switch) at the fan coil between R and
G. When the thermostat is not calling for heating or
cooling and the fan switch is in the ON position the fan
will operate at half the fan speed for constant fan
circulation.
Note: This wiring is not required for heat pump set ups,
as Y2 is activated for both heating and cooling.
Y WIRE FROM THE THERMOSTAT TO
ANTI-ICE CONTROL TO INTERRUPT
THE CONDENSERS “Y” SIGNAL
ANTI-ICE
CONTROL
Z1 - HEATING MODE
24V OUTPUT
(W2 ONLY)
OPTIONAL WIRING FOR HIGHEST
FAN SPEED FOR HEATING AND COOING
Y
C
1
C Z1 C H1 X2 X1
AUXILIARY RELAY
(HEATING)
SET AUXILIARY TIMER
TO THE “OFF” POSITION
L
A3
A1 AND A3 HEATING MODE
AUXILIARY CONTACT
W1 AND W2 ONLY
A2
A1
N
CONSTANT LOW
SPEED FAN
ON / OFF SWITCH
W1 W2 C G R Y2 Y1 D O/B
W
C
G
R
Y
THERMOSTAT
2 Stage Heating
OPTIONAL STAGING THE 15-23 KW UNITS
THROUGH OUT DOOR THERMOSTAT
For optional energy savings install a
outdoor thermostat to limit the use of
the second stage of the ESH. For
example - 2 staging the electric strip
interrupt “C” and “1” or “C” and “2”
with a outdoor stat as shown below.
This allows single stage of the two
banks of the electric strip to activate,
the second stage will be allowed to
activate by the outdoor stat.
SINGLE
STAGE
TWO
STAGE
C
1
2
C
1
2
C
1
2
OPTIONAL STAGING THE 15-23 KW UNITS
THROUGH THERMOSTAT
SINGLE STAGE
ELECTRIC STRIP
24V TERMINALS
TWO
STAGE
C
1
2
ELECTRIC STRIP
INTERNAL 24V
2
1
C
1
C Z1 C H1 X2 X1
Z1 - HEATING MODE
24V OUTPUT
(W2 Only)
2
AUXILIARY RELAY
(HEATING)
SET AUXILIARY TIMER
TO THE “OFF” POSITION
OUTDOOR STAT
Set to 42°F (5°C)
minimum
L
A3
A2
A1
A1 AND A3 HEATING MODE
AUXILIARY CONTACT
W1 And W2 Only
N
W1 W2 C G R Y2 Y1 D O/B
1 Stage Cooling 2 Stage Heating
Heat pump c/w condenser defrost cycle
W1 W2
OPTIONAL STAGING THE 15-23 KW UNITS
THROUGH THERMOSTAT
ELECTRIC STRIP
24V TERMINALS
TWO
STAGE
C
1
2
C
ANTI-ICE
CONTROL
2
1
C Z1 C H1 X2 X1
Z1 - HEATING MODE
24V OUTPUT
(W2 Only)
Y
C
G
R
THERMOSTAT
O/B
R
W1
X1 AND X2 WIRES TO ANTI-ICE CONTROL,
CONDENSING UNIT “Y” AND “C”
SIGNAL FROM H1 AND C TO
COMPLETE SIGNAL
L
A3
A2
AUXILIARY RELAY
(HEATING)
SET AUXILIARY TIMER
TO THE “OFF” POSITION
A1
A1 AND A3 HEATING MODE
AUXILIARY CONTACT
W1 And W2 Only
N
W1 W2 C G R Y2 Y1 D O/B
E
W1 W2
C
G
R
Y
O/B
THERMOSTAT
Module ESH Electrical Strip Heater Installation (4/4)
-41-
© 1995-2009 Energy Saving Products Ltd.
Module OPT
Add-Ons & Third Party Options (1/2)
Options & Add-Ons
PWM Zoning Controller
Filter Rack (Optional)
Available from Energy Saving Products is a 3” (76mm)
Filter Rack. Filters are 1 inch (25mm) thick, 3 medium filters
approximately 14% efficient. Any after market filter may be
used with both the Hi-Velocity Return Air Base and Filter
Rack.
Fig. 04 - Filter Rack and Filter
Hi-Velocity Air Purification System
Designed specifically for use with the Hi-Velocity
Systems TM product line, the Hi-Velocity Air Purification
System gives consumers unsurpassed indoor air
quality.
Three powerful technologies in one Air Purification
System:
• Electrostatic
MERV-11
Filter
Removes
Allergens Electrostatically
• Photo-Catalytic Oxidation destroys toxic
chemicals and eliminates household odors
• Ultraviolet Light Kills Disease Germs on
Contact
Our one-size-fits-all design allows for easy
applications on any Hi-Velocity System. See our
website (www.hi-velocity.com) for Brochure and
Installation Module. The Hi-Velocity Air Purification
System comes with a built-in Remote Mounted Service
Panel to automatically keep track of service intervals.
Indicator lights will tell you when to change the filter and
ultraviolet lamps 30 days in advance:
MER 11 Filter: Change every 6 months - service light
turns from green to yellow after five months and to red
after six months.
Ultraviolet Lamps: Change every 12 months - service
light turns from green to yellow after eleven months and
to red after twelve months.
The add-on Pulse Width Modulating Input (PWM
Controller) provides total motor control making multiple
zoning easy without the need of by-pass air flow. The
pressure sensing PWM Controller will adjust the motor
performance to maintain constant pressure in the supply
plenum. Cooling, Heating, and Constant fan mode will
compensate for damper operation and changing airflow
demands, all while maintaining peak energy efficiency
with the variable frequency drive technology.
The PWM controller is pressure reactive and will change
the energy input to maintain constant CFM flow of open
outlets from 150 - 1250 CFM (71 - 590 L/s). The PWM
controller has three independent settings for Cooling,
Heating and Recirc. Fan, allowing for fine tuning with
variable commands. The PWM unit is compatible with most
forced air zoning packages and has been successfully
integrated with Inverter Drive Heat Pump Condensing
Units, providing leading edge technology for unsurpassed
comfort and energy efficiency. See our website (www.
hi-velocity.com) for Brochure and Design/Installation
Modules.
Turbo Meter™ from Davis Instruments
The Turbo Meter provides uncommon accuracy,
sensitivity, and pocket-sized convenience. It is based on the
principle that a freely turning turbine will rotate at a speed
directly proportional to the wind speed. To insure maximum
sensitivity and accuracy, the turbine is suspended on
sapphire jewel bearings, and its rotation is sensed by an
infrared light beam which adds no friction. The resulting
signal is processed electronically by an LSI (Large Scale
Integrated) circuit for improved reliability and reduced size.
A special three digit display is used for extra resolution and
provides excellent viewing contrast in bright sunlight. A
handy switch selects between four different scales —knots,
feet per minute, meters per second, and miles per hour —
for unmatched versatility. Unit is compact size (2.6 x 4.7”, 7x
12cm) and light weight ( 3oz., 85g). Measures wind speed
from 0 - 99.9 mph. Available from Energy Saving Products,
or directly from Davis Instruments.
Module OPT Add-Ons & Third Party Options (1/2)
-42-
© 1995-2009 Energy Saving Products Ltd.
Module OPT
Add-Ons & Third Party Options (2/2)
Fig. 01 – Fresh Air Make up
Third Party Options
Insulated Fresh Air Intake
Exterior
Intake
Adjustable
Damper
Install at least 6’ (1.8m) away from fancoil,
not directly into the air stream, to allow fresh
air to mix with the return air. A P-Trap of at
least 3’ (914mm) in depth should be installed
to stop the migration of air.
P-Trap
Fresh Air Make-Up
For areas that require fresh air make-up, a small intake
may have to be installed. It is recommended to install
an insulated flex duct, with a damper, into the return air
plenum. The damper can then be adjusted to supply the
exact amount of fresh air needed to meet local building
codes (Fig. 01). This should be balanced to the exhaust air
levels of the structure. Either filter the combined air stream
through a common filter or use separate filters for both air
streams.
Install the fresh air duct to the side of the return air and
not directly into the air stream. As shown in Fig. 01, the
fresh air duct should be installed more than 6’ (1.5m) away
from the fan coil and before a 90º bend.
If too large of a duct is installed, the excess fresh air will
increase system operating costs and decrease system
performance.
An approximate fresh air duct sizing is: 3” (76mm) for
the HE-50, 4” (102mm) for the HE-70, and 5” (127mm) for the
HE-100.
Humidity Control
When a bypass type
humidifier is used, the
humidifier can be mounted on
the return air duct, and then a
2” (51mm) take-off from the hot
air side is run back (Fig. 03).
DO NOT use any size larger
than 2” (51mm), and be sure to
install a summer shut-off, or it
will create problems with the
airflow.
Fig. 03 – Humidifier
18”
HRV/ERV
An HRV (Heat Recovery Ventilator) is typically a flat-plate
air-to-air heat exchanger that transfers temperature between
the two air streams. An ERV (Energy Recovery Ventilator)
Fire Stopping
will exchange water vapour as well as temperature. It is
Some areas require a Fire Stopping device to stop
usually a “heat wheel” and some amount of air will leak
the spread of a fire and/or prevent the duct system from
between the two airstreams. It is generally more costly
supplying oxygen to the fire. The Hi-Velocity System can
than an HRV but it has the advantage of reducing the latent
be used in conjunction with several types of Fire Stopping
devices such as pipe collars, wrap strips and mechanical
capacity and not just the sensible capacity.
shut-offs.
There are several ways to integrate these products
Fig. 02 – Fire Stopping Devices
into
the Hi-Velocity System. The easiest is to draw the
With our Rough-In Boots,
exhaust from the return duct and then to add the fresh air
Metacaulk pipe collars work very
well; Fig. 02 gives an illustration of
immediately downstream.
a pipe collar used with the RoughHowever, the best method is to have a separate return
In Boot. Many options are available
for the exhaust air. This will minimize any short circuiting
to the designer. If assistance is
of air between the fresh air and the exhaust, optimizing the
needed in product choice, call our
location of the exhaust returns, which are best located in
representatives at Energy Saving
bathrooms.
Products for free technical advice.
Module OPT Add-Ons & Third Party Options (2/2)
-43-
© 1995-2009 Energy Saving Products Ltd.
Module CTS Check List & Trouble Shooting
Installation Check List (1/4)
Hi-Velocity Systems Installation Check List
TM
Ensure that all electrical connections are tight, and
that any packing or shipping restraints are removed
from both the fan coil, and the outdoor unit. With the
power to the condensing unit off, check the thermostat
for normal operation, and again check that there is
proper airflow from all the vents. Ensure that no branch
ducts were damaged or bent sharply. Do not run the
fan coil without a filter in place.
Observe the system pressures during the initial
start-up and charging of the system. Check the voltage
and amp draw of both the fan coil, and the outdoor
unit. The voltages must be within 10% of the rating
plate data. If more than 10% is noted, contact your
local electrical company. Check that the amp draws
of both units are within the information printed on the
unit rating plates. Set the system charge and adjust
the TXV setting according to the RPM-E Installation
Module.
Flexible Duct
___ Ensure Rough-In Boots located in unconditioned
spaces are properly sealed and vapour barriered.
___ Ensure no Flex runs are shorter than 10’ (3.05m) or
longer than 25’ (7.62m).
___ Ensure no Flex duct is crushed or torn.
___ Ensure proper bend radius in flex duct.
___ Ensure all Flex connections are secured and sealed at
the plenum and Rough In Boot.
___ Ensure vent plate is properly connected to the rough in
boot, using a vent extender kit if necessary.
___ Ensure flex connections are not kinked at plenum.
Supply Plenum
___ Ensure no flext duct is used for supply plenum.
___ Ensure a minimum 18” (457mm) of straight plenum
off fan coil (no elbows, tees, outlets, etc.).
___ Ensure plenum and all connections are sealed
(elbows, tee’s, end caps, etc.).
___ Ensure proper system balancing is maintained if Tee’s
have been used in Plenum. .
___ Ensure all duct and components in unconditioned
space are insulated with a vapour barrier.
Fan Coil
___ Ensure motor, blower, and coil(s) are free of dirt,
drywall dust, etc.
___ Ensure return air opening has been cut in fan coil.
___ Ensure minimum clearances are met for maintenance
accessibility.
Cooling Coil (If Applicable)
___ Ensure condensate line is vented with a P-trap. (WCM/
WM Coils)
___ Ensure proper slope has been maintained in
condensate line for drainage.
Return Air
___ Ensure all outlet dampers are fully open, and
unobstructed.
___ Ensure correct size return is used and securely
connected.
___ Ensure all vent caps have been cut out.
___ Ensure filter is installed before fan coil or cooling
module if applicable.
In the event of difficulty during the start-up procedure, please refer to the
trouble shooting flow charts to assist you in determining the problem.
Module CTS Check List & Trouble Shooting (1/4) - Installation Check List
-44-
© 1995-2009 Energy Saving Products Ltd.
Module TS Check List & Trouble Shooting
EPC Motor/Low Air Flow (2/4)
Start
Open doors to
inspect Controller
Green light
present on Motor
Control Board
(MCB)
Y
Orange
flashing light
present
on MCB?
N
Ensure the 4 Pin Plug
from Motor is properly
connected to MCB
Ensure that 9 wire
plug is connected to MCB
and PCB (Red Wire on
PCB side lines up with
W1 terminal on PCB)
To eliminate outside
variables, remove all
thermostat wires
from the PCB
Ensure that you have
24v being supplied by
the Transformer. This
can be done via the
“R” and “C”
thermostat terminals
on the PCB
Ensure breaker is
turned on
N
Verify that the
input line voltage is
present on the PCB via
the “L” and “N” screw
terminals on the
auxiliary power block.
Y
Ensure 4 Pin Input
Voltage Plug is
properly connected to
Printed Circuit Board
(PCB)
Once voltage
presence is verified on
PCB, shut power off
to the unit
Ensure that 4 Pin
Input Voltage Plug is
properly connected
to MCB.
Call Tech Support
1-888-652-2219
N
Fan Running?
Y
N
PCB = Printed Circuit Board
MCB = Motor Control Board
Finished
Return to start to
ensure motor is
running properly
Y
Allow 1-2 minutes
for the capacitors
to charge.
Green light on?
Allow 5 minutes for
capacitors to dissipate,
then reconnect power
Y
Verify that
input voltage is
present on PCB via
“L” and “N” screw
terminals.
N
Check for broken or
loose wires from
breaker to Unit
Trouble Shooting: EPC Motor not Running
N
Y
Indicates Controller
has entered an
unnatural state and
gone into safe mode
to prevent damage
to the Motor
Control Board
Contact
ESP to return board for
free change out on
completion of RMA form
Y
24v present on
Circuit Board?
N
Refer to 24V Trouble
Shooting
Set system for
operation by placing a
jumper between the
R and Y2 terminals on
the PCB. Wait a few
seconds as the EPC
motor ramps up slowly.
Start
Set system
for operation
Clean dirty
components and
verify airflow
Add more Return Air
Y
Inspect flex duct for
damage
N
Inspect flex duct for
sharp bends
Y
Check that the correct N
number of vents are
present on system
Airflow may be
reduced by 15-20%
unless corrected
Y Ensure Dip Settings
are set properly for
desired CFM output N
N
Y
Y
Refer to 24v
Troubleshooting
Guide
Refer to Dip Setting
Pages for proper
dip settings
Add or remove
vents as necessary,
Refer to HE Design
Manual for correct
parameters
Seal any
leaking
connections,
branches or elbows
PCB = Printed Circuit Board
MCB = Motor Control Board
Ensure unit is running
on highest speed.
Confirm by checking that N
there is 24v between C and
High Speed Terminal
(Y2 for Cooling,
W2 for Heating)
Trouble Shooting: Low Air Flow
Ensure all dampers
are fully open
N
Check
system, are
components clean
and not
restricted?
Y
Ensure
min. of 18”
straight duct
before first
elbow or tee.
Correct?
Y
Ensure that Return
N Air is not blocked and Y
properly sized. Sized
correctly?
Repair flexible duct
or add more vents to
compensate for
lower airflow
Repair/Replace
damaged duct
N
N
Inspect main plenum
Y
connections, branches
and elbows for leaks
1-888-652-2219
Call Tech Support
Module CTS Check List & Trouble Shooting (2/4) - EPC Motor/Low Air Flow
© 1995-2009 Energy Saving Products Ltd.
-45-
N
N
Refer to
EPC Motor
Troubleshooting
Guide
Finished
Y
Fan running?
Y
N
Signal from
Thermostat? (Check N
across Y1/Y2 & C or
W1/W2 & C)
Y
Verify 24v power
between R & C
Y
Controller Board cable
plug is reversible; ensure
the Red Wire on the plug is
located on the same side as
W1 of the Circuit Board
Y
Verify Line Voltage
power between
L and N
Start
24v THERMOSTAT TO PCB
N
Fix or replace Wiring
Check Resettable
Fuse (F1) for heat.
Caution: Extremely hot
if tripped
Y
Check for broken or
incorrect wiring
between Thermostat
and Board
Y
Is T’Stat set for
Constant Fan,
Cooling or Heating?
Y
N
N
Disconnect 24v
Transformer plug
N
with two red wires
from middle of circuit
board and check for
24v from Transformer
Y
Check
Transformer Plugs
Connected?
N
N
N
Check 24v Wiring for a dead
short and for possible second
24v source being input into
the Circuit Board i.e. Z1 & C
Check for continuity
through Thermostat
Finished
Y
Fan running?
Set Thermostat
Temperature and
Switch for Constant
fan, heating or cooling
Replace 24v
Transformer
Connect
Transformer Plugs
and return to start
Check that Line
Voltage wiring from
breaker is proper
Y
Line Voltage plug
connected?
Trouble Shooting: 24 Volt
Replace
Thermostat
Refer to
EPC Motor
Troubleshooting
Guide
Return to
Start
Connect Line
Voltage plug and
return to start
Y1 for Multi staging
units only, Y1 controls
blower only, refer to
the Sequence of
Operation*
Y1 & C
Y
Y2 & C
N
N
N
Verify 24v Power
between H1 & C
N
Y
Verify 24v Power
between X1 & C
Blower Operation
Y
Verify 24v Power
between Y1/Y2 & C
Y
Verify 24v Power
between G & C
N
N
Freeze Stat Tripped
or not Connected
Call Technical Support
Refer to Trouble
Shooting
EPC Motor not
Running
Check Thermostat
time delay for Y1/Y2
Check Thermostat
W1 for Multi staging
units only, W1
controls blower and
Auxiliary relay. Refer
to the Sequence of
Operation*
W1 & C
Y
W2 & C
N
N
Auxiliary Relay
Activated
Y
Verify 24v Power
between Z1 & C
Blower Operation
Y
Verify 24v Power
between W1/W2 & C
N
N
Call Technical Support
Call Technical Support
Refer to Trouble
Shooting
EPC Motor not
Running
Check Thermostat
*Sequence of Operation Page is located on Pg 24 of the HE Installation Manual,
and online at www.hi-velocity.com (Module WIR - Wiring and Dip Settings)
Start Thermostat
Heating Call
Trouble Shooting: Heating 24 Volt Circuit Board
Start Thermostat
Cooling Call
Trouble Shooting: Cooling 24 Volt Circuit Board
Module CTS Check List & Trouble Shooting
24 Volt Heating/Circuit Board (3/4)
Module CTS Check List & Trouble Shooting (3/4) - 24 Volt Heating/ 24 Volt Circuit Board
© 1995-2009 Energy Saving Products Ltd.
-46-
Module CTS Check List & Trouble Shooting
Outdoor Unit/Short Cycling (4/4)
Y
Y
Y
N
N
Go to start of Trouble
Shooting 24v
Check for improper
wiring or damage
between Indoor and
Outdoor Units
Freeze Stat opened?
N
Y
Y
Ensure System is
Y
properly charged
and airflow is correct
Replace Contactor
N
Ensure System is
properly charged
and airflow is correct
Replace
Wiring
Check
Compressor
Y
230v out of
Contactor?
Y
230v into
Contactor?
N
Supply 230v power
to Condenser
Trouble Shooting: Outdoor Unit - Electrical
Start
Is Contactor
pulled in?
N
N
Check for 24v across
Contactor Coil
Check for open
Safety Controls on
Outdoor Unit
N
24v
across X1 & C
at the
Fan Coil?
Y
24v across
X1 & X2 at the
Fan Coil?
Y
Allow
System
to settle and
Freeze Stat
to open
Replace
Freeze Stat
Start
Fan
running?
N
Refer to EPC
Troubleshooting
Guide to ensure fan is
working properly
N
N
N
Trouble Shooting: Short Cycling
Y
Y
Verify that 24v
power is present
between C and Y2
terminals
Check that TX Valve
setting and charge
is proper
TX and
charge good?
Confirm that the unit
is properly sized
Y
Confirm the line sizes
are correct
Confirm that all
piping is done
properly
Y
Is
Freeze Stat
working
properly?
Check that the
TX Valve Bulb
is installed correctly
Confirm that other
Safety Controls are
working properly
Refer to 24v
Troubleshooting
Guide
Refer to 24v
Troubleshooting
Guide
Refer to Cooling
Start-Up
Replace Freeze Stat
Module CTS Check List & Trouble Shooting (4/4) - Outdoor Unit - Electrical/Short Cycling
© 1995-2009 Energy Saving Products Ltd.
-47-
Matching Coils
Refrigerant Coils
RPM-E-50, 70, 100
Chilled Water Coils
WCM-50, 70, WM-100
Hot Water Coils
HV-50, 70. 100 - 6 Row
Electrical Coils
ESH-650 (5-15 kW)
ESH-750 (5-18 kW)
ESH-1100 (5-23 kW)
Model
HE Series
Specifications
HE-50/51
Hot Water Heating
2 Ton Airflow (7.0 kW)
Coil Type
Max. BTUH @ 190°F E.W.T. (kW @ 88°C)
Max. BTUH @ 180°F E.W.T. (kW @ 82°C)
Max. BTUH @ 170°F E.W.T. (kW @ 77°C)
Max. BTUH @ 160°F E.W.T. (kW @ 71°C)
Max. BTUH @ 150°F E.W.T. (kW @ 66°C)
Max. BTUH @ 140°F E.W.T. (kW @ 60°C)
Max. BTUH @ 130°F E.W.T. (kW @ 54°C)
Max. BTUH @ 120°F E.W.T. (kW @ 49°C)
Max. BTUH @ 110°F E.W.T. (kW @ 43°C)
GPM Flow ratings (L/s)
Pressure Drop in FT. (m) H2O
CFM @ 68°F E.A.T. (L/s @ 20°C E.A.T.)
Chilled Water Cooling
Coil Type
(WCM Modules in Cooling Mode)
(WCM Modules in Heating Mode)
Max. BTUH @ 150°F E.W.T. (kW @ 66°C)
Max. BTUH @ 140°F E.W.T. (kW @ 60°C)
Max. BTUH @ 130°F E.W.T. (kW @ 54°C)
Max. BTUH @ 120°F E.W.T. (kW @ 49°C)
Max. BTUH @ 110°F E.W.T. (kW @ 43°C)
GPM Flow ratings (L/s)
Pressure Drop in Ft. (m) H2O
(Standard & Metric)
HE - 100/101
3 Ton Airflow (10.6 kW)
5 Ton Airflow (17.5 kW)
6 Row/10 FPI
6 Row/10 FPI
6 Row/10 FPI
59,400 (17.4 kW)
54,500 (16.0 kW)
49,600 (14.5 kW)
44,600 (13.1 kW)
39,700 (11.6 kW)
34,700 (10.2 kW)
29,700 (8.7 kW)
24,800 (7.3 kW)
20,100 (5.9 kW)
89,200 (26.1 kW)
81,800 (24.0 kW)
74,400 (21.8 kW)
67,100 (19.7 kW)
59,700 (17.5 kW)
51,800 (15.2 kW)
44,700 (13.1 kW)
37,400 (11.0 kW)
30,300 (8.9 kW)
134,000 (39.3 kW)
122,900 (36.0 kW)
111,800 (32.8 kW)
100,700 (29.5 kW)
89,700 (26.3 kW)
78,400 (23.0 kW)
67,100 (19.7 kW)
56,200 (16.5 kW)
45,500 (13.3 kW)
5 (0.32 L/s)
3 (9.15 KPa)
470 (221 L/s)
7 (0.44 L/s)
6.5 (19.8 KPa)
700 (300 L/s)
10 (0.63 L/s)
6.8 (20.7 KPa)
1120 (528 L/s)
2 Ton Airflow (7.0 kW)
3 Ton Airflow (10.6kW)
5 Ton Airflow (17.5 kW)
6 Row/10 FPI
Total
Sensible
Max. BTUH @ 48°F E.W.T. (kW @ 8.9°C)
Max. BTUH @ 46°F E.W.T. (kW @ 7.8°C)
Max. BTUH @ 44°F E.W.T. (kW @ 6.7°C)
Max. BTUH @ 42°F E.W.T. (kW @ 5.6°C)
Max. BTUH @ 40°F E.W.T. (kW @ 4.4°C)
HE - 70/71
Module SPC
Specifications & Sizing (1/2)
19,300 (5.7 kW)
20,900 (6.1 kW)
22,600 (6.6 kW)
24,200 (7.1 kW)
25,800 (7.6 kW)
6 Row/10 FPI
Total
Sensible
13,700 (4.0 kW)
14,200 (4.2 kW)
14,900 (4.4 kW)
15,700 (4.6 kW)
16,300 (4.8 kW)
27,000 (7.9 kW)
29,400 (8.6 kW)
31,800 (9.3 kW)
34,000 (10.0 kW)
36,400 (10.7 kW)
19,200 (5.6 kW)
20,000 (5.9 kW)
21,000 (6.2 kW)
21,800 (6.4 kW)
23,000 (6.7 kW)
6 Row/10 FPI
Total
Sensible
42,100 (12.3 kW) 30,300 (8.9 kW)
45,800 (13.4 kW) 32,100 (9.4 kW)
49,500 (14.5 kW) 33,700 (9.9 kW)
53,200 (15.6 kW) 35,100 (10.3 kW)
56,800 (16.6 kW) 36,400 (10.7 kW)
Total
39,700 (11.6 kW)
34,700 (10.2 kW)
29,700 (8.7 kW)
24,800 (7.3 kW)
20,100 (5.9 kW)
Total
59,700 (17.5 kW)
51,800 (15.2 kW)
44,700 (13.1 kW)
37,400 (11.0 kW)
30,300 (8.9 kW)
Total
89,700 (26.3 kW)
78,400 (23.0 kW)
67,100 (19.7 kW)
56,200 (16.5 kW)
45,500 (13.3 kW)
5 (0.32 L/s)
3 (9.15 KPa)
7 (0.44 L/s)
6.5 (19.8 KPa)
10 (0.63 L/s)
6.8 (20.7 KPa)
1.5 - 2.0 Tons (3.5-6.4 kWh)
2.5 - 3.0 Tons (8.8-10.5 kWh)
3.5 - 5.0 Tons (12.3-17.5 kWh)
5 - 15 kW
5 - 18 kW
5 - 23 kW
Refrigerant Cooling
RPM Modules
BTUH Refrigerant TX Cooling
Electrical Heating
Kilowatt Range (240v)
Fan Coil
Voltage
11 5 / 2 3 0 / 1 / 5 0 / 6 0
Max Rated C.F.M. (L/s)
Horse Power/Watts
R.P.M.
Integral Surge and Fuse System
Supply Air Size
Supply Maximum Length(1)
Return Size Needed
Minimum Outlets(2)
Maximum Outlets
Shipping Weight
Fan Coil Size
(1)
(2)
520 (245 L/s)
3/4 - 310
Variable
Yes
8” round (203mm)
70’ (21.3m)
12” (120 in2) (305mm/774cm2)
770 (363 L/s)
3/4 - 530
Variable
Yes
8” round (203mm)
80’ (24.4m)
12” (120 in2) (305mm/774cm2)
1260 (595 L/s)
3/4 - 720
Variable
Yes
10” round (254mm)
100’ (30.5m)
14” (168 in2) (356mm/1084cm2)
12
24
20
32
28
52
80 lbs (36.3 Kg)
Length
Width
Height
F. L . A . 8 a m p
32” (813mm)
14” (356mm)
18” (457mm)
95 lbs (43.1 Kg)
32” (813mm)
19” (483mm)
18” (457mm)
115 lbs (52.2 Kg)
32” (813mm)
25” (635mm)
18” (457mm)
Maximum length is from the unit to the supply end run cap. More than one run per unit is allowable.
Minimum of eight 2” outlets per ton of cooling needed. (HE Duct = Minimum four outlets per ton)
Module SPC Specifications & Sizing (1/2) - Standard & Metric Specs
-48-
© 1995-2009 Energy Saving Products Ltd.
Module SPC
Specifications & Sizing (2/2)
Quick Sizing Guide
Phone: 780-453-2093
Fax: 780-453-1932
Toll Free: 1-888-652-2219
Item
Length
Fan Coils
Width
Height
Part Number
A
B
C
HE-50 H
32 ⁄16” (821mm)
14 ⁄2” (368mm)
18 ⁄4” (464mm)
20010100050
HE-52 H
30 ⁄2” (775mm)
18 ⁄2” (470mm)
14 ⁄4” (362mm)
20020100052
HE-70 H
32 ⁄16” (821mm)
19 ⁄2” (495mm)
18 ⁄4” (464mm)
20010100070
HE-100 H
32 5⁄16” (821mm)
25 1⁄2” (648mm)
18 1⁄4” (464mm)
20010100100
HE-50 BU
32 ⁄16” (821mm)
14 ⁄2” (368mm)
18 ⁄4” (464mm)
20010200050
HE-52 BU
30 ⁄2” (775mm)
18 ⁄2” (470mm)
14 ⁄4” (362mm)
20020200052
HE-70 BU
32 ⁄16” (821mm)
19 ⁄2” (495mm)
18 ⁄4” (464mm)
20010200070
HE-100 BU
32 5⁄16” (821mm)
25 1⁄2” (648mm)
18 1⁄4” (464mm)
20010200100
5
1
5
5
1
5
Refrigerant Modules
1
1
1
1
1
1
1
1
1
1
1
1
G
E
F
RPM-E-50
19 ⁄4” (489mm)
14 ⁄8” (371mm)
RPM-E-70
24 ⁄4” (616mm)
RPM-E-100
32” (813mm)
1
1
Water Cooling Modules
J
18 ⁄2” (470mm)
3
⁄8” (9.5mm)
14 ⁄8” (371mm)
18 ⁄2” (470mm)
3
14 5⁄8” (371mm)
18 1⁄2” (470mm)
3
5
5
1
1
⁄8” (22mm)
20011202050
⁄8” (9.5mm)
1 ⁄8” (35mm)
20011202070
⁄8” (9.5mm)
1 3⁄8” (35mm)
20011202100
G
E
F
WCM-50
14 ⁄8” (365mm)
10 ⁄8” (257mm)
18 ⁄2” (470mm)
3
WCM-70
19 ⁄8” (492mm)
10 ⁄8” (257mm)
18 ⁄2” (470mm)
3
WM-100
25 ⁄8” (645mm)
7” (178mm)
18 ⁄8” (467mm)
3
B
D
C
3
3
3
Hot Water Coils (6 Row)
1
1
1
1
3
⁄4” (19mm)
⁄4” (19mm)
3
⁄4” (19mm)
3
5 ⁄2”(140mm)
16” (406mm)
HE-70
19” (483mm)
5 ⁄2” (140mm)
16” (406mm)
3
HE-100
25” (635mm)
5 ⁄2” (140mm)
16” (406mm)
3
1
⁄4” (19mm)
10010201050
⁄4” (19mm)
10010201070
⁄4” (19mm)
10010200100
H
13 ⁄2” (343mm)
1
K
3
HE-50
1
3
J
3
1
K
7
I
⁄4” (19mm)
3
⁄4” (19mm)
3
⁄4” (19mm)
20100100050
⁄4” (19mm)
3
⁄4” (19mm)
20100100070
⁄4” (19mm)
20100100100
Heating Coil Add-on does not come as a module, it slides into the Hi-Velocity fan coil
Electrical Strip Heater
B
D
C
HV-650
13 ⁄4” (349mm)
5 ⁄8” (143mm)
15 ⁄2” (394mm)
HV-750
18 ⁄4” (476mm)
5 ⁄8” (143mm)
15 1⁄2” (394mm)
HV-1100
24 3⁄4” (629mm)
5 5⁄8” (143mm)
15 1⁄2” (394mm)
3
3
5
5
1
Dimensions for the ESH do not include the electrical access panel, add 4” to ESH for Total Length
Hi-Velocity Air Pur. Syst.
HE PS c/w Merv 11 Filt.
29” (737mm)
21” (533mm)
11” (279mm)
Module SPC Specifications & Sizing (2/2) - Quick Sizing Guide
-49-
20180100000
© 1995-2009 Energy Saving Products Ltd.
Module SRV
Service and Performance Form (1/2))
Date
Service and Performance Form
Date Installed
Job Information
Job Name
Job Number
Job Location
Distributor/Supplier
Installing Contractor
Contact Name
Contact Name
Phone Number
Address
Fax Number
City, State
Elevation
Zip Code
Design Temp. (Heating/Cooling)
Phone Number
Fax Number
Issue
Heating
Cooling
Airflow
System Information
Fancoil Model
Watts
Amperage
Voltage
Fancoil Serial
Dip Switch Setting
PWM
Yes
Yes
Clean
Static Plate Installed
Filter
No
No
Dirty
Static Press. 18" from Supply
Static Press. Blower Compartment
E.A.T. (DB/WB)
L.A.T. (DB/WB)
E.A.T. R/A Grill
L.A.T. First Outlet
Airflow
L.A.T. Last Outlet
Ductwork Information
Fancoil Location
Attic
Crawlspace
Conditioned Space
Supply Duct Size
Plenum Location
Attic
Crawlspace
Conditioned Space
Return Duct Size
Attic
Crawlspace
Return Air Location
Plenum Length
Fresh Air Duct Size
Conditioned Space
Insulated
Yes
No
R-Value
Extra Insulation Over Ductwork
Yes
No
R-Value
Distance to First Elbow/Tee
Total # Of 2" Vents (HE Vents = Two 2" Vents)
Number Of 10' AFD's
Number Of Other AFD's
Average Length Of Others
Total # Of 15' AFD's
Heating Information (Electric Strip, Hot Water)
Model
E.W.T
% Glycol
Serial
L.W.T
Circ. Pump
Coil Size
4 Row
Lines (Size/Length)
6 Row
Cooling Information (Chilled Water)
Model
E.W.T
% Glycol
Serial
L.W.T
Circ. Pump
Lines (Size/Length)
Refrigerant Information (AC, Heat Pump)
Model
Suction Press.
Siteglass
Bubbles
Serial
Liquid Press.
Moisture
Wet
Outdoor Make
Suction Temp.
Outdoor E.A.T.
Outdoor Model
Liquid Temp.
Outdoor L.A.T.
Location Of TXV Bulb
Insulated
Location Of Anti-Ice Control
Insulated
Yes
No
Location Of Equalizer Line
Insulated
Yes
No
Yes
No
Hard Start Kit
Yes
No
Outdoor Amps
Filter-Drier
Line-set (Length/Height)
Expansion Valve Model
Expansion Valve Size
P-Trap
Clear
Dry
Yes
No
Hot Gas BP
Yes
No
Delay Timer
Yes
No
If More Than One Fancoil Is Present On This Job, Please Indicate Which One:
Notes:
Module SRV Service and Performance Form (1/2)
-50-
© 1995-2009 Energy Saving Products Ltd.
Module SRV
Service and Performance Form (2/2))
Service and Performance Form
Airflow Information
#
Location
FPM
LPS
CFM
#
1
1
2
2
3
3
4
4
5
5
6
6
7
7
8
8
9
9
10
10
11
11
12
12
13
13
14
14
15
15
16
16
17
17
18
18
19
19
20
20
21
21
22
22
23
23
24
24
25
25
TOTAL CFM
Date
Date Installed
Location
FPM
LPS
CFM
Conversion Factors
2" Knots to CFM:
HE Knots to CFM:
2" FPM to CFM:
HE FPM to CFM:
x 2.2
x 4.2
x 0.022
x 0.042
2" Knots to L/s:
x 1.4
HE Knots to L/s
2" m/s to L/s
HE m/s to L/s
x 1.98
x 2.02
x 3.85
If More Than One Fancoil Is Present On This Job, Please Indicate Which One:
Notes:
Module SRV Service and Performance Form (2/2)
-51-
© 1995-2009 Energy Saving Products Ltd.
Energy Saving Products Ltd., established in 1983, manufactures the
Hi-Velocity SystemsTM product line for residential, commercial and multi-family markets.
Our facilities house Administration, Sales, Design, Manufacturing, as well as Research &
Development complete with an in-house test lab. Energy Saving Products prides itself on
Customer Service and provides design services and contractor support.
For all of your Heating, Cooling and Indoor Air Quality needs, the Hi-Velocity
System is the right choice for you!
Small Duct Heating, Cooling and IAQ Systems
Build Smart, Breathe Easy
Hi-Velocity HE Fan Coils, Green Technology
HARDI
Phone: 780-453-2093
Fax: 780-453-1932
Toll Free: 1-888-652-2219
www.hi–velocity.com