1
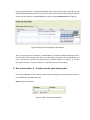
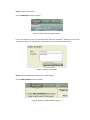
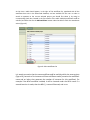
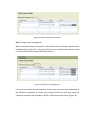
GreenLand v2 application - user manual 1. Menu option features This section contains the short description of the menu bar options, provided by the GreenLand application: New project: it allows the creation of a new project. A project is one of the key concepts of the GreenLand application, that stores one or more workflows; Edit project: useful for changing the name or the description of an already existing project; Delete project: allows the user to delete an existing project. This action is triggered together with a warning popup message, just to clearly notify the user regarding this aspect; All: it could be used to check/uncheck all the expandable workflow (together with their child items) in the workflows list; Add workflows: opens a table populated with existing workflows inside the GreenLand database. Using this feature the user is able to attach a list of workflows to the current selected project; Remove workflows: in order to remove a workflow the user has to select it first. The selection is made by checking the combo box module, positioned on the left side of the workflow’s name; Start process: by using this option the user triggers the Grid execution, related to the current selected project. Several pre-processing validations are performed, such as: o Check if the project contains at least one workflow; o Check if all the workflows inputs are properly specified; o etc. 2. Use case scenario 1 – Use an already existing project The following section highlights what are the steps required for performing a valid Grid processing, using the features provided by the GreenLand application. This use case contains an already defined project, called (Istanbul_project_imported). In this case, the project contains two workflows: NDVI and EVI. Step 1: Sign in your account Figure 1. Sign in GreenLand application Step 2: Open the project content The process step was already completed for this project using the Grid infrastructure. Click the project name to open its content (Figure 2). It is important to mention that you could not execute a project that has the “Executing project” status. This status is displayed just under the project name, in the projects list. Figure 5. Select the Figure 2. Identify the project and open its content workflows to attach to the new created project Step 3: Output results management In order to handle the output results, just select the project from the project list, and use the Execution results option (Figure 3). Figure 5. Select the workflows to attach to the new created project Figure 3. Visualize the process results Once this step completes, a new table will appear that contains all the output results for the two specified workflows (NDVI and EVI). At this moment the results analysis could be performed only on the user local machine, by downloading the results, using the Download option (Figure 4). Figure 4. Output result management and analysis After a project finishes its execution, the workflows list could be modified (add new items or remove some of the existing ones). Also, you could specify new inputs for the workflows, and start a new process, based on the values that you specified (follow the steps 3, 4, 5 and 6 described in section 3. Use case scenario 2 – Create/execute your own project). 3. Use case scenario 2 – Create/execute your own project This section highlights all the necessary steps used for executing a new project that contains a list of workflows, specified by the user. Step 1: Sign in your account Figure 5. Sign in GreenLand application Step 2: Create a new project Use the NewProject menu bar option. Figure 6. Identify the New project option In this step both the name and the description fields are mandatory. Please take care when naming your project. All the projects in your projects list should have unique names. Figure 7. Create a new project Step 3: Add new workflows to the current created project Use the Add workflows menu bar option. Figure 8. Identify the Add workflows option At this time a table should appear, in the right of the workflows list, populated with all the workflows that exist in the GreenLand database, and are available for this user. In order to attach an operator to the current selected project you should first select it, by using its corresponding check box, located in the first column of the table. Multiple workflows could be selected, and after that use the Add workflows button under the table to finish the attachment action (Figure 9). Figure 5. Select the workflows to attach to the new created project Figure 9. Select workflows list It is worth to mention that the same workflow could be multiply within the same project (Figure 10), but each of its instances will have a different name (contains the workflow’s name and an index, that represent the number of instances for this workflow). For example if the NDVI workflow is added, it will be inserted under the NDVI name. If a second insertion is made, then the NDVI_1 name will be used, and so on. Figure 5. Select the workflows to attach to the new created project Figure 10. Create multiple instances of the same workflow Step 4: Remove workflows At any time you could add new workflows by following Step 2, or remove workflows from a project by using the Remove workflows menu bar option. Figure 5. Select the workflows to attach to the new created project Figure 11. Remove workflows from the current selected project Step 5: Specify workflow inputs. In order to accomplish this step, simply click on a workflow. This action will display all the primary inputs of that workflow and for each input a list of possible values (e.g. satellite images) are provided to the user. The user could specify for each input a single value that will be used further on in the Grid based execution process. Using the Save button all the values you specified for these inputs will be save, and there is no undo possibility. The Resume last saved option play the undo role, but only if it does not immediately follows after a save action (Figure 12). Figure 5. Select the workflows to attach to the new created project Figure 12. Remove workflows from the current selected project Also you could change the name and the description of the workflow. Step 6: Start the Grid processing After all the workflows inputs were properly specified, the execution process could begin, using the Start process menu bar option. Figure 13. Identify the Start process option Figure 5. Select the workflows to attach to the After this action, a monitoring table will be display that highlights the processing new created project progress (Figure 14). Figure 5. Select the workflows to attach to the new created project Figure 14. Monitor the project execution Step 7: Output results management When a workflow finishes its execution a list of results will be available, together with a download option (Figure 15). Using this option the user is able to download the result on its local machine and analyze its different aspects. Figure 5. Select the workflows to attach to the new created project Figure 15. Output result management It is worth to mention that the execution process may take some time, depending on the workflows complexity. A refresh timer (located above the monitoring table) will update the execution data, based on a 10, 85 or 100 seconds time interval (Figure 15). 4. Conclusions This is the first version of the GreenLand application, and there are some things to be improved or added as new functionalities: Extend the GreenLand database with new workflows; Allow the user the possibility to create its own workflows using a WorkflowEditor module; Implement the online result analysis module; Implement the uploading data (e.g. satellite images) functionality; Support for the OGG services.