1
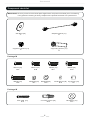
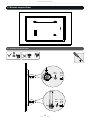
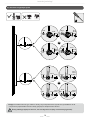
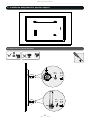
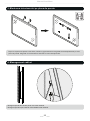
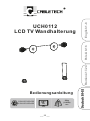
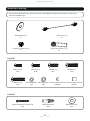
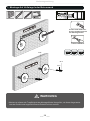
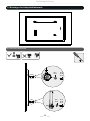
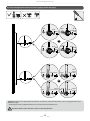
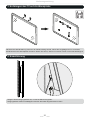
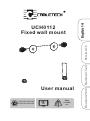
User manual
200x200/300x300
400x200/400x400
55"
MAX
50kg
(110lbs)
MAX
Deutsch 25-32
Română 17-24
Polski 9-16
English 1-8
UCH0112
Fixed wall mount
User manual
____________________________________________________________________________________
NOTE: Read entire instruction sheet before you start installation and
assembly.
WARNING
• Do not begin to installation of the product on you have read and understand the
instructions and warnings contained in this Installation Sheet. If you have any question
regarding any of the instruction or warning, Please contact your local distributor.
• This product should only be installed by someone of good mechanical aptitude, with
experience and basic building, and fully understands.
• Make sure that the supporting surface will safely support the combined load of the
equipment and all attached hardware and components.
• Never exceed the Maximum Load Capacity.
• Always use an assistant or mechanical lifting equipment to safely lift and position
equipment.
• Tighten screws firmly, but do not over tighten. Over tightening can damage the items,
greatly reducing their holding power.
• This products intended for indoor use only. Use of this product outdoors could lead to
product failure and personal injury.
Specifications are subject to change without notice.
English
Correct Disposal of This Product
(Applicable in the European Union and othor European countries with separate collection
systems)
This marking shown on the product or Its literature, indicates that It should not be disposed with other
household wastes at the end of its working life. To prevent possible harm lo the environment or human
health from uncontrolled waste disposal, please separate this from other types of wastes and recycle
it responsibly to promote the sustainable reuse of material resources.
Household users should contact either the retailer where they purchased this product, or their local
government office, for details of where and how they can take this item for environmentally safe
recycling.
Business users should contact their supplier and check the terms and conditions of the purchase
contract This product should not be mixed with other commercial wastes for disposal
Made in China for LECHPOL Zbigniew Leszek, Miętne, 1 Garwolińska Street 08-400 Garwolin.
___ 3 ___
User manual
____________________________________________________________________________________
Component checklist
IMPORTANT: Ensure you have received all parts against the component checklist prior to installing.
If any parts are missing or faulty, telephone the special franchiser for a placement.
adapter bracket (x1)
B
wall plate (x2)
A
supporting spacer (x1)
C
supporting spacer (x1)
D
Package M
M5x14 (x4)
M-A
M8x30 (x4)
M-E
M8x20 (x4)
M-C
M6x14 (x4)
M-B
D5 washer(x4)
M-F
D8 washer(x4)
M-G
M6x30 (x4)
M-D
small spacer (x8)
M-H
big spacer (x4)
M-I
Package W
ST5.5x50 (x2)
W-A
concrete anchor (x2)
W-B
___ 4 ___
D6 washer (x2)
W-C
User manual
____________________________________________________________________________________
1. Mount on Solid Brick and Concrete Block
60mm
(2.4")
ø 8mm
(ø 5/16")
1
(1
80
m
m
-2
20
m
m
Mark the
exact location of
mounting holes
)
2
Drill pilot holes
W-B
√
X
X
W-A
W-C
WARNING
• Installers must verify that the supporting surface will safely support the combined load of the
equipment and all attached hardware and components.
___ 5 ___
User manual
____________________________________________________________________________________
2. Install Adapter Brackets
2-1 For Flat Back Screen
TV
TV
TV
M-F
M-G
M-F
M-G
___ 6 ___
M-A
M-B
M-C
M-A
M-B
M-C
User manual
____________________________________________________________________________________
2-2 For Bump-out or Recessed Back Screens
TV
TV
TV
M-H
M-G
M-C
M-H
M-C
M-G M-D
M-E
or
M-I
M-H
M-H
M-I
M-G
M-D
M-E
M-G M-C
M-G
M-D
M-E
M-H
M-C
M-D
M-G M-E
M-H
M-I
M-D
M-G M-E
or
M-I
M-D
M-G M-E
Note: Choose the appropriate screws, washers and spacers (if necessary) according to the type of screen.
· Screw the supporting spacers onto the TV.
Tighten all screws but do not over tighten.
___ 7 ___
User manual
____________________________________________________________________________________
3. Hanging the TV onto the Wall Plate
After the wall mount has been safely secured to the wall, Carefully lift your TV and hook wirerope into the
wall plate rail. Make sure your TV is securely and correctly attached.
4. Cable Management
• Fold out the tilt supports to access the cables.
• Fold the tilt supports back once all cables have been installed.
Maintenance
Maintenance
• Check that the bracket is secure and safe to use at regular intervals(at least every three months).
• Please contact your dealer if you have any questions.
___ 8 ___
Instrukcja obsługi
200x200/300x300
400x200/400x400
55"
MAX
___ 9 ___
50kg
(110lbs)
MAX
English 1-8
Deutsch 25-32
Română 17-24
Polski 9-16
UCH0112
Uchwyt ścienny do TV
Instrukcja obsługi
____________________________________________________________________________________
UWAGA: Przed rozpoczęciem montażu, należy przeczytać instrukcję
obsługi.
UWAGA
• Przed przystąpieniem do montażu, należy dokładnie przeczytać całą instrukcję obsługi. W
przypadku jakichkolwiek wątpliwości, należy skontaktować się z lokalnym dystrybutorem.
• Należy przestrzegać zaleceń producenta odnośnie miejsca i sposobu montażu.
• Instalacja uchwytu powinna być przeprowadzona przez wykwalifikowaną osobę cechującą
się dobrymi umiejętnościami mechanicznymi, znającą konstrukcję budynku oraz dobrze
rozumiejącą instrukcję obsługi.
• Nie należy przekraczać dopuszczalnego maksymalnego obciążenia.
• Podczas przymocowywania telewizora, należy skorzystać z pomocy drugiej osoby.
• Śruby należy dokręcić mocno, lecz nie za mocno. Zbyt mocne dokręcenie może
doprowadzić do zniszczenia lub osłabienia gwintu.
• Produkt przeznaczony jest do użytku wewnątrz pomieszczeń.
___ 10 ___
Instrukcja obsługi
____________________________________________________________________________________
Zawartość opakowania
WAŻNE: Należy się upewnić, że w zestawie są wszystkie elementy wymienione na liście. Jeżeli brakuje
jakiejkolwiek części lub jest ona uszkodzona, należy skontaktować się z dystrybutorem.
wspornik (x1)
B
uchwyt ścienny (x2)
A
dystans (x1)
C
regulowany dystans (x1)
D
Opakowanie M
M5x14 (x4)
M-A
M8x30 (x4)
M-E
M6x14 (x4)
M-B
D5 podkładka (x4)
M-F
M8x20 (x4)
M-C
M6x30 (x4)
M-D
D8 podkładka (x4) dystans - mały (x8)
M-G
M-H
dystans - duży (x4)
M-I
Opakowanie W
Śruba ST5.5x50 (x2)
W-A
kołek rozporowy (x2)
W-B
___ 11 ___
D6 podkładka (x2)
W-C
Instrukcja obsługi
____________________________________________________________________________________
1. Montaż do ściany betonowej
60mm
(2.4")
ø 8mm
(ø 5/16")
1
(1
8
0m
m
-2
20
m
m
)
2
Należy dokładnie zaznaczyć i
wywiercić otwory montażowe.
W-B
√
X
W-A
W-C
UWAGA
• Należy się upewnić, że powierzchnia nośna wytrzyma obciążenie uchwytu wraz z
podłączonymi do niego urządzeniami.
___ 12 ___
X
Instrukcja obsługi
____________________________________________________________________________________
2. Montaż wsporników
2-1 Telewizor z płaskim tyłem
TV
TV
TV
M-F
M-G
M-F
M-G
___ 13 ___
M-A
M-B
M-C
M-A
M-B
M-C
Instrukcja obsługi
____________________________________________________________________________________
2-2 Telewizor z wypukłym tyłem
TV
TV
TV
M-H
M-H
M-G
M-C
M-C
M-G M-D
M-E
lub
M-I
M-H
M-H
M-I
M-G
M-D
M-E
M-G
M-D
M-E
M-H
M-C
M-D
M-G M-E
M-H
M-I
M-D
M-G M-E
M-G M-C
lub
M-I
M-D
M-G M-E
Uwaga: W zależności od typu ekranu należy użyć odpowiednich dystansów, podkładek i śrub.
· Za pomocą odpowiednich śrub należy przykręcić wsporniki do ekranu.
Śruby należy przykręcić mocno, ale nie zbyt mocno (aby nie zniszczyć gwintu).
___ 14 ___
Instrukcja obsługi
____________________________________________________________________________________
3. Przymocowanie telewizora do uchwytu
Telewizor wraz z przymocowanym wspornikiem należy zawiesić na uchwycie ściennym.
Uwaga: Przed puszczeniem telewizora, należy się upewnić, że jest od dobrze zamocowany.
4. Podłączenie przewodów
• Używając regulowanego dystansu, należy odchylić telewizor od ściany.
• Po podłączeniu przewodów, należy ustawić telewizor w pierwotnym położeniu.
___ 15 ___
Instrukcja obsługi
____________________________________________________________________________________
Użytkowanie
• Po zawieszeniu telewizora, należy się upewnić że jest on dobrze przymocowany. Należy
okresowo (np. co kilka miesięcy) sprawdzać, czy śruby i inne elementy nie poluzowały
się i są solidnie zamocowane.
• Jeżeli istnieją jakiekolwiek wątpliwości lub problemy odnośnie montażu, należy
skontaktować się z lokalnym dystrybutorem.
Specyfikacja produktu może ulec zmianie bez powiadomienia.
Poland
Prawidłowe usuwanie produktu
(zużyty sprzęt elektryczny i elektroniczny)
Oznaczenie umieszczone na produkcie lub w odnoszących się do niego tekstach wskazuje, że po
upływie okresu użytkowania, nie należy usuwać go z innymi odpadami pochodzącymi z gospodarstw
domowych. Aby uniknąć szkodliwego wpływu na środowisko naturalne i zdrowie ludzi wskutek
niekontrolowanego usuwania odpadów, prosimy o oddzielenie produktu od innego typu odpadów oraz
odpowiedzialny recykling w celu promowania ponownego użycia zasobów materialnych jako stałej
praktyki.
W celu uzyskania informacji na temat miejsca i sposobu bezpiecznego dla środowiska recyklingu tego
produktu użytkownicy w gospodarstwach domowych powinni skontaktować się z punktem sprzedaży
detalicznej, w którym dokonali zakupu produkt, lub z organem władz lokalnych.
Użytkownicy w firmach powinni skontaktować się ze swoim dostawcą i sprawdzić warunki umowy
zakupu. Produktu nie należy usuwać razem z innymi odpadami komunalnymi.
Wyprodukowano w CHRL dla LECHPOL Zbigniew Leszek, Miętne ul. Garwolińska 1, 08-400 Garwolin.
___ 16 ___
Manual de utilizare
200x200/300x300
400x200/400x400
55"
MAX
___ 17 ___
50kg
(110lbs)
MAX
English 1-8
Deutsch 25-32
Română 17-24
Polski 9-16
UCH0112
Suport TV LCD LED
Manual de utilizare
____________________________________________________________________________________
Inainte de instalare
• Nu incepeti instalarea suportului decat dupa ce ati citit si inteles instructiunile de
montare.
• Respectati recomandarile din acest manual de instalare cu privire la distanta fata
de perete necesara la montarea suportului.
• Instalarea suportului este recomandata sa fie executata de catre personal calificat.
• Verificati daca peretele este poate suporta sarcinile maxime admisibile de catre suport.
• Nu depasiti sarcina maxima admisibila a suportului.
• Asigurati-va ca suruburile de fixare pentru diblu sa fie centrate exact in mijlocul
gaurilor de pozitionare de pe suport (eventual utilizati un dispozitiv de centrare)
in momentul strangerii acestora.
• Strangeti suruburile ferm dar nu exagerati. Strangerea prea puternica a acestora
poate distruge partile componente ale suportului
• Solicitati ajutorul altei persoane pentru pozitionarea aparatului pe suport.
• Suportul este destinat utilizarii in interior. Nu utilizati suportul in exterior pentru a
evita riscul produycerii de accidente sau defectarea produsului.
___ 18 ___
Manual de utilizare
____________________________________________________________________________________
Continut colet
Asigurati-va ca ati primit toate componentele necesare montarii suportului inainte de instalarea
acestuia, urmarind figurile urmatoare:
placa de baza (x2)
A
adaptor (x1)
B
saiba (x1)
C
saiba (x1)
D
Pachet M
M5x14 (x4)
M-A
M6x14 (x4)
M-B
M8x30 (x4)
M-E
D5 saiba (x4)
M-F
M8x20 (x4)
M-C
D8 saiba(x4)
M-G
Saiba mica (x8)
M-H
M6x30 (x4)
M-D
Saiba mare (x4)
M-I
Pachet W
Surub ancorare ST5.5x50 (x2)
W-A
diblu beton (x2)
W-B
___ 19 ___
D6 saiba (x2)
W-C
Manual de utilizare
____________________________________________________________________________________
1. Montarea suportului pe perete de beton
60mm
(2.4")
ø 8mm
(ø 5/16")
1
(1
80
m
m
-2
20
m
m
Marcati locatia
exacta a orifiicilor
de montare
)
2
Efectuati gaurile de ghidare
W-B
√
X
W-A
W-C
AVERTISMENT
• Instalatorii trebuie sa verifice ca suprafata de sprijin va suporta in conditii de siguranta
sarcina echipamentelor si toate componentele atasate.
___ 20 ___
X
Manual de utilizare
____________________________________________________________________________________
2. Instalarea adaptoarelor pentru suport
2-1 Pentru TV cu spatele drept (plat)
TV
TV
TV
M-F
M-G
M-F
M-G
___ 21 ___
M-A
M-B
M-C
M-A
M-B
M-C
Manual de utilizare
____________________________________________________________________________________
2-2 Pentru TV cu spatele curbat sau pentru accesarea intrarilor A/V
TV
TV
TV
M-H
M-G
M-C
M-H
M-C
M-G M-D
M-E
or
M-I
M-H
M-H
M-I
M-G
M-D
M-E
M-G M-C
M-G
M-D
M-E
M-H
M-C
M-D
M-G M-E
M-H
M-I
M-D
M-G M-E
or
M-I
M-D
M-G M-E
Nota: Alegeti suruburile, saibele si distantierele (daca e necesar) in functie de tipul ecranului.
· Insurubati adaptoarele pe TV.
Strangeti toate suruburile dar nu exagerati.
___ 22 ___
Manual de utilizare
____________________________________________________________________________________
3. Montarea televizorului pe placa de perete
Dupa ce suportul de perete a fost fixat, ridicati cu grija televizorul si agatati sforile dispozitivului pe sina
placii de perete. Asigurati-va ca televizorul este fixat in mod corespunzator.
4. Management cabluri
• Strangeti suportii de inclinare pentru a accesa cablurile.
• Strangeti suportii inapoi odata au fost instalate toate cablurile.
___ 23 ___
Manual de utilizare
____________________________________________________________________________________
Intretinere
Intretinere
· Verificati ca suportul sa fie fixat la intervale regulate (cel putin o data la 3 luni)
· Va rugam sa contactati furnizorul in cazul in care aveti intrebari.
Specificatiile sunt supuse schimbarilor fara notificare prealabila.
Romania
Reciclarea corecta a acestui produs
(reziduuri provenind din aparatura electrica si electronica)
Marcajale de pe acest produs sau mentionate in instructiunile sale de folosire indica faptul ca
produsul nu trebuie aruncat impreuna cu alte reziduuri din gospod arie atunci cand nu mai este in
stare de functionare. Pentru a preveni posibile efecte daunatoare asupra mediului inconjurator sau a
san ata tii oamenilor datorate evacuarii necontrolate a reziduurilor, va rugam są separati acest
produs de alte tipuri de rezuduuri si sá-l reciclati in mod responsabil pentru a promova refolosirea
resurselor materiale.
Utilizatorii casnici sunt rugati są ia legatura fie cu distribuitorul de la care au achizitionat acest
produs, fie cu autoritatile locale, pentru a primi informatii cu privire la locul si modul in care pot
depozita acest produs in vederea reciclarii sale ecologice.
Utilizatori institutionali sunt rugati są ia legatura cu furnizorul si są verifice conditiile stipulate in
contractul de vanzare. Acest produs nu trebuie amestecat cu alte reziduuri de natura comerciala.
Produs in RPC pentru Lechpol Electronic SRL, Republicii nr. 5, Resita, CS , ROMANIA.
___ 24 ___
Bedienungsanleitung
200x200/300x300
400x200/400x400
55"
MAX
___ 25 ___
50kg
(110lbs)
MAX
English 1-8
Deutsch 25-32
Română 17-24
Polski 9-16
UCH0112
LCD TV Wandhalterung
Bedienungsanleitung
____________________________________________________________________________________
Vor Der Montage
• Beginnen Sie mit der Montage erst nachdem Sie die Montageanweisungen gelesen
und verstanden haben.
• Befolgen Sie die Empfehlungen des Handbuchs bezüglich des benötigten Abstandes
zwischen Wand und Halterung.
• Es wird empfohlen, die Montage von qualifiziertem Personal durchzuführen.
• Prüfen Sie, ob die Wand die Belastung der Halterung aushält.
• Überschreiten Sie nicht die maximal zulässige Last der Halterung.
• Bei einer Montage auf einer Holzwand achten Sie darauf, dass die
Befestigungsschrauben in der Mitte der Pfosten zentriert werden (eventuell benutzen
Sie eine Zentriervorrichtung).
• Ziehen Sie die Schrauben fest an, aber ziehen Sie die Schrauben nicht übermäßig an.
Zu festes Anziehen der Schrauben, kann diese beschädigen und vermindert dadurch
ihre Haltkraft.
• Bitten Sie eine andere Person um Hilfe für die Positionierung des Gerätes in der
Halterung.
• Die Halterung ist nur für den Innenraum bestimmt. Verwenden Sie die Halterung nicht
im Außenbereich um das Risiko von Verletzungen oder Beschädigungen am Produkt
zu vermeiden.
___ 26 ___
Bedienungsanleitung
____________________________________________________________________________________
Inhalt Der Packung
Vor der Montage Stellen Sie sicher, dass alle notwendigen Einzelteile vorhanden sind anhand
folgender Abbildungen.
Halterung (x1)
B
Basisplatte (x2)
A
supporting spacer (x1)
C
supporting spacer (x1)
D
Paket M
M5x14 (x4)
M-A
M8x30 (x4)
M-E
M8x20 (x4)
M-C
M6x14 (x4)
M-B
D5 Scheibe(x4)
M-F
D8 Scheibe(x4)
M-G
M6x30 (x4)
M-D
Kleines Distanzstück Grosses Distanzstück
(x8) M-H
(x4) M- I
Paket W
Holzschraube ST5.5x50 (x2)
W-A
Betondübel (x2)
W-B
___ 27 ___
D6 Scheibe (x2)
W-C
Bedienungsanleitung
____________________________________________________________________________________
1. Montage Auf Vollziegel oder Betonwand
60mm
(2.4")
ø 8mm
(ø 5/16")
1
(1
80
m
m
2
-2
0m
m
Finden und markieren
Sie die exakte Position
der Montagelöcher
)
2
Löcher vorbohren
W-B
√
X
X
W-A
W-C
WARNUNG
• Monteure müssen die Tragfähigkeit der Montagefläche überprüfen, ob diese die gesamte
Last der Geräte und angeschlossenes Zubehör sicher aushält.
___ 28 ___
Bedienungsanleitung
____________________________________________________________________________________
2. Montage der Adapterklammern
2-1 Für Flache Hinterseite
TV
TV
TV
M-F
M-G
M-F
M-G
___ 29 ___
M-A
M-B
M-C
M-A
M-B
M-C
Bedienungsanleitung
____________________________________________________________________________________
2-2 Für Zurückgesetzte Hinterseite oder Zugängliche A/V Eingänge
TV
TV
TV
M-H
M-G
M-C
M-H
M-C
M-G M-D
M-E
or
M-I
M-H
M-H
M-I
M-G
M-D
M-E
M-G M-C
M-G
M-D
M-E
M-H
M-C
M-D
M-G M-E
M-H
M-I
M-D
M-G M-E
or
M-I
M-D
M-G M-E
Hinweis: Wählen Sie passende Schrauben, Scheiben und Distanzstücke, (wenn nötig) passend zum
Bildschirmtyp.
· Befestigen Sie die Adapterklammern mit Schrauben am Bildschirm.
Alle Schrauben fest anziehen, aber nicht überdrehen.
___ 30 ___
Bedienungsanleitung
____________________________________________________________________________________
3. Aufhängen des TV auf die Wandplatte
Nachdem die Wandhalterung sicher an der Wand befestigt wurde, heben Sie sorgfältig Ihren TV und haken
das Drahtseil in die Wandplatten-Schiene. Stellen Sie sicher, dass Ihr Fernseher sicher und korrekt befestigt ist.
4. Kabelführung
• Klappen Sie die Neigungsstütze aus, um auf die Kabel zuzugreifen.
• Neigungsstütze wieder zurückklappen nachdem alle Kabel angeschlossen wurden.
___ 31 ___
Bedienungsanleitung
____________________________________________________________________________________
Wartung
Wartung
• Überprüfen Sie ob die Klammern sicher befestigt sind in regelmäßigen Abständen (zumindest
alle drei Monate)
• Für etwaige Fragen wenden Sie sich an Ihren Händler.
Die Spezifikationen können ohne Ankündigung geändert werden.
Deutsch
Korrekte Entsorgung dieses Produkts
(Elektromüll)
(Anzuwenden in den Ländern der Europäischen Union und anderen europäischen Ländern mit einem
separaten Sammelsystem)
Die Kennzeichnung auf dem Produkt bzw. auf der dazugehörigen Literatur gibt an, dass es nach seiner
Lebensdauer nicht zusammen mit dam normalen Haushaltsmüll entsorgt werden darf. Entsorgen Sie dieses
Gerät bitte getrennt von anderen Abfällen, um der Umwelt bzw. der menschlichen Gesundheit nicht durch
unkontrollierte Müllbeseitigung zu schaden. Recyceln Sie das Gerät, um die nachhaltige Wiederverwertung
von stofflichen Ressourcen zu fördern
Private Nutzer sollten den Händler, bei dem das Produkt gekauft wurde, oder die zuständigen Behörden
kontaktieren, um in Erfahrung zu bringen, wie sie das Gerät auf umweltfreundliche Weise recyceln können
Gewerbliche Nutzer sollten sich an Ihren Lieferanten wenden und die Bedingungen des Verkaufsvertrags
konsultieren. Dieses Produkt darf nicht zusammen mit anderem Gewerbemüll entsorgt werden
Made in China für Lechpol Electronics Bv Provincialeweg 7, 3248 Lk Melissant, Holland
___ 32 ___
www.cabletech.pl