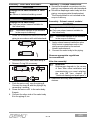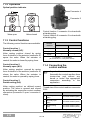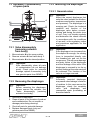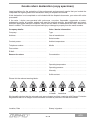
1
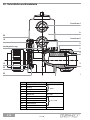
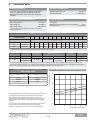
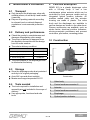
610 Membranventil Kunststoff, DN 12 - 15 Diaphragm Valve Plastic, DN 12 - 15 DE ORIGINALBETRIEBSANLEITUNG GB OPERATING INSTRUCTIONS 610 Inhaltsverzeichnis 1 1 2 2.1 Voraussetzungen für die einwandfreie Funktion des GEMÜ-Ventils: Sachgerechter Transport und Lagerung. Installation und Inbetriebnahme durch eingewiesenes Fachpersonal. Bedienung gemäß dieser Betriebsanleitung. Ordnungsgemäße Instandhaltung. Allgemeine Hinweise 2 Allgemeine Sicherheitshinweise 2 Hinweise für Serviceund Bedienpersonal 3 2.2 Warnhinweise 3 2.3 Verwendete Symbole 4 3 Begriffsbestimmungen 4 4 Vorgesehener Einsatzbereich 4 5 Auslieferungszustand 4 6 Technische Daten 5 7 Bestelldaten 6 8 Herstellerangaben 7 8.1 Transport 7 8.2 Lieferung und Leistung 7 8.3 Lagerung 7 8.4 Benötigtes Werkzeug 7 9 Funktionsbeschreibung 7 10 Geräteaufbau 7 11 Montage und Bedienung 8 11.1 Montage des Membranventils 8 11.2 Bedienung 10 11.3 Steuerfunktionen 10 11.4 Steuermedium anschließen 10 12 Montage / Demontage von Ersatzteilen 11 12.1 Demontage Ventil (Antrieb vom Körper lösen) 11 12.2 Demontage Membrane 11 12.3 Montage Membrane 11 12.3.1 Allgemeines 11 12.3.2 Montage der Konkav-Membrane 12 12.4 Montage Antrieb auf Ventilkörper 12 13 Inbetriebnahme 13 14 Inspektion und Wartung 13 15 Demontage 14 16 Entsorgung 14 17 Rücksendung 14 18 Herstellererklärung / Hinweise 14 19 Fehlersuche / Störungsbehebung 15 20 Schnittbild und Ersatzteile 16 Notizen 17 Rücksendeerklärung 34 610 Allgemeine Hinweise Korrekte Montage, Bedienung und Wartung oder Reparatur gewährleisten einen störungsfreien Betrieb des Membranventils. + 2 Beschreibungen und Instruktionen beziehen sich auf Standardausführungen. Für Sonderausführungen, die in dieser Betriebsanleitung nicht beschrieben sind, gelten die grundsätzlichen Angaben in dieser Betriebsanleitung in Verbindung mit einer zusätzlichen Sonderdokumentation. Allgemeine Sicherheitshinweise Die Sicherheitshinweise berücksichtigen nicht: Zufälligkeiten und Ereignisse, die bei Montage, Betrieb und Wartung auftreten können. die ortsbezogenen Sicherheitsbestimmungen, für deren Einhaltung - auch seitens des hinzugezogenen Montagepersonals - der Betreiber verantwortlich ist. 2 / 36 2.1 Hinweise für Serviceund Bedienpersonal 2.2 Die Betriebsanleitung enthält grundlegende Sicherheitshinweise, die bei Inbetriebnahme, Betrieb und Wartung zu beachten sind. Nichtbeachtung kann zur Folge haben: Gefährdung von Personen durch elektrische, mechanische und chemische Einwirkungen. Gefährdung von Anlagen in der Umgebung. Versagen wichtiger Funktionen. Gefährdung der Umwelt durch Austreten gefährlicher Stoffe bei Leckage. Vor Inbetriebnahme: G Betriebsanleitung lesen. G Montage- und Betriebspersonal ausreichend schulen. G Sicherstellen, dass der Inhalt der Betriebsanleitung vom zuständigen Personal vollständig verstanden wird. G Verantwortungs- und Zuständigkeitsbereiche regeln. Warnhinweise Warnhinweise sind, soweit möglich, nach folgendem Schema gegliedert: SIGNALWORT Art und Quelle der Gefahr ® Mögliche Folgen bei Nichtbeachtung. G Maßnahmen zur Vermeidung der Gefahr. Warnhinweise sind dabei immer mit einem Signalwort und teilweise auch mit einem gefahrenspezifischen Symbol gekennzeichnet. Folgende Signalwörter bzw. Gefährdungsstufen werden eingesetzt: GEFAHR Unmittelbare Gefahr! ® Bei Nichtbeachtung sind Tod oder schwerste Verletzungen die Folge. WARNUNG Bei Betrieb: G Betriebsanleitung am Einsatzort verfügbar halten. G Sicherheitshinweise beachten. G Nur entsprechend der Leistungsdaten betreiben. G Wartungsarbeiten bzw. Reparaturen, die nicht in der Betriebsanleitung beschrieben sind dürfen nicht ohne vorherige Abstimmung mit dem Hersteller durchgeführt werden. GEFAHR Möglicherweise gefährliche Situation! ® Bei Nichtbeachtung drohen schwerste Verletzungen oder Tod. VORSICHT Möglicherweise gefährliche Situation! ® Bei Nichtbeachtung drohen mittlere bis leichte Verletzungen. VORSICHT (OHNE SYMBOL) Möglicherweise gefährliche Situation! ® Bei Nichtbeachtung drohen Sachschäden. Sicherheitsdatenblätter bzw. die für die verwendeten Medien geltenden Sicherheitsvorschriften unbedingt beachten! Bei Unklarheiten: Bei nächstgelegener GEMÜVerkaufsniederlassung nachfragen. 3 / 36 610 2.3 Verwendete Symbole 4 Gefahr durch heiße Oberflächen! Gefahr durch ätzende Stoffe! + G ® 3 Hand: Beschreibt allgemeine Hinweise und Empfehlungen. Punkt: Beschreibt auszuführende Tätigkeiten. Pfeil: Beschreibt Reaktion(en) auf Tätigkeiten. Aufzählungszeichen Begriffsbestimmungen Vorgesehener Einsatzbereich Das GEMÜ-Membranventil 610 ist für den Einsatz in Rohrleitungen konzipiert. Es steuert ein durchfließendes Medium indem es durch ein Steuermedium geschlossen oder geöffnet werden kann. Das Membranventil ist geeignet für aggressive, neutrale, gasförmige und flüssige Medien, die die physikalischen und chemischen Eigenschaften des jeweiligen Gehäuse- und Membranwerkstoffes nicht negativ beeinflussen. Die Betätigung erfolgt über einen wartungsarmen Kolbenantrieb. Das Membranventil gemäß der technischen Daten einsetzen (siehe Kapitel 6 "Technische Daten"). Schrauben und Kunststoffteile am Membranventil nicht lackieren! WARNUNG Betriebsmedium Medium, das durch das Membranventil fließt. Membranventil nur bestimmungsgemäß einsetzen! ® Sonst erlischt Herstellerhaftung und Gewährleistungsanspruch. G Das Membranventil ausschließlich entsprechend den in der Vertragsdokumentation und Betriebsanleitung festgelegten Betriebsbedingungen verwenden. G Das Membranventil darf nicht in explosionsgefährdeten Zonen, die in der Vertragsdokumentation nicht bestätigt sind, verwendet werden. Steuermedium Medium mit dem durch Druckaufbau oder Druckabbau das Membranventil angesteuert und betätigt wird. Steuerfunktion Mögliche Betätigungsfunktionen des Membranventils. 5 Auslieferungszustand Das GEMÜ-Membranventil wird als separat verpacktes Bauteil ausgeliefert. 610 4 / 36 6 Technische Daten Betriebsmedium Umgebungstemperatur Aggressive, neutrale, gasförmige und flüssige Medien, die die physikalischen und chemischen Eigenschaften des jeweiligen Gehäuse- und Membranwerkstoffes nicht negativ beeinflussen. Ventilkörper PVC / PP 5 bis 60° C Ventilkörper PVDF -20 bis 60° C Steuermedium Temperatur Betriebsmedium Neutrale Gase Ventilkörper PVC 5 bis 60° C Ventilkörper PP 5 bis 80° C Ventilkörper PVDF Max. zul. Temp. des Vorsteuermediums Füllvolumen 40° C 0,061 dm³ -20 bis 80° C Der zulässige Betriebsdruck ist abhängig von der Temperatur des Betriebsmediums Druck / Temperatur-Zuordnung für Kunststoff Temperatur in °C (Kunststoffgehäuse) -20 -10 ±0 5 10 Ventilkörperwerkstoff PVC-U PP PVDF Code 1 Code 5 Code 20 20 25 30 40 50 60 70 80 2,1 3,3 4,3 0,9 2,4 3,8 1,6 3,2 0,9 2,8 zulässiger Betriebsdruck in bar 6,0 6,0 6,0 6,0 6,0 6,0 6,0 6,0 6,0 6,0 6,0 6,0 6,0 6,0 6,0 4,8 5,1 5,4 3,6 4,2 4,8 Erweiterte Temperaturbereiche auf Anfrage. Bitte beachten sie, dass sich aufgrund der Umgebungs- und Medientemperatur eine Mischtemperatur am Ventilkörper einstellt, welche die oben angegebenen Werte nicht überschreiten darf. Betriebsdruck Steuerdruck Kv-Wert Gewicht Membrangröße DN (bar) Stf. 1 Stf. 2 + 3 (m3/h) (g) 10 12 15 0 - 6 bar 5,0 - 7,0 bar max. 5,5 bar 2,8 3,5 240 290 siehe Diagramm Sämtliche Druckwerte sind in bar - Überdruck, Betriebsdruckangaben wurden mit statisch einseitig anstehenden Betriebsdruck bei geschlossenem Ventil ermittelt. Für die angegebenen Werte ist die Dichtigkeit am Ventilsitz und nach außen gewährleistet. Angaben zu beidseitig anstehenden Betriebsdrücken und für Reinstmedien auf Anfrage. Die Angaben des Steuerdruckes sind abhängig vom Hub. Kv-Werte: Toleranz ±10%. Werkstoff O-Ring bei Ventilkörpern mit Armaturenverschraubung Werkstoff O-Ring NBR EPDM FPM FPM EPDM EPDM PTFE FPM PSt Steuerdruck (bar) Membranwerkstoff Steuer- /Betriebsdruckdiagramm 6 5 4 Andere Kombinationen auf Anfrage Stf. 2 Stf. 3 3 Bei fremdgesteuerten Membranventilen besteht bezüglich des Ventilhubs eine Abhängigkeit zwischen dem Steuer- und dem Betriebsdruck. 2 Bei Federkraft schließenden Ventilen gilt: je niedriger der Betriebsdruck ist, desto höher muss der Steuerdruck sein, um das Ventil vollständig zu öffnen. Bei Federkraft öffnenden Ventilen verhält sich die Situation umgekehrt. Grundsätzlich ist jedoch darauf zu achten, dass keinesfalls die angegebenen Maximaldrücke überschritten oder die Minimaldrücke unterschritten werden. 1 0 0 Die notwendigen Steuerdrücke entnehmen Sie bitte aus nebenstehendem Diagramm. 1 2 3 4 5 6 PB Betriebsdruck (bar) 5 / 36 610 7 Bestelldaten Gehäuseform Steuerfunktion Code Durchgang D Anschlussart Code Gewindemuffe DIN ISO 228 1 Klebemuffe DIN 2 Armaturenverschraubung mit Einlegeteil DIN (Muffe) 7 Stutzen zum IR-Stumpfschweißen, WNF 28 Armaturenverschraubung mit Einlegeteil Zoll (Muffe) 33 Code Federkraft geschlossen (NC) 1 Federkraft geöffnet (NO) 2 Beidseitig angesteuert (DA) 3 Antriebsgröße Code Membrangröße 10 1/N Integrierte Befestigungsplatte Code Mit integrierter Befestigungsplatte M Werkstoff-Code 20 Armaturenverschraubung mit Einlegeteil DIN (IR-Stumpfschweißen) 78 Ohne Befestigungsplatte O Werkstoff-Code 20 Ohne Befestigungsplatte Ventilkörperwerkstoff Code PVC-U, grau 1 PP 5 PVDF 20 Membranwerkstoff Code NBR 2 FPM 4 EPDM PTFE/EPDM Bestellbeispiel 14 PTFE kaschiert 610 Typ 610 Nennweite Gehäuseform (Code) Anschlussart (Code) Ventilkörperwerkstoff (Code) Membranwerkstoff (Code) Steuerfunktion (Code) Antriebsgröße (Code) Integrierte Befestigungsplatte (Code) 610 - Werkstoff-Code 1 und 5 52 15 D 7 1 14 1 1/N - 15 D 7 1 14 1 1/N - 6 / 36 8 Herstellerangaben 8.1 G G G G Transport Membranventil nur auf geeignetem Lademittel transportieren, nicht stürzen, vorsichtig handhaben. Verpackungsmaterial entsprechend den Entsorgungsvorschriften / Umweltschutzbestimmungen entsorgen. 8.2 G Lieferung und Leistung Ware unverzüglich bei Erhalt auf Vollständigkeit und Unversehrtheit überprüfen. Lieferumfang aus Versandpapieren, Ausführung aus Bestellnummer ersichtlich. Auslieferungszustand des Ventils: Steuerfunktion: 1 Federkraft geschlossen (NC) 2 Federkraft geöffnet (NO) 3 Beidseitig angesteuert (DA) G G G G GEMÜ 610 ist ein Kunststoff-Membranventil mit Durchgangskörper. Das Ventil besitzt einen wartungsarmen Kolbenantrieb, der mit neutralen Gasen angesteuert werden kann, und eine integrierte optische Stellungsanzeige. Alle mediumsberührten Teile und das Antriebsgehäuse sind aus Kunststoff. Ventilkörper und Membrane sind gemäß Datenblatt in verschiedenen Ausführungen erhältlich. Vielfältiges Zubehör ist lieferbar, z.B. Hubbegrenzung, elektrische Stellungsrückmelder, elektropneumatische Stellungs- und Prozessregler, Pilotventile, Befestigungsplatten. 10 Geräteaufbau 6 Zustand: geschlossen geöffnet 4 3 undefiniert 5 Lagerung Membranventil staubgeschützt und trocken in Originalverpackung lagern. UV-Strahlung und direkte Sonneneinstrahlung vermeiden. Maximale Lagertemperatur: 40° C. 8.4 G Funktionsbeschreibung Das Membranventil wird im Werk auf Funktion geprüft. 8.3 G 9 Geräteaufbau Benötigtes Werkzeug Benötigtes Werkzeug für Einbau und Montage ist nicht im Lieferumfang enthalten. Passendes, funktionsfähiges und sicheres Werkzeug benutzen. 7 / 36 1 Ventilkörper 2 Steuermediumanschluss 2 3 Antrieb 4 Steuermediumanschluss 4 5 Membrane 6 Optische Stellungsanzeige 610 11 Montage und Bedienung Installationsort: Vor Einbau: G Ventilkörper- und Membranwerkstoff entsprechend Betriebsmedium auslegen. G Eignung vor Einbau prüfen! Siehe Kapitel 6 "Technische Daten". VORSICHT G G G 11.1 Montage des Membranventils G WARNUNG Unter Druck stehende Armaturen! ® Gefahr von schwersten Verletzungen oder Tod! G Nur an druckloser Anlage arbeiten. WARNUNG Aggressive Chemikalien! ® Verätzungen! G Montage nur mit geeigneter Schutzausrüstung. VORSICHT Heiße Anlagenteile! ® Verbrennungen! G Nur an abgekühlter Anlage arbeiten. VORSICHT Ventil nicht als Trittstufe oder Aufstiegshilfe benutzen! ® Gefahr des Abrutschens / der Beschädigung des Ventils. VORSICHT Maximal zulässigen Druck nicht überschreiten! ® Eventuell auftretende Druckstöße (Wasserschläge) durch Schutzmaßnahmen vermeiden. G G Montagearbeiten nur durch geschultes Fachpersonal. Geeignete Schutzausrüstung gemäß den Regelungen des Anlagenbetreibers berücksichtigen. 610 Ventil äußerlich nicht stark beanspruchen. Installationsort so wählen, dass Ventil nicht als Steighilfe genutzt werden kann. Rohrleitung so legen, dass Schub- und Biegungskräfte, sowie Vibrationen und Spannungen vom Ventilkörper ferngehalten werden. Ventil nur zwischen zueinander passenden, fluchtenden Rohrleitungen montieren. Richtung des Betriebsmediums: Beliebig. Einbaulage des Membranventils: Beliebig. Montage: 1. Eignung des Ventils für jeweiligen Einsatzfall sicherstellen. Das Ventil muss für die Betriebsbedingungen des Rohrleitungssystems (Medium, Mediumskonzentration, Temperatur und Druck) sowie die jeweiligen Umgebungsbedingungen geeignet sein. Technische Daten des Ventils und der Werkstoffe prüfen. 2. Anlage bzw. Anlagenteil stilllegen. 3. Gegen Wiedereinschalten sichern. 4. Anlage bzw. Anlagenteil drucklos schalten. 5. Anlage bzw. Anlagenteil vollständig entleeren und abkühlen lassen bis Verdampfungstemperatur des Mediums unterschritten ist und Verbrühungen ausgeschlossen sind. 6. Anlage bzw. Anlagenteil fachgerecht dekontaminieren, spülen und belüften. Montage bei Schweißstutzen: 1. Schweißtechnische Normen einhalten! 2. Antrieb mit Membrane vor Einschweißen des Ventilkörpers demontieren (siehe Kapitel 12.1). 3. Schweißstutzen abkühlen lassen. 4. Ventilkörper und Antrieb mit Membrane wieder zusammen bauen (siehe Kapitel 12.4). 8 / 36 Montage bei Armaturenverschraubung mit Einlegeteil: VORSICHT Beschädigungen am Ventilantrieb oder Ventilkörper! ® Schweißtechnische Normen einhalten! VORSICHT Montage bei Klebemuffe: Beschädigungen des Ventilkörpers! ® Nur für Ventilkörper geeigneten Kleber verwenden. + Montage bei Gewindeanschluss: G Schraubverbindungen entsprechend der gültigen Normen in Rohr einschrauben. G Membranventilkörper an Rohrleitung anschrauben, geeignetes Gewindedichtmittel verwenden. Das Gewindedichtmittel ist nicht im Lieferumfang enthalten. VORSICHT Beschädigungen des Ventilkörpers! ® Nur für Ventilkörper geeigneten Kleber verwenden. Der Kleber ist nicht im Lieferumfang enthalten! + 1. Schraubverbindung entsprechend der gültigen Normen in Rohr einschrauben. 2 Der Kleber ist nicht im Lieferumfang enthalten! 1. Kleber im Ventilkörper und auf Rohrleitung laut Angaben des Kleberherstellers auftragen. 2. Ventilkörper mit Rohrleitung verbinden. 1 Entsprechende Vorschriften für Anschlüsse beachten! Nach der Montage: 3 + 2. Überwurfmutter 1 am Ventilkörper 2 abschrauben. 3. O-Ring 3 ggf. wieder einsetzen. 2 3 5 1 4 G Wichtig: Membranen setzen sich im Lauf der Zeit. Nach Installation und Inbetriebnahme des Ventils unbedingt Muttern 20 (siehe Kapitel 20 "Schnittbild und Ersatzteile") nachziehen. Alle Sicherheits- und Schutzeinrichtungen wieder anbringen bzw. in Funktion setzen. 4. Überwurfmutter 1 über Rohrleitung 4 stecken. Einlegeteil 5 durch Kleben / Schweißen mit der Rohrleitung 4 verbinden. 5. Überwurfmutter 1 wieder auf Ventilkörper 2 aufschrauben. 6. Ventilkörper 2 an anderer Seite ebenfalls mit Rohrleitung 4 verbinden. 9 / 36 610 11.2 Bedienung Optische Stellungsanzeige Anschluss 4 Anschluss 2 Ventil offen Bei Steuerfunktion 1 ist der Anschluss 4 mit einem Blindstopfen verschlossen. Bei Steuerfunktion 2 ist der Anschluss 2 mit einem Blindstopfen verschlossen. Ventil geschlossen 11.3 Steuerfunktionen Folgende Steuerfunktionen sind verfügbar: Steuerfunktion 1 Federkraft geschlossen (NC): Ruhezustand des Ventils: durch Federkraft geschlossen. Ansteuern des Antriebs (Anschluss 2) öffnet das Ventil. Entlüften des Antriebs bewirkt das Schließen des Ventils durch Federkraft. Steuerfunktion 2 Federkraft geöffnet (NO): Anschlüsse Steuerfunktion 2 4 1 (NC) + - 2 (NO) - + 3 (DA) + + + = vorhanden / - = nicht vorhanden (Anschlüsse 2 / 4 siehe Bild oben) 11.4 Steuermedium anschließen Ruhezustand des Ventils: durch Federkraft geöffnet. Ansteuern des Antriebs (Anschluss 4) schließt das Ventil. Entlüften des Antriebs bewirkt das Öffnen des Ventils durch Federkraft. Steuerfunktion 3 Beidseitig angesteuert (DA): + Wichtig: Steuermediumleitungen spannungs- und knickfrei montieren! Je nach Anwendung geeignete Anschlussstücke verwenden. Gewinde des Steuermediumanschlusses: G1/4 Ruhezustand des Ventils: keine definierte Grundposition. Öffnen und Schließen des Ventils durch ansteuern der entsprechenden Steuermediumanschlüsse (Anschluss 2: Öffnen / Anschluss 4: Schließen). Steuerfunktion Anschluss 1 Federkraft geschlossen (NC) 2: Steuermedium (Öffnen) 2 Federkraft geöffnet (NO) 4: Steuermedium (Schließen) 3 Beidseitig angesteuert (DA) 2: Steuermedium (Öffnen) 4: Steuermedium (Schließen) Anschlüsse 2 / 4 siehe Bild oben 610 10 / 36 12 Montage / Demontage von Ersatzteilen 12.3 Montage Membrane 12.3.1 Allgemeines + Wichtig: Für Ventil passende Membrane einbauen (geeignet für Medium, Mediumkonzentration, Temperatur und Druck). Die Absperrmembrane ist ein Verschleißteil. Vor Inbetriebnahme und über gesamte Einsatzdauer des Membranventils technischen Zustand und Funktion überprüfen. Zeitliche Abstände der Prüfung entsprechend den Einsatzbelastungen und / oder der für den Einsatzfall geltenden Regelwerken und Bestimmungen festlegen und regelmäßig durchführen. + Wichtig: Ist die Membrane nicht weit genug in das Verbindungsstück eingeschraubt, wirkt die Schließkraft direkt auf den Schraubpin und nicht über das Druckstück. Das führt zu Beschädigungen und frühzeitigem Ausfall der Membrane und Undichtheit des Ventils. Wird die Membrane zu weit eingeschraubt, erfolgt keine einwandfreie Dichtung mehr am Ventilsitz. Die Funktion des Ventils ist nicht mehr gewährleistet. + Wichtig: Falsch montierte Membrane führt ggf. zu Undichtheit des Ventils / Mediumsaustritt. Ist dies der Fall dann Membrane demontieren, komplettes Ventil und Membrane überprüfen und erneut nach obiger Anleitung montieren. A 22 18 2 19 20 23 1 12.1 Demontage Ventil (Antrieb vom Körper lösen) 1. Antrieb A in Offen-Position bringen. 2. Antrieb A vom Ventilkörper 1 demontieren. 3. Antrieb A in Geschlossen-Position bringen. + Wichtig: Nach Demontage alle Teile von Verschmutzungen reinigen (Teile dabei nicht beschädigen). Teile auf Beschädigung prüfen, ggf. auswechseln (nur Originalteile von GEMÜ verwenden). 12.2 Demontage Membrane + Wichtig: Vor Demontage der Membrane bitte Antrieb demontieren, siehe "Demontage Ventil (Antrieb vom Körper lösen)". 1. Membrane herausschrauben. 2. Alle Teile von Produktresten und Verschmutzungen reinigen. Teile dabei nicht zerkratzen oder beschädigen! 3. Alle Teile auf Beschädigungen prüfen. 4. Beschädigte Teile austauschen (nur Originalteile von GEMÜ verwenden). 11 / 36 610 Das Druckstück ist lose. Druckstück und Antriebsflansch von unten gesehen: 7. Beim Verspüren eines deutlichen Widerstands Membrane soweit zurückschrauben, bis Membran-Lochbild mit Antriebs-Lochbild übereinstimmt. 12.4 Montage Antrieb auf Ventilkörper G 1. Antrieb A in Offen-Position bringen. 2. Antrieb A mit montierter Membrane 2 auf Ventilkörper 1 aufsetzen, auf Übereinstimmung von Membransteg und Ventilkörpersteg achten. 3. Schrauben 18, Scheiben 19 und Muttern 20 handfest montieren. 4. Antrieb A in Geschlossen-Position bringen. 5. Muttern 20 über Kreuz festziehen. Druckstück lose auf Ventilspindel aufsetzen, Nasen in Führungen (Pfeile) einpassen. 12.3.2 Montage der Konkav-Membrane Druckstückaussparung Schraubpin 6. Abdeckkappen 22 und 23 wieder aufsetzen. 7. Auf gleichmäßige Verpressung der Membrane 2 achten (ca. 10-15 %, erkennbar an gleichmäßiger Außenwölbung). 8. Komplett montiertes Ventil auf Dichtheit prüfen. + Membrandom 1. Antrieb A in Geschlossen-Position bringen. 2. Druckstück lose auf Ventilspindel aufsetzen, Nasen in Führungen einpassen (siehe Kapitel 12.3.1 "Allgemeines"). 3. Kontrollieren ob das Druckstück in den Führungen liegt. 4. Neue Membrane von Hand fest in Druckstück einschrauben. 5. Kontrollieren ob Membrandom in Druckstückaussparung liegt. 6. Bei Schwergängigkeit Gewinde prüfen, beschädigte Teile austauschen (nur Originalteile von GEMÜ verwenden). 610 12 / 36 Wichtig: Membranen setzen sich im Lauf der Zeit. Nach Installation und Inbetriebnahme des Ventils unbedingt Muttern 20 (siehe Kapitel 20 "Schnittbild und Ersatzteile") nachziehen. 13 Inbetriebnahme 14 Inspektion und Wartung WARNUNG WARNUNG Aggressive Chemikalien! ® Verätzungen! G Vor Inbetriebnahme Dichtheit der Medienanschlüsse prüfen! G Dichtheitsprüfung nur mit geeigneter Schutzausrüstung. Unter Druck stehende Armaturen! ® Gefahr von schwersten Verletzungen oder Tod! G Nur an druckloser Anlage arbeiten. VORSICHT Heiße Anlagenteile! ® Verbrennungen! G Nur an abgekühlter Anlage arbeiten. VORSICHT Gegen Leckage vorbeugen! G Schutzmaßnahmen gegen Überschreitung des maximal zulässigen Drucks durch eventuelle Druckstöße (Wasserschläge) vorsehen. VORSICHT G Vor Reinigung bzw. vor Inbetriebnahme der Anlage: G Membranventil auf Dichtheit und Funktion prüfen (Membranventil schließen und wieder öffnen). G Bei neuen Anlagen und nach Reparaturen Leitungssystem bei voll geöffnetem Membranventil spülen (zum Entfernen schädlicher Fremdstoffe). Reinigung: Betreiber der Anlage ist verantwortlich für Auswahl des Reinigungsmediums und Durchführung des Verfahrens. + Wichtig: Membranen setzen sich im Lauf der Zeit. Nach Installation und Inbetriebnahme des Ventils unbedingt Muttern 20 (siehe Kapitel 20 "Schnittbild und Ersatzteile") nachziehen. G G Wartungs- und Instandhaltungstätigkeiten nur durch geschultes Fachpersonal. Für Schäden welche durch unsachgemäße Handhabung oder Fremdeinwirkung entstehen, übernimmt GEMÜ keinerlei Haftung. Nehmen Sie im Zweifelsfall vor Inbetriebnahme Kontakt mit GEMÜ auf. 1. Geeignete Schutzausrüstung gemäß den Regelungen des Anlagenbetreibers berücksichtigen. 2. Anlage bzw. Anlagenteil stilllegen. 3. Gegen Wiedereinschalten sichern. 4. Anlage bzw. Anlagenteil drucklos schalten. Der Betreiber muss regelmäßige Sichtkontrollen der Ventile entsprechend den Einsatzbedingungen und des Gefährdungspotenzials zur Vorbeugung von Undichtheit und Beschädigungen durchführen. Ebenso muss das Ventil in entsprechenden Intervallen demontiert und auf Verschleiß geprüft werden (siehe Kapitel 12 "Montage / Demontage von Ersatzteilen"). 13 / 36 610 15 Demontage Demontage erfolgt unter den gleichen Vorsichtsmaßnahmen wie die Montage. G Membranventil demontieren (siehe Kapitel 12.1 "Demontage Ventil (Antrieb vom Körper lösen)"). 18 Herstellererklärung / Hinweise + Herstellererklärung: Gemäß EG-Maschinenrichtlinie 2006/42/EG gilt dieses Ventil nicht als Maschine, kann jedoch in eine als Maschine geltende Installation eingebaut werden. In diesem Fall den nachfolgenden Hinweis beachten. + Beim Einbau in eine als Maschine geltende Installation: Inbetriebnahme ist untersagt, bis festgestellt wurde, dass die Maschine (Anlage), in die dieses Ventil eingebaut wird, den Bestimmungen der EGMaschinenrichtlinie 2006/42/EG entspricht. + Hinweis zur Richtlinie 94/9/EG (ATEX Richtlinie): Ein Beiblatt zur Richtlinie 94/9/EG liegt dem Produkt bei, sofern es gemäß ATEX bestellt wurde. + Hinweis zur Mitarbeiterschulung: Zur Mitarbeiterschulung nehmen Sie bitte über die Adresse auf der letzten Seite Kontakt auf. 16 Entsorgung G G Alle Ventilteile entsprechend den Entsorgungsvorschriften / Umweltschutzbestimmungen entsorgen. Auf Restanhaftungen und Ausgasung von eindiffundierten Medien achten. 17 Rücksendung G G Membranventil reinigen. Rücksendung nur mit vollständig ausgefüllter Rücksendeerklärung (anbei). Ansonsten erfolgt keine Gutschrift bzw. keine Erledigung der Reparatur sondern eine kostenpflichtige Entsorgung. + Hinweis zur Rücksendung: Aufgrund gesetzlicher Bestimmungen zum Schutz der Umwelt und des Personals ist es erforderlich, dass Sie die Erklärung (anbei) vollständig ausgefüllt und unterschrieben den Versandpapieren beilegen. Nur wenn diese Erklärung vollständig ausgefüllt ist, wird Ihre Rücksendung bearbeitet! 610 Im Zweifelsfall oder bei Missverständnissen ist die deutsche Version des Dokuments ausschlaggebend! 14 / 36 19 Fehlersuche / Störungsbehebung Fehler Möglicher Grund Fehlerbehebung Steuermedium entweicht aus Anschluss 4* (bei Steuerfunktion 1 (NC)) bzw. Anschluss 2* (bei Steuerfunktion 2 (NO)) Steuerkolben defekt Antrieb austauschen Steuermedium entweicht aus Leckagebohrung* Spindelabdichtung undicht Antrieb austauschen und Steuermedium auf Verschmutzungen untersuchen Betriebsmedium entweicht aus Leckagebohrung* Absperrmembrane defekt Absperrmembrane auf Beschädigungen prüfen, ggf. Membrane tauschen Steuerdruck zu niedrig (bei Steuerfunktion 1, Federkraft geschlossen (NC)) Ventil mit Steuerdruck laut Datenblatt betreiben Vorsteuerventil defekt Vorsteuerventil prüfen und austauschen Steuermedium nicht angeschlossen Steuermedium anschließen Absperrmembrane nicht korrekt montiert Antrieb demontieren, Membranmontage prüfen, ggf. austauschen Antriebsfeder defekt (bei Steuerfunktion 2, Federkraft geöffnet (NO)) Antrieb austauschen Betriebsdruck zu hoch Ventil mit Betriebsdruck laut Datenblatt betreiben Steuerdruck zu niedrig (bei Steuerfunktion 2, Federkraft geöffnet (NO) und bei Steuerfunktion 3, Beidseitig angesteuert (DA)) Ventil mit Steuerdruck laut Datenblatt betreiben Fremdkörper zwischen Absperrmembrane und Ventilkörpersteg Antrieb demontieren, Fremdkörper entfernen, Absperrmembrane und Ventilkörpersteg auf Beschädigungen untersuchen, ggf. austauschen Ventilkörpersteg undicht bzw. beschädigt Ventilkörpersteg auf Beschädigungen prüfen, ggf. Ventilkörper tauschen Absperrmembrane defekt Absperrmembrane auf Beschädigungen prüfen, ggf. Membrane tauschen Antriebsfeder defekt (bei Steuerfunktion 1, Federkraft geschlossen (NC)) Antrieb austauschen Absperrmembrane falsch montiert Antrieb demontieren, Membranmontage prüfen, ggf. austauschen Verschraubung zwischen Ventilkörper und Antrieb lose Verschraubung zwischen Ventilkörper und Antrieb nachziehen Absperrmembrane defekt Absperrmembrane auf Beschädigungen prüfen, ggf. Membrane tauschen Ventilkörper beschädigt Ventilkörper tauschen Unsachgemäße Montage Montage Ventilkörper in Rohrleitung prüfen Ventil öffnet nicht bzw. nicht vollständig Ventil im Durchgang undicht (schließt nicht bzw. nicht vollständig) Ventil zwischen Antrieb und Ventilkörper undicht Verbindung Ventilkörper - Rohrleitung undicht Verschraubungen lose Ventilkörper undicht Verschraubungen festziehen Dichtmittel defekt Dichtmittel ersetzen Ventilkörper defekt Ventilkörper auf Beschädigungen prüfen, ggf. Ventilkörper tauschen * siehe Kapitel 20 "Schnittbild und Ersatzteile" 15 / 36 610 20 Schnittbild und Ersatzteile Anschluss 4 A 22 Anschluss 2 18 2 Leckagebohrung 5 4 19 3 20 23 1 610 Pos. Benennung 1 Ventilkörper 3 O-Ring 4 Einlegeteil 5 Überwurfmutter 2 Membrane 18 Schraube 19 Scheibe 22 Abdeckkappe 23 Abdeckkappe 20 Mutter A Antrieb Bestellbezeichnung } K610... } 600 10M... 610...S30... 9610 10... 16 / 36 Notizen 17 / 36 610 Contents 1 2 2.1 General notes General safety notes Notes for servicing and operating personnel 2.2 Warning notes 2.3 Symbols used 3 Definition of terms 4 Envisaged operational area 5 Delivery condition 6 Technical data 7 Order data 8 Manufacturer’s information 8.1 Transport 8.2 Delivery and performance 8.3 Storage 8.4 Tools needed 9 Function description 10 Construction 11 Assembly and operation 11.1 Assembling the diaphragm valve 11.2 Operation 11.3 Control functions 11.4 Connecting the control medium 12 Assembly / disassembly of spare parts 12.1 Valve disassembly (removing actuator from body) 12.2 Removing the diaphragm 12.3 Mounting the diaphragm 12.3.1 General notes 12.3.2 Mounting a concave diaphragm 12.4 Actuator mounting on the valve body 13 Commissioning 14 Inspection and servicing 15 Disassembly 16 Disposal 17 Returns 18 Manufacturer’s declaration / information 19 Troubleshooting / Fault clearance 20 Sectional drawing and spare parts Notes Goods return declaration 610 1 18 18 19 19 20 20 20 20 21 22 23 23 23 23 23 23 23 24 24 26 26 26 27 27 27 27 27 28 General notes Prerequisites for the correct functioning of the GEMÜ valve: Proper transport and storage. Installation and commissioning by trained specialist staff. Operation according to these operating instructions. Correct maintenance. Correct assembly, operation, servicing and repair work ensure faultless diaphragm valve operation. + 2 The descriptions and instructions apply to the standard versions. For special versions not described in these operating instructions the basic information contained herein applies in combination with an additional special documentation. General safety notes The safety notes do not take into account: Coincidences and events, which may occur during assembly, operation and servicing. Local safety regulations which must be adhered to by the operator - also with respect to any additional assembly personnel. 28 29 29 30 30 30 30 31 32 33 35 18 / 36 2.1 Notes for servicing and operating personnel 2.2 The operating instructions contain fundamental safety notes that must be observed during commissioning, operation and servicing. Non-observance can cause: Prior to commissioning G Read the operating instructions. G Provide adequate training for the assembly and operating personnel. G Ensure that the contents of the operating instructions have been fully understood by the responsible personnel. G Define the areas of responsibility. During operation G Keep the operating instructions available at the place of use. G Observe the safety notes. G Use only in accordance with the operational data. G Any servicing work and repairs not described in the operating instructions may not be performed without previous consultation with the manufacturer. Strictly observe the safety data sheets or the safety regulations valid for the media used. Wherever possible, warning notes are organised according to the following scheme: SIGNAL WORD Type and source of the danger ® Possible consequences of non-observance. G Measures for avoiding danger. Personal hazard due to electrical, mechanical and chemical effects. Hazard to nearby equipment. Failure of important functions. Hazard to the environment due to the leakage of dangerous materials. DANGER Warning notes Warning notes are always marked with a signal word and sometimes also with a symbol for the specific danger. The following signal words and danger levels are used: DANGER Imminent danger! ® Non-observance will lead to death or severe injury. WARNING A possibly dangerous situation! ® Non-observance can cause death or severe injury. CAUTION A possibly dangerous situation! ® Non-observance can cause medium to light injury. CAUTION (WITHOUT SYMBOL) A possibly dangerous situation! ® Non-observance can cause damage to property. In case of uncertainty Consult the nearest GEMÜ sales office. 19 / 36 610 2.3 Symbols used 4 Danger - hot surfaces! Danger - corrosive materials! + G ® 3 Hand: indicates general notes and recommendations. Point: indicates the tasks to be performed. Arrow: indicates the response(s) to tasks. Enumeration sign flows The GEMÜ 610 diaphragm valve is designed for installation in piping systems. It controls a flowing medium by being closed or opened by a control medium. The diaphragm valve is suitable for corrosive, inert, gaseous and liquid media which have no negative impact on the physical and chemical properties of the body and diaphragm material. The valve is operated by a low maintenance piston actuator. Use the diaphragm valve as specified in the technical data (see chapter 6 "Technical data"). Do not paint the bolts and plastic parts of the diaphragm valve! WARNING Definition of terms Working medium The medium that diaphragm valve. Envisaged operational area through the Control medium The medium with which increasing or decreasing pressure causes the diaphragm valve to be actuated and operated. Control function The possible actuation functions of the diaphragm valve. Use the diaphragm valve only for the intended purpose! ® Otherwise the manufacturer liability and guarantee will be void. G Use the diaphragm valve only in accordance with the operating conditions specified in the contract documentation and operating instructions. G The diaphragm valve must not be used in explosion-endangered zones unless expressly approved in the contract documentation. 5 Delivery condition The GEMÜ diaphragm valve is supplied as a separately packed component. 610 20 / 36 6 Technical data Working medium Ambient temperature Corrosive, inert, gaseous and liquid media which have no negative impact on the physical and chemical properties of the body and diaphragm material. Valve body PVC-U / PP Working medium temperature Control medium 5 to 60° C Valve body PVDF -20 to 60° C Valve body PVC-U 5 to 60° C Inert gases Valve body PP 5 to 80° C Max. perm. temperature of control medium 40° C Filling volume 0.061 dm³ Valve body PVDF -20 to 80° C The permissible operating pressure depends on the working medium temperature. Pressure / temperature correlation for plastic Temperature in °C (plastic body) -20 -10 ±0 Valve body material PVC-U PP PVDF Code 1 Code 5 Code 20 5 10 20 25 30 40 50 60 70 80 0.9 2.4 3.8 1.6 3.2 0.9 2.8 Permissible operating pressure in bar 6.0 6.0 6.0 6.0 6.0 6.0 6.0 6.0 6.0 6.0 6.0 6.0 6.0 6.0 6.0 4.8 5.1 5.4 3.6 4.2 4.8 2.1 3.3 4.3 Data for extended temperature ranges on request. Please note that the ambient temperature and medium temperature generate a combined temperature at the valve body which must not exceed the above values. Control pressure Operating press. Kv value Weight Diaphragm size DN (bar) C.f. 1 C.f. 2 + 3 (m3/h) (g) 10 12 15 0 - 6 bar 5.0 - 7.0 bar max. 5.5 bar 2.8 3.5 240 290 see diagram All pressures are gauge pressures. Operating pressure values were determined with static operating pressure applied on one side of a closed valve. Sealing at the valve seat and atmospheric sealing is ensured for the given values. Information on operating pressures applied on both sides and for high purity media on request. Control pressure values depend on the valve stroke. O-ring material for valve bodies with union ends O-ring material NBR FPM EPDM PTFE EPDM FPM EPDM FPM PSt Control pressure (bar) Diaphragm material Control pressure/Operating pressure diagram Other combinations on request. 6 5 4 C.f. 2 C.f. 3 3 With pneumatically operated valves there is an interdependence between control pressure and operating pressure regarding the valve stroke. With valves closed by spring pressure this means: The lower the operating pressure, the higher the control pressure must be to open the valve completely. With valves opened by spring pressure the opposite applies. 2 1 In principle care has to be taken that the stated maximum pressures are not exceeded and that the minimum pressures are adhered to. 0 0 Required control pressures can be seen from the adjacent diagram. 1 2 3 4 5 PB Operating pressure (bar) 21 / 36 610 6 7 Order data Body configuration Control function Code 2/2-way D Connection Code Threaded sockets DIN ISO 228 1 Solvent cement sockets DIN 2 Union ends with DIN insert (socket) 7 Code Normally closed (NC) 1 Normally open (NO) 2 Double acting (DA) 3 Actuator size Code Diaphragm size 10 Spigots for IR butt welding, BCF 28 Union ends with inch insert (socket) 33 1/N Integrated mounting plate Code With integrated mounting plate M Material code 20 Union ends with DIN insert (for IR butt welding) 78 Without mounting plate O Material code 20 Without mounting plate Valve body material Code PVC-U, grey 1 PP 5 PVDF 20 Diaphragm material Code NBR 2 FPM 4 EPDM PTFE/EPDM 14 PTFE laminated Order example 610 Type Nominal size Body configuration (code) Connection (code) Valve body material (code) Diaphragm material (code) Control function (code) Actuator size (code) Integrated mounting plate (code) 610 610 - Material code 1 and 5 52 15 D 7 1 14 1 1/N - 15 D 7 1 14 1 1/N - 22 / 36 8 Manufacturer’s information 8.1 G G G G Transport Only transport the diaphragm valve with suitable means, do not drop it and handle it carefully. Dispose of packing material according to relevant local or national disposal regulations / environmental protection laws. 8.2 G Delivery and performance Check the goods for completeness and damages immediately upon receipt. The scope of delivery is apparent from the dispatch documents and the design from the order number. The valve's delivery condition: Control function: 1 Normally closed (NC) 3 Double acting (DA) undefined G G 6 4 3 5 Storage Store the diaphragm valve dust protected and dry in its original packaging. Avoid UV rays and direct sunlight. Maximum storage temperature: 40°C. 8.4 G 10 Construction The performance of the diaphragm valve is checked at the factory. 8.3 G GEMÜ 610 is a plastic diaphragm valve with a 2/2-way body. It has a low maintenance piston actuator which can be controlled by inert gaseous media and an integrated optical position indicator. All medium wetted parts and the actuator housing are made of plastic. The valve body and the diaphragm are available in various designs as shown in the data sheet. Diverse accessories are available, such as stroke limiter, electrical position indicators, electro-pneumatic positioners and process controllers, pilot valves, mounting plates. closed open G Function description Condition: 2 Normally open (NO) G 9 Tools needed The tools required for installation and assembly are not included in the scope of delivery. Use appropriate, functional and safe tools. Construction 1 Valve body 2 Control medium connector 2 3 Actuator 4 Control medium connector 4 5 Diaphragm 6 Optical position indicator 23 / 36 610 11 Assembly and operation Prior to installation: G Ensure that valve body and diaphragm material are appropriate and compatible to handle the working medium. G Check the suitability prior to the installation. See chapter 6 "Technical data". 11.1 Assembling the diaphragm valve WARNING The equipment is subject to pressure! ® Risk of severe injury or death! G Only work on depressurized plant. WARNING Corrosive chemicals! ® Risk of caustic burns! G Wear appropriate protective gear when assembling. CAUTION Hot plant components! ® Risk of burns! G Only work on plant that has cooled down. CAUTION Never use the valve as a step or an aid for climbing! ® This entails the risk of slipping-off or damaging the valve. CAUTION Do not exceed the maximum permissible pressure! ® Take precautionary measures to avoid possible pressure surges (water hammer). G G Assembly work may only be performed by trained specialised staff. Use appropriate protective gear as specified in plant operator's guidelines. 610 Installation location: CAUTION G G G G Do not apply external force to the valve. Choose the installation location so that the valve cannot be used as a foothold. Lay the pipeline so that the valve body is protected against transverse and bending forces, and also vibrations and tension. Only mount the valve between matching aligned pipes. Direction of the working medium: optional. Mounting position of the diaphragm valve: optional. Assembly: 1. Ensure the suitability of the valve for each respective use. The valve must be appropriate for the piping system operating conditions (medium, medium concentration, temperature and pressure) and the prevailing ambient conditions. Check the technical data of the valve and the materials. 2. Shut off plant or plant component. 3. Secure against re-commissioning. 4. Depressurize the plant or plant component. 5. Completely drain the plant (or plant component) and let it cool down until the temperature is below the media vaporization temperature and scalding can be ruled out. 6. Correctly decontaminate, rinse and ventilate the plant or plant component. Assembly - Butt weld spigots: 1. Adhere to technical welding norms! 2. Disassemble the actuator with the diaphragm before welding the valve body into the pipeline (see chapter 12.1). 3. Allow butt weld spigots to cool down. 4. Reassemble the valve body and the actuator with diaphragm (see chapter 12.4). 24 / 36 Assembly - Union ends with insert: Assembly - Threaded connections: G Screw the threaded connections into the piping in accordance with valid standards. G Screw the diaphragm valve body into the piping, use appropriate thread sealant. The thread sealant is not included in the scope of delivery. CAUTION Damage to the valve actuator or valve body! ® Adhere to technical welding norms! CAUTION Assembly - Solvent cement sockets: Damage to the valve body! ® Only use solvent cement suitable for the valve body. + CAUTION Damage to the valve body! ® Only use solvent cement suitable for the valve body. The solvent cement is not included in the scope of delivery! 1. Screw the threaded connections into the piping in accordance with valid standards. 2 1 Observe appropriate regulations for connections! 2. Unscrew union nut 1 from valve body 2. 3. Reinsert O-ring 3 if necessary. 3 5 The solvent cement is not included in the scope of delivery! 1. Apply solvent cement inside the valve body socket connections and on the piping as specified by the solvent cement manufacturer. 2. Connect the valve body to the piping. 3 2 + After the assembly: + 1 4 G 4. Push the union nut 1 over the piping 4. Connect the insert 5 with the piping 4 by cementing / welding. 5. Screw the union nut 1 to the valve body 2 again. 6. Connect the other side of the valve body 2 to the piping 4, too. 25 / 36 Important: Diaphragms degrade in the course of time. After valve installation and commissioning you must retighten the nuts 20 (see chapter 20 "Sectional drawing and spare parts"). Reactivate all safety and protective devices. 610 11.2 Operation Optical position indicator Connector 4 Connector 2 Valve open Control function 1: connector 4 is closed with a blanking plug. Control function 2: connector 2 is closed with a blanking plug. Valve closed 11.3 Control functions The following control functions are available: Control function 1 Normally closed (NC): Valve resting position: closed by spring force. Activation of the actuator (connector 2) opens the valve. When the actuator is vented, the valve is closed by spring force. Control function 2 Normally open (NO): Valve resting position: opened by spring force. Activation of the actuator (connector 4) closes the valve. When the actuator is vented, the valve is opened by spring force. 2 4 1 (NC) + - 2 (NO) - + 3 (DA) + + + = available / - = not available (for connectors 2 / 4 see photo above) 11.4 Connecting the control medium + Control function 3 Double acting (DA): Valve resting position: no defined normal position. The valve is opened and closed by activating the respective control medium connectors (connector 2: open / connector 4: close). Connectors Control function Important: Assemble the control medium lines tension-free and without any bends or knots! Use appropriate connectors according to the application. Thread size of the control medium connector: G1/4 Control function Connector 1 Normally closed (NC) 2: Control medium (open) 2 Normally open (NO) 4: Control medium (close) 3 Double acting (DA) 2: Control medium (open) 4: Control medium (close) For connectors 2 / 4 see photo above 610 26 / 36 12 Assembly / disassembly of spare parts 12.3 Mounting the diaphragm 12.3.1 General notes + Important: Mount the correct diaphragm that suits the valve (suitable for medium, medium concentration, temperature and pressure). The diaphragm is a wearing part. Check the technical condition and function of the diaphragm valve before commissioning and during the whole term of use. Carry out checks regularly and determine the check intervals in accordance with the conditions of use and / or the regulatory codes and provisions applicable for this application. + Important: If the diaphragm is not screwed into the adapter far enough, the closing force is transmitted directly onto the threaded pin and not via the compressor. This will cause damage and early failure of the diaphragm and thus leakage of the valve. If the diaphragm is screwed in too far no perfect sealing at the valve seat will be achieved. The function of the valve is no longer ensured. + Important: Incorrectly mounted diaphragm may cause valve leakage / emission of medium. In this case remove the diaphragm, check the complete valve and diaphragm and reassemble again proceeding as described above. A 22 18 2 19 20 23 1 12.1 Valve disassembly (removing actuator from body) 1. Move actuator A to the open position. 2. Remove actuator A from valve body 1. 3. Move actuator A to the closed position. + Important: After disassembly, clean all parts of contamination (do not damage parts). Check parts for potential damage, replace if necessary (only use genuine parts from GEMÜ). 12.2 Removing the diaphragm + Important: Before removing the diaphragm, please remove the actuator, see "Valve disassembly (removing actuator from body)". 1. Unscrew the diaphragm. 2. Clean all parts of the remains of product and contamination. Do not scratch or damage parts during cleaning! 3. Check all parts for potential damage. 4. Replace damaged parts (only use genuine parts from GEMÜ). 27 / 36 610 The compressor is loose. Compressor and actuator flange seen from below: 7. When clear resistance is felt turn back the diaphragm until its bolt holes are in correct alignment with the bolt holes of the actuator. 12.4 Actuator mounting on the valve body G Place the compressor loosely on the valve spindle, fit the wings into the guides (arrows). 12.3.2 Mounting a concave diaphragm Recess of compressor Threaded pin 1. Move actuator A to the open position. 2. Position actuator A with the mounted diaphragm 2 on the valve body 1, aligning the diaphragm weir and valve body weir. 3. Insert and tighten the bolts 18, washers 19 and nuts 20 by hand (hand tight only). 4. Move actuator A to the closed position. 5. Fully tighten the nuts 20 diagonally. 6. Put on the caps 22 and 23 again. 7. Ensure that the diaphragm 2 is compressed evenly (approx. 10-15 %, visible by an even bulge to the outside). 8. Check tightness of completely assembled valve. + Diaphragm boss 1. Move actuator A to the closed position. 2. Place the compressor loosely on the valve spindle, fit the wings into the guides (see chapter 12.3.1 "General notes"). 3. Check if the compressor fits closely in the guides. 4. Screw new diaphragm tightly into the compressor manually. 5. Check if the diaphragm boss fits closely in the recess of the compressor. 6. If it is difficult to screw it in, check the thread, replace damaged parts (only use genuine parts from GEMÜ). 610 28 / 36 Important: Diaphragms degrade in the course of time. After valve installation and commissioning you must retighten the nuts 20 (see chapter 20 "Sectional drawing and spare parts"). 13 Commissioning 14 Inspection and servicing WARNING WARNING Corrosive chemicals! ® Risk of caustic burns! G Check the tightness of the media connections prior to commissioning! G Use only the appropriate protective gear when performing the tightness check. The equipment is subject to pressure! ® Risk of severe injury or death! G Only work on depressurized plant. CAUTION Hot plant components! ® Risk of burns! G Only work on plant that has cooled down. CAUTION CAUTION Protect against leakage! G Provide precautionary measures against exceeding the maximum permitted pressures caused by pressure surges (water hammer). G Prior to cleaning or commissioning the plant: G Check the tightness and the function of the diaphragm valve (close and reopen the diaphragm valve). G If the plant is new and after repairs rinse the piping system with a fully opened diaphragm valve (to remove any harmful foreign matter). Cleaning: The plant operator is responsible for selecting the cleaning material and performing the procedure. + Important: Diaphragms degrade in the course of time. After valve installation and commissioning you must retighten the nuts 20 (see chapter 20 "Sectional drawing and spare parts"). G G Servicing and maintenance work may only be performed by trained specialised staff. GEMÜ shall assume no liability whatsoever for damages caused by improper handling or third-party actions. In case of doubt, contact GEMÜ before commissioning. 1. Use appropriate protective gear as specified in plant operator's guidelines. 2. Shut off plant or plant component. 3. Secure against re-commissioning. 4. Depressurize the plant or plant component. The operator must carry out regular visual examination of the valves dependent on the operating conditions and the potential danger in order to prevent leakage and damage. The valve also has to be disassembled in the corresponding intervals and checked for wear (see chapter 12 "Assembly / Disassembly of spare parts"). 29 / 36 610 15 Disassembly Disassembly is performed observing the same precautionary measures as for assembly. G Disassemble the diaphragm valve (see chapter 12.1 "Valve disassembly (removing actuator from body)"). 18 Manufacturer's declaration / information + Manufacturer's declaration: According to the EC Machinery Directive 2006/42/EC, this diaphragm valve is not regarded as a machine, however it can be installed into an installation that is viewed as a machine. In this case, the following note must be observed. + For assembly in an installation viewed as a machine: The commissioning is prohibited until it has been determined that the machine (plant) in which this valve is to be installed meets the regulations of the EC Machinery Directive 2006/42/EC. + Note on Directive 94/9/EC (ATEX Directive): A supplement to Directive 94/9/EC is included with the product if it was ordered according to ATEX. + Note on staff training: Please contact us at the address on the last page for staff training information. 16 Disposal G G All valve parts must be disposed of according to relevant local or national disposal regulations / environmental protection laws. Pay attention to adhered residual material and gas diffusion from penetrated media. 17 Returns G G Clean the diaphragm valve. Returns must be made with a completed declaration of return (included). If not completed, GEMÜ cannot process credits or repair work but will dispose of the goods at the operator's expense. + Note for returns: Legal regulations for the protection of the environment and personnel require that you include the completed and signed goods return declaration (attached) with the dispatch documents. Your returned goods can be processed only when this declaration is completed. 610 Should there be any doubts or misunderstandings in the preceding text, the German version of this document is the authoritative document! 30 / 36 19 Troubleshooting / Fault clearance Fault Possible cause Fault clearance Control medium escapes from connector 4* (for control function 1 (NC)) or from connector 2* (for control function 2 (NO)) Control piston faulty Replace actuator Control medium escapes from leak detection hole* Spindle seal leaking Replace actuator and check control medium for impurities Working medium escapes from Valve diaphragm faulty leak detection hole* Valve doesn't open or doesn't open fully Valve leaks downstream (doesn't close or doesn't close fully) Valve leaks between actuator and valve body Valve body connection to piping leaks Valve body leaks Check valve diaphragm for damage, replace diaphragm if necessary Control pressure too low (for control function 1, normally closed (NC)) Operate valve with control pressure specified in data sheet Pilot valve faulty Check and replace pilot valve Control medium not connected Connect control medium Valve diaphragm incorrectly mounted Remove actuator, check diaphragm mounting, replace if necessary Actuator spring faulty (for control function 2, normally open (NO)) Replace actuator Operating pressure too high Operate valve with operating pressure specified in data sheet Control pressure too low (for control function 2, normally open (NO) and control function 3, double acting (DA)) Operate valve with control pressure specified in data sheet Foreign matter between valve diaphragm and valve body weir Remove actuator, remove foreign matter, check valve diaphragm and valve body weir for damage and replace if necessary Valve body weir leaking or damaged Check valve body weir for damage, if necessary replace valve body Valve diaphragm faulty Check valve diaphragm for damage, replace diaphragm if necessary Actuator spring faulty (for control function 1, normally closed (NC)) Replace actuator Valve diaphragm incorrectly mounted Remove actuator, check diaphragm mounting, replace if necessary Bolting between valve body and actuator Retighten bolting between valve body loose and actuator Valve diaphragm faulty Check valve diaphragm for damage, replace diaphragm if necessary Valve body damaged Replace valve body Incorrect installation Check installation of valve body in piping Bolting loose Tighten bolting Sealing material faulty Replace sealing material Valve body faulty Check valve body for damage, replace valve body if necessary * see chapter 20 "Sectional drawing and spare parts" 31 / 36 610 20 Sectional drawing and spare parts Connector 4 A 22 Connector 2 18 2 Leak detection hole 5 4 19 3 20 23 1 610 Item Name 1 Valve body 3 O-ring 4 Insert 5 Union nut 2 Diaphragm 18 Bolt 19 Washer 22 Cap 23 Cap 20 Nut A Actuator Order description } K610... } 600 10M... 610...S30... 9610 10... 32 / 36 Notes 33 / 36 610 Rücksendeerklärung (Kopiervorlage) Gesetzliche Bestimmungen, der Schutz der Umwelt und des Personals erfordern es, diese Erklärung vollständig ausgefüllt und unterschrieben den Versandpapieren beizulegen. Wenn diese Erklärung nicht vollständig ausgefüllt ist oder den Versandpapieren nicht beigelegt ist wird Ihre Rücksendung nicht bearbeitet! Wurde das Ventil / Gerät mit giftigen, ätzenden, brennbaren, aggressiven oder wassergefährdenden Medien betrieben, alle mediumsberührten Teile sorgfältig entleeren, dekontaminieren und spülen. Geeigneten sicheren Transportbehälter wählen, diesen beschriften mit welchem Medium das Ventil / Gerät in Kontakt war. Personen- und Sachschäden durch Medienrückstände werden so vermieden. Angaben zur Firma: Angaben zum Ventil / Gerät Firma . . . . . . . . . . . . . . . . . . . . . . . . . . . . . . . . . . . . Typ: . . . . . . . . . . . . . . . . . . . . . . . . . . . . . . . . . . . . . . Adresse . . . . . . . . . . . . . . . . . . . . . . . . . . . . . . . . . . Baujahr: . . . . . . . . . . . . . . . . . . . . . . . . . . . . . . . . . . ......................................... Seriennummer: . . . . . . . . . . . . . . . . . . . . . . . . . . . . Ansprechpartner . . . . . . . . . . . . . . . . . . . . . . . . . . . Umgebungstemperatur: . . . . . . . . . . . . . . . . . . . . . Telefonnummer . . . . . . . . . . . . . . . . . . . . . . . . . . . . Medien: . . . . . . . . . . . . . . . . . . . . . . . . . . . . . . . . . . Faxnummer . . . . . . . . . . . . . . . . . . . . . . . . . . . . . . . ......................................... E-Mail . . . . . . . . . . . . . . . . . . . . . . . . . . . . . . . . . . . . ......................................... Grund der Rücksendung: Konzentration: . . . . . . . . . . . . . . . . . . . . . . . . . . . . . ......................................... ......................................... ......................................... ......................................... ......................................... Betriebstemperatur: . . . . . . . . . . . . . . . . . . . . . . . . ......................................... Betriebsdruck: . . . . . . . . . . . . . . . . . . . . . . . . . . . . . ......................................... Viskosität: . . . . . . . . . . . . . . . . . . . . . . . . . . . . . . . . . ......................................... Feststoffanteil: . . . . . . . . . . . . . . . . . . . . . . . . . . . . . Kreuzen Sie bitte zutreffende Warnhinweise an: radioaktiv explosiv ätzend giftig gesundheitsschädlich biogefährlich brandfördernd unbedenklich Hiermit bestätigen wir, dass die zurückgesandten Teile gereinigt wurden und dass entsprechend den Gefahren-Schutzvorschriften keinerlei Gefahr von Medienrückständen für Personen und Umwelt ausgeht. Ort, Datum . . . . . . . . . . . . . . . . . . . . . . . . . . . . . . . . 610 Stempel / Unterschrift . . . . . . . . . . . . . . . . . . . . . . . 34 / 36 Goods return declaration (copy specimen) Legal regulations for the protection of the environment and personnel require that you include the completed and signed goods return declaration with your dispatch documents. If this declaration is not completed or not included with the dispatch documents, your return will not be processed! If the valve / device was operated with poisonous, corrosive, flammable, aggressive or waterendangering media, all medium wetted parts must be emptied carefully, decontaminated and rinsed. Select an appropriate transport container, label it with the name of media which the valve / device has been in contact. This serves to avoid personal injury or damage to property from the media remains. Company details: Valve / device information: Company: . . . . . . . . . . . . . . . . . . . . . . . . . . . . . . . . . Type: . . . . . . . . . . . . . . . . . . . . . . . . . . . . . . . . . . . . . Address: . . . . . . . . . . . . . . . . . . . . . . . . . . . . . . . . . . Year of manufacture: . . . . . . . . . . . . . . . . . . . . . . . . ......................................... Serial number: . . . . . . . . . . . . . . . . . . . . . . . . . . . . . . Contact person: . . . . . . . . . . . . . . . . . . . . . . . . . . . . Ambient temperature: . . . . . . . . . . . . . . . . . . . . . . . . Telephone number: . . . . . . . . . . . . . . . . . . . . . . . . . Media: . . . . . . . . . . . . . . . . . . . . . . . . . . . . . . . . . . . . Fax number: . . . . . . . . . . . . . . . . . . . . . . . . . . . . . . . .......................................... E-Mail: . . . . . . . . . . . . . . . . . . . . . . . . . . . . . . . . . . . .......................................... Reason for return: Concentration: . . . . . . . . . . . . . . . . . . . . . . . . . . . . . . ......................................... .......................................... ......................................... .......................................... ......................................... Operating temperature: . . . . . . . . . . . . . . . . . . . . . . ......................................... Operating pressure: . . . . . . . . . . . . . . . . . . . . . . . . . ......................................... Viscosity: . . . . . . . . . . . . . . . . . . . . . . . . . . . . . . . . . . ......................................... Solids content: . . . . . . . . . . . . . . . . . . . . . . . . . . . . . . Please tick the relevant warning labels: radioactive explosive corrosive poisonous harmful to health biohazardous oxidising harmless We herewith declare that the returned parts were cleaned and that complying with Danger Protection Regulations there is no danger from the remains of media for persons or for the environment. Location, Date . . . . . . . . . . . . . . . . . . . . . . . . . . . . . Stamp / signature . . . . . . . . . . . . . . . . . . . . . . . . . . 35 / 36 610 GEMÜ Gebr. Müller Apparatebau GmbH & Co. KG · Fritz-Müller-Str. 6-8 · D-74653 Ingelfingen-Criesbach Telefon +49(0)7940/123-0 · Telefax +49(0)7940/123-192 · [email protected] · www.gemue.de Änderungen vorbehalten · Subject to alteration · 04/2009 · 88327032 VENTIL-, MESS- UND REGELSYSTEME VALVES, MEASUREMENT AND CONTROL SYSTEMS