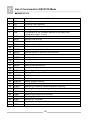
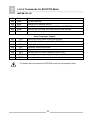
1
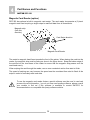
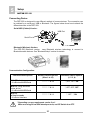
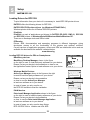
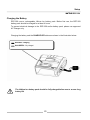
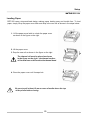
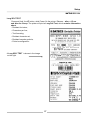
DATECS
USER'S
MANUAL
ESC/POS
Thermal Printer
DPP-350
We wish you a pleasant work
with DPP-350!
The information contained in this document is subject to change without prior notice.
All rights reserved. Any mechanical, electrical or electronic reproduction
or adaptation of the information in this document
without prior written permission from DATECS Ltd. is prohibited
1784 Sofia, Bulgaria, 115A Tzarigradsko shosse blvd.
Tel.: +359 2/8165 500, 8165 501, 8165 506, 8165 511; Fax: +359 2/8165 510
Е-mail: [email protected]
Version: october 2009 г. / firmware version 1.59
CONTENTS
DATECS DPP-350
Introduction
Main features ........................................................................................................................ 4
1. Technical Specifications .................................................................................................. 5
2. Safety Instructions .............................................................................................................. 7
3. Confirmation of Carton Contents.....................................................................9
4. Part Names and Functions
Front / Right View............................................................................................................... 10
Front / Left View ................................................................................................................. 11
ON/OFF button and LF button Functions........................................................................ 12
LEDS .................................................................................................................................... 13
Magnetic Card Reader ....................................................................................................... 14
Smart Card Reader............................................................................................................. 15
5. Setup
DIP Switch Settings ........................................................................................................... 16
Printer Configuration ......................................................................................................... 17
Memory Switches Setup.................................................................................................... 18
Saving and Clearing PAIRING Info................................................................................... 19
Connecting Device ............................................................................................................. 20
Bluetooth Setup.................................................................................................................. 21
Loading Drivers for DPP-350 ............................................................................................ 22
Charging the Battery.......................................................................................................... 23
Replacing the Battery ........................................................................................................ 24
Loading Paper .................................................................................................................... 25
SELF TEST Printing ........................................................................................................... 26
6. Troubleshooting................................................................................................................. 28
7. List of Commands for ESC/POS mode ..................................................................... 29
3
INTRODUCTION
DATECS DPP-350
Main Features DATECS DPP-350 is a mobile ESC/POS thermal printer with 3-inch wide printing
mechanism. It can be used in dynamic working conditions and its abundant built-in
features allow it to be widely used for different applications. Printer can quickly and
easily print text and/or graphics, depending on customer’s needs – barcodes, logo, etc.
Features:
– Small and lightweight, for real mobility;
– High speed and low noise, owing to line thermal print;
– Easy paper-loading;
– Can be used with 2 types of thermal paper – 78 mm or 58 mm wide;
– Long lasting battery – max 30000 lines per charge;
– Serial RS232 and USB interfaces;
– Supports protocol for POS and BARCODE;
– Capable of printing alpha-numeric and graphical data;
– Drivers for Pocket PC, Palm OS, Windows and Blackberry.
Configuration Options:
– Bluetooth interface;
– Magnetic Stripe Reader (3 track);
– Smart Card Reader;
– MIFARE card Reader;
– SD card slot reader;
– Built-in metal belt hook and neck lanyard.
DATECS DPP-350 corresponds to the European safety directives:
EN 55022:2006 – class B, EN 61000-3-2:2006, EN 61000-3-3:2000+A1:2003+A2:2006,
EN 55024:2001+A1:2002+A2:2003, EN 55022:2001+A1:2002+A2:2003.
No deviations from standard norms.
DATECS DPP-350 has passed a functional test In Datecs Development Department. It
was tested in ESC/POS operation mode in configuration with the Intel Pentium 4
computer, CPU 2.86 GHz, 480 MB RAM, using a Datecs Development Department
program. The number of tested devices is one – factory number S / N AAA000001BB07,
1.12 firmware version (by Datecs Development Department).
4
1
Technical Specifications
DATECS DPP-350
Parameter
Printing
Fonts
Description
Printing Method
Line thermal dot printing
Printer mechanism
FTP-638MCL 103
Resolution
203 dpi (8 x 8 dots/mm)
Dot pitch
Horizontal – 0.125 mm (8 dot/mm)
Vertical – 0.125 mm (8 dot/mm)
Max. Print Width
72 mm / 576 dots per line
Paper Feed System
Step
Printing Speed
60 mm/s
Print lines per charge
30 000
Resident Fonts
Font А: 12 х 24 dots (48 char. per line);
Font B: 9 х 16 dots (64 char. per line);
Loadable
Font C: 12 х 24 dots (48 char. per line);
Font D: 9 х 16 dots (64 char. per line);
Japanese vers. only
Font E (JIS and Shift-JIS): 24 х 24 dots
(28 char. per line);
Font F (GB2312): 24 х 24 dots
(28 char. per line);
Chinese vers. only
Media:
Roll Thermal Paper
Recommended
Paper
78 mm x 50 mm diameter
57 mm x 50 mm diameter (option)
Resident
Barcodes
1D
EAN 13
EAN 8
UPC A
UPC E
Codabar
Code 39
Code 128
2D
PDF417, QR Code
Logo Registration
1 Black and White
Size: 576 x 248 dots
Interfaces
Serial
USB
Bluetooth
RS232 C – max. 115200 bps
USB v 1.1, compatible with 2.0
Option
5
1
Technical Specifications
DATECS DPP-350
Parameter
Description
Emulation
ESC/POS
Continuous paper Mode
Label/Black Mark Mode
Readers
"Smart Card" Reader
Option
Magnetic Card Reader
3-track head, ISO 7811 (Option)
MIFARE Card Reader
ISO 1443-A (Option)
SD Card Reader
Option
Input Buffer
36 864 bytes (option 131 072 bytes)
Battery
Rechargeable
Li-ion battery
7,4 V / 2000 mAh
Adapter
Model:
Input:
Output:
10AD-E
AC 100 – 240 V, 1,3 A, 50/60 Hz
DC 9 V, 1 A
Operation
switches
Button LF
Paper feed, Self test, Dump Mode
Button ON/OFF
Switch On/Switch OFF
Power Switch
Weight
ON/OFF
Without paper:
400 g
With paper:
460 g
Dimensions (mm)
Environment
109 (W) X 120 (D) Х 63 (H)
Temperature from 0оС to 40оС
Humidity from 35% RH to 85% RH
Operating temperature
conditions:
Temperature from -20оС to 60оС
Humidity from 10% RH tо 90% RH
Storage temperature
conditions:
Reliability
Printing Head:
50 km paper long
(printing rate 25% max)
"Drop" тест:
upto 110 cm
"Waterproof"
Cables
RS-232 interface cable;
mini USB cable А to B cable
(option)
6
2
Safety Instructions
DATECS DPP-350
SAFETY INSTRUCTIONS
which must be strictly observed!
Warning
Indicates a situation, which if was not observed and
handled properly, could result in serious injury.
Caution
Indicates a situation, which if was not observed and
handled properly, could result in injury.
Caution
● Prior to operation, read carefully DPP-350 safety instructions and save them for later
reference.
● Do not drop or put foreign matter such as clips and pins into the printer. This may cause
problems.
● Do not spill drinks such as tea, coffee and juice on the printer or spray insecticide on
the printer. If drink or water is spilled, first be sure to turn the power off and then
consult our service personnel.
● Be careful when moving or carrying the printer. Dropping the printer may cause injury or
property damage.
● When cleaning the surface of the printer case, do not use the cloth that is soaked in
thinner, trichloroethylene, benzine, ketone or similar chemicals.
● Operate the control panel properly. A careless, rough handling may cause problems or
malfunction. Do not use such sharp-edged tool as a ballpoint pen for operation.
● When printer trouble occurs, do not try to dissemble it. Instead, consult our service
personnel.
● Do not disassemble or modify the printer.
Discard or safely store the plastic packing bag.
This bag should be kept away from children.
If the bag is pulled over a child’s head, it may cause suffocation.
7
2
Safety Instructions
DATECS DPP-350
DATECS
NOTICE
● Before use, be sure to read this manual. And keep it handy for reference when
needed.
● DATECS reserves the right to change the content of this manual without prior notice.
● Reproduction, transfer, or transmission of the contents of this manual without prior
consent is strictly prohibited.
● DATECS is not liable for any problems resulting from the use of optional products
consumable supplies other than the designated products contained herein.
and
● Do not handle, disassemble or repair the parts other than those specified in this manual.
● DATECS is not liable for any damage caused by user's erroneous use of the printer and
inadequate environment.
● Data residing in the printer is temporary. Therefore, all data will be lost if power is lost.
DATECS is not liable for any damage or loss of profits caused by data loss due to failures,
repairs, inspections, etc.
● Please contact us if there are any mistakes or ambiguities within this manual.
We would be grateful!
8
3
Confirmation of Carton Contents
DATECS DPP-350
When unpacking the printer, check carefully that the following accessories are included in the
carton:
Item
Part Name
1
DPP-350 Thermal printer
2
AC Charger
3
1 Roll of thermal paper
4
User's Manual
5
DPP-350 Drivers
6
RS232 Interface cable
7
Partition (2 pcs.) for 58/60 mm x ∅ 50 mm paper rolls.
Note: Because of the continually evolving Drivers & SDK to support new mobile devices,
Drivers & SDK are distributed online an dis available for download at our website
indicated below:
http://datecs.bg/support.php?cat=4&soft=1#1
9
4
Part Names and Functions
DATECS DPP-350
DPP-350 right view
Power ON/OFF Switch.
Paper Feed (LF).
STATUS LED – it indicates the printer status.
CHARGING LED – it indicates the battery status.
Charger Input
USB port
10
Части на принтера и техните функции
DATECS DPP-350
DPP-350 left view
Serial RS232
Magnetic Card, Smart Card and contactless RFID Card Readers LED
Smart Card Reader (Option)
Magnetic Card Reader (Option)
Contactless RFID Card Reader (Option)
Paper Cover Lever
Paper Cover
11
4
Part Names and Functions
DATECS DPP-350
ON/OFF button and LF button Functions
Button
Functions
ON/OFF
1. Switch ON / Switch OFF the printer.
2. Holding ON/OFF button while power on for ~ 4 сек. (first sound signal)
– If serial cable is connected (RS232 communication) – temporary
forcing 9600 bps serial speed.
– If no serial cable connected (Bluetooth or USB communication) –
starting a hardware menu for fast Bluetooth pairing info reset.
3. Holding ON/OFF button while power on for more than 6 сек. – enters
hardware setup mode.
1. Pressing LF button – feeding the media while the button is pressed, after
releasing the button the feeding stops.
2. Push and Hold
while Power ON –
Release after the
number of beeps:
LF
After ~ 0.5 sec
and after the 1-beep
SHORT
SELF TEST
print
After ~ 2.5 sec
and after the 2-beep
Hex DUMP mode
After ~ 4.5 sec
and after the 3-beep
LONG
SELF TEST
print
After ~ 6.5 sec
and after the 4-beep
Program mode –
loading
the optional
card reader
firmware
After ~ 8.5 sec
and after the 5-beep
4-tone beep
Program mode –
loading
the firmware
3. Pressing LF button in hardware setup mode confirms the changes.
4. LF switch operation in black mark mode:
Short pressing: feeds one line.
Continuous pressing (>1 sec): Feeds the paper to find next black marker
(the same as sending FF command).
12
Part Names and Functions
DATECS DPP-350
LEDS
LED
Function
1. It lights green – the printer power is on.
2. It lights red – end of the paper or paper out. After the loading a new
paper roll it lights green.
STATUS
3. It blinks green/red – the printer thermal head is overheat. The printer
stops printing. When the printer head temperature returns to normal the
STATUS LED lights green and the printer continues to print.
4. It blinks green – low battery.
5. When switching ON the printer, while the LF button is pressed, red and
green lights are rotated after every beep (up to the fifth).
6. In the long pressing the button it blinks green/red after a beep.
After releasing the ON/OFF button it lights green.
CHARGE
1. It lights green when the adapter is swiched ON and the battery is fully
charged.
2. It lights red when the adapter is swiched ON and the battery is
charging.
Magnetic
Card,
Smart Card
and
contactless
RFID Card
Raders LED
1. It blinks green when a magnetic card, Smart Card or MIFARE card is
reading.
13
4
Part Names and Functions
DATECS DPP-350
Magnetic Card Reader (option)
DPP-350 has optional a built-in magnetic card reader. The card reader incorporates a (3)-track
magnetic read head requiring a single swipe to read field data from all three tracks.
Magnetic strip
(face this
direction)
Card Swipe direction
Magnetic Card Reader
The reader’s magnetic head faces towards the front of the printer. When placing the card into the
reader, the magnetic strip must be facing as show in the figure above. Keep the bottom edge of
the card flat on the inner base of the reader to ensure that the magnetic strip passes over the
read head evenly.
When swiping the card through the reader, use an even consistent motion from start to finish.
The speed of swiping can vary however the speed must be consistent from start to finish of the
swipe in order to accurately read card data.
To use the magnetic card reader feature, special software must be used to read and
process the card information. I you do not have card reading software, please consult
your resaller to find out if this software is available or contact DATECS for
recommendations on compatible third party software solution.
14
Part Names and Functions
DATECS DPP-350
Smart Card Reader (option)
The DPP-350 has a built-in smart card reader (optional). The smart card reader is designed to
read information stored embedded on smart chips and process the information using device side
software.
Smart Chip (Face this direction)
Card Insert direction
Reader Active LED
When placing the card into the reader, the smart chip must be facing to the front of the printer as
show in the figure above. Insert the card in to the reader until the card stops.
To use the smart card reader feature, special software must be used to read and
process the card information. I you do not have card reading software, please consult
your resaller to find out if this software is available or contact DATECS for
recommendations on compatible third party software solution.
MIFARE Card Reader (option))
The DPP-350 has a built-in MIFAREreader (optional). The MIFAREreader is designed
to read information stored embedded on MIFARE contactless cards or tags and process
the information using device side software.
MIFARE card
To use the smart card reader feature, special software must be used to read and
process the card information. I you do not have card reading software, please consult
your resaller to find out if this software is available or contact DATECS for
recommendations on compatible third party software solutio.
15
5
Setup
DATECS DPP-350
DIP Switch Settings
Switch
OFF
ON
Sw1
Wide paper (78 mm)
Thinner paper (58 mm)
Sw2
Continuous paper mode
Label/Black mark mode*
Sw3
Hardware protocol
Xon/Xoff protocol
Sw4
Normal operation mode
Protocol mode
The printer has two operation modes. They are determined by the state of switch Sw2:
OFF
Continuous paper mode
ON
Black Mark searching mode
* The black mark searching mode
is designed for accurate positioning
starting print position on paper
with printed information on it.
DIP Switches Location
The DIP switch location is shown in the illustration below:
16
Setup
DATECS DPP-350
Printer Configuration
DPP-350 uses nonvoltatile memory for storing some of the printer default configuration. The
following table shows the available options:
Memory Switches (see GS command)
1000000010
BAUD RATE
115200 bps
POWER OFF TIME
10 min
PRINT DENSITY
100%
CHARACTER TABLE
WESTERN (1252)
PAIRING INFO
[SAVE=NO]
To change the settings:
1. Switch OFF the printer.
2. Press and hold the ON/OFF button. The STATUS LED flashes GREEN and after about
6 sec holding the ON/OFF button STATUS LED flashes RED and then turns RED.
3. Release the ON/OFF buton and wait for the printer to print out the current memory
settings and instruction.
The pressing LF (YES) – confirms changes.
The pressing ON/OFF (No) – cancels changes.
To exit the hardware menu –
hold the ON/OFF button
for more than 1 sec.
Care must be taken when
changing factory preset
configuration information.
17
5
Setup
DATECS DPP-350
Memory Switches Setup
DPP-350 has 10 memory switches, which have the following action:
Flag
1
2
3
4
5
6
7
8
9
10
OFF
ON
Power ON/OFF sound disabled
CR (ASCII code 13) is not executed
LF (ASCII code 10) is executed
LF immediately after CR
as selected by flag 3
Default is Font A (12x24)
“Cover open” sensor monitored
Disable IrDa module
Bluetooth in DISCOVERABLE mode
USB interface disabled
USB in mode HOST
Power ON/OFF sound enabled
CR is executed LF (ASCII code 10)
LF (ASCII code 10) is not executed
LF immediately after CR
is not executed
Default is Font B (9x16)
“Cover open” sensor disabled
Enable IrDa module
Bluetooth in NONDISCOVERABLE mode
USB interface enabled
USB in mode DEVICE
To change the settings:
1. Switch OFF the printer.
2. Press and hold the ON/OFF button.
The STATUS LED flashes GREEN
and after about 6 sec holding the ON/OFF button
STATUS LED flashes RED and then turns RED.
3. Release the ON/OFF buton and wait
for the printer to print out the current memory
settings and instruction.
4. Follow the printer instruction
to make the necesary changes.
The pressing LF (YES) – confirms changes.
The pressing ON/OFF (No) – cancels changes.
Care must be taken when
changing factory preset
configuration information.
18
Setup
DATECS DPP-350
Saving and Clearing PAIRING Info
When saving PAIRING Information, the printer Bluetooth information of the last device
connected paired) to the printer. Saving PAIRING info prevents the printer from asking for
passkey upon initialization. The process for using this option is described below:
To speed this programming process, you may bypass the memory switch settings by indicating
"NO" via pressing of the ON/OFF button when the printer prints "CHANGE MEMORY
SWITCHES" as shown on page 18. This will advance you to the next level of setting where
pairing can be found. The default PAIRING info option is [SAVE=No].
To save PAIRING Info:
1. Change the PAIRING Info option to [SAVE=YES].
2. Confirm SAVE SETTINGS pressing LF.
3. Turn the printer ON and it will PAIR with the first Bluetooth device.
4. The printer will now remember the PAIRING information and not prompt user for a
passkey on every printer initialization.
To clear PAIRING Info:
1. Change the PAIRING Info option to [SAVE= No].
2. Turn ON the printer and PAIR the new Bluetooth device to the printer.
3. The printer will prompt user for a passkey on every printer initialization.
19
5
Setup
DATECS DPP-350
Connecting Device
The DPP-350 is designed to use different method of communicaions. The connection can
be realized by a serial port, USB or Bluetooth. The figures below show how to attach the
different devices to the DPP-350:
Serial/USB (Cabled) Version:
USB Port
Serial Port
Bluetooth (Wireless) Version:
The DPP-350 Bluetooth version uses Bluetooth wireless technology to connect to
Bluetooth enable devices. See "BluetoothSetup" section for details.
Communication Configuration:
Memory Switch Options
(from 1 tо 10)
Hardware Switch Options
(1, 2 3, 4)
With PDA device
• Via Bluetooth/USB/Serial
*******010
*, OFF, OFF, ON
With PC (using Windows
printer driver)
• Via Bluetooth/USB/Serial
*******011
*, OFF, OFF, OFF
With PC
in Service mode
• Via Serial Interface
*******011
*, OFF, *, ON
Communication options
* Depending on user requirments can be 0 or 1.
When not using Driver/SDK developer tools, set DIP Switch 4 to OFF.
20
Setup
DATECS DPP-350
Bluetooth Setup
Bluetooth setup enables the printer DPP-350 included Bluetooth option to communicate
with other Bluetooth devices. For this purpose, use the corresponding to your device
Bluetooth manager.
The following is a brief explanation on how to [PAIR] your Bluetooth DPP-350 to PDA and
Smartphon.
BlackBerry Devices:
Add Device or Pairing Bluetooth peripherals to BlackBerry
devices require the use of the device Bluetooth manager.
The image on the right shows a typical
BlackBerry Bluetooth manager.
WindowsMobile Devices:
Creating a New Partnership or Pairing Bluetooth
peripherals to your WindowsMobile device require
the use of the device Bluetooth manager.
The image on the right shows a typical
WindowsMobile Bluetooth manager.
Palm Devices:
Add Device or Pairing Bluetooth peripherals to your Palm
devices require the use of the device Bluetooth manager.
The image on the right shows a typical
Palm Bluetooth manager.
When adding / pairing the DPP-350 as a Bluetooth device, use the [0000] pairing
key when prompted.
21
5
Setup
DATECS DPP-350
Loading Drivers for DPP-350:
To print information from your device it is necessary to install DPP-350 printer drivers.
DATECS offers the following drivers for DPP-350:
DATECS ESC/POS printer drivers (on Windows NT/2k/XP/2k3+)
Windows printer drivers for all Datecs ESC/POS printers.
PrintSuite
PrintSuit is a pack of applications and drivers for DATECS PP-50/55, CMP-10, DPP-250
and DPP-350 printers on Windows/PalmOS/Windows Mobile/Windows CE.
There are no developer tools and SDKs inside!
PPDevelop
Drivers, SDK, documentation and exemplary programs in different languages, giving
developers access to all the functionality of the printers and optional modules.
Current versions of application programs, drivers and SDK are distributed online and are
available for download at the website, indicated below:
www.datecs.bg
Loading DPP-350 drivers for PDA or Smartphones:
BlackBerry devices:
BlackBerry Decktop Manager, shown in the figure
on the right is used to load third party softawere on your device.
Please, review your device's documentation on how to use
the Application Loader Option to load software on to your device.
Windows Mobile Devices:
Active Sync Manager shown in the figure on the right
is used to load third party softawere on your device.
Please, review your device's documentation
on how to use the Active Sync Manager
to load new software on to your device.
In most of cases you only need to run
the DPP-350 installer to start the instalation.
PALM devices
Palm Install Manager Application shown in the figure
on the right is used to load third party softawere on your device.
Please, review your device's documentation
on how to use the Palm Install Manager Application
to load new software on to your device.
In most of cases you only need to drag & drop
DPP-350 PRC files in installer and click ADD.
22
Setup
DATECS DPP-350
Charging the Battery
DPP-350 uses a rechargeable Lithium Ion battery pack. Before first use, the DPP-350
battery pack should be charged for at least 4 hours.
To prevent electrical damage to the DPP-350 and/or battery pack, please use approved
AC Charger only.
Charging the battery and the CHARGE LED status are shown in the illustration below:
Solid RED – charging
Solid GREEN – fully charged
The Lithium Ion battery pack should be fully charged before use to ensure long
battery life.
23
5
Setup
DATECS DPP-350
Replacing Battery
To replace the battery in the DPP-350 thermal printer follow the steps below:
1. Turn over the DPP-350 and place on a flat surface.
Rotate the (2) locking levers as shown in the figure on the right.
2. Lift the battery cover as shown in the figure on the right.
3. Lift the battery as shown in the figure on the right.
4. Detach the battery as shown in the figure on the right.
Reverse Steps 1-4 to install the new battery pack.
24
Setup
DATECS DPP-350
Loading Paper
DPP-350 uses a drop-and-load design making paper loading easy and trouble free. To load
paper, simply lift up the paper cover latch and drop in the new roll as shown in the steps below.
1. Lift the paper cover latch to unlock the paper cover
as shown in the figure on the right.
2. Lift the paper cover.
3. Drop the new roll as shown in the figure on the right
The thermal roll must be placed as shown
in the figure on the right – the thermal surface
of the media must be faced to the thermal head.
4. Close the paper cover until it snaps lock.
Be sure to pull at least 12 mm or more of media above the top
of the printer before closing.
25
5
Setup
DATECS DPP-350
SELF TEST printing
Short SELF TEST
Press and Hold the LF button, while Power On the printer. Release – after ~ 0.5 sec
and after the 1-beep. The printer will print a Short Self Test, which contains information
about:
– Printer's model; Firmware version;
– Serial number;
– Interface;
– Baud rate;
– Flow control;
– USB mode;
– Black Mark mode;
– Protocol mode;
– Rеader module;
– Intensity;
– Auto Off Time;
– Temperature;
– Date and Time;
– Battery;
– Switches.
The Short SELF TEST looks as shown below:
26
Setup
DATECS DPP-350
Long SELF TEST
Press and Hold the LF button, while Power On the printer. Release – after ~ 4.5 sec
and after the 3-beep. The printer will print a Long Self Test, which contains information
about:
– Rezident font sizes;
– Characters per line;
– Text formating;
– Rezident character set;
– Rezident barcode symbols;
– Printer's configuration
A Long SELF TEST is shown in the image
on the right:
27
6
Troubleshooting
DATECS DPP-350
Troubleshooting
If you're having printing problem refer to the table below for possible causes:
№
1.
Problem
Possible Causes
Paper feeds after
Thermal media is specially coated on outside of roll. Remove
issuing a print job, but paper roll and reload properly.
no printed text vizible See section "Loading Paper" for details on loading paper.
on paper.
Paper cover not installed properly. See section "Loading Paper"
for details on replacing paper cover.
2.
STATUS LED blinks
RED continuously.
Printer out of paper or Paper not properly loaded.
See section "Loading Paper" for details on loading paper.
Battery voltage low.
See section on charging battery pack.
3.
Text and/or graphics
are printed very light. Thermal media not imaging correctly.
Verify that you are using the recommended
thermal media.
4.
Strange characters
are printed when
printing.
5.
STATUS LED
flashes green
6.
STATUS LED flashes The printer thermal head is overheat. When the printer head
green/red
temperature returns to normal the STATUS LED lights green
and printer stops
and the printer continues to print.
printing.
7.
Printer stops
responding to print
and paper feed
commands.
8.
Printing is light
or missing only
on half of the print
width.
Battery voltage low.
See section on charging battery pack.
Battery voltage low.
Remove battery for 5
and reconnect battery.
seconds
Paper cover not properly installed. See section on loading
paper.
Mechanism jarred loose. Contact technical support.
28
7
№
List of Commands for ESC/POS Mode
DATECS DPP-350
Command
Description
1
BEL
Sounds the buzzer
2
HT
Horizontal Tab Command
3
LF
Printing а line and Paper Feeding command
4
FF
Printing and paper feeding to the black mark position
5
CR
6
7
DC2 =
DC3 (
The operation of the command depends on the state of the
configuration flags 2, 3 and 4
DC3 (Ruled line) commands sequence start
8
DC3 +
Sets the ruled line off
9
DC3 -
Selects ruled line A
10
DC3 A
Selects ruled line B
11
DC3 B
Clears selected ruled line buffer
12
DC3 C
Sets a single dot in selected ruled line buffer
13
DC3 D
Ruled line pattern set
14
DC3 F
Ruled line line set
15
DC3 L
Selects ruled line combine mode
16
DC3 M
Ruled line 1 dot line print
17
DC3 P
Ruled line n dots line print
18
DC3 p
Ruled line image write
19
DC3 v
Canceling print data in page mode
20
CAN
Printing data in page mode
21
ESC FF
DC3 (Ruled line) commands sequence start
22
ESC RS
Sounds the buzzer
23
ESC SP
Setting character spacing
24
ESC #
Setting EURO symbol position
25
ESC $
Specifying the absolute horizontal position of printing
26
ESC %
Selecting/Canceling the printing of downloaded user character sets
27
ESC &
Selecting user character set
28
ESC !
Specifying printing mode of text data
29
ESC *
Printing graphical data
30
ESC +
Switchs OFF the printer
31
ESC -
Selecting/Canceling underlining
32
ESC .
Printing self test/diagnostic information
Sets the ruled line ON
29
7
List of Commands for ESC/POS Mode
DATECS DPP-350
33
ESC 2
Specifying 1/6-inch line feed rate
34
ESC 3
Specifying line feed rate n/203 inches
35
ESC <
Changes print direction to opposite
36
ESC =
Data input control
37
ESC >
Selecting print diraction
38
ESC ?
Reading magnetic stripe card
39
ESC @
Initializing the printer
40
ESC CAL
Black mark mode sensor calibration
41
ESC D
Setting horizontal tab position
42
ESC E
Specifying/Canceling highlighting
43
ESC F
Filling or inverting the page area in page mode
44
ESC G
Specifying/Canceling highlighting
45
ESC I
Specifying/Canceling Italic print
46
ESC J
Printing and Paper feed n/203 inches
47
ESC L
Sellecting page mode
48
ESC N
Reading programmed serial number
49
ESC R
Selecting country
50
ESC S
Specifying speed (bps) of the serial port
51
ESC T
Printing short self test
52
ESC U
Selecting/Canceling underlined printing
53
ESC V
Selecting/Canceling printing 90°- right turned characters
54
ESC W
Defining the print area in page mode
55
ESC X
Specifying max printing speed
56
ESC Y
Selecting intensity level
57
ESC Z
Returning diagnostic information
58
ESC \
Specifying relative horizontal position
59
ESC ]
Loading the default settings stored in Flash memory
60
ESC ^
Saving current settings in Flash memory
61
ESC _
Loading factory settings
62
ESC `
Reading the Battery Voltage and Thermal head temperature
63
ESC a
Aligning the characters
64
ESC b
Increasing text line height
65
ESC c5
Enabling/Disabling the functioning of the button LF
66
ESC d
Printing and feeding paper by n- lines
30
List of Commands for ESC/POS Mode
DATECS DPP-350
67
ESC f
Select symbol ‘0’ printing style
68
ESC i
Feeding paper backwards
69
ESC o
Temporarily feeding paper forward
70
ESC pair=
Enabling/Disabling PAIRING info saving in Bluetooth mode
71
ESC pwd=
Programming a new Bluetooth password (PIN)
72
ESC r
Full command for sounding buzzer
73
ESC s
Reading print settings
74
ESC u
Selecting code table
75
ESC v
Transmitting the printer status
76
ESC x
Setting the time interval for automatically switching Off the printer
77
ESC y BTH: Bluetooth module settings adjustment
78
ESC {
Enabling/Canceling printing of 180° turned characters
79
GS FF
Printing in page mode and returning to standard mode
80
GS S
Specifying the absolute vertical position in page mode
81
GS )
Setting printer flags (memory switches)
82
GS *
Defining a Downloaded Bit Image (logo)
83
GS /
Printing a Downloaded Bit Image
84
GS :
Starting/ending macro definitions
85
GS B
Enabling/Disabling inverse printing (white on black)
86
GS C
Read the Real Time Clock
87
GS H
Selecting Printing position of HRI Code
88
GS L
Setting the left margin
89
GS Q
Printing 2-D barcodes
90
GS R
Filling or inverting a restangle in page mode
91
GS S
Selecting 2-D barcode cell size
92
GS T
Sellecting the print direction in page mode
93
GS U
Selecting standard mode
94
GS W
Setting the print area width
95
GS X
Drawing a rectangular box with selected thickness in page mode
96
GS Z
Printing the non blank page area only in page mode
97
GS \
Specifying the relative vertical position in page mode
98
GS ^
Executing macro
99
GS c
Setting the Real Time Clock
100
GS f
Setting the font of HRI characters of the barcode
31
7
List of Commands for ESC/POS Mode
101
GS h
Setting the height of the barcode
102
GS k
Printing a barcode
103
GS p
Settings for 2D barcode PDF417
104
GS q
Selecting the height of the module of 2D barcode PDF417
105
GS w
Selecting the horizontal size (Scale factor) of the barcode
106
GS x
Direct text print in page mode
DATECS DPP-350
Asian Languages Support
107
FS !
Specifying printing mode of two-byte text data
108
FS &
Selecting two-byte text mode (JIS or GB2312)
109
FS -
Selecting/Canceling underline mode for two-byte text mode
110
FS .
Canceling two-byte text mode
111
FS 2
Defining one custom Kanji character
112
FS C
Selecting Shift-JIS mode (Japanese version only)
113
FS S
Specifying character spacing for two-byte text mode
114
FS W
Selecting double size characters for two-byte text mode
* For details about commands for ESC/POS mode see Programmer's User.
32