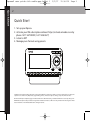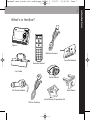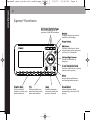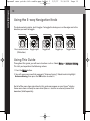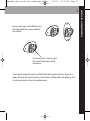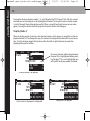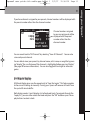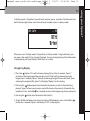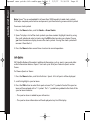
1
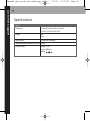
XpressR user guide old cradle.qxp:Layout 1
5/2/07
12:38 PM
Page 1
user guide
XMCK-20KC
XpressR user guide old cradle.qxp:Layout 1
5/2/07
12:38 PM
Page 2
Quick Start
2
Quick Start
1. Set up your XpressR
2. Activate your XM subscription online at https://activate.xmradio.ca or by
phone 1 877 GET XMSR (1-877-438-9677)
3. Listen to XM*
4. Manage your channels using presets
*Hardware and required monthly subscription sold separately. Other fees and taxes, including a one-time activation fee, may apply. Subscription fee is consumer only. XM products, programming, services, and fees are subject to change, at any time, without notice.
Channels with frequent explicit language are indicated with an XL. Channel blocking is available for XM radio receivers by calling 1-877GET-XMSR. Subscriptions subject to Customer Agreement available at xmradio.ca. XM service only available in the 48 contiguous United
States and Canada. ©2007 XM Satellite Radio Inc. All rights reserved.
XpressR user guide old cradle.qxp:Layout 1
5/2/07
12:38 PM
Page 3
Introduction .............................................. 4
Features............................................................ 4
Safety Instructions........................................ 5
What’s in the Box .......................................... 7
XpressR Controls ............................................ 8
Remote ............................................................ 9
Using this Guide ........................................ 10
Vehicle Installation ............................ 11
Mounting the XM Antenna .................... 14
Installing the Vent or Swivel Mount .... 15
How to Receive XM Through your Car’s
Stereo ............................................................ 18
Making Your FM Radio an XM Radio .. 20
Activation .................................................. 23
Using your XpressR ............................ 25
XpressR Controls
Listening to Live XM.................................. 26
Direct Entry .................................................. 27
Using Presets................................................ 27
Categories .................................................... 28
Jump .............................................................. 28
Info .................................................................. 29
Display............................................................ 29
30-Minute Replay ...................................... 31
TuneSelect .................................................... 34
Menu Options ............................................ 35
Change Display .......................................... 35
Edit Alerts...................................................... 37
Stocks ............................................................ 39
Info Extras .................................................... 40
Channel Access .......................................... 41
Antenna Aiming ........................................ 44
Set Time ........................................................ 44
Factory Defaults.......................................... 47
FM Modulator .............................................. 47
Line Out ........................................................ 49
Set Tone ........................................................ 50
Customer Support .............................. 51
Troubleshooting ........................................ 52
Specifications .............................................. 54
Product Registration ................................ 56
Patent Information .................................... 57
IC & FCC Statement............................ 58
Warranty .................................................... 59
Contents
3
XpressR user guide old cradle.qxp:Layout 1
5/2/07
12:38 PM
Page 4
introduction
4
Features
Congratulations on your purchase of the Audiovox XpressR. Your new XpressR
includes:
Multi channel monitoring, view six channels at once
View current and previous channels at the same time
Shortcut to FM frequencies
Scan music category
30 minute Replay- Pause and replay up to 30 mintues of live broadcast.
GameSelect- Finds your favourite sport and team events.
TuneSelect- Finds your favourite songs by song title or artist name if they are currently
playing on any XM channel.
Personalized Stock and Sports Tickers- Track your favourite stocks and sports scores on
your XpressR’s display while listening to your favourite music.
A bright, white LED backlit display with “Auto Dimming” capabilities.
XM Satellite Radio is Canada's premium digital audio entertainment and information
company with the best satellite coverage in the country and offering a unique lineup
of premier Canadian and international content. XM Canada offers listeners unique and
exclusive programming including the most NHL™ games, PGA TOUR™ and Major
League Baseball™ coverage, the deepest play list, and news, talk, sports, entertainment
and children's programming. After the 2006 / 2007 season, XM will become the exclusive provider of NHL games on satellite radio.
We recommend that you read the entire manual before using your XpressR.
XpressR user guide old cradle.qxp:Layout 1
5/2/07
12:38 PM
Page 5
Safety Instructions
Please read and understand all the instructions to avoid injury to yourself and/or damage
to your XpressR. Please be aware that XM claims no responsibility for damage from data
loss due to breakdown, repair, or
other causes.
XpressR Digital Audio Player
Do not expose to extreme temperatures (above 140°F or below -4°F, or above 60°C
or below -20°C).
Do not expose to moisture. Do not use XpressR near or in water.
Do not let any foreign matter spill into XpressR.
Do not expose to chemicals such as benzene and thinners. Do not use liquid or
aerosol cleaners. Clean with a soft damp cloth only.
Do not expose to direct sunlight, fire, flame or other heat sources for a prolonged
period.
Do not try to disassemble and/or repair XpressR yourself.
Do not drop your XpressR or subject it to severe impact.
Do not place heavy objects on XpressR.
Do not subject XpressR to excessive pressure.
Do not touch the XpressR with wet hands.
Do not store in dusty areas.
introduction
5
XpressR user guide old cradle.qxp:Layout 1
5/2/07
12:38 PM
Page 6
introduction
6
Caution: Opening the case may result in electric shock.
Caution: The uninsulated parts inside the power adapter and cradle may cause electric
shock or fire. For your safety, please do not open these components. Do not let metallic
objects, such as necklaces or coins, come into contact with the power adapter plugs.
Caution: To avoid electric shock, use the power adapter only with an outlet that
matches the shape of the adapter’s plug.
Caution: Make sure that you insert the adapter’s plug all the way into the outlet.
Caution: Do not plug several devices into the same electrical outlet.
Important: Always read and understand the user guide to prevent problems.
Warning: Use the power adapter and cradle away from water sources to avoid fire or
electric shock.
Environmental Information
Follow local guidelines for waste disposal when discarding packaging and electronic
appliances.
Your Satellite Radio receiver is packaged with cardboard, polyethylene, etc., and does
not contain any unnecessary materials.
Warnings
When using this product it is always important to keep your eyes on the road and
hands on the wheel. Not doing so could result in personal injury, death, and/or damage to your XpressR Receiver, accessories, and/or to your vehicle or other property.
XpressR should be placed in your vehicle where it will not interfere with the function of
safety features, e.g., deployment of airbags. Failure to correctly place XpressR may result in injury to you or others if the unit becomes detached during an accident and/or
obstructs the deployment of an airbag.
XpressR user guide old cradle.qxp:Layout 1
5/2/07
12:38 PM
Page 7
What’s in the Box?
XpressR
info
display
menu
mute
+
1
2
3
4
5
6
7
8
9
jump
0
p/d
XM SureConnect
Cassette Adapter
Remote Control
Car Cradle
Swivel Mount
Car Power Adapter
Vent Mount
Swivel Mount Preparation Kit
XM Car Antenna
introduction
7
XpressR user guide old cradle.qxp:Layout 1
5/2/07
12:38 PM
Page 8
introduction
8
XpressR Functions
30-Minute Replay Buttons
Pause and replay up to 30
minutes of live XM broadcast.
Dis play
Changes the way content is
viewed on the display.
Power Button
XM Button
Confirms selection for channel and menu items also press
and hold to TuneSelect.
Left and Right Arrows
Search for channels by
category.
5-way Navigation Knob
Previews channels; also selects
various menu options.
Menu
Access advanced features
and configuration options.
Number Keys
Enter a channel
directly or select your
favourite preset.
Info
Displays either your
personal stock or info
extras information.
Jump
Switches between
current channel and
previous channel.
Preset/Direct
Selects between direct
channel entry and up to 30
presets.
5/2/07
12:38 PM
Page 9
9
Remote Control Functions
Power Button
30-Minute Replay Buttons
Pause and replay up to 30
minutes of live XM broadcast
Arrow Buttons
Select menu entries,
change channels.
XM Button
Confirms selected channel
or menu options.
info
Displays either your personal
stock or info extras
information.
Display
Changes the way content
is viewed on the display
info
display
menu
mute
+
1
2
3
4
5
6
7
8
9
jump
0
p/d
Mute
Silences live or replayed
XM content.
Number Keys
Enter a channel directly
or select your favourite
preset.
Jump
Switches between current
channel and previous
channel
Menu
Access advanced features
and configuration options.
+ and Change channels or control
volume for audio system
(sold separately)
Preset/Direct
Selects between direct
channel entry and up to 30
presets.
introduction
b
selects
XpressR user guide old cradle.qxp:Layout 1
XpressR user guide old cradle.qxp:Layout 1
5/2/07
12:38 PM
Page 10
introduction
10
Using the 5-way Navigation Knob
The knob not only rotates, but it toggles. To toggle the knob, press on the edge and in the
direction you want to toggle.
Press center button Toggle right
(XM button)
Toggle left
Toggle up
Toggle down
Using This Guide
Throughout this guide, you will see instructions such as Select Menu Antenna Aiming.
This tells you to perform the following actions:
1. Press the Menu button.
2. You will see a menu icon that represents “Antenna Aiming.” Rotate knob to highlight
Antenna Aiming, then press the XM button to select it.
Not all of the menu items described in this guide may appear on your XpressR display.
Some menu items will only be seen when XpressR is used in an accessory home kit or
boombox (Sold Separately).
XpressR user guide old cradle.qxp:Layout 1
5/2/07
12:38 PM
Page 11
1
vehicle installation
vehicle installation
11
XpressR user guide old cradle.qxp:Layout 1
5/2/07
12:38 PM
Page 12
vehicle installation
12
Vehicle installation
Every vehicle is different; for your safety, follow all instructions carefully. Consult a
professional installer if you have questions.
1. To begin, first decide which method of installation is best for your vehicle:
Cassette Adapter
XM SureConnect
Cassette Adapter: Use the cassette adapter if your vehicle’s audio system has a built
in cassette player.
XM SureConnect: You can listen to your XpressR through your car stereo by using
XpressR’s built-in FM modulator and the XM SureConnect. Simply find an unused FM
frequency on the stereo and set your XpressR to transmit on that same frequency. See
your XM SureConnect installation guide.
FM Direct Adapter: The third option is the FM Direct Adapter (sold separately). We
recommend professional installation if you choose to use this method of install.
Audio input: Some vehicles come with an audio input jack. If your vehicle has this
type of input you can simply use a mini audio cable (sold separately).
XpressR user guide old cradle.qxp:Layout 1
5/2/07
12:38 PM
Page 13
2. Once you have chosen your method of installation, next decide where in your vehicle
you would like to mount your XpressR. The two included methods are vent mount
and swivel mount:
Vent Mount
Swivel Mount
3. Next decide the best location for your XM antenna. Mount this antenna to the
roof or trunk of the vehicle. During installation, make sure you are outdoors and the
antenna is not obstructed by tall buildings.
4. Finally you will connect all of the plugs to the car cradle and lock your XpressR into
place. Once in place you can activate your XpressR
Now that you have all of the parts you need, you are ready to begin installing your
XpressR.
vehicle installation
13
XpressR user guide old cradle.qxp:Layout 1
5/2/07
12:38 PM
Page 14
vehicle installation
14
Step 1: Mounting the XM Antenna
Mount the XM antenna to the roof or trunk of the vehicle. During installation,
make sure you are outdoors and the antenna is not obstructed by tall buildings.
For best results mount the XM antenna to the outside of your vehicle. Below are
the recommended options.
op
tio
n
op
tio
n
1
2
Keep excess cable
behind or under
the dashboard.
The XM antenna contains a strong magnet, allowing
it to stick to any metal parts of your vehicle.
Magnet
XpressR user guide old cradle.qxp:Layout 1
5/2/07
12:38 PM
Page 15
Step 2: Installing the Vent Mount or Swivel Mount
Installing the vent mount
To install the vent mount, find a horizontal vent that is strong enough to hold your
XpressR and car cradle. To remove the vent mount, push it into the vent and lift upwards
slightly to release the mount’s hooks from the vent vane.
Some parts of the vent mount can be adjusted
to better suit your vent.
vehicle installation
15
XpressR user guide old cradle.qxp:Layout 1
5/2/07
12:38 PM
Page 16
vehicle installation
16
Installing the swivel mount
To install the swivel mount, first find a suitable location. The swivel mount’s adhesive is
very strong and may be difficult to remove. Do not install this mount on leather surfaces and make sure the air temperature is at least 60°F (15°C).
Clean the mounting surfaces with the
surface preparation kit.
Peel away the adhesive liner and firmly press the
swivel mount to the surface for 30 seconds. Allow
24 hours before using the mount
adhesive liner
XpressR user guide old cradle.qxp:Layout 1
5/2/07
12:38 PM
Page 17
You can orient your swivel different ways
to accommodate the space available in
your vehicle.
You can adjust this screw to adjust
the tension of the mount with a
screwdriver.
If you need to remove the mount, carefully lift the adhesive pad with your fingers or a
spoon. Warming with a hair dryer for several minutes will help soften the adhesive. Your
swivel mount comes with an extra adhesive pad.
vehicle installation
17
XpressR user guide old cradle.qxp:Layout 1
5/2/07
12:38 PM
Page 18
vehicle installation
18
Step 3: How to receive XM through your car stereo
There are several methods of receiving XM through your car stereo
Cassette Adapter: Use the cassette adapter if your vehicle’s audio system has a built
in cassette player.
XM SureConnect: You can listen to your XpressR through your vehicle’s audio system
by using XpressR’s built-in FM modulator and the XM SureConnect. Simply find an unused FM frequency on the stereo and set your XpressR to transmit on that same frequency. For XM SureConnect install, please see your XM SureConnect Installation
guide.
Professional Wired: The third option is the FM Direct Adapter (sold separately). We
recommend professional installation if you choose to use this method of install.
Audio input: Some vehicles come with an audio input jack. If your vehicle has this
type of input you can simply use a mini audio cable (sold separately).
Plug the antenna, power adapter, and either the cassette adapter or XM SureConnect
into the car cradle as shown on the next page. The FM Direct Adapter is not pictured.
XM
XpressR user guide old cradle.qxp:Layout 1
5/2/07
12:38 PM
Page 19
XpressR Car Cradle
ANT IN
or
AUDIO OUT
DC IN
You can use either the cassette
adapter, or a mini audio cable (not
included) in the line out.
Power Adapter
XM Antenna
Cassette Adapter
XM SureConnect
vehicle installation
19
XpressR user guide old cradle.qxp:Layout 1
5/2/07
12:38 PM
Page 20
vehicle installation
20
Now that your XpressR is all set up, it is time to power it up. If you are using the XM
SureConnect you will need to read Step 4. If you are using the cassette adapter you are
all finished and ready to move on to activation on page 24.
Step 4: Making Your Vehicle’s FM Radio an XM Radio
Your XpressR contains a built-in FM modulator that requires the use of either the
included XM SureConnect or the optional FM Direct Adapter (sold separately) to
transmit the XM audio signal to your vehicle’s FM radio.
First, turn on your car stereo. You will need to find a suitable FM frequency in order to
get the best sound. A suitable FM frequency is an unused frequency or weak station
that is not located near a strong FM station in your area.
XpressR user guide old cradle.qxp:Layout 1
5/2/07
12:38 PM
Page 21
Press Menu FM Modulator
FM Frequency.
Match the frequency to the frequency you see on your car’s FM radio
FM Modulator > FM Freq
88.1
88.3
88.5
88.7
88.9
Now you should be able to hear your XpressR through your FM stereo. If you can’t hear
any sound please check all of your connections and be sure your XM antenna is not
obstructed. Visit Troubleshooting (page 52) for more information.
Now you will learn how to activate and use your XpressR.
vehicle installation
21
XpressR user guide old cradle.qxp:Layout 1
vehicle installation
22
Notes
5/2/07
12:38 PM
Page 22
XpressR user guide old cradle.qxp:Layout 1
5/2/07
12:38 PM
Page 23
2
activation
activation
23
XpressR user guide old cradle.qxp:Layout 1
5/2/07
12:38 PM
Page 24
activation
24
Before you can listen to XM content, you must activate your XpressR.
1. Set up your XpressR, car cradle, power adapter, and antenna (pages 11- 22). Make sure
XpressR can receive the XM signal.
2. Find the 8-character XM Radio ID, which is printed on the package or on the back of
your XpressR. Or select XM channel 0 to view the Radio ID. Record the Radio ID here for
reference:
The XM Radio ID does not use the letters I, O, S, or F.
3. Activate your XM Satellite Radio service online at https://activate.xmradio.ca and 1 877
GET XMSR (1-877-438-9677). You will need a major credit card. The website will walk
you through activation, selecting a service plan, and creating an XM account.
XM will send a signal from the satellites to activate the full channel lineup. Activation
normally takes 10 to 15 minutes, but during peak busy periods you may need to keep
your XpressR on for up to an hour. When you can access the full channel lineup on your
XpressR, you’re finished!
XpressR user guide old cradle.qxp:Layout 1
5/2/07
12:38 PM
Page 25
3
using your XpressR
using your XpressR
25
XpressR user guide old cradle.qxp:Layout 1
5/2/07
12:38 PM
Page 26
using your XpressR
26
Listening to Live XM
Turn on your XpressR. Subscribe to XM (page 24) if you haven’t done so already.
Direct
XM Preview
5:13
1
What's on XM?
xmradio.com
Selecting Channels
Rotate the knob to scroll through the list of channels. Press the XM button to select
that channel. You can also set up XpressR so that you do not have to press the XM button to select a channel. See “Direct Tune” on page 41.
- OR –
Press the number keys on your XpressR or the remote that correspond to the channel
number.
- OR –
Pressing one of the preset buttons that correspond to the channel number. When
you’ve entered a valid channel number, your XpressR will tune to that channel within 2
seconds.
XpressR user guide old cradle.qxp:Layout 1
5/2/07
12:38 PM
Page 27
Direct Entry
1. Press the p/d button until the word “Direct” appears in the display.
2. Press the number keys corresponding to the channel number. For example, for
channel 31, press 3 followed by 1. You can select the channel faster by pressing
the XM button after entering the channel number.
Using Presets
There are 30 presets in all; each bank (A, B, and C) holds 10 presets. Press the “p/d” button to select the proper bank. Use these banks to organize your favourite channels or
to create separate preset banks for additional users to enjoy. To set a channel preset:
1. Tune to the desired channel.
2. Press the p/d button until the appropriate “Preset” bank (Preset A, B, or C) appears in
the display.
3. Press and hold the number key that corresponds to the preset you would like to set.
XpressR beeps when the channel is stored.
To select a stored preset:
1. Press the p/d button until the appropriate “Preset” bank (Preset A, B, or C) appears
in the display.
2. Press one of the number keys. XpressR will tune to that channel.
using your XpressR
27
XpressR user guide old cradle.qxp:Layout 1
5/2/07
12:38 PM
Page 28
using your XpressR
28
Categories
XM channels are organized into categories, or genres, such as “Rock,” “Jazz,” or “News.”
To find a channel by category:
1. Toggling the knob left and right will display categories
2. Rotate knob and press the XM button to select a channel
Preset categories are displayed within categories only when channels are assigned to those
presets (see Using Presets).
When you are browsing the channels by category you have the option to Scan all channels
in that category, or to revert back to the all channels list.
When you choose scan, each channel in the category plays for 5 seconds. To stop scanning, press the
XM button to select that channel.
While a category is being scanned,
the word "Scan" will flash on and
off.
Classical
XM Classics
Vox!
XM Pops
>Scan Classical
>All Channels
110
112
113
Jump
Press the jump button to switch to the channel that was previously being listened to.
Pressing the jump button more than once allows you to switch between two channels at a
time. Display mode 4 allows you to view both current channel and previous channel at the
same time.
XpressR user guide old cradle.qxp:Layout 1
5/2/07
12:38 PM
Page 29
Info
Press the info button to display either stock quotes or Info Extras. See pages 41 and 42
for more information on each of these features.
Display
Press the display button to change the way you view the content on the display.
There are 4 different display modes.
XM Cafe
45
REM
Drive
Direct
5:14
REM
Drive
Direct
All Channels
45 XMU
REM Fred
Drive XM Cafe
Top Tracks
Ethel
45
Display mode 2 (single channel)
Display mode 1
(single channel large font)
XM Cafe
5:13
Direct
XM Cafe
43
44
45
46
47
Display mode 3 (split display with 6 channels)
XM Cafe
5:15
Previous Channel
74
45 Bluesville
B.B. King
REM
Take it Home
Drive
Display mode 4
(split display with previous channel)
using your XpressR
29
XpressR user guide old cradle.qxp:Layout 1
5/2/07
12:38 PM
Page 30
using your XpressR
30
Turning the knob in display modes 1, 2 and 4 display the “All Channels“list with the current
channel you are listening to as the highlighted channel. Turning the knob in display mode
3 scrolls through the displayed channel list. When using left and right arrow to view categories, turning the knob scrolls through the channels within that category.
Display Mode 3
When in display mode 3, you can view channel names, artist names or song titles in the displayed channel list. To change the way this content is displayed the channel list must be active. Turn the knob or toggle the knob in either the left or right direction to make the
displayed channel list active.
Direct
5:14
All Channels
45 XMU
REM Fred
Drive XM Cafe
Top Tracks
Ethel
XM Cafe
43
44
45
46
47
Be sure a channel within the displayed
channel list is highlighted before pressing “display.” If it is not highlighted you
will switch to display mode 4 instead.
Channel name is displayed
Direct
XM Cafe
5:14
Direct
All Channels
45 Coldplay
REM U2
Drive REM
Led Zeppelin
Red Hot Chili Pe
43
44
45
46
47
Artist name is displayed is displayed
XM Cafe
5:14
All Channels
45 Clocks
REM New Year's Day
Drive Drive
Whole Lotta Lov
Snow (Hey Oh)
Song title is displayed
43
44
45
46
47
XpressR user guide old cradle.qxp:Layout 1
5/2/07
12:38 PM
Page 31
If you have channels assigned to your presets, channel numbers will be displayed with
the preset number rather than the channel number.
Preset A-1
Ethel
11:55
Preset A
47 Ethel
A-1
A-2
Coldplay U-POP
Clocks Fuego sp
A-3
>Scan Preset A
>View All Channels
Channel numbers assigned
to your current preset will be
displayed with the preset
number rather than the
channel number.
You can revert back to “All Channels” by selecting “ View All Channels”. You can also
scan each preset channel.
You are able to view your presets by channel name, artist name, or song title by pressing “display.” Be sure that one of the channels is highlighted before pressing “display.”
(See page 30 for more information). You can also toggle left and right to view categories.
30-Minute Replay
30-Minute Replay gives you the opportunity to “hear that again.” This feature applies
to the current listening session only. Turning your XpressR off removes all tracks from
the up-to-30 minute buffer.
Both display modes 3 and 4 display a list of replayed tracks. To navigate through the
"replay list", you can either rotate the knob and press the “XM” button or press the replay buttons to select a track.
using your XpressR
31
XpressR user guide old cradle.qxp:Layout 1
5/2/07
12:38 PM
Page 32
using your XpressR
32
Display mode 2 (single channel)
Display updates as
new track begins.
4:30
Direct
XM Cafe
45
REM
Drive
Replay Status Bar represents the total replay session
3:11
Displays elapsed time
of current track within
the replay buffer.
3:35
Displays total time of
current track within the
replay buffer.
Space between white bars
represents tracks within
total replay session.
Display modes 3 and 4
Direct
XM Cafe
3:11
5:35
Replay List
45 U-POP
REM U-POP
Drive XM Cafe
XM Cafe
XM Cafe
29
29
45
45
45
Both split display modes ( 6 channels
mode and view previous channel) display
a list of replay content. You can choose to
display artist names, song titles or channel names within the replay list by pressing display.
Older info is displayed at the bottom of the list. As new content is added, it appears at
the top of the list.
XpressR user guide old cradle.qxp:Layout 1
5/2/07
12:38 PM
Page 33
In display mode 1 (large font) you will only see play, pause, rewind, or fast-forward symbol in the top right corner next to the channel number, when in replay mode.
XM Cafe
45
REM
Drive
When you are in Display mode 1 (large font) or Display mode 2 (single channel), you
can access the replay list by turning the knob. You can change the way the information
is displayed by pressing “display” while the list is visible.
Navigating Replay
1. Press the button. If a track has been playing for less than 5 seconds, XpressR
rewinds to the beginning of the previous track. If the track has been playing for
longer than 5 seconds, XpressR rewinds to the beginning of the current track. Upon
entering the replay buffer, XpressR will display “Replay” on the display.
2. Pressing the button again skips backward to previous tracks in the order they
played. XpressR allows you to access up to 30 minutes of previously listened to live
broadcast. Press and hold for 3 seconds to skip to the beginning of your replay list.
3. Pressing the
button skips forward in the track list.
4. To exit 30-Minute Replay and return to the live XM broadcast, press and hold the
button for 3 seconds; XpressR will display “LIVE” on the display.
using your XpressR
33
XpressR user guide old cradle.qxp:Layout 1
5/2/07
12:38 PM
Page 34
using your XpressR
34
To Pause a Track
1. Press the
button. The pause icon appears in the display.
2. To resume playback from where you had paused, press the
3. To return to the live XM broadcast, press and hold the
and displays “LIVE” on the display.
button again.
button until XpressR beeps
TuneSelect
TuneSelect finds your favourite artist or song whenever they’re currently being played
on any XM channel. XpressR can track up to 20 of your favourite artists or songs.
To TuneSelect a song or artist:
1. At any live display press and hold the
knob for 3 seconds
2. Choose between TuneSelecting the artist
or TuneSelecting the song
3. When any song or artist in your TuneSelect
list is currently playing on any other XM
channel, XpressR will alert you audibly
and visually. Tune to that channel by
pressing the XM button.
To edit your TuneSelect list see “Edit Alerts”
under the Menu Items page. When you attempt
to add more than 20 artists or songs, your
XpressR will give you the option to replace one
of your previously saved selections
TuneSelect Song
TuneSelect Artist
TuneSelect List Full
Replace An Existing TuneSelect
Do Not Replace And Exit
XpressR user guide old cradle.qxp:Layout 1
5/2/07
12:38 PM
Page 35
Menu Options
When your XpressR is in the car cradle (and using either SureConnect or FM Direct accessory to transmit audio), and you press Menu, your display will look like this:
Change Display
FM Modulator
(car cradle only)
Edit Alerts
Stocks
Change Display
Exit
Info Extras
Channel Access
Antenna Aiming
Factory Defaults
Set Time
Note: pressing the Menu or toggling the knob left, allows you to back out of any menu.
using your XpressR
35
XpressR user guide old cradle.qxp:Layout 1
5/2/07
12:38 PM
Page 36
using your XpressR
36
Change Display
Display Settings
To change the display’s brightness, contrast, backlight timer, and Auto Dimming status:
1. Press the Menu button, scroll to Change Display Display Settings.
2. Rotate knob to scroll through items on display.
3. Press the XM button to select an item.
4. Rotate knob to adjust the selected item.
5. Press the XM button to confirm your selection.
6. Then press either the Menu button or toggle the knob to the left repeatedly
until you return to normal operation.
Leaving the Auto Dimming feature "off" means the user has to manually adjust the
brightness of the display. Enabling the Auto Dimmer (turning it "On") means that
XpressR adjusts the brightness of the display for daytime and night time mode.
XpressR user guide old cradle.qxp:Layout 1
5/2/07
12:38 PM
Page 37
Display Scrolling
At times cold weather can negatively affect the visual quality of scrolling text. Display
scrolling can be enabled or disabled globally. By default Display Scrolling is set to “On”.
When Display Scrolling is set to “On”, all on display items such as Artist Name, Song Title,
Info Extras, and Stock information that need to scroll have the ability to do so. Setting
Display Scrolling to “Off” disables all items from scrolling allowing only to page.
To disable all display scrolling:
1. Press the Menu button, scroll to Change Display Display Scrolling (On)
A confirmation display will be displayed stating Display Scrolling is “Off”. All on dis
play information will Page instead.
To enable all display scrolling:
1. Press the Menu button, scroll to Change Display Display Scrolling (Off)
A confirmation display will be displayed stating Display Scrolling is “On”
Edit Alerts
Edit TuneSelect
TuneSelect finds your favourite artist or song whenever they’re currently being played
on any XM channel. To edit your TuneSelect list:
Press the Menu button, scroll to Edit Alerts Edit TuneSelect.
using your XpressR
37
XpressR user guide old cradle.qxp:Layout 1
5/2/07
12:38 PM
Page 38
using your XpressR
38
A list of songs and or artists that have been
TuneSelected will be displayed. Select an
artist or song to change its alert status or
choose to delete the TuneSelect. XpressR
can track up to 20 of your favourite artists
and songs.
TuneSelected by song
Edit Alerts > Edit TuneSelect
Yeah Yeah Yeahs
New Years Day
Fallen
Red Hot Chili Peppers
Whole Lotta Love
TuneSelected by artist
Alert is turned off for that item
Edit GameSelect
Adding sports and teams at the info extras menu in which XM broadcasts (see page 40 )
automatically adds those sports and teams to your GameSelect list. GameSelect finds and
alerts you as to whenever your favourite sports and teams are being played on any other
XM channel. XpressR will store up to 50 GameSelects. To edit your GameSelect list:
Press the Menu button, scroll to Edit Alerts Edit GameSelect.
A list of sports and teams that you have added will be displayed. Select a sport or team to
change its alert status. XpressR can track up to 50 of your sports and teams.
Note: You will only receive a GameSelect alert on those events in which XM broadcasts.
All Alerts
Selecting All Alerts changes the status of all alerts globally. By default All Alerts are “On”.
To disable All Alerts:
XpressR user guide old cradle.qxp:Layout 1
5/2/07
12:38 PM
Page 39
1. Press the Menu button, scroll to Edit Alerts All Alerts (On)
A confirmation display will be displayed stating All Alert is “Off”. All audible and dis
play alerts are disabled.
To enable All Alerts:
1. Press the Menu button, scroll to Edit Alerts All Alerts (Off)
2. Enable any GameSelect or TuneSelect alert when all alerts are set to “Off”.
A confirmation display will be displayed stating All Alert is “On”. All audible and dis
play alerts are enabled.
Stocks
XM Satellite Radio broadcasts information such as sports scores, stocks, and other features. XpressR can track up to 20 of your favourite stock symbols, displaying the price
and daily movement on the display.*
To add a stock symbol:
1. Press the Menu button, scroll to
Stocks Add Stocks
2. Use the scroll wheel (or remote) to select
each letter in the desired stock symbol.
Press the XM button after each letter.
Stocks > Add Stocks
Rotate Dial For Stock Symbols
Stock Symbol
3. Press the XM button to confirm and
save the stock symbol in memory.
4. Press the Info button once to view your personal Stock Ticker at any live XM display.
*You can track any stock and most indices listed on the NYSE, AMEX, or NASDAQ. Market information is
delayed approximately 25 minutes. Stock data provided by ComStock, Inc.
using your XpressR
39
XpressR user guide old cradle.qxp:Layout 1
5/2/07
12:38 PM
Page 40
using your XpressR
40
Note: XpressR has an embedded list of more than 9,000 regularly traded stock symbols
that helps complete partial entries and prevents you from entering a non-existent symbol.
To erase a stock symbol:
1. Press the Menu button, scroll to Stocks Erase Stocks
2. XpressR displays a list of the stock symbols you have created. Highlight stocks by using
the scroll wheel and select a stock using the XM button to make your choice. Choose
yes from the decision display to erase the stock symbol. Erasing the stock symbol will
remove it from the list.
3. Press the Menu button several times to return to normal operation.
Info Extras
XM Satellite Radio will broadcast additional information such as sports scores and other
useful information features. XpressR can track up to 50 of your favourite Sports and or
Teams.
To Choose Sports or Teams:
1. Press the Menu button, scroll to Info Extras> Sports. A list of sports will be displayed.
2. scroll to highlight a sport or team.
3. Press the XM button to select that sport or team. The “-“symbol in front of the sport or
team will be replaced with a “+” symbol. The “+” symbol being added to the front of the
sport or team indicates:
- The sport or team is added to your info extras.
- The sport or team information will be displayed at any live XM display.
XpressR user guide old cradle.qxp:Layout 1
5/2/07
12:38 PM
Page 41
- The sport or team is added to your GameSelect list if broadcast on XM. GameSelect
finds and alerts you when your favourite sports and teams are being played on any
other XM channel. To Edit your GameSelect list see page 38.
Note: You will only receive a GameSelect alert on those events in which XM
broadcasts.
4. Press the Info button to view your info extras on any live XM display.
Direct
XM Cafe
Direct
5:13
45
XM Cafe
5:13
45
REM
REM
Drive
Drive
Stocks
Sports
Sports scores provided
Stock Quotes provided
Channel Access
Direct Tune
Normally, as you scroll through live XM channels while rotating the knob, you can preview the channel list before selecting one channel. XpressR does not switch to that
channel until you push the XM button. You can change this behavior so that XpressR
automatically tunes to the channel that you’re previewing.
To enable Direct Tune:
1. Press the Menu button, scroll to Channel Access Direct Tune (Off)
A confirmation display will be displayed stating Direct Tune is “On”. XpressR will automatically tune to the channel that you preview.
using your XpressR
41
XpressR user guide old cradle.qxp:Layout 1
5/2/07
12:38 PM
Page 42
using your XpressR
42
To disable Direct Tune:
1. Press the Menu button, scroll to Channel Access Direct Tune (On)
A confirmation display will be displayed stating Direct Tune is “Off”. XpressR returns to
its default state: you have to push the XM button to switch to a channel
Channel Skip/Add
You can simplify the list of channels that you see when you browse through categories
or the all channels list by selecting channels to skip.
To skip a channel:
1. Press the Menu button, scroll to Channel Access Channel Skip/Add
2. XpressR displays a list of channels. By default, a “+”is in front of each channel.
The “+” symbol indicates the channel is not skipped within the channel list.
3. To skip a channel, use the scroll wheel to highlight a channel. Press the XM button to
change the “+” to a “-“.The “-” symbol indicates the channel is skipped within the
channel list.
4. To add a channel back to the channel list, use the scroll wheel to highlight a skipped
channel. Press the XM button to change the “-“ to a “+”.
5. Pressing either the Menu button or toggle the XM button to the left, XpressR displays
a confirmation display stating the channel list has been updated.
XpressR user guide old cradle.qxp:Layout 1
5/2/07
12:38 PM
Page 43
Explicit Language Channels
Those channels identified with a “xL” in front of the channel name are “Explicit Language
Channels”. You can choose to skip all “Explicit Language Channels” by performing the
following steps:
1. Press the Menu button, scroll to Channel Access Explicit Language Channels
(On)
A confirmation display will be displayed stating all Explicit Language channels are “Off”.
All Explicit Language channels will be removed from the channel list and the channel list
at the channel skip/add sub menu.
To add all “Explicit Language Channels” to the channel list:
1. Press the Menu button, scroll to Channel Access Explicit Language Channels
(Off)
A confirmation display will be displayed stating all Explicit Language channels are “On”.
Note: You can still tune to skipped channels by entering the channel number (in direct
entry mode) or by pressing a preset (in preset mode) if that channel has already been
stored. This is not considered an appropriate method for performing “parental control.”
Channel Skip/Add should not be used as a form of parental control. To completely block
access to an XM channel, contact XM Listener Care at 1-877-GET-XMSR (1-877-438-9677)
using your XpressR
43
XpressR user guide old cradle.qxp:Layout 1
5/2/07
12:38 PM
Page 44
using your XpressR
44
Aiming the Antenna
For optimal reception of XM’s live satellite
signal, your XpressR antenna should have
an unobstructed view of the XM satellites
in the southern sky. In large cities, XM also
has a network of ground repeaters to help
increase the signal coverage.
Antenna Aiming
Satellite
Terrestrial
Your XpressR can help you aim the antenna to pull in the strongest possible signal.
1. Press the Menu button, scroll to Antenna Aiming
2. Slowly turn and tilt the antenna. The “Satellite” and “Terrestrial” signal bars will
change. Find the position that gives the strongest signal strength on either “Satellite”
or “Terrestrial.”
3. The antenna aiming display remains as long as it’s needed to help you position the
antenna. When you’ve found the best position, press the “menu” button or left toggle
repeatedly to exit the menu.
4. Select XM channel 1. You should be able to listen to the XM Preview Channel.
Set Time
Set Clock
Select Time Zone
The time is automatically set using the XM signal. To set the correct time for your
location:
XpressR user guide old cradle.qxp:Layout 1
5/2/07
12:38 PM
Page 45
1. Press the Menu button, scroll to Set Time Set Clock Select Time Zone
Scroll through the list of time zones and select your time zone, the XpressR clock will
update.
Daylight Savings Time
You can also choose whether or not to adjust your settings for daylight savings time.
1. Press the Menu button, scroll to Set Time Set Clock Daylight Savings Time
12/24 Hour Mode
To display time in 12 or 24 hour format, select the desired format by Set Time Set
Clock 12/24 Hour Mode.
Automatic Power
Normally, XpressR turns on whenever it receives power. To disable automatic power:
1. Press the Menu button, scroll to Set Time Automatic Power (On)
When Automatic power is set to “Off”, you must now use the power button to turn
XpressR on and off.
To enable automatic power:
1. Press the Menu button, scroll to Set Time Automatic Power (Off)
XpressR turns on automatically whenever it receives power.
using your XpressR
45
XpressR user guide old cradle.qxp:Layout 1
5/2/07
12:38 PM
Page 46
using your XpressR
46
Sleep Timer (Home stand option only, sold seperately)
Options: OFF, 15 Minutes, 30 Minutes, 45 Minutes, and 1 Hour
Your XpressR has a sleep timer that can automatically shut off the unit after a period of
time. By default, the sleep timer is set to “Off”. Perform the following steps to adjust the
sleep timer for your XpressR:
1. Press the “menu” button, scroll to Set Time Sleep Timer
2. Select the desired time period.
3. Press the XM button; you will receive a confirmation display displaying your
selection.
4. To reset the sleep timer, you can:
-restart XpressR
-wait for XpressR to automatically shut down. On restart XpressR returns to its default
state: Sleep timer “Off”.
-select the "Off" option from the Set Time Sleep Timer menu
Delayed Power Off (car cradle option only)
Options: OFF, 60 Minutes, 90 Minutes, 120 Minutes, and 180 minutes
If the cigarette lighter is always powered, you can set XpressR to automatically turn off
after 60 to180 minutes after you turn it on.
1. Press the Menu button, scroll to Set Time Delayed Power Off
2. Select the desired time period.
XpressR user guide old cradle.qxp:Layout 1
5/2/07
12:38 PM
Page 47
3. Press the XM button; you will receive a confirmation display displaying your selection.
The setting is saved even if you turn XpressR off. The “Delayed Power Off” setting is only
active when you use the XpressR car cradle. To reset the “Delayed Power Off” to “OFF”
(meaning XpressR will not automatically shut down in its car cradle):
1. Press the “menu” button, scroll to Set Time Delayed Power Off
2. Select Off
3. Press the XM button; you will receive a confirmation display displaying your selection.
Factory Defaults
This feature erases all of your personal settings in the presets, TuneSelect, GameSelect,
Stock Ticker, and Sports Ticker and resets all other settings to the original factory configuration.
1. Press the Menu button, scroll to Factory Defaults
2. Confirm by selecting Yes, or cancel by selecting No.
FM Modulator
FM Frequency
If you choose to use the FM modulator to listen to XM in your vehicle, you will need to
find a suitable FM frequency in order to get
the best sound. A suitable FM frequency is
an unused frequency or weak station that is
not located near a strong FM station in your
area. (See page 20).
FM Modulator > FM Freq
88.1
88.3
88.5
88.7
88.9
using your XpressR
47
XpressR user guide old cradle.qxp:Layout 1
5/2/07
12:38 PM
Page 48
using your XpressR
48
After selecting a FM Frequency, you will be given
the choice to add that Frequency to your “FM Presets”. Creating a list of FM Presets is a valuable
shortcut for those people who need to change
FM Frequencies often. You can assign a FM Frequency to FM Presets by:
FM Modulator > FM Preset
95.9
97.3
107.7
-Press any 0-9 buttons to assign that frequency to
that number.
FM-1
FM-2
FM-3
FM-4
FM-5
-Or-Scroll to any FM-# and press the XM button to assign that frequency to that number
(For more information, see FM Preset on page 48).
FM Level
When listening to your XpressR using the FM modulator, you can adjust its volume
level to match other audio sources (your CD player, other FM stations, or MP3 player).
1. Press the Menu button, scroll to FM Modulator FM Level
2. Rotate the knob counter clockwise to decrease the FM Level or rotate the knob
clockwise to increase the FM Level.
3. Press the XM button to accept changes.
A confirmation display will be displayed stating FM Level has been “Updated”.
FM Presets
Creating a list of FM Presets is a valuable shortcut for those people who need to
change FM Frequencies often. There are three ways to access the FM Presets menu:
FM-6
FM-7
FM-8
FM-9
FM-0
XpressR user guide old cradle.qxp:Layout 1
5/2/07
12:38 PM
Page 49
1. Press the Menu button, scroll to FM Modulator FM Frequency. After choosing a
frequency the FM Presets list will be displayed.
2. Press the Menu button, scroll to FM Modulator FM Presets.
3. Press and hold Jump for 3 seconds at any live XM display.
To select a FM Frequency from the FM Preset menu, either:
Press a number key on your XpressR that has a FM Frequency assigned to it
-ORScroll to any FM-# that has a FM Frequency assigned to it and press the XM button
To exit the FM Presets list do one of the following:
1. Press the Menu button
2. Select a FM Preset
3. After 30 seconds the display will time out
Line Out Level
There are two methods of connecting the
Line Out on the XpressR car cradle directly
to your car’s stereo to transmit audio:
Line Out Level
1. Using the cassette adapter
2. If you car stereo has an audio input
called “Aux In”
Either of these methods will give you the best audio quality. When using either of
these methods to transmit audio through your car’s stereo, you can adjust XpressR’s
audio level to match other audio sources.
using your XpressR
49
XpressR user guide old cradle.qxp:Layout 1
5/2/07
12:38 PM
Page 50
using your XpressR
50
1. Press the menu button, scroll to Line Out Level
2. Rotate the knob counter clockwise to decrease the Line Out Level or rotate the
knob clockwise to increase the Line Out Level.
3. Press XM button to accept changes. A confirmation display will be displayed stating
Line Out Level has been “Updated”.
Do not use the Line Out Level menu item as a volume control; use the volume control
on your car stereo instead. Line out level is used to adjust the volume level to match
other audio sources (your CD player, other FM stations, or MP3 player).
Set Tone (Audio system option)*
You can adjust the bass and treble to suit the kind of music you’re listening to.
1. Press the menu button, scroll to and select “Set Tone”
2. Rotate knob to highlight either “Bass” or
“Treble”.
3. Press the XM button to select an item.
Set Tone
4. Rotate knob clockwise to increase levels
and rotate knob counter clockwise to
decrease levels.
5. Press the XM button to confirm your
selection.
6. Then press either the menu button or toggle the knob to the left repeatedly until
you return to normal operation.
*Audio Systems are sold separately
XpressR user guide old cradle.qxp:Layout 1
5/2/07
12:38 PM
Page 51
4
Customer Support
customer support
51
XpressR user guide old cradle.qxp:Layout 1
5/2/07
12:38 PM
Page 52
customer support
52
Troubleshooting
XpressR is designed and built to provide you with trouble-free performance without
the need for servicing. If it does not appear to be functioning properly, follow these
troubleshooting steps first to try to remedy the situation yourself:
1. Attach all connections firmly and securely.
2. Make sure the cigarette lighter/auxiliary power socket is clean and free of corrosion.
3. If you have installed XpressR in a vehicle and it does not power on, check the 12V
adapter fuse by unscrewing the ribbed end of the 12V adapter. If required, replace
with a 1-amp fuse only. If the 12V adapter does not have a removable end-cap, it has
an internal fuse that resets itself after it is left unplugged for a period of time.
If you see this on the display:
You should:
No Signal
Something is blocking the XM signal. Move your XM antenna away
from the obstructed area (e.g., an underground garage). Make sure
the XM antenna is mounted outside of the vehicle.
Antenna
Be sure that the antenna cable is fully inserted on the connector.
Make sure the cable is not bent or broken. Turn XpressR off, then
on, to reset this message.
Off Air
The channel you’ve selected is not currently broadcasting.
Tune to another channel.
Loading
Your XpressR is acquiring audio or program information from the
XM signal. This message should disappear in a few seconds in
good signal conditions.
Updating
XM is updating your XpressR with the latest encryption code.
Simply wait a few seconds until the update is done. – OR – You may
be attempting to tune to a channel that is blocked or unavailable.
--- (no artist or title)
No program information, such as artist name, song title, or channel
exists.
XpressR user guide old cradle.qxp:Layout 1
5/2/07
12:38 PM
Page 53
If this happens:
You should:
XpressR shuts off unexpectedly.
Check whether you set the sleep timer, and set it to “Off” if desired.
Check whether “Vehicle Mode/Delayed Power Off” is set, and set it
to “Off” if desired. XpressR remember the “Vehicle Mode” setting
even when you turn the device off.
You do not receive all the XM channels you
have subscribed to.
Check to see if you skipped any channels (page 42). If you still do
not receive all channels, your XpressR may not be activated. Contact XM Satellite Radio. See page 24.
No audio.
Check all connections between your XpressR and your stereo
system.
No song title or artist name is displayed.
Nothing is wrong with your XpressR. That information may be in
the process of being updated. Some channels, such as news and
sports, may not have such information.
No audio when listening to XpressR through
an FM radio.
Check that your XpressR and your radio are tuned to the same FM
frequency.
Audio fades or has static when listening
You might be hearing interference from another FM station. First
check all cables for a proper connection on your XpressR car dock.
If the problem persists, you might be hearing interference from
another FM station. Set your XPressR and your radio to a different
FM frequency.
Audio sounds too soft
Raise or lower the FM audio level until the sound quality improves.
XM Instant Traffic and Weather channels
sound different than other channels
Nothing is wrong with your XpressR. These channels use a
different audio technology than the other XM channels
customer support
53
XpressR user guide old cradle.qxp:Layout 1
5/2/07
12:38 PM
customer support
54
Specifications
XpressR
Dimensions
115 mm (W) x 63 mm (H) x 16 mm (D)
4.5 in (W) x 2.5 in (H) x 0.6 in (D)
Weight
94 g
3.3 oz
Audio output
3.5 mm mini-stereo jack
Antenna connector (home and car cradle) RF SMB
External power
Voltage: 5 V DC
Current: 2000 mA
Polarity:
Page 54
XpressR user guide old cradle.qxp:Layout 1
5/2/07
12:38 PM
Page 55
Remote
Dimensions
40 mm (W) x119 mm (H) x 14 mm (D)
1.5 in (W) x 4.7 in (H) x 0.55 in (D)
Weight
40 g
1.4 oz
Battery
Type: CR2032
Voltage: 3 V
Model Numbers
XpressR
XMCK-20KC
XPress universal home kit
XMHKU-1KC
XPress universal car kit
XMCKU-1KC
customer support
55
XpressR user guide old cradle.qxp:Layout 1
5/2/07
12:38 PM
Page 56
customer support
56
Product Registration
1. Register your product. We will keep
the details of your purchase on file to
help you refer to this information in
the event of an insurance claim such
as loss or theft.
2. Receive updates on the latest products and technologies.
3. Download owner’s manuals, order
product catalogues, research new
products, and much more.
IMPORTANT (Serial Number) The serial number of this device is located on the back
of this unit. For your own security and convenience, be sure to record this number for
future warranty claims.
Serial Number:
XpressR user guide old cradle.qxp:Layout 1
5/2/07
12:38 PM
Page 57
Patent Information
Technology. It is prohibited to, and you agree that you will not, copy, decompile, disassemble, reverse engineer, hack, manipulate, or otherwise access and/or make available any technology incorporated in receivers compatible with the XM Satellite Radio
system. Furthermore, the AMBE (r) voice compression software included in this product is protected by intellectual property rights including patent rights, copyrights, and
trade secrets of Digital Voice Systems, Inc. The software is licensed solely for use
within this product. The music, talk, news, entertainment, data, and other content on
the Services are protected by copyright and other intellectual property laws and all
ownership rights remain with the respective content and data service providers. You
are prohibited from any export of the content and/or data (or derivative thereof ) except in compliance with applicable export laws, rules and regulations. The user of this
or any other software contained in an XM Radio is explicitly prohibited from attempting to copy, decompile, reverse engineer, hack, manipulate or disassemble the object
code, or in any other way convert the object code into human-readable form.
customer support
57
XpressR user guide old cradle.qxp:Layout 1
5/2/07
12:38 PM
Page 58
FCC Statement
58
IC & FCC Statement
Please note that the power cable that has been supplied with your device is supplied with permanently
attached ferrite beads. It is the responsibility of the user to use the power cable with the ferrite beads.
The user is cautioned that changes or modifications not expressly approved by XM Satellite Radio Inc.
can void the user’s authority to operate this device.
This device has been designed to operate with the antenna provided in the original packaging. Use of
antenna other than the antenna provided will result in improper operation, and is strictly prohibited per
regulations of Industry Canada.
Operation is subject to the following two conditions:
(1) This device may not cause harmful interference.
(2) This device must accept any interference received, including interference that may cause undesired operation.
This equipment generates, uses, and can radiate radio frequency energy and, if not installed and used in
accordance with the installation instructions, may cause harmful interference to radio communications.
However, there is no guarantee that interference will not occur in a particular installation. If this equipment does cause harmful interference to radio or television reception, which can be determined by
turning the equipment off and on, the user is encouraged to try to correct the interference by one or
more of the following measures:
- Reorient or relocate the receiving antenna of the affected receiver.
- Increase the separation between the XM equipment and the affected receiver.
- Connect the XM equipment into an outlet on a circuit different from that to which the affected
receiver is connected.
- Consult the dealer or an experienced radio/TV technician for help.
Warning: The FCC and FAA have not certified this Satellite Radio Receiver for use in any aircraft
(neither portable nor permanent installation). Therefore, XM Satellite Radio cannot support this
type of application or installation
XpressR user guide old cradle.qxp:Layout 1
5/2/07
12:38 PM
Page 59
5
Warranty
warranty
59
XpressR user guide old cradle.qxp:Layout 1
5/2/07
12:38 PM
Page 60
warranty
60
12 Month Limited Warranty
AUDIOVOX ELECTRONICS CORPORATION (the Company) warrants to the original retail
purchaser of this product that should this product or any part thereof, under normal use
and conditions, be proven defective in material or workmanship within 12 months from
the date of original purchase, such defect(s) will be repaired or replaced with new or reconditioned product (at the Company's option) without charge for parts and repair labor.
To obtain repair or replacement within the terms of this Warranty, the product is to be
delivered with proof of warranty coverage (e.g. dated bill of sale), specification of
defect(s), transportation prepaid, to an approved warranty station or the Company at
the address shown below.
This Warranty does not extend to the elimination of externally generated static or noise,
to costs incurred for installation, removal or reinstallation of the product, damage to
speakers, accessories, or vehicle and home electrical systems, malfunction of satellite
transmissions, repeater signal or receiver unit.
This Warranty does not apply to any product or part thereof which, in the opinion of the
Company, has suffered or been damaged through alteration, improper installation, mishandling, misuse, neglect, accident, or by removal or defacement of the factory serial
number/bar code label(s).
THE EXTENT OF THE COMPANY'S LIABILITY UNDER THIS WARRANTY IS LIMITED TO THE
REPAIR OR REPLACEMENT PROVIDED ABOVE AND, IN NO EVENT, SHALL THE COMPANY'S
LIABILITY EXCEED THE PURCHASE PRICE PAID BY PURCHASER FOR THE PRODUCT.
XpressR user guide old cradle.qxp:Layout 1
5/2/07
12:38 PM
Page 61
This Warranty is in lieu of all other express warranties or liabilities. ANY IMPLIED WARRANTIES, INCLUDING ANY IMPLIED WARRANTY OF MERCHANTABILITY, SHALL BE LIMITED
TO THE DURATION OF THIS WRITTEN WARRANTY. ANY ACTION FOR BREACH OF ANY
WARRANTY HEREUNDER INCLUDING ANY IMPLIED WARRANTY OF MERCHANTABILITY
MUST BE BROUGHT WITHIN A PERIOD OF 48 MONTHS FROM DATE OF ORIGINAL PURCHASE. IN NO CASE SHALL THE COMPANY BE LIABLE FOR ANY CONSEQUENTIAL OR INCIDENTAL DAMAGES FOR BREACH OF THIS OR ANY OTHER WARRANTY, EXPRESS OR
IMPLIED, WHATSOEVER. No person or representative is authorized to assume for the
Company any liability other than expressed herein in connection with the sale of this
product.
Some states do not allow limitations on how long an implied warranty lasts or the exclusion or limitation of incidental or consequential damage so the above limitations or exclusions may not apply to you. This Warranty gives you specific legal rights and you may
also have other rights which vary from state to state.
U.S.A. : AUDIOVOX ELECTRONICS CORPORATION, 150 MARCUS BLVD., HAUPPAUGE, NEW
YORK 11788 1-800-645-4994
CANADA : CALL 1-800-645-4994 FOR LOCATION OF WARRANTY STATION SERVING YOUR
AREA
warranty
61
XpressR user guide old cradle.qxp:Layout 1
5/2/07
12:38 PM
Page 62
XMCK-20KC
128-8074