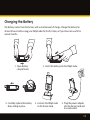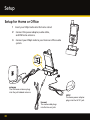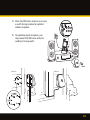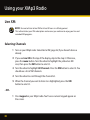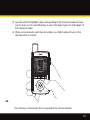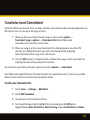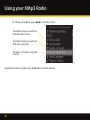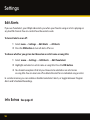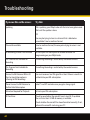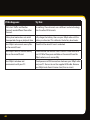
1
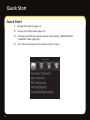
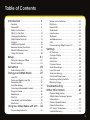
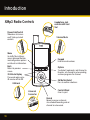
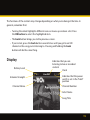
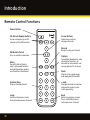
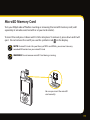
User Guide
Quick Start
Quick Start
1 Charge the battery (page 13).
2 Set up your XMp3 radio (page 21).
3 Activate your XM subscription online or by calling 1 800 XM RADIO
(1-800-967-2346) (page 25).
4 Press the menu button. You should see this screen:
2
Table of Contents
Introduction . . . . . . . . . . . . . . . . . . 4
Features . . . . . . . . . . . . . . . . . . . . . . . . . . . . . . . . 5.
About XM . . . . . . . . . . . . . . . . . . . . . . . . . . . . . . 6
Safety Instructions . . . . . . . . . . . . . . . . . . . . . . 7
What’s in the Box? . . . . . . . . . . . . . . . . . . . . . . 12
Charging the Battery. . . . . . . . . . . . . . . . . . . . 13 .
XMp3 Radio Controls. . . . . . . . . . . . . . . . . . . . 14 .
Display. . . . . . . . . . . . . . . . . . . . . . . . . . . . . . . . . 15 .
Additional Symbols. . . . . . . . . . . . . . . . . . . . . 16 .
Remote Control Functions. . . . . . . . . . . . . . . 18 .
MicroSD Memory Card. . . . . . . . . . . . . . . . . . 19 .
Using this Guide. . . . . . . . . . . . . . . . . . . . . . . . 20
Setup . . . . . . . . . . . . . . . . . . . . . . 21
Setup for Home or Office . . . . . . . . . . . . . . . 22.
While Traveling. . . . . . . . . . . . . . . . . . . . . . . . . 24
Activation . . . . . . . . . . . . . . . . . . . 25
Subscribing to XM . . . . . . . . . . . . . . . . . . . . . . 26
Using your XMp3 Radio . . . . . . . 27
Live XM . . . . . . . . . . . . . . . . . . . . . . . . . . . . . . . . 28
Pause and Replay Live XM . . . . . . . . . . . . . . 31 .
Recording XM . . . . . . . . . . . . . . . . . . . . . . . . . . 32 .
Auto Recording . . . . . . . . . . . . . . . . . . . . . . . . . 33.
Listening to Recorded Content . . . . . . . . . . 34 .
Program Guide . . . . . . . . . . . . . . . . . . . . . . . . . 36
Bookmarks . . . . . . . . . . . . . . . . . . . . . . . . . . . . . 36
Playlists . . . . . . . . . . . . . . . . . . . . . . . . . . . . . . . . 37
TuneSelect and GameSelect . . . . . . . . . . . . 39
Info Extras . . . . . . . . . . . . . . . . . . . . . . . . . . . . . . 41
Using Your XMp3 Radio with a PC . . 43
System Requirements . . . . . . . . . . . . . . . . . . 44
Setup and Installation. . . . . . . . . . . . . . . . . . 45
My Music. . . . . . . . . . . . . . . . . . . . . . . . . . . . . . 46
Record XM. . . . . . . . . . . . . . . . . . . . . . . . . . . . . 47
Bookmarks. . . . . . . . . . . . . . . . . . . . . . . . . . . . . 48.
napster.com. . . . . . . . . . . . . . . . . . . . . . . . . . . 49
My Books. . . . . . . . . . . . . . . . . . . . . . . . . . . . . . 50.
audible.com/xm . . . . . . . . . . . . . . . . . . . . . . . 51
Info . . . . . . . . . . . . . . . . . . . . . . . . . . . . . . . . . . . 52
Disconnecting XMp3 from a PC . . . . . . . . 53
Settings . . . . . . . . . . . . . . . . . . . . 54
EQ Settings . . . . . . . . . . . . . . . . . . . . . . . . . . . . . 55
Change Display . . . . . . . . . . . . . . . . . . . . . . . . . 55
Edit Alerts . . . . . . . . . . . . . . . . . . . . . . . . . . . . . . 56
Info Extras . . . . . . . . . . . . . . . . . . . . . . . . . . . . . . 56
Channel Access . . . . . . . . . . . . . . . . . . . . . . . . . 57
Auto Recordings . . . . . . . . . . . . . . . . . . . . . . . . 58
Line Out Level . . . . . . . . . . . . . . . . . . . . . . . . . . 58
Antenna Aiming . . . . . . . . . . . . . . . . . . . . . . . . 59 .
Clock and Sleep Timer . . . . . . . . . . . . . . . . . . 60
Restoring Factory Defaults . . . . . . . . . . . . . . 60 .
Memory Usage . . . . . . . . . . . . . . . . . . . . . . . . . 61
Troubleshooting . . . . . . . . . . . . . 62
Other Information . . . . . . . . . . . . 67
Product Registration . . . . . . . . . . . . . . . . . . . . 68
XMp3 Radio Customer Service
Information. . . . . . . . . . . . . . . . . . . . . . . . . . . . 68.
Product Specifications . . . . . . . . . . . . . . . . . . 69.
Patent Information . . . . . . . . . . . . . . . . . . . . . 71
FCC and IC Statement . . . . . . . . . . . . . . . . . . . 72
Limited Warranty . . . . . . . . . . . . . . . . . . . . . . . 73
3
Introduction
4
Introduction
Features
The XMp3: Record What You Love, Listen When You Want!™
• Live or recorded XM content at your fingertips. Spin the wheel to quickly tune to your favorite XM channels.
• Have to step away for a few minutes? Pause and replay up to 30 minutes of XM programming.
• Record up to 5 channels simultaneously, so you’ll always have something to listen to. Schedule a recording time, or let the XMp3 radio learn your listening habits and automatically record your favorite channels for you.
• Find out what’s playing now or in the future with XM’s programming guide.
• TuneSelect and GameSelect finds your favorite artists or sports events on any XM channel.
• Upload MP3 files, WMA tracks, and Audible.com books from your PC. Manage your collection and playlists with the XM2go Music Manager software.
• Store MP3 or WMA files on a removable microSD memory card (sold separately).
5
Introduction
About XM
XM is America’s number one satellite radio company. Broadcasting live daily from studios in
Washington, DC, New York City, Chicago, the Country Music Hall of Fame in Nashville, Toronto,
and Montreal, XM’s 2008 lineup includes more than 170 digital channels of choice from coast
to coast: commercial-free music, premier sports, news, talk radio, comedy, children’s and
entertainment programming; and the most advanced traffic and weather information.
XM, the leader in satellite-delivered entertainment and data services for the automobile market
through partnerships with General Motors, Honda, Hyundai, Nissan, Porsche, Subaru, Suzuki,
and Toyota, is available in 140 different vehicle models for 2008. XM’s industry-leading products
are available at consumer electronics retailers nationwide. For more information about XM
hardware, programming, and partnerships, please visit http://www.xmradio.com.
6
Safety Instructions
IMPORTANT! Always read and understand all the instructions to avoid injury to yourself and/or
damage to your device. XM Satellite Radio claims no responsibility for damage from data loss due to breakdown, repair or other causes.
DO NOT:
• Expose to extreme temperatures, i.e. above 140°F (60°C) or below -4°F (-20°C).
• Expose to moisture. Do not use the radio near or in water. Don’t touch the radio with wet hands.
• Let any foreign matter spill into the radio.
• Store in dusty areas.
• Expose to chemicals such as benzene, thinners, liquid or aerosol cleaners.
• Expose to direct sunlight, fire, flame, or other heat sources for a prolonged period.
• Try to repair or disassemble the radio yourself. Opening the case, power adapter, or home stand may cause electric shock.
• Drop, hit, or bend your radio.
• Place heavy objects on your radio.
DO:
• Use only the approved power adapter. The power adapter plug should match the outlet.
• Insert the power adapter plug all the way into the outlet. Be careful not to overload the outlet with too many electrical devices, and keep metallic 7
Introduction
objects away from the power plugs.
•
Stay aware of your surroundings when enjoying your XMp3 radio. If you’re a pedestrian, keep your eyes and ears open. If you’re driving, keep your eyes on the road and your hands on the wheel. Not doing so can result in personal injury, death, and/or damage to your device, accessories, and/or to your vehicle or other property.
•
Place your XMp3 radio where it won’t interfere with your vehicle’s safety features, such as airbags. Failing to correctly place the device may result in injury to you and others if it becomes detached during an accident and/or obstructs the deployment of an airbag.
Environmental Information
• Follow local guidelines for waste disposal when discarding packaging, batteries, and electronic appliances. The battery type is Lithium-Ion (Li-Ion) and should be disposed of properly.
8
Protect Your Ears and Yourself
• Always follow traffic safety directions. Do not use earbuds or headphones while operating a bicycle, automobile, or motorcycle. Not only is it dangerous, it may be illegal.
• Make sure the earbud or headphone cable does not get in the way of your arms or other surrounding objects while you’re walking or exercising.
• Maintain a moderate volume when walking or exercising. Always be aware of what is happening around you.
• Using earbuds or headphones for a long time and/or at high volume can cause serious damage to your hearing. If you hear ringing in your ears, STOP listening immediately.
Sound can be deceiving. Over time, your hearing “comfort level” adapts to higher and higher
volumes; what sounds “normal” may be dangerously loud.
TO ESTABLISH A SAFE LEVEL: Start the volume control at a low setting. Slowly increase the
volume until you can hear comfortably, without distortion, and still be aware of your surroundings.
ONCE YOU ESTABLISH A COMFORTABLE SOUND LEVEL:
Leave the volume at that level; do not increase it over time.
Pioneer and the Consumer Electronics Association recommend that you avoid prolonged
exposure to excessive noise. Sustained sound levels above 85 decibels can be dangerous without
9
Introduction
hearing protection. (For reference, a garbage disposal or loud shouting at 3 feet are about 80
decibels; a food blender or gas lawn blower at 3 feet are around 90 decibels.)
Pioneer disclaims all liability for hearing loss, bodily injury, or property damage as a result of
use or misuse of this product.
Important battery information
Your XMp3 radio’s battery should be charged before you use the radio. The amount of
charge is indicated by the battery level meter in your XMp3 radio’s display. When you’re
charging the battery you will see
. When the battery is exhausted you will see a red
battery icon.
When you use your XMp3 radio for the first time, charge the battery until the battery icon
turns green. Then use your XMp3 radio until the battery is exhausted. This charge/discharge
cycle calibrates the battery level meter so that it accurately reports the state of the battery.
Batteries gradually wear down and require longer charging times. When a battery no longer
holds its charge, you should purchase a new battery. Always use authorized batteries and
power adapters. Replacement batteries and power adapters can be ordered online at
www.xmradio.com/accessories.
To prevent injuring yourself or your XMp3 radio, do not disassemble, crush, or puncture the
battery. Never allow metal to touch the battery terminals.
Your XMp3 radio’s rechargeable battery should be disposed of properly and may need to be
10
recycled. Contact your local recycler for details. Never dispose of batteries in a fire or in water as
they may explode.
To insert or remove the battery see page 13 for more information.
11
Introduction
What’s in the Box?
XMp3 Radio
Home Stand
Remote Control
Earbuds
RCA Audio Cable
XM Home Antenna
USB Cable
Battery
12
AC Power Adapter
Also Included:
User Guide and Getting the
Most From your XM Radio
Guide
Charging the Battery
The battery comes from the factory with a small amount of charge. Charge the battery for
at least 8 hours before using your XMp3 radio for the first time, or if you have not used it for
several months.
1. Open battery
compartment.
3. Carefully replace the battery door, sliding in place.
2. Insert the battery into the XMp3 radio.
4. Connect the XMp3 radio
to the home stand.
5. Plug the power adapter into the home stand and to a wall socket.
13
Introduction
XMp3 Radio Controls
Power/Hold Switch
Slide down to turn on
or off, slide up to lock
controls.
Headphone Jack
and microSD Card
Slot
Volume/Mute
Menu
Go to My Music Library,
access advanced features
and configuration options
or info extras information.
Keypad
Enter channel numbers.
Back
Return to previous
screen.
30-Minute Replay
Pause and replay up to
30 minutes of live XM
Options
TuneSelect, bookmarks, add channel to
favorites, set channel to auto recording,
and view programs for channel.
XM Button/Select
Press to confirm selections.
USB Jack
Universal
Connector
Control Wheel
Give it a spin!
Record
Record a song or a channel also schedule recording and set
channel to auto record.
14
The functions of the controls may change depending on what you’re doing at the time. In
general, remember that:
• Turning the wheel highlights different icons or moves up or down a list. Press the XM button to select the highlighted item.
• The back button brings you to the previous screen.
• If you’re lost, press the back button several times until you get to an XM channel or the song you’re listening to. Pressing and holding the back button will do the same thing.
Display
Battery Level
Antenna Strength
Channel Name
Indicates that you are
listening to live or recorded
content
Clock
Indicates that the power
switch is set in the “hold”
position
Channel Number
Artist Name
Song Title
15
Introduction
Additional symbols
Live XM
My Music Library
Auto Recordings
Settings
Battery Charging
Battery Charged (green)
Battery Low (red)
Hold - controls locked. To unlock, slide the power switch
down to the middle position
Mute – to unmute, press both volume up and volume down
buttons at the same time
Repeat
Shuffle
MP3 or WMA song loaded onto the microSD card
16
microSD card is in the device, has been scanned and is safe to
be removed (green)
Song included on a playlist
MP3 or WMA song loaded onto the microSD card that has
been added to a playlist
TuneSelect set to alert on artist’s name
TuneSelect set to alert on song title
XM signal strength
MicroSD card is being read. Do not eject the microSD card
until this icon disappears (red)
GameSelect set to alert and channel added to channel list (see
channel skip/add)
Scheduled recording via “View Programs” or “XM Highlights”
Schedule to Alert via “View Programs” or “XM Highlights”
Scheduled recording via “Schedule Recording”
17
Introduction
Remote Control Functions
Power Button
30-Minute Replay Buttons
Pause and replay up to 30
minutes of live XM content.
XM Button/Select
Press to confirm selections.
Menu
Go to My Music Library,
access advanced features
and configuration options
or info extras information.
18
Arrow Buttons
Select menu entries,
change channels.
Record
Record a song or channel.
Options
TuneSelect, bookmarks, add
channel to favorites, set
channel to auto record, and
view programs for channel.
Mute
Silences live, saved songs,
and replayed XM content.
Number Keys
Enter a channel directly.
+ and Change channels or control
volume for audio system
(sold separately).
Jump
Switches between current
channel and previous channel.
Back
Return to previous screen.
Press and hold to return
to the previous channel.
MicroSD Memory Card
Turn your XMp3 radio off before inserting or removing the microSD memory card (sold
separately at xmradio.com/microSD or at your local retailer).
To insert the card press it down until it clicks into place. To remove it, press down and it will
eject. Do not remove the card if you see this symbol in red
on the display.
NOTE! A microSD card is for your library of MP3s and WMAs, you cannot store any recorded XM content on your microSD card.
WARNING! Do not remove microSD Card during scanning.
Be sure you insert the microSD
card correctly.
19
Introduction
Using this Guide
Throughout this guide, you will see instructions such as Select menu → Settings → Change
Display → Brightness. This tells you to do the following:
1 Press the menu button.
2 Turn the wheel clockwise until the Settings Icon is highlighted.
3 Press the XM button to select Settings.
4 Turn the wheel to get to Change Display, press the XM button again to select.
5 Press the XM button to toggle through the brightness choices.
20
Setup
21
Setup
Setup for Home or Office
1 Insert your XMp3 radio into the home stand. 2 Connect the power adapter, audio cable, and XM home antenna.
3 Connect your XMp3 radio to your home or office audio system.
line out
antenna
antenna
The XM home antenna plugs
into the jack labeled antenna.
line out
The audio cable plugs
into the line out jack.
22
5V DC
The home power adapter
plugs into the 5V DC jack.
4 Place the XM home antenna in or near a south facing window for optimal indoor reception.
5 To optimize signal reception, you may mount the XM home antenna outdoors, facing south.
South
Outdoors
Outdoors
23
Setup
While Traveling
You can connect the power adapter directly to your XMp3 radio.
24
Activation
25
Activation
Subscribing to XM
Before you can listen to any of XM’s more than 170 channels, you must first activate your
XMp3 radio.
1 Make sure your XMp3 radio is receiving the XM signal in live mode so that you can hear the audio on Channel 1.
2 Make a note of your XM Radio ID. You can find it:
• On XM Channel 0
• On the rear package label
• On the label inside of the battery compartment
NOTE! The XM Radio ID does not use the letters I, O, S, or F.
3 Activate your service:
• Online: Go to activate.xmradio.com
OR
• By phone: call 1-800-XM-RADIO (1-800-967-2346)
4 When your service is activated, your XMp3 radio will receive all channels. This usually takes 10 to 15 minutes, but may take up to an hour. Your XMp3 radio must remain on until activated.
If you have not yet activated your XMp3 radio and it is not receiving a signal, the radio may
show a Product Demo on its display. The demo disappears when you activate the radio.
26
Using Your XMp3 Radio
27
Using your XMp3 Radio
Live XM
NOTE! Be sure to listen to live XM for at least 8 hours in a 30-day period. This authenticates your XM subscription and ensures you continue to enjoy your live and recorded XM programs.
Selecting Channels
1 Turn on your XMp3 radio. Subscribe to XM (page 26) if you haven’t done so already.
2 If you see Live XM at the top of the display, skip to the step 3. Otherwise, press the menu button. Turn the wheel to highlight the yellow live XM icon, then press the XM button to select it.
3 Turn the wheel to highlight All Channels. Press the XM button to select it. You should see a list of XM channels.
4 Turn the wheel to scroll through the channel list.
5 When the channel you want to listen to is highlighted, press the XM button to select it.
- OR 1 Press keypad on your XMp3 radio. You’ll see a numeric keypad appear on the screen.
28
2 Turn the wheel to highlight a digit corresponding to the channel number that you want to listen to. Press the XM button to select that digit. Repeat for all the digits of that channel number.
3 When you’ve entered a valid channel number, your XMp3 radio will tune to that channel within 2 seconds.
- OR -
Press the keys on the remote that correspond to the channel number.
29
Using your XMp3 Radio
Categories
XM channels are organized into channel categories, or genres, such as “Rock,” “Jazz,” or “News.” To
find a channel by category:
1 Select menu → Live XM → All Categories.
2 You’ll see a list of all the XM categories. Turn the wheel to highlight a category, then press the XM button to select it.
3 You’ll now see a list of all channels within that category. Use the wheel and XM button to tune to your desired channel.
4 To briefly listen to each channel in a category, select “Scan (category name)” then press the XM button.
Favorite Channels
You can save up to 99 of your favorite channels in an easily accessible list.
1 While you’re tuned to a channel, press options.
2 Select Add to Favorites.
To listen to your favorite channels:
1 Press menu.
2 Spin the wheel to highlight the live XM icon. Press the XM button to select it.
3 Highlight and select Favorite Channels.
30
4 You should see a list of your favorite channels. Turn the wheel to highlight the desired channel then press the XM button to select it.
To remove a channel from your “Favorites” list:
1 Tune to that channel.
2 Select options → Remove Favorite.
Pause and Replay Live XM
Need to take a phone call or step away for a few minutes? Now
you can, and you won’t have to miss a second of live XM –
simply pause by pressing the button and you can walk away
up to 30 minutes. Press the button to resume playing.
To repeat the song you just heard or the song you are currently
listening to press If More than 5 seconds into the next song
press twice
Turn the wheel to see a list of songs that you missed, from
newest to oldest. Press the or buttons to skip to the
previous or next song in the list. You can also press and hold the
or buttons to rewind or fast-forward through individual
songs.
31
Using your XMp3 Radio
To return to live XM select menu → All Channels, or All Categories, or Favorite Channels.
You can also press several times or enter the channel number using the keypad or from the
replay list select Go to Live XM.
You won’t be able to record a song that is paused or being replayed. Your scheduled recording
and auto-recording sessions take place as normal.
Recording XM
Your XMp3 radio gives you more ways to record up to 100 hours of your favorite XM content.
Push a button to immediately record the song or channel that you’re currently listening to.
Or schedule a recording session by setting the date, time, and channel. You can also schedule
recording sessions using the XM2go® Music Manager application. Lastly, your XMp3 radio
automatically records content from the channels you listen to the most – so you’ll always have
something to hear.
To record a song or channel immediately:
1 While listening to a song press the rec button, which is the bottom portion of the wheel.
2 Select Record song (which records just that one song) or Record channel (which records the channel up to 6 hours, or until you tell it to stop).
TIP! Try pressing and holding the rec button. This records a single song immediately. Up to
10 hours of individual songs can be recorded.
To schedule a recording session for the future:
32
1 Select rec → Schedule Recording or Menu → Live XM → Schedule Recording.
2 Use the wheel and XM button to enter the date, start time, end time, and channel.
3 Select OK when done.
You can use the same method to edit or delete an existing recording session. You can also use the
XM2go Music Manager to create, edit, and delete recording sessions.
Your XMp3 radio can record up to 5 separate channels at the same time.
NOTE! The priority for recordings is as follows: (1) individual song, (2) channel recording, (3) scheduled recordings, and (4) auto recordings
Auto Recording
Your XMp3 radio learns your listening habits and automatically records up to 30 hours of XM
programming from the five channels you listen to most frequently. To automatically record
programs in this manner, make sure that:
• XMp3 radio is docked and is plugged into AC or vehicle power.
• XMp3 radio can receive an XM signal.
You can also turn all auto-recording off by selecting menu → Settings → Auto Recording, press
the XM button to toggle between Off and On.
33
Using your XMp3 Radio
To designate a specific channel to be auto-recorded:
1 Tune to that channel.
2 Select rec → Set to Auto Record. You can designate up to 5 channels in this manner.
To remove channels from the auto-record list, select rec → Remove Auto Rec.
Listening to Recorded Content
Recorded XM, MP3 and WMA files, audiobooks – they’re all in one place.
1 Select menu → My Music Library.
2 Choose Recorded XM, MP3s and WMAs, or My Books.
3 If you choose Recorded XM, you’ll see this screen:
34
4 You can view all songs in your library of recorded XM content, or sort by artist, category, channel name, and so on. You’ll see similar menus when you view your library of MP3/WMA files or audiobooks.
As you listen to recorded music or audiobooks, try pressing options. Depending on the type
of content, you will find options to add the songs or artist to your TuneSelect list (XM content
only), repeat songs, shuffle songs, add them to playlists, or see more information about the
track (if available).
Wondering how to get MP3/WMA files and audiobooks onto your XMp3 radio? You can upload
MP3/WMA files from your PC directly to your XMp3 radio using a USB cable and the XM2go
Music Manager.
You can also store MP3/WMA files directly on a microSD memory card. When you view the
library of MP3/WMA files on XMp3 radio, these types of files are indicated by this symbol:
Try to store most of your MP3/WMA files on the microSD card. This lets your XMp3 use more of
its internal memory to hold recorded XM content.
Your XMp3 radio will inform you when its memory is full. To continue recording XM content,
delete some songs. To delete songs:
1 Select menu → My Music Library → Recorded XM.
2 Choose any method to display a list of songs.
3 Highlight a song.
4 Select options → Delete.
35
Using your XMp3 Radio
Program Guide
To see what will be playing on a particular channel:
While listening to live XM, select options → View Programs.
You will see a list of programs that will be playing on that
channel.
If you then highlight a program and select it, you can see
information about that program, schedule to record it, or
set an alert that will notify you when the program starts.
Looking for an interesting program but don’t know quite what you want? Select menu → Live XM
→ XM Highlights. You’ll see a list of the best programs across select XM channels for the next few
days.
Bookmarks
Use XMp3 radio’s “bookmarks” to remember artist and title information of interesting songs.
To bookmark a song that is currently playing, simply select options → Bookmark Song.
You can then view these bookmarks at a later time using the XM2go Music Manager application on
your PC. The XM2go Music Manager also makes it easy for you to purchase the songs that you’ve
bookmarked. You can purchase the songs from napster.com.
36
Playlists
You can create one or more custom lists, called playlists. A playlist is simply a collection of
recorded tracks that play in a certain order. Create a “morning commute” playlist, a “workout”
playlist, a “best of” playlist, and more. And yes, the same song can appear on more than one
playlist.
1 While listening to recorded XM or MP3/WMA files, select options → Add to Playlist.
2 Choose to add the song to an existing playlist or to a new playlist. To create a new playlist, select New Playlist. You will see an alphabetic keyboard that allows you to spell the name of the playlist.
NOTE! You cannot make playlists using both MP3/WMA files and XM recorded content.
Turn the control
wheel to highlight a
letter; press the XM
button to select it.
Shift displays lower-case
characters and other
symbols.
Select Enter when you’re
done spelling the name.
Playlist name
Correct errors using the
Back key.
Exit cancels the operation
without creating the playlist
name.
37
Using your XMp3 Radio
To delete a playlist:
1 Select menu → My Music Library → Recorded XM or menu → My Music Library → MP3s and WMAs.
2 Select Playlists.
3 Highlight a playlist name and select options → Delete.
To remove songs from a playlist:
1 Select menu → My Music Library → Recorded XM or menu → My Music Library → MP3s and WMAs.
2 Select Playlists.
3 Select a playlist name and highlight a song within that playlist.
4 Select options → Remove from Playlist
A playlist may hold only one of these content types:
• Recorded XM content
• MP3/WMA files uploaded to your XMp3 radio using a PC
• MP3/WMA files stored on the microSD card
You cannot create a playlist that, for example, mixes recorded XM content with MP3 files.
38
TuneSelect and GameSelect
TuneSelect finds your favorite artists or songs and alerts you whenever they are being played on any
XM channel. You can save up to 30 songs or artists.
1 When you hear one of your favorite songs or artists, select options →
TuneSelect Song or options → TuneSelect Artist. Your XMp3 radio remembers the song title or artist name.
2 When any song or artist on your TuneSelect list is being played on any other XM channel, your XMp3 radio alerts you with a short beep and by displaying information about that song, artist, and channel.
3 Press the XM button to change channels and hear that song or artist. If you don’t do anything, the alert will go away after 6 seconds.
You can do the same thing with sports games; just select options → GameSelect.
Your XMp3 radio might find more than one TuneSelect or GameSelect entry; in that case, you’ll be
able to choose which one to listen to by turning the wheel.
To edit your TuneSelect list:
1 Select menu → Settings → Edit Alerts.
2 Select Edit TuneSelect.
3 You will see a list of TuneSelect entries.
4 To change the type of alert, highlight that entry and press the XM button. Toggle between Alert On Artist or Alert On Song, choose Do Not Alert or Delete.
39
Using your XMp3 Radio
5 When you’re done, press back to exit the screen.
TuneSelect alerts you when it
finds this artist name.
TuneSelect alerts you when it
finds this song title.
No alerts set for this song title
or artist.
GameSelect alerts may be set or disabled in a similar manner.
40
Info Extras
XM broadcasts information such as sports scores and stock quotes. This information can be
displayed at the bottom of your XMp3 radio’s screen.
To choose a sport or team:
1 Select menu → Settings → Info Extras → Sports.
2
You’ll see a list of sports. Use the wheel and XM button to select the sports you’re interested in. Depending on the sport, you may see a list of team choices as well.
3
Select a sport or team by highlighting that entry. Press the XM button; a check mark will appear in front of that sport or team. Not interested in that team? Press the XM button again to remove the check mark. You can select several sports or teams by repeating this step.
4 When you’re done selecting sports and teams, press back repeatedly to exit.
41
Using your XMp3 Radio
Choosing a stock is a similar process:
1 Select menu → Settings → Info Extras → Stocks.
2 Select Add Stocks.
3
To add the symbol for XM Satellite Radio, “XMSR,” turn the wheel until “X” appears in the first letter position. Press the XM button to confirm. Turn the wheel until “M” appears in the second letter position, then press the XM button to confirm. Do the same thing for the remaining letters.
4 You can delete stock symbols by choosing Erase Stocks during step 2, then following directions on your XMp3 radio’s screen.
5 When you’re done with the stock list, press back to exit.
42
Using Your XMp3 Radio with a PC
43
Using your XMp3 Radio with a PC
The XM2go Music Manager runs on Windows-based personal computers and allows you to:
• Manage your music: create and customize playlists of XM recordings or your personal MP3 or WMA files.
• Schedule recordings.
• View XM’s Online Program Guide: discover new music and programs by seeing what’s available on all XM channels for the next week.
• Rip CDs to MP3 or WMA files.
• Bookmark and purchase songs from compatible online music services including Napster®.
• Listen to and purchase audiobooks from Audible.com®.
• Manage up to 5 compatible XM radios.
System Requirements
PCs running Microsoft® Windows® XP must meet the following requirements:
• Service Pack 2 (SP2) or higher
• CPU: 400 MHz or higher
• Hard drive: at least 100 MB free disk space
• RAM: at least 256 MB
• High-speed Internet connection
• Windows Media Player 11 (loaded at time of installation if not present)
44
PCs running Microsoft® Windows® Vista must meet the following requirements:
• CPU: 800 MHz or higher for Vista Home; 1 GHz or higher for other Vista editions
• Hard drive: at least 100 MB free disk space
• RAM: at least 512 MB for Vista Home; at least 1 GB for other Vista editions
• High-speed Internet connection
• Windows Media Player 11 (loaded at time of installation if not present)
Setup and Installation
Download the XM2go Music Manager software and instructions from:
www.xmradio.com/xm2gomusicmanager
45
Using your XMp3 Radio with a PC
My Music
The XM2go Music Manager helps you organize recorded XM content and your MP3s.
• View your XM recordings, including the artist name, song title, the channel it was recorded from and song length.
• View your personal music (MP3s and WMA files) collection, including the artist name, song title, album and song length.
• View, create and modify playlists and add songs.
• View XM’s Online Programming Guide to see what’s playing on XM.
46
Record XM
Schedule Recordings of XM content directly from your XMp3 radio, or with the XM2go Music
Manager.
• Save time by recording up to five channels at the same time.
• View all scheduled recordings, including the duration.
• View XM’s Online Programming Guide to see what’s playing on XM.
47
Using your XMp3 Radio with a PC
Bookmarks
Bookmarks are an easy way to flag your favorite songs while listening to your XMp3 radio.
• View songs you have bookmarked on your XMp3 radio and link to Napster.com to purchase them.
•
Add your music library to the XMp3 radio with a standard or high capacity microSD card. We recommend storing your MP3 files on a microSD card since you can only record XM content onto the XMp3 radio – it cannot be transferred to a microSD card.
• View XM’s Online Programming Guide to see what’s playing on XM.
48
napster.com
Napster enables you to purchase and own songs you heard and bookmarked on your XMp3
radio.
• Easy access to a library of millions of songs.
• Add your music library to the XMp3 radio with a standard or high capacity microSD card.
• We recommend storing your MP3 files on a microSD card since you can only record
XM content onto the XMp3 radio – it cannot be transferred to a microSD card.
49
Using your XMp3 Radio with a PC
My Books
View the authors, titles, and length of audible books saved on your XMp3 radio.
• Link to audible.com/xm to see available audible books.
• View XM’s Online Programming Guide to see what’s playing on XM.
50
audible.com/xm
Audible is your source for the internet’s largest selection of premium digital audio.
• Choose from over 40,000 downloadable audiobooks, including the latest best sellers and timeless classics.
• Download content to your XMp3 radio or other compatible devices and listen at the gym, on your commute, anywhere, anytime.
51
Using your XMp3 Radio with a PC
Info
View Information about your XMp3 radio such as model and radio ID.
• Personalize the name of your XMp3 radio.
• View the amount of XM content storage used/available and personal music storage used/available on your XMp3 radio.
• View the amount of personal music storage/used on your microSD card.
• View XM’s Online Programming Guide to see what’s playing on XM.
52
Disconnecting XMp3 from a PC
To disconnect your XMp3 from your PC, you must follow these steps:
1 Click on “Eject” on the lower left-hand corner of the XM2go Music Manager screen.
2 XM2go Music Manager will sync with your XMp3 radio, then inform you that you can disconnect your XMp3 radio.
3 Unplug the USB cable from either the PC or your XMp3 radio.
NOTE! DO NOT use Windows’ “Safely Remove Hardware” button as it does not
properly sync XM2go Music Manager with your XMp3 radio.
53
Settings
ON
54
Settings
You can manage your XMp3 radio settings by selecting menu → Settings. The list of settings
will vary depending on whether you’re using your XMp3 radio in a portable mode, docked into a
vehicle cradle, in a home stand, or in a sound system.
EQ Settings
Change the tone by selecting menu → Settings → EQ Settings. By pressing the XM button,
you can choose between “Flat,” “Max Boost,” “Pop,” “Rock,” “Classical,” and more.
The EQ setting is not available when listening to XM through your vehicle’s FM radio. To change
the audio quality, use the tone or EQ controls of the FM radio.
Change Display
Control the display appearance by selecting menu → Settings → Change Display. You have
the following options:
• Brightness: select between high, medium, or low screen brightness.
• Backlight Timer: determines how long the screen remains lit. Choose between Always On, 1 minute, 30 seconds, or 15 seconds.
• Show Info Extras: choose to show stock, sports, or no info extras while you listen.
55
Settings
Edit Alerts
If you use TuneSelect, your XMp3 radio alerts you when your favorite song or artist is playing on
any live XM channel. You can control how these alerts work.
To turn all alerts on or off:
1 Select menu → Settings → Edit Alerts → All Alerts.
2 Press the XM button to turn all alerts off or on.
To choose whether you get an alert based on an artist name or song title:
1 Select menu → Settings → Edit Alerts → Edit TuneSelect.
2 Highlight and select an artist name or song title. Press the XM button.
3 You should see options that let you choose to be alerted on an artist name or song title. You can also turn off or delete the alert for an individual song or artist.
In a similar manner, you can enable or disable GameSelect alerts, or toggle between Program
Alerts and Scheduled Recordings.
Info Extras
56
See page 41
Channel Access
Direct Tune
Normally, as you scroll through live XM channels using the wheel, your XMp3 radio displays the
channel, artist name, and song title, which allows you to preview the information before tuning
to that channel. To hear that channel, you would then press the XM button.
You can set your XMp3 radio to automatically tune to a channel without having to press the XM
button:
1 Select menu → Settings → Channel Access → Direct Tune.
2 Press the XM button to toggle between On and Off. Setting this to On
means that your XMp3 radio automatically tunes to a channel.
Skipping a Channel
If you don’t want to scroll through all XM channels to get to the ones you want, you can easily
remove channels from the list that displayed on the screen. To remove channels from the
channel list:
1 Select menu → Settings → Channel Access → Channel Skip/Add.
2 You’ll see a list of all XM channels. Channels that are visible when you normally turn the wheel are marked with a check; those that don’t appear do not have a check. Press the XM button to turn the check mark on or off.
3 To exit, press back repeatedly.
57
Settings
You can always access a skipped channel by entering its channel number directly.
Blocking xL Channels
A channel logo that contains “xL” means that you may hear frequent explicit language on that
channel. To block these channels:
1 Select menu → Settings → Channel Access → xL Channels.
2 Press the XM button to select Off. xL channels will no longer appear on the channel list. Select On to be able to view the xL channels.
Auto Recordings
You can turn all auto-recording off by selecting:
menu → Settings → Auto Recording, press the XM button to toggle between Off and On.
Line Out Level
When you connect your XMp3 radio to a home stereo or to your vehicle’s stereo (using a cassette
adapter or the vehicle’s auxiliary input), you should set your XMp3 radio’s audio level to match
58
the volume of other audio sources.
1 Select menu → Settings → Line Out Level.
2 Turn the wheel to increase or decrease the audio level.
3 Press the XM button to set that level.
Do not use the Line-Out Level menu item as a volume control; you should use the volume
control on your home or car stereo instead.
Aiming the Antenna
For best reception, your XM antenna should have an unobstructed view of the XM satellites
in the southern sky. In large cities, XM’s network of repeaters
helps increase signal coverage.
Your XMp3 radio can help you aim the antenna for best
reception.
1 Select menu → Settings → Antenna Aiming.
2 The “Satellite” and “Terrestrial” bars show the level of your current signal.
3 Rotate or move the antenna to make at least one of the bars as strong as possible.
59
Settings
Clock and Sleep Timer
• The time is automatically set using the XM signal. Select menu → Settings → Set Time → Time Zone to set the proper time zone for your location.
• Your XMp3 radio can automatically adjust for Daylight Savings Time. To turn this feature on, select menu → Settings → Set Time → Daylight Savings.
• To display time in 12- or 24-hour format, select the desired format through menu → Settings → Set Time → Hour Mode.
• Your XMp3 radio has a sleep timer, which automatically shuts off the unit after a period of time. Select menu → Settings → Set Time → Sleep Timer. Choose between 15, 30, 45, or 60 minutes; choose “Off” to disable the sleep timer.
Restoring Factory Defaults
To restore all your XMp3 radio settings and preferences to a “factory fresh” state:
- OR -
1 Select menu → Settings → Restore Defaults.
2 Choose Restore Setting to reset all options to factory defaults without erasing any stored content.
Choose Restore and Erase to reset all options to factory defaults AND erase all stored content.
Be careful!
60
3 You’ll see several confirmation screens. If you change your mind, simply select No. Alternatively, press back to exit this set of menus and return to normal operation.
Memory Usage
Select menu → Settings → Memory Usage to view memory status on your XMp3 radio.
• XM Singles represents songs recorded individually from live XM channels.
• Other Content represents channel recordings from live XM, scheduled recordings, and WMA/MP3/audiobook files transferred to your XMp3 radio using a PC.
• SD Card represents WMA or MP3 files that are stored on a microSD card plugged into your XMp3 radio.
61
Troubleshooting
62
Troubleshooting
XMp3 has been designed and built to be trouble-free but if you experience a problem, try this:
• Check that all connections are firm and secure.
• Remove its battery, wait at least 30 seconds, then re-insert it.
If you see this on the screen:
Try this:
No signal
Make sure the XM antenna is not obstructed.
Check Antenna
Make sure that the antenna cable is firmly and securely plugged
into the home stand. Make sure the cable is not bent or broken.
Turn XMp3 off, then on, to reset this message.
Off Air
The channel you’ve selected is not currently broadcasting. Tune
to another XM channel.
---
No program information, such as artist name, song title, or
channel exists.
Loading
Your XMp3 radio is acquiring audio or program information from
the XM signal. This message usually goes away in a few seconds.
You may also see this message if the channel you’re tuning to is
blocked. Try another channel.
63
Troubleshooting
If you see this on the screen:
Try this:
Updating
XM is updating your XMp3 radio with the latest encryption code.
Wait until the update is done.
OR
You may be trying to tune to a channel that is blocked or
unavailable. Tune to another channel.
Channel Unavailable
Tune to another channel; the one you’re trying to access is not
available.
All Recording Features Not Available
Activate your XM subscription to be able to record XM
programming on your XMp3 radio.
This Channel Not Available for
Recording
Do nothing. Recording is restricted by the content owners.
This Program Not Available for
Recording
Do nothing. Recording is restricted by the content owners.
Connect to XM Antenna Within 30
Days to Avoid Interruption in
Listening to XM Recordings
You must receive a live XM signal for at least 8 hours a month to
authenticate your XM subscription.
Please Connect to XM Antenna to
Confirm Valid Subscription
Select “Live XM” and make sure you get a strong signal.
Activation Required for Playback
Activate your XM subscription.
SD Card Error
Check to see whether the microSD card is too full; if so, delete
files so that at least 32 MB of memory is available.
Check whether the microSD has been formatted correctly; if not,
reformat the microSD card using your PC.
64
If this happens:
Try this:
XMp3 radio shuts off unexpectedly.
Check whether you’ve set the sleep timer, and set it to “Off,” if
desired. If you’re in a car, check whether “Vehicle Mode/Delayed
Power Off” is set, and set it to “Off,” if desired.
There is no power or XMp3 radio shuts
off quickly.
Check the battery level; it may be low. Charge the battery for 8
hours.
You do not receive all the XM
channels you subscribed to.
Check that you have not skipped any channels. If you still do not
receive all channels, your XMp3 may not be properly activated.
Contact XM Listener Care.
No audio.
Check all cables between your XMp3 radio and your stereo
system for a firm and secure connection.
No song title or artist name is
displayed.
The information may not be available or updates may be in
progress.
No audio when listening to XMp3
radio through an FM radio.
Check that your XMp3 radio and your radio are tuned to the
same FM frequency.
Audio fades or has static when
listening through your vehicle’s FM
radio.
Set your XMp3 radio and FM radio to another frequency.
Controls do not respond.
Check whether the power switch is in the “hold” position. If so,
slide it to the center position to unlock the controls.
The controls still refuse to respond,
the display does not change, or
the backlight does not turn off as
expected.
Reset your XMp3 radio by removing and re-inserting the battery.
65
If this happens:
Try this:
XM Instant Traffic and Weather
channels sound different from other
channels.
Do nothing. These channels use a different audio technology
than the other XM channels.
Battery level meter does not match
the expected charge or playback time.
Fully charge the battery, then use your XMp3 radio until the
battery is exhausted. This calibrates the battery level meter.
Your XMp3 radio cannot see any files
on the microSD card.
Check that the microSD card is unlocked.
Your XMp3 radio still cannot see any
files on the microSD card.
Check whether the microSD card is too full. There must be at
least 32 MB of free space available on the microSD card for
XMp3 radio to use it successfully.
Your XMp3 radio does not
communicate with your PC.
Check power and USB connections between your XMp3 radio
and your PC. Be sure to use the supplied USB cable. Remove
your XMp3 radio from its home stand, then re-insert.
66
Other Information
67
Other Information
Product Registration
Visit us at the following site: http://www.pioneerelectronics.com
1 Register your product. We will keep the details of your purchase on file to help you refer to this information in the event of an insurance claim such as loss or theft.
2 Receive updates on the latest products and technologies.
3 Download owner’s manuals, order product catalogues, research new products, and much more.
IMPORTANT! The serial number of this device is located on the back of this unit.
Serial No.:___________________________
XMp3 Radio Customer Service Information
Because your satisfaction is important to us, we encourage you to use the toll-free Listener Care
Center number for any question regarding your XMp3 radio.
1 800 XM RADIO (1-800-967-2346)
68
Product Specifications
XMp3 Radio
Dimensions
51 mm (W) X 92 mm (H) X 15 mm (D)
2 in (W) X 3.6 in (H) X 0.6 in (D)
Weight
69g without battery / 88g with battery
Storage Capacity
Internal: 2GB
Removable memory: Type: microSD™ Card Size: up to 8 GB
Audio Output
3.5 mm mini-stereo jack
Antenna Connector (Home and Car)
RF SMB
Battery
Type: rechargable lithium ion
Voltage: 3.7 V
Capacity: Up to 4 hours Live XM/Up to 16.5 hours playback
Standby time: > 30 days (for a fully charged battery)
External Power
Voltage: 5.2V DC
Current: 1600 mA
Polarity:
Music File Formats
MP3 and WMA fixed bitrates: 32, 48, 64, 96, 128, 160, 192, 256,
320 kbps
MP3 and WMA variable bitrates: 64-128, 128-256, 160-320 kbps
69
Other Information
Remote Control
Dimensions
40 mm (W) X 119 mm (H) X 15.4 mm (D)
1.5 in (W) X 4.7 in (H) X 0.60 in (D)
Weight
60g
Battery
Type: CR2032
Voltage: 3V
Model Numbers
XMp3 Radio
GEX-XMP3
XMp3 Car Kit
CD-XMPCAR1
XMp3 Home Car Kit
CD-XMHOME1
70
Patent Information
It is prohibited to, and you agree that you will not, copy, decompile, disassemble, reverse
engineer, hack, manipulate, or otherwise access and/or make available any technology
incorporated in receivers compatible with the XM Satellite Radio system. Furthermore, the
AMBE® voice compression software included in this product is protected by intellectual
property rights including patent rights, copyrights, and trade secrets of Digital Voice
Systems, Inc. The software is licensed solely for use within this product. The music, talk,
news, entertainment, data, and other content on the Services are protected by copyright
and other intellectual property laws and all ownership rights remain with the respective
content and data service providers. You are prohibited from any export of the content and/
or data (or derivative thereof ) except in compliance with applicable export laws, rules and
regulations. The user of this or any other software contained in an XM Radio is explicitly
prohibited from attempting to copy, decompile, reverse engineer, hack, manipulate or
disassemble the object code, or in any other way convert the object code into
human-readable form.
Environmental Information
Follow local guidelines for waste disposal when discarding packaging and electronic
appliances.
Your Satellite Radio receiver is packaged with cardboard, polyethylene, etc., and does not
contain any unnecessary materials.
71
Other Information
FCC and IC Statement
The user is cautioned that changes or modifications not expressly approved by XM Satellite Radio Inc. can void the
user’s authority to operate this device.
This device has been designed to operate with the antenna provided in the original packaging. Use of antenna
other than the antenna provided will result in improper operation, and is strictly prohibited per regulations of
Industry Canada.
This device complies with Part 15 of the FCC Rules and is certified to Industry Canada’s RSS-210 specification:
1 This device may not cause harmful interference.
2 This device must accept any interference received, including interference that may cause undesired operation.
This equipment has been tested and found to comply with the limits for a Class B digital device, pursuant to
Part 15 of the FCC Rules and Industry Canada RSS-210. These limits are designed to provide reasonable
protection against harmful interference in a residential installation.
This equipment generates, uses, and can radiate radio frequency energy and, if not installed and used in
accordance with the installation instructions, may cause harmful interference to radio communications.
However, there is no guarantee that interference will not occur in a particular installation. If this equipment does
cause harmful interference to radio or television reception, which can be determined by turning the equipment
off and on, the user is encouraged to try to correct the interference by one or more of the following measures:
• Reorient or relocate the receiving antenna of the affected receiver.
• Increase the separation between the XM equipment and the affected receiver.
• Connect the XM equipment into an outlet on a circuit different from that to which the affected receiver is connected.
• Consult the dealer or an experienced radio/TV technician for help.
WARNING! The FCC and FAA have not certified this Satellite Radio Receiver for use in any aircraft (neither portable
nor permanent installation). Therefore, XM Satellite Radio cannot support this type of application or installation.
72
LIMITED WARRANTY
WARRANTY VALID ONLY IN COUNTRY OF PRODUCT PURCHASE
WARRANTY
Pioneer Electronics (USA) Inc. (PUSA), and Pioneer Electronics of Canada, Inc. (POC), warrants
that products distributed by PUSA in the U.S.A., and by POC in Canada that fail to function
properly under normal use due to a manufacturing defect when installed and operated
according to the owner’s manual enclosed with the unit will be repaired or replaced with a
unit of comparable value, at the option of PUSA or POC, without charge to you for parts or
actual repair work. Parts supplied under this warranty may be new or rebuilt at the option of
PUSA or POC.
THIS LIMITED WARRANTY APPLIES TO THE ORIGINAL OR ANY SUBSEQUENT OWNER OF THIS
PIONEER PRODUCT DURING THE WARRANTY PERIOD PROVIDED THE PRODUCT WAS
PURCHASED FROM AN AUTHORIZED PIONEER DISTRIBUTOR/DEALER IN THE U.S.A. OR
CANADA. YOU WILL BE REQUIRED TO PROVIDE A SALES RECEIPT OR OTHER VALID PROOF
OF PURCHASE SHOWING THE DATE OF ORIGINAL PURCHASE OR, IF RENTED, YOUR RENTAL
CONTRACT SHOWING THE PLACE AND DATE OF FIRST RENTAL. IN THE EVENT SERVICE IS
REQUIRED, THE PRODUCT MUST BE DELIVERED WITHIN THE WARRANTY PERIOD,
TRANSPORTATION PREPAID, ONLY FROM WITHIN THE COUNTRY OF PURCHASE AS EXPLAINED
IN THIS DOCUMENT. YOU WILL BE RESPONSIBLE FOR REMOVAL AND INSTALLATION OF THE
PRODUCT. PUSA OR POC, AS APPROPRIATE, WILL PAY TO RETURN THE REPAIRED OR
REPLACEMENT PRODUCT TO YOU WITHIN THE COUNTRY OF PURCHASE.
(warranty continues next page)
73
Other Information
PRODUCT WARRANTY PERIOD
Portable Satellite Radio……………………………...… 1 Year Parts & Labor
Portable Satellite Radio Battery……………………… 90 Days Parts & Labor
The warranty period for retail customers who rent the product commences upon the date
product is first put into use (a) during the rental period or (b) retail sale, whichever occurs first.
WHAT IS NOT COVERED
IF THIS PRODUCT WAS PURCHASED FROM AN UNAUTHORIZED DISTRIBUTOR, THERE ARE NO
WARRANTIES, EXPRESS OR IMPLIED, INCLUDING THE IMPLIED WARRANTY OF MERCHANTABILITY
AND THE IMPLIED WARRANTY OF FITNESS FOR A PARTICULAR PURPOSE AND THIS PRODUCT
IS SOLD STRICTLY “AS IS” AND “WITH ALL FAULTS”. PIONEER SHALL NOT BE LIABLE FOR ANY
CONSEQUENTIAL AND/OR INCIDENTAL DAMAGES. PIONEER DOES NOT WARRANT ANY
PRODUCT LISTED ABOVE WHEN IT IS USED IN A TRADE OR BUSINESS OR IN ANY INDUSTRIAL
OR COMMERCIAL APPLICATION. THIS WARRANTY DOES NOT APPLY IF THE PRODUCT HAS
BEEN SUBJECTED TO POWER IN EXCESS OF ITS PUBLISHED POWER RATING. THIS WARRANTY
DOES NOT COVER THE CABINET OR ANY APPEARANCE ITEM, USER ATTACHED ANTENNA, ANY
DAMAGE TO THE PRODUCT RESULTING FROM ALTERATIONS, MODIFICATIONS NOT AUTHORIZED
IN WRITING BY PIONEER, ACCIDENT, MISUSE OR ABUSE, DAMAGE DUE TO LIGHTNING OR
TO POWER SURGES, SUBSEQUENT DAMAGE FROM LEAKING, DAMAGE FROM INOPERATIVE
BATTERIES, OR THE USE OF BATTERIES NOT CONFORMING TO THOSE SPECIFIED IN THE OWNER’S
MANUAL. THIS WARRANTY DOES NOT COVER THE COST OF PARTS OR LABOR WHICH WOULD
BE OTHERWISE PROVIDED WITHOUT CHARGE UNDER THIS WARRANTY OBTAINED FROM ANY
(warranty continues next page)
74
SOURCE OTHER THAN A PIONEER AUTHORIZED SERVICE COMPANY OR OTHER DESIGNATED
LOCATION. THIS WARRANTY DOES NOT COVER DEFECTS OR DAMAGE CAUSED BY THE USE OF
UNAUTHORIZED PARTS OR LABOR FROM IMPROPER MAINTENANCE. ALTERED, DEFACED, OR
REMOVED SERIAL NUMBERS VOID THIS ENTIRE WARRANTY. NO OTHER WARRANTIES
IN THE U.S.A. - PIONEER LIMITS ITS OBLIGATIONS UNDER ANY IMPLIED WARRANTIES
INCLUDING, BUT NOT LIMITED TO, THE IMPLIED WARRANTIES OF MERCHANTABILITY AND
FITNESS FOR A PARTICULAR PURPOSE, TO A PERIOD NOT TO EXCEED THE WARRANTY PERIOD.
NO WARRANTIES SHALL APPLY AFTER THE WARRANTY PERIOD. SOME STATES DO NOT ALLOW
LIMITATIONS ON HOW LONG AN IMPLIED WARRANTY LASTS AND SOME STATES DO NOT
ALLOW THE EXCLUSIONS OR LIMITATIONS OF INCIDENTAL OR CONSEQUENTIAL DAMAGES,
SO THE ABOVE LIMITATIONS OR EXCLUSIONS MAY NOT APPLY TO YOU. THIS WARRANTY GIVES
YOU SPECIFIC LEGAL RIGHTS AND YOU MAY HAVE OTHER RIGHTS WHICH MAY VARY FROM
STATE TO STATE.
IN CANADA – EXCEPT AS EXPRESSLY PROVIDED HEREIN, THERE ARE NO REPRESENTATIONS,
WARRANTIES, OBLIGATIONS OR CONDITIONS, IMPLIED, STATUTORY OR OTHERWISE,
APPLICABLE TO THIS PRODUCT.
TO OBTAIN SERVICE
PUSA has appointed a number of Authorized Service Companies throughout the U.S.A.
should your product require service. To receive warranty service you need to present your
sales receipt showing place and date of original owner’s transaction. If shipping the unit you
(warranty continues next page)
75
Other Information
will need to package it carefully and send it, transportation prepaid by a traceable, insured
method, to an Authorized Service Company. Package the product using adequate padding
material to prevent damage in transit. Include your name, address and telephone number where
you can be reached during business hours.
On all warranty complaints and concerns, please call 1-800-421-1404.
DISPUTE RESOLUTION
Following our response to any initial request to Customer Support, should a dispute arise
between you and Pioneer, Pioneer makes available to you, without charge, it’s Complaint
Resolution Program. You are required to use the Complaint Resolution Program before you
exercise any rights under, or seek any remedies, created by Title I of the Magnuson-Moss
Warranty-Federal Trade Commission Improvement Act, 15 U.S.C. 2301 et seq.
To use the Complaint Resolution Program call 1-800-421-1404 and explain to the customer
service representative the problem you are experiencing, steps you have taken to have the
product repaired during the warranty period and the name of the authorized Distributor/Dealer
from whom the Pioneer product was purchased. After the complaint has been explained to the
representative, a resolution number will be issued. Within 40 days of receiving your complaint,
Pioneer will investigate the dispute and will either: (1) respond to your complaint in writing
informing you what action Pioneer will take, and in what time period, to resolve the dispute;
or (2) respond to your complaint in writing informing you why it will not take any action.
For hook-up and operation of your unit or to locate an Authorized Service Company, please call
or write:
(warranty continues next page)
76
PIONEER ELECTRONICS SERVICE, INC.
P.O. BOX 1760
LONG BEACH, CALIFORNIA 90810
1-800-421-1404
http://www.pioneerelectronics.com
77
GEX-XMP3
Pioneer Electronics Service, Inc.
P.O. Box 1760
Long Beach, California 90810
1 800 421 1404
http://www.pioneerelectronics.com
XM, XMp3, XM2go, and related logos are trademarks of XM Satellite Radio Inc.
Other trademarks are the property of their respective owners.
©2008 Pioneer Electronics Service, Inc. All rights reserved.