1
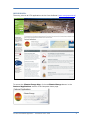
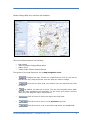
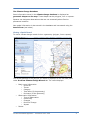
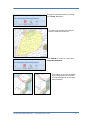
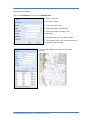
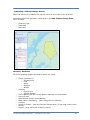
CTA Climate Change Map
User’s Guide
2013
CREE GEOPORTAL The entry point to all CTA applications is the Cree GeoPortal (www.creegeoportal.ca)
To access the Climate Change Map, click one Climate Change banner in the
Featured Applications section of the Geoportal home page.
CTA Harvest Database Application – Local Officer User’s Guide
2
Climate Change Monitoring Page Launch the Climate Change application by clicking on the Climate Change Map link.
CTA Harvest Database Application – Local Officer User’s Guide
3
Climate Change Map User Interface and Database The map interface features the following:
•
•
•
•
Map Layers
Years of Climate Change Observation
Search Form
Create a New Climate Change Record
The top bar of the map features a set of map navigation tools:
•
•
•
Enlarges the map, focuses on a specific area. Click on the icon to
activate the tool, drag the pointer over the area you wish to enlarge.
Click the icon then drag your pointer over the map area you wish
to reduce.
By default, the Pan tool is active. The pan tool becomes active again
once you have completed your operation. To pan move your pointer over the
map, click and drag the map in any direction.
•
Click this icon to return the map to its initial view.
•
Click this icon to return to the previous map view.
•
Click this icon to cycle to the other map views you established.
CTA Harvest Database Application – Local Officer User’s Guide
4
The Climate Change Database
Some information stored in the climate change database is displayed as
geometric shapes on the map. These shapes can be polygons, line or squares.
Squares can designate observations that are not necessarily about fixed or
permanent locations.
Non-spatial information is also stored in the database and is accessed using the
Search Form (see below).
Viewing a Spatial Record To view a climate change record click on a geometry (polygon, line or square).
The record attached to the polygon you select is displayed in the left hand panel
under the View Climate Change Record tab. The record displays:
•
•
•
Basic record information
o record Id
o Theme
o Category
o Total Area (of the geometry)
o Perimeter (of the geometry)
Observation Information
o Type of Observation
o Community
o Changes
o Period of Change
o Impact
Photos
CTA Harvest Database Application – Local Officer User’s Guide
5
Enlarge the selected area by clicking
the Zoom To button.
The map will enlarge the selected
area for detailed inspection.
Click Cancel to close the record and
reset the interface.
The images on the left illustrate
how trail geometries and other
records will appear on the map
when selected.
CTA Harvest Database Application – Local Officer User’s Guide
6
Searching for a Record
Click on the Search tab to open the Search Form.
1. Enter a keyword
2. Choose a theme
3. Choose a community
4. Enter geographic coordinates
5. Enter the range covered by the
coordinates.
6. Click Reset to clear the search fields.
7. Click Search when you are done entering
information into the fields.
The map will display the extent of the search
results.
CTA Harvest Database Application – Local Officer User’s Guide
7
Click on a record from the Search Results.
The climate change record will be displayed and the geometry on the map will be
highlighted:
•
•
•
red for a trail line
yellow for a polygon
a circle for other information
Click Cancel to close the record and
reset the interface.
CTA Harvest Database Application – Local Officer User’s Guide
8
Create a New Climate Change Record Click on the Create New Climate Change Record tab.
To create a new climate change record:
1. Choose a tool from the interface and draw a line, point or polygon on the map at
the location of your observation;
or
2. Fill in the Form
Drawing on the Map Polygon - click once and move the mouse pointer to
the next point location, and click again. Double click
to complete the polygon.
Point – click once on the location on the map.
Line – click once and mover the mouse pointer to the
next point location, and click again. Double click to
complete the line.
CTA Harvest Database Application – Local Officer User’s Guide
9
Completing a Climage Change Record
When the drawing is complete, the map will zoom to the extent of the geometry.
Information about the geometry is displayed in the New Climate Change Zone,
which includes:
•
•
•
Geometry type
Total Area
Perimeter
Geometry Attributes
Fill in the following detailed information about the record:
•
•
•
•
•
•
•
•
•
Theme (mandatory)
o Infrastructure
o Land
o Water
o Weather
o Wildlife
Category
o Electric Grid
o Sewage System
Source Name (the name of the person reporting the observation)
Source E-mail
Date Entered (filled in automatically)
Observation (mandatory) – what change did you observer
Changes
Period of Change – how long has this change taken, or how long it has it been
noticed.
Impact – what effects the change is having
CTA Harvest Database Application – Local Officer User’s Guide
10
Click Save to record the information
entered in the form fields.
The information entered into the form
fields is displayed in the record panel.
Upload a Photograph
Click on the Photo tab, select an
image from your computer and click
Save.
Click Discard to delete the record.
Click Submit to add the record to the
database.
This new record will be examined by
the proper authorities before it is
displayed for public viewing.
CTA Harvest Database Application – Local Officer User’s Guide
11
Filling in the Form Click on the Form button.
Fill in the following detailed information
about the record:
•
•
•
•
•
•
•
•
•
CTA Harvest Database Application – Local Officer User’s Guide
Theme (mandatory)
o Infrastructure
o Land
o Water
o Weather
o Wildlife
Category
o Electric Grid
o Sewage System
Source Name (the name of the
person reporting the observation)
Source E-mail
Date Entered (filled in
automatically)
Observation (mandatory) – what
change did you observer
Changes
Period of Change – how long has
this change taken, or how long it
has it been noticed.
Impact – what effects the change
is having
12
Click Save to record the information
entered in the form fields.
The information entered into the form
fields is displayed in the record panel.
Upload a Photograph
Click on the Photo tab, select an
image from your computer and click
Save.
Click Discard to delete the record.
Click Submit to add the record to the
database.
This new record will be examined by
the proper authorities before it is
accessible for public viewing.
CTA Harvest Database Application – Local Officer User’s Guide
13