1
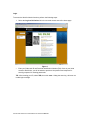
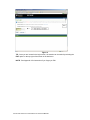
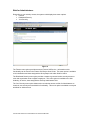
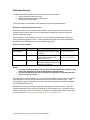
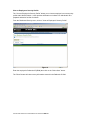
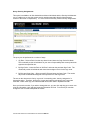
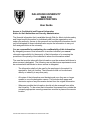
DALHOUSIE UNIVERSITY WEB FOR ADMINISTRATORS User Guide Access to Confidential and Personal Information Notice for Unit Authorities and Security Administrators The financial information that is available through Web for Admin includes salary and fringe benefit information for individuals paid from the organization units under your authority. Access to this personal and confidential information should only be delegated to those individuals who require the information to carry out their assigned duties at the university. You are responsible for maintaining the confidentiality of this information. By delegating access of that information to another individual you cannot relinquish responsibility for the security of that information or for ensuring the protection of the privacy of the individual to whom the information relates. The care that must be taken with this information must be reviewed with those to whom access is delegated. The following use and disclosure requirements must be reviewed with individuals to whom access is delegated: - The information shall only be used by the employee to the extent it is required for their job function. The information shall not be disclosed directly or indirectly to any other party. - All copies of the information must be destroyed once they are no longer needed or once the delegation ceases. This includes both paper and electronic copies of any documents derived from the original information. - Wherever possible the information should only be accessed from within the University. To the extent that information is accessed from outside the university appropriate security precautions must be in place at the remote location. S:\Finance\ALL\Banner Procedures\W4A User Guide-revised v6.doc DALHOUSIE UNIVERSITY WEB FOR ADMINISTRATORS User Guide Table of Contents Overview ........................................................................................ 3 Web for Admin Support ................................................................ 3 Web Address ................................................................................. 3 Login .............................................................................................. 4 Web for Administrators ................................................................ 7 Distributed Security ...................................................................... 8 View an Employee’s Security Profile ........................................ 10 Update Administrative Security Assignments ......................... 12 To Assign a Role/Orgn ............................................................... 14 To Revoke a Role/Orgn .............................................................. 14 Query Security Assignment ....................................................... 15 Your Security............................................................................... 16 Appendix A – PIN Reset Appendix B – Glossary of Terms Appendix C – Quick Reference November 2007 This document is updated periodically and available at http://as01.ucis.dal.ca/fs/index.cfm S:\Finance\ALL\Banner Procedures\W4A User Guide-revised 2v6.doc Overview DalOnline delivers the various self serve modules to support electronic interaction with Students, Faculty and staff. As the University expands the use of DalOnline and electronic interaction for administrative functions, an effective means to determine the individual responsible to authorize access to information and processes for their areas of responsibility (Organization Unit(s)) is critical for success. The individual responsible for the Organization Unit and/or hierarchy is hereinafter referred to as the Unit Authority. Please refer to the glossary in Appendix B for clarification. Dalhousie has developed a Web for Administrators (Web for Admin) module for DalOnline. Web for Admin delivers security management and other administrative functions directly to the individual(s) responsible for the action. Web for Admin will provide the tool to link an individual to the Organization(s) within his/her responsibility. This is critical to effectively maintain distributed security for various roles/information. The first phase delivers the ability to manage security access to support the existing Finance Self Serve (FSS) and E~Print modules. These modules provide timely financial information, however they have been accessible to a very limited group of faculty and departmental administrators. Web for Administrators enables access to the Principal Investigators who manage research funds and additional administrative staff. Web for Admin Support The Business Process and Integration Office and Financial Services provide support for the Web for Administrators functions. Financial Services provides support for the Finance Self Serve functionality delivered through the Web for Administrators menu. If you have any questions or require assistance contact us by email: [email protected] for Web for Administrator questions/issues, or [email protected] for Web for Administrator and Finance Self Serve questions/issues. For questions related to FAMIS Self Service contact [email protected] Web Address The URL for access to Dal Online, Web for Administrators is: https://dalonline.dal.ca This URL should be bookmarked for future reference. Alternatively, links to Dal Online are also available from the Dal Home page and My.Dal.ca portal. NOTE: If this is your first time to access Dal Online click on “Create PIN” and follow the instructions and screen prompts. You will need your Dalhousie ID (B00……) which can be found on your Dal Card or pay stub. If you are unsure contact Human Resources. S:\Finance\ALL\Banner Procedures\W4A User Guide-revised 3v6.doc Login To access the Web for Admin functions, perform the following steps: 1. Select the Login to Dal Online link in the secured access area of the home page. Figure 1 2. Enter your Dalhousie ID and Personal Identification Number (PIN). If this is your initial access to Dal Online, you will be asked to provide a hint question and response for security purposes for resetting passwords. TIP: After entering your ID, select TAB, do not hit enter. Hitting the enter key, will return an invalid login message. S:\Finance\ALL\Banner Procedures\W4A User Guide-revised 4v6.doc Figure 2 TIP: Once you are located in the login screen, the session can be ended by selecting the EXIT option on the top right of the screen in the dark area. NOTE: See Appendix A for instructions if you forgot you PIN. S:\Finance\ALL\Banner Procedures\W4A User Guide-revised 5v6.doc 3. Successful login will present you with the Dal Online Main Menu. The options will vary from user to user, as they are dependent on the access provided from various system modules. If you don’t see the Web for Administrators menu, please contact, Web for Admin Support at [email protected] or [email protected]. 4. Select the Web for Administrators option from this Main Menu. Figure 3 S:\Finance\ALL\Banner Procedures\W4A User Guide-revised 6v6.doc Web for Administrators: Depending on your security access, the system could display three menu options: • Finance • Distributed Security • Your Security Figure 4 The Finance menu option provides access to Finance Self Service. Information on this functionality can be found in the Finance Self Service User Guide. This menu option is available to Unit Authorities and those assigned the Query/Report role within Web for Admin. The Distributed Security menu option provides a means to grant and revoke security access to roles and organization units to eligible employees. This menu option is available to the Unit Authority, as well as, those assigned the Security Administrator Role. The Your Security menu option allows each user who has access to Web for Administrators to view their own security access within this functionality. This menu option is available to everyone with Web for Admin access. S:\Finance\ALL\Banner Procedures\W4A User Guide-revised 7v6.doc Distributed Security: The Distributed Security menu option contains three sub-menu options: • View an Employee’s Security Profile • Update Administrative Security Assignments • Query Security Assignments This functionality is only available to Unit Authorities and Security Administrators. What does “Distributed Security” mean? Distributed Security is the mechanism that allows the above named roles to be able to view another person’s Web for Admin security, assign eligible employees to specific role(s) and specific organization unit(s). If the employee is a Unit Authority at a level 1 or 2, they will automatically have the ability to assign roles and organization codes. These individuals can assign the Security Administrator, Query/Report and FAMIS Requestor roles to eligible employees. Roles Currently Available Role Security Administrator Orgn Required Query Reports Required FAMIS Requestor Not applicable Function Allows access to orgns to be delegated to other users of Web for Admin Allows Web for Admin users to view reports in Finance Self Serve and e-Print To allow access to the FAMIS Self Serve module to submit and track service requests Support [email protected] or [email protected] [email protected] or [email protected] [email protected] NOTE: It is highly recommended that only one Security Administrator be assigned in each faculty and department (Faculty and Department Administrators). The Security Administrator role should not be assigned to an individual who has access to orgns at a level 3. If the employee is a Unit Authority level 3 (eg. Principal Investigator), they are able to assign the Query/Report role and can assign individual access to their own unit authority orgns. They cannot assign orgns for which they are not the Unit Authority unless they have been delegated the Security Administrator role. Distributed security is the first step in granting/revoking access to Web for Admin. There are additional steps that may be required by the Web for Admin support team. It may take several days for access to be active for a new user. If access is not activated after 4 days contact Web for Admin Support [email protected] or [email protected]. S:\Finance\ALL\Banner Procedures\W4A User Guide-revised 8v6.doc Figure 5 S:\Finance\ALL\Banner Procedures\W4A User Guide-revised 9v6.doc View an Employee’s Security Profile: The “View an Employee’s Security Profile” allows you to view an employee’s current security profile within Web for Admin. It also provides information to indicate if an individual’s ID is prepared and active for Web for Admin. From the Distributed Security menu, click on “View an Employee’s Security Profile”. Figure 6 Enter the employee’s Dalhousie ID (B00#) then click on the “Select User” button. The “Reset” button will clear out any information entered in the Dalhousie ID field. S:\Finance\ALL\Banner Procedures\W4A User Guide-revised 10v6.doc Figure 7 The Personal Security Profile will display the following information: • Employee’s Dalhousie ID – This is their B00# that was entered to get to this screen. • Oracle ID and Finance Security Profile – The employee’s Oracle ID and Finance registry. If the Oracle ID states “no Oracle ID has been set up”, you will need to contact Web for Admin Support [email protected] or [email protected] to have an Oracle ID created before any roles/orgns can be assigned to the employee. • Web for Administrators Access - Active indicates that the employee currently has access to the Finance area of Web for Administrators. If it indicates inactive or no FOBPROF record found, this employee does not have access to Finance Self Service or ePrint. • “This Employee is/is not a Unit Authority” – Indicates if the individual is the Unit Authority at level 1, 2 and/or 3 orgns. If the employee is a Unit Authority, the orgn, title and status will be listed in this section. • Home Department – This is the employee’s home department, based on the employee’s record in the Human Resource system. This is important for revoking roles. • Senior Administrator – The level 1 orgn associated with the home department. • Web for Administrators Assigned Roles: If the employee has any assigned roles, they will display in this section with the associated orgn that the role applies to, Max Amount (for future use), assigned by and effective date. The following are the roles that can be assigned: o o o Security Administrator – access to distributed security Query/Reports – access to Finance Self Service functionality FAMIS Requestor – access to FAMIS self serve functions S:\Finance\ALL\Banner Procedures\W4A User Guide-revised 11v6.doc Update Administrative Security Assignments: The “Update Administrative Security Assignments” form allows the Unit Authority or Security Administrator to assign a Web for Admin role/orgn combination to an eligible employee. From the Distributed Security menu, click on “Update Administrative Security Assignments”. Figure 8 Enter the employee’s Dalhousie ID (B00#) then click on the “Continue” button. The “Reset” button will clear out any information entered in the Dalhousie ID field. S:\Finance\ALL\Banner Procedures\W4A User Guide-revised 12v6.doc Figure 9 The list in the Additional Roles drop down box will depend upon your role within Web for Admin. For example: • Unit Authorities levels 1, 2 and 3 and Security Administrators - will view Query/Reports, Security Administrator and FAMIS Requestor. Within this screen, you can view: o The last time the employee accessed Dal Online o The role description o The associated orgn o The Max Amount (for future use) o Who assigned the role/orgn to the employee o When the role/orgn was assigned to the employee The Security Administrator and the Query/Reports roles are assigned for a specific Organization Code. Therefore, each orgn to be assigned must be associated with a specific role. The FAMIS Requestor role is not associated with specific organization codes. Unit Authority’s of a given orgn cannot have their orgn access revoked through Web for Admin. This access can only be revoked in Financial Services. Any individual assigned a role/orgn through Web for Admin, can have the access revoked by the Unit Authority or Security Administrator for the given orgn. S:\Finance\ALL\Banner Procedures\W4A User Guide-revised 13v6.doc To Assign a Role/Orgn: • To assign a user role/orgn, select the appropriate role from the Additional Roles drop down box. The Orgn Code field will appear on the screen, if applicable to the role. • Enter the organization code for which access is being granted. • Then click on “Continue” button. Who can assign a Role/Orgn? The following are the only people that can assign an orgn: • A Unit Authority or Security Administrator who has access to the specific orgn to be granted • Web for Admin Support [email protected] or [email protected]. If someone who does not have the authority to assign a specific orgn tries, they will receive the You are not authorized to grant access to the specified orgn code”. following error message “ The change will not be saved. To revoke a Role/Orgn: • To revoke access, click on the “Revoke” button. Once this is done, the orgn will be removed from the employee’s list of orgns they are able to view. Who can revoke a Role/Orgn? The following are the only people that can revoke a role/orgn: • The person who assigned the orgn to the employee • A Unit Authority or Security Administrator for the orgn in question • Web for Admin Support [email protected] or [email protected] If you are eligible to revoke a role/orgn, you will see a “Revoke” button beside the Assigned By field for only the orgns you are authorized to revoke. If you are not authorized to revoke an orgn, you will not see the “Revoke” button. S:\Finance\ALL\Banner Procedures\W4A User Guide-revised 14v6.doc Query Security Assignments This option is available to all Unit Authorities and those individuals with the Security Administrator role. It enables one to view the current security assignments within Web for Administrators relative to their area of responsibility. It is a tool to more efficiently monitor security assignments. The query can be performed in a number of ways: 1. By Role – Select a Role from the drop down list and leave the Orgn Code field blank. The results will provide all individuals in your area of responsibility that currently has been signed to the specified role. 2. By Orgn Code – Leave the Role at “All Roles” and enter the pertinent Orgn Code. The results will provide all individuals who have been assigned a role for this orgn code. 3. By Role and Orgn Code – Select a specific Role and enter the Orgn Code. The results will provide all individuals assigned to the specified role and Orgn Code. The sort on the document is first by ‘orgn code’ in ascending order, then by ‘assigned to’ in descending order. Therefore, all the level 1 orgns are listed first and all the level 3 orgns are listed last. Within each orgn, the individuals with access are listed in alphabetical order. Once you have the results, if you wish to change the sort, you can click and drag your cursor over all of the information, copy and then paste the information in Excel. From Excel you can then change the sort to further manipulate the results. S:\Finance\ALL\Banner Procedures\W4A User Guide-revised 15v6.doc Your Security The Your Security menu option under Web for Administrators allows all Web for Admin users to view their security profile within Web for Admin. Under Your Security menu option, it currently contains “View your own security profile”. Figure 12 Click on “View your security profile”. S:\Finance\ALL\Banner Procedures\W4A User Guide-revised 16v6.doc The following screen will appear. Figure 13 The Personal Security Profile will display the following information: • Dalhousie ID – This is your B00#. • Oracle ID – Your oracle id that has been setup by Admin Computing. This is the user id used for ePrint. • Web for Administrators Access - Active indicates that the employee currently has access to the Finance area of Web for Administrators. • “This Employee is/is not a Unit Authority” – Indicates if you are a Unit Authority at level 1, 2 and/or 3 orgns. If you are a Unit Authority, the orgns and title will be listed in this section. • Home Department – This is your home department based on the employee’s record in the Human Resource system. • Senior Administrator – The level 1 orgn associated with your home department. • Web for Administrators Assigned Roles: If the employee has any assigned roles, they will display in this section with the associated orgn that the role applies to, Max Amount (for future use), assigned by and effective date. The following are the roles that can be assigned: o o o Security Administrator – access to distributed security Query/Reports – access to Finance Self Service functionality FAMIS Requestor – access to FAMIS self serve functions S:\Finance\ALL\Banner Procedures\W4A User Guide-revised 17v6.doc Appendix A - PIN Reset If you do not remember your PIN: • • In the Dalhousie ID box, type in your Dalhousie ID. Characters are case sensitive and must be uppercase. Click on Forgot PIN? Figure 14 A new screen will appear, showing the ID and the question set up at first login. Type in the answer to the question shown, and select “Submit Answer” S:\Finance\ALL\Banner Procedures\W4A User Guide-revised 18v6.doc Figure 15 A new screen will appear, prompting you to reset your PIN. Figure 16 Once the new PIN is entered, the Main Menu will appear. S:\Finance\ALL\Banner Procedures\W4A User Guide-revised 19v6.doc Appendix B Glossary of Terms Assigned Orgns – These are the organization units that have been granted to an eligible employee. These are the orgns the user will have access to in Web for Admin. Assigned Roles – These are the role(s) that have been granted to an eligible employee. NOTE: Unit Authorities cannot be assigned a role. Eligible Employee – “Current employee status” is active and whose primary position is not in one of the following employee classes: • AC – Courtesy Access • HM – Health Services Professionals • IW – Int Brother Electrical Workers • LD - Long Term Disability Recipient • PM - Pensioners • ZM – Non Resident • ZY - Exception ID • ZZ – Test Class for Conversion • 00 – 2000 Year to Date Totals • 01 – 2000 Year to Date Totals • 99 – Misc, LTD, Pension Refund Query/Reports – role in which employee will have query access to FSS. Security Administrators – role in which an employee will be able to assign and revoke roles and organization units to eligible employees. They will have access to the Distribute Security functionality. Security Officer – Role assigned to the Web for Admin Support Team. Typically, this will be the Data Steward and Security Officer from Central Admin area. Organization Unit - An organization unit is an endeavour or a collection of people and/or University resources that contribute to the fulfilment of some aspect of the University's mission. This definition is enterprise in nature, supports data integration and provides a consistent basis for consolidating activities for the administrative systems of the University. Organization Hierarchy - The organization hierarchy identifies the individual organization units by faculty and department. This hierarchy is not a pyramid structure, but a broader base with the Senior Administrators at the highest level. The levels and their definition are: a. Senior Administration (Level 1): Often referred to as a Faculty, it is the highest responsible level in the organization hierarchy, normally appointed on the authorization of the Board of Governors and includes the President, Vice-Presidents, and their Directors, and Deans. All departments, activities and resources fall under the responsibility of a Senior Administrator. b. Responsible Unit (Level 2): This second hierarchy level consists of departments, allocated a distinct and separate operating mandate. The units within this level are established based on criteria to facilitate senior administration and academic programs. c. Activity (Level 3): This level consists of all fiscal units to which financial transactions are maintained; as well as other units required for space management purposes. Appendix C provides details the current entities at the Senior Administration level. Appendix D provides details on the hierarchy for the Department of English in the Faculty of Arts and Social Sciences. This information has been provided as an illustration of the hierarchy structure. S:\Finance\ALL\Banner Procedures\W4A User Guide-revised 20v6.doc Unit Authority - Unit Authority denotes the individual responsible for the activities of the Organization Units and Hierarchy. This individual is ultimately responsible and has the authority to delegate functional roles and information to others: a. The Senior Administrator responsible for activities of the Organization Units at Level 1 of the hierarchy. If this position is vacant or not appointed, responsibility defers to the Vice President responsible or the President. b. The Chair/Director responsible for activities of the Organization Units at Level 2 of the hierarchy. If this position is vacant or not appointed, responsibility defers to the Senior Administrator. c. The Principal Investigator for research funded units at Level 3 of the hierarchy. d. The employee who has responsibility for activities of non-research funded units at Level 3 of the hierarchy. This assignment is by exception and at the discretion of the pertinent Senior Administrator or Chair/Director. On the norm, these units do not have a Unit Authority assigned and responsibility defers to the Unit Authority at the Responsible Unit or Senior Administration level respectively. S:\Finance\ALL\Banner Procedures\W4A User Guide-revised 21v6.doc Appendix C Quick Reference NOTE: If access to FSS/e~Print is given through Web for Admin, it is the responsibility of the Unit Authority or Security Administrator to remove access when a person no longer requires access. Here are the steps required to delegate access to FSS & e~Print through Web for Administrators: 1. Log in to Dal Online 2. Click on Web for Administrators 3. Click on Distributed Security 4. Click on "Update Administrative Security Assignments" 5. Enter Banner id of the person being delegated access, click Continue button 6. The Additional Role, click on the drop down box, to select the Query/Reports role 7. In the Orgn field, enter the grant account to be assigned to this person and then click on the Continue button. 8. Repeat step 6/7 until all the orgns have been assigned to the person. S:\Finance\ALL\Banner Procedures\W4A User Guide-revised 22v6.doc