1
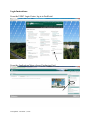
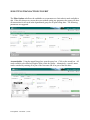
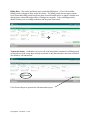
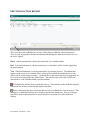
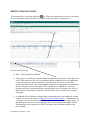
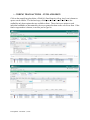
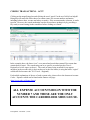
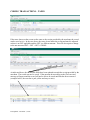
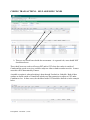
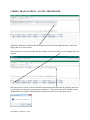
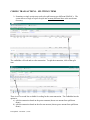
University of Northern British Columbia PURCHASING CARD USER MANUAL Last updated: November 7, 2014 Overview The online Purchasing Card system permits cardholders to view and reconcile their procurement card purchases on a daily basis Transactions are downloaded from the bank every morning Cardholders are encouraged to reconcile their transactions on a daily or (minimum) weekly basis. Important dates: 3rd of each month – cutoff date for MasterCard activity. Purchases made after this date will appear on the next statement. 20th of each month – all transactions reconciled online 25th of each month – paperwork (original receipts, travel authorizations, approved statement) submitted to Finance 30th of each month – purchasing card transactions posted to Banner by Finance. Any unreconciled Purchasing Card transactions as of the 30th of each month will be posted to the cardholders default Fund and Org (using account 7001 Unallocated MasterCard) and will need to be corrected, after the fact, by a Finance representative. Please note that a card may be revoked if there are frequent occurrences of non-submission. Last updated: November 7, 2014 Login Instructions: From the UNBC Login Centre, log in to FastPortal. From the Applications Menu, choose Purchasing Card. Last updated: November 7, 2014 Application Info and Quick Launch Tabs The Quick Launch tab provides the cardholder with an at-a-glance overview of activity on their own card and any other cards within their departmental grouping. List of My Accounts – this shows all cards belonging to the cardholder. The amount represents the gross value of all transactions not yet posted to Banner. Clicking on the card will take the user directly to the Report Results tab on the edit transactions page. List of Accounts I Manage – clicking on the + sign will show all of the cards that belong to the same departmental grouping as the cardholder (if any). Cards shown under this tab can be reconciled by any cardholder within the group. Clicking on any card will take the user directly to the Report Results tab on the edit transactions page. Print monthly statements – quick launch to the print monthly statement function. The Application Info tab has a pull down menu on the right side of the screen titled PCard Links. This pull down menu offers links to information that cardholders may find useful when reconciling their card statements. This information can also be accessed directly from the Finance web page. Last updated: November 7, 2014 Account Holder Tasks Users can also access their tasks from the pull down menu on the toolbar Last updated: November 7, 2014 SELECTING TRANSACTIONS TO EDIT The Filter Options tab allows the cardholder to set parameters to limit what is made available to edit. If the user chooses to execute the report without setting any parameters the report will show all transactions for all cards in the departmental group for all open billing dates. The following parameters are suggested. Account holder: Using the magnifying glass, open the query box. Click on the search box. All cards available to be edited will appear in the results box below. Alternatively, a specific name can be searched by entering all or part of the first name OR all or part of the last name. Last updated: November 7, 2014 Billing Date: Click on the pull down menu icon beside billing date. A list of all available billing periods will appear in the results box below. If a billing period does not appear on this list it means that billing period has already been posted to Banner and is no longer available to be edited (please contact the budget officer if changes are required). Select a billing period by double clicking on it or clicking on the date and the green check mark. Transaction Status: Cardholders can review all of the transactions contained in a billing period or filter them to look at only those already reconciled or only those that have not been reconciled. The default is "all transactions”. Click Execute Report to generate the edit transaction report. Last updated: November 7, 2014 EDIT TRANSACTION REPORT This screen gives the cardholder an overview of the charges within the selected parameters. There is a pop up legend on the bottom left hand side that appears when the mouse hovers over the word “legend.” Black: if the merchant name is black, the transaction is in Canadian dollars. Red: if the merchant name is red, the transaction is a credit (there will be a minus sign before the gross amount) Teal: if the merchant name is teal, the transaction is in a foreign currency. The amount that appears on the screen is in Canadian dollars, which will not match the amount on the receipt (which will be in the foreign currency). As shown above, this transaction is for a registration fee for a conference being held in the United States. The actual receipt is for $450.00 USD, the amount above is the Canadian dollar converted amount. All transactions initially show up with this red icon. This indicates to the cardholder that this transaction has not been reconciled and requires attention. When a transaction has been reconciled and saved by a cardholder the icon turns green. This indicates to a cardholder that they have already reconciled this transaction. However, changes can still be made to this transaction at any point before it is posted (it is still available for editing). Last updated: November 7, 2014 EDITING TRANSACTIONS To edit transactions, click on the applicable icon. The list of transactions will move to the bottom of the screen and the chosen transaction will appear in the edit window as shown below. Click on the pencil to open the transaction to editing. Please note the following: Index: This field must be left blank. Fund, Orgn, Acct and Prog are required fields (as indicated by the red stars to the right of the word). Each transaction will come prepopulated with the cardholders fund and orgn default as specified when the card was requested. Each transaction will specify account 7001 (unallocated MasterCard) – this account must be changed to the appropriate account number for the transaction or the reconciliation will be returned to the cardholder for correction. Program code 9999 is the natural default for that field and can be left at that value. If any of these fields are left blank the transaction will not be able to be saved and an error message will appear. A cardholder will be limited to using the funds and orgns that have been authorized for them on their web access form (please see http://www.unbc.ca/finance/forms). If additional access is required a web access form will need to be completed and signed by the budget holder. As indicated on the form, access can be granted to allow a user to monitor the budget in FAST Reporting OR to post transactions in FAST Purchasing Card OR both depending on the boxes checked. Last updated: November 7, 2014 CODING TRANSACTIONS – FUND AND ORGN Click on the magnifying glass below a FOAPAL (Fund Orgn Acct Prog Actv Locn) element to open a search window. For fund and orgn, clicking on the word “search” will show the cardholder only those options that are available to them. These choices are unique to each individual cardholder as determined by the access granted to them on the web access form. If the fund or orgn number is known, it can also just be typed in. Last updated: November 7, 2014 CODING TRANSACTIONS – ACCT Clicking on the magnifying glass and clicking the word “search” in the acct field is less helpful. Doing this will return the entire chart of accounts (some 950 account numbers and names including balance sheet, revenue and salary accounts). If the account number is known, it can be typed in. However, the search mechanism can also be used more productively by providing a key word (or search string) in the search box before clicking on “search”. In the example above, the letters “trav” were entered and search has returned 24 accounts that contain those 4 letters. The search string can be as specific as needed (such as Travel – Regional) or be left vague (as above). The words or letters being searched for can appear anywhere in the account code, it does not have to be the first letters (ie using the letters “region” would still find account code 7911 Travel – Regional). For detailed explanations of the use of each account code, please refer to the document Account Codes – Expenses which can be found on the finance web page (http://www.unbc.ca/finance/forms). ALL EXPENSE ACCOUNTS BEGIN WITH THE NUMBER 7 AND THESE ARE THE ONLY ACCOUNTS THE CARDHOLDER SHOULD USE. Last updated: November 7, 2014 CODING TRANSACTIONS – PROG ACTV and LOCN The magnifying glass search mechanism works exactly the same for the remaining three elements of the FOAPAL. PROG – program codes are used extensively by some departments but not at all by many others. While this is a required field, the value can be left at 9999 if no other program code is used. ACTV – activity codes are not a required field so for most transactions this field can be left blank. However, this field must be used when coding travel or personnel costs as follows: 2000 Accommodation 2001 Airfare 2002 Meals 2003 Mileage 2004 Other (bus, parking, ferry, etc) 2005 Vehicle rentals 2006 Taxi 2007 Registration 2008 Fuel LOCN – location codes are not a required field so for most transactions this field can be left blank. However, when coding travel or personnel costs it is necessary to attach those transactions to the person to whom the expenses belong. This facilitates the reporting requirements of the Financial Information Act to which UNBC is subject. Click on the magnifying glass and search by any part of a name to find the unique code for each individual Please refer to the sections on Travel and Professional Dev in the document Account Codes – Expenses which can be found on the finance web page (http://www.unbc.ca/finance/forms). These sections specify which account codes also require the use of activity and location codes. Last updated: November 7, 2014 CODING TRANSACTIONS – COMMENTS The comment field is not a required field and any information written here will not be seen in FAST Classic Reporting. However, this field allows the user to enter 230 characters of information that prints out on the statement. This is a useful place to provide reference notes for the cardholder, the supervisor or Finance. Examples of ways this field can be used: For travel expenses - to indicate the dates of the travel, the purpose of the travel and the name of the traveler. For meeting expenses - to record the names of the persons who were in attendance (as required under the entertainment policy). For expenses – what was purchased or why it was purchased (ie for an event). To leave notes for Finance – to indicate an item in dispute, to indicate an item to be reimbursed by a third party, etc. Last updated: November 7, 2014 CODING TRANSACTIONS – TAXES There are reference documents on the Finance web page (http://www.unbc.ca/finance/forms) related to taxes to assist the users in completing this section. Please note the following: The University is able to recover 67% of all GST paid so it is very important to record this tax. It is imperative to note that the taxes that will appear in the PST and GST boxes may not be correct. The information is sent from the merchant to the bank and in many cases will not reflect the actual taxes assessed. Most receipts that are received from vendors will clearly show the taxes that have been paid. When dining, the receipt brought to the table will identify the GST/HST paid on that meal. This receipt must be retained along with the machine receipt received on payment. The receipts for taxi fare do not show the GST/HST paid. There is a simple calculation to break out this tax. Please refer to the document “GST and PST” for further instructions. Most hotel bills will summarize the GST paid on the last page. There is no need to break out any of the other taxes as no rebate is available. When travelling in other provinces the University is still able to claim a rebate on the GST paid, even in provinces under the HST model. Please refer to the document “GST and PST” for assistance in breaking out the GST portion of the HST. Please refer to the document Tax by province or territory (http://www.unbc.ca/finance/forms) to find the current rates of tax in Canada. This document will be updated whenever there is a tax rate change in any of those provinces. There is no tax on any travel (hotel, meals, etc.) outside of Canada or any goods consumed outside of Canada. Last updated: November 7, 2014 CODING TRANSACTIONS – TAXES If the taxes shown on the screen are the same as the receipt provided by the merchant, the record can be saved as it is. In the case above, the taxes do not match the receipt and must be adjusted as there is no PST applicable and the GST is a different amount. This will also require a change to the net amount as PST + GST + NET = GROSS. As indicated above, the tax and net fields have been updated to match the receipt provided by the merchant. The record can now be saved. If the amounts do not add up to the Gross an error message will appear and the record will not be able to be saved until this has been corrected (example below, the error bar is pale yellow and easy to miss). Last updated: November 7, 2014 CODING TRANSACTIONS – SELF ASSESSING TAXES There are two check boxes beside the tax amounts. As a general rule, users should NOT check these boxes. These check boxes are used to self assess PST and/or GST where the vendor is outside of Canada and the goods or services would be subject to either or both tax under tax rules. In most cases this will be determined by Finance. A notable exception is when advertising is done through Facebook or LinkedIn. Both of these vendors are based outside of Canada but in both cases the transaction is subject to GST under Canadian tax law. In these cases, the checkbox beside GST should be checked as in the example below. Last updated: November 7, 2014 CODING TRANSACTIONS – SAVING THE RECORD When the cardholder is satisfied that the transaction has been coded appropriately, click on the floppy disk to save the record. If the record has saved successfully the edit window will close and the icon will change from red to green. Once the record is saved, it can be returned to an unreconciled transaction by clicking on the red x and saying ok to the pop up message (as seen below). The record will not be deleted, just any changes that were made to coding and taxes and the icon will revert from green to red. Last updated: November 7, 2014 CODING TRANSACTIONS – SPLITTING ITEMS Sometimes a single receipt may need to be split between two different FOAPAL’s. The system allows a single receipt to be split into as many different lines as the user deems necessary. The cardholder will code and save the transaction. To split the transaction, click on the split icon. There is now a second line available for coding for the same transaction. The cardholder has the option to: a) split the transaction based on the pretax amount (choose net amount from pull down menu) b) split the transaction based on the after tax amount (choose gross amount from pull down menu) Last updated: November 7, 2014 c) or to enter all amounts (uncheck the calculate taxes box) Please note that if the original tax amounts have been changed, it will be necessary to use option c. When the record is saved by clicking the floppy disk, the system will reduce the first line by the amounts entered on the second line. If the cardholder has selected either net amount or gross amount, the system will prorate the taxes between the two lines of coding as well. In the example above, the single receipt for Grower Direct has been split evenly between two different FOAPAL’s. The transaction split icon now appears beside each line of coding. That allows for further splits of either line should it be required. Changes to the coding of either line can be done by clicking on the pencil icon. If the second line of coding is not required, it can be deleted by clicking the red x. The pop up message will appear as it did before, but in this case it will actually remove the unwanted line of coding and return all values to the first record. Last updated: November 7, 2014 ATTACHING RECEIPTS ELECTRONICALLY Please note that Finance requires all original receipts to be submitted monthly. To attach a receipt or any other document, click on the paperclip beside the transaction. This opens a new window. Click on the add icon to open the search tool. Click on browse to go find the appropriate document(s) and upload the file. The document will now be attached to the transaction. It can be deleted or additional attachments can be added. Last updated: November 7, 2014 MONTH END By the 5th of every month all of the transactions for that month will have been downloaded from the bank and will be available for edit. All transactions must be coded by the 20th of the month. When coding is complete, the cardholder will: print off their monthly statement attach all original receipts attach travel authorizations where applicable circulate for approval signatures if required All paperwork should be in the Finance office by the 25th of each month. To print a copy of your statement, click on the account holder menu and choose “print monthly statement.” This will take the cardholder to the Statement Selector page. From this page the cardholder can choose the current period and print a copy of their statement (or save it as a PDF) as well as review any electronic attachments. From the pull down menu, the card holder can also choose a previous period and complete the same task. Last updated: November 7, 2014