1
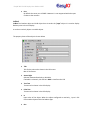
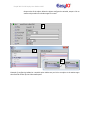
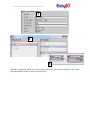
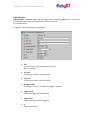
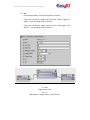
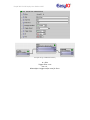
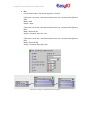
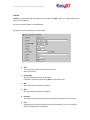
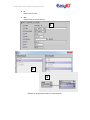
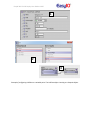
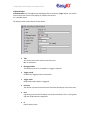
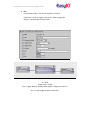
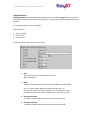
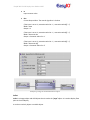
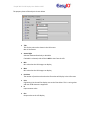
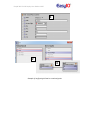
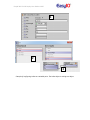
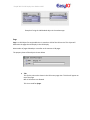
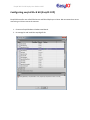
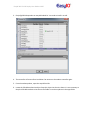
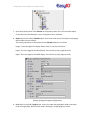
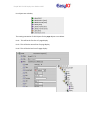
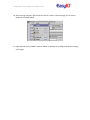
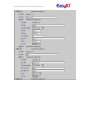
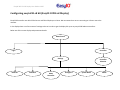
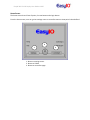
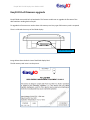
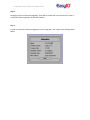
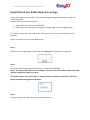
EasyIO 30P FG LCD Display User Guide v1.007
EasyIO FG Lcd User Guide
(Sedona apps config)
EasyIO 30P FG LCD Display User Guide v1.007
Document Change Log
06th February 2012
Document created. Pre-release version.
01th March 2012
Added in firmware flashing/upgrade procedure.
15th May 2012
Added in steps for restoring back to factory settings.
Images changes as firmware version updated.
13th June 2012
Official document release , v1.007. Firmware v1.007.
Added in steps for custom logo
EasyIO 30P FG LCD Display User Guide v1.007
Disclaimer
EasyIO 30P is a product by EasyIO Corporation Ptd Ltd.
The EasyIO 30P was built on the Sedona Framework ®.
Sedona Framework is a trademark of Tridium, Inc.
EasyIO 30P FG LCD Display User Guide v1.007
Contents
Introduction .................................................................................................................................................. 5
easyioFGLcd kit ............................................................................................................................................. 6
FGLcdServerService................................................................................................................................... 7
LcdBool ...................................................................................................................................................... 8
LcdBoolOneShot...................................................................................................................................... 11
LcdBoolOverwrite ................................................................................................................................... 14
LcdFloat ................................................................................................................................................... 16
LcdFloatOverwrite................................................................................................................................... 21
LcdInt....................................................................................................................................................... 22
LcdSchedule ............................................................................................................................................ 26
Page......................................................................................................................................................... 27
Configuring easyioFGLcd kit (EasyIO 30P)................................................................................................... 28
Configuring easyioFGLcd kit (EasyIO 30FGLcd Display) .............................................................................. 34
Home Screen ........................................................................................................................................... 35
Login ........................................................................................................................................................ 36
Settings.................................................................................................................................................... 37
Controller ................................................................................................................................................ 42
EasyIO FGLcd firmware upgrade ................................................................................................................. 44
EasyIO FGLcd user define Home Screen logo. ............................................................................................ 47
EasyIO FGLcd restore factory settings ........................................................................................................ 49
EasyIO 30P FG LCD Display User Guide v1.007
Introduction
The FG-LCD-MMI is a smart and cost effective human machine interface, HMI LCD approach to display
real time status information and modify points value on building control system in additional to
conventional Niagara AX system. The LCD is a touch screen display which provides ease of usage for
different users. It works in latest Sedona Framework™ and interfaces seamless with all Sedona-based
devices and makes information accessible from all systems connected to these devices.
Below are some of the features of the FGLcd display.
•
•
•
•
•
•
•
•
•
•
•
•
•
•
•
•
•
Touch screen with sharp colour display
Sedona Framework™ support
Communicates with all Sedona devices, with EasyIOFGLcd kit
View and edit points
Supports multiple data types e.g. Boolean, integer, float
Ethernet based
Simple configuration/setup on both Sedona devices and LCD display.
Easy Firmware upgrade
Real time data upgrade
Small form factor
Accessible up to 600 points per controller
Access to multiple controller
Cost effective upgrade in project phase
Minimum effort for system transfer from existing EasyIO product
Simplified control of maintenance/ facility team
Watchdog governed to prevent system abnormality
Simple and clean GUI
This document is a user guide for user configure the FGLcd display and the easyIO 30P to communicate
with the FGLcd.
EasyIO new LCD screen display enable user to display points and command points from the LCD display
without any workbench needed.
This LCD will act as the MMI for user. It is suitable for small retail shop or convenient shop.
It has supports up to 18 controllers and each controller can display up to 99 pages.
EasyIO 30P FG LCD Display User Guide v1.007
easyioFGLcd kit
This kit contains 10 object as show below.
To use this object just drag and drop into the wire sheet space.
The hierarchy of the LCD service is as below.
FGLcd Service object is a child of Service folder
Page object is a child of the FGLcd Service object
Line object is a child of the Pagex object.
EasyIO 30P FG LCD Display User Guide v1.007
Line objects are are objects as image below.
FGLcdServerService
FGLcdServerService is service object that drop in to the service folder wire sheet in order for the
LCD to display values.
It is not necessary to drop the LCDService under the service folder. It can be anywhere in the apps.
The property sheet of the object is shown below
♦ Enable
FGLcd service can be enable or disable with this parameter.
♦ Title
This slot will be the display name of the controller when view at the LCD. It support
max 13 characters.
♦ Status
Status of the FGLcd Service object. It will show error when the LCD device might be
having same port with other application. It will show “cannot bind to port.”
♦ Last Client Address
Shows the latest client connected to the server object. Client is the EasyIO LCD
device.
EasyIO 30P FG LCD Display User Guide v1.007
♦ Port
By default the server port is 59905. However it is not supported with other port
number at the moment.
LcdBool
LcdBool is a Boolean object and child object that sits under the “page” object. It is used to display
Boolean point in the LCD display.
It can be a read-only object or writable object.
The property sheet of the object is shown below
♦ Title
Title for the point to be shown in the LCD screen.
Max 15 characters.
♦ Access Right
Selection between Read-only or Writable.
If writable is selected , title will be in Bold is view from the LCD
♦ True Text
True text to be shown in the LCD display
♦ False Text
True text to be shown in the LCD display
♦ In
Input value of the object. When the object configured as read-only , input is link
from another object within the Sedona apps.
♦ Out
EasyIO 30P FG LCD Display User Guide v1.007
Output value of the object. When the object configured as writable, output is link to
another object within the Sedona apps for control.
1
2
3
Example of configuring LcdBool as a writable point. Make sure you link to an object in the sedona apps
that would be control by the LCD writable point.
EasyIO 30P FG LCD Display User Guide v1.007
1
2
3
Example of configuring LcdBool as a read-only point. Make sure you link from an object in the sedona
apps that would be monitor by the LCD read-only point.
EasyIO 30P FG LCD Display User Guide v1.007
LcdBoolOneShot
LcdBoolOneShot is a Boolean object and child object that sits under the “page” object. It is used to
control Boolean point from the LCD display for a define time period.
It is a writable object.
The property sheet of the object is shown below
♦ Title
Title for the point to be shown in the LCD screen.
Max 15 characters.
♦ True Text
True text to be shown in the LCD display
♦ False Text
True text to be shown in the LCD display
♦ Retrigger Enable
This property can be set to enable is re-trigger is required.
♦ Trigger period
Period of the trigger period in seconds.
♦ Trigger Value
Output Value when object is triggered.
♦ In
Input Constant value.
EasyIO 30P FG LCD Display User Guide v1.007
♦ Out
Current Output Value. The control algorithm is a below.
If the input is set to true , trigger value set to false , when a trigger fire
Output = false according to the period time.
If the input is set to false , trigger value set to true , when trigger is fire
Output = true according to the period time.
Example 01 of LcdBoolOneShoot,
In = true
Trigger value = false
Out = In ,
When object is trigger output = false for 5secs.
EasyIO 30P FG LCD Display User Guide v1.007
Example 02 of LcdBoolOneShoot,
In = false
Trigger value = true
Out = In ,
When object is trigger output =true for 5secs.
EasyIO 30P FG LCD Display User Guide v1.007
LcdBoolOverwrite
LcdBoolOverwerite is a Boolean object and child object that sits under the “page” object. It is used
to control/overwrite Boolean point from the LCD display. It is a permanent overwrite until the
overwrite is released.
It is a writable object from the LCD display.
It has 3 Selection ;
1. Auto , null value
2. Overwrite On
3. Overwrite Off
The property sheet of the object is shown below
♦ Title
Title for the point to be shown in the LCD screen.
Max 15 characters.
♦ Mode
Selection of mode available. This selection is available in the LCD display.
Auto , null value output. When this mode is selected , Out = In
Overwrite On. When this mode is selected , Out = Overwrite On Value
Overwrite Off. When this mode is selected , Out = Overwrite On Value
♦ Overwrite On Value
User define output value when mode selection is Overwrite On.
♦ Overwrite Off Value
User define output value when mode selection is Overwrite Off.
♦ In
Input constant value.
EasyIO 30P FG LCD Display User Guide v1.007
♦ Out
Current Output Value. The control algorithm is a below.
If the input is set to true , overwrite value On set to true , overwrite value Off set to
false ,
Mode = Auto
Output = Input
If the input is set to true , overwrite value On set to true , overwrite value Off set to
false ,
Mode = Overwrite On
Output = Overwrite Value On = true
If the input is set to true , overwrite value On set to true , overwrite value Off set to
false ,
Mode = Overwrite Off
Output = Overwrite Value Off = false
Example of using the LcdBoolOverwrite object
EasyIO 30P FG LCD Display User Guide v1.007
LcdFloat
LcdFloat is a Float object and child object that sits under the “page” object. It is used to display Float
point in the LCD display.
It can be a read-only object or writable object.
The property sheet of the object is shown below
♦ Title
Title for the point to be shown in the LCD screen.
Max 15 characters.
♦ Access Right
Selection between Read-only or Writable.
If writable is selected, title will be in Bold is view from the LCD
♦ Min
Min value that the LCD Float can display
♦ Max
Min value that the LCD Float can display
♦ Precision
The number of precision value that the float value will display in the LCD screen
♦ Unit
Engineering Unit that will be display next to the Float Value. This is a string value
and max of 15 characters supported.
EasyIO 30P FG LCD Display User Guide v1.007
♦ In
Input constant value
♦ Out
Output value to the LCD display
1
2
3
Example of configuring LcFloatl as a read-only point.
EasyIO 30P FG LCD Display User Guide v1.007
1
2
3
Example of configuring LcdFloat as a writable point. The LcdFloat object is writing to a Setpoint Object.
EasyIO 30P FG LCD Display User Guide v1.007
LcdFloatOneShot
LcdFloatOneShot is a Float object and child object that sits under the “page” object. It is used to
control Float point from the LCD display for a define time period.
It is a writable object.
The property sheet of the object is shown below
♦ Title
Title for the point to be shown in the LCD screen.
Max 15 characters.
♦ Retrigger Enable
This property can be set to enable is re-trigger is required.
♦ Trigger period
Period of the trigger period in miliseconds.
♦ Trigger Value
Output Value when object is triggered.
♦ Precision
The number of precision value that the float value will display in the LCD screen
♦ Unit
Engineering Unit that will be display next to the Float Value. This is a string value
and max of 15 characters supported.
♦ In
Input Constant value.
EasyIO 30P FG LCD Display User Guide v1.007
♦ Out
Current Output Value. The control algorithm is a below.
If the input is set to X , trigger value set toY , when a trigger fire
Output = Y according to the period time.
Example of LcdFloatOneShoot,
In = 24.00
Trigger value = 23.00
Out = Trigger Valuefor 5seconds when object is trigger from the LCD
Out = In after trigger period 5 second ends.
EasyIO 30P FG LCD Display User Guide v1.007
LcdFloatOverwrite
LcdFloatOverwerite is a Float object and child object that sits under the “page” object. It is used to
control/overwrite Float point from the LCD display. It is a permanent overwrite until the overwrite is
released.
It is a writable object from the LCD display.
It has 3 Selection ;
4. Auto , null value
5. Overwrite On
6. Overwrite Off
The property sheet of the object is shown below
♦ Title
Title for the point to be shown in the LCD screen.
Max 15 characters.
♦ Mode
Selection of mode available. This selection is available in the LCD display.
Auto , null value output. When this mode is selected , Out = In
Overwrite On. When this mode is selected , Out = Overwrite On Value
Overwrite Off. When this mode is selected , Out = Overwrite On Value
♦ Overwrite On Value
User define output value when mode selection is Overwrite On.
♦ Overwrite Off Value
User define output value when mode selection is Overwrite Off.
EasyIO 30P FG LCD Display User Guide v1.007
♦ In
Input constant value.
♦ Out
Current Output Value. The control algorithm is a below.
If the input is set to X , overwrite value On = Y , overwrite value Off = Z ,
Mode = Auto
Output = X
If the input is set to X , overwrite value On = Y , overwrite value Off = Z ,
Mode = Overwrite On
Output = Overwrite Value On = Y
If the input is set to X , overwrite value On = Y , overwrite value Off = Z ,
Mode = Overwrite Off
Output = Overwrite Value On = Z
Example of using the LcFloatlOverwrite object
LcdInt
LcdInt is a Integer object and child object that sits under the “page” object. It is used to display Float
point in the LCD display.
It can be a read-only object or writable object.
EasyIO 30P FG LCD Display User Guide v1.007
The property sheet of the object is shown below
♦ Title
Title for the point to be shown in the LCD screen.
Max 15 characters.
♦ Access Right
Selection between Read-only or Writable.
If writable is selected, title will be in Bold is view from the LCD
♦ Min
Min value that the LCD Integer can display
♦ Max
Min value that the LCD Integer can display
♦ Precision
The number of precision value that the float value will display in the LCD screen
♦ Unit
Engineering Unit that will be display next to the Float Value. This is a string value
and max of 15 characters supported.
♦ In
Input constant value
♦ Out
Output value to the LCD display
EasyIO 30P FG LCD Display User Guide v1.007
1
2
3
Example of configuring LcFloatl as a read-only point.
EasyIO 30P FG LCD Display User Guide v1.007
1
2
3
Example of configuring LcdInt as a writable point. The LcdInt object is writing to a object.
EasyIO 30P FG LCD Display User Guide v1.007
LcdSchedule
LcdSchedule is a Integer object and child object that sits under the “page” object. It is used to
display easyIO schedule object in the LCD display.
This object will replicate the easyIO schedule in the sedona apps and display it in the LCD display.
User can edit the schedule from the LCD display with the same format as easyIO schedule object.
Please refer to easyIO sedona kits , easyioSchedule for schedule editing format.
The property sheet of the object is shown below
♦ Title
Title for the point to be shown in the LCD screen.
Max 15 characters.
♦ True text
Text that will appear in the LCD display next to the title
♦ True text
Text that will appear in the LCD display next to the title
♦ In
Input constant value.
This slot has to be link from a easyioSchedule kit object.
♦ Out
Output value to other objects to be control.
EasyIO 30P FG LCD Display User Guide v1.007
Example of using the LcdSchedule object in the sedona apps.
Page
Page is a child object for easyioLcdService. It must be a child of the LCD service. This object will
determine the page that will display in the LCD display.
Max number of pages allowed per controller at the moment is 99 pages.
The property sheet of the object is shown below
♦ Title
Title for the point to be shown in the LCD screen page view. This title will appear on
top of the page.
Max 15 characters are allowed.
Title is not used for hpage.
EasyIO 30P FG LCD Display User Guide v1.007
Configuring easyioFGLcd kit (EasyIO 30P)
EasyIO 30P controller are called FGLcd server and FGLcd Displays are clients. We recommend one server
connecting to 4 clients max at the moment.
1. Connect to EasyIO Sedona via Sedona workbench.
2. Hit manage kit and install the easyioFgLCD kit.
EasyIO 30P FG LCD Display User Guide v1.007
3. EasyioFgLCD kit dependant on easyioSchedule kit. You need to install it as well.
4. The controller will restart after installation. Re-connect to the sedona controller again.
5. From the sedona palette , open the easyioFGLcd kit.
6. Locate the FGLcdServerService object. Drop this object into the wire sheet. It is not necessary to
drop the FGLcdServerService into the service folder. It can be anywhere in the apps folder.
EasyIO 30P FG LCD Display User Guide v1.007
7. Open the property sheet of the FGLcdSe. In the property sheet, title is the controller display
name show in the FGLcd display. It can only support max 13 characters.
8. Page1 object is the child of FGLCDSe object. It has to be under the service object. Drop a page1
object under the service folder.
The naming convention of child objects for the FGLcdSer objects are as below.
hpage : The main page of the display. Home screen. It can only hold 2 lines.
page1 : This is the page for the FGLcd display. You can have as many pages up to 99.
Pagex : This is the page for the FGLcd display. You can have as many pages up to 99.
Example of hpage and pagex configurations.
9. Line1 object is the child of page object. It has to be under the page object. Drop a line object
under the page object. Max of 6 lines allow fr each page , except hpage only 2 lines.
EasyIO 30P FG LCD Display User Guide v1.007
Line objects are as below;
The naming convention of child objects for the page objects are as below.
Line1 : This will be the first line of a page display
Line2 : This will be the second line of a page display
Line6 : This will be the last line of a page display
EasyIO 30P FG LCD Display User Guide v1.007
10. After finishing configure, right click at the service > Actions > Get total page. This is to force
update to the FGLcd display.
11. Pages and lines can be added in anytime. Below is a example of a configuration with one hpage
and 2 pages.
EasyIO 30P FG LCD Display User Guide v1.007
EasyIO 30P FG LCD Display User Guide v1.007
Configuring easyioFGLcd kit (EasyIO 30FGLcd Display)
EasyIO 30P controller are called FGLcd server and FGLcd Displays are clients. We recommend one server connecting to 4 clients max at the
moment.
In the display there are a few screens of settings to be set in order to get the display link up to any easyIO 30P sedona controllers.
Below are all the screen display and parameters details.
Home Screen
Controller
Login
Settings
Ethernet
Controller
Home
Controller
Controller
Selection
Change Pin
System Menu
About
EasyIO 30P FG LCD Display User Guide v1.007
Home Screen
The home screen show 2 lines of points, 2 menu button and a login button.
From the home screen, user can go into settings menu or controllers menu to view point’s value defined.
2
1
1: Button to settings menu.
2. Button to LOGIN.
3. Button to controllers page.
3
EasyIO 30P FG LCD Display User Guide v1.007
Login
The LOCK symbol is the login button. You may need to login in order to change settings or overwrite
points in the controller page.
There are 2 passwords preset to the FGLcd Display.
No
1
Pin
1234
User Privilege
User
2
123456
Admin
Before login the symbol will show
Remarks
This user has full access to “Controllers” pages
but do not have access rights to “Setting” page.
This user has full access to both “Controller” and
“Setting” page
as and after login the symbol will be
1
1: Login Button
EasyIO 30P FG LCD Display User Guide v1.007
Settings
Settings menu can be access by clicking on the Settings button at home screen.
There are 6 setting menus. Are the menus are lock with password for editing. You will need to login in
order to change the value.
The 6 settings menu are ;
1.
2.
3.
4.
5.
6.
Ethernet
Controller IP address
Home Controller
Change PIN
System
About
1
4
2
5
3
6
1. Ethernet
This sub menu is to set the FGLcd IP address. To edit, tap on the IP address space and a pop up
keypad will be seen. Do remember to hit the save button.
EasyIO 30P FG LCD Display User Guide v1.007
2. Controllers IP
This sub menu is to set the controllers IP that the FGLcd will connect to. A maximum of 18
controllers can be configuring for 1 FGLcd display.
Click on “1”, a separate window will show as “2”. Key in the IP address.
1
2
The controller name will display here. This is set in the EasyIO 30P. Max characters allow is 13.
3. Home Controller.
This sub menu is to set the home controller IP address. The home controller will be the home
screen display. It can only support up to 2 lines.
Home controller IP address is configuring here.
EasyIO 30P FG LCD Display User Guide v1.007
4. Change PIN
This sub menu enable user to change the login PIN code. There are 2 PIN codes available. Refer
to table below for details.
No
1
Pin
1234
User Privilege
User
2
123456
Admin
Remarks
This user has full access to “Controllers” pages
but do not have access rights to “Setting” page.
This user has full access to both “Controller” and
“Setting” page
EasyIO 30P FG LCD Display User Guide v1.007
5. System Menu
This sub menu will display the display hardware settings. Settings are as below.
a. Refresh rate – this is to set the polling rate of the display
b. TimeOut – Preset Time before the screen return to Home Screen
c. Logo Setup – This menu enable user to change the Home Screen Logo to User preference.
Refer to next page for the Home Screen Logo setup page.
d. Calibration – calibration of the display touch accuracy
e. Test – This menu will run a few test for the FGLcd Display ; colour , buzzer , touch.
f.
Reboot – this will reboot the FGLcd display
EasyIO 30P FG LCD Display User Guide v1.007
To change the Home Screen Logo
select the
to user preference ,
button. It will load the logo from the SD card.
Maximum size of the logo allows is 320 x 88. Measurement is in pixel. Steps to install the user
logo are in the next section below.
6. About
This sub menu will display the display system information. This is a read-only page.
EasyIO 30P FG LCD Display User Guide v1.007
Controller
Controllers menu can be access by clicking on the Settings button at home screen.
Maximum of 18 controllers are allow for a single FGLCd display. It contains 3 pages. Use the
and
to go between pages.
Clicking on the
will bring user to a page as below ;
EasyIO 30P FG LCD Display User Guide v1.007
This is a typical view of a controller page. A writable point will be in “Bold”.
Use
and
to move between pages.
EasyIO 30P FG LCD Display User Guide v1.007
EasyIO FGLcd firmware upgrade
EasyIO FGLcd comes with built in bootloader. This feature enable user to upgrade the firmware of the
device without sending back to EasyIO.
To upgrade the firmware user need to have a SD memory card. Any type of SD memory card is accepted.
There is a SD card slot on top of the FGLcd display.
SD Memory Card Slot
Image below shows the Back view of theFGLcd display label.
The SD memory card insert is as the picture.
EasyIO 30P FG LCD Display User Guide v1.007
Step 1:
Get the firmware from EasyIO technical support. The firmware file is named “FGLCD.bin”.
Note : The name of the firmware cannot be change or rename as the built-in FGLCd display bootloader
will only recognize this file by its name.
Step2:
The firmware FGLCD.bin need to be place in a folder named “FG-LCD”.
Note 1: The name of the folder cannot be change or rename as the built-in FGLCd display bootloader
will only recognize this folder.
Step 3:
Copy the folder in step 2 into a SD memory card. Power off the FGLcd display.
Step 4:
Insert the SD memory card into FGLcd SD card slot.
Step 5:
Power on the FGLcd display. The device will automatically locate the folder FG-LCD folder and it’s child
bin file.
Before the firmware upgrade begin, the device will compare the firmware version installed and the
firmware version in the SD memory card.
If the firmware version in the SD memory card is later than the version installed then the bootloader will
start the firmware upgrading.
EasyIO 30P FG LCD Display User Guide v1.007
Step 6:
During the process of firmware upgrading , there will be a status bar in the FGLcd screen. After a
successful firmware upgrade , the FGLcd will reboot.
Step 7:
In order to confirm the firmware upgrade is a success upgrade , user can go to the Settings Menu >
About.
EasyIO 30P FG LCD Display User Guide v1.007
EasyIO FGLcd user define Home Screen logo.
Starting from firmware version 1.007, user has the privilege of changing the Home Screen logo to a
custom logo design.
However there are some limitations to it.
1. Logo maximum size allow is 320 x 88 pixels.
2. Basic colours are supported. Fancy colours and image might results in image distortion.
To install the custom logo, user needs to have a SD memory card. Any type of SD memory card is
accepted.
There is a SD card slot on top of the FGLcd display.
Step 1:
Obtain the custom logo. Logo or image name has to logo.jpg. Only jpeg format is supported.
Step 2:
The custom logo file logo.jpeg need to be place in a folder named “FG-LCD”.
Note 1: The name of the folder cannot be change or rename as the built-in FGLCd display bootloader
will only recognize this folder by its name.
The firmware can co-exist in this folder. If a newer firmware is attached into this folder , the FGLcd
Display bootloader will upgrade the firmware.
Step 3:
Copy the folder in step 2 into a SD memory card root directory.
EasyIO 30P FG LCD Display User Guide v1.007
Step 4:
Insert the SD memory card into FGLcd SD card slot. Power cycle is not needed in this process.
Step 5:
Go to the system menu by accessing the Settings Menu from the Home Page.
Step 6:
Next select the logo setup menu and touch on the “Install Logo” button. The FGLcd will load the custom
logo. When the loading process is done , user can return to Home Screen to check at the custom logo.
The custom logo is store in the FGLcd display itself. SD memory card be remove after the logo is saved.
The custom logo will remain in the display even custom logo is not selected. To remove it, a restore
factory settings process needs to be done.
User can restore back to the default logo by selecting the Default button in the Logo Setup screen.
EasyIO 30P FG LCD Display User Guide v1.007
EasyIO FGLcd restore factory settings
Every FGLcd Display comes with the function restore factory settings. This feature will erase and restore
the FGLcd Display back to factory settings.
All user settings are restore back to factory settings including PIN codes.
To restore the FGLcd Display to factory setting user need to have a SD memory card. Any type of SD
memory card is accepted.
There is a SD card slot on top of the FGLcd display.
Step 1:
Get the .cfg file from EasyIO technical support. The file is named “FGLCD.cfg”.
Note : The name of the file cannot be change or rename as the built-in FGLCd display bootloader will
only recognize this file by its name.
Step2:
The firmware FGLCD.cfg need to be place in a folder named “FG-LCD”.
Note 1: The name of the folder cannot be change or rename as the built-in FGLCd display bootloader
will only recognize this folder by its name.
The firmware can co-exist in this folder. It a newer firmware is attached into this folder , the FGLcd
Display bootloader will upgrade the firmware following with restore factory settings.
Step 3:
Copy the folder in step 2 into a SD memory card. Power off the FGLcd display.
Step 4:
Insert the SD memory card into FGLcd SD card slot.
EasyIO 30P FG LCD Display User Guide v1.007
Step 5:
Power on the FGLcd display. The device will automatically locate the folder FG-LCD folder and it’s
child .cfg and .bin file(if available).
Step 6:
During the process of factory default restoring , there will be a few test being carry out. User need to
calibrate the touch screen.
The FGLcd will also run some test in order to make sure the display is in good condition. Just follow the
steps on screen to complete the restoring process.
Step 7:
The FGLcd Display will complete restoring back to factory default after the main screen is displayed.
User may now reconfigure the controllers IP address and PIN codes as well.