1
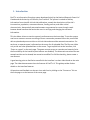
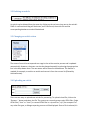
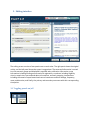
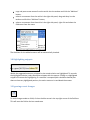
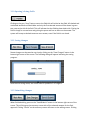
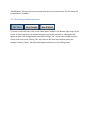
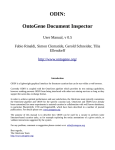
ExaCT 1.0 User Interface
User Guide
1.
Introduction .......................................................................................................................................... 2
2.
Main menu ............................................................................................................................................ 3
2.1 Filtering articles................................................................................................................................... 3
2.2 Deleting an article ............................................................................................................................... 4
2.3 Changing an article status ................................................................................................................... 4
2.4 Uploading an article ............................................................................................................................ 4
2.5 Selecting an article for review and editing ......................................................................................... 5
3.
Editing interface .................................................................................................................................... 6
3.1 Toggling panels on/off .................................................................................................................... 6
3.2 Changing tabs .................................................................................................................................. 7
3.3 PMID lookup.................................................................................................................................... 7
3.4 Showing/hiding unchecked answers............................................................................................... 7
3.5 Viewing context .............................................................................................................................. 8
3.6 Selecting answers............................................................................................................................ 8
3.7 Adding a new answer ...................................................................................................................... 8
3.8 Highlighting snippets....................................................................................................................... 9
3.9 Ignoring recent changes .................................................................................................................. 9
3.10 Opening/closing fields................................................................................................................. 10
3.11 Saving changes ............................................................................................................................ 10
3.12 Submitting changes ..................................................................................................................... 10
3.13 Returning to the main menu....................................................................................................... 11
1. Introduction
ExaCT is an Information Extraction system developed jointly by the National Research Council of
Canada and the University of California, San Francisco. The system is trained to find key
information from scientific clinical trial publications, namely the descriptions of the trial's
interventions, population, outcome measures, funding sources, and other critical
characteristics. Automatically extracted answers are presented to a user through a web
browser-based interface that assists the users in verifying and changing the extracted
information.
This site allows visitors to test the system's performance on their own data. To use the system,
one has to create an account consisting of a user name and a password. After that, one will be
able to upload and process articles on clinical trials and amend the automatic extractions. For
each user, a separate space is allocated on the server for all uploaded files. The files are visible
only to the user who uploaded them to the server. To get a quick look at the interface, click
“Enter as a guest” on the main page. The guest account serves as a preview and severely limits
the functionality of the interface (most buttons are disabled). The automatic extractions for two
example articles can be viewed, but cannot be modified. For full functionality, please create a
user account.
A good starting point to familiarize oneself with the interface is a short video found on the main
page. The video demonstrates the main features of ExaCT's UI. This guide provides further
details on the interface features.
All questions and feedback can be sent via a web form by clicking on the “Contact us” link on
the main page or at the bottom of the menu page.
2. Main menu
The menu page lists all articles currently present in the user’s directory. It shows the
corresponding PMID, title, file name and status. The status indicates if the article is being
processed by the extraction system (Processing), has been successfully processed by the system
(Auto Answers), has been processed with errors (Error), has been worked on by a curator (In
Progress), completely processed by a curator (Complete), or archived (Archived). The list of
articles can be sorted by any of the columns by clicking on the column name.
2.1 Filtering articles
The list of articles can be filtered by the status column to reduce the size of the table. To filter
out articles, uncheck one or more of the checkboxes in the top right corner.
2.2 Deleting an article
An article can be deleted from the server by clicking on the red cross icon next to the article’s
PMID. A confirmation dialog will be shown, and if confirmed, the article file and the
corresponding database record will be deleted.
2.3 Changing an article status
The status of an article corresponds to a stage in the article curation process and is updated
automatically. However, the status can also be changed manually by selecting the appropriate
line in the drop-down menu. The new status will be stored in the database. This feature is
needed, for example, to archive an article and remove it from the current list (filtered by
Archived status).
2.4 Uploading an article
There are two ways to upload new articles for processing. To upload a local file, click on the
“Browse…” button and select the file. The system can currently process only HTML files. Single
HTML files (“.htm” or “.html”) or several HTML files in a zip archive (“.zip”) are accepted. For
any other file types, a dialogue reporting an error will be displayed. Once a file is selected, hit
ok and then press the upload button. Alternatively, copy-and-paste a URL in the textbox labeled
“URL” and click “Upload”. If the upload was successful, the file appears in the article table with
a status of “Processing”. The processing takes approximately 3-5 minutes per article (or longer
if the server is busy). While the article is being processed, the corresponding row of the table is
disabled. The work with the web site can be continued (e.g. other files can be uploaded,
reviewed, or edited) while the processing is performed in the background. The menu page is set
to automatically refresh every minute. When the processing is finished, a dialogue notifying the
user is shown, and the article status is updated to “Auto Answers” (on success) or “Error” (on
failure). If the status is not updated automatically, refresh the page manually. Now, the
corresponding table row is clickable to access, review and amend the automatic extractions.
2.5 Selecting an article for review and editing
To review and edit the automatic extractions for an article, click on the corresponding row in
the table. If the article’s status is “Processing”, please wait until the processing is finished and
the status is updated.
3. Editing interface
The editing screen consists of two panels next to each other. The right panel shows the original
article, and the left panel shows the system’s suggestions. The extracted information is sorted
into five semantic groups and displayed in separate tabs: publication information, meta
information including funding sources and trial registration, enrolment including eligibility
criteria, sample size, start and end dates of enrolment, and early stopping, interventions
including the names of experimental and control treatments and their dosage, frequency,
route, and duration, and finally, the primary and secondary outcomes with their corresponding
time points.
3.1 Toggling panels on/off
Each panel can be minimized to gain additional space. To minimize the left panel, click on the
“<<” button at the top of the interface. To restore the panel, click on the “>>” button. Similarly,
to minimize the right panel, click on the “>>” button. To restore the panel, click on the “<<”
button.
3.2 Changing tabs
To view a different information group, click on one of the tabs at the top of the left-side panel.
3.3 PMID lookup
If the automatically extracted information in the “Publication Info” tab is incorrect, it can be
replaced by the information for another PMID using the form at the bottom of the tab. Type a
valid PMID into the corresponding textbox and click on the “Get Info” button. The system will
get the information for the new PMID from the PubMed database and automatically fill in the
rest of the fields. Alternatively, the article information can be typed manually. Then, this
information can be associated with the article by clicking on the “Use This Info” button. The
information will appear at the top of the tab. The “Clear” button will clear the PMID Lookup
form. The “Undo Changes” button will restore the publication information recorded in the
database at the last save action.
3.4 Showing/hiding unchecked answers
For each information element, the automatic extraction method outputs up to five solutions. If
no sufficiently good solution is found in the text, the message shows “not found”. Otherwise,
the solution with the highest confidence score is displayed. To expand the list of system’s
suggestions to all five choices, click on the corresponding “+” button. Clicking on the “-“ button
will suppress the list to show only accepted (with checked checkbox) answers.
3.5 Viewing context
To judge the relevance of a sentence, it is often helpful to see the sentence in context. That is
why the suggestions in the left pane are linked with the full text in the right pane, through the
“View Context” icon. Clicking on the small green icon next to an answer will highlight the
corresponding text in the right-hand panel and scroll down to the location of the text. If the
answer’s “View Context” button is grayed out, then the answer has been added manually and
the system will not be able to highlight the corresponding text.
3.6 Selecting answers
Each extracted sentence has a corresponding checkbox. If the checkbox is checked, the
sentence is considered a valid answer for that field; if it is not checked, the sentence is
considered irrelevant. By default only the first (or none) answer is checked. To modify the
automatic answers, check the relevant sentences and uncheck the irrelevant ones.
3.7 Adding a new answer
If the correct answer is not among the shown automatic answers, it can be added to the list by
any of the following methods:
type a new answer into the textbox next to the “Add Item” button and click the button;
copy and paste a new answer from the article into the textbox and click the “Add Item”
button;
select a new answer from the article in the right side panel, drag-and-drop it to the
textbox and click the “Add Item” button;
select a new answer from the article in the right side panel, right click and select the
field name from the menu:
The checkbox for the added sentence will be automatically checked.
3.8 Highlighting snippets
Within the suggested sentences, snippets for the actual solution are highlighted. To overrule
the highlighted solution, select alternative snippets with the mouse. Clicking on a highlighted
snippet will remove the highlighting. If a sentence is accepted (with checkbox checked) but
does not have any highlighted portions, the entire sentence is considered the answer.
3.9 Ignoring recent changes
To undo changes made to a field, click on the blue arrow in the top right corner of the field box.
This will reset the field to the last saved state.
3.10 Opening/closing fields
Clicking on the grey “close” button next to the field title will minimize that field. All checked and
unchecked sentences will be hidden and only the first selected answer will be shown in green
text, next to the title of the field. This will indicate that the field has been dealt with. Closing the
field is simply for convenience and gaining the space and has no effect on the answer. The
system will accept a checked sentence as an answer, even if the field is not closed.
3.11 Saving changes
Recent changes can be saved at any time by clicking on the “Save Changes” button in the
bottom right corner of the screen. The following dialog will appear indicating the saving
progress:
After the first saving action, the article status is updated to “In Progress”.
3.12 Submitting changes
When finished editing, press on the “Save&Submit” button in the bottom right corner of the
screen. This will bring up the summary screen with all the selected answers for the final
approval. Clicking “Cancel” on the summary screen will return to the editing screen. Clicking
“Save&Submit” will save the current answers and return to the main menu. The file status will
be updated to “Complete”.
3.13 Returning to the main menu
To return to the main menu, click on the “Main Menu” button in the bottom right corner of the
screen. If there have been any unsaved changes to the article extractions, a dialog box will
appear and ask if the changes need to be saved. Clicking “Yes” will save the changes and then
return to the main menu. Clicking “No” will return to the main menu without saving the
changes. Clicking “Cancel” will close the dialog box and return to the editing screen.