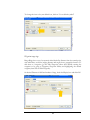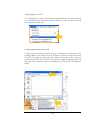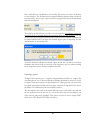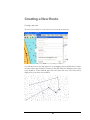
1
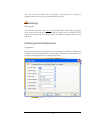
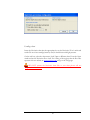
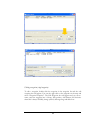
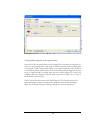
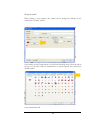
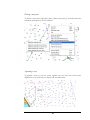
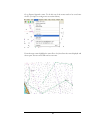
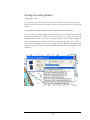
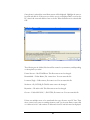
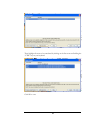
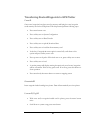
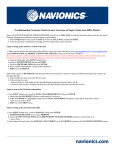
NAVIONICS NAVPLANNER 4.03
User Guide
USRG/NP/EN/0907
Table of Contents
Important Information
...................................................................... System requirements for NavPlanner
....................................................................................................Chart compatibility
............................................................................................. Setting up NavPlanner
........................................................................................ 23-in-1 Multi Card Reader
Warnings
..........................................................................................................Renaming files
Setting Up User Preferences
............................................................................................................ Configuration
........................................................................................................Chart properties
............................................................................................. Depth contour shading
.........................................................................................................Loading a chart
Navigating Around the Map
....................................................................................................................Zooming
.................................................................................................................... Panning
Waypoints
Adding Waypoints
.................................................................................................... Adding a waypoint
.....................................................................................Adding a waypoint manually
...............................Adding a waypoint by copying the data from another waypoint
.......................................... Adding a waypoint by selecting a distance and bearing
Editing Waypoints
........................................................................ Editing a waypoint (single waypoint)
.................................................... Editing multiple waypoints in the waypoint library
.................................................................................................... Waypoint symbols
............................................................................................... Waypoint range rings
................................................................................................... Deleting waypoints
..................................................................................................... Sorting waypoints
Saving & Loading Waypoints
........................................................................ Saving waypoints to a memory card
..................................................................................... Saving waypoints to the PC
..................................................................... Loading waypoints from memory card
Waypoint Library
.....................................................................................Viewing the waypoint library
..................................................................................... Printing the waypoint library
Finding Waypoints
................................. Zoom to a waypoint (moving the chart to show the waypoint)
Importing & Exporting Waypoints
................................................................. Exporting waypoints to Microsoft Excel®
................................................................................................. Importing waypoints
................................................................................................. Point of interest files
Routes
Creating a New Route
................................................................................................ Creating a new route
Route Properties
.....................................................................................................Route/plan details
................................................................................................................ Route data
............................................................................................................Route display
.......................................................................................Route display presentation
.................................................................................................Printing route details
Editing a Route
.............................................................................................. Route point properties
.................................................................................................Moving a route point
.................................................................................................... Expanding a route
..................................................................................................... Extending a route
............................................................................................... Deleting a route point
.................................................................................................... Appending a route
Saving & Loading Routes
................................................................................................. Saving routes to PC
.................................................................. Saving routes to cartridge/memory card
..........................................................................................................Loading routes
Transferring Routes/Waypoint to the GPS Plotter
....................................................................................................................Furuno®
........................................................................................................... Humminbird®
..................................................................................................... Lowrance/Eagle®
................................................................................................................ Northstar®
............................................................................................................. Raymarine®
.................................................................................................................. Geonav®
Transferring Routes/Waypoint from the GPS Plotter to a
memory card
....................................................................................................................Furuno®
........................................................................................................... Humminbird®
2
..................................................................................................... Lowrance/Eagle®
................................................................................................................ Northstar®
............................................................................................................. Raymarine®
.................................................................................................................. Geonav®
Upgrades
............................................................................................. Upgrading NavPlanner
Troubleshooting
Important Information
System requirements for NavPlanner
Windows 2000/XP/Vista (32 bit only), CD-Rom drive/7MB of hard drive disk space,
Hi-Speed USB port.
Chart compatibility
Navionics NavPlanner is compatible with the following Navionics charts: Platinum+,
Platinum, Gold+, Fish’N Chip, Silver, HotMaps Platinum, and HotMaps Premium.
Setting up NavPlanner
Insert the NavPlanner CD-ROM into the PC and the disk should auto run. You will
be prompted to accept the terms and conditions of the program and then prompted to
enter your serial product code found on the back of the quick start guide. **Keep your
serial product code for your records as this will be needed for re-install and updating
the software in the future.
If auto run does not start from start menu go to run or double-click on my computer,
open CD and double-click on setup.exe.
Once the software is installed restart your computer. The Navionics 23-in-1 multi card
reader must be attached to the PC in order to open NavPlanner.
23-in-1 Multi Card Reader
The Navionics 23-in-1 multi card reader is the only reader compatible with Navionics
charts.
3
The 23-in-1 multi card reader must be attached to the computer for starting the
program and must be the only card reader attached to the PC.
Warnings
Renaming files
The Navionics chart files codes can not be renamed; doing so will result in corruption
of the chart and the chart and/or chart file will no longer read in your GPS unit. This
will not be covered under any warranty, and a new Navionics chart would have to be
purchased.
Setting up User Preferences
Configuration
Before getting started, the user preferences can be changed. Under File- Configurationthe units for measure, length, distance, fuel, fuel flow and depth can be changed. In the
second tab the language can also be changed. See below:
4
Chart properties
To select or change active features, go to Chart- Chart Properties. You can save your
setting by checking “Use saved setting when loading a chart”.
To hide the box boundaries of the selected chart file, uncheck Folio boxes under
Auxiliary layers.
Depth contour shading
To change the shading of depth contours, click on the “Details” button next to Depth
areas & contours. Here you can set the safety contour value to any desired depth by
clicking “Use safety contour value” and entering the desired depth.
5
Loading a chart
Insert the Navionics chart into the appropriate slot on the Navionics 23-in-1 multi card
reader. Do not force cartridge/memory card; it should insert with light pressure.
On the task bar, select the chart menu; Load/Open a different chart. From the Open
window select the Navionics file to load. For a listing of the regions that the file codes
represent visit our website at www.navionics.com and go to the FAQ page.
**DO NOT rename the Navionics chart files as your chart plotter will not
recognize the altered name.
6
7
Navigating around the map
Zooming
There are several different ways to zoom:
The Page Up and Page Down keys on your keyboard
The wheel on your mouse
Right click on the map and select the page up or page down
The + and – symbols on the top of the menu bar.
Panning
Panning the view of the chart area can be performed in different ways as follows:
Use the Chart Drag Mode (the hand icon) and then drag the chart by holding down
the left mouse button and moving the mouse. Releasing the mouse draws the chart in
the new position. If the chart is at its display limits, then the chart may not move.
Use the arrow keys on your keyboard to move the chart in the corresponding
direction. When the chart is redrawn, it will stay in the same scale if there is data
available at the same scale.
Use the Pan symbols. Move the cursor to the edge of the chart and the cursor will
change into a larger arrow and the word Pan will appear, click the left mouse button
and the chart will scroll/pan.
Use double click. This can be enabled and disabled in the “Chart properties and chart
operations” tab in chart properties. Once enabled, double click at any position on the
chart will center to chart at that position. This can be used for panning or scrolling the
chart.
8
Waypoints
Adding Waypoints
Adding a waypoint
To add a waypoint, click on Waypoint- Add waypoint from menu bar.
Then, place your mouse on the map where you would like the waypoint to be
positioned and left click on the map. A window will pop-up to add waypoint
information, such as a long name, a short name, a group name, the Datum setting used
(For Navionics charts this is always WGS84) and notes. The Symbol can be changed,
please see Waypoint symbol section below. Range rings can be modified, please see
Waypoint range rings section below.
This can also be achieved in the map view by right clicking on the map and select “Add
waypoint at this point”.
Once information is complete, click OK.
9
Adding a waypoint manually
To add waypoints manually, click on Waypoint-Waypoint Library.
The next screen will appear and from the drop down menu add a waypoint by selecting
-entering Waypoint information manually.
This will bring you to the Add Waypoint screen where waypoint information can be
entered as well as the Latitude and Longitude can be changed
.
Once information is complete, click OK.
10
Adding a waypoint by copying the data from another waypoint
To add a waypoint starting with the data from another waypoint already in the
waypoint library, click the waypoint in the waypoint list you wish to copy. Then select
the option “Copying the information from a selected waypoint” from the pull down
list after the -Add waypoint by dialog box. The Add Waypoint window will appear and
changes can be entered.
Adding a waypoint by selecting a distance and bearing from another waypoint
To add a waypoint by specifying a distance and bearing from another waypoint already
in the waypoint library, click the waypoint in the waypoint list (the waypoint to use as
the base waypoint) as performed above in; “adding a waypoint by copying the data from
another waypoint”. Then select “Applying a distance and bearing from a selected
waypoint” from the pull down list after “Add waypoint by”.
The dialog will then display an area where a distance and bearing can be entered. Click
the “Create” button when the data is entered. The text for the waypoint will be
automatically created from the selected waypoint and the distance and bearing entered,
i.e. if the original waypoint has the text “Fishin1”, the new one would be “Fishing1,
0.30 NM North of” if a distance of 0.3 NM was entered and a bearing of 0 degrees.
11
Editing a waypoint (single waypoint)
To edit a waypoint, double click the waypoint in the waypoint list and the edit
waypoint box will appear. You can also right click on the waypoint on the map and
select “Waypoint Properties”. The Edit Waypoint box will appear and you can rename, enter the waypoint into a Group, Edit position, Add Datum (for Navionics
charts this is always WGS84), change symbol, add range rings and add a note.
12
Editing multiple waypoints in the waypoint library
Some data in the waypoints library can be changed for more than one waypoint at a
time. To select the waypoints to edit, click on the first waypoint to edit and hold down
the keyboard “CTRL” button while clicking on the other waypoints to edit. NOTE: if
you hold the keyboard “Shift” button down when clicking a second waypoint, then the
range of waypoints will be selected from the first waypoint selected. To select ALL
waypoints, select any waypoint in the list and then press the “CTRL” and “A” keys on
the keyboard at the same time.
Once a selection has been made, click “Edit Waypoint”. The following data can be
edited for multiple waypoints: Group Name, Symbols, Notes, Datum and Range
Rings. See “Entering a Waypoint/Editing a Waypoint” for more information.
13
Waypoint symbols
When creating a new waypoint, the symbol can be changed by clicking on the
Symbol/Icon “change” button.
Once clicking on the Change button you will see the following screen. From the tabs at
the top you can select from the standard icons or plotter specific icons then select
desired symbol.
Once selected click OK.
14
To change the icon to be your default icon, click on “Use as default symbol”
Waypoint range rings
Range Rings show a set of concentric circles labeled by distance from the central point,
with radial lines, useful for judging distance and angle from a geographic location. To
add these to a waypoint, go into Edit Waypoint; (either when initially creating the
waypoint or by going to Waypoint, Waypoint Library and highlighting the desired
waypoint, then click on Edit Waypoint).
Set desired Distance in NM and number of rings, check the Display box and click OK.
15
Then you will see the created rings:
Deleting waypoints (single or multiple waypoints)
To delete a single waypoint, select the waypoint in the waypoint library and select –
“Delete waypoint”.
To select more than one waypoint to delete click on the first waypoint to delete, then
hold the keyboard “CTRL” button while clicking on the other waypoints to delete.
NOTE: if you hold the keyboard “Shift” button down when clicking a second
waypoint, then the range of waypoints will be selected from the first waypoint selected.
To select ALL waypoints, select any waypoint in the list and then press the “CTRL”
and “A” keys on the keyboard at the same time. Once a selection has been made, click
the button “Delete Waypoint”.
Sorting waypoints
To sort the waypoint list, select the sort option from the “Sort” pull down box. The
options available are:-Name
-Short Name
-Group Name
16
Saving & Loading Waypoints
Saving waypoints to memory card to be imported into a chart plotter
To save the waypoints to a blank memory card, first remove the Navionics card and
then insert the blank CF or SD (note: unlock the SD card before using) card to be
used. Then go to “Waypoints”, “Save Waypoints on Cartridge/Memory card”. The
Save to Cartridge/Memory card box will be displayed. From here select the plotter the
waypoints will be loaded into and verify that the “Save to” drive is correct. For file
naming see below. If you attempt to name a file with a unit that cannot accept that
name an error message will appear indicating the proper file name.
The following are the folders/files that will be created on your memory card depending
on what plotter you select:
Furuno Navnet – file-GP1650B.rou. This file name cannot be changed.
Humminbird – Folder-Matrix, File- *name*.hwr. You can name this file.
Lowrance/Eagle – Folder-waypts, file *name*.usr. You can name this file.
Northstar – file, NSTAR_db. This file name cannot be changed.
Raymarine – File archive.fsh. This file name cannot be changed.
Geonav – Folder GEONAV/.../MARKERS, file *name*.mrk. You can name this file.
With Northstar units, the file name must be in a specific format in order for the unit to
load the waypoints. You may receive the following error:
17
Click OK to continue to save for a Northstar.
With Raymarine C & E Series units, the file name must be in a specific format in order
for the unit to load the waypoints. You may receive the following error:
Click OK to continue to save for a Raymarine.
In addition, with Raymarine the waypoints must be converted. Navplanner will do this
automatically and a screen will appear indicating when the process is complete. DO
NOT remove the CF card until the following pop-up message is displayed:
Click OK, then OK to complete.
18
Saving waypoints to the PC
To save Waypoints to the PC, (this is highly recommended to do as back-up method)
go to- Waypoints/Save Waypoints. Select the desktop, or folder you have created in
your computer and click save.
Loading waypoints from memory card
To load a waypoint file from a memory card; go to -Waypoints, Load Waypoints from
Cartridge/Memory card. Select the file to be loaded. **From the drop down menu,
you will need to select the plotter the file is under. You may also need to select the
correct removable disk from “Look in”. Once the file is displayed, highlight the file and
click open. These waypoints will now be displayed on the map and in the Waypoint
Library.
19
Waypoint Library
Viewing the waypoint library
To view waypoints in the waypoint library go to –Waypoints/Waypoint Library.
Printing the waypoint library
To print the waypoint library, click the “Print” button at the bottom of the waypoint
library dialog.
Finding Waypoints
Zoom to a waypoint (moving the chart to show the waypoint)
To see where a waypoint is positioned, the chart can be repositioned to center on a
particular waypoint. Click the waypoint in the waypoint library and then click the
button “Zoom to waypoint”. The chart view will be repositioned so that the waypoint
is in the center of the view (or as close as can be achieved).
Importing & Exporting Waypoints
Exporting waypoints to Microsoft Excel®
Waypoints can be exported from NavPlanner so that they can be manipulated, printed
and can also be imported back into the application. To export the waypoints, go to –
Waypoint/Waypoint Library and click on - Export Waypoints.
20
Next, select where you would like to save the file. This can be saved onto the desktop
for easy location. The file name can be changed if desired, and more than one file can
be created. The “Save as type” option cannot be changed if this file will be transferred
back into NavPlanner.
The next pop-up will ask how you wish to save the waypoints. NavPlanner requires the
waypoints to be in decimal degrees for importing back into the program. You can
select to have these in degrees, minutes and seconds, however a formula would need to
be created within Excel to put these into decimal degrees prior to importing. For this
demonstration we are selecting NO.
An Excel document will then be created. Open the file and you will have an Excel
document that can be saved as a back-up of the waypoints, used to continue creating
more waypoints or sent to another computer via e-mail.
Importing waypoints
To import the waypoints go to - waypoint, waypoint library and click on - import. The
next dialog allows you to select the filename (including the directory where it is stored)
to import. Once the waypoints are imported there is a dialog that tells you how many
have been imported successfully and how many could not be imported. If the data in
the fields is not valid data then the record will be rejected.
The data format is the same as the export although some of the fields at the end that
are not needed and can be left out (i.e. you can just leave the last three fields if you
don't want any range rings specified). This option can also be used to import POI’s
which are in .CSV format, as POI files (see below).
21
POI files (Point Of Interest)
Import customized points of interest created by others with the program. In today’s
fast-paced world, points of interest are ever-changing. With the help of this program,
you can now add your favorite new restaurants, shops, superstores, etc, as points of
interest (POIs). The files are .CSV files and the waypoint library IMPORT facility can
now load these POI files.
There are many websites, some free and some with a fee to join, that allow a user to
download the POI CSV files. One website is http://www.gps-data-team.com/poi/.
Once on the site select the country, category desired and store desired and select
download. This will bring you to a page of options of the type of file to download; the
file type needed is GARMIN POI CSV. Save this file to your computer and then open
the NavPlanner program. Go to –waypoints/waypoint library and select import. Find
the POI saved file and select open. There will be a pop-up displayed that will tell you
have many successfully and unsuccessfully transferred in. Click OK and now those
POI files will be displayed on the screen.
To change the format of the name displayed go to – waypoints/waypoint library. Select
all POI files and select edit waypoint. From here you can select to show long name,
short name or no text as well as change the symbol used.
*Note-When attempting to import CSV file the Excel application must be closed prior
to import.
22
Creating a New Route
Creating a new route
To create a route click on –route/create a new route from menu bar.
You will then have a cross hair appear on your mapping screen and left click on where
the start of the route should be. Continue to left click where the different points of the
route should be. When finished right click and select end route. The route will be
displayed on your screen as seen below:
23
Route Properties
Route/plan details
To change the route properties you can go to the “Routes” menu and select
“Properties” or right click on any point within the route. The following route
properties display box will be shown.
Within this screen you can change the speed to use and the fuel consumption and
recalculate the route.
24
Route data
The route can be named in the route data tab.
Route display
In the route display tab you can select to show information about the route, the
waypoint number, the waypoint text and the position. Note- if the “Show route” box is
not checked the route will not be displayed on the screen.
25
Route display presentation
To change the color of the route click on the color box and the following screen will
appear. Click on any color and click ok. The line thickness can also be changed under
“leg lines- thickness”.
Once complete click OK to return to the map screen and view the route with the
changes.
26
Editing a Route
To edit a route right click on any point within the route and the following menu screen
will appear.
Route point properties
From the route point properties menu option the following screen will appear. This
screen allows you to
•
add a description to this route point
•
add a route point before this point
•
add a route point after this route point
27
•
delete this individual route point
•
delete the route or gain access to the route properties menu screen described
above
Moving a route point
When “move route point” is selected, the point will become fluid and you can
reposition the waypoint to the desired location.
28
Expanding a route
When either “add a route point AFTER this point” or “add a route point BEFORE
this point” are selected the line will become fluid and another point can be added.
Extending a route
To extend a route right-click and select “extend route” function. This will allow you to
continue that route point after it has been ended.
29
Deleting a route point
To delete a route point, right-click, select “delete route point(s)” and select from the
side menu which point (s) are to be deleted.
Appending a route
To append a route (to join two routes together into one), have one of the routes
displayed on your screen that you wish to join to another route.
30
Go to Routes/Append a route. To do this one of the routes needs to be saved onto
the PC. (For steps on saving routes see section below).
From the next screen highlight the route file to be joined into the route displayed and
select open. The two routes will now be one route.
31
Saving & Loading Routes
Saving routes to PC
To save routes to the PC have the route to be saved shown on the screen and go to –
Routes/Save Routes. Select the location of where you want the routes to be saved and
click ok.
Saving routes to cartridge/memory card (to be imported into a chart plotter)
To save routes to a blank cartridge/memory card, first remove the Navionics card and
then insert the blank CF or SD card to be used. Then go to “routes, save route on
cartridge/memory card”. The “Save to cartridge/memory card” box will be displayed.
Select the plotter the route will be loaded into and verify that the “save to drive” is
correct. For file naming see below, if you attempt to name a file with a unit that cannot
accept that name, an error message will appear indicating what the proper file name
should be.
32
Once plotter is selected the route library screen will be displayed. Highlight the route to
be saved and click ok. If the route you wish to save is not displayed and is saved on the
PC, select load route and add the route to the list. When desired route is selected click
OK.
The following are the folders/files that will be created on your memory card depending
on what plotter you select:
Furuno Navnet – file-GP1650B.rou. This file name can not be changed.
Humminbird – Folder-Matrix, File- *name*.hwr. You can name this file.
Lowrance/Eagle – Folder-routes, file *name*.usr. You can name this file
Northstar – file, NSTAR_db. This file name can not be changed
Raymarine – File archive.fsh. This file name can not be changed
Geonav – Folder GEONAV/.../ROUTES, file *name*.rut. You can name this file.
If there are multiple routes to be transferred then save all routes onto PC first. Then
select “routes/save routes to cartridge/memory card”. In the route library screen click
on “add route to list” and continue to add routes from PC until all routes are displayed.
33
Then highlight all routes to be transferred by clicking on the first route and holding the
“CTRL” key on your keyboard.
Click OK to save.
34
Transferring Routes/Waypoints to GPS Plotter
Furuno®
Once route/waypoints have been saved to memory card bring the route/waypoint
saved memory card to the GPS plotter. With chip inserted perform following steps:
•
Press menu button once
•
Press softkey next to System Configuration
•
Press softkey next to Data Transfer
•
Press softkey next to upload/download data
•
Press softkey next to load data from memory card
•
In the box, if waypoint & routes option is turned off, scroll down to this
option and press softkey next to edit
•
Press up arrow on d-pad to fill in circle next to on, press softkey next to enter
•
Press softkey next to load
•
A caution prompt will display warning that previously saved routes/waypoints
will be overwritten. If this is okay, press enter. If not okay, press clear button to
abort operation.
•
Press enter knob, then menu button to return to mapping screen.
Humminbird®
Insert waypoint loaded cartridge into plotter. Data will automatically save into plotter.
Lowrance®/Eagle®
•
With route and/or waypoint-loaded card in plotter, press the menu button
twice.
•
Scroll down to system setup, press enter button
35
•
Scroll down to transfer my data, press enter button
•
Question box will pop up asking “transfer data which way?”, press arrow to
highlight load box and press enter
•
Transfer my data box will appear. Press enter to bring down the drop-down
box and view list of files to load.
•
Select the file that was saved from NavPlanner, press enter button
•
Press the down arrow on the d-pad to highlight the load data box, press enter.
A box should appear stating the data loaded successfully.
•
Press exit button until map screen appears.
Northstar®
•
With the route and/or waypoint-loaded card in plotter, press the
waypoints/routes button located just below the keypad.
•
Press the softkey next to import/export
•
Press the softkey next to compact flash
•
Press the softkey next to import
•
Press ENT button to confirm
•
Press the softkey next to start
•
Press the chart button to return to the chart screen
Raymarine® C & E Series
•
With the route and/or waypoint-loaded card in plotter, press data button
•
Press Archive & Transfer softkey at the bottom of screen
•
Press retrieve from card softkey
36
•
“Waypoint List” screen will pop-up; either select a group from the list and
press retrieve group softkey, or press retrieve all softkey to save all data to the
plotter
•
If routes or waypoints are already saved in the plotter, a message box will
display stating “Group already exists in list. What do you want to do? Press a
softkey”. If you do not want to erase the existing data from your plotter, press
the retrieve as a new group softkey. If okay to overwrite the existing data, press
the replace group softkey, or press skip this group softkey and no action will be
taken
•
Press OK button.
Raymarine® 430/435
•
With route and/or waypoint-loaded card in machine, press "Enter" button
•
At the bottom of the screen, scroll over to the "More" box, press "Enter"
button
•
Highlight "Archives" box, press "Enter" button
•
Scroll over to "More" box, press "Enter" button
•
Scroll over to "Route Arch. List" box for routes or "Waypoint Arch. List" box
for waypoints, press "Enter" button
•
"Route Archives" window will appear for routes, "Waypoint Archives"
window will appear for waypoints. Highlight desired route/waypoint from list
(Ex: 01 Archive); scroll to "Load Route" box for routes or "Add Waypoints"
box for waypoints at bottom of screen; press "Enter" button
•
*Press "Clear" button until mapping screen appears
Raymarine® A65
•
With route and/or waypoint-loaded card in machine, press "Data" button
•
Press "Archive & Transfer" softkey at the bottom of screen
•
Press "Retrieve from Card" softkey
37
•
"Waypoint List" screen will pop up; either select a group from the list and
press "Retrieve Group" softkey, or press "Retrieve All" softkey to save all
data to the plotter.
•
Note: If routes or waypoints are already saved in the plotter, a message
box will display stating "Group already exists in list. What do you want to
do? Press a softkey." If you do not want to erase the existing route from
you plotter, press the "Retrieve As New Group" softkey. If okay to
overwrite the existing route, press the "Replace Group" softkey, or press
the "Skip This Group" softkey and no action will be taken.
•
Press "OK" button
Geonav®
•
With the route and/or waypoint-loaded card in plotter, press the GOTO key
to display the menu.
•
Select ROUTE or MARKERS.
•
Select OLD and press ENTER to open the catalog.
•
Select the route or waypoints to load by using the CURSOR key.
•
Press ENTER to confirm or PAGE to exit.
Transferring Routes/Waypoints from a GPS Plotter
to a memory card
Furuno®
'* When route(s)/waypoint(s) created in plotter, insert SD card with enough
memory to store the route(s).
NOTE: MAKE SURE TAB IS NOT IN "LOCKED" POSITION!
•
Press "Menu" button
•
Press softkey next to "System Configuration"
•
Press softkey next to "Data Transfer"
38
•
Press softkey next to "Upload/Download Data"
•
Press softkey next to "Save Data To Memory Card"
•
In the white box, if "Waypoints & Routes" option is turned off, scroll
down to this option and press softkey next to "Edit"
•
Press up arrow on d-pad to fill in circle next to "On", press softkey next to
"Enter"
•
Press softkey next to "Save"
•
A caution prompt will display warning user that previously saved rts/wpts
will be overwritten. If this is okay, press the enter knob. If not okay, press
"Clear" button to abort operation
•
Press enter knob, then "Menu" button to return to mapping screen
Humminbird®
•
When route(s)/waypoint(s) created in plotter, insert SD/MMC card with
enough memory to store the data
•
NOTE: IF USING SD CARD, MAKE SURE TAB IS NOT IN
"LOCKED" POSITION!
•
Press "Menu" button twice
•
Scroll over to "Nav" tab
•
Scroll down to "Export All Nav Data", press right arrow
•
Caution message will display notifying that any routes/wpts saved to card
previously will be overwritten. If okay, press right arrow to confirm. If not
okay, press left arrow to abort operation.
Lowrance®/Eagle®
•
When route(s)/waypoint(s) created in plotter, insert SD/MMC card with
enough memory to store the route(s)/waypoint(s)
39
•
NOTE: IF USING SD CARD, MAKE SURE TAB IS NOT IN
"LOCKED" POSITION!
•
Press "Menu" button twice
•
Scroll down to "System Setup" option, press "Enter" button
•
Scroll down to "Transfer My Data…" option. Press "Enter" button
•
* Question box will appear asking "Transfer data which way?", highlight
"Save" box, press "Enter" button
•
"Transfer My Data" box will appear. If more than one SD/MMC card is
inserted in plotter, highlight "MMC Card" option and press "Enter"
button to expand drop down list. The list will show how many megabytes
are free on each chip. Choose which one to save to and press "Enter"
button.
•
Scroll down to "File Name" option. If desired, press "Enter" button to
change name of data. Press "Enter" button when finished
•
Scroll down to "Save Data" box, press "Enter" button
•
Prompt should display stating "User Data Saved Successfully".
•
Press "Exit" button until mapping screen is visible.
Northstar®
•
When route(s)/waypoint(s) created in plotter, insert CF card with enough
memory to store the data
•
Press "Waypts/Routes" button
•
Press softkey next to "Import/Export"
•
Press softkey next to "Compact Flash"
•
Press softkey next to "Export"
•
Press "ENT" button to confirm
•
Press softkey next to "Start"
40
•
Press "Chart" button to return to mapping screen
Raymarine® C & E Series
•
When route(s)/waypoint(s) created in plotter, insert CF card with enough
memory to store the data
•
Press the "Data" button
•
Press the softkey below "Archive & Transfer" at the bottom of the screen
•
Press the softkey below "Save To Card"
•
To import routes, press softkey below "Select List" until "RTE" is
highlighted, for waypoints, press softkey until "WPT" is highlighted
•
Choose a route or waypoint to save from the list and press softkey below
"Save Route" or "Save Waypoint" or if all routes/waypoints are to be
saved to card, press softkey below "Save All"
•
When finished saving, press "OK" button and "Cancel" button to return
to mapping screen
Raymarine® 430/435
•
When route(s)/waypoint(s) created in plotter, insert CF card with enough
memory to store the data
•
Press the "Enter" button
•
At the bottom of the screen, scroll over to the "More" box, press "Enter"
button
•
Highlight "Archives" box, press "Enter" button
•
Highlight "Archive Route" box for routes or "Archive Waypoint" box for
waypoints, press "Enter button
•
Route List or Waypoint list will appear. Choose route/waypoint from list
and press "Enter" button.
41
•
Box will appear with route or waypoint name giving the option to rename
the route. Press "Enter" button when finished.
Raymarine® A65
•
When route(s)/waypoint(s) created in plotter, insert CF card with enough
memory to store the data
•
Press the "Data" button
•
Press softkey below "Save Wpts/Rtes To Card…" at the bottom of the
screen
•
Press softkey below "Select List" until "RTE" is highlighted
•
Choose a route to save from the list and press softkey below "Save Route"
or if all routes are to be saved to card, press softkey below "Save All"
•
When finished saving, press "Cancel" button to return to mapping screen
Geonav®
•
When route(s)/waypoint(s) created in plotter, insert CF card with enough
memory to store the data.
•
Press the GOTO key to display the menu bar.
•
Select ROUTE or MARKER.
•
Select CURRENT.
•
Select SAVE (or SAVE ALL) and press ENTER to confirm.
•
Use the CURSOR key to change the default name and press ENTER to
confirm.
42
Upgrading
To find available updates to your NavPlanner software please visit the NavPlanner
section of our website, www.navionics.com and go to updates. You can verify the
version of your currently installed NavPlanner software by going to Help- About
program… on the menu bar.
Troubleshooting
Error “A valid card reader can not be found”
If he program will not install or fails to open or error “Program has performed an
illegal operation” then perform the following:
• Firstly uninstall NavPlanner and reboot the system.
• Disable any other programs running (i.e. Norton System Doctor, Virus
detection programs, etc.) and re-install NavPlanner.
• If the PC has a network drive connected it may not be possible to see the
second Drive on the card reader.
• The Navionics card reader has 3 drives (normally E,F and G)
On Navionics reader the first (Normally E) is for CF cards
On Navionics reader the third (Normally G) is for SD cards
• If you are unable to see the Drive and have a network drive connected, try
disconnecting from the drive and then locating the Card.
Cannot read chart from Card Reader or NavPlanner does not start giving an error
3000, 3001, 3002 or 3004 (software conflict)
There are some software packages that can conflict with the card reader. If
this happens, this software needs to be disabled. One particular package is Adobe
Photoshop Elements (apdproxy.exe). This runs in the background and may need
to uninstalled or simply stop it running.
Cannot read chart from Card Reader or NavPlanner does not start giving an error
3000, 3001, 3002 or 3004 (hardware conflict)
If there are a large number of other USB devices on a system this can
cause difficulty in the system recognizing the Navionics card reader. If this occurs,
remove all of the other USB devices as well as any hubs and plug the card reader
directly into the computers USB port. If there are built-in memory card readers
43
installed that use internal USB ports then these should also be disabled if possible.
Retry the software to see if the charts can now be read from the card reader.
Error stating the security is invalid.
If you get an error stating that the security is invalid, make sure you are
reading the chart from the memory card and not from the hard disk. It must be
read from a Navionics card reader.
Auto Play
The symptoms are that Windows keeps trying to read from the card reader via
“auto play”. Also when NavPlanner is being used, Windows tries to read the
installed cartridges from the file menu without prompting. This could be caused
by another software application in the system which is most likely to be a scanner
or camera software. Disconnect all other devices (USB hubs, printers, scanners,
other USB devices, Ethernet wireless hubs, network adapters, Bluetooth adapters,
etc). Then plug in just the card reader and run NavPlanner. If this solves the
problem, start adding each device one at a time and check the application. If the
device that is causing the problem can be identified try uninstalling the device and
reinstalling but with only the minimum additional software (a lot of scanners and
cameras come with lots of additional editing and viewing software that do tend to
try and automatically read cards plugged into card readers). Alternatively, check for
the latest drivers for the device as the problems may have been cured in the later
drivers/software.
Error “This application has requested the Runtime to terminate it in an unusual way”
This problem may be from a windows update. Firstly check that your
computer is fully updated with all the latest windows updates. If this does not
resolve the issue then please look at the following Microsoft article no 884538:http://support.microsoft.com/kb/884538.
For any questions regarding the use of NavPlanner please contact Customer Support at
1-800-848-5896 or by e-mail [email protected] or you can check the NavPlanner
FAQ page where new FAQ’s are added.
44