1
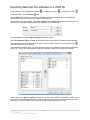
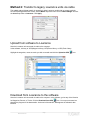
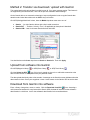
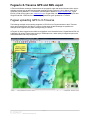
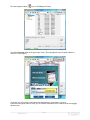
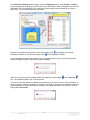
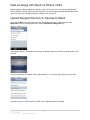
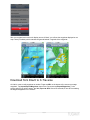
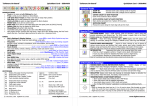
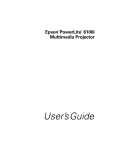
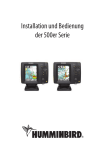
Fugawi™ Data Exchange Guide Transferring Waypoints, Routes, Tracks to / from GPS Devices and Plotters Applicable to these software products: Fugawi Global Navigator 4.5 Fugawi Marine ENC 4.5 Navionics HotMaps Explorer 4.5 Navionics NavPlanner2 v4.5 TABLE OF CONTENTS Overview …........................................................................................................... 3 Lowrance Data Exchange .................................................................................… 4 Garmin Data Exchange …..................................................................................... 8 Humminbird Data Exchange …........................................................................... 10 Raymarine Data Exchange ...............................................................................…11 Geonav Data Exchange ..................................................................................… 13 Northstar 6000 Series Data Exchange ............................................................… 15 Furuno Data Exchange ....................................................................................… 17 X-Traverse with iNavX.......................................................................................... 18 X-Traverse with Fugawi iMap and MacENC......................................................... 24 Page 2 MANUAL-Data Exchange-R1 Overview If you wish to transfer waypoints, routes, or tracks between Fugawi powered software and compatible GPS devices or chart plotters, there are two ways to do this: Import / Export using memory cards such as SD / miniSD / microSD, MMC and CF. Download / Upload directly to the GPS device using a cable. Which option you use, and some of the details of how the transfer is done, depends on your GPS device manufacturer and model. Refer to the manufacturer specific sections that follow in this document for details. A common set of preparatory steps, regardless of GPS make / model, is this: 1. Click GPS|Settings|Model tab. 2. Set the Model drop-down to a manufacturer device family close to your model, or select NMEA for a generic choice. The purpose of this selection helps both with getting GPS position data live from a device as well as with data exchange. 3. Set the Icons drop-down to a manufacturer device family close to your model, or select none. The purpose of this selection is to approximately match the icons seen on the software’s display with the icons that appear on the GPS device or chart plotter. These icons are updated from time to time; newer model’s icon set may not yet be programmed into the software. 4. Click Apply. Note: The scope of this document is limited to data exchange between the software and GPS devices / chart plotters. No feature in the software uploads maps to a device. MAN-DATAEX-R1 Page 3 Lowrance Data Exchange Overview of Lowrance .USR or .GPX files on storage card Many Lowrance models (ex: iFinder, LCX-15, and LCX-16) exchange data via a MMC or SD card. In the software, click one of the Waypoint , or Route , or Track libraries. Then click the Import icon to bring data into your software or Export to send data to a memory card. Lowrance data files have the extension .USR (ex. “data.USR”) and contain all waypoint, route and track data. In the example below, a Lowrance data file is being loaded (imported) from a drive and folder selected from the Look in: drop-down box. The Files of type drop-down is set to Lowrance Files to narrow down the types of files listed. For Lowrance software version 4 models (such as Lowrance HDS), the .USR file may not be compatible with the Fugawi powered software on your computer. You may get “out of memory” error or other messages. If this applies to you, there are two work-around options: Study your Lowrance chart plotter's data export options for a .GPX file format selection. If supported by the Lowrance model, export in GPX file format. Then use the computer software's Import feature from any of the Waypoint, Route, or Track libraries to import with the Files of type drop-down set to GPX. The data will then appear in the data library as expected. OR Examine the Lowrance chart plotter's options for saving data. If a Lowrance version 3 file format options is available, select that. After that, your computer software will import and export .USR files as described in the pages that follow. Page 4 MANUAL-Data Exchange-R1 Some technical notes about data exchange: For Lowrance units with firmware version 2.1 and earlier, the .USR files must be named exactly: DATA.USR. This restriction is removed in later firmware versions. Very old Lowrance units use a .LOW file type with which the software is incompatible. If the storage card is in a USB card reader, the software can read / write to the card directly. If the storage card is accessed using an older technology Parallel port reader, the .USR file must be copied to your hard drive before importing data. With the parallel reader, you must copy the file back to the card after creating a new .USR file. Users with parallel readers should download the latest MMC card browser from the Lowrance web site. Once you have a storage card in your Lowrance unit, the data can be transferred to the main memory of the unit. On the Lowrance GPS go to: Main Menu|System Setup|Transfer My Data and select either Save or Load, depending on whether you are transferring data to the card or from the card to the unit. Some Lowrance units may have a slightly different menu path. Importing data from a .USR file into the software In the software, click GPS|Waypoint Library Click the Import , or GPS|Route Library , or GPS|Track Libary . icon. Use the Look In drop-down to guide the software to the removable drive letter representing the memory card containing the Lowrance .USR data file. The memory card drive letter varies, typically anything from drive E: to Z:. Select the .USR file on the card and the Data Exchange window will appear. Select the Waypoint, Route or Track tab found along the top left corner of the Data Exchange window. Select the data items on the right side of the form. Click on the transfer-left button to move the data from the USR file over to your software's data libraries. Repeat for the other types of data in remaining tabs. When finished, click Close. Now the data will be in your Waypoint, and/or Route, and/or Track libraries where you may use and edit them as needed. MAN-DATAEX-R1 Page 5 Exporting data from the software to a .USR file In the software, click GPS|Waypoint Library In the data library, click the Export , or GPS|Route Library , or GPS|Track Libary . icon. Use the Save In drop-down box to guide the software to the removable drive letter representing the memory card where you will save the Lowrance .USR data file. At the bottom of the export dialog, select Save as type to the Lowrance Files format. Enter whatever file name you wish, though something simple like “data.USR” is recommended. Click the Save button and the Data Exchange window will appear. Select the Waypoint, Route or Track tab found along the top left corner of the data exchange window. Select the items on the left side of the form that you wish to transfer; then click on the transfer-right button to move them to the .USR file. In the example illustration below, five non-contiguous tracks in the software's Track Library are selected with CTRL + clicks. After clicking transfer-right, the track data is ready to be saved to the .USR file. When finished, click Save or Save As to finalize the contents of the .USR file. Now that the .USR file is on your memory card, insert the card into a Lowrance chart plotter and use its interface to load up the data. Review your Lowrance model's User Manual for details on loading data from the card. Page 6 MANUAL-Data Exchange-R1 Method 2: Transfer to legacy Lowrance units via cable This cabled method of data transfer is generally for older Lowrance models with no storage card slot. Click GPS|Settings|Model tab. In here, set the Model drop-down menu set to Lowrance/Eagle. Also set the Icons drop-down to Lowrance. Click Apply. Upload from software to Lowrance Have the Lowrance unit connected via cable to the computer. In the software, click any of: GPS|Waypoint Library, GPS|Route Library, or GPS|Track Library. Highlight the waypoints, routes or tracks you wish to transfer and click the Upload to GPS icon. Download from Lowrance to the software Have the Lowrance unit connected via cable to the computer. In the software, go into any of the libraries for Waypoints, Routes, or Tracks. Click the Download from GPS icon. You may see a status bar showing the progress of the data transfer. At the end of the transfer, data appears in software's data libraries. MAN-DATAEX-R1 Page 7 Garmin Data Exchange Overview: Two transfer methods, some exceptions The software transfers data to Garmin devices in two possible ways depending on your model: either data is exchanged directly to the Garmin, or data is stored as GPX files on a SD type storage card from which the Garmin loads data. Some Garmin models have exceptions in terms of what they can and cannot do: A few types of Garmin are unable to send / receive data with the software at all: the automobile oriented nuvi and zumo families are the prime examples. A few Garmin models (ex. Garmin GPS 18) allow for real time GPS data but not for the transfer of waypoints, routes, and tracks. Colorado and Oregon models have a USB connection cable in the box, and the USB connection is for “mass storage”, i.e. transferring data to a storage card as if it was a USB removable drive. This is fine for data exchange but insufficient for real time GPS data. An outline of compatibility is found at: http://www.fugawi.com/web/support/gps_compatibility.htm Method 1: GPX files via storage card Click GPS|Waypoint Library , or Route Library , or Track Library . From any folder, select one or more items. You can select multiple items in a folder by holding the CTRL key while mouse clicking on the desired items. Then click the Export icon (upper left corner) to open the save dialog. In here select your SD or CF card in the Save in drop down, edit the file name if you wish, and make sure to set Save as type to the GPS Exchange Format (GPX) option. Depending on the particulars of your model, you may have to save to a GPX sub-folder on the data card already inside the Garmin (as in the Colorado example above), or save to a memory card connected to your computer via USB card reader. After clicking Save, the data file is on the storage card. Consult your Garmin User Guide or help screens for instructions on using the data in the Garmin unit. Page 8 MANUAL-Data Exchange-R1 Method 2: Transfer via download / upload with Garmin This method works with various Garmin models but not all. If you get a message saying “This feature is not supported by the selected GPS”, then use the previous method of data exchange. On the Garmin device, we assume the data input / output configuration is set to regular Garmin data transfer mode. Other data modes such as NMEA may not function. Click GPS|Settings|Model tab. In here, have the Model drop-down menu set to one of: Garmin ... for older Garmin devices with a 9-pin serial connection. Garmin PVT ... ”Position / Velocity / Time”, not applicable to data upload / download. Garmin USB ... best for all newer Garmin devices with USB. You should also set the Icons drop-down to Garmin or Garmin II+. Then click Apply. Upload from software into Garmin Click GPS|Waypoint Library , or GPS|Route Library , or GPS|Track Library . Click the Upload to GPS icon. If this icon is grayed out, there is no valid cable connection to the device or this function is incompatible with your particular model. The data upload should only take a few seconds. A message on the Garmin's screen indicates when the data transfer is done. Check your waypoints / routes / tracks menus on the Garmin GPS to see the data. Download from Garmin into software Enter a library of waypoints, routes, or tracks. Click the Download from GPS icon. Assuming a valid connection between the computer and the Garmin GPS, the data will transfer into the software's data libraries in a brief time. Look in the software's data libraries for the transferred data. MAN-DATAEX-R1 Page 9 Humminbird Data Exchange To prepare for data transfer to or from a Humminbird, click the software menu GPS|Settings|Model tab. Set the Model drop-down and Icons drop-down to the Humminbird family of devices. Click Apply. 1. Click GPS|Waypoint Library or GPS|Route Library . 2. Click the icon for Upload to GPS to send data to the Humminbird's memory card. Or click the Download from GPS icon to fetch data from the memory card. 3. In the Select Device dialog box that follows, select the memory card. (See the Northstar Data Exchange section for an illustration.) The card will display as a removable drive attached to your computer, probably with a drive letter like E:, F: or higher. 4. In the Data Exchange dialog box, select waypoints or routes. (See the Raymarine Data Exchange seciton for an illustration.) Move them to/from the software and memory card using the appropriate left or right arrow ( or ) icons. 5. Click OK. 6. Refer to your Humminbird User Guide to understand how the Humminbird loads data it finds on an inserted memory card. Limitations: The software's tracks are not compatible with Humminbird plotters; no transfer is supported. For tested Humminbird models, a maximum of 3000 waypoints contained within 50 routes can be stored in the unit’s internal memory. Long waypoint or route names may be truncated once transferred to Humminbird. If not enough memory is available in the Humminbird internal memory to add all objects, as many objects as possible will be added. Technical Notes: Your plotter may require a firmware update to fully support CF card or SD card data transfer. Refer to your Humminbird instructions and support materials for more details. To avoid potential problems it is best to save Waypoints and Routes on a blank storage card, not on cards containing map / chart files. For example, do not try to save a waypoint file to a Navionics Gold chart card – you could damage the card’s contents. The Humminbird plotter creates routes by stringing together a series of waypoints, therefore when you transfer a route to card, the software will also create a waypoint on the card for every point in the route. Page 10 MANUAL-Data Exchange-R1 Raymarine Data Exchange Set up in software Supported Raymarine chart plotters such as the A series, C series and E series models exchange waypoint or route data via flash memory or serial data transfer. Raymarine uses .FSH files which the software can convert for use in the data libraries. 1. In the software, click GPS|Settings|Model tab. 2. With Realtime GPS Devices selected, set the Model drop-down to either: Raymarine Flash Data Transfer … for models with a Compact Flash card. or Raymarine Serial Data Transfer… for other serial cabled Raymarine models. 3. Click Apply. Troubleshooting tip: Some customers find it is best to plug in the Raymarine unit via cable only at this point, otherwise the Model setting spontaneously slips to a non-Raymarine item. Technical notes for Raymarine C and E series Routes can not be transferred to the Raymarine plotter if they contain more than 50 points. File names should be no longer than 16 simple alphabetic characters to prevent problems. Track transfer with the software is not supported. Refer to your Raymarine instructions and support materials for more details on how to operate the Raymarine interface. On the next page, follow the instructions for either data transfer via cable or via CF memory card. (continued next page...) MAN-DATAEX-R1 Page 11 Download from Raymarine via cable 1. In the software, click GPS|Waypoint Library or GPS|Route Library . 2. Click the Download from GPS icon (green icon with arrow pointing down). 3. Find the new waypoint or route data appears in the library. If you wish, drag and drop data items to different sub-folders in the library. Upload to Raymarine via cable 1. In the software, click GPS|Waypoint Library or GPS|Route Library . 2. Click the Upload to GPS icon (green icon with arrow pointing up). 3. The Raymarine chart plotter will show the data within its waypoint and route menus. Data transfer using Compact Flash (CF) cards 1. Click GPS|Waypoint Library or GPS|Route Library . 2. Click the Upload to GPS icon to send data to your blank CF memory card. (Do not use a card from Navionics with charts on it.) Or click the Download from GPS icon to fetch data from the CF memory card. 3. In the Select Device dialog box that follows, select the CF card. Typically it appears in Windows as a removable E:, F: or other drive letter. 4. In the Data Exchange window, select data to transfer. Then click the right data to the CF card, or click the left arrow to transfer arrow to transfer data into the software's data libraries. 5. Click OK. 6. If you save data on to a CF memory card, insert it into your Raymarine E-series chart plotter as per the manufacturer instructions. Press the DATA button, then select Archive and Transfer. See the chart plotter's User Manual for more details. Page 12 MANUAL-Data Exchange-R1 GEONAV Data Exchange Export data from software to GEONAV 1. Click GPS|Waypoint Library , or GPS|Route Library Waypoint Library is shown as an example below). or GPS|Track Library (a 2. Select one or more waypoints so they are highlighted; hold down the CTRL key while clicking items if you need to select multiple non-contiguous items. 3. Click the Export icon. 4. In the Save in drop-down, select as the destination a removable SD storage card to be used by the Geonav device. 5. From the Save as type drop-down, select GEONAV MARK Files (for waypoints), GEONAV Routefiles (for routes) or GEONAV Trackfiles (for tracks). The only valid file names include text in the range A to Z, 0 to 9, and the underscore _ character. If you enter an invalid file name, a confirmation dialog asks if you really wish to use that name. If you need to correct the file name, click No and re-enter valid text. MAN-DATAEX-R1 Page 13 If you try to export a group of tracks, only the first of that group will be used in the export. You should select one track at a time for export to Geonav. Once the data is saved, consult your Geonav model's User Manual for instructions on loading data into the chart plotter. Import data from GEONAV to software 1. Assuming the Geonav chart plotter has saved data to a memory card, plug that memory card into a USB card reader connected to your computer. 2. Click GPS|Waypoint Library 3. Click the Import , or GPS|Route Library or GPS|Track Library icon. 4. Select the data file saved on the memory card. 5. Click Open and the data appears in the appropriate data library. Page 14 MANUAL-Data Exchange-R1 . Northstar 6000 Series Data Exchange Set up in GPS Settings menu The Northstar 6000 series plotters use a Compact Flash (CF) card for exchanging data. The plotter accepts waypoint and route data in a file format unique to Northstar, but the software converts its data to that format via CF card. 1. In the software, click GPS|Settings|Model tab. 2. With Realtime GPS Devices selected, set: ◦ the Model drop-down to Northstar 6000 series, ◦ the Icons drop-down to none. 3. Click Apply. 4. Click GPS|Waypoint Library or GPS|Route Library 5. Click the icon for Upload to GPS Or click the Download from GPS . to send data to the Northstar's CF memory card. icon to fetch data from the CF card. 6. In the Select Device dialog box that follows, select the CF card. Typical it appears in Windows as a removable E:, F: or other drive letter. Click OK. (continued next page...) MAN-DATAEX-R1 Page 15 7. In the Data Exchange dialog, select individual or all data elements you wish to transfer and click the right or left pointing arrows to move them to / from the CF card. 8. Click OK. The data has now been transferred. 9. If new data is on the CF card, insert it into the chart plotter and use the manufacturer's instructions for importing the data into the plotter. Technical details for Northstar 6000i and 6100i Chart Plotters: Routes can not be transferred if they contain more than 35 points. The Northstar plotter creates routes by stringing together a series of waypoints, therefore when you transfer a route to the CF card, the software creates a waypoint on the CF card for every point in the route. The Northstar Plotter does not support tracks, therefore the software will not allow you to transfer tracks to a CF card used by Northstar. To transfer waypoints and routes between the CF card and the Northstar 6000i or 6100i, insert the CF card in the Northstar plotter according to the manufacturers instructions, press the WAYPTS/ROUTES button on the chart plotter, then select Import /Export. For more information, refer to your Northstar documentation. Page 16 MANUAL-Data Exchange-R1 Furuno Data Exchange 1. In the software, click GPS|Settings|Model tab. 2. With Reatime GPS Devices selected, set: the Model drop-down to Furuno Flash Data Transfer (if using memory cards) or Furuno Serial Data Transfer (if connected via cable to the chart plotter). the Icons drop-down to either of the Furuno options or none. 3. Click Apply. 4. (a) If using a SD or CF memory card for data transfer, plug the card into a USB card reader so Windows sees the card as a removable drive, typically drive letter E:, F:, G: or higher. (b) For a data cable connection, confirm the NMEA data cable is reliably connecting the Furuno plotter to your computer. All data transferred is in the form of NMEA sentences. 5. In the software, click GPS|Waypoint Library 6. Click the Upload to GPS or GPS|Route Library icon to export or Download from GPS . icon to import. 7. (a) If using a SD or CF memory card for data transfer do these additional steps: i. A Select Device dialog box appears. Click your memory card drive letter (varies per computer) and click OK. ii. Copy selected data to the card by clicking the right arrow , or copy data into the software by clicking the left arrow . iii. Click OK to finish the transfer. NOTE: Data gets saved to a memory card as two files with extensions .ROU and .RAT. (b) For a data cable connection, the data transfer to the chart plotter completes after a brief time. 8. For data being moved to a Furuno chart plotter: If the data is on a memory card, insert it into the Furuno chart plotter as per manufacturer's instructions. NOTE: Many Furuno models are compatible with memory cards of 2GB or less capacity; larger capacity cards may be incompatible. For a cabled connection, the data is already present in the chart plotter. Consult your Furuno model's User Manual for details on how to load data, then select and use waypoints and routes. MAN-DATAEX-R1 Page 17 Fugawi’s X-Traverse GPX and KML export X-Traverse facilitates exchange of data and use of topographic maps and nautical charts to/from various software products such as Internet connected computers running Fugawi 4.5.28 (or higher), Mac OS X computers running MacENC 7 or GPSNavX, netbooks able to browse to www.x-traverse.com, Apple iPhone or iPad running iNavX (see: www.inavx.net) or Fugawi iMap, etc. GPS eXchange (GPX) files and Google Earth KML / KMZ files are the currently supported file types uploaded to X-Traverse. Fugawi uploading GPX to X-Traverse The following example covers sending waypoints in GPX files from Fugawi software to the X-Traverse server and importing them into iNavX. A variety of other types of data exchange are possible; the example below is typical of any data exchange using X-Traverse. In Fugawi, lay down waypoints and edit them as desired. In the illustration below, Fugawi Marine ENC 4.5 is displaying an online Touratel map courtesy of TRAKmaps.com, and a variety of waypoints (some with customized labels and icons) are present. Page 18 MANUAL-Data Exchange-R1 Click the Waypoint Library icon or GPS|Waypoint Library. Click the X-Traverse button in the upper right corner. (This only appears if your Fugawi software is version 4.5.28 or higher.) Login with your X-Traverse e-mail login name and password. (If necessary, sign up at X-traverse.com/signup and then verify your X-Traverse subscription in the e-mail from [email protected].) MAN-DATAEX-R1 Page 19 A Select File windows appears inviting you to select files or load up new files for X-Traverse. Click the New (blank sheet of paper) a GPX file. icon to name and describe the data you wish to upload to X-Traverse as A second Create New File windows appears. In the File Name text box, type in an appropriate name. Optionally, enter more text in the Description text box. Then click OK. (continued next page) Page 20 MANUAL-Data Exchange-R1 The X-Traverse Exchange window appears. Select the Waypoints tab (or, select Routes or Tracks if you are managing other data types). In the folder of your choice select whatever waypoints you wish from that folder. Press your keyboard's CTRL (control) key while clicking individual waypoints you want, or press CTRL + A to select all waypoints in the folder. Between the two panes of this window, click the single right arrow waypoints for transfer or click the double right arrow to designate only selected for all waypoints in a folder. If you accidentally copy the same waypoint over to the right hand pane twice, you will be prompted to replace the waypoint (Yes) or abort the copy (No or Cancel). When you are sure you have the right assortment of waypoints, click the Save icon. This uploads the data to the X-Traverse server. icon or Save As If you do not save and instead click Close, a prompt will ask if you wish to save the current GPX data. To do the equivalent of saving / uploading to X-Traverse, click Yes. Or, discard the work (without erasing the original waypoints in Fugawi) and leave the window by clicking No. Otherwise, click Cancel to continue working within X-Traverse. MAN-DATAEX-R1 Page 21 Data exchange with iNavX on iPhone / iPad With the waypoint data uploaded your “My files” page of X-Traverse.com, you may now download the GPX or KML file to iNavX. These instructions assume you have already bought and installed iNavX from the iTunes App Store, and iNavX has been enabled to use X-Traverse. Upload Waypoint file from X-Traverse to iNavX Finger tap the WP+ button at the bottom of any chart displayed in iNavX. This brings you to the Waypoints screen for managing the data. Tap the Import/Export Waypoints row. Assuming the device is connected to the Internet, a catalog of data on X-Traverse is retrieved after a few seconds. From the resulting list of available GPX or KML data files on X-Traverse, finger tap the one you wish. A prompt asks you to confirm the GPX or KML file for download to iNavX. Tap Yes. Page 22 MANUAL-Data Exchange-R1 After you navigate back to the main display screen of iNavX, you will see the waypoints displayed on an map / chart (if available) which matches the general latitude / longitude of the waypoints. Download from iNavX to X-Traverse On iNavX, create or edit waypoints as needed. Finger tap WP+ at the bottom of the screen to manage waypoints. Tap Import/Export Waypoints, then on the next screen tap Export Waypoints. To the prompt asking if you wish to export, tap Yes, Export to GPX. After a few seconds, a new GPX containing the waypoints appears on X-Traverse. MAN-DATAEX-R1 Page 23 X-Traverse with Fugawi iMap Fugawi iMap (any edition) can import GPX files stored on your X-Traverse account's “My files” page. Tap the Location icon (upper left corner) and select the My Library tab, then tap the X-Traverse exchange button. The app contacts your X-Traverse account via Internet connection and displays GPX files available. Select (highlight) a file name and then tap the yellow open folder icon. The individual waypoints within the file will then appear in the My Libray list of waypoints and the waypoints will appear on the topographic map corresponding to their co-ordinates. . X-Traverse used with other applications New software destinations for data on X-Traverse will be offered from time to time by a variety of vendors. For example, GPSNavX™ and MacENC™ are Mac OS X native applications that can receive GPX files from X-Traverse. To establish the connection, you first need to install a file that bridges the Apple computer application with X-Traverse: download and install the application from: http://www.inavx.net/X-Traverse.dmg Refer to the computer application's Help files or support services for specific steps on importing / exporting GPX files. Page 24 MANUAL-Data Exchange-R1 Additional Instructions This manual is a brief overview of one element of the Fugawi software product. More details and many more features are available in the program. Detailed information is available in the Fugawi On-Line Help Files: press the F1 key from any point in the program to view help resources. Technical Support Technical support is available by email (preferred), phone or fax, during the standard business hours of Northport Systems Inc. (9:00 AM to 5:00 PM, Mon-Fri, Eastern Standard/Daylight time). Technical support is available only to registered licensed users of Fugawi software, with introductory help for prospective customers sampling Fugawi demonstration downloads. You must either complete the online registration process (available from Help|Fugawi Product Registration) or send in the mail in registration form within 30 days of having purchased your Fugawi software license in order to be eligible for technical support. Please address your technical support questions to: Email: [email protected] Telephone: +1-416-920-9300 FAX: +1-416-964-6313 For recent information: http://www.fugawi.com MAN-DATAEX-R1 Page 25 <<<<<BLANK PAGE>>>>> Page 26 MANUAL-Data Exchange-R1 MAN-DATAEX-R1 Page 27