1
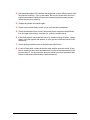
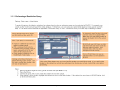
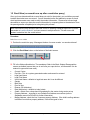
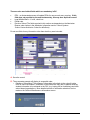
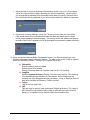
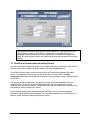
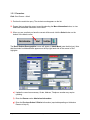
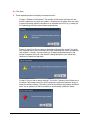
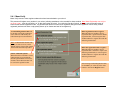
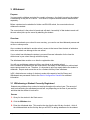
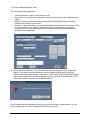
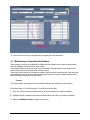
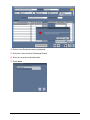
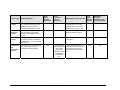
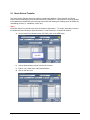
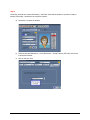
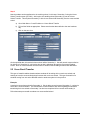
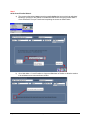
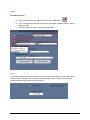
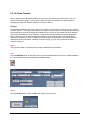
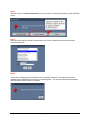
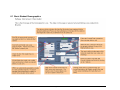
Registration &
Demographics
Reference Guide
Version 1.3
10 Oct 2008
BCeSIS Implementation Team
Contents
Overview .........................................................................................................................................................2
Work Processes ........................................................................................................................................2
Roles and Responsibilities........................................................................................................................2
1.
Admitting a Student..................................................................................................................................4
1.1 Perform a Restrictive Query..............................................................................................................4
1.2 Enroll New (no record turns up after a restrictive query)..................................................................7
1.3 Enrolling a Student with an Existing Record ..................................................................................10
2.
Registration ............................................................................................................................................13
Purpose ...................................................................................................................................................13
2.1 Registering a Single Student During Admission .............................................................................13
2.2 Registering a Single Student After Admission................................................................................15
2.3 Reverse Registration .......................................................................................................................16
2.4 Mass Registration............................................................................................................................17
3.
Withdrawal .............................................................................................................................................18
3.1 Withdrawing a Student Currently Registered..................................................................................18
3.2 No Shows (dependent on district company file settings) ................................................................20
3.3 Viewing Historical Records for Withdrawn Students .....................................................................27
4.
Cross Enrollment....................................................................................................................................28
4.1 Withdrawing a Cross-Enrolled Student...........................................................................................29
5.
Introduction ............................................................................................................................................31
5.1 Home School Transfer.....................................................................................................................33
5.2 Cross Enroll Transfer ......................................................................................................................35
5.3 No Show Transfer ...........................................................................................................................38
6.
Demographics.........................................................................................................................................40
6.1 Basic Student Demographics...........................................................................................................41
6.2 Student Citizenship Related Information1 ......................................................................................42
6.3 Student Miscellaneous Information 1 – Permissions Tab ...............................................................43
6.4 Student Miscellaneous Information 1 – Miscellaneous Tab............................................................44
6.5 Student Miscellaneous Information 1 – Locker Tab........................................................................45
6.6 Parent Information...........................................................................................................................46
6.7 Student Siblings...............................................................................................................................47
6.8 Emergency Contacts........................................................................................................................48
6.9 Medical/Health Information ............................................................................................................49
6.10 Transportation .................................................................................................................................50
6.11 Transportation – Alternate Addresses .............................................................................................51
6.12 Homeroom/Staff Assignments ........................................................................................................52
6.13 Student Fees/Assistance ..................................................................................................................53
Registration Basics Reference Guide
Page 1 of 53
10-Oct-2008
Overview
This guide will cover the processes involved in admitting, registering and withdrawing students
within your school.
Work Processes
Admitting a Student
Registering a Student
Withdrawing a Student
Cross-Enrolling a Student
Transferring a Student
The Demographic Loop
Roles and Responsibilities
School clerical support staff
Level 1 Support staff
Introduction
This document discusses the various ways to manage a student’s record in BCeSIS. It
is of utmost importance that there is only one record ever created for a student.
Unless the student is entering a StrongStart Centre or a school in BCeSIS for the first
time ever, there will already be a record for the student and that is the record that MUST
be located in BCeSIS and used. Only this initial record will receive a PEN.
This record is then passed on, or shared between schools, building up the educational
history of the student. When a student moves to another BCeSIS school, access to that
record changes through the withdraw/admit process.
It is the responsibility of everyone entering student information into BCeSIS to
use great care in following the standard admission procedures (see Standards
Handbook p14-21 of the print version, and 15-22 of the pdf version). If this is not done, a
duplicate record will be created. That new record will not receive a PEN (see definition
below) and cannot be merged with the original record. Consequently, the school will
receive a PEN error report, will have to print all relevant data, and then manually
update the original record. The duplicate record must then be deleted which is done
by request to the BCeSIS Service Desk.
Important Note: Remember to follow procedures in the BCeSIS Standards Manual
by using LEGAL documentation only, and checking the data entered for errors,
typos, and incorrect birthdates etc. to ensure that duplicate student records are
not created.
PEN
The Personal Education Number (PEN) number cannot be entered into
BCeSIS, the field is populated daily through an automated process
once a student is admitted for the first time in BCeSIS. The system
looks for students without a PEN and populates the State/Ministry field.
If it doesn’t populate, that means there is already a record for that
student in the system. When the PEN number will not populate
because there is already an existing record with that number in
BCeSIS, the district will receive an error report. It is very important to
review these reports each week and clean up duplicates immediately.
The longer the duplicate record remains, the more information will be
entered and will need to be printed and manually re-entered when the
duplicate record is deleted.
Registration Basics Reference Guide
Page 3 of 53
10-Oct-2008
1. Admitting a Student
Currently when a student enters your school and fills in a form to indicate his/her
intention of being an active student in your school, you can create (if new to BCeSIS) or
call up (if currently in BCeSIS) a record of that student so you can perform the necessary
tasks to place that student within your school. In BCeSIS, claiming ownership of a
student record is referred to as admitting the student. The student is not active in the
school and will not appear on attendance forms. They will, however, appear on TA class
lists if placed into homerooms or courses in the current year.
The Admission process has two main steps.
1. Query the database to determine if the student you wish to admit already has a
record in BCeSIS.
2. a) Admit a student new to BCeSIS by entering basic demographic information;
OR
b) Admit a student who has an existing record by selecting that record and updating
their information as necessary.
The first record entered for a student becomes that student’s permanent record and
must be maintained so that a complete history for the student is generated.
1.1 Perform a Restrictive Query
Restrictive Query is the name given to the process of searching the Provincial
database to determine if the student record already exists. It’s important to be certain
the student you are admitting is not already in the database. If the student is coming to
your school from another school in BC, there is a good chance the student already has a
record in BCeSIS.
With more and more StrongStart Centres opening and students receiving their PEN at
that time, it is ESSENTIAL that these procedures be followed for every child regardless
of age. Do not assume that the child is not already in BCeSIS.
To protect students, restrictions have been placed on how an admission query can be
conducted in BCeSIS. For example, you cannot use the % wild card. Furthermore, you
can only query certain fields (legal last name, gender and birth date). It is for these
reasons that that the appellation “Restrictive Query” is used.
If at any time the query calls up the student, then select that line and press the Select
button. If not, then go to the next number in the list.
1. Enter the student’s LEGAL last name, gender and birth date. Check your data
entry carefully against the LEGAL documents from which you are working (i.e.,
Birth Certificate, Passport, etc). Be careful in your data entry, look for typos in the
name, inverted birth dates etc. - these are the most common errors staff make
during the registration process.
Registration Basics Reference Guide
Page 4 of 53
10-Oct-2008
2. Ask the student/parent if the student was registered under a different name at his
her previous school(s). If so, try that name. Be sure to use the same source of
legal documentation (variations can occur between legal documents) as was
used at the previous school(s).
3. Change the gender and search again.
4. Check to see if the birthday month, day or year has been transposed.
5. Check the admission form to see if the student has a usual last name different
from the legal name and try using that (i.e. mother’s maiden name).
6. If the student has a compound last name: try variations using a hyphen, using a
space, using the hyphen with spaces, or using just one of the two names in the
compound.
7. Check spelling variations such as Smith/Smyth Clark/Clarke.
8. If none of these work, contact should be made with the previous school (if any)
prior to creating a new record and determine how the record was entered in the
previous school. It may be that the previous school has not yet processed that
student or has entered the student’s data erroneously.
Registration Basics Reference Guide
Page 5 of 53
10-Oct-2008
1.1.1 Performing a Restrictive Query
Registration Basics Reference Guide
Page 6 of 53
10-Oct-2008
1.2 Enroll New (no record turns up after a restrictive query)
Once you have determined that a record does not exist for the student, you would then proceed
to admit the student as a new record. You will be asked on the first admission screen to check
what legal documents were used to verify the student information. Please refer to these legal
documents to ensure you have the correct information by comparing them to the admission form
the parent/guardian completed prior to beginning this process.
Note: Most school users would not have the choice of selecting a different school but if you do,
remember to Lock the School if you have access to multiple schools. This will ensure the
student is admitted into the correct school.
Procedure
Path: Start screen>Admit
1. Perform the restrictive query. Message at bottom of screen reveals ‘ no records retrieved’
2. Click the Enroll New button on the bottom of the Admit screen.
3. Fill in the fields outlined below. The mandatory fields in the Basic Student Demographics
screen are bolded (ensure that you do not have your caps lock on, all information is to be
entered in upper and lower case).
•
•
•
•
•
•
•
•
•
•
•
•
•
Current Centre
Pupil No—This is a system-generated number and cannot be entered
Legal Last Name
Legal First Name
Usual Last Name—defaults to legal last name but it can be different
Gender
Birth Date
Proof of Age
Reason (for Admission)
Date (Admission)—defaults to today’s date
Grade—Select from a drop-down list populated by the centre during centre set-up
Property Address – important to use Canada Post address conventions (refer to
Standards manual for BCeSIS for further information)
Mailing Address- check the box if same as property address. If the child’s mailing address
is different from his/her property address, it should be typed in here
Registration Basics Reference Guide
Page 7 of 53
10-Oct-2008
There are also non-bolded fields which are mandatory in BC:
•
PEN – an Automated process will update PENs for new records every evening. If this
field does not populate by the next business day, this may be a duplicate record!
Legal Middle Name – if none, check box
Postal code
Previous School (The fields required in this section are dependant on the Admission
Reason code chosen in the Admission Information section. Check Systems
Codes>Centre>Admission Codes for definitions)
•
•
•
Do not use fields for any information other than what they were intended.
4. Save the record.
5. Three separate prompts will display in sequential order;
i.
Release of Information? The release of information refers back to the school’s intake
form for each new student. Questions on the intake form may refer to parents allowing
student information to be released to the PAC (e.g. hotdog list for fundraising) and other
school-based organizations. More detailed release of information selections can be
made on the Student Miscellaneous Information screen.
Registration Basics Reference Guide
Page 8 of 53
10-Oct-2008
ii.
Would you like to create an Attendance Registration record? Yes or No. Only respond
with a Yes if the student will begin attending your school immediately. Yes will enable
you to begin taking attendance for the student on the date you specify. Respond with a
No if the student is being admitted to your school with intentions to attend at a later date.
iii.
Do you wish to assign siblings? Yes or No. Choosing Yes will take you to the select
Child screen where a list of students that share the same last name, phone number
and/or property address will be displayed. This activity will link the children and parents
records so that if one is updated you will be prompted to automatically update the others.
6. Once you save the Student Basic Demographic Screen, you will automatically go to the
Student Citizenship Related Information screen. The data on this screen is also a required
part of the admission process. There are four Tabs on this screen.
a) Citizenship
Default country of birth is Canada
Default Citizen of is Canada
Default Citizenship Status is Canadian (required for 1701 funding)
b) Lang/Eth
Default Language at Home is English. This field is required for 1701 reporting.
If the student has been identified as First Nations, this information will be
entered here. If the Aboriginal Ancestry as Status – Living on Reserve, then you
must enter the Band of Residency. DIA# is optional.
c) Tuition
This form is not used in BC.
d) LEP
This form may be used to track the students’ English proficiency. The Years of
ESL field will be populated annually based on a file that we receive from the
Ministry. It is important to note that this field is for information only.
Registration Basics Reference Guide
Page 9 of 53
10-Oct-2008
Note that there are some fields that will not be used for BC; Ethnicity/Race on the
Student Basic screen is one of those. It is important to remember that this is a
packaged software product that is also used by other jurisdictions throughout the
world. BC does not have control over fields and screens that are generic to the base
product.
1.3 Enrolling a Student with an Existing Record
You have performed a Restrictive Query for the student and have found that a record exists in
BCeSIS. Choose the student you wish to admit by clicking the Select button.
It is possible, that the query would reveal more than one student that matches the search
criteria. It is important to ensure that you are selecting the correct record. The More
Information button will reveal additional information, such as parents’ names, to assist with the
identification.
The student cannot be admitted to your school until they have been withdrawn from the
previous school. If you do not see the Withdrawal date, then the student has not been
withdrawn from the previous school. Contact the school and advise them that the student has
indicated their intent to attend your school.
As this student already has a permanent record in BCeSIS, most of their demographic
information will already have been entered. You only need to update any new information: i.e.
address, grade, admission reason and previous school.
Registration Basics Reference Guide
Page 10 of 53
10-Oct-2008
1.3.1 Procedure
Path: Start Screen > Admit
1. Perform the restrictive query. The student record appears on the list.
2. Ensure that you have the correct record by selecting the More Information button, to view
additional identifiable information on the child.
3. When you are sure that you have the correct child record, click the Select button on the
bottom of the Admit screen.
The Basic Student Demographics screen will appear in Admit Mode (note the blue bar). Note
that the student’s withdrawal date appears on the top right hand side of the screen in Red
highlights.
e) Update the record as necessary. Grade, Address, Telephone number may require
updating.
f) Enter the Reason under Admission Information.
g) Enter the Previous School / District Information (required depending on Admission
Reason of step 6).
Registration Basics Reference Guide
Page 11 of 53
10-Oct-2008
h) Click Save.
i) Three separate prompts will display in sequential order:
Prompt 1: Release of Information? The release of information refers back to the
school’s intake form for each new student. Questions on the intake form may refer
to parent’s allowing student information to be released to the PAC (e.g. hotdog list
for fundraising) and other school-based organizations.
Prompt 2: Would you like to create an Attendance Registration record? Yes or No.
Only respond with a Yes if the student will begin attending your school immediately
(see section 2.1 below). Yes will enable you to begin taking attendance for the
student. Respond with a No if the student is being admitted to your school with
intentions to attend at a later date.
Prompt 3: Do you wish to assign siblings? Yes or No. Choosing Yes will take you to
the select Child screen where you will be required to perform a restrictive query to
select the children siblings. This activity will link the children and parents records so
that if one is updated you will be prompted to automatically update the others.
Registration Basics Reference Guide
Page 12 of 53
10-Oct-2008
2. Registration
Purpose
You cannot take attendance for a student until the student is verified as participating in a
learning program. This is known in BCeSIS as Registration.
The Registration date is the first date of attendance.
Registration is vital for reporting purposes to indicate:
• Funding eligibility
• Enrolment counts
• Library and other internal system transfers
• Transcripts
• Permanent student record information
Overview
The school calendar must be set up before a student can be registered. This must be done prior
to the start of the new school year. Refer to QRG New School Year Startup Checklist for
instructions on how to create a school calendar.
There are three ways to register a student in BCeSIS:
1. Single student during admission
2. Single student after admission
3. Mass register a whole school, homeroom or class.
The registration date cannot be prior to the admission date.
2.1 Registering a Single Student During Admission
During the school year, if a new student is being admitted, you might want to register them
immediately.
Procedure
Path: Start Screen > Admit
You have already performed the restrictive query and are in the process of admitting the student
as per section 1.3.1 above. You have pressed save. One of the prompts you will receive will
ask you if you would like to create an Attendance Registration record.
Registration Basics Reference Guide
Page 13 of 53
10-Oct-2008
1. When prompted to create an Attendance Registration record, choose Yes.
2. Enter a Registration Date if the date is other than today’s date. If you do not enter a
date the registration date will default to the current date.
3. Click the Continue button and continue with the admission of the student.
A green button will display the registration date DD-MMM-YYYY on the student Basic
screen.
Registration Basics Reference Guide
Page 14 of 53
10-Oct-2008
2.2 Registering a Single Student After Admission
If a student has been previously admitted but is not yet registered, you can register them using the Registrations screen.
Registration Basics Reference Guide
Page 15 of 53
10-Oct-2008
2.3 Reverse Registration
You can also Reverse Register a student who has been registered in error. This form could also
be used to change the registration date for a student.
A teacher may identify students who are “No Shows” in the week or so following the start of
school year; those students can be reverse registered and withdrawn from BCeSIS as No Show
students.
Procedure
Path: Main Menu > Change Student > Register
Navigate to the registration screen and query for the student if he/she doesn’t appear at the top
of the screen.
The registration date will appear in the field in the middle of the screen.
Select the Reverse Register button.
Click Save.
You will get a message that reverse registration has been successful.
Registration Basics Reference Guide
Page 16 of 53
10-Oct-2008
2.4 Mass Registration
You can Mass Register students by class, by homeroom or for the entire school population.
You can mass register all admitted students prior to or on the first day of school (this can only
be done once each year). Mass registration can save a lot of time by registering large numbers
of admitted students simultaneously even though students who have not shown up will also be
registered. Any students that should not have been registered during the mass registration can
be easily deregistered (students who have not physically shown up for classes are best left
unregistered).
Registration of homerooms/classes, on the other hand, can be done at any point during the
school year. Registration by homeroom would benefit the registration of a group of students
transitioning into your school such as kindergarten students.
Procedure
Path: Attendance > Period or Daily Attendance > Verify Registration > Verify all Students
1. Navigate to the attendance module by selecting the
icon. This action will take you out of
the main esis module.
2. Enter a date in the Default Registration Date field.
3. Select the appropriate radio buttons as described below.
4. If you leave the radio buttons in their default format, you will need to press the tab key to
activate the Register button.
5. Press the Register button.
When the registration is complete, a message will appear indicating the number of records
that have been created.
You can only mass register students once per year. If the procedure has already been
performed/attempted for your school, a message will appear saying that mass registration
has already happened. Registrations will have to be done on a student by student basis for
the remainder of the school year.
Each time you register, reverse register, or modify a registration record, a corresponding
record is created in the Admit/Withdrawal History.
6. Reverse register any students that should not have been registered. This can be done on
the Verify by Homeroom, Verify by Class or Register screens.
Registration Basics Reference Guide
Page 17 of 53
10-Oct-2008
2.4.1 Mass Verify
Mass Verify means to mass register students that have been admitted to your school.
This process will register every student in your school, allowing attendance to be recorded for these students. Note: Mass Registration can only be
run once a year. It can be run before, on, or after the first day of school. If run after the first day of school, be sure to use the actual first day of
school as the Default Registration Date. Any students that should not have been registered during the mass registration can be easily reverse
registered (students who have not physically shown up for classes are best left unregistered).
The Default Registration Date will
be the date used for all registrations
unless otherwise indicated by the
radio button options selected below.
Delete registrations and re-register:
When this subset of students’ current
registration date is greater than the default
registration date, it will un-register these
students and then re-register them with the
default registration date.
Note: As illustrated the bottom radio
buttons, of each set of two, are the
default options. Choose other options
based on the information provided.
Delete the registrations and re-register:
When this subset of students’ current
registration date is less than or equal to the
default registration date, it will un-register
students and then re-register them with the
default registration date.
Future Admission Options:
When this subset of students’ current
admission date is greater than the
default registration date entered, the
students’ future admission date will
be used as the registration date.
After entering a Default Registration Date,
use the tab key or select any of the radio
buttons to activate the Register button.
Registration Basics Reference Guide
Page 17 of 53
10-Oct-2008
3. Withdrawal
Purpose
You may need to withdraw a student for a variety of reasons – the family is moving, the student
is transferring or they are a “no show”. A No Show is a special situation and will be discussed
separately.
Before a student can be admitted in his/her next BCeSIS school, the current school must
withdraw the student.
The current school is the school of record and will retain “ownership” of that student record until
the next school picks up the record by admitting the student.
Overview
If the student attends your school for even one day, you need to use the withdrawal process and
not the no show process.
Once a student is admitted to another school, access to that record from the date of admission
to the new school now belongs to the new school.
If your school has withdrawn the student, you can still access information for the time the
student was in your school through a historical query.
The withdrawal date must be on or after the registration date.
You still own a withdrawn student until they are picked up by another school.
Once a student is withdrawn from the home school, the history for that student is archived and
some reports cannot be run. Therefore, it is important to print any reports before the student is
withdrawn. Report cards cannot be run for a student after they have withdrawn.
In BC, districts have a number of choices to make with respect to how No Shows and
Withdrawals are processed. Refer to the District Configuration Checklist for additional
information.
3.1 Withdrawing a Student Currently Registered
Students may withdraw from a school at anytime throughout the school year. The amount of
work involved during the withdrawal process will vary depending on the time of year and the
activities that the student is involved in.
Process
1. Query for the student in the Start screen.
2. Click the Withdraw icon.
3. Enter the withdrawal date. This must be the day after the last full day of school – think of
the withdrawal date as the first day that you will NOT be taking attendance for the student.
Registration Basics Reference Guide
Page 18 of 53
10-Oct-2008
4. Enter a withdrawal reason code.
5. Review any outstanding items:
•
•
•
•
Locker information. Check to clear the locker info.
Next School. If you know the students next school you may enter it here, otherwise leave
it blank.
Memo. Information entered here will populate the interoffice Memo button and will be
available to the student’s new school
Programs. If the student has a current program assignment this button will be active. Click
on it to reveal the current program assignments. Enter an end date for the program
assignment if this is your district practice (some districts have Programs automatically
end-dated upon withdrawal).
6. Select the Withdraw button. You will receive a pop up, warning you to print all required
reports. Your district may have decisions in place regarding which reports should be
printed when withdrawing students. Examples of which reports to print include the student’s
report card (if appropriate), an admit/withdraw report (as necessary) and the student’s PR
card (if the student is moving to a non-BCeSIS school).
Once a student has been withdrawn from your school and enrolled in another school, you will
have to contact the new school if additional information is required.
Registration Basics Reference Guide
Page 19 of 53
10-Oct-2008
Other pop ups may open warning you of other conditions regarding this student’s records.
Select OK to continue or cancel to deal with the issue
You may be prompted to enter final marks, address outstanding fees, team or locker
information.
3.2 No Shows (dependent on district company file settings)
Overview
No show means that an admitted student never showed up at your school and never will. In this
case, you can ‘no show’ the student if the Allow “No Show” option is set to Yes in the
company file (district setting). If set to Yes, then students who have been registered at a
school but do not show up may be withdrawn as a ‘no show’.
When you No Show a student who has been admitted to BCeSIS previously, ownership of the
student record will revert back to the previous school.
When you no show a student with no previous school in BCeSIS, you have the option to delete
the student from the database or transfer them to another school.
When a student is withdrawn with a No Show code, the student’s previous and current fees go
to the Fees Archive table.
No Show may also be processed for Cross-Enrolment.
No Shows can be processed before school starts (admitted student) or after school starts
(registered student).
If the student has attendance records (i.e., school started and he/she has been marked absent
for three days but has never been present), you will have to first delete all the attendance
records.
3.2.1 No Showing a Student (admitted but not registered)
Process
Path: Start Screen > Withdraw button
1. Query for the student on the BCeSIS Start window
2. Click the WDR button on the toolbar at the top of the screen.
3. Enter the withdrawal reason.
4. Enter the withdrawal date. The withdrawal date should be equal to the admit date. If you
don’t know the admit date leave this field blank and you will be asked if you want to use the
admit date when you click on the No Show button.
5. Click the No Show button.
6. You will receive a message about the admission date if the date field has been left blank.
Click OK. Go to step 7 if the student has NO previous school indicated in their record. Got
to step 8 if the student has had a previous school indicated in their record.
Registration Basics Reference Guide
Page 20 of 53
10-Oct-2008
7. If the student has no previous school indicated in their records, they will have the option to
delete this student record. Choose to Delete the student or transfer the file to another
school. The No Show process will end when you confirm the deletion or transfer.
8. If the student had a previous school on record, the student’s admit date will appear in the
Date field.
9. You will receive an “Are you sure?” message.
10.
Click OK to continue.
When the no show is done, you will receive the message that the process is complete. This
student’s record will now revert to being “owned” by the previous school.
Registration Basics Reference Guide
Page 21 of 53
10-Oct-2008
3.2.2 No Showing a Registered Student (but attendance has not yet been taken)
After Mass Registration is completed at the beginning of the school year, some students will not
show up for a variety of reasons. Teachers will identify students who are ‘No Shows’ in the days
following the start of school. Those students can then be reverse registered and withdrawn
from BCeSIS as No Show.
1. Query the student on the BCeSIS start screen.
2. Go to the Registrations screen: Main Menu > Change Student > Register
3. The student’s original registration date will appear in the Registration Date field. Click on
the Reverse Registration radio button.
4. Press the save icon. A message will appear under the Registration Date field indicating
that the reverse registration has been successful.
5. Click on the door to exit.
6. Back on the start screen for the student, click the Withdraw
icon.
7. Enter the withdrawal reason.
8. Enter the withdrawal date. The withdrawal date should be equal to the admit date. If you
don’t know the admit date leave this field blank and you will be asked if you want to use the
admit date when you click on the No Show button.
9. You will receive a message about the admission date if the date field has been left blank.
Click OK. Go to step 10 if the student has NO previous school indicated in their record.
Got to step 11 if the student has had a previous school indicated in their record.
Registration Basics Reference Guide
Page 22 of 53
10-Oct-2008
10.
If the student has no previous school indicated in their records, they will have the option
to delete this student record. Choose to Delete the student or transfer the file to another
school. The No Show process will end when you confirm the deletion or transfer.
11.
If the student had a previous school on record, the student’s admit date will appear in the
Date field.
12.
You will receive an “Are you sure?” message.
13.
Click OK to continue.
When the no show is done, you will receive the message that the process is complete. This
student’s record will now revert to being “owned” by the previous school.
Registration Basics Reference Guide
Page 23 of 53
10-Oct-2008
3.2.3 No Showing a Student with Attendance Records
If the student has attendance records (i.e., school started and he/she has been marked absent
for three days but has never been present), you will have to first delete all the attendance
records.
1. Query for the student on the start screen.
2. Go to Common View > Student Absences. The absences for the student will list in the
details area.
3. For each absence click the modify button and on the next screen click the DEL button.
4. Save after each deletion and return to the Student Absences screen to delete the next until
all have been deleted.
5. Exit from the screen.
6. Go to the Registrations screen: Main Menu > Change Student > Register
7. The student’s original registration date will appear in the Registration Date field. Click on
the Reverse Registration radio button.
8. Press the save icon. A message will appear under the Registration Date field indicating
that the reverse registration has been successful.
Registration Basics Reference Guide
Page 24 of 53
10-Oct-2008
9. Click on the door to exit.
10.
Back on the start screen for the student, click the Withdraw
11.
Enter the withdrawal reason.
icon.
12.
Enter the withdrawal date. The withdrawal date should be equal to the admit date. If you
don’t know the admit date leave this field blank and you will be asked if you want to use the
admit date when you click on the No Show button.
13.
You will receive a message about the admission date if the date field has been left
blank. Click OK. Go to step 14 if the student has NO previous school indicated in their
record. Got to step 15 if the student has had a previous school indicated in their record.
14.
If the student has no previous school indicated in their records, they will have the option
to delete this student record. Choose to Delete the student or transfer the file to another
school. The No Show process will end when you confirm the deletion or transfer.
15.
If the student had a previous school on record, the student’s admit date will appear in the
Date field.
16.
You will receive an “Are you sure?” message.
17.
Click OK to continue.
Registration Basics Reference Guide
Page 25 of 53
10-Oct-2008
When the no show is done, you will receive the message that the process is complete. This
student’s record will now revert to being “owned” by the previous school.
Registration Basics Reference Guide
Page 26 of 53
10-Oct-2008
3.3 Viewing Historical Records for Withdrawn Students
On occasion you may need to review the records of a student that was previously registered at
your school. The Prior Student query allows for that situation. The info presented is for is
viewing only. Changes cannot be made to any of these records, except by the home school.
You can view the credit details, attendance summary, special education designations, incidents
and testing records.
Process
Path: Start Screen > Main Menu > Queries > Prior Students
Click on the button for the info that you wish to view.
Registration Basics Reference Guide
Page 27 of 53
10-Oct-2008
4. Cross Enrollment
Cross-enrolment is typically used to give a student access to programs or courses that are not
available in their home school but are delivered in other schools throughout the province.
Students may be cross-enrolled in more than one school.
Students may only ever have one home school.
Students may request to have their home school transferred.
The home school is responsible for processing the cross-enrolment.
The cross enrolled school can:
•
•
•
•
•
•
Schedule courses in their school for the student
Enter marks for those courses that the student is taking in their school.
Can enter attendance for the student.
View demographic data but not change it.
Enter discipline items for the time the student is in their school
Accept or reject a request to withdraw the student or to become the student’s home
school.
When both schools are on BCeSIS, ensure that the student is cross enrolled to one of the
schools, not enrolled in both as this creates duplicate records and PEN errors.
At the new (cross-enrolled) school, the student appears on the school roster in blue.
Process
Path: Main Menu > Cross-Enrolment > Cross-Enrolment Student
1. From the Cross-Enrolment Student screen, query the student you wish to cross-enroll.
2. Click the Add button to begin the process.
3. Enter the required fields
•
•
•
Cross-enrolled Schools:
Adm Date: DD-MMM-YYYY
Enrolled Reason:
Registration Basics Reference Guide
Page 28 of 53
10-Oct-2008
4. Select Save to save your changes and complete the cross-enrolment.
4.1 Withdrawing a Cross-Enrolled Student
If the program or course is completed or dropped by the student at the cross enrolled school
they can withdraw the student from their school.
If the student does not show up at the school into which they have been cross-enrolled, that
school will be able to record that action as a No Show.
If the home school wants to withdraw the student from the cross-enrolled school, they must first
get permission from the cross-enrolled student and contact the cross-enrolled school to have
them withdraw the student from their school
Process
The school where the student is cross-enrolled withdraws the student from their school.
Path: Main Menu > Cross-Enrolment > Cross-Enrolment Student
1. From the Cross-enrolment Student screen, query the student you wish to withdraw.
2. Highlight the line containing the cross-enrolled school from which you wish to withdraw.
3. Select the Withdraw button to begin the process.
Registration Basics Reference Guide
Page 29 of 53
10-Oct-2008
4. Delete Cross Enrollment screen is presented.
5. Select the Cross-enrolment Withdrawal Reason
6. Enter the cross enroll withdrawal date.
7. Select Save.
Registration Basics Reference Guide
Page 30 of 53
10-Oct-2008
5. Introduction
There are a variety of ways to move a student between schools in BCeSIS. The recommended
way to handle student movement, whenever possible, is the straightforward, well-documented
withdrawal of the student from one school and the subsequent admission to another.
However, there are times when this method does not fulfill the needs of a school.
Home School Transfer
Home School Transfer involves flipping a cross enrolled school’s status with that of the
student’s home school, also maintaining cross enrolled courses at other schools. The student
remains enrolled in all courses in the home school and all attendance data is preserved.
Cross Enrollment Transfer
A Cross Enrollment Transfer involves transferring a student’s school of record from their home
school to a cross enrolled school. Unlike Home School Transfer, the student completely exits
their previous home school. Only courses in credit details transfer.
No Show Transfer
When a student is newly admitted into BCeSIS and they do not show up for classes at their preadmitted school, they can be transferred to the school the student will actually be attending.
Registration Basics Reference Guide
Page 31 of 53
10-Oct-2008
Home
School
Courses
Maintained
Cross
Enrollment
Courses
Maintained
Application
Requires
Permission from
Receiving School?
Transfer Type
Best Suited When:
Home School
Transfer
A receiving school needs access to
the student’s records before the
sending school is prepared to
completely withdraw the student.
Yes
Yes
Exchanges status with a cross
enrolled school. The crossenrolled school becomes the
home school, and visa versa.
No
Yes
Cross
Enrollment
Transfer
A student is continuing to take
courses at the cross enrolled
school, but is exiting their home
school.
No
Yes
The cross-enrolled school
becomes the home school.
Yes
Yes
No Show
Transfer
At the beginning of the school year,
a student shows up at a different
school than the one they were first
admitted to.
N/A
N/A
The record is transferred to the
new school.
N/A
No
Pre-transition
The receiving school is expecting
the student. This is a type of
transfer but for NEXT YEAR.
N/A
Cross enrollment
links are broken at
YET, unless
courses are
scheduled in the
cross-enrolled
school before
YET.
The student becomes crossenrolled to the receiving school
as long as they are on the
sending school’s pre-transition
list.
N/A
No
(not
discussed in
this doc)
Registration Basics Reference Guide
Page 32 of 53
What Happens to the Record?
Final
Marks
Must be
Entered
10-Oct-2008
5.1 Home School Transfer
The Home School Transfer allows two schools to swap status between “Cross enrolled” and “Home
school” while maintaining any cross enrolled courses to a third school. It also allows an incoming student
to be updated and scheduled by the receiving school while still allowing the sending school to finalize any
outstanding records (i.e., attendance, marks, etc.).
Step 1
Secondary School X must first cross enroll the student to Secondary Y. To do this, Secondary X queries
the student and then follows this path: Main Menu > Cross Enrolment > Cross Enroll Student.
a) On the Cross-Enroll Student screen (STU185), click on the ADD button.
b) Choose the destination school from the list of values.
c) Enter a Year, Admit Date, and Enrolled Reason.
d) Click on the save icon.
Registration Basics Reference Guide
Page 33 of 53
10-Oct-2008
Step 2
Secondary X would now contact Secondary Y and inform them that the student in question is ready to
transfer; Secondary Y would have to accept the transfer…
a) Secondary Y queries the student.
b) Following the path Main Menu > Cross Enrollment > Accept Transfer (STU183), tick the box
to accept the transfer.
c) Click on the save icon.
Registration Basics Reference Guide
Page 34 of 53
10-Oct-2008
Step 3
Now the student can be transferred to the receiving school, in this case, Secondary Y using the Home
School Transfer screen (STU182). At this point, the sending school (Secondary X) can do a Home
School Transfer. This will place Secondary Y as the home school and Secondary X as the cross-enrolled
school.
a) Go to Main Menu > Cross Enrollment > Home School Transfer
b) Fill in all the fields as appropriate. Please note that the dates default to the next business
day.
c) Click on the save icon.
On the specified date, this student’s home school will be Secondary Y. She will remain cross enrolled to
her old school, Secondary X, until such a time as she is withdrawn through the Cross-enroll Student
screen. Note: A cross enrollment link with School Z remains intact including all marks and attendance.
5.2 Cross Enroll Transfer
This type of transfer handles situations where students will be exiting their current home school and
wanting to have the cross enrolled school become their new home school. This type of transfer is for
students moving from one active BCeSIS school to another anywhere in the province.
Example:
A student’s current home school is Secondary X. She is taking several courses Secondary Y, a school to
which she is cross enrolled to. The schools have communicated to each other regarding this student’s
transferring her home school to Secondary Y as she has completed all her courses at Secondary X.
Follow these steps to transfer a student to a cross-enrolled school.
Registration Basics Reference Guide
Page 35 of 53
10-Oct-2008
Step 1
At the Cross Enrolled School:
a) The cross-enrolled school must accept the transfer before the home school can withdraw/
transfer by querying for the student on the BCeSIS start screen and going to Main Menu >
Cross Enrollment > Accept Transfer and completing the screen as shown below.
b) Go to Main Menu > Cross Enrollment > Approve Withdrawal of Student to allow the student
to be withdrawn as a cross enrollment student.
Registration Basics Reference Guide
Page 36 of 53
10-Oct-2008
Step 2
At the Home School:
a) Query for the Student to be transferred and click the WDR button.
b) Type in the withdrawal date and the select the appropriate withdrawal reason, click the
Withdraw button.
c) The screen below will appear, complete as appropriate.
Step 3
The cross enrolled school (now the home school) must register the student by going to Main Menu >
Change Student > Register and entering a modified registration date. Courses in progress and
attendance data all stay intact through this process.
Registration Basics Reference Guide
Page 37 of 53
10-Oct-2008
5.3 No Show Transfer
When a student new to BCeSIS is admitted to your school, but shows up at another school, you can
conduct a No Show Transfer. The key point is that you know which school the No Show student is
attending, otherwise this student’s record will need to be deleted.
Example:
A student was admitted to your school, School X, in August. On the first day of school, you get a phone
call from School Y. They inform you that they have done a restrictive query on this student and found that
she already has a record in BCeSIS and is admitted to your school. As this student has never attended
your school, best practice is to No Show her. However, because you created her record and because
she is a No Show, you will have two options: to transfer her record to the school she will actually be
attending or to delete her record. Deleting her record would be the best option if you didn’t know what
had become of this new student. Because you know, though, you can carry on with the No Show
Transfer to School Y.
Step 1
Query for the student on the Start screen using the standard query techniques.
Step 2
Click the Withdraw button on the Start screen to open the Withdrawal screen. Enter a withdrawal date of
the current date and select the appropriate withdrawal reason.
Step 3
Click the No Show button and click OK to the question “Are you sure?”
Registration Basics Reference Guide
Page 38 of 53
10-Oct-2008
Step 4
Select the option of Transfer the Student on the next screen for those students going to another BCeSIS
school.
Step 5
Select the school that the student will be transferred to. Enter an admission date and reason before
clicking the Ok button.
Step 6
You will get a message saying the Student has successfully transferred. This student record is now
available at the transferred school and can be reported against. You can now contact Alsek Elementary
and inform them that the transfer is complete!
Registration Basics Reference Guide
Page 39 of 53
10-Oct-2008
6. Demographics
The following sets of screens are all part of the demographic loop. Some of the screens are of
a more critical nature than others (i.e. Emergency Contacts vs Lockers), some are essential for
funding purposes (i.e. Student Citizenship Related Information1), and some are essential to
student attendance at your school (i.e. Student Course Selections). Many of the screens will
require your attention at your earliest convenience after registration.
Registration Basics Reference Guide
Page 40 of 53
10-Oct-2008
6.1 Basic Student Demographics
Registration Basics Reference Guide
Page 41 of 53
10-Oct-2008
6.2 Student Citizenship Related Information1
Registration Basics Reference Guide
Page 42 of 53
10-Oct-2008
6.3 Student Miscellaneous Information 1 – Permissions Tab
Registration Basics Reference Guide
Page 43 of 53
10-Oct-2008
6.4 Student Miscellaneous Information 1 – Miscellaneous Tab
Registration Basics Reference Guide
Page 44 of 53
10-Oct-2008
6.5 Student Miscellaneous Information 1 – Locker Tab
Registration Basics Reference Guide
Page 45 of 53
10-Oct-2008
6.6 Parent Information
Registration Basics Reference Guide
Page 46 of 53
10-Oct-2008
6.7 Student Siblings
Registration Basics Reference Guide
Page 47 of 53
10-Oct-2008
6.8 Emergency Contacts
Registration Basics Reference Guide
Page 48 of 53
10-Oct-2008
6.9 Medical/Health Information
Registration Basics Reference Guide
Page 49 of 53
10-Oct-2008
6.10 Transportation
Registration Basics Reference Guide
Page 50 of 53
10-Oct-2008
6.11 Transportation – Alternate Addresses
Registration Basics Reference Guide
Page 51 of 53
10-Oct-2008
6.12 Homeroom/Staff Assignments
Registration Basics Reference Guide
Page 52 of 53
10-Oct-2008
6.13 Student Fees/Assistance
Registration Basics Reference Guide
Page 53 of 53
10-Oct-2008