1
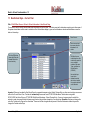
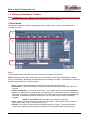
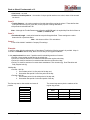
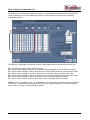
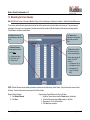
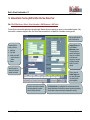
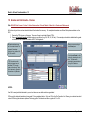
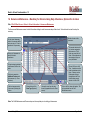
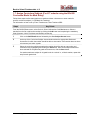
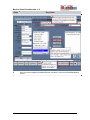
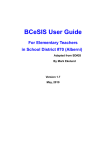
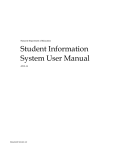
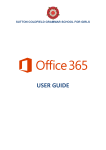
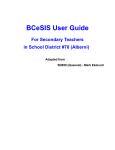
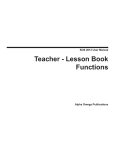
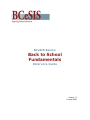
BCeSIS Basics:
Back to School
Fundamentals
Reference Guide
Version 1.2
7 August 2009
Back to School Fundamentals v 1.2
Version History
Version
Date
Description
0.1
14-Aug-2008
Document complete pending updated information on Mass Registration
1.0
19-Aug-2008
Mass Registration information updated.
Added Grades and Catchments section.
1.1
21-Aug-2008
Addition of new Office Staff Tips for a successful school year chart p.4
This document was reorganized to include only the required tasks
schools must complete post YET to prepare to begin the new school
year.
1.2
7-Aug-2009
The previous version contained the following sections which have
been deleted. Material on deleted topics is still available under the
corresponding topics on the ISW:
x Office Staff Tips for a successful school year – this 1 page doc is
now posted separately on the ISW
x 1.3 Assigning Standardized Tests to Students – No longer
required (i.e. Toggling Diploma Type)
x 1.7 Reporting Periods – Due to the importance of this topic, there
is a separate LE this year and new resources have been created
to address this topic separately
x 2.1 - 2.7 Information on Admit & Registering Individual Students
x 2.9 No Shows
x 2.10 Creating Program Assignments
x 2.11 Mass Entry of Program Assignments
The following new section has been added:
x 1.2 Setting up Attendance Tumbles
Back to School Fundamentals v1.2
Contents
Overview ........................................................................................................................... 4
1.1 Non-School Days – Current Year.......................................................................... 5
1.2 Setting up Attendance Tumbles ............................................................................ 6
1.3 Rebuilding the School Calendar.......................................................................... 10
1.4 Add and Delete Teaching Staff to Reflect the New School Year ........................ 11
1.5 Grades and Catchments – Review...................................................................... 12
1.6 Homeroom Maintenance – Mandatory for Schools taking Daily
Attendance, Optional for all others ...................................................................... 13
1.7 Assign Curriculum Subjects (For K-7 schools using the BCeSIS
Curriculum Model for Mark Entry) ....................................................................... 14
1.8 Mass Registration................................................................................................ 16
Back to School Fundamentals v1.2
Overview
The intention of this reference guide is to review the fundamental setup and processes that need
to be completed by schools before and at the beginning of the school year.
Further material on other topics relating to tasks occurring at the beginning of the school year,
such as Admit, Register, No Show, etc. are available on the ISW Learning Resource Centre.
Revised: 7 Aug 2009
Page 4 of 16
Back to School Fundamentals v1.2
1.1 Non-School Days – Current Year
Path: BCeSIS Start Screen > School > School Information > Non-School Days
This screen is used to identify calendar dates when attendance will not be taken. This data is required for attendance reporting, and other areas of
the system where dates must be used in calculations. Non-School dates display in green on the attendance calendar and attendance cannot be
taken on these days.
Select Current.
Select a non-school
day reason from the
dropdown list of
values.
Click the ADD button
(lower right) Enter the
calendar date of the
non-school day.
Will allow the nonschool days from this
school to be copied to
one or multiple
schools of the same
Type, as defined on
School Details
(SYS040)
Non-school days
found at the
destination school
which do not exist at
the copied school will
not be affected.
Important: Dates can be added to Non-School Days for unexpected reasons such as School Closings Entry or other non-school day occurrences
while in the Current School Year. The date will automatically be removed from ATT205.FMX Attendance Tumbles when using either
SCH215.FMX Non-School Days or ATT060.FMX Daily/Period Attendance - School Closings Entry. You are no longer required to rebuild the
calendar in order to remove the date that was a regular school day and then changed to a non-school day. Remember, this does not change the
rest of the Tumble and/or Days on the other dates. These must still be changed manually as each School will determine whether they wish to
change the Tumbles and/or Days.
Revised: 7 Aug 2009
Page 5 of 16
Back to School Fundamentals v1.2
1.2 Setting up Attendance Tumbles
Path: BCeSIS Start Screen > School > School Information >School Details > Current Year (3rd screen)
This first section covers Course based schools, see below for Curriculum schools.
Course Based
Attendance Tumbles are a way of rotating periods during a date and are used to ensure attendance is
recorded accurately.
1
2
3
4
Area 1
This information was moved from next year to current year during the YET process.
NOTE: Changes can be made to these values, but one should have a thorough understanding of School
Setup, Pre-Scheduling, Scheduling and Attendance prior to making the changes. It is advisable to contact the
BCeSIS service desk prior to making changes.
x Year – Current school year based on the date of the beginning of the school year.
x Semestered? – should be checked for all schools; Homerooms and many reports require this to be
checked.
x Number of Semesters – the number of semesters. This example shows a school with 2 semesters
x Terms – are always within a semester and are for defining when courses start and end. This example
school has 2 semesters (18 weeks in length) and also offers 9 week courses; therefore 2 terms would
be defined, as indicated in the above screen shot. This will create 4 terms in total for scheduling
purposes.
NOTE: These DO NOT define how often report cards are handed out.
x Days – defines how often sections of courses meet. Everyday = 1 day defined; every other day = 2
days defined, every 5th day = 5 days defined, etc, etc.
x Periods – the number of periods used for scheduling sections of courses. This should include all
regular school periods as well as periods for sections of courses offered before and after school.
Revised: 7 Aug 2009
Page 6 of 16
Back to School Fundamentals v1.2
x Use Lunch – not used
x Number of tumble patterns – the number of unique period rotations at a school, these will be entered
into Area 2.
Area 2:
x Tumble Patterns – the various rotations of periods that will be used at the school. These define what
order periods show up on a given date, for the purpose of taking attendance.
x All periods must be defined in D1
Note – Although the Tumble Patterns are referred to as D1, D2, etc it is maybe helpful to think of them as
Tumble 1, Tumble 2, etc.
Area 3:
x Period and Length – each period must have a period length defined. These settings are used to
determine full or part-time status.
Note – this does not effect 1701 calculations
Area 4
x This will be visible if enabled in Company File settings
Example:
In order to assist with the understanding of Attendance Tumbles the following scenario is provided. Keep in
mind this is a SAMPLE school setup; there is no one way to set up period rotations.
In this sample school there were 7 periods used for scheduling sections of courses:
x Periods 1-4 are regular periods during the school day;
x Period 5 is used for sections of courses that start before the regular school day;
x Period 6 is used for sections of courses that start after the regular school day;
x Period 7 is used for sections of courses where attendance is not recorded (e.g. Grad Transition and
Daily Physical activity).
Additionally:
x Periods 1 & 2 flip:
1. On one date period 1 is first period of the day and;
2. On another date period 2 is the first period of the day
x Periods 3 & 4 flip:
1. On one date period 3 is the third period of the day and;
2. On another date period 4 is the third period of the day
The first step was to draw a table and enter all
periods:
Periods Used
1
2
3
4
5
6
7
Revised: 7 Aug 2009
The second step was to plot the rotations of the
regular day periods:
Periods
Used
1
2
3
4
1st Rotation
2nd Rotation
1
2
3
4
2
1
4
3
Page 7 of 16
Back to School Fundamentals v1.2
The third task is to create period rotations (in Area 2) to accommodate the before and after school sections.
These periods show up on some dates and not others. Therefore there is a need to have all possible
combinations defined:
2
The following is a description of how each of these Tumble Patterns will be used during the school year:
D1 – All periods used at the school must be included.
D2 – Will be used for dates in which there is a morning class using Rotation 1 and no after school class.
D3 – Will be used for Rotation 1 dates in which there is no morning class and there is an after school class.
D4 – Will be used for Rotation 2 on dates in which there is a morning class and no after school class
D5 – Will be used for Rotation 2 dates in which there is no morning class and there is an after school class.
D6 – Will be used for Rotation 1 dates in which there is both morning and afternoon classes
D7 – will be used for Rotation 2 dates in which there is both morning and afternoon classes
NOTE: Period 7 is not defined in D2 – D7, as attendance will not be taken for sections of courses scheduled
into period 7. Be aware that on some attendance screens, for example Period Att.- Teams/Group screen,
period 7 will be an option to record attendance against.
Revised: 7 Aug 2009
Page 8 of 16
Back to School Fundamentals v1.2
Curriculum Based
The above screen shot is a typical Curriculum based school setup. See the Course Based section (previous)
for descriptions of fields.
Revised: 7 Aug 2009
Page 9 of 16
Back to School Fundamentals v1.2
1.3 Rebuilding the School Calendar
Path: BCeSIS Start Screen > Attendance Module > Daily or Period Attendance > Attendance Tumbles > Tumble Calendar Maintenance
This screen is used to define the period rotation and day that will be used for each instructional date in the school year. Two processes are
performed on this screen, one is to populate all the dates schools will be in session (Rebuild Calendar) and the second is to assign specific
Tumble Patterns and Days to specific dates.
The Date column shows all
instructional days in the school
year.
The Rebuild Calendar
button populates the three
columns with:
1) All instructions dates.
2) All Tumbles set to 1.
3) All Days set to 1.
The Tumble column
indicates the Tumble Pattern
that will be used on that
Date.
The Day column indicates
the Day that will be used
on the corresponding date.
Sections where the day (D)
attribute of the STDP
contains a:
x 1 will appear on Day 1s
x 2 will appear on Day 2s
x 0 will appear on All
Days (i.e. both Day 1
and 2)
NOTE: Rebuild Calendar uses the following information to determine instructional days: School Details – Days the school has classes; School
Schedule – First and last day of the school year and; Non-School Days.
Steps to Rebuild Calendar:
1) Click Rebuild Calendar
2) Click Save
Revised: 7 Aug 2009
Steps to assign Tumble Patterns and Days to all Dates:
1. Under the Tumble column enter the Tumble pattern, for that date
2. Under the Day column enter the Day number, for that date
3. Repeat steps 1 & 2, for all Dates listed
4. Click Save upon completion
Page 10 of 16
Back to School Fundamentals v1.2
1.4 Add and Delete Teaching Staff to Reflect the New School Year
Path: BCeSIS Start Screen > School > School Information > Staff Maintenance > Staff Details
This time of year is an excellent opportunity to add and/or delete Teachers who are no longer at your school; you cannot deleted teachers, if they
have a section or homeroom assigned to them. See School Setup documentation for a complete list of information on setting up staff.
Filter your staff view with
these 3 radio buttons.
Required fields for
adding a Teacher:
x Last Name
x First Name
x Initials (no two staff
can have the same
initials)
x Gender
Assigned Room pulls
from the Room
Maintenance screen.
The system does not
consider the Assigned
Room to be connected
to the Homeroom,
however it is used with
the Master Timetable
Builder. This field is
optional.
Indicate here with a
check mark if this staff
member is a teacher.
Filling in values for
Grades Taught does
not restrict this teacher
from teaching other
grades (optional).
Transfer a teacher with no classes or
teaching assignments to another
school by clicking this button.
Revised: 7 Aug 2009
Curr Subject Access is a valuable tool for curriculum-based schools,
allowing optimization of the Mark Entry screens for teachers by assigning
them the specific subject areas they are responsible for marking.
Page 11 of 16
Back to School Fundamentals v1.2
1.5 Grades and Catchments – Review
Path: BCeSIS Start Screen > School > School Information > School Details > More Info > Grades and Catchments
At this time of year there are two items that should be checked for accuracy. For complete information see School Setup documentation on the
ISW.
1. Review the FTE column on this page. There are 3 ways to calculate Student FTE’s.
2. Ensure all potential grades students maybe in, are defined (e.g. GA, GR, SU, HS etc). If for example, a student is admitted with a grade
not defined on this screen the student will NOT be Registered.
All grades students may
be in must be defined. For
example, Secondary
Schools: this includes GA,
GR, SU and HS.
FTE: Schools have the
ability to choose how to
calculate FTE for each
grade in the school. There
are 3 options: by Grade, by
Homeroom or by Minutes.
Ensure you are working in
the Current year.
Set the Last Grade for this
school by checking the tick
box. This becomes
particularly important when
doing Pre-Transition.
NOTES:
Use GA for newly admitted students to your school who are now adults and have graduated
GR is used for students transitioning from grade 12 to a graduated status. Only use GR on the Pre-Transition List. Never give a student an admit
code of GR during the admission process. Returning grade 12 students must have a grade of 12 or GA .
Revised: 7 Aug 2009
Page 12 of 16
Back to School Fundamentals v1.2
1.6 Homeroom Maintenance – Mandatory for Schools taking Daily Attendance, Optional for all others
Path: BCeSIS Start Screen > School > School Information > Homeroom Maintenance
The Homeroom Maintenance screen lists all information relating to each homeroom setup at the school. Schools should review this setup for
accuracy.
Number of seats in this
homeroom
For the typical elementary
school, no semesters will be
set up so enter a “1” here to
represent a full year setup.
This number indicates the
# of students assigned to
this homeroom. The #
Used can exceed the # of
Seats. When students are
mass assigned, they are
evenly distributed.
Enter up to 6 characters to
identify individual
homerooms.
To begin assigning students
to homerooms, click on this
button.
Choose Full time or Half
Time. A selection must be
made for attendance to be
taken. Classes, such as
Kindergarten, that are
designated as Half Time
should indicate so and
whether it is AM or PM.
Click here to associate
Additional Teachers with
this homeroom (i.e. Team
Teachers).
Monitor changes made to
this screen by clicking this
button.
Choose the best fit for
Class Type (Optional).
Choose the room from the drop
down list (populated from the Room
screen).
Click on the? to choose the teacher. This
list is populated from the Staff
Maintenance screen.
Note: The Staff Maintenance and Rooms setup must be complete prior to setting up Homerooms.
Revised: 7 Aug 2009
Page 13 of 16
Back to School Fundamentals v1.2
1.7 Assign Curriculum Subjects (For K-7 schools using the BCeSIS
Curriculum Model for Mark Entry)
Follow these steps to allow team teachers or teachers without a homeroom to enter marks for
specific curriculum subjects (i.e. PE/Math/ Art Teachers).
For information on how to set up Team Teachers see Team Teachers QRG.
Steps
Key Points
From the BCeSIS Start screen, select School> School Information> Staff Maintenance. Select a
teacher from the list or add a new teacher by clicking the Add button and completing the mandatory
fields (Surname, Initial, First Name and Gender) and saving.
1
Click on the Staff Details button followed by the Curr Subject Access button.
2
At the top of the Curriculum Subject Access window select the appropriate Grade and
Homeroom for which the teacher should be able to enter marks. If the teacher does not have
a homeroom just select a grade.
3
Select the curriculum subject areas that the teacher should be able to enter marks and
comments for by highlighting and clicking the Add button. Once all the subject areas have
been selected for the particular grade and homeroom, click the Save button.
If a teacher teaches a subject for all grade levels in a school i.e., a Music teacher, repeat this
step for each grade level.
Revised: 7 Aug 2009
Page 14 of 16
Back to School Fundamentals v1.2
Steps
4
Key Points
Once you have completely finished and saved, exit twice to return to the Staff Maintenance
screen.
Revised: 7 Aug 2009
Page 15 of 16
Back to School Fundamentals v1.2
1.8 Mass Registration
Path: Attendance Module > Period or Daily Attendance > Verify Registration > Verify All Students… > Mass Registration Verification
In order for attendance to be recorded students must be registered. This process will register every student in your school. Mass Registration
can only be run once a year. It can be run before, on, or after the first day of school. If run after the first day of school, be sure to use the actual
first day of school as the Default Registration Date. Any students who should not have been registered during the mass registration process can
be easily reverse registered at a later date as a follow up step.
The Default Registration
Date will be the date used for
all registrations unless
otherwise indicated by the
radio button options selected
below.
Future admission options:
When this subset of students’
current admission date is
greater than the default
registration date entered, the
students’ future admission
Note: As illustrated the
bottom radio buttons, of each
set of two, are the default
options. Choose other
options based on the
information provided.
Default Registration Date
will be the date used.
Revised: 7 Aug 2009
Delete registrations and
re-register: When this
subset of students’ current
registration date is less than
or equal to the default
registration date, it will unregister students and then
re-register them with the
default registration date.
After entering a Default
Registration Date, use the tab
key or select any of the radio
buttons to activate the
Register button.
Page 16 of 16