1
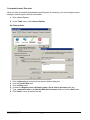
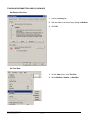
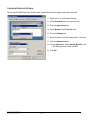
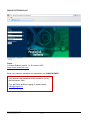
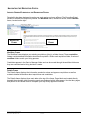
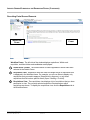
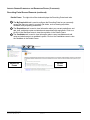
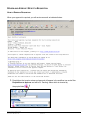
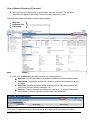
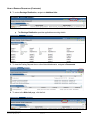
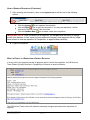
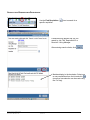
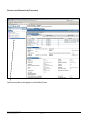
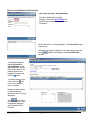
PEOPLECLICK
USER GUIDE
APPROVAL WORKFLOW
PEOPLECLICK USER GUIDE
APPROVAL WORKFLOW
PAGE 1
PEOPLECLICK USER GUIDE
APPROVAL WORKFLOW
APPROVING REQUISITIONS
HOW TO APPROVE A REQUISITION ...................................................................................... 3
ACCESSING PEOPLECLICK
TIPS FOR USERS OF NON-INTERNET EXPLORER BROWSERS ............................................... 3
CONFIGURE INTERNET EXPLORER .................................................................................... 4
CONFIGURE DESKTOP SETTINGS ..................................................................................... 7
SIGN IN TO PEOPLECLICK ............................................................................................... 8
NAVIGATING THE RECRUITMENT PORTAL
IDENTIFY SCREEN ELEMENTS IN THE RECRUITING PORTAL ................................................ 9
REVIEW AND APPROVE / REJECT A REQUISITION
HOW TO REVIEW A REQUISITION ...................................................................................... 12
WHAT TO EXPECT IF A REQUISITION IS DENIED / REJECTED................................................ 15
SEARCH FOR A REQUISITION IN PEOPLECLICK ....................................................................... 16
PEOPLECLICK USER GUIDE
APPROVAL WORKFLOW
PAGE 2
APPROVING REQUISITIONS
Peopleclick is the University of Calgary‟s recruitment management system. This system enables us to
manage our postings, applicants and approval processes. When a Department/Faculty receives a
request to post a position, the information is entered into Peopleclick (including the chain of approval
needed). The posting then requires the appropriate approvals before it is processed and posted on
the website.
HOW TO APPROVE A REQUISITION
Once you receive a notification email to review and approve a requisition, you must sign into
Peopleclick to approve or deny / reject the requisition.
ACCESSING PEOPLECLICK - CONFIGURING YOUR BROWSER SETTINGS FOR PEOPLECLICK
The Peopleclick RMS Recruiting Portal is a web-based application. While you do not need to install
any Peopleclick software on your computer to use the Recruiting Portal, you do need to install an
approved version of the Microsoft Internet Explorer browser (version 7 or 8) and configure it
correctly in order to use all of the functions of the Recruiting Portal.
TIPS FOR USERS OF NON-INTERNET EXPLORER BROWSERS
If you are a PC user and have selected a different browser as your default (e.g., Firefox), you
can access Peopleclick by opening Internet Explorer from your desktop and going to
https://home.peopleclick.com. If Internet Explorer 7 or 8 is not installed on your PC, you can
download it from http://microsoft.com.
Mac users have the option of accessing the U of C Virtual Desktop which will allow you to
use Internet Explorer on your computer. For instructions, please visit
http://www.ucalgary.ca/hr/administrators/recruitment and click on Accessing Peopleclick on a
Mac OSX.
Note: You must be on campus to access the Virtual Desktop
If you are a Linux or Sun Microsystems user, there are alternatives:
a. There are often labs and /or PCs available for use by students/staff. Inquire in your
department/unit as to where you may be able to access a PC.
b. Contact your HR Services team to inform them you are unable to access Peopleclick.
They will provide any details you require regarding the requisition and will request that
you submit an email with your approval decision.
PEOPLECLICK USER GUIDE
APPROVAL WORKFLOW
PAGE 3
CONFIGURE INTERNET EXPLORER
When you have successfully downloaded Internet Explorer (if necessary), you must configure certain
settings to ensure proper functions are available.
1. Open Internet Explorer
2. On the Tools menu, select Internet Options
SET TRUSTED SITES:
3.
4.
5.
6.
7.
8.
Click the Security tab at the top of the Internet Options dialog box
Click the Trusted Sites icon
Click the Sites button
Unselect the Require server verification (https:) for all sites in this zone check box
Type *.peopleclick.com in the Add this Web site to the zone field and click the Add button
Click Close to return to the Security tab
PEOPLECLICK USER GUIDE
APPROVAL WORKFLOW
PAGE 4
CONFIGURE INTERNET EXPLORER (CONTINUED)
SET SECURITY SETTINGS:
1. On the Security tab, click the Custom level
button
2. Use the information in the table below to set
the Security Settings that impact the
Peopleclick RMS Recruiting Portal
3. Click OK to apply and save your changes
4.
Setting Name
Active X controls and plug-ins
Run signed ActiveX controls
Script ActiveX controls marked safe for
scripting
Downloads
File Download
Required Value
Enable
Enable
Enable (Required to view candidate and
requisition attachments that are not viewed
natively within the browser window.)
Miscellaneous
Submit non-encrypted form data
Enable. (Required to support the Candidate
Portal if not using HTTPS.)
Scripting
Active Scripting
PEOPLECLICK USER GUIDE
APPROVAL WORKFLOW
Enable. (Required to support the Candidate
Portal and Business Intelligence Platform.)
PAGE 5
CONFIGURE INTERNET EXPLORER (CONTINUED)
SET PRIVACY SETTINGS:
1. Click the Privacy tab
2. Use the slider to set the privacy setting to Medium
3. Click OK.
SET TEXT SIZE:
1. On the View menu, click Text Size
2. Select Medium, Smaller, or Smallest
PEOPLECLICK USER GUIDE
APPROVAL WORKFLOW
PAGE 6
CONFIGURE DESKTOP SETTINGS
The Peopleclick RMS Recruiting Portal is best viewed when specific display settings are selected:
1. Right-click in your Windows Desktop
2. Select Properties from the pop-up menu
3. Click the Appearance tab
4. Select Normal in the Font size field
5. Click the Settings tab
6. Move the slider to set the display size to 1024X768
7. Click the Advanced button
8. On the General tab, select Normal (96 DPI) in the
DPI Setting field and then click OK
9. Click OK.
PEOPLECLICK USER GUIDE
APPROVAL WORKFLOW
PAGE 7
SIGN IN TO PEOPLECLICK
STEPS
In Internet Explorer (version 7 or 8), enter the URL:
https://home.peopleclick.com/
Enter your username, password and organization key (UNIVCALGARY).
Your username and password will be provided to you by
the Recruitment Team.
If you are having problems logging in, please contact
[email protected].
PEOPLECLICK USER GUIDE
APPROVAL WORKFLOW
PAGE 8
NAVIGATING THE RECRUITING PORTAL
IDENTIFY SCREEN ELEMENTS IN THE RECRUITING PORTAL
Peopleclick has been designed to make your work easier and more efficient. The Recruiting Portal
window is divided into two primary frames: the Workflow frame, located on the left, and the Details
frame, located on the right.
DETAILS
FRAME
WORKFLOW
FRAME
Workflow Frame
The Workflow frame displays your existing requisitions (jobs) in a folder format. These requisition
folders contain detailed information about each requisition. Within each requisition folder, a series of
workflow folders match your hiring process.
Candidates appear in the Sent to Manager folder and can be moved through the workflow folders as
they are evaluated and a hiring decision is made.
Details Frame
The Details frame displays the information needed to review and approve requisitions as well as
maintain detailed information about requisitions and candidates.
The Details frame displays three main tabs at the top of the frame. Page labels are located directly
beneath the main tabs, and information panels are displayed within these pages. Use the tabs, pages,
and panels of the Details frame to complete your day-to-day approval functions.
PEOPLECLICK USER GUIDE
APPROVAL WORKFLOW
PAGE 9
IDENTIFY SCREEN ELEMENTS IN THE RECRUITING PORTAL (CONTINUED)
Recruiting Portal Screen Elements
1
2
3
DETAILS
FRAME
WORKFLOW
FRAME
Workflow Frame. The left side of the window displays requisitions. Within each
requisition, workflow folders and candidates are displayed.
1
Global Icons Toolbar. The Global toolbar is visible regardless of which main tab is
selected in the Details Frame.
2
Requisition Filter. Requisition filters are used to manage the list of requisitions that
is displayed in the Workflow frame. For example, you can use filters to display only
requisitions that you need to approve (Requisitions to Approve), or only those
requisitions that fall under a specific status (Open / Pending / On Hold).
3
Requisitions View. The requisitions view displays a list of requisitions that you have
permission to view. The currently selected requisition filter determines which
requisitions are shown. To display the requisitions view, click the Requisitions tab in
the Workflow frame.
PEOPLECLICK USER GUIDE
APPROVAL WORKFLOW
PAGE 10
IDENTIFY SCREEN ELEMENTS IN THE RECRUITING PORTAL (CONTINUED)
Recruiting Portal Screen Elements (continued)
Details Frame. The right side of the window displays the Recruiting Portal main tabs:
1
2
3
The My Peopleclick tab is used to configure the Recruiting Portal so you can easily
access the items you need in your daily job duties, such as viewing requisition,
candidate, and job posting summaries.
The Requisitions tab is used to view information about your current requisitions, and
add, view, and delete notes and attachments associated with requisitions. Click on a
job title in the Workflow frame to view the requisition in the Details Frame.
The Candidates tab is used to view information about current candidates and add
notes and attachments to a candidate‟s profile. Click on the Candidates name to view
the Candidate in the Details Frame.
1
2
3
DETAILS
FRAME
WORKFLOW
FRAME
PEOPLECLICK USER GUIDE
APPROVAL WORKFLOW
PAGE 11
REVIEW AND APPROVE / REJECT A REQUISITION
HOW TO REVIEW A REQUISITION
When your approval is required, you will receive an email as indicated below:
1. Requisitions that require review and approval will appear in the workflow tree under filter
Requisitions to Approve and will be in „Pending‟ status which is denoted by
the purple folder
PEOPLECLICK USER GUIDE
APPROVAL WORKFLOW
PAGE 12
HOW TO REVIEW A REQUISITION (CONTINUED)
2. In the workflow tree, click the title of the requisition you want to review. The requisition
information will appear in the Details Frame on the right side of the screen.
Requisition information is divided into three separate pages:
Main Info
Additional Info
Documents
3. Begin with the Main Info page which contains the following sections:
Approval - Lists the individuals in the approval workflow and shows date/time stamp
General Info - Includes the position title, number of positions and expected start and
end dates
Detail Info - Includes all position details including position type, faculty/department,
work hours, job code, position description, etc.
Contacts – Lists the contacts connected to the requisition (i.e. those individuals who
have access to view the requisition and the associated candidates)
Scroll down to view the panels you should review prior to approving or rejecting the requisition.
PEOPLECLICK USER GUIDE
APPROVAL WORKFLOW
PAGE 13
HOW TO REVIEW A REQUISITION (CONTINUED)
4. To review Earnings Distribution, navigate to Additional Info:
The Earnings Distribution provides applicable accounting details:
5. To view the Posting Request form or other Notes/Attachments, navigate to Documents
6. To return to the Main Info page, click the link:
PEOPLECLICK USER GUIDE
APPROVAL WORKFLOW
PAGE 14
HOW TO REVIEW A REQUISITION (CONTINUED)
7. After reviewing the information, return to the Approval panel and take one of the following
actions:
Click the Approve
icon to approve the requisition
Click the Reject
icon to deny the requisition. If you deny the requisition, it will be
sent back to the HR Service Team for review
Click the Add New Note
icon to attach a note to the requisition
IMPORTANT NOTE: Once you action on an approval, you do not have the ability to change /
modify your decision. In fact, once you have actioned a request, most approvers will no longer
have access to view the requisition in Peopleclick, so approve/deny carefully!
8. Logout of Peopleclick
WHAT TO EXPECT IF A REQUISITION IS DENIED / REJECTED
If at any point in the approval process an approver rejects / denies the requisition, the HR Services
Team Contact (Primary Recruiter in Peopleclick) will receive an email notification.
The HR Services Team contact will make the necessary changes and resubmit the requisition for
approval.
PEOPLECLICK USER GUIDE
APPROVAL WORKFLOW
PAGE 15
SEARCH FOR A REQUISITION IN PEOPLECLICK
Use the Find Requisition (
specific requisition.
) icon to search for a
A search box will appear and you can
search by Job Title, Requisition ID or
Recruiter / Hiring Manager.
After entering search criteria, click
.
Matches display in the box below. Select one
or more requisitions from the list and click
(more than one selection can be made using
the „Ctrl‟ key).
PEOPLECLICK USER GUIDE
APPROVAL WORKFLOW
PAGE 16
SEARCH FOR A REQUISITION (CONTINUED)
Selected requisitions will appear in the Workflow Frame.
PEOPLECLICK USER GUIDE
APPROVAL WORKFLOW
PAGE 17
SEARCH FOR A REQUISITION (CONTINUED)
Search by Recruiter / Hiring Manager
To search by Recruiter or Hiring
Manager, click on the Add People link,
and the search window displayed below
will appear.
Select “Recruiter” or “Hiring Manager” in the Search For drop
down menu.
Enter the Last Name of the person you are searching for and
click
section.
To select and add the
desired Recruiter or
Hiring Manager to the
appropriate box, doubleclick on the name in the
Search Results list or
highlight the name and
click the
arrow.
To remove a name from
a box, click the
icon
next to the name you
want to remove.
Repeat the above steps
to select additional
Recruiters and / or Hiring
Managers.
Click
when done
and the names you have
selected will appear in
the Requisition Quick
Find box.
PEOPLECLICK USER GUIDE
APPROVAL WORKFLOW
PAGE 18
. Matches will appear in the Search Results
SEARCH FOR A REQUISITION (CONTINUED)
The name(s) you have selected
will appear in the Requisition
Quick Find box.
After entering any additional
search criteria, click
.
Matches display in the box below.
Select one or more requisitions
from the list and click
(more
than one selection can be made
using the „Ctrl‟ key).
Selected requisitions will appear in
the Workflow Frame.
PEOPLECLICK USER GUIDE
APPROVAL WORKFLOW
PAGE 19