1
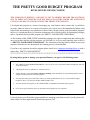
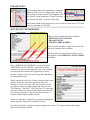
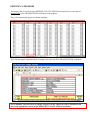
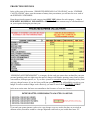
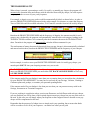
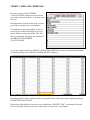
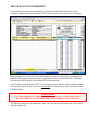
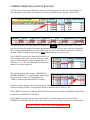
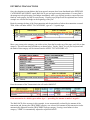
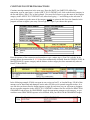
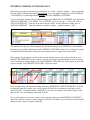
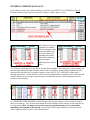
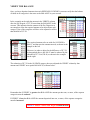
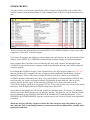
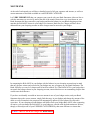
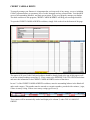
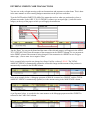
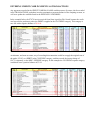
PRETTY GOOD BUDGET PROGRAM
USER GUIDE
TABLE OF CONTENTS
1. INTRODUCTION
2. SETTING UP THE PROGRAM
3. EXPENSE CATEGORIES
4. PROJECTED EXPENSES
5. THE HARSH REALITY
6. CREDIT CARDS & CREDITORS
7. THE TRANSACTIONS WORKSHEET
8. CURRENT CHEQUING ACCOUNT BALANCE
9. ENTERING TRANSACTIONS
10. CONTINUE TO ENTER TRANSACTIONS
11. ENTERING CREDITS AUTOMATICALLY
12. ENTERING CREDITS MANUALLY
13. VERIFY THE BALANCE
14. OTHER CREDITS
15. MONTH END
16. CREDIT CARDS & DEBTS
17. ENTERING CREDIT CARD TRANSACTIONS
18. ADJUSTING FOR INTEREST CHARGES
19. ENTERING CREDIT CARD PAYMENTS AS TRANSACTIONS
20. YEAR END
THE PRETTY GOOD BUDGET PROGRAM
DEVELOPED BY DENNIS COOPER
THE PURPOSE OF KEEPING A BUDGET IS NOT TO MERELY RECORD TRANSACTIONS,
BUT TO FORECAST EXPENSES FOR THE YEAR AND ENSURE THERE ARE SUFFICIENT
FUNDS AVAILABLE TO COVER EACH OF THE PROJECTED EXPENSES.
I developed this program as a means of managing my own finances and to ensure that I would have
necessary funds set aside to cover projected expenses. For several years I had maintained a budget using
ledger books and entering every transaction by hand. When I began working with Spreadsheet programs,
however, I realized that the use of formulas written into cells would be perfect for maintaining a budget,
and so, I gradually developed this program, the “PRETTY GOOD BUDGET PROGRAM”.
At first reading of this USER GUIDE, maintaining a budget may appear complicated and confusing but,
once you become familiar with the program, you will find it is very easy and, hopefully, that it really is
a, “PRETTY GOOD BUDGET PROGRAM”. The satisfaction of having funds available to meet your
expenses when they are due should make the learning process well worthwhile.
If you have any questions about this program please email me at [email protected] with a
subject line, “PRETTY GOOD BUDGET”
***********************************************************************************
By using this program to manage your personal finances you agree to the following terms:
•
This “PRETTY GOOD BUDGET PROGRAM” is free to use for your own personal finance management. and will
not be sold to others.
•
This program carries no guarantee of “financial success”.
•
Neither Dennis Cooper nor Cooper Computer Consulting will be held liable for any financial problems, real or
imagined, resulting from the use of this program.
•
You may share this program with others whom you feel might benefit from it but, if you forward the budget
template to others, you must forward this USER GUIDE as well.
•
You must not alter the program, or this USER GUIDE, or manipulate the formulas in the program
•
If you do not agree with these terms you must delete the program from your computer.
I sincerely hope you will find this program helpful in managing your finances and, if you do, please tell
others about it so they might benefit from this program as well.
PLEASE NOTE:
While entering data in this Spreadsheet, if numbers
appear as ####, as in the example on the left, they
are too large to fit the column. If this happens click
on “Format” on the menu then “Column” and then
on “Autofit Selection”, as shown on the right.
The column widths in this program were set for an Excel zoom level of 75% and
a screen resolution of 1024x768.
************************************************************************************
SETTING UP THE PROGRAM
There are three worksheets in this workbook,
- EXPENSE CALCULATIONS
- TRANSACTIONS
- CREDIT CARDS & DEBTS
To access each worksheet, simply click on the Tab
title at the bottom of the worksheet.
The first sheet you must access in order to set up
the program is the, EXPENSE CALCULATIONS
worksheet.
In the “EXPENSE CATEGORIES” section of the sheet,
“EXPENSE CALCULATIONS”, enter titles for all the
expenses you must meet throughout the year. The examples
preexisting in the worksheet are suggestions for yearly
expense categories, but your own list may differ depending
on your personal needs.
Simply replace the text in any of these categories that do not
apply to your needs with more appropriate titles. For
example, if you do not own a home and, therefore, do not
pay property taxes, you might replace that category with
“Pet Expenses”, “Ski Pass”, “Golf Club Fees” or some other
expense for which you must set aside funds. You must limit
your expense categories to 16, so it may be necessary to
combine similar expenses under one title.
Do not rearrange these categories by cutting and pasting but,
rather, retype the titles in this section if necessary.
If you have less than 16 expense categories simply enter a letter “X” in place of unneeded category
spaces at the bottom of the list.
EXPENSE CATEGORIES
As category titles are entered in the EXPENSE CALCULATIONS worksheet they are also entered
automatically in the TRANSACTIONS worksheet of the program.
They will automatically appear as column headings…
They will also appear automatically in a category list at the top of the TRANSACTIONS worksheet…
Never manually enter any titles of expense categories in the TRANSACTIONS worksheet, but
only in the appropriate section of the EXPENSES CALCULATIONS worksheet.
PROJECTED EXPENSES
In the yellow area of the section, “PROJECTED EXPENSE CALCULATIONS”, on the, “EXPENSE
CALCULATIONS” sheet, enter the amount of money that you estimate you will need to cover each of
the EXPENSE CATEGORIES.
Enter the projected expense for each category into ONLY ONE column for each category… either in
PER WEEK, BI-WEEKLY, PER MONTH or PER YEAR. These amounts may be calculated based
on your expenses during the previous year.
“SPENDING & ENTERTAINMENT” is a category for the cash you want to have on hand for your own
personal spending such as a night out at the movies, dinners with friends, sporting events, lottery tickets,
wine and beer, barbeque parties, etc. Try to allow yourself a reasonable amount of spending money from
each pay cheque because, if you don’t have sufficient spending cash, you will probably not stick to your
budget. In order to make a budget work effectively you must be sure to PAY YOURSELF FIRST!
In the next section enter the letter corresponding to the frequency of your pay cheques.
If you and your spouse/partner each receive a pay cheque every two weeks, but they are received on
alternate weeks, then there would be a cheque deposited each week so you would enter letter “D”.
THE HARSH REALITY
When a letter is entered, representing a weekly, bi-weekly, or monthly pay cheque, the program will
automatically determine how much money must be allocated from each pay cheque, for each expense
category, in order to cover all your yearly expenses.
For example, a deposit every two weeks would be automatically divided, as shown below, in order to
meet the PROJECTED EXPENSES entered in the earlier sample. For instance, to ensure that Property
Taxes of $900.00 would be available when due, $34.62 must be set aside from each bi-weekly cheque.
Based on the PROJECTED EXPENSES and the frequency of deposits, the amounts needed for each
category are calculated by the program, and automatically entered below each category heading in the
TRANSACTIONS worksheet. Never manually alter these amounts shown on the TRANSACTIONS
sheet. Formulas in the program will automatically calculate all these amounts for you.
The total amount of money that must be deposited from your pay cheque is also automatically calculated
and entered on this sheet, based on the PROJECTED EXPENSES and the frequency of your cheques.
In this example, in order to meet your PROJECTED EXPENSES with a bi-weekly pay cheque, you
must deposit $1417.31 into your chequing account every two weeks.
The HARSH REALITY of a budget is that if you do not earn the amount calculated by the program to
meet your PROJECTED EXPENSES you must either CUT BACK YOUR EXPENSES or find a way
to EARN MORE MONEY.
If the amount needed for your budget is more than you are earning then you must adjust the calculations
for your PROJECTED EXPENSES. You may have to cut back on your Savings, Vacation, Clothing or
Christmas plans and, perhaps, re-examine your personal spending habits.
If the amount needed for your budget is less than you earn then you can put more money aside in the
Savings, Investments or Vacations categories.
If you are working in a profession where your income fluctuates, and is different with each pay cheque,
you may find that you will be short of the required deposit on one pay cheque but you may earn extra on
the next. In this case you will simply adjust your deposits so that categories that are shorted on one pay
cheque will be compensated on the next.
Remember that the purpose of a budget is not to simply track your spending, but to ensure that funds
will be set aside to cover all of your expenses…no matter how often you are paid.
CREDIT CARDS AND CREDITORS
In the next section of the EXPENSE
CALCULATIONS worksheet you will list all
your credit cards and creditors…any money that
you owe.
Enter the names of all the credit cards you have,
even if they currently carry a zero balance.
It is important, in keeping a budget, to keep a
record of your credit card charges even if you
pay the balance owing each month. This will
help you determine, and adjust, the amounts of
your PROJECTED EXPENSE
CALCULATIONS.
As you enter items in the list of CREDIT CARDS AND DEBTS these names will automatically appear
as column headings in the CREDIT CARDS & DEBTS worksheet…
Recording of debts will be explained in this user guide after the following sections explaining entering
BUDGET TRANSACTIONS.
Before proceeding further be sure to save the workbook as “BUDGET 2006”, or the name of the year
you are recording. Each time you enter transactions, be sure to save your changes.
THE TRANSACTIONS WORKSHEET
All financial transactions, debits and credits, are entered in the TRANSACTIONS sheet of this
workbook. Simply click on the TRANSACTIONS tab at the bottom of the sheet to access this page.
In the columns A, B, C & D, under the yellow headings, you will enter the DATE of each transaction,
PARTICULARS of the transaction, where you purchased an item, to which EXPENSE CATEGORY
the transaction will be applied, and the AMOUNT of that transaction.
All calculations to adjust the BALANCE in your chequing account, and the remaining funds available in
each expense category, will be carried out automatically by formulas written in the cells under the blue
column headings.
WARNING!
IT IS VERY IMPORTANT THAT YOU ENTER DATA ONLY IN SPECIFIED CELLS
DATA ENTERED IN AUTOMATED CELLS WILL CORRUPT THE FORMULAS
The following instructions will explain into which cells you will enter information, and which cells are
updated automatically.
CURRENT CHEQUING ACCOUNT BALANCE
The first step in entering your financial transactions in this program is to enter the current balance in
your chequing account. Enter your balance in the first cell under the blue heading, “BALANCE”.
The balance of your account will be automatically distributed amongst your EXPENSE CATEGORIES.
The amounts in the cells to the right of the shaded cells
under each EXPENSE CATEGORY
may then be manually changed from those automatically entered. You may prefer that some categories
have a smaller amount than entered, and some larger. The total of the amounts entered are reflected in
the blue VERIFY column and that amount must equal the balance in your account.
If the VERIFY amount is less than the BALANCE, as
in the example to the right, you must enter more funds
in one or more categories. In this example there is a
difference of -$23.00, so an additional $23.00 must be
added to one of the categories.
The amount entered in the category, SPENDING &
ENTERTAINMENT, is, in this example, increased by
$23.00, from $150.00 to $173.00 and now the
VERIFY column equals the BALANCE column.
Whenever transactions are entered in this program, either debits or credits, always ensure that the
amount in the blue VERIFY cell equals the amount in the BALANCE cell to its’ left.
If the VERIFY amount is less than the BALANCE, there has been a mistake, and additional funds must
be added to an EXPENSE CATEGORY.
If the VERIFY amount is greater than the BALANCE, too much money has been entered in an
EXPENSE CATEGORY and, therefore, the amount entered in one of the categories must be decreased.
VERIFY MUST ALWAYS EQUAL BALANCE
ENTERING TRANSACTIONS
Once the chequing account balance has been entered, amounts have been distributed in the EXPENSE
CATEGORIES and VERIFY equals BALANCE you can begin entering transactions. You may find it
advantageous to begin keeping your budget immediately after a pay deposit in order to ensure there are
funds in each category, but this is not necessary. Entering a pay deposit will be explained later. In this
example we will start the budget at the beginning of the year.
Begin by entering the date of the first transaction and the particulars of where the transaction occurred.
Then, in the cell under APPLY TO CATEGORY, type an “=” (equals) sign.
Move your cursor to the category you wish to select, from the list at the top of the page, and click on that
category. This will enter that cell address, as shown below. Tap the “Enter” key on your keyboard and
the name of that category will be inserted into the APPLY TO CATEGORY cell.
Enter the amount of the Transaction in the cell under AMOUNT.
If the transaction is a debit, type a minus sign “-“ preceding the amount to make it negative.
The BALANCE of the account, in this example, is now automatically reduced by the amount of the
transaction and, because the GROCERIES category was selected, the amount of this transaction is also
automatically deducted from the GROCERIES expense category, leaving a new balance in that
category. VERIFY is automatically adjusted to equal BALANCE.
CONTINUE TO ENTER TRANSACTIONS
Continue entering transactions in the same way. Enter the DATE, the PARTICULARS of the
transaction, type an equal sign (=) in the APPLY TO CATEGORY cell, click on the desired category in
the list and tap the “Enter” key on the keyboard. (You may find it faster to type the name of the expense
category in the APPLY TO CATEGORY cell, rather than typing “=” and clicking on the selection. If
you do, be certain to type the name of the category exactly as written in this list or the formulas in the
program will not recognize your entry. Do not type the = sign if you choose this option)
Enter the amount of the transaction and remember to type a minus sign (-) first if it is a debit. In the
example below the transaction of -$35.00 has been automatically deducted from the VEHICLE FUEL &
MAINTENANCE expense category and the balance in that category has been automatically reduced
from $75.00 to $40.00.
In the following example, $30.00 was spent in one receipt, on Jan 25, at London Drugs. $20.00 of this
amount was for hand soap and shampoo, but the other $10.00 was for canned soup and crackers. In a
case like this you do not need to obtain separate receipts for each item, but you will want to designate
the two separate categories in the APPLY TO CATEGORY column. One line will be for HEALTH &
GROOMING and the next for GROCERIES. Apply the appropriate amount to each category, as you
would not want GROCERIES expenses to be deducted from your HEALTH & GROOMING budget.
ENTERING CREDITS AUTOMATICALLY
When your pay cheque is deposited you will enter it as a credit…a positive amount… and you will then
have the option of letting the program automatically enter your deposit amongst the various EXPENSE
CATEGORIES, or of entering amounts manually into each EXPENSE CATEGORY.
To have the deposit automatically distributed amongst your EXPENSE CATEGORIES, enter the phrase,
“REGULAR DEPOSIT” in the APPLY TO CATEGORY cell. You can type “=” in the cell, click on
“REGULAR DEPOSIT” at the top of the sheet, and tap “Enter” on the keyboard or simply type in
“REGULAR DEPOSIT”. Enter the amount as a positive number…without a minus (-) sign.
The amount of the deposit will be automatically distributed amongst your EXPENSE CATEGORIES
based on the percentage of the deposit each EXPENSE CATEGORY should receive. These percentages
are automatically determined by formulas in the program so never change them on this sheet.
If the amount of your deposit is less than the required amount to meet your expenses, based on your
PROJECTED EXPENSES and the frequency of your pay cheques, the amount placed in each category
will be less than the amount displayed in each EXPENSE CATEGORY title. If the deposit is more than
required, though, each EXPENSE CATEGORY will receive more.
In the example above, the amount normally allotted to SPENDING & ENTERTAINMENT is $150.00,
as displayed under the category title. As the deposit of $1400.00 is less than the required bi-weekly
deposit of $1417.31 displayed under “AMOUNT”, however, the automatic allocation of funds would
place $148.17 into that category rather than $150.00.
If you would prefer to have more control over the amount going in to each EXPENSE CATEGORY,
and wish to raise the amount in some categories, and lower it in others, you can enter the division of the
deposit into the expense categories manually.
ENTERING CREDITS MANUALLY
If you choose to enter your credit manually you will leave the APPLY TO CATEGORY cell blank.
Enter the amount of your deposit as a positive number, with no minus (-) sign.
Each Expense Category
contains two columns.
The left column records
credits and debits and
the right column will
automatically update
the balance remaining
in that category,
reflecting each credit or
debit.
You will never manually enter any data in the right hand columns of the categories as these columns are
automatically updated through formulas written in the cells. Debits, in the left hand columns, are also
automatically inserted when you apply a category in the APPLY TO CATEGORY column while
entering transactions. Credits, however, may be entered automatically or manually in the cells in the left
column. When your pay cheque is deposited you can manually enter the required amount in the left
column of each category.
The figures appearing in each expense category heading, just under the title, are the amounts determined
by your PROJECTED EXPENSES, and the frequency of your pay cheques, to be set aside in order to
meet your expenses. You can enter that amount in the left column of each category on the same line as
your pay deposit, But, you may increase or decrease the specified amounts, as you enter them,
depending on the amount of the deposit. If your deposit is less than required you will enter less in
some categories and if it is more, you will enter more.
VERIFY THE BALANCE
Once you have deposited amounts into each EXPENSE CATEGORY you must verify that the balance
of funds in all categories is the same as the BALANCE in your account.
In the example on the right the amount in the VERIFY column,
after the Pay Deposit, is $17.29 more than the BALANCE in the
account. This indicates that the amount of the Pay Deposit was
not enough to allow the required amount to be entered into each
category. One of the categories will have to be adjusted to reflect
that shortfall of $17.29.
The required amount to be set-aside for SAVINGS is
$46.15, and that was the amount entered, as shown in the
sample on the left.
However, in order to adjust for the difference of $17.29,
as determined above, this $46.15 must be reduced by the
shortfall of $17.29 to $28.86, as shown in the example
on the right.
The reduction of $17.29 in the SAVINGS category has now adjusted the VERIFY column by that
amount and VERIFY now equals BALANCE, as shown below.
Remember that if VERIFY is greater then BALANCE the amount put into one, or more, of the expense
categories must be reduced.
If VERIFY is less then BALANCE the amount deposited into one, or more, of the expense categories
must be increased.
VERIFY MUST ALWAYS EQUAL BALANCE
OTHER CREDITS
You may, at times, receive money other than your Pay Cheque to be deposited in your account. This
could be a bonus, an Income Tax Rebate or, in the example below, money received from the sale of an
item.
This extra income may be deposited in your SAVINGS or VACATION column or, if one of your other
categories is “in the hole”, into that category.
If you know the category into which you want to deposit this extra income you can enter the title of that
category in the APPLY TO CATEGORY column and the specified category will reflect that deposit.
In the example above, the money received from the sale of the used computer was deposited in the
SAVINGS category because a new computer would be purchased the next day and would be deducted
from that category.
Even though the SAVINGS category, in the example above, now has a negative balance of -$321.14,
after the purchase of the computer, the other categories remain unaffected, and the balance in them
remains the same. There is still, in this example, $88.46 set aside for a vacation, even though the
SAVINGS column is temporarily in the hole .As the required $46.15 is deposited into SAVINGS from
each bi-weekly pay cheque, the negative balance will gradually decrease and will, after seven pay
cheques, become positive again. At the same time, after those seven weeks, the balance in the
VACATION category would have increased to $357.68. If any extra income were to be received during
that time it could be deposited into SAVINGS to help reduce that deficit.
If you adhere to this budget you will not find yourself in a situation where, for instance, you could not
afford to go out for dinner because your car insurance was due. The funds for your car insurance would
have accumulated in your VEHICLE PAYMENTS & INSURANCE column and the money in your
SPENDING & ENTERTAINMENT category would be intact even if your SAVINGS were temporarily
in the hole.
When one category falls into a negative balance the other categories may still continue to grow
and satisfy the goal of your budget, which is to ensure that necessary funds will be available when
payments become due.
MONTH END
At the end of each month you will have a detailed record of all your expenses and income, as well as a
current statement of the funds available in each EXPENSE CATEGORY.
It is VERY IMPORTANT that you compare your records with your Bank Statement, either on-line or
with the statement you receive by mail at the end of the month. Insure that every item shown on your
Bank Statement has been entered in your budget and that the balance in your Bank chequing account
matches the BALANCE shown in your budget. For instance, Bank Service Charges will have been
deducted from your chequing account so these charges must be entered in your budget.
In comparing the BALANCE in your budget with the balance in your chequing account keep in mind
that any cheques written and recorded in your budget may not yet appear on your Bank Statement. The
Bank will have no record of a cheque until it has been cashed. So, if the BALANCE in your budget does
not match the balance shown in your chequing account, ensure that there are no outstanding cheques that
would cause the difference.
If you have accidentally recorded an incorrect amount in one of your budget entries, and your Bank
Statement shows the correct amount, simply find that entry in your budget and change the amount of the
debit or credit. Formulas in the program will automatically update all your balances to reflect this
correction. If your chequing account balance still differs from your budget BALANCE, after comparing
all entries, you can change the BALANCE in your budget to coincide with the bank statement. Be sure,
though, to also adjust one of your EXPENSE CATEGORIES by that same difference to insure that…
VERIFY MUST ALWAYS EQUAL BALANCE
CREDIT CARDS & DEBTS
To properly manage your finances it is important that you keep track of any money you owe, including
Credit Card transactions, car payments, line of credit, mortgage and any personal loans. You should be
aware of all outstanding balances, and their current status, if you are to properly manage your budget.
The third worksheet in this program, CREDIT CARDS & DEBTS will help you to manage this data.
To open the CREDIT CARDS & DEBTS worksheet, simply click on the tab at the bottom of the page.
The names of all your Credit Cards and creditors should be already listed at the top of this page as well
as on blue column headings across line 12. If not, return to the EXPENSE CALCULATIONS worksheet
and enter this information in the CREDIT CARDS & DEBTS section of that sheet.
In row 13 of the CREDIT CARDS & DEBTS worksheet, enter the outstanding balance in the blank cell
under each category. This number must be entered as a negative number, preceded with a minus (-) sign,
if there is money owing. If there is no money owing type a zero (0).
These entries will be automatically totaled and displayed in column F, under TOTAL AMOUNT
OWING.
ENTERING CREDIT CARD TRANSACTIONS
You are now ready to begin entering credit card transactions and payments on other loans. This is done
in the same manner as when entering budget transactions on the previous worksheet.
Type the DATE and the PARTICULARS of the transaction such as what was purchased or where a
payment was made. In the APPLY TO CATEGORY column, type an equal sign (=) and click on the
category at the top of the page to which you will apply the transaction.
Tap the “Enter” key on your keyboard and the name of the selected category will appear in the APPLY
TO CATEGORY field. Enter the amount of the transaction in the CREDIT column if it is a payment or
in the DEBIT column if the amount is being charged. If the transaction is a DEBIT be sure to type a
minus sign (-) first to enter it as a negative value.
In the example below a parka was charged to a Sears Card for a value of -$59.95. The TOTAL
AMOUNT OWING is automatically updated to reflect this charge and the amount of the purchase is
automatically recorded in the SEARS column.
In the next example, below, a Mortgage payment of $800.00 is entered as a CREDIT, and the TOTAL
AMOUNT OWING is automatically updated, as is the amount owing in the MORTGAGE column.
A car Payment, below, is recorded in the same manner as the Mortgage payment and the CREDIT is
reflected in the CAR LOAN column.
ADJUSTING FOR INTEREST CHARGES
It is very important to remember, when charging an item to a Credit Card or making a mortgage
payment or car loan payment, that the amount of the CREDIT transaction will be offset by a DEBIT
interest charge. These interest charges must be accounted for when recording CREDIT CARD & LOAN
transactions.
In the example below, the original cost of the parka charged to the Sears credit card was $59.95.
However, when the Sears invoice arrives, interest charges and other fees have increased the required
payment to $76.74. The payment of $76.74, recorded on Feb 26, was applied as a CREDIT against the
original charge of $59.95 in the SEARS column, and it appears as though there is now a positive balance
of $16.79 in that column. The additional charges that were added to the original invoice, however, have
not yet been recorded. These interest charges must now be entered as a DEBIT transaction in order to
accurately reflect the new balance in the SEARS account, which is $0.00
Interest charges must also be deducted from any mortgage or loan payments entered as a CREDIT. In
the example below, a mortgage payment CREDIT of $800.00 was recorded on Feb 1 and a Car Loan
payment was entered as a CREDIT on Feb. 15. However, when the bank statement is received at the
end of the month, it is revealed that $240.00 of the mortgage payment, and $75.00 of the Car Loan
payment, was applied to interest, rather than principle. These interest payments must, therefore, be
recorded as DEBITS in order to accurately reflect the balances of money owing.
Whenever invoices for credit cards or bank statements are received, be sure to examine them for interest
charges, and make sure you record these charges as DEBITS in the CREDIT CARDS & DEBTS sheet.
ENTERING CREDIT CARD PAYMENTS AS TRANSACTIONS
Any payments recorded in the CREDIT CARDS & LOANS worksheet must, of course, also be recorded
in the TRANSACTIONS worksheet in order to maintain an accurate balance of the chequing account, as
well as to update the available funds in the EXPENSE CATEGORIES.
In the example below, the $76.74 invoice received from Sears is paid on Feb 16 and, because the credit
card was used to purchase a parka, the DEBIT is applied to the CLOTHING category. This category is
now left with a negative balance of -$14.60.
An alternate, and more accurate, way of recording this transaction would be to apply the original cost of
the parka, $59.95, as a DEBIT in the CLOTHING category, and then record the interest charge of
$16.79, separately, to the MISC. EXPENSE category. In this example the CLOTHING expense category
would now have a positive balance of $2.19.
YEAR END
At the end of the year you will want to save the current years’ budget to a disk for future reference.
Be sure to take note of the final ACCOUNT BALANCE, as well as the balance in each EXPENSE
CATEGORY, in order to enter these figures in a fresh budget template for the New Year.
Examine the “Total Amounts Spent To Date” at the top of each EXPENSE CATEGORY to determine if
an adjustment will be required in your PROJECTED EXPENSE CALCULATIONS in the new
workbook. If one, or more, categories ended up with expenditures greater than you had anticipated, you
should consider increasing the amount you had originally entered in the PROJECTED EXPENSE
CALCULATIONS. To help offset this increase, categories that had fewer expenses than anticipated at
the end of the year might have their PROJECTED EXPENSE CALCULATIONS decreased.
If you find that the required amounts to be deposited in each EXPENSE CATEGORY do not meet your
needs, feel free to change the values in the PROJECTED EXPENSE CALCULATIONS section on the
first sheet, EXPENSE CALCULATIONS to adjust these required amounts. A budget should be flexible,
allowing you to make adjustments to meet your own financial demands. Remember, though, that the
goal of your budget must be to ensure that necessary funds will be available when payments become
due.
I sincerely hope this PRETTY GOOD BUDGET will help you.
Good Luck
Dennis Cooper
If you find that this PRETTY GOOD BUDGET PROGRAM helps in managing your finances, please
share it with others.
Dennis Cooper
10542 Seaton Rd
Lake Country, B.C. V4V 1K4
250-766-3600