1
User Guide
© Blue Link Associates Limited
Blue Link Solutions™
Table of Contents
1:
INTRODUCTION ............................................................................. 11
2:
INSTALLATION............................................................................... 13
2.1
2.2
2.3
2.4
2.5
2.6
2.7
3:
3.2
3.3
CONFIGURING USERS AND PASSWORDS ....................................... 32
3.1.1 Adding A User ........................................................................................33
3.1.2 Editing An Existing User’s Information ....................................................33
3.1.3 Deleting A User ......................................................................................33
SETTING PERMISSIONS ................................................................ 34
3.2.1 Individual User Permissions....................................................................34
3.2.2 Setting Group Permissions .....................................................................35
LOGGING ON TO THE SYSTEM...................................................... 37
3.3.1 Changing Passwords..............................................................................37
GETTING STARTED....................................................................... 39
4.1
4.2
4.3
5:
2.2.1 Recommended Client Hardware: ............................................................15
2.2.2 Recommended Network Specification ....................................................15
2.2.3 Terminal Server ......................................................................................15
2.2.4 Configuring Blue Link Solutions for use in a Terminal Server Environment16
USING BLUE LINK SOLUTIONS ....................................................... 17
2.3.1 Starting Blue Link Solutions ....................................................................17
2.3.2 Choose Company Button........................................................................18
2.3.3 Log Off Button .......................................................................................20
2.3.4 Internet FAQ Button................................................................................20
2.3.5 Accessing Blue Link Solutions Modules..................................................20
GETTING AROUND IN SOLUTIONS .................................................. 23
2.4.1 Standard Key Functions .........................................................................23
2.4.2 Screen Display Conventions...................................................................23
2.4.3 Printing Reports......................................................................................24
2.4.4 Printing to a Specific Printer ...................................................................25
MAINTAINING YOUR BLUE LINK SOLUTIONS SYSTEM ...................... 26
FAVOURITES ................................................................................ 27
2.6.1 Add Screens to Favourites Folder ..........................................................27
2.6.2 Remove Screens from Favourites Folder................................................28
IN / OUT BOARD ........................................................................... 29
SECURITY....................................................................................... 31
3.1
4:
INSTALLATION PROCEDURES ........................................................ 14
SYSTEM REQUIREMENTS .............................................................. 15
PREPARING TO USE BLUE LINK SOLUTIONS IN YOUR BUSINESS ...... 40
4.1.1 Planning and Accumulating Your Data....................................................40
4.1.2 Entering Initial Information ......................................................................43
4.1.3 Updating Your System with Recent Information......................................46
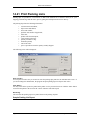
PLAYGROUND .............................................................................. 49
4.2.1 Activating the Playground Notice ............................................................49
CHECKLIST .................................................................................. 51
4.3.1 Planning and accumulating your data .....................................................51
4.3.2 Entering Initial Information ......................................................................51
4.3.3 Updating Your System With Recent Information .....................................51
4.3.4 Copy your data file, and rename the file Playground...............................52
IMPORTANT TIMES ....................................................................... 53
5.1
5.2
5.3
5.4
5.5
RECURRING TRANSACTIONS ......................................................... 54
THINGS TO DO DAILY .................................................................... 55
THINGS TO DO W EEKLY ................................................................ 56
THINGS TO DO MONTHLY .............................................................. 57
THINGS TO DO YEARLY (FISCAL YEAR END).................................. 58
Table of Contents
TOC 1
Blue Link Solutions™
6:
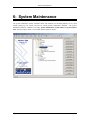
SYSTEM MAINTENANCE .............................................................. 59
6.1
6.2
6.3
6.4
6.5
6.6
7:
SYSTEM INTERFACE ..................................................................... 60
SYSTEM MASTER ......................................................................... 62
6.2.1 Company Information .............................................................................63
6.2.2 Using Windows Regional Settings to Control the Display of Dates .........67
6.2.3 G/L Information.......................................................................................69
6.2.4 Report Options .......................................................................................73
6.2.5 Outlook and Word...................................................................................76
6.2.6 Data Entry & Other Defaults ...................................................................82
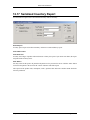
6.2.7 Inventory Information ..............................................................................86
SYSTEM MASTER LISTS ................................................................ 89
6.3.1 Currencies/Departments/Payment Methods............................................90
6.3.2 Shipping Related ....................................................................................92
6.3.3 Terms / Types / RMA Reason Codes .....................................................94
6.3.4 Tax Setup ...............................................................................................97
6.3.5 Fax Exceptions .......................................................................................98
6.3.6 Job Costing ............................................................................................99
6.3.7 Multiple UOM........................................................................................104
6.3.8 Inventory Configurator ? ......................................................................106
6.3.9 Inventory Categories.............................................................................107
SYSTEM MAINTENANCE PURGE ROUTINES .................................. 109
6.4.1 Clear System Data ...............................................................................110
6.4.2 End of Month Routine ...........................................................................112
6.4.3 End of Year Routine .............................................................................114
6.4.4 Purge History Information .....................................................................116
UTILITIES ................................................................................... 117
6.5.1 Check Control Account Balances .........................................................118
6.5.2 Recalculate A/R and A/P Balances.......................................................119
6.5.3 Recalculate General Ledger Summaries...............................................120
6.5.4 Inventory UOM Configuration Wizard....................................................121
6.5.5 Create/Verify Inventory Locations .........................................................122
6.5.6 CHANGE CODES (Customer, Inventory, Vendor, G/L) .......................124
6.5.7 Contact Manager Maintenance.............................................................125
6.5.8 IMPORT FROM OUTLOOK..................................................................126
6.5.9 Check References ................................................................................127
6.5.10 Table Viewer ........................................................................................128
CURRENT USER DEFAULTS ........................................................ 130
GENERAL LEDGER ..................................................................... 131
7.1
7.2
7.3
7.4
7.5
7.6
ENTER/CHANGE GENERAL LEDGER ACCOUNTS ........................... 132
7.1.1 Creating New Accounts ........................................................................136
7.1.2 Setting up Budgets ...............................................................................137
7.1.3 Deleting Accounts.................................................................................137
GENERAL JOURNAL ENTRIES ...................................................... 139
7.2.1 Creating a new Transaction ..................................................................141
7.2.2 Saving a Transaction ............................................................................142
7.2.3 Changing an Existing Transaction ........................................................143
7.2.4 Deleting an Existing Transaction ..........................................................143
7.2.5 Posting an Existing Transaction............................................................143
ENTER RECURRING GENERAL JOURNAL ENTRIES ........................ 144
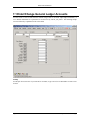
GENERATE RECURRING TRANSACTIONS ..................................... 146
CREATE DEPARTMENTS ............................................................. 147
EXECUTIVE SUMMARY SCREEN.......................................... 148
7.6.1 Information Included .............................................................................148
7.7
7.8
7.9
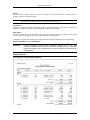
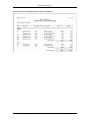
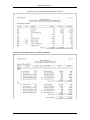
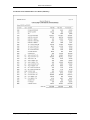
PRINT CHART OF ACCOUNTS ...................................................... 153
PRINT JOURNALS ....................................................................... 155
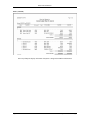
PRINT GL TRANSACTION REPORT............................................... 161
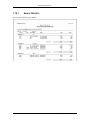
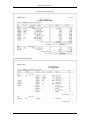
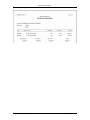
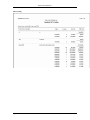
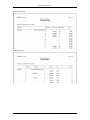
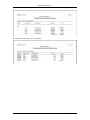
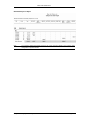
7.9.1 Sample Report......................................................................................162
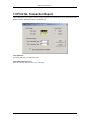
7.10 PRINT GENERAL JOURNAL BY NUMBER/DATE .............................. 163
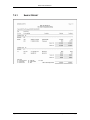
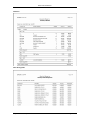
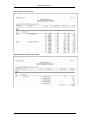
7.10.1 Sample Reports....................................................................................164
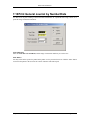
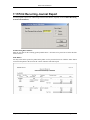
7.11 PRINT RECURRING JOURNAL REPORT ......................................... 165
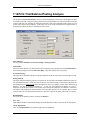
7.12 PRINT TRIAL BALANCE/POSTING ANALYSIS ................................. 166
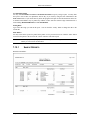
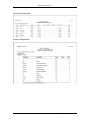
7.12.1 Sample Reports....................................................................................167
TOC 2
Table of Contents
Blue Link Solutions™
7.13 FINANCIAL REPORT GENERATOR ................................................ 169
7.14
7.15
8:
9:
7.13.1 Financial Reports System Setup...........................................................169
7.13.2 Report Definitions .................................................................................171
7.13.3 COLUMN DEFINITIONS ......................................................................175
7.13.4 GROUP DEFINITIONS.........................................................................176
7.13.5 Print Report ..........................................................................................177
PRINT HISTORIC FX RATES ........................................................ 179
CASEWARE™ EXPORT ............................................................... 180
MULTIPLE CURRENCIES............................................................ 181
8.1
8.2
SETUP NOTES............................................................................ 182
TRANSACTION POSTING ............................................................. 183
8.3
8.4
8.5
8.6
8.2.1 Recording Invoices to Customers in Foreign Currencies ......................183
8.2.2 Recording Payments from Customers in Foreign Currencies................183
8.2.3 Transferring Funds between Bank Accounts in Different Currencies ....184
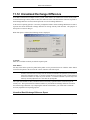
RECONCILING THE EXCHANGE DIFFERENCE ACCOUNT ................. 185
REVALUATION REPORT............................................................... 186
BANK TRANSACTIONS IN DIFFERENT CURRENCIES....................... 187
CONVERSION FROM A PREVIOUS SYSTEM ................................... 188
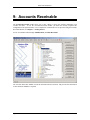
ACCOUNTS RECEIVABLE .......................................................... 190
9.1
9.2
9.3
9.4
9.5
9.6
9.7
9.8
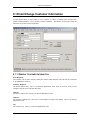
ENTER/CHANGE CUSTOMER INFORMATION.................................. 191
9.1.1 General Customer Information..............................................................191
9.1.2 Phone Numbers/Internet Addresses .....................................................193
9.1.3 Defaults ................................................................................................194
9.1.4 MTD/YTD .............................................................................................197
9.1.5 RMA’s? ...............................................................................................198
9.1.6 Orders ..................................................................................................198
9.1.7 Aging ....................................................................................................199
9.1.8 Ship To Addresses ...............................................................................199
9.1.9 Contact Notes.......................................................................................200
9.1.10 Multiple Contacts Button.......................................................................201
9.1.11 Drill Down Button..................................................................................201
9.1.12 Sales Order Button ...............................................................................202
9.1.13 Payment History Button ........................................................................202
9.1.14 Sales History ........................................................................................203
9.1.15 Group Statement? ...............................................................................204
9.1.16 Creating a New Customer Record ........................................................204
9.1.17 Changing an Existing Customer Record ...............................................204
9.1.18 Deleting an Existing Customer Record .................................................205
9.1.19 Inactive Flag .........................................................................................206
QUICK CUSTOMER LOOKUP ........................................................ 207
ENTER/CHANGE A/R VOUCHER .................................................. 209
9.3.1 Adding a New Voucher .........................................................................212
9.3.2 Distributing the Amount to G/L Accounts ..............................................213
9.3.3 Changing an Existing Voucher..............................................................214
9.3.4 Reversing a Posted Voucher ................................................................214
RECORD PAYMENTS ................................................................... 216
9.4.1 Choosing Invoices for Payment ............................................................217
9.4.2 Unapplied Payments.............................................................................218
9.4.3 Recording NSF Cheques ......................................................................218
COLLECTIONS SCREEN............................................................... 220
CHARGE INTEREST ..................................................................... 226
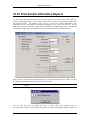
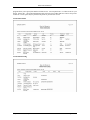
PRINT CUSTOMER INFORMATION REPORTS ................................. 228
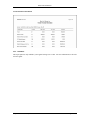
9.7.1 Print Customer Tax Reports .................................................................232
9.7.2 Commodity Tax Report .........................................................................232
9.7.3 PST Expiry By Date..............................................................................233
9.7.4 PST Expiry By Days .............................................................................234
PRINT AGING REPORTS .............................................................. 235
9.8.1 Accounts Receivable Aging Report.......................................................236
9.8.2 Accounts Receivable Detailed Aging ....................................................236
9.8.3 Salesperson Aging Report ....................................................................237
9.8.4 Accounts Receivable Listing Report .....................................................238
9.8.5 Accounts Receivable Detailed Transactions Report .............................238
Table of Contents
TOC 3
Blue Link Solutions™
9.9
9.10
9.11
9.8.6 Retroactive Listing Report ....................................................................240
9.8.7 Retroactive Aging Report......................................................................240
STATEMENTS ............................................................................. 242
DUNNING NOTICES ..................................................................... 245
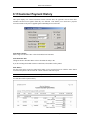
CUSTOMER PAYMENT HISTORY .................................................. 248
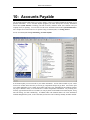
10: ACCOUNTS PAYABLE ................................................................ 249
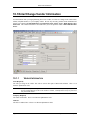
10.1 ENTER/CHANGE VENDOR INFORMATION ...................................... 250
10.1.1 Vendor Information ...............................................................................250
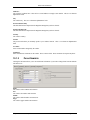
10.1.2 Phone Numbers....................................................................................251
10.1.3 General Info Tab...................................................................................252
10.1.4 History/P.O.’s Tab ................................................................................254
10.1.5 Outstanding Tab and Fields..................................................................255
10.1.6 Contact Notes Tab................................................................................255
10.1.7 Purchase Order Button .........................................................................256
10.1.8 Payment History Button ........................................................................257
10.1.9 AP Voucher Button ...............................................................................257
10.1.10 Creating a New Vendor Record .......................................................257
10.1.11 Changing an Existing Vendor Record..............................................258
10.1.12 Deleting an Existing Vendor Record ................................................259
10.1.13 Inactive Flag....................................................................................260
10.2 QUICK VENDOR LOOKUP ............................................................ 261
10.3 ENTER/CHANGE A/P VOUCHER .................................................. 262
10.3.1 Voucher Entry Fields ............................................................................262
10.3.2 Detail/Distribution Section.....................................................................265
10.3.3 Adding a New Voucher .........................................................................266
10.3.4 Changing an Existing Voucher..............................................................268
10.3.5 Reversing a Posted Voucher ................................................................268
10.3.6 Accounts Payable Source Document....................................................270
10.4 PICK INVOICES TO PAY ............................................................... 271
10.4.1 Choosing an Individual Invoice for Payment .........................................272
10.4.2 Selecting Invoices by Due Date ............................................................274
10.4.3 Edit/Change Invoices To Pay ...............................................................274
10.4.4 Finding An Invoice To Pay....................................................................275
10.5 ALTERNATE VENDOR PAYMENT .................................................. 276
10.5.1 Alternate Payment at AP Voucher ........................................................277
10.6 ENTER RECURRING VOUCHER .................................................... 278
10.7 GENERATE RECURRING VOUCHERS ............................................ 280
10.8 VOID PAYABLE CHEQUE ............................................................. 281
10.9 PREPARE TAX REMITTANCE........................................................ 283
10.9.1 Print Tax Remittance ............................................................................284
10.9.2 Post Tax Remittance ............................................................................284
10.9.3 Note......................................................................................................285
10.10 PRINT VENDOR INFORMATION REPORTS ..................................... 286
10.11 PRINT AGING ............................................................................. 290
10.11.1 Aging Report ...................................................................................291
10.11.2 Listing Report ..................................................................................292
10.11.3 Retroactive Listing Report ...............................................................292
10.11.4 Retroactive Aging Report ................................................................293
10.10.5 Unpaid Invoice Report .....................................................................293
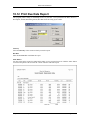
10.12 PRINT DUE DATE REPORT .......................................................... 295
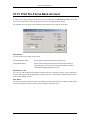
10.13 PRINT PRO-FORMA BANK ACCOUNT ........................................... 296
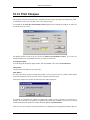
10.14 PRINT CHEQUES ........................................................................ 298
10.15 PRINT OPEN VOUCHERS............................................................. 301
10.16 PRINT RECURRING VOUCHER REPORT ........................................ 302
10.17 PRINT VENDOR HISTORY REPORT .............................................. 303
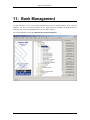
11: BANK MANAGEMENT ................................................................. 304
11.1
11.2
11.3
11.4
TOC 4
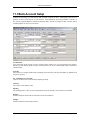
BANK ACCOUNT SETUP .............................................................. 305
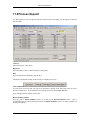
PROCESS DEPOSIT .................................................................... 307
BANK ACTIVITIES ....................................................................... 309
TRANSFER FUNDS ...................................................................... 312
Table of Contents
Blue Link Solutions™
11.5 RECONCILE ACCOUNT ................................................................ 314
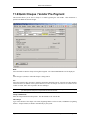
11.6 QUICK CHEQUE / VENDOR PRE-PAYMENT ................................... 318
11.7 QUICK CHEQUE / CUSTOMER REFUND ........................................ 320
11.8 BANK HISTORY (CLEARED ITEMS) ............................................... 323
11.9 BANK ACCOUNT BALANCE INQUIRY ............................................. 325
11.10 PRINT UNCLEARED ITEMS REPORT ............................................. 326
11.11 PRINT CLEARED ITEMS REPORT ................................................. 328
11.12 UNREALIZED EXCHANGE DIFFERENCE ......................................... 330
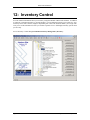
12: INVENTORY CONTROL............................................................... 332
12.1 SETUP NOTES............................................................................ 333
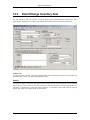
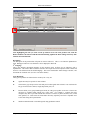
12.2 ENTER/CHANGE INVENTORY ITEM ............................................... 334
12.2.1 Comments & Info Tab...........................................................................337
12.2.2 MTD/YTD Tab ......................................................................................338
12.2.3 Purchases ............................................................................................340
12.2.4 Locations Tab .......................................................................................340
12.2.5 Serial #’s Tab........................................................................................341
12.2.6 More Info Tab .......................................................................................342
12.2.7 BOM (Bill of Materials) Tab...................................................................344
12.2.8 PICTURE TAB......................................................................................344
12.2.9 VENDORS PER PRODUCT .................................................................345
12.2.10 MULTIPLE UOM TAB .....................................................................345
12.2.11 SALES HISTORY BUTTON ............................................................346
12.2.12 Adding a New Inventory Record ......................................................346
12.2.13 Changing an Existing Inventory Record...........................................347
12.2.14 Deleting an Existing Inventory Record.............................................348
12.3 UNIT OF MEASURE ..................................................................... 349
12.3.1 Configuring Unit of Measure .................................................................349
12.3.2 Inventory...............................................................................................354
12.3.3 Purchase Order ....................................................................................356
12.3.4 Sales Order ..........................................................................................357
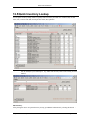
12.4 INVENTORY LOOKUP (WITHOUT COSTS) ...................................... 360
12.5 QUICK INVENTORY LOOKUP ........................................................ 363
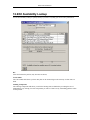
12.6 KIT AVAILABILITY LOOKUP .......................................................... 366
12.7 ADJUST INVENTORY VALUES/LEVELS .......................................... 367
12.8 ENTER/CHANGE PRICE MATRIX .................................................. 370
12.9 GLOBAL PRICE CHANGE ............................................................. 371
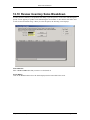
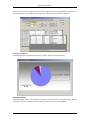
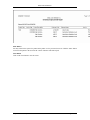
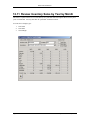
12.10 REVIEW INVENTORY SALES BREAKDOWN .................................... 373
12.11 REVIEW INVENTORY SALES BY YEAR BY MONTH.......................... 376
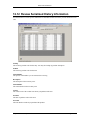
12.12 REVIEW SERIALIZED HISTORY INFORMATION ............................... 377
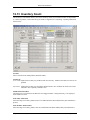
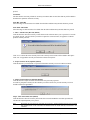
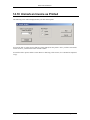
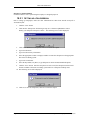
12.13 INVENTORY COUNT .................................................................... 379
12.13.1 General Program Operation ............................................................381
12.13.2 Counting Serialized Items................................................................382
12.14 REORDER INVENTORY ................................................................ 384
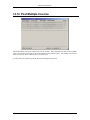
12.15 PRODUCTION CONTROL.............................................................. 387
12.15.1 Creating a New Production Batch (Normal Method) ........................388
12.15.2 Creating a New Production Batch (Quick Method)..........................390
12.15.3 Changing a Production Batch ..........................................................391
12.15.4 Deleting a Production Batch ............................................................392
12.16 PRINT INVENTORY INFORMATION REPORTS ................................. 393
12.17 SERIALIZED INVENTORY REPORT ................................................ 401
12.18 PRINT PRODUCTION CONTROL.................................................... 403
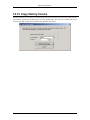
13: PURCHASE ORDER..................................................................... 407
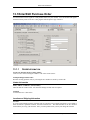
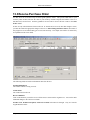
13.1 ENTER/EDIT PURCHASE ORDER ................................................. 408
13.1.1 Order Information..................................................................................408
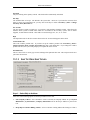
13.1.2 Order Details ........................................................................................410
13.1.3 Ship To / Drop Ship To Info ..................................................................411
13.1.4 Adding a New P.O. ...............................................................................415
13.1.5 Changing an Existing P.O.....................................................................417
13.1.6 Changing a P.O. Line Item....................................................................417
13.1.7 Deleting a P.O. Line Item......................................................................417
Table of Contents
TOC 5
Blue Link Solutions™
13.1.8 Deleting an Existing P.O.......................................................................417
13.2 AUTOMATIC PURCHASE ORDER CREATION .................................. 419
13.2.1 Reorder Inventory .................................................................................419
13.2.2 Sales Order / Purchase Order Integration.............................................419
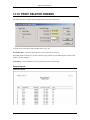
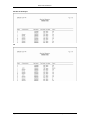
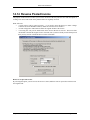
RECEIVE PURCHASE ORDER ...................................................... 421
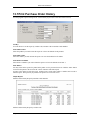
DISPLAY PURCHASE ORDER HISTORY ......................................... 427
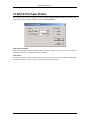
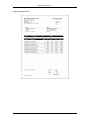
PRINT PURCHASE ORDERS ......................................................... 430
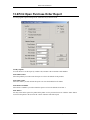
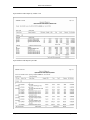
PRINT OPEN PURCHASE ORDER REPORT ................................... 432
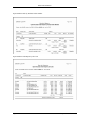
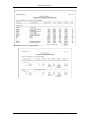
PRINT PURCHASE ORDER HISTORY ............................................ 435
13.3
13.4
13.5
13.6
13.7
13.8 LANDED COST ACCRUALS REPORT ................................... 437
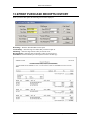
13.9 PRINT PURCHASE RECEIPTS HISTORY.............................. 438
13.10 PRINT DELETED ORDERS .................................................... 439
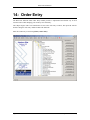
14: ORDER ENTRY............................................................................. 442
14.1 USING AN ORDER ENTRY SYSTEM .............................................. 444
14.1.1 Purchase for Customer (Purchase Order / Sales Order Integration) .....444
14.1.2 Reserve Inventory ................................................................................447
14.1.3 Multiple Invoicing and Adding to an Existing Sales Order .....................448
14.1.4 Examples of Sales Order Systems .......................................................448
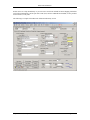
14.2 ENTER/CHANGE SALES ORDER .................................................. 450
14.2.1 Customer Info Tab ................................................................................450
14.2.2 Order Details Tab .................................................................................454
14.2.3 Ship To Info Tab ...................................................................................457
14.2.4 Create P/O’s Tab ..................................................................................458
14.2.5 Freight Calculations Tab? ...................................................................459
14.2.6 Totals Section.......................................................................................460
14.2.7 Sales History ........................................................................................462
14.2.8 Customer Aging....................................................................................463
14.2.9 Recalculate...........................................................................................464
14.2.10 Kit/FG Availability ............................................................................464
14.2.11 Item Lookup Button .........................................................................465
14.2.12 More on Inventory Button ................................................................467
14.2.13 Serial #’s Button ..............................................................................469
14.2.14 Profit Button ....................................................................................469
14.2.15 Configurator Button? ......................................................................471
14.2.16 Fill Backorders Button? ..................................................................471
14.2.17 Save/Print .......................................................................................471
14.2.18 Printing Sales Orders ......................................................................473
14.3 ADDING A NEW SALES ORDER .................................................... 479
14.3.1 Changing a S/O Line Item.....................................................................480
14.3.2 Deleting a S/O Line Item.......................................................................481
14.3.3 Saving the Sales Order.........................................................................481
14.4 CHANGING AN EXISTING SALES ORDER....................................... 483
14.5 REVERSING A SALES ORDER ...................................................... 484
14.6 DELETING AN EXISTING SALES ORDER ........................................ 485
14.7 USING KIT EXPLOSION ............................................................... 486
14.8 ENTER RECURRING SALES ORDERS ........................................... 487
14.9 GENERATE RECURRING SALES ORDERS ..................................... 490
14.10 UNMARK AN INVOICE AS PRINTED ............................................... 491
14.11 POST INVOICES .......................................................................... 492
14.12 POST MULTIPLE INVOICES .......................................................... 493
14.13 COPY HISTORY INVOICE ............................................................. 494
14.14 REVERSE POSTED INVOICE ........................................................ 495
14.15 REVIEW SALES ORDER HISTORY ................................................ 496
14.16 PRINT OPEN ORDER REPORTS ................................................... 498
14.17 PRINT BACKORDER REPORTS ..................................................... 501
14.18 RECURRING SALES ORDER REPORTS ......................................... 505
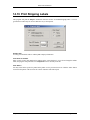
14.19 PRINT SHIPPING LABELS ............................................................ 507
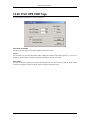
14.20 PRINT UPS COD TAGS.............................................................. 509
14.21 PRINT PACKING LISTS ................................................................ 510
14.22 PRINT INVOICES ......................................................................... 512
TOC 6
Table of Contents
Blue Link Solutions™
14.23 REPRINT AN INVOICE .................................................................. 515
14.24 SALES HISTORY/ORDER MARGIN REPORTS ................................ 516
14.25 SALES REPORT .......................................................................... 518
14.26 PRINT DELETED ORDERS ........................................................... 521
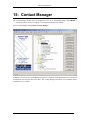
15: CONTACT MANAGER.................................................................. 522
15.1 ENTER/VIEW PROSPECT ............................................................ 523
15.2
15.3
15.4
15.5
15.6
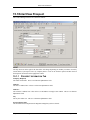
15.1.1 Prospect Information Tab .....................................................................523
15.1.2 Phone Numbers/Internet Addresses .....................................................524
15.1.3 Misc. Information ..................................................................................525
15.1.4 Set Appointment ...................................................................................527
15.1.5 Set Task ...............................................................................................528
15.1.6 Prospect Contact Tab ...........................................................................530
15.1.7 Contact Notes.......................................................................................531
15.1.8 Quotes Tab...........................................................................................532
15.1.9 Sales History Button .............................................................................533
15.1.10 Entering A New Prospect ................................................................534
15.1.11 Changing Contacts..........................................................................535
15.1.12 Deleting a Contact...........................................................................535
15.1.13 Merge With Word Template.............................................................536
15.1.14 Export Contacts To Outlook ............................................................536
ENTER/EDIT QUOTES ................................................................. 537
15.2.1 Quote Information .................................................................................537
15.2.2 Quote Details.......................................................................................539
15.2.3 Ship to Info ...........................................................................................540
15.2.4 Totals Section.......................................................................................541
15.2.5 Show Sales Orders...............................................................................542
15.2.6 More About Inventory Button ................................................................542
15.2.7 Save/Print.............................................................................................543
15.2.8 Move Quote to Sales Order ..................................................................544
15.2.9 Copy Quote to Another Contact............................................................544
15.2.10 Select all and Unselect All ...............................................................545
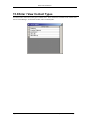
ENTER / VIEW CONTACT TYPES .................................................. 546
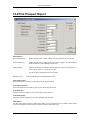
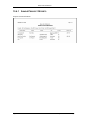
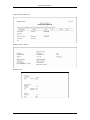
PRINT PROSPECT REPORT ......................................................... 547
15.4.1 Sample Prospect Reports .....................................................................548
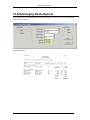
OUTSTANGING QUOTE REPORTS ................................................ 550
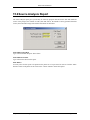
SOURCE ANALYSIS REPORT ....................................................... 551
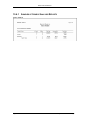
15.6.1 Samples of Source Analysis Reports....................................................552
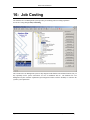
16: JOB COSTING .............................................................................. 554
16.1 SET-UP NOTES .......................................................................... 555
16.2 MAINTAIN JOB COST DEFAULTS .................................................. 556
16.3 ENTER/CHANGE JOB INFORMATION............................................. 557
16.4
16.5
16.6
16.7
16.8
16.9
16.3.1 Project Description Tab ........................................................................558
16.3.2 More Information Tab ...........................................................................559
16.3.3 Enter Estimates ....................................................................................560
ENTER JOB TRANSACTIONS ........................................................ 564
ENTER/CHANGE TIME CARD INFORMATION .................................. 567
POST TIME CARDS ..................................................................... 571
CLOSE JOB ................................................................................ 573
PRINT JOB INFORMATION REPORTS ............................................ 574
TIME CARD REPORTS ................................................................. 580
17: ELITE FEATURES ........................................................................ 583
17.1 MAINTAIN CONTRACT PRICING? ................................................ 585
17.2 RMA (RETURNED MERCHANDISE AUTHORIZATION) ? ................. 586
17.3
17.2.1 Define Reason Codes...........................................................................586
17.2.2 Set Restocking Charges & RMA Write-Off G/L Codes..........................586
17.2.3 Sequence of Events .............................................................................586
17.2.4 Field Descriptions .................................................................................587
17.2.5 RMA Reports ........................................................................................591
LANDED COST TRACKING ? ....................................................... 592
Table of Contents
TOC 7
Blue Link Solutions™
17.4
17.5
17.6
17.7
17.8
17.3.1 Setting Up Landed Cost Factors ...........................................................592
17.3.2 Inventory Item Overrides ......................................................................593
17.3.3 Setting Up Landed Costs For A Purchase Order ..................................593
17.3.4 Posting Landed Costs...........................................................................594
17.3.5 Reporting On Accrued Landed Costs ...................................................594
17.3.6 Landed Cost Accruals Change Vendor .................................................595
17.3.7 Reporting on Landed Cost Variances ...................................................596
17.3.8 Applying Landed Cost Accruals Against Vendor Invoices .....................597
FREIGHT MANAGEMENT ? ......................................................... 601
17.4.1 Set-up and Preparation.........................................................................601
17.4.2 Inventory Information ............................................................................602
17.4.3 Calculating Freight Charges on Sales Orders .......................................602
17.4.4 Tracking Shipping Details .....................................................................604
THE CONFIGURATOR ? ............................................................. 605
17.5.1 Inventory Categories.............................................................................607
17.5.2 Define Inventory Items to Categories....................................................607
17.5.3 Using the Configurator..........................................................................608
FILL BACKORDERS ? ................................................................. 610
CONTRACT PRICING ? .............................................................. 611
17.7.1 Setting up Contracts .............................................................................612
17.7.2 Editing and Deleting Contracts .............................................................613
17.7.3 Assigning Contracts To Customers.......................................................613
FIFO COSTING? ...................................................................... 614
18: EMPLOYEE & SALESPERSON ................................................... 615
18.1 ENTER / SETUP EMPLOYEES ....................................................... 616
18.2
18.3
18.4
18.5
18.1.1 Employee Information...........................................................................616
18.1.2 Payroll Info / Employment Review ........................................................617
ENTER/SETUP SALESPERSONS ................................................... 618
18.2.1 Setting up a Salesperson......................................................................620
PAYMATE PAYROLL IMPORT ........................................................ 621
PAYMATE – JOB COST EXPORT .................................................. 623
PRINT COMMISSION REPORT ...................................................... 624
19: INDEX............................................................................................ 629
TOC 8
Table of Contents
Blue Link Solutions™
TOC 10
Table of Contents
Blue Link Solutions™
1: Introduction
Congratulations on your purchase of Blue Link Solutions. Blue Link Solutions is easy to use business
management software. The documentation provided in this manual, and in the on-line help screens, is
presented in the format of a reference guide. Users seeking training on accounting and procedural issues
should contact their dealers for information specific to your particular situation.
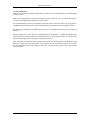
1.1.1.1 Registering Software
A unique code number protects our software. This number is based on a combination of your company
name as entered into Blue Link Solutions, your serial number (as assigned by Blue Link), and the version
of Blue Link Solutions which you have loaded. In order to use Blue Link Solutions with your own
company name, you need to register the software.
WARNING:
Do not change the company name until you have obtained an unlock code
from Blue Link Associates at (905) 660-0599 OR 1-877-BLU-LINK (258-5465).
Use the instructions in the installation chapter of this manual to install the software onto your computer.
1.1.1.2 Username and Password for Sample Data File
A sample company data file, “Blue Link Giftware Inc.” has been provided as an example for you to
experiment with. The product is fully functional with one exception – you cannot change the company
name. If you do, Solutions will assume that you are ready to proceed with the registration procedure, and
you’ll be required to enter a new registration code. If you haven’t already obtained the code, you’ll be
locked out of Solutions.
The username and password for the sample data file are:
Username: Admin
Password: Admin
1.1.1.3 Obtaining an Unlock Code for Your Company Name
As mentioned previously, you cannot change the company name of the sample data file until you’ve called
to obtain a registration number.
When you call, please be sure that you have the following information available:
?
The version of Blue Link Solutions that you are using.
?
The serial number located on the back cover of this manual.
?
The exact spelling of your company name including any short forms, periods and commas.
You may call the following telephone number in order to register your Blue Link Solutions package:
(905) 660-0599 OR 1-877-BLU-LINK (258-5465)
Chapter 1 – Introduction
Page 11
Blue Link Solutions™
1.1.1.4 Trademarks
Microsoft Windows™, Access™, Microsoft Office™, Microsoft Windows™, Microsoft Windows NT™,
Microsoft Windows 2000™, and Microsoft Windows XP™ are trademarks of Microsoft Inc.
1.1.1.5 Disclaimer
This Blue Link Solutions user guide is printed in Canada. We believe that the information contained in the
manual is correct. However, we do not assume responsibility for the accuracy of the content of this manual
nor for any patent infringements or other rights to third parties who may use the manual or the software
herein. We reserve the right to revise, update or change either the product or the manual without a direct or
inferred obligation to notify any person of such revisions, updates, or changes.
1.1.1.6 Software Copyright Notice
This product is licensed only and is not sold. It remains the property of Blue Link Associates Limited. This
package contains a written limited warranty and a sealed CD-ROM jewel case. If you cannot agree to these
terms, return the product to the point of purchase within three days for full refund, provided all items are
returned in the new condition and provided the jewel case is still sealed. Unauthorised use of the software
related materials could result in civil damages and criminal penalties.
Page 12
Chapter 1 – Introduction
Blue Link Solutions™
2: Installation
Your Blue Link Solutions package should include, as a minimum, the following:
1.
This user guide.
2.
Blue Link Solutions CD-ROM.
3.
Software license agreement.
If any of the above items are missing, please contact your dealer immediately.
Chapter 2 – Installation
Page 13
Blue Link Solutions™
2.1 Installation Procedures
For more information on installation procedures see the Blue Link Solutions SQL reference guide. Ask your
Blue Link contact for this document.
Page 14
Chapter 2 – Installation
Blue Link Solutions™
2.2 System Requirements
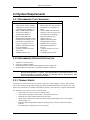
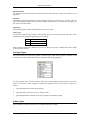
2.2.1 RECOMMENDED CLIENT HARDWARE:
Client / Server Configuration
? A personal computer with a
Pentium™ III, Celeron 300Mhz,
AMD Duron (or better) processor.
? A minimum of 64 megabytes of
RAM, 128MB Recommended.
? At least 100 megabytes of
available hard disk space.
? Microsoft Windows 98™,
Windows ME™, Windows NT™,
or Windows 2000/XP™ (for best
performance and reliability we
strongly encourage the use of
Windows 2000/XP Professional
for all workstations).
? A display resolution of at least
800 by 600.
? 100Mbit Network Card.
Terminal Server Clients
? A personal computer with a
Pentium™ II (or better) processor.
? A minimum of 32 megabytes of
RAM
? At least 10MB of available hard
disk space (Note, more space may
be required for local printing.)
? Microsoft Windows 98™,
Windows NT™, or
Windows 2000/XP (clients
running Windows 2000 or
Windows XP do not require
additional Terminal Server
licenses).
? A display resolution of at least
800 by 600.
? 10/100Mbit Network Card.
2.2.2 RECOMMENDED NETWORK SPECIFICATION
1.
2.
3.
4.
100base-T switched network
Category 5 cabling (Certified)
Name Brand Network cards (3COM 100BaseTX, Intel 100 Base TX)
Dedicated Windows 2000 Server or Windows 2000/XP workstation
Note:
To take full advantage of Blue Link Solutions integration with Microsoft Outlook public folders a
Microsoft Exchange Server is required. Microsoft BackOffice™ Small Business Server is an
affordable alternative that includes Windows NT, Exchange Server™, Proxy Server™, SQL
Server™, Web Publishing, Network Fax and More.
2.2.3 TERMINAL SERVER
Terminal Server allows remote users to connect to and open “virtual computer” sessions. The Terminal
Server takes on all processing tasks, sending only display and input information across the network. This
allows many remote users to run Blue Link Solutions remotely, at the same time, using the same hardware.
Use Terminal Server to do one or more of the following:
? Grant remote users access to your accounting system
? Allow remote salespeople to enter orders, view customer status, etc.
? Extend the life of the computer hardware in your office
? Allow remote warehouses to check on inventory status, pick and ship orders, receive against
purchase orders, etc.
? Eliminate modem long distance charges by allowing users to connect to their local Internet
provider.
? Do anything they could do if they were at the office
Chapter 2 – Installation
Page 15
Blue Link Solutions™
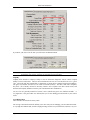
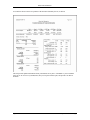
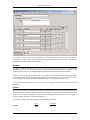
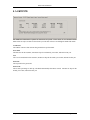
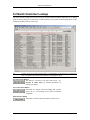
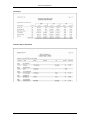
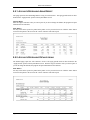
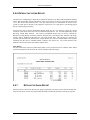
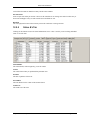
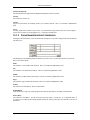
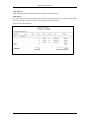
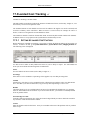
At this writing, the following Terminal Server products were available. Highlighted are some of the “extra”
features that may be convenient to have.
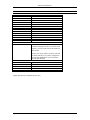
Product
Microsoft Windows
2000 Server and
Advanced Server
Citrix Extensions for
Windows 2000
Supports
Local
Printing
Supports
Clipboard
Transfers
Supports
Session
Monitoring
X*
X
X
X*
X
X
Supports
Multiple
Protocols
X
*Note: in some cases, it may be beneficial to configure local printers as TCP/IP printers on the server, rather than have them be autoconfigured by the Terminal Server client. The guide to configuring Blue Link Solutions in a Terminal Server environment details the
steps required to enable automatic mapping of remote printers. (http://www.bluelink.ca/downloads/2002-04-09TerminalServerInstructions.pdf -- Please note, this document is updated frequently, please check the support section of our site for the
latest version of this document.)
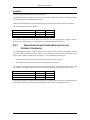
2.2.4 CONFIGURING BLUE LINK SOLUTIONS FOR USE IN A TERMINAL
SERVER ENVIRONMENT
Do the following to configure Blue Link Solutions on a Terminal Server:
? Download the Terminal Server configuration guide from the following URL:
o http://www.bluelink.ca/downloads/2002-04-09-TerminalServerInstructions.pdf (Please
note, this document is updated frequently, please check the support section of our site for
the latest version of this document.)
? Follow the steps in this guide.
o The guide contains all of the technical information required to configure your terminal
server.
Page 16
Chapter 2 – Installation
Blue Link Solutions™
2.3 Using Blue Link Solutions
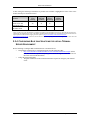
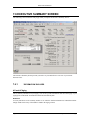
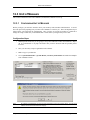
2.3.1 STARTING BLUE LINK SOLUTIONS
1.
From your Windows Desktop, choose the icon for Blue Link Solutions and either double click it or
press the <Enter> key to execute the program
or
Choose Start | Programs | Blue Link Solutions Elite
then click “Elite” for Solutions Elite, or “Professional” for Professional
2.
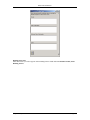
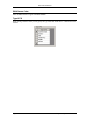
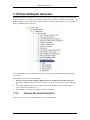
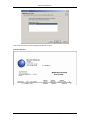
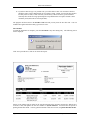
The program will display the Blue Link Solutions Explorer Menu:
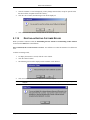
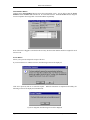
3.
The security system will require you to log on as soon as you start up Blue Link Solutions, before you
can access the Explorer Menu. Type in the User ID and Password assigned to you.
Note:
If you are connected to the wrong data file, you may be denied access. To connect to the correct
data file, click the “choose company” button as described below.
Chapter 2 – Installation
Page 17
Blue Link Solutions™
The default User ID is “Admin” and the password is “Admin”
4.
Click the “Log On” button
5.
Once you have successfully logged on as a specific user, you may navigate the menu structure
depending on the permissions assigned to your User ID. (See Chapter 3 – Security for more details
on User ID’s and permissions).
6.
Once the Explorer Menu is displayed, you are ready to access the various program modules of Blue
Link Solutions.
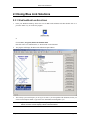
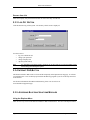
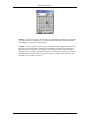
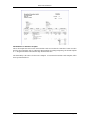
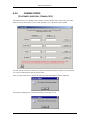
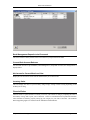
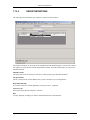
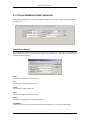
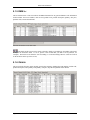
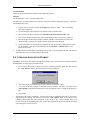
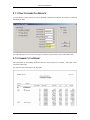
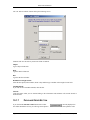
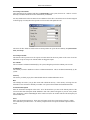
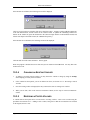
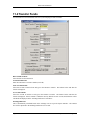
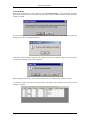
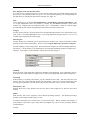
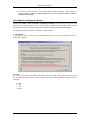
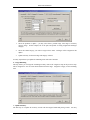
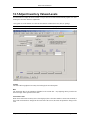
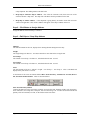
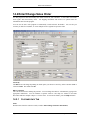
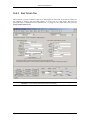
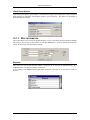
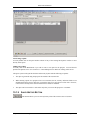
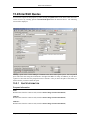
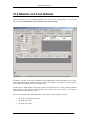
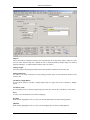
2.3.2 CHOOSE COMPANY BUTTON
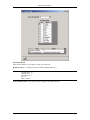
Blue Link Solutions allows you to work with many company files. This functionality allows you to switch
between live and playground data files, or manage the books of more than one company.
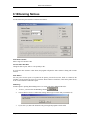
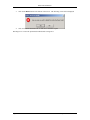
To add additional data files to the menu, you may click the “choose company” button to display the
following screen:
Page 18
Chapter 2 – Installation
Blue Link Solutions™
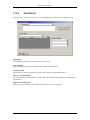
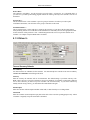
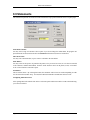
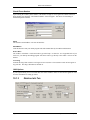
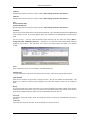
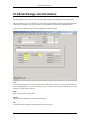
Use
To switch to a different company file, select the file from the list then click the use button. Solutions will
take a minute or two to establish the connection to the new data file.
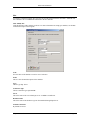
Add / Modify List
Click this button to add a company to the list. For more information on setting up a database, see the Blue
Link Solutions SQL reference guide.
Code
Give the name of the database a code for ease of reference.
Name
This is a more detailed description of the database.
Type
Choose type SQL Server
Connection Type
Choose connection type SQLOLEDB.
Server
This is the name of the server that SQL server or MSDE is installed on.
Database Name
This is the name of the database as given when attached through SQL Server.
Trusted Connection
By default select true.
Chapter 2 – Installation
Page 19
Blue Link Solutions™
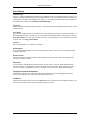
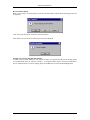
Remove from List
Select the company entry then click this button to remove the entry from the list.
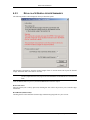
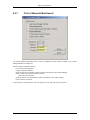
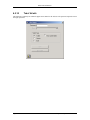
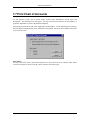
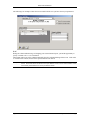
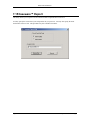
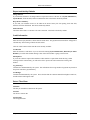
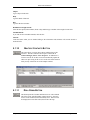
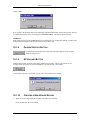
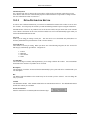
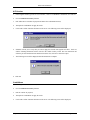
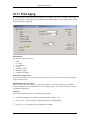
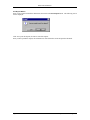
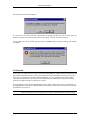
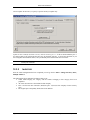
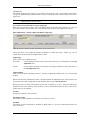
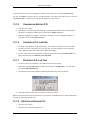
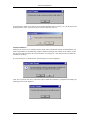
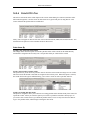
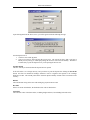
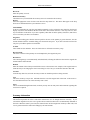
2.3.3 LOG OFF BUTTON
Click this button to log off the system. The Security Check screen is displayed:
Use this screen to:
? log on as a different user
? change your password
? change company files
? quit the system entirely
Note:
It is important to log off the system. Failure to do so may result in an incorrect number of user
licenses being consumed by the system.
2.3.4 INTERNET FAQ BUTTON
This button will link to Blue Link’s web site and the Frequently Asked Questions (FAQ) page. It will start
your Web Browser if it is not already open and start the Dial-Up program if you are not already connected
to the Internet.
For the latest information about Blue Link Solutions, please visit our web site at
www.bluelink.ca/support/faq.asp.
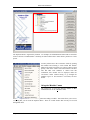
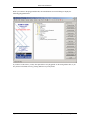
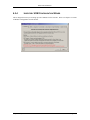
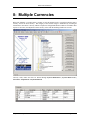
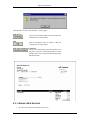
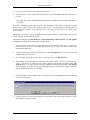
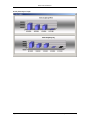
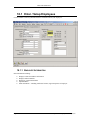
2.3.5 ACCESSING BLUE LINK SOLUTIONS MODULES
Using the Explorer Menu
There are two ways to access the different modules in Blue Link Solutions. The first is the Explorer Menu.
Page 20
Chapter 2 – Installation
Blue Link Solutions™
The Explorer Menu is organized by function. For example, the Administration button leads to items that
relate to all facets of administration. Similarly, the Sales button leads to items that are pertinent to a sales
person.
You may add screens to the “Favourites” folder by opening
that module and selecting a screen within that module.
While in the actual screen that you want to return to again
quickly, click on the “Heart” tool on the menu bar. The next
time that Blue Link Solutions is started from this
workstation, that module will be displayed under the
“Favourites” folder without having to go through the
modules to get to it. See Section 2.6 - Favourites, for more
details.
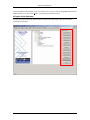
Using the “Modules” menu
The second way to access the different modules in Blue
Link Solutions is via the “Modules” menu.
The Modules pull-down menu structure is organized according to module. This menu allows you to access
everything that you can from the Explorer Menu. There are certain features that can only be accessed
through this menu.
Chapter 2 – Installation
Page 21
Blue Link Solutions™
To exit from Blue Link Solutions, or log on as another user, you may select the “Log Off” button from the
Explorer Menu, or you may select Security, Log Off from the pull-down menus.
Using the Quick Shortcuts
You may also click on the Quick Shortcuts on the far right of the main menu. These are a list of the
commonly used modules.
Page 22
Chapter 2 – Installation
Blue Link Solutions™
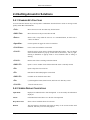
2.4 Getting Around in Solutions
2.4.1 STANDARD KEY FUNCTIONS
You will find the function keys and keystroke combinations described below useful in moving around
quickly within Blue Link Solutions.
<Tab>
Moves the cursor to the next data entry field or button
<Shift+Tab>
Moves the cursor to the previous tab item field
<Enter>
Same as Tab, except when the cursor is on a command button, in which case it
“clicks” the button
<SpaceBar>
Use the spacebar to toggle the value of a checkbox.
<Ctrl+Enter>
Forces a new line within the current field.
<Ctrl+F>
Opens the “Find” screen (same as clicking the binoculars button). Tip: Use instead
of the binoculars button on “pop-up” screens such as sales history. Also, try rightclicking in datasheets on pop-up forms to access functions such as sorting or
filtering.
<Ctrl+S>
Has the same effect as clicking on the Save button
<Shift+F2>
Opens a “zoom” window for the field in which the cursor is currently located
<F4>
Opens a drop down list or list box.
<F9>
Refreshes the data underlying the current field.
<Shift+F9>
Use Shift+F9 to refresh the entire form.
<F6>
Cycle through the header, detail section, and footer of a data entry screen.
<Ctrl+F4>
Close the current screen.
2.4.2 SCREEN DISPLAY CONVENTIONS
Input fields
Displayed as indented with a white background. You can modify the information
displayed.
Labels
Field identifiers located above or to the left of an input field.
Drop Down Lists
Shows a list of available choices for selection.
Buttons
The four buttons at the bottom left appear on many of the screens in Blue Link
Solutions, and always serve the same purpose.
Chapter 2 – Installation
Page 23
Blue Link Solutions™
Exit - closes the current screen
Save - saves any changes you have made on the current screen
Delete - permanently deletes the record currently displayed on screen
New - clears the screen to facilitate entry of a new record
2.4.3 PRINTING REPORTS
All Blue Link Solutions reports have been designed to fit on letter-sized (8½ x 11 inch) paper in either
portrait or landscape mode.
All reports can be previewed on screen, or printed directly to a printer. If previewing to screen, you can use
the buttons on the toolbar to print the report, close the current screen and perform other document-related
activities.
For best results, we recommend printing most reports to a laser printer.
Page 24
Chapter 2 – Installation
Blue Link Solutions™
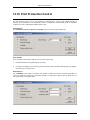
2.4.4 PRINTING TO A SPECIFIC PRINTER
To print all reports to a specific printer, change your Windows Default Printer.
To print a particular report to a particular printer without changing your system default:
? print preview the report to screen
? press CTRL+P
? select the printer you want
? press print
Chapter 2 – Installation
Page 25
Blue Link Solutions™
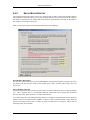
2.5 Maintaining your Blue Link Solutions System
See more information on maintaining your database in the Blue Link Solutions SQL reference guide.
Page 26
Chapter 2 – Installation
Blue Link Solutions™
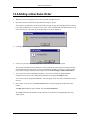
2.6 Favourites
You can add screens that you access frequently to the “Favourites” folder on the main Blue Link Solutions
screen so that you can access them quickly.
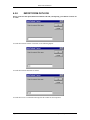
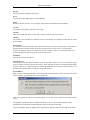
2.6.1 ADD SCREENS TO FAVOURITES FOLDER
Follow these steps to add screens to or remove screens from the Favourites folder.
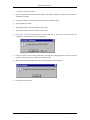
1.
Open the screen you wish to add to Favourites.
Click the “Heart” tool on the toolbar. The following message will
be displayed.
Click Yes to add the screen to Favourites; click No to cancel the request.
Chapter 2 – Installation
Page 27
Blue Link Solutions™
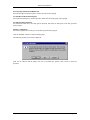
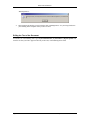
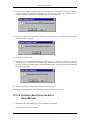
2.
The following screen will advise you that the Favourites folder will be updated next time you start Blue
Link Solutions.
Note:
Your list of favourites is stored in the application file on your machine. When new updates are
delivered, these favourites will be over-written with those from the new file.
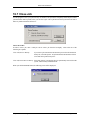
2.6.2 REMOVE SCREENS FROM FAVOURITES FOLDER
3.
Open the screens you wish to remove from Favourites.
4.
Click on the “Heart” tool on the toolbar. The following
displayed.
5.
Click Yes to remove the screens from Favourites; click No to cancel the request.
6.
The next screen will advise you that the Favourites folder will be updated next time you start Blue Link
Solutions.
Page 28
message will be
Chapter 2 – Installation
Blue Link Solutions™
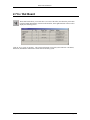
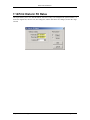
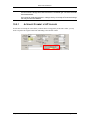
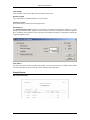
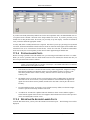
2.7 In / Out Board
The In/Out board allows you to track who is in or out of the office, and when they will return.
Click the In/Out Board button, located on the menu bar, at the right hand side of the screen to
display the following screen:
Click on “In” or “Out” as necessary. The system will prompt you to enter your return time. The Name,
Extension, and Mailbox information is taken from the Security system.
Chapter 2 – Installation
Page 29
Blue Link Solutions™
Page 30
Chapter 2 – Installation
Blue Link Solutions™
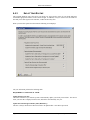
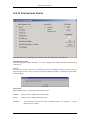
3: Security
The log on security feature of Blue Link Solutions provides a method of restricting access to the various
modules based on a User ID and/or user group.
Upon starting Blue Link Solutions, the user will be prompted to enter a User ID and a password. After
entering a valid User ID and password, the user will be able to see all items in the modules menu and the
tree control, but will be denied access as appropriate when they try to use restricted features.
These restrictions are based on the user permissions described in this chapter.
Chapter 3 – Security
Page 31
Blue Link Solutions™
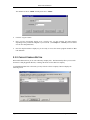
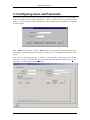
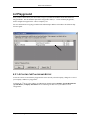
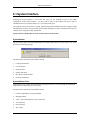
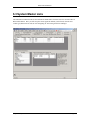
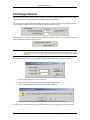
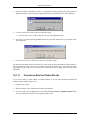
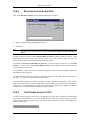
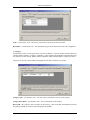
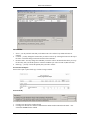
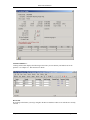
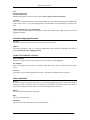
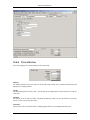
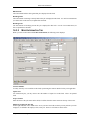
3.1 Configuring Users and Passwords
In order to be able to define User ID’s and passwords, and their associated permissions, you need to log on
to Blue Link Solutions as the “System Administrator”. This is a special user who has permissions, at least
initially, to all the functions of Blue Link Solutions. When starting Blue Link Solutions, the following
screen will display:
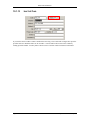
Enter “Admin” as the User ID, and enter “Admin” again as the password. Note that when you type the
password, the actual letters typed will not display, but instead a series of asterisks will represent the letters
entered.
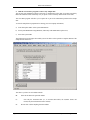
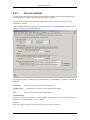
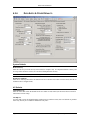
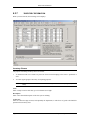
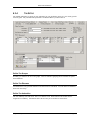
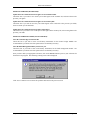
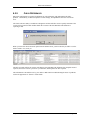
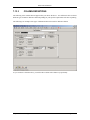
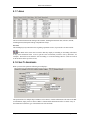
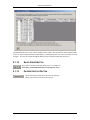
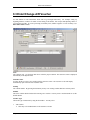
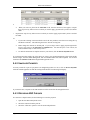
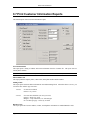
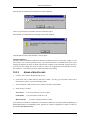
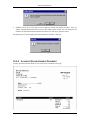
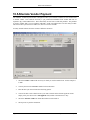
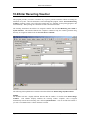
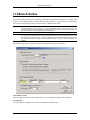
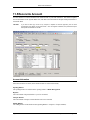
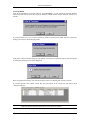
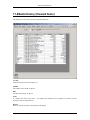
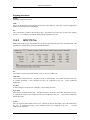
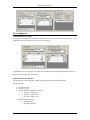
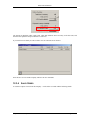
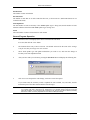
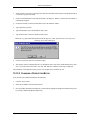
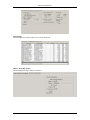
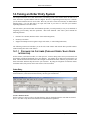
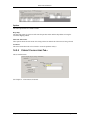
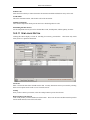
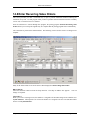
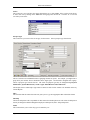
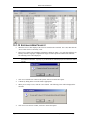
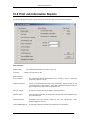
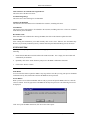
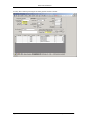
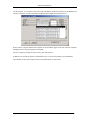
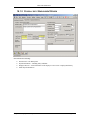
Once you have successfully logged on as Admin, you may proceed to define users and set up their
permissions. In order to do this, select Security from the pull-down menu bar, and then select Users &
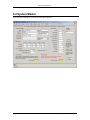
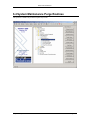
Permissions. The following screen will be displayed:
Page 32
Chapter 3 – Security
Blue Link Solutions™
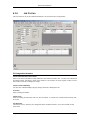
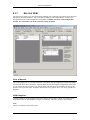
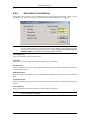
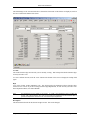
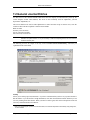
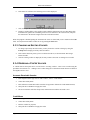
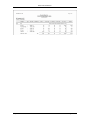
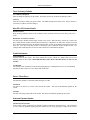
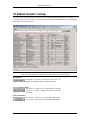
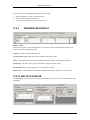
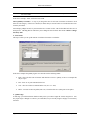
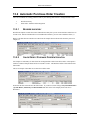
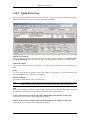
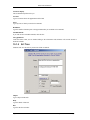
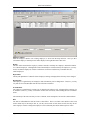
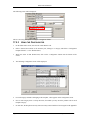
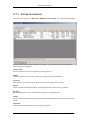
The top half of the Users tab allows you to create new users, edit existing user information, or delete users.
The bottom section of the User tab allows you to define permissions for the User ID currently displayed
being modified.
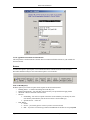
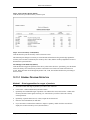
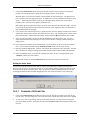
3.1.1
ADDING A USER
To add a user, enter a new User ID and press Enter. A message will prompt you to confirm that you wish to
add a new user; click on Yes. In the next field, assign the user a password. The password may not exceed
ten characters in length, and may be a combination of letters and numbers. You will then be required to
move to the next field and confirm the password by retyping it. If the confirmation password is not the
same as the password originally entered an error message will display and you will have to retry.
Once you have successfully entered a new User ID, entered and confirmed the password, your new user will
be saved. You may then proceed to define the permissions for that user. (See section 3.2).
3.1.2
EDITING AN EXISTING USER’S INFORMATION
To change a user’s password or permissions, select their User ID by entering it in the User ID box, or by
choosing it from the dropdown list. The user’s information may now be freely edited.
Note:
If you change a user’s password, the change will be saved (after prompting for confirmation) as
soon as you move the cursor into the permissions section of the screen.
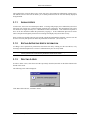
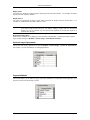
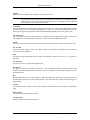
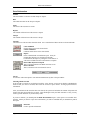
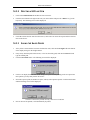
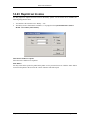
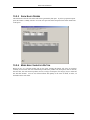
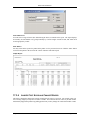
3.1.3
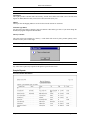
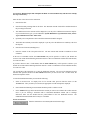
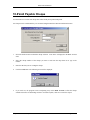
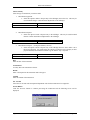
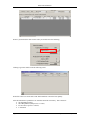
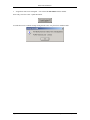
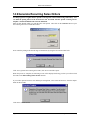
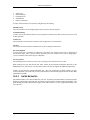
DELETING A USER
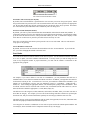
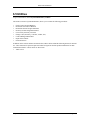
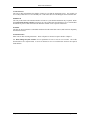
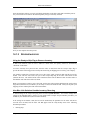
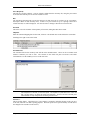
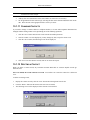
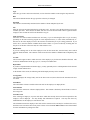
In order to delete a user, select their User ID as previously described, and click on the delete button at the
bottom of the screen.
The following screen will be displayed:
Click Yes to delete the user, click No to cancel.
Chapter 3 – Security
Page 33
Blue Link Solutions™
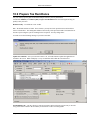
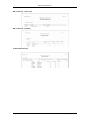
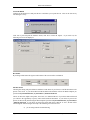
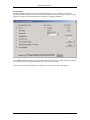
3.2 Setting Permissions
There are two ways to set user permissions in Blue Link Solutions: (1) Individual User Permissions and
(2) Group Permissions. A user assigned to a particular group inherits the permissions of that group
regardless of what the individual security preferences are.
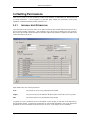
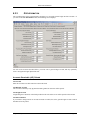
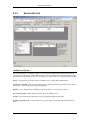
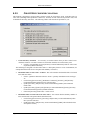
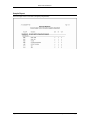
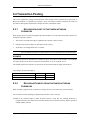
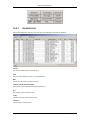
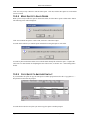
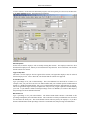
3.2.1
INDIVIDUAL USER PERMISSIONS
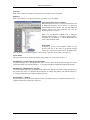
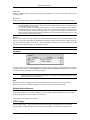
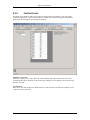
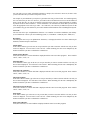
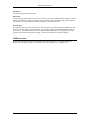
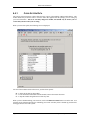
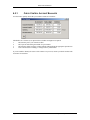
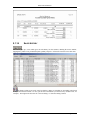
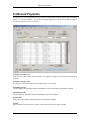
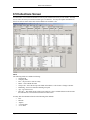
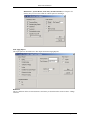
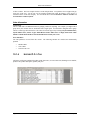
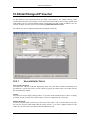
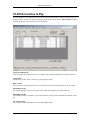
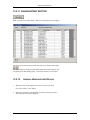
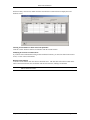
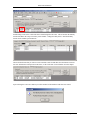
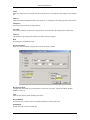
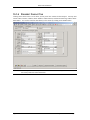
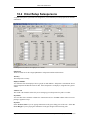
The bottom half of the User tab is used to set or define permissions (the modules and functions the user may
access) for the currently selected user. After recalling a user to the screen (or adding a new user) in the top
half, each of the currently defined modules or functions in Blue Link Solutions is displayed in tabular form
in the bottom half of the screen.
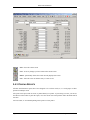
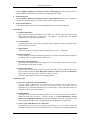
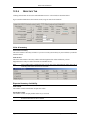
Each module offers one of three permissions:
None
The user has no access to any functions in this module
Inquiry
The user can only use the functions that Print reports to either the screen or a printer
Full
The user has full access to all functions in this module
To quickly set a user’s permission level on all modules to None, Inquiry or Full click on the button above
the appropriate column. To change the permissions for each module individually, click on the appropriate
permission level for each module for the current user on screen. Your changes are saved instantly.
Page 34
Chapter 3 – Security
Blue Link Solutions™
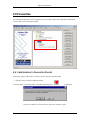
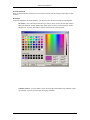
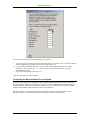
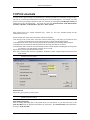
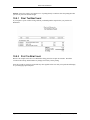
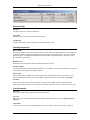
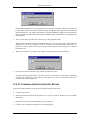
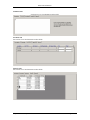
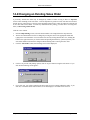
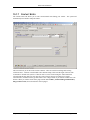
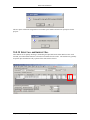
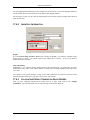
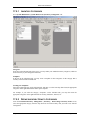
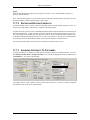
3.2.1.1
Form Level Security
While setting up security for each user you may also wish to limit their access to certain forms within a
module. For example, you may wish for an employee to have access to Accounts Payable but not to be able
to print cheques. You would then give full access to Accounts Payable, but then give no access to Print
Cheques.
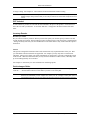
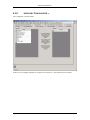
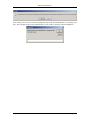
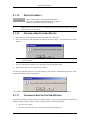
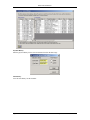
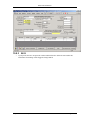
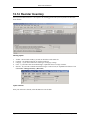
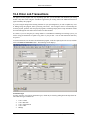
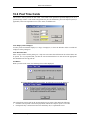
Double Click on the module on the Security Administration form (in this example Accounts Payable) to
access form and sub-form security levels. From the pick list, select which forms are applicable. In this
example, AP Pick to Pay is selected.
Note:
If no sub-forms are selected, then it is assumed that the user has full permissions to a module. Therefore
you do not need to add every sub-form to grant full permission to a module.
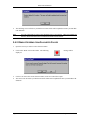
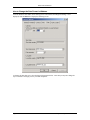
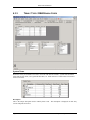
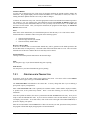
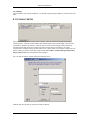
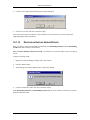
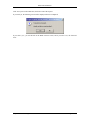
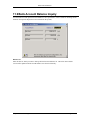
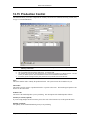
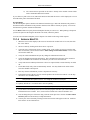
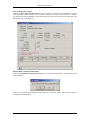
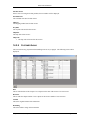
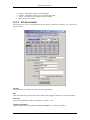
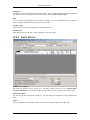
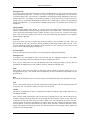
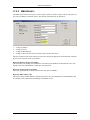
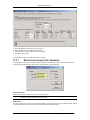
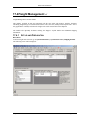
3.2.2
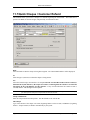
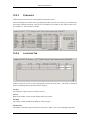
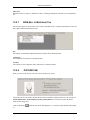
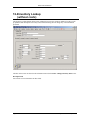
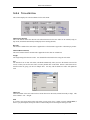
SETTING GROUP PERMISSIONS
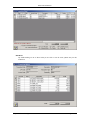
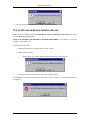
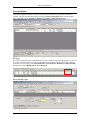
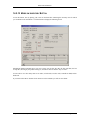
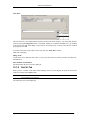
The Groups tab allows you to quickly set up more than one user with the same set of permissions. This is
useful, for example, if several users perform the same duties and needed access to the same functions.
Chapter 3 – Security
Page 35
Blue Link Solutions™
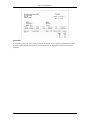
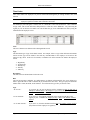
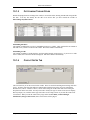
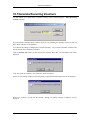
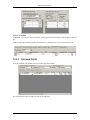
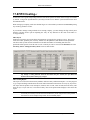
The “Group Name” section lists groups that have been set up. To create a new group, enter its name in the
next empty field.
The “Users In” section lists users that have been assigned to the group selected in the “Group Name”
section. To add a user to the group, select them from the drop down list on the next empty line. Note:
User ID’s must have already been created before they can be assigned to a group.
To set the permission levels for the group follow the same procedures as outlined in Section 3.2.1. Setting
permissions on this screen will update all users assigned to that group. Form and sub-form security can be
set up for group permissions as well.
NOTE:
Page 36
Group permissions override individual user permissions. For example, if you create a group
called “Administrators” and assign full security privileges to that group, any users who is defined
as a member of that group will also receive full security privileges (regardless of whether their
individual permissions grant or deny access to any particular module).
Chapter 3 – Security
Blue Link Solutions™
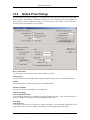
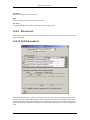
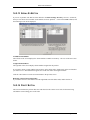
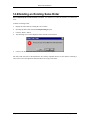
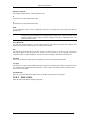
3.3 Logging On To The System
After you have defined users and passwords, any user may log on to Blue Link Solutions using the
appropriate User ID and password.
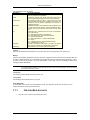
Enter the appropriate User ID and password and press the “Log On” button.
Note:
When the password is typed in the actual letters typed do not display, but instead a series of
asterisks display. This is done in order to maintain the confidentiality of a password.
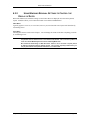
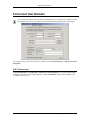
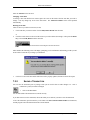
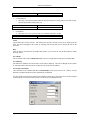
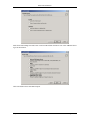
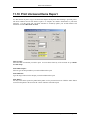
3.3.1
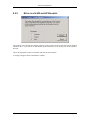
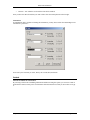
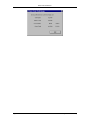
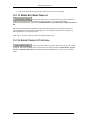
CHANGING PASSWORDS
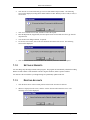
To change the password, enter a valid User ID and the current password. Then click on the Change
Password button.
New Password
Type the new password in this field.
Verify Password
Type the new password again. The second time is in order to ensure that you did not make a typing error
when entering the password the first time.
Click the “Log On” button to continue logging on. The next time you log on, you will use the new
password.
Chapter 3 – Security
Page 37
Blue Link Solutions™
Page 38
Chapter 3 – Security
Blue Link Solutions™
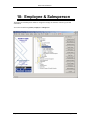
4: Getting Started
Implementing Blue Link Solutions
Blue Link Solutions is an integrated accounting and business management system. As such, many things
must be taken into account to ensure the successful operation of the software. For the best results, we
highly recommend securing the services of a Blue Link dealer to perform the data imports and to guide you
through the process of configuring Blue Link Solutions.
The information presented in this chapter can help you organize your information to ensure a successful
implementation and transition to the new system.
Before You Configure Blue Link Solutions
As you progress through the items in this chapter, you will learn about Blue Link Solutions, and the
information required for the transition. You will be responsible for collecting the information required for the
transition, and for making decisions that will impact on company operations, policies and procedures.
We have included sample data for a hypothetical company to show you one way to set up company data. This
data, along with the program summaries found in this manual, can help you learn how Blue Link Solutions
operates and decide how you would like it to work for you.
The suggested sequence in this chapter can be broken into three general phases:
1.
2.
3.
Preparing for setup: Planning and accumulating your data.
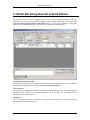
Entering initial information: Establishing system defaults, entering summary and detailed
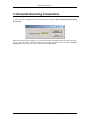
information as of your start-up date (for example, end of month, quarter, or year)
Updating information with recent/ongoing transactions since the startup date.
Chapter 4 – Getting Started
Page 39
Blue Link Solutions™
4.1 Preparing to use Blue Link Solutions in your
Business
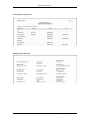
The setup procedure listed below is comprehensive; guidance is provided for every module included within
Blue Link Solutions. Depending on your requirements, you might not need to follow the detail of every one of
these steps.
Blue Link Solutions lets you start with a subset of its functionality and, as your requirements change, you can
take advantage of other features of the system. For example, you could use Blue Link Solutions just to create
and track General Journal entries without taking advantage of the rest of the modules. Some businesses might
use just the Accounts Receivable module and create vouchers without going into the more formal procedure of
using invoices or using the Accounts Payable portion of Blue Link Solutions.
If you are starting with a subset of Blue Link Solutions and later you want to use another function (such as
adding inventory control), return to the start-up procedure discussed here for a general perspective on the
interrelationship of these modules to your existing system.
4.1.1 PLANNING AND ACCUMULATING YOUR DATA
Before you set up your new accounting system, there are several steps we recommend in order to make your
implementation of Blue Link Solutions as smooth as possible.
1. Explore Blue Link Solutions features using the sample company data.
Go into Blue Link Solutions and familiarise yourself with the menus and various entry screens. In
particular, you should look at the way the sample data has been set up. Look at Section 2.5 - Getting
Around in Solutions to learn how to make use of the function keys to view sample data. The sample
company includes customers, vendors, employees, bank accounts, inventory, and several open
transactions. Use this sample as a basis for comparison to help you decide how to set up your own system.
2. Close the accounting records in your previous system.
Whether you have been using a manual system or another computer system, you should have an
up-to-date summary of your financial records before you set up Blue Link Solutions. You will need to
have the following items ready at various stages of this checklist:
a)
b)
c)
d)
e)
f)
A copy of your current Chart of Accounts
Year-to-date balances for all General Ledger Accounts as of the closing period date.
A detailed address list of all customer, vendors & prospects
Outstanding invoices and credits for all Accounts Receivable customers and Accounts Payable
vendors.
Your chequing account balance(s) as of the transition date (including all outstanding cheques and
deposits).
Your inventory on-hand quantities for each of your products.
Where possible, you should only bring forward outstanding transactions and summary data from your
previous system. Do not expect Blue Link Solutions to manage extended financial histories created and
reconciled using another method.
Any recent transactions that not reflected in the “moment in time” summary data will be entered as “live”
data as the final phase of the setup procedure.
Page 40
Chapter 4 – Getting Started
Blue Link Solutions™
3.
Review the financial statements and chart of accounts provided by Blue Link Solutions with
your accountant.
We suggest that you read through the entire setup procedure and familiarize yourself with the system
before making a decision on how you will use it. The following items, found with the software, will help
you explain your options within the system to your accountant to determine what best meets your needs.
a) The chart of accounts provided by Blue Link Solutions.
Is this chart of accounts adequate for your business? If so, it may be sufficient to make simple adjustments
to this chart of accounts and use it for your business. If not, we recommend entering your chart of
accounts into an Excel spreadsheet to be imported at a later date.
b) The sample Balance Sheet and Income Statement.
These are based on the sample chart of accounts provided by Blue Link Solutions. For example, the
accounts in the sample data that have a '1' as the initial number are all asset accounts, those with '2' as the
initial number are liability accounts, etc. Are the ranges and titles appropriate for the financial
statements you will be producing? If you are creating a custom chart of accounts, be sure to make note
of the account ranges you will be changing when you set up your financial statements.
c)
If you decide to create your own chart of accounts, it is very important to put some thought into its
structure. Each account type should be in its own number group. For example, asset accounts might
be from 1000 to 1999, liabilities from 2000 to 2999, and so on.
d) If you are using your own chart of accounts, be sure to go over the System Interface screen and
identify which account you will use for each account type required by Blue Link Solutions.
4. Prepare your inventory, vendor and customer data.
Make sure you have the required fields for inventory, vendor and customer data. As a quick test, try
manually keying some parts, vendors and customers into the system using the data you currently have as
the source. Do you have enough information to populate the required fields? If not, you may have to
update your raw data before entering it later.
Required Fields
Inventory
? Product Code
? Product Description
? Type (R, N, F, K)
? Class
Customers
? Customer Code
? Customer Name
? Currency
? Terms
? Tax Authority
Vendors
? Vendor Code
? Vendor Description
? Currency
? Terms
? Tax Authority
Note:
You cannot change the currency of a Vendor or Customer once you have saved the record. All
other data can be changed on an ongoing basis by those with sufficient security privileges.
Chapter 4 – Getting Started
Page 41
Blue Link Solutions™
5. Run the “Clear Data” program to remove any sample data.
The previous steps should have helped you decide if a modification of the chart of accounts provided by
Blue Link Solutions will be satisfactory or if you prefer to enter an entirely different chart of accounts.
The Clear Data program will allow you to replace all or part of the information provided in the sample
data.
To clear the sample data in preparation for entering your own company information,
a)
from the Explorer Menu select System Maintenance
b) then System Maintenance Purge Routines (found only in the Main Menu explorer tree)
c)
then Clear System Data
The following screen will appear from which you will be able to select a partial or complete deletion of the
sample data at each choice.
The choices you have for each module include:
D–
C–
N–
Page 42
delete all the data in the specified module
clear only the transaction data (i.e., in Accounts Receivable, the customer details will
remain, only their transactions will be deleted)
Do not clear or delete anything from this module
Chapter 4 – Getting Started
Blue Link Solutions™
Example:
If you have decided to use the existing General Ledger Chart of Accounts as a model for your own
company, you will probably choose “C” to clear only the transaction-related data from the General Ledger
in order to keep the actual list of accounts. For every other module listed on the screen, select “D” to
Delete All in order to eliminate all the sample data.
Then select the Run Clear Data button. The following screen will prompt you to reconsider or check
your selections. Click Yes if you are sure; click No if you want to make any changes or cancel the
procedure.
If you click Yes, then another confirmation screen will appear. Follow the instructions on the screen and
click Cancel if you need to close any windows or log any other user off. Click OK to proceed with the
Clear Data procedure.
After the procedure has run, the following screen will appear with the message “Clearing data as
requested is complete”. Click OK; click the Exit button at the bottom left.
You are now ready to set up your system using the Checklist provided in Section 4.3.
4.1.2 ENTERING INITIAL INFORMATION
These steps do not repeat basic information about each program's operation. As you step through each item,
you should consult the chapter in the manual that summarizes that particular function before proceeding. You
may find it useful to use the checklist in Section 4.3 when performing these steps.
1.
Create / Change G/L Chart of Accounts
Enter your chart of accounts. You should only enter account codes and descriptions at this time. As an
option, you can enter your budget amounts. Do not enter beginning balances; this will be dealt with later.
There is no need to create account headers or footers, only posting detail accounts.
2.
Create G/L Departments (Optional)
If you are going to use department codes, you can set up G/L departments now. You also can set up
departments later if you are not yet sure whether you want to use departments or not. Refer to System
Maintenance and General Ledger.
3.
Print G/L Chart of Accounts
Now that you have set up your chart of accounts, you need to have a printout of this information for future
reference.
4.
Define Employee Information
Chapter 4 – Getting Started
Page 43
Blue Link Solutions™
From the Modules | Employee & Salesperson | Enter / Setup Employees screen, define at least one
employee number and name that can be used later for assigning system defaults.
5.
Setup Sales Persons
From the Modules | Employee & Salesperson | Enter / Setup Salespersons screen, enter a salesperson
code, and select either an employee, or vendor code to associate with this salesperson.
6.
Prepare System Interface
Use the System Interface option from the System Maintenance menu, to define the following:
System Master
a) Company Information
Enter your basic company information, name, address, etc., and the transaction numbers, aging
periods, fiscal year start date, etc. on this screen. (See Chapter 6 – System Interface for a detailed
description of the required and optional fields.)
b) G/L Information
On this System Interface screen, enter the General Ledger integration accounts, which must already
exist in your chart of accounts.
c) Report Options
On this tab you can specify various settings for reports such as invoices
and cheques.
d) Outlook and Word
To take advantage of Microsoft Outlook integration, or to use Microsoft Word document templates
for printing invoices, complete the items on this screen.
e) Data Entry and Other Defaults
Specify data entry defaults (the default settings used in various modules such as order entry), other
system defaults, and the AR & AP notes.
f) Inventory Information
On this screen you must define at least one inventory class that can be associated with inventory
items. You must complete the Code, Description, COGS Acct, Sales Acct, Asset Acct and Report
fields. Failure to do so will result in “invalid use of null” errors later.
Also enter a main warehouse and at least one shipping method.
System Mater Lists
g) Currencies / Departments / Payment Methods
If you are selling or purchasing in any foreign currencies set them up now with the amount of
Canadian Dollars needed to buy one unit of the foreign currency. Also, define any G/L
departments if you intend departmentalizing your General Ledger. Specify the payment terms you
would like to support (Cash, Visa, Debit etc.)
h) Shipping Related
If you plan to use the landed cost tracking (Elite) feature, it is necessary to define the different
landed cost factors that you will use. In order to do this, go to System Maintenance | System
Master Lists | Shipping Information tab and enter in the landed cost factors. You will also setup
various shipping methods as well as configuring rates for Freight Manager (if applicable).
i) Terms / Types / RMA Reason Codes / Other Lists
Enter at least one set of terms (i.e. Net 30 Days, Cash on Delivery, etc.). I f you want to classify your
customers and vendors you can enter the master lists here. If you plan to use the Returned Materials
Page 44
Chapter 4 – Getting Started
Blue Link Solutions™
Authorization (RMA) Elite feature, go to System Maintenance | System Master Lists | Terms /
Types RMA Reason Codes / Other Lists tab and enter “RMA Reason Codes”.
j) Tax Authorities
Define at least one tax authority. For detailed examples, please see your country specific reference
guide (ask your Blue Link representative for more information).
k) Fax Exceptions
If you plan to send faxes directly from within Solutions, you may define the fax exceptions here.
Note: Microsoft Fax is required to use this service.
l) Job Costing
If you plan to use the job costing module, specify the required G/L accounts, define cost codes, and
define time codes.
m) Inventory Multiple UOM
It is recommended to use the Inventory UOM Configuration Wizard found under the Utilities menu
option in setting up Unit of Measure for the first time. Subsequent modifications or additions can be
made on this tab.
n) Inventory Configurator
If you plan to use the configurator, specify which sub-categories are related to which master
categories. (Select a master category in the left column, and specify one or more related subcategories in the right column.)
o) Inventory Categories
On this tab you may enter up to 3 sub categories that your inventory items may fall into. Each item
requires that the master item be setup in Inventory Configurator.
7.
Enter/Change Bank Accounts
From the Modules | Bank Management | Setup Bank Accounts enter your bank accounts in Bank
Management Setup. The name can be a bank name, an account number, or any other convention. Enter in
the starting balance of your chequing account(s) as of your system Go-Live date. For example, if you go
live on July 1, then you will enter the ending balance from your bank statement as of June 30. This will
most likely differ from your GL balance at that point in time.
8.
Inventory - Enter Price Matrix (Optional)
Blue Link Solutions allows you to set up a price matrix of up to 9 levels of discount percentages for
multiple products. A specific level of that matrix can then be assigned to a customer. For example, a
dealer of your product could occupy a different level of your price matrix than a customer who is charged
a higher price.
Because this kind of matrix can be applied across multiple inventory items, you should set up these price
matrices before you enter your inventory items.
If you don't want to use this cross-product discount structure, you can bypass this step. You will still be
able to assign flat discount amounts by product as you enter your inventory in the next step. In all cases,
use of a price matrix is optional and you may see little need for the extra structure involved in this pricing
approach. If you do decide to use either type of price matrix, you should read the discussion in the
inventory chapter and consider the overall system you want to implement in order to use a price matrix
effectively.
Chapter 4 – Getting Started
Page 45
Blue Link Solutions™
9.
Enter/Change Inventory
Build your inventory information. At this stage, you are only entering the product codes, descriptions,
classes, and default price and vendor information. Entry of actual on-hand quantities is dealt with in a
later step.
10. Set up Kits / Bills of Material
If you assemble products from components, or sell multiple products for one price as a “kit”, define the
components that comprise these products or kits now. Refer to the Inventory section for details.
11. Print Physical Checklist
When you are satisfied with your inventory information, use Inventory Control | Inventory Information
Reports | Physical Checklist to print out your inventory. You will use this printout in Section 4.2.3 step
1 to record your units on hand information.
4.1.3 UPDATING YOUR SYSTEM WITH RECENT INFORMATION
You have now finished the second phase of setting up Blue Link Solutions - all your initial company
information has been entered. You are now ready to input your financial data for your Accounts Receivable,
Accounts Payable and Inventory sub-ledgers.
1.
Enter/Change Inventory Information
Freeze your inventory at the same point you captured your summary information for General Ledger
entries. Use the printout you created in step 11 (Print Physical Checklist) to record physical counts.
Remember that beginning inventory quantities and average costs are not needed for type “N”
(non-inventory) items. Check your figures and make corrections on paper until you are satisfied that you
have an accurate count. Any receipts, purchase orders, or invoices, that occur after this cut-off must be
held for entry until after you have entered your beginning inventory quantities.
Use the Adjust Inventory Value/Levels in the Inventory module to enter the quantities, entering your
existing average cost in the “New Cost” field.
When complete, print the Inventory Information Reports | Availability and confirm that the total
inventory dollar value listed at the end of the report matches the beginning balance you placed in the
inventory asset account(s) in the General Ledger. If the figures do not match, return to the detail you
carried over from your previous accounting system, and/or look at your inventory information in Blue
Link Solutions to establish the product(s) whose costs or quantities do not match.
2.
Enter/Change Customers
Enter customer name and address information, and defaults (currency, terms, tax authority, etc.). Do not
enter any outstanding invoice or credit amounts. These will all be entered in step 3.
3.
Enter A/R Vouchers
You can now enter invoice and credit amounts representing transactions up to your cut-off date, broken
down into individual invoices, in Accounts Receivable.
Because you have already entered a beginning balance for Accounts Receivable in the General Ledger,
you must distribute the entire amount of each invoice to your A/R control account. The system debits and
credits the A/R control account for a net change of $0, but the customer account will now show the
outstanding invoice and the invoice will appear on A/R aging as of the appropriate invoice date.
Do not enter any transactions that have occurred since the cut-off date; you can enter them at the end of
this procedure.
Page 46
Chapter 4 – Getting Started
Blue Link Solutions™
Note:
This method of distributing your A/R control account should only be during setup. After you have
completed this checklist, your normal procedure for a voucher will be to distribute to a sales account, not
the A/R control account.
4.
Print A/R Aging
Print the Accounts Receivable Aging or Listing reports to determine the A/R sub-ledger balance. Check
this balance with the opening balance to be entered in your G/L. If these match, then all outstanding
transactions have been entered successfully. If there is a discrepancy, compare each line item in this report
to those from your previous accounting system.
5.
Enter/Change Vendors
Enter vendor name and address. Do not enter any outstanding invoice or credit amounts. These will all be
entered in step 6.
6.
Enter/Change A/P Voucher
You can now enter invoice and credit amounts representing transactions up to the cut-off date in Accounts
Payable.
Because you have already entered a beginning balance for Accounts Payable in the G/L, you must
distribute the entire amount to your A/P control account. The system debits and credits the A/P control
account for a net change of $0, but the vendor information and vendor aging information will now show
your outstanding payable.
Do not enter any transactions that have occurred since the cut-off date; you can enter these after you have
completed this checklist.
Note:
7.
This method of distributing to your A/P control account should only be used during setup. After you have
completed this checklist, you will normally be distributing your vouchers to an expense account, not to your
main A/P control account.
Print A/P Aging Reports
At this point, you should confirm that the Accounts Payable listing balance in Solutions that you entered in
the G/L matches the total of vendor balances entered in step 6.
If these two figures don't match, validate the vendor balances. If necessary, use Enter/Change A/P
Voucher, to back out and re-enter information so that these figures will be brought into balance.
8.
Enter G/J Entries (Beginning Balance Only)
Enter beginning balances for all your General Ledger accounts (income, expense, asset, owner's equity,
and liability) as General Journal entries. Use your fiscal year start date for these entries. All beginning
balance entries should have the same date.
Note:
9.
The inventory asset account(s), Accounts Payable liability, and Accounts Receivable asset account
balances MUST equal the summary figures you are entering in this step. You may choose to enter these
figures as a lump sum year-to-date (YTD) figure or you can separate your beginning balance into
month-to-date (MTD) subtotals for the current year by creating a separate transaction for each month. The
sum of these MTD entries must equal the YTD figure for that account.
Post G/J Transactions
Blue Link Solutions keeps a detailed transaction file as your audit trail. With this step, you are posting the
beginning figures entered in step 13 to your G/L Detailed Transaction file and your chart of accounts.
10. Print Trial Balance
If these figures don't balance with your previous accounting data, repeat steps make the necessary
adjustments in order to balance. Then print the Trial Balance again so that you have a final printout that
shows that your accounts balance with the previous accounting data.
Chapter 4 – Getting Started
Page 47
Blue Link Solutions™
Setup of Blue Link Solutions is now complete!
You will now be able to rely on the audit trail generated by Blue Link Solutions as you enter transactions
because you have confirmed that all your setup information is correct and all the programs within Blue Link
Solutions have a consistent starting point for your financial data.
The transactions that you have held for entry that occurred since your cut-off date can now be entered as
invoices, purchase orders, or vouchers.
Over time, you will find other time- saving options not mentioned in this checklist. For example, you can set
up Recurring A/P vouchers, A/R invoices, and G/L transactions for transactions that you repeat periodically.
Page 48
Chapter 4 – Getting Started
Blue Link Solutions™
4.2 Playground
Once you have entered all of your current data, a copy of your data file should be made and renamed to:
Playground.mdf. This file should be placed the ‘Playground’ folder (i.e. \\server\solutions\playground\),
and be configured to appear in the “Choose Company” list:
See more information on copying your Blue Link Solutions SQL database in the Blue Link Solutions SQL
reference guide.
4.2.1 ACTIVATING THE PLAYGROUND NOTICE
To activate a notice to users that the playground file is the currently selected company, change the 1st line of
your company’s address to “playground”.
To change the 1st line of you’re address, an administrator should open the Modules | System Maintenance
| System Master | Company Information screen and change the first line of your address to read
“Playground”.
Chapter 4 – Getting Started
Page 49
Blue Link Solutions™
When you connect to the playground data file, the main Solutions screen will change to display the
following playground notice:
If you don’t see this notice, you may have placed the word “playground” on the wrong address line, or you
may need to refresh this screen by pressing Shift+F9 on your keyboard.
Page 50
Chapter 4 – Getting Started
Blue Link Solutions™
4.3 Checklist
4.3.1 PLANNING AND ACCUMULATING YOUR DATA
1.
2.
3.
4.
5.
Review Blue Link Solutions using the sample company data.
Close the accounting records in your previous system.
Review the demo financial statements and chart of accounts with your accountant.
Prepare your data:
Chart of Accounts & Opening Balances
Inventory Information & Count as of the Start Date
Customer Information & Outstanding A/R
Vendor Information & Outstanding A/P
Bank Information & Outstanding Items etc.
Run Clear Data to remove sample data.
4.3.2 ENTERING INITIAL INFORMATION
1.
2.
3.
4.
5.
6.
7.
8.
9.
10.
11.
12.
13.
14.
15.
16.
Create G/L Departments (Optional)
Create/Change G/L Chart of Accounts
Print G/L Chart of Accounts
Prepare System Interface
a) Company Information
b) G/L Information
c) A/R and A/P Information
d) Currency
Enter/Change Bank Accounts
Enter/Change Terms Information
Enter/Change Vendors
Enter Price Matrix (Optional)
Setup Inventory Classes and Locations
Enter/Change Inventory
Set up Kits / Bills of Material (Optional)
Print Physical Check List
Enter Tax Authorities
Enter G/J Entries (Beginning Balance Only)
Post G/J Transactions
Print Trial Balance
4.3.3 UPDATING YOUR SYSTEM WITH RECENT INFORMATION
1.
2.
3.
4.
5.
6.
7.
Enter/Change Inventory Information
Enter/Change Customers
Enter A/R Vouchers
Print A/R Aging
Enter/Change Vendors
Enter/Change A/P Vouchers
Print A/P Aging
Chapter 4 – Getting Started
Page 51
Blue Link Solutions™
4.3.4 COPY YOUR DATA FILE, AND RENAME THE FILE PLAYGROUND
See more information on this section in Blue Link Solutions SQL reference guide.
Page 52
Chapter 4 – Getting Started
Blue Link Solutions™
5: Important Times
The guidelines below are procedures that you should follow on a regular basis to maintain your Blue Link
Solutions system.
The list notes how often you should perform certain maintenance tasks and can help you prepare for accounting
routines performed at end of month or end of year.
Although some of the individual items in this list may not apply to your business, there are many items that
apply to anyone using Blue Link Solutions.
Important:
The Blue Link Solutions database should be repaired & optimized on a regular basis (at least
once a week) to ensure good system performance, and to prevent data corruption over time.
Chapter 5 – Important Times
Page 53
Blue Link Solutions™
5.1 Recurring Transactions
Blue Link Solutions supports the creation of recurring transactions for General Journal Transactions,
Recurring Sales Orders, and Recurring Vouchers. These recurring transactions can be generated at any
time, but must be generated manually by a user of the system.
Tip:
Page 54
A default user for recurring transactions can be defined in the system interface. This user will automatically be
reminded by the system when transactions are due after logging in.
Chapter 5 – Important Times
Blue Link Solutions™
5.2 Things to do Daily
1.
Post completed items. Be sure you have posted all general journal transactions, A/R vouchers and A/P
vouchers entered during the day.
2.
Process Accounts Payable Cheques:
a)
b)
c)
d)
print / review vendor aging or due date listing
pick invoices to pay
print / review pro forma register
print and post cheques
3.
Backup your data file(s) (My Company Data 32.mdf). We strongly suggest that you purchase backup
scheduling software (such as Veritas Backup Exec) to automate the backup process. We also suggest
establishing a set of backup media labeled for each day of the week with two or more “Friday” tapes.
Always store at least one tape off-site in the event of a disaster.
4.
(Optionally) Print a G/L Detail Trial Balance/Posting Analysis report using the current date for the
beginning and ending date selection. (This report lists all transactions posted during the course of the
day including those that posted with a different transaction date). Verify that distributions are correct and
that the report column totals for debits and credits are in balance. In the event of an out of balance
condition, print the individual journals for the selected date to help locate the transaction in question.
Normally each journal should be in balance.
5.
(Optionally) print individual journals to review daily activity in specific areas of your business. In
particular, you may want to review the sales and cash receipts journals daily.
6.
(Optionally) review your backorder listing and your open sales order listing. As stock is received
into available on-hand inventory, determine which orders should be released and which priority (if any)
should be used to fill backorders.
7.
(Optionally) review the register for each currency, and prepare a deposit if required.
Note:
Items marked as “Optional” should be done for at least the first two weeks of operation, or until your staff
are comfortable and familiar with the numbers being produced by the system.
Chapter 5 – Important Times
Page 55
Blue Link Solutions™
5.3 Things to do Weekly
1.
Review any unposted transactions, and post or delete if necessary:
a) General Journal Entries
b) Sales Order Invoices
2.
Review any post dated cheques on hand, and enter any falling due within the next few days in Accounts
Receivable, Record Payments.
3.
Optimize your data and distribute a fresh copy of your application
See Blue Link Solutions SQL reference guide for more information on optimizing your data in SQL.
Page 56
Chapter 5 – Important Times
Blue Link Solutions™
5.4 Things to do Monthly
1.
Make archive backup sets for each month of the year, just before performing month end routines.
2.
Reconcile your Bank Account(s).
3.
If you levy interest charges against overdue invoices, run Accounts Receivable | Charge Interest.*
4.
(Optionally) print an A/R Aging report and, if required an A/R Aging listing.
5.
If you send statements that show both open and paid detail, you should print them now since the paid items
may be purged from the detail during the month end processing.*
6.
Print an A/P Aging report and, if required, an A/P Aging listing.
7.
Verify that all sub-ledgers balance with their control accounts.
These include: A/R, A/P, Inventory, Accruals, and Bank Account.
8.
Print an Inventory Availability report for all products. The "Total Value" figure should equal the dollar
value in your inventory asset general ledger account. If you have more than one inventory asset account,
the report total should equal the sum of those accounts.
9.
Note:
There may be a small variance between the Total Value on the report and the sum of the General Ledger
accounts. This is due to rounding. Inventory values are tracked to many decimal places on an item by
item basis.
Caution:
Be sure to run the valuation report that matches the inventory costing method used by your business. For
Average Costing, run the “inventory valuation” report. For FIFO costing, run the “FIFO Costing” report.
(Optionally) Print financial statements.
10. (Optionally) print the trial balance for the month and/or journals for the month. Check that it is in balance.
In the month end routine, you have the option to clear or not clear the trial balance detail. If you choose to
clear the detail, this is the last chance to print these reports.
11. (Optionally) Run the end of month routine to reset the MTD sales values.
12. Change the “Post From” date in the System Interface to prevent users from posting into prior periods.
13. Run the ‘Create Inventory Locations’ routine from the Utilities Menu to verify the accuracy of all
Inventory records. It is safest to make a copy of your data file before running any Utility.
*
Items with a “*” should be performed after the last transaction is posted for the current month and before
the first transaction is posted for the next month.
Chapter 5 – Important Times
Page 57
Blue Link Solutions™
5.5 Things to do Yearly
(Fiscal Year End)
1.
Make a backup of all data files to archive media and store in a safe place.
NOTE:
Some reports can only be run before the year end procedure. Keep the backup handy in case you forget
to run any of these reports.
2.
Print financial statements for the year.
3.
Print a detailed trial balance and detailed journals. This is especially important if you purge trial
balance detail in preparation for the new fiscal year.
4.
Run the End of Year routine. This routine will:
a)
Clear all year to date information in the customer, vendor and inventory files, moves YTD to
Last Year.
b) Optionally clear the Detailed Trial Balance.
c) Increment the fiscal year start date in the System Maintenance information.
d) Move all current year amounts in the general ledger to one year past, all one year past amounts
to two years past and rolls all two years past information off the file. Beginning balances are
calculated for the current year in preparation for the new year's business.
5.
Change your “post from” date.
6.
(Optionally) purge detailed transaction data. If your company processes an extraordinarily large
(i.e. over 100,000 transactions per month) it may be necessary to purge detailed transaction histories.
Consult your reseller to determine if this is necessary in your company’s situation.
Page 58
Chapter 5 – Important Times
Blue Link Solutions™
6: System Maintenance
The system maintenance options included in Blue Link Solutions are intended primarily for use when
initially setting up your system, and also for certain periodic maintenance functions. The System
Maintenance Menu is available by selecting “System Maintenance, System Master or System Master
Lists” from the Explorer Menu. The available options appear as follows:
Chapter 6 – System Maintenance
Page 59
Blue Link Solutions™
6.1 System Interface
Preparing the System Interface is one of the first steps you will undertake as part of your initial
configuration of Blue Link Solutions. You may need to return to this module from time to time as
information about your company changes or as your requirements grow.
This program may be used to enter or change general background information about the company, default
information that is used in various modules, general ledger integration accounts, information about currency
exchange rates, and general ledger departments.
System Interface is divided into two main sections with its own subsections:
System Master
This list contains master information that should not be changed while others are in the system. You will be
greeted by the following message:
The subsections contained in System Master include:
1.
Company Information
2.
G/L Information
3.
Report Options
4.
Outlook and Word
5.
Data Entry & Other Defaults
6.
Inventory Information
System Master Lists
System Master Lists contains setup information centralized in one area. You may change the information
contained in here while others are in the system.
The subsections contained in System Master include:
1.
Currency/ Departments / Payment Methods
2.
Shipping Related
3.
Terms / Types / RMA Reason Codes / Other Lists
4.
Tax Authorities
5.
Fax Exceptions
6.
Job Costing
Page 60
Chapter 6 – System Maintenance
Blue Link Solutions™
7.
Service Manager
8.
Inventory Multiple UOM (if Unit of Measure is selected)
9.
Inventory Configurator
10. Inventory Categories
Chapter 6 – System Maintenance
Page 61
Blue Link Solutions™
6.2 System Master
Upon entering System Master you will notice the following screen.
Page 62
Chapter 6 – System Maintenance
Blue Link Solutions™
6.2.1
COMPANY INFORMATION
The first section is entitled Company Information. The information entered in this section will be used on
all reports that include your company name and/or address. Please enter the information as you would like
it to appear on those reports.
Name
Enter your company name here. The name that you enter here will display on your Explorer Menu screen,
at the top of every report you print from the system and optionally on invoices, purchase orders and other
documents.
Caution:
Only change the company name when you are ready to register the product. Changing the company
name will require you to enter a registration number. Failure to enter the correct number will completely
disable the software. Call Blue Link at (905) 660-0599 to obtain a registration code for your company.
Address 1 and Address 2
Enter your company address here. There are two lines for this purpose, the first being intended for street
address while the second is intended for entry of a suite or unit number, if applicable. If this file will be a
“playground” file, enter the text “playground” on address line 1.
C/P/P
This field is intended for entry of the city, province (State) and postal code (Zip Code).
Sales E-Mail
If your company has an email address for a sales contact, enter it here, otherwise leave it blank. This will
appear on Invoices and other sales documents (Order Confirmation etc.)
Web Site URL
Enter the URL of your company’s website if applicable (for example www.bluelinksolutions.com)
Toll Free
Enter your toll free number (if applicable) to appear on external documents (Invoice etc).
Phone
Enter your phone number in this field.
Fax
Enter your fax number in this field.
Regional Settings
Select the country in which you operate. See your country specific reference guide for more information.
Aging Periods – Payables and Receivables
Enter the aging period (in days) you require for accounts payable and accounts receivable respectively. For
example, if you wish your accounts receivable to be aged in columns for current, 30 days, 60 days, 90 days,
and 120 days and over, you would enter 0, 30, 60, 90, and 120 respectively.
Note:
Aging reports will start on the day after the date you specify here. For example, an aging report with the
dates defined above would appear as Current, 31 to 60 days, 61 to 90 days, 91 to 120 days, and 121+
days.
Next Numbers
Using the fields in this section of the screen, you may set the starting numbers for various documents and
transactions as detailed below.
Chapter 6 – System Maintenance
Page 63
Blue Link Solutions™
Caution:
Once you have started using Blue Link Solutions, it is potentially dangerous to return to the screen and
change any of these numbers. Change them only if you are sure that what you are doing is correct.
The numbers controlled by this screen include:
Invoice
assigned to the next sales order invoice.
Purchase Order
assigned to the next purchase order issued from the purchase order module.
Sales Order
assigned to the next sales order (these numbers are assigned as soon as you begin
entering a sales order).
GJ Transaction
assigned to the next general journal transaction.
Recurring GJ
assigned to the next recurring general journal entry entered into the system.
Recurring S/O
assigned to the next recurring sales order entered into the system.
AR Voucher
assigned to the next accounts receivable voucher (which may be overridden at
transaction entry time).
AP Voucher
assigned to the next accounts payable voucher entry, (which can and will usually be
overridden by the supplier’s invoice number at transaction entry time).
Production #
assigned to the next production control batch.
CM Quote
assigned to the next Quote in Contact Manager.
RMA
assigned to the next RMA that is issued.
Work Order
assigned to the next work order in Service Manager.
A/R Interest Rate
The monthly interest rate used to calculate interest on overdue accounts receivable transactions. The rate
entered here is only relevant if you intend to actually charge interest on overdue accounts.
A/R Interest Days
The number of days the system should wait after the invoice’s due date before it charges interest on a
particular item.
Compound Interest
Check this box if you would like interest to be compounded.
Fiscal Year Start
Enter the first day of your fiscal year in this field. When you perform the end of year process (see later in
this chapter), this date will automatically be incremented by one year.
Note:
Do not change the fiscal year start once you have begun posting transactions.
change your fiscal year, contact your Blue Link Solutions Dealer for assistance.
If you need to
Post From Date
Blue Link Solutions will not post transactions dated prior to this date. By default, Blue Link Solutions
permits you to post transactions to any date in the current or two previous fiscal years. A date entered in the
“post from” field overrides the default.
Note:
Page 64
This date may be changed back and forth. For example, you may wish to set this date to the beginning of
your current fiscal year. When you have previous year closing entries to process, you may change the
date back to the previous fiscal year, enter those prior year final adjustments, and then change the post
from date back to the beginning of the current fiscal year.
Chapter 6 – System Maintenance
Blue Link Solutions™
Override Password
When set, this password is required to perform certain activities such as posting to Sub-Ledger control
accounts.
Date Mask
To provide additional year 2000 flexibility, you may now select the desired format for entering dates.
BG Colour – this is the background colour you wish to choose, for the all of the date fields in
Blue Link Solutions. Simply double click on this square to choose a colour from the colour’s
dialogue box. You may also define a custom colour from the colour spectrum.
Calendar Control – you may double click on all of the date fields in Blue Link Solutions to pull
up a calendar. You may use this rather than typing in the date.
Chapter 6 – System Maintenance
Page 65
Blue Link Solutions™
mm/dd/yy – all items are required, you must enter a two-digit month, two-digit day, and two-digit
year. Note: this may be confusing if you are using a different “short-date” format as defined in
your computer’s control panel, regional settings.
No Mask – select this option to remove the mask from the date fields. Doing so will allow you to
enter dates in a free-form fashion – Solutions will automatically complete missing information
using the current year as default. (For example, you could enter the date as 5/20, 5/20/2001, or
5/20/01.) If you’ve specified a different date format in your computer’s control panel, regional
settings then those conventions will also apply (for example, if you prefer day, month year, you
could enter 20/5, 20/5/2001, or 20/5/01.)
Page 66
Chapter 6 – System Maintenance
Blue Link Solutions™
6.2.2
USING WINDOWS REGIONAL SETTINGS TO CONTROL THE
DISPLAY OF DATES
Blue Link Solutions uses Windows settings to control how dates are displayed on screen and on printed
reports. Windows allows you to control the format of two different standard dates:
Short Dates
Typically appear as xx/xx/xx, or xx/xx/xxxx, however you can control the exact layout of the short date by
customizing it here.
Long Dates
The long date format is used on A/P Cheques. You can change the format of the date to anything you’d like
by customizing it here.
Caution:
Since each users’ Windows 95/98/NT, 2000, or Windows XP operating system controls this setting
the potential exists for different users to have different date formats. This could cause problems if
some users format Month/Day/Year and others format Day/Month/Year.
We recommend standardizing on ONE date format. Failure to do so will result in reports printed
by different individuals following different formats. This could be especially troublesome if you
use pre-printed forms that expect date information in a certain format.
Chapter 6 – System Maintenance
Page 67
Blue Link Solutions™
How to Change the Date Format in Windows
From the Windows Start Menu, Select Settings, then Control Panel, then Regional Settings. Once
displayed, click the Date tab to display the following screen:
To change the short date style, select the desired format from the list. Note that you may also change the
style to include a four digit year for year 2000 compliance.
Page 68
Chapter 6 – System Maintenance
Blue Link Solutions™
6.2.3
G/L INFORMATION
The second function of the System Interface program is to record the general ledger interface accounts. If
you click on the G/L Information button, the following screen displays:
For each of the accounts described below, you must enter a general ledger account, and may optionally
enter a valid general ledger department code.
Accounts Receivable (A/R) Related
A/R Account
Enter the accounts receivable control account in this field.
A/R Discount Account
The account to which any early payment discounts granted to customers will be posted.
A/R Freight Account
Freight charged to customers in the field provided on the sales order screen will be posted to this account.
A/R Interest Earned
If you intend to charge interest on overdue accounts receivable, this is the general ledger account to which
that interest will be posted.
Chapter 6 – System Maintenance
Page 69
Blue Link Solutions™
Accounts Payable (A/P) Related
A/P G/L Account
This is the accounts payable control account.
A/P Discount G/L Account
Early payment discounts taken from vendors are posted to this account.
A/P Freight Account
Freight charges on a purchase order from a supplier will be posted to this account.
Purchasing (PO & A/P) Related
P/O Not Invoiced Account
When you record the receipt of goods on a purchase order in Blue Link Solutions, you have two options:
either record the supplier’s invoice at the same time, or record the supplier’s invoice at a later stage. If you
do not record the supplier’s invoice at the time that you receive the items on the purchase order, this
account will be credited (as an accrual), and the supplier’s invoice should subsequently be allocated against
this account.
Landed Cost Variances ?
This specifies the default account that Landed Cost Variances will be posted to. The user can override this
default on a transaction by transaction basis. This is an Elite feature; Professional users should set this
account to the same account used by G/L Clearing.
Order Entry & Sales Related
Cash Over/Short Account
The Process Deposits procedure contains a provision for reconciling the amount of a deposit with the
amount of money recorded as having been received. Any amount over or short will be posted to the
account specified here.
Outside Commission Account
The Blue Link Solutions Salesperson commission function provides for inside and outside salespeople.
Outside salespeople are considered vendors, and will be paid through the Accounts Payable module. Their
sales commission will be allocated to this account.
Customer Deposit Account
You may optionally record a deposit from a customer on a sales order, prior to that sales order becoming an
invoice. In this case, the customer deposit is allocated to this account (usually a liability account), and
when the invoice is subsequently posted this account is debited with the amount of the original deposit.
Inventory & RMA Related
Inventory Adjustment
The inventory adjustment account is used by the Adjust Inventory Value/Levels program, and is usually
an expense or cost of sales type of account.
Page 70
Chapter 6 – System Maintenance
Blue Link Solutions™
Work in Progress
If you intend using the Bill of Materials and Production Control capabilities of Blue Link Solutions, this
account will be used during the production process. It will contain the value of inventory items that have
been withdrawn for production, prior to completion of the finished products for which they are used.
Restocking Charges ?
This is a revenue account that the RMA module uses to place the difference between the originally invoiced
amount and the amount being credited to a customer with a return. This is an Elite feature; Professional
users should set this account to the same account used by G/L Clearing.
RMA Write-Off Account?
Items returned via the RMA module, but not returned to inventory will have their cost price debited to this
account (i.e. defective goods). This is an Elite feature; Professional users should set this account to the
same account used by G/L Clearing.
Bank Related
Deposit Clearing Account
Payments received from customers are posted to this account. When you process a deposit (in the Bank
Management module) the money is removed from this account and placed in the appropriate bank account.
Bank Charges Account
Bank charges recorded in the bank reconciliation program are posted to this account.
Bank Interest Earned
Any interest earned on your bank account, and recorded during the bank reconciliation process, will be
allocated to this account.
Foreign Exchange (F/X) Related
Exchange Difference Account
When recording foreign currency transactions, these transactions are translated in the general ledger into
your home currency’s equivalent dollars. However, when transferring funds between two bank accounts of
different currencies, an unrealized exchange difference occurs. This difference will be allocated to this
exchange difference account.
Note for accountants: this is an unrealized exchange gain/loss account.
FX Variance Account
This is the expense account where gain or loss on exchange is realized.
Retained Earning / General Ledger (GL) Clearing
Retained Earnings
This account stores the accumulated earnings for previous fiscal years. When you run the end of year
process, the net income or loss for the year will be added to (or subtracted from) this account.
G/L Clearing Account
This account is used when a general ledger account code is not found during a posting routine. (You must
define a valid G/L Clearing Account in order to post any transactions in Blue Link Solutions. If you have
not specified a G/L Clearing Account, the first time you attempt to process a transaction an error message
Chapter 6 – System Maintenance
Page 71
Blue Link Solutions™
will appear, and the transaction will not post.) This account should be reviewed on a regular basis, and any
balances should be accounted for and re-allocated to the proper accounts.
Page 72
Chapter 6 – System Maintenance
Blue Link Solutions™
6.2.4
REPORT OPTIONS
Update the information on this tab to set report options and other defaults.
Report Options tab:
Company Logo
If you have your company logo in an electronic format, such as a bitmap file, you may insert it here and
optionally have it print on certain reports such as invoices, quotes, and others.
To insert the logo, follow these steps:
1.
2.
3.
4.
Open the logo file in Paint or any other application and select it.
Select Edit, Copy.
Return to Blue Link Solutions program and click once on Company Logo field.
Select Edit, Paste (or press CTRL+V).
The logo will be scaled to fit in the box, as it will on the reports that use the company logo.
Print Company Logo on Laser Forms
Check this box to have the logo print on forms that can use it (such as the Invoice, Quote, Purchase Order,
Statement and others).
Wide Logo
This is designed for certain logos that contain the company’s name and are more horizontally designed.
Chapter 6 – System Maintenance
Page 73
Blue Link Solutions™
Purchase Order Reports
Laser PO’s
Check this box if you intend to use laser printed purchase orders, or leave the box unchecked to specify preprinted continuous purchase order forms.
No. Purchase Orders to Print
Enter the number of copies of each purchase order that you want to print by default.
Accounts Payable Ending Lines
Use this to enter ending lines for your Purchase Orders. An example may be “Call before shipping”.
Cheque Reports
Print Company Info on Cheques
Check this box if you want to print your company’s name and address information in the top-left of Laser
Cheques.
Laser Cheques
Check this box if you intend to use the standard Blue Link Solutions laser printer cheque forms. If you
leave this box unchecked, the standard continuous (dot matrix) cheque forms will be used.
Print all cheque advice lines (use / void multiple cheques if necessary)
The advice portion of a cheque lists all of the invoices to which the cheque is being applied. In some cases,
there may be more advice lines than can fit on one cheque. If you would like these extra lines to be carried
forward to the next cheque’s advice portion, enable this option. The next cheque will be voided, and the
advice will be printed.
1. Unchecked – Prints as many detail lines as can fit over both advice portions, not printing the
second advice portion if required.
2. Checked - Use multiple cheque stubs to show all of the invoices being paid – void the cheque
portion of the extra cheques.
AR Statements
Laser Statements
Check this box if you intend to use laser printed statements, or leave the box unchecked to specify preprinted continuous form statements.
Sales Order Reports
Laser Invoices
Check this box if you intend to use laser printer invoices, otherwise leave it unchecked to use pre-printed
continuous form invoices.
No. Invoices to Print
Enter the number of copies of each invoice that you want the sales order system to print by default.
Accounts Receivable Ending Lines
Use this for ending lines to print on all invoices.
Document Specific Ending Lines
Select the button to call up the form. This form allows you to enter different
Page 74
Chapter 6 – System Maintenance
Blue Link Solutions™
Dunning Notice Text
Enter the text that you wish to appear on the Dunning Notices found under Accounts Receivable | Print
Dunning Notices.
Chapter 6 – System Maintenance
Page 75
Blue Link Solutions™
6.2.5
OUTLOOK AND WORD
If you have Microsoft Office 97™, Microsoft Office 2000™, or Microsoft Office XP™ installed you can
take advantage of the Solutions-Word or Solutions-Outlook integration.
You can use Microsoft Word™ to print customized forms (such as invoices) or you can save contact
information to Outlook.
On the Outlook and Word tab, specify how each of the following modules should update Outlook: Contact
Manager, Vendors, Customers and Employees:
The following options are available from the drop down list for Contact Manager, Customers, Vendors and
Employees:
Save Always
Prompt to Save
Never
always saves the contact into Outlook contacts folder
will prompt before if saves into the Outlook contacts folder
will never save into the Outlook contacts folder
Contact Manager
When a new contact is created in the Contact Manager module (Sales | Contact Manager | Enter/View
Prospect), specify how you want it to save in Outlook.
Vendors
When new vendor is created in A/P, specify how you want it to save in Outlook.
Page 76
Chapter 6 – System Maintenance
Blue Link Solutions™
Customers
When a new customer is created in A/R, specify how you want it to save in Outlook.
Employees
When a new employee is created, specify how you want it to save in Outlook.
Microsoft Exchange Server™ Support
When this option is selected, a copy of contact items saved
in Blue Link Solutions can be stored in a Microsoft
Outlook Public Contacts Folder. Any user with Microsoft
Outlook, who has been given permission, may view the
central repository of contacts.
When you run Microsoft Outlook with a Microsoft
Exchange Server mailbox, a new option “Public Folders”
will appear in your folder list. A system administrator can
create a shared contact folder.
Public Folder
If Outlook is set up to access Public Folders on your
network, then this is the name of the shared Outlook
contact file. (In the screen capture above, the public folder
name for the Blue Link Contacts folder is \Public Folders\All Public Folders\Blue Link Contacts.)
Private Folder
This is the name of the local Outlook contacts folder (usually \Personal Folders\Contacts).
Full Pathname of Contact Manager Word Template
In contact manager, this is the template that will be used by Microsoft Word when merging the current
contact information. The default template is: “C:\Program Files\Blue Link\Solutions SQL\Welcome.dot”.
Full Pathname of Default Invoice Template
This is the template that will be used on the Sales Order screen when the “Print/Save” button is used to print
the current sales order to a Microsoft Word template for editing and printing. The default template is:
“C:\Program Files\ Blue Link \Solutions SQL\Invoice.dot”.
Detail Columns … (Button)
This option allows you to select the columns to print in the detail section of your Microsoft Word invoice
template and the order in which they will print.
Chapter 6 – System Maintenance
Page 77
Blue Link Solutions™
You can use the following options when making your selections:
1.
2.
3.
Type the sequence in which you want the fields to be printed (i.e., Product Code (10) will be in the first
column, Product Description (20) will be in the second column, etc.)
If you want the “Extended Description” for the product to be printed directly below the “Product
Description” on the invoice, type “-1”. NOTE: Do not use this for any other fields except the
“Extended Description”.
If you do not want a field to print, type a “0”.
Click the Exit button to save the selections.
Configuring the Microsoft Word Invoice Template
You can use the sample invoice template that ships with Blue Link Solutions called “invoice.dot” as the
starting point for designing your custom invoice. This file is located in the Blue Link Solutions folder on
your local machine. When you’re template is complete, copy it to a common server location, and update
the Blue Link Solutions system interface to point to it as appropriate.
The following screen is a sample of the initial Word Invoice Template, with all the necessary codes
displayed. NOTE: Type the codes EXACTLY as listed below, with in {curly brackets}
Page 78
Chapter 6 – System Maintenance
Blue Link Solutions™
Field Names
If you wish to create your own or wish to customize the sample invoice, type the field names listed on the
next page within curly brackets EXACTLY as listed below at the appropriate location in a new Word
Template.
Chapter 6 – System Maintenance
Page 79
Blue Link Solutions™
NOTE:
These fields are NOT Word merge fields; they are simply text within curly brackets.
Invoice #
Invoice Date
Customer Name
Customer Address
Attention Line
Ship To Customer Name
Ship To Customer Address
Telephone Number
Order Date
Order Number
Ship Via
Terms
Salesperson
FOB
Customer Code
{InvoiceNumber}
{InvoiceDate}
{CustomerName}
{CustomerAddress}
{Attention}
{ShipName}
{ShipAddress}
{Telephone}
{OrderDate}
{OrderNumber}
{ShipVia}
{Terms}
{Salesperson}
{FOB}
{CustomerCode}
Detail Columns
Use a Word Table for the detail section, with the
Columns Headings in the first row and the word
{Details} in curly brackets in the SECOND row,
first column.
NOTE: You specify which columns to print and
in which order they are to print by setting them
up in System Maintenance | System Interface |
Outlook and Word tab.
Subtotal
Freight
GST
PST
Total
{Subtotal}
{Freight}
{GST}
{PST}
{Total}
Sample Word Invoice (Solutions Invoice.doc)
Page 80
Chapter 6 – System Maintenance
Blue Link Solutions™
Full Pathname for Default PO Template
This is the template that will be used on the Purchase Order screen when the “Print/Save” button is used to
print the current purchase order to a Microsoft Word template for editing and printing. The default template
is: “c:\Program Files\Blue Link\Solutions SQL\PurchaseOrder.dot”.
The functionality is the same as for the invoice template. To customize the Purchase Order template, follow
the steps mentioned above.
Chapter 6 – System Maintenance
Page 81
Blue Link Solutions™
6.2.6
DATA ENTRY & OTHER DEFAULTS
System Defaults
Home Currency
Enter the code for your local currency in this field (for example CA$). It is important that this currency also
be set up in the currencies screen (see Currencies and Departments section).
Note:
The home currency cannot be changed after transactions have been posted.
Default Tax Authority
Enter the tax authority that will be the default for all new customer and vendor records created (click the tax
authorities tab to configure them).
AP Defaults
AP Default Terms
Enter the Terms that will be the default for all new vendor records created (see the terms/classes section for
instructions on terms setup).
AP Ship Via
Use this field to enter the default shipping method used on purchase orders, these will default on purchase
order entry but may be overridden at transaction entry time.
Page 82
Chapter 6 – System Maintenance
Blue Link Solutions™
AR Defaults
AR Default Terms
Enter the Terms that will be the default for all new customer records created (see the terms/classes section
for instructions on terms setup).
A/R Salesperson
You may optionally enter the initials of a default salesperson here.
Verify Credit
Check this box if you wish Blue Link Solutions to verify credit limits (and optionally overdue invoices), and
provide warnings on sales order entry. If you do not wish Blue Link Solutions to perform a credit check
leave this box unchecked.
Default Credit Limit
Enter the credit limit you want defaulted when creating new customers.
Warn if Credit is Over
In the order entry module, Blue Link Solutions will automatically warn users if a customer is over their
credit limit. The “Days for Credit Warning” enhances this functionality by warning users of any balances
that are this number of days outstanding beyond their regular credit terms.
If you enter a number other than zero in this field, the system will check to see whether the customer has
any invoices unpaid and overdue by a number of days equal to or greater than the number entered in this
field. For example, if you enter thirty in this field, a customer whose terms are Net 30 will trigger a credit
when the item’s age hits 60 days or greater.
Sales Order Entry Defaults
Flag Orders as “Ready” by Default
If you check this field, each sales order when entered will automatically default as ready to ship. If you
leave this box unchecked, sales orders will automatically be placed on hold when entered, and you will need
to manually check the “Ready” check box on the sales order to release each sales order individually. Use
this option to prevent sales orders from being included in batch operations such as the batch printing of
invoices, the batch printing of sales orders, etc.
Batch Post Sales Orders
If you check this box, Sales Orders will not be posted to the G/L after they are printed. If the box is left
unchecked, Sales Orders will automatically post.
Post Bill of Material Components
If you use the Production Control and Bill of Materials functions of Blue Link Solutions, you may specify
non-inventory components in a bill of material (such as labour). If you wish these components to actually
post in the general ledger in order to track variances, check this box. If you leave this box unchecked, noninventory components will be ignored for purposes of calculating the cost of finished goods.
AR Ship Via
Use this field to enter the default shipping method used on sales orders, these will default on sales order
entry but may be overridden at transaction entry time.
FOB
Enter the default FOB status that you wish to appear in Order Entry for each order.
Chapter 6 – System Maintenance
Page 83
Blue Link Solutions™
Sales Order Departments
Require User to Select a Department
Checking this box requires a department to be entered on every sales order before saving it.
Replace the GL Department with that on Sales Order
Check this box for the GL department to be posted to from posting an invoice. When posting an invoice the
GL accounts posted to depend on the inventory items sold and their respective classes (see Inventory
Information). However you may want to post to the same GL account but to a different department. If so,
check this box.
Order Details
Allow Zero Qty on the SO detail line
Checking this box will allow the user to enter a quantity of zero in a line item of the sales order.
Allow Kit Component Deletion on S/O
Check this box to allow users to delete items of a kit after the kit has been added to an order. Leave
unchecked to prevent users from deleting kit components from the order – deleting any item will remove the
entire kit from the order.
Recurring Sales Order
User ID for Recurring Sales orders
Enter the name of the person who will be generating Recurring Sales Orders.
When that user is logged in they will receive reminders to generate recurring Sales Orders if applicable.
Purchase Order Defaults
Default PO Price
1. Vendor Last Price - Check this if you want the Price field on all PO’s created to be automatically
filled in with the last price paid for this item to this particular vendor. This is ideal if you do not
have a price list per vendor but want the system to remember what the last cost was for this
inventory item from this vendor.
2.
Vendor Specified Price – Check this if you want the price field on all PO’s to default with the price
specified per vendor in inventory. This is ideal if you have a price list set up with a major vendor
and don’t want to re-key it into the PO.
3.
Neither – Check this if the above two options do not apply or you wish those entering the PO to
reconfirm the price at the time of entry.
Display PO / SO Integration
If you are using the Purchase Order and Sales Order integration, where you have created a Purchase Order
from a backorder item on a Sales Order then you may want to check this flag. By checking this flag you
will be able to view the Purchase Order number that this Sales Order created while in Order Entry, and the
Sales Order number that this Purchase Order was created from while in Purchase Order. You will find the
reference field on the inventory line item on the Order Details tab.
Page 84
Chapter 6 – System Maintenance
Blue Link Solutions™
PDF File Generation
The PDF file generation is for the Collections Screen found in Accounts Receivable. There is an option to
print reports to a PDF file and email them. This is the setup for that option.
Default PDF Writer
The default PDF writer is the DocuCom PDF Driver. Ask your Blue Link reseller for more information on
acquiring this PDF Driver.
Email Reply Address
Since you are sending email out to customers, you may want to add the email address of whom you want
them to reply to via email.
SMTP Server
Add your SMTP mail server address here.
Email Subject
What do you want the subject of the email to be? Remember that this will be the subject for all email
messages generated from the collections screen so try to keep it generic.
1099 Options
This feature is only applicable if your Regional Setting is set to USA. See the USA reference guide for
more information.
Chapter 6 – System Maintenance
Page 85
Blue Link Solutions™
6.2.7
INVENTORY INFORMATION
When you select this tab, the following screen displays:
Inventory Classes
The purpose of defining inventory classes is twofold:
1.
To determine what G/L accounts are posted to when an item belonging to this class is purchased or
sold.
2.
To create logical groups of inventory for reporting purposes.
Note:
Although an unlimited number of classes can be defined, you are limited to 12 reporting levels (described
below).
Code
Enter a unique code for each class, up to four characters in length.
Description
Enter a more detailed description of the class you are defining.
COGS Acct
Enter the General Ledger account, and optionally the department, to which cost of goods sold should be
posted for this inventory class.
Page 86
Chapter 6 – System Maintenance
Blue Link Solutions™
Sales Acct
Enter the General Ledger account, and optionally the department, to which sales of this inventory class
should be posted.
Asset Acct
Enter the General Ledger account in which the value of inventory for this inventory class will be tracked.
Notes:
?
?
It is important that the above General Ledger accounts are accurately defined, and they must already exist in
the General Ledger chart of accounts.
You may wish to define one additional inventory class if you intend using the Production Control module to
assemble products from their Bill of Materials. In this case, you should enter an inventory class under which
you will track the labour cost included in any production run. (The account that you define as the asset account
for this class will be credited with the labour value absorbed into the manufactured finished product. For more
details, see the Production Control module.)
Report
Various sales reports (such as the Salesperson Commission Report, detailed sales, Daily Sales Report, Daily
Sales by Class report and the Weekly Sales Reports) display information with inventory classes across the
top, and detailed information in the body. The report number determines the order in which these items
appear across the top of the page, 1 to 12 from left to right.
Note: This number must be entered to ensure the accuracy of Inventory Reporting.
Locations
You may define as many inventory locations as you like, with a 10 character location code and a lengthier
description of the location. It is mandatory to create at least one inventory location before you can use
the sales order, purchase order and inventory programs.
Note:
After defining a new location, Solutions will prompt you to run the “create inventory locations” routine.
This routine may be found under the Utilities menu. Its purpose is to update the underlying inventory
tables to activate the new warehouse(s).
Hide
If you have created a warehouse that is for internal purposes then you may want to prevent it from
displaying in the list of available warehouse locations in Order Entry and Purchase Order.
Multiple Units of Measure
Checking off this flag enables the Unit of Measure (UOM) feature. By enabling the UOM it will require that
all inventory items have at least one UOM set up. Use the UOM Configuration Wizard to do this. Once
checking this flag you will not be able to turn UOM off.
See Chapter 12 on UOM for more details.
FIFO Costing?
This is an Elite Feature. This check box specifies which inventory costing method you will be using.
Checking this box will enable the First In First Out costing method. Leaving this box blank will use
Chapter 6 – System Maintenance
Page 87
Blue Link Solutions™
Average Costing. See Chapter 18 – Elite Features for more information on FIFO costing.
Note:
Once you have selected a costing method and have begun to enter transactions, it is important that you
DO NOT change costing method unless you are ready to make the G/L entries that correspond with such
a move.
PST Included
In some industries, products are sold with the PST included in the price of the product. Check this box if
this is the case with your business. A new field “PST Incl.” will appear in the detail section of the sales
order.
Inventory Reorder
Reorder by Location
Do you want to reorder by location? When you select this option you can then specify reorder levels and
reorder amounts per location. Then reordering becomes location specific. This form below is found in Enter
/ Change Inventory Item after you select the Reorder Levels button which is only visible when this option is
checked on.
Seasons
This option is designed for businesses that reorder certain items only at particular times of the year. Here
you will add the various seasons that are applicable. For example you may only stock a certain item at
Christmas. When you are doing your reorder information you can decide if you want to include this season
in this reorder. Otherwise these items that you only stock for Christmas or other seasons, continually come
up for reordering but they are not needed.
See Chapter 12 on Inventory for more information on reordering options.
Path to Images Folder
Enter the Universal Naming Convention (UNC) path to the folder where you will store inventory images.
Click the “…” browse button to browse to the folder if you aren’t sure of the path.
Note:
Page 88
The “images folder” must be located on a network share where all users of have read permission.
Solutions will automatically convert mapped drive letters (such as s:\images) to UNC paths (such as
\\server\solutions\images) so those users without the same drive mapping can still access the information.
Chapter 6 – System Maintenance
Blue Link Solutions™
6.3 System Master Lists
The information contained in this section includes the maintenance of master lists to be used elsewhere in
Blue Link Solutions. Here you will set up the various payment methods you deal with, customer and
vendor types, RMA reason codes as well configuring for Job Costing and Service Manager.
Chapter 6 – System Maintenance
Page 89
Blue Link Solutions™
6.3.1
CURRENCIES/DEPARTMENTS/PAYMENT METHODS
If you click on the Currencies/Departments/Payment Methods tab on the System Interface screen, the
following screen displays:
Currencies
You may define as many currencies as you need, giving each a unique code (up to 3 characters), a
description and an exchange rate expressed as Canadian dollars per unit of foreign currency.
You may also wish to update the exchange rate in this file periodically, or even daily. When entering a
foreign currency transaction, the rate last entered in this file will default, but may be overridden.
Be sure to enter a code for local currency (i.e. CA$) with a rate of 1.0000.
Symbol
This displays the symbol on selected screens and reports such as invoices and purchase orders.
Page 90
Chapter 6 – System Maintenance
Blue Link Solutions™
Display Name
The word to be displayed on cheque reports which represents the whole number. For example, in Canada
and the USA this would be “Dollars”.
Display Name 2
The word to be displayed on cheque reports which represents the number after the decimal place. For
example, in Canada and the USA this would be “Cents”.
Note:
Currency codes must be at least two characters long. Currency symbols other than “$” should not be used
in the code, but may be used in the name. (For example, creating a currency code of “£” will not work
because it is only one character long, and because most keyboards don’t include that symbol as a
character users can type.)
Historical Exchange Rates
Each time the exchange rate is changed it is stored in Blue Link Solutions. You have the ability to print a
report on these changes in Modules | General Ledger | Print Historic FX Rates.
General Ledger Departments
This section will display departments created in Modules | General Ledger | Create GL Departments.
See Chapter 7 for more information on creating departments.
Payment Methods
This section allows you to define the types of payment tendered as Accounts Receivable payments, or as
deposits on sales in the Order Entry System.
Chapter 6 – System Maintenance
Page 91
Blue Link Solutions™
6.3.2
SHIPPING RELATED
Landed Cost Factors ?
This is an Elite feature. A landed cost factor is a cost involved in making the goods purchased ready for
sale. These are costs that you want included into the cost of the inventory item. Examples include, but are
not limited to freight, brokerage, duty, etc. See Chapter 18 – Elite Features for more details on this module.
Factor – enter the factor you wish to track as a landed cost (e.g. Freight, Duty and Brokerage)
Percentage or Amount – If you have a rough estimate on what you normally pay in either of these factors,
enter it here. Choose either the percentage or flat amount.
Default – do you want this factor to default to show up on the PO. If yes then leave checked.
GL Accrual Account - what account you wish to accrue the landed costs to.
Vendor – the vendor who will most likely invoice you regarding the landed cost factor
Inventory Override Level – at the inventory level, do you wish to override this item with a landed cost
factor.
Page 92
Chapter 6 – System Maintenance
Blue Link Solutions™
Shipping Methods And Related Rates
This program allows you to define any number of standard shipping methods, in order to speed daily entry
when entering sales and purchase orders.
Description
This is the description of the shipping method that will display on data entry screens, and print on sales and
purchase orders and invoices.
Configure Freight Manager Rates
By clicking on a freight method you can then set up rates for a postal code range using this freight method.
In this example using Shipping Method “UPS” from L4K 4X2 through L5N 6W4 the cost is $1.00 per cube
rate or $1.00 per weight rate.
See Chapter 18 on Freight Manager for more details.
Note this feature is only applicable for shipping within Canada.
Chapter 6 – System Maintenance
Page 93
Blue Link Solutions™
6.3.3
TERMS / TYPES / RMA REASON CODES
System Terms
Define the terms you would like to be able to use in the A/R and A/P modules. System terms determine
when items are due, allow you to grant/take discounts, etc. Each customer or vendor must be associated
with a set of terms.
Description
This is the unique description used to identify these terms. The description is displayed on data entry
screens and prints on invoices.
Page 94
Chapter 6 – System Maintenance
Blue Link Solutions™
Discount Amount
The amount of discount allowed if paid within the specified discount days. Enter zero if discount is not
applicable.
Max Days
The number of days permitted for the discount defined in the previous column, if any. An invoice must be
paid in full within this number of days in order to qualify for the discount. If discount does not apply, you
may enter zero in this column.
Terms Days
The maximum number of days allowed before an invoice is overdue.
Terms Type
You have three options in this column, which describe the type of discount permitted under these terms.
Pull down the list to display the applicable types, as follows:
%
$
N
Percentage Discount
Dollar Discount
No Discount
When entering or modifying a standard set of terms, you may save the entry or changes that you have made
by moving to the next line.
Customer Types
This section allows you to define any number of customer types, which may be applied to customers in the
customer file in order to differentiate them for information and reporting purposes.
For each customer class you wish to define, simply type in the description and press Enter to move the
cursor to the next line. Some examples of the types of customer classes you may wish to set up are as
follows:
1.
Types that differentiate resellers from end-users.
2.
Types that classify customers by size or volume of sales.
3.
Types that differentiate customers by the type of industry in which they operate.
Vendor Types
This is similar to Customer Types but set up for differentiating your vendors.
Chapter 6 – System Maintenance
Page 95
Blue Link Solutions™
RMA Reason Codes
Enter the RMA Reasons to appear in the RMA Module.
Type Of PO
When entering a Purchase Order you may specify the type of Purchase Order that it is. Maintain the master
list here.
Page 96
Chapter 6 – System Maintenance
Blue Link Solutions™
6.3.4
TAX SETUP
For detailed information on setting up Tax Authorities for your jurisdiction, please see your country specific
reference guide. Ask your Blue Link representative for this document if you do not have it.
Define Tax Groups
Normally you will have one or two tax groups. This is a method of grouping the tax elements for reports
and calculations.
Define Tax Elements
Tax Elements are every possible detail tax levels that need to be calculated. You can define Tax Elements
under each Tax Group.
Define Tax Authorities
The Tax Authority is the end result. This is a 2 character code. Each Customer and Vendor must be
assigned a Tax Authority. Information such as the tax rates per tax element are entered here.
Chapter 6 – System Maintenance
Page 97
Blue Link Solutions™
6.3.5
FAX EXCEPTIONS
By default, all fax numbers with area codes that are different than your company’s area code will be
considered long distance. The Fax Exceptions screen allows you to define exceptions to long distance
dialing rules when faxing out documents from Solutions.
Company’s Area Code
Enter your company’s area code in this field. All fax numbers that begin with this area code will be
considered local calls by Solutions. If the some of the exchanges in your company’s area code are long
distance, enter 000.
Exception List
Enter Area Codes and exchanges for numbers that are in the area code specified in the Company’s Area
Code field, and are local calls.
Page 98
Chapter 6 – System Maintenance
Blue Link Solutions™
6.3.6
JOB COSTING
This screen allows you to enter default information to be used in the Job Costing module.
G/L Integration Accounts
Labour/Materials/Sub Contract/Other
Enter G/L accounts to default for Labour, Materials, Sub Contract and Other costs. You may enter Labour and
Overhead “burden” percentages, which will be added to cost estimates on various reports in order to factor
these indirect costs into overall project costing.
Labour/Overhead/Markup
You may enter a default markup if project pricing is based on a markup from cost.
Next Num
Enter a starting Job Number.
Labour Code
Select an existing Non-Inventory item to be used for Labour. If you have not created such an inventory item,
do so now.
Job Detail On?
Check these boxes to show the job costing fields in the module mentioned. Leave the box blank to hide
these fields.
Chapter 6 – System Maintenance
Page 99
Blue Link Solutions™
Job Detail fields when enabled in
A/P Voucher Screen will add these columns.
Post Time Cards to Job only (not Payroll)
By default, time card information is posted from the time card entry screen into the payroll system. When
the payroll run has been processed, the costs associated with the time cads will be posted to the appropriate
job. By checking off this flag, the time cards will post the costs directly to the job(s) specified. This allows
use of the timecard system when Blue Link Canadian Payroll is not being used.
Post Cost of Goods Sold (Sales Orders)
By default, job costs are posted from the Purchase Order Module, rather than the Order Entry Module. A
construction company leaves this box unchecked to ensure that materials purchased, even though not ending
up as line items on customer invoices, end up associated with the job’s cost. A distribution company would
check this box so that costs are posted to jobs when items in inventory are sold.
If this box is checked, the Sales Order system posts the costs to cost code 10000. This cost code must be
set up prior to any postings.
Cursor Defaults to Job# in AP
By default, the cursor in the AP Vouchers Screen defaults to the G/L Account Number. If you check this
box, you will be changing this default to the Job# field.
Cost Codes
Cost codes are the basis for accurate estimates in the Job Cost system. Use this function to add new cost codes
or to view or update your earlier estimates and transactions. If for any reason you want to change the cost
codes in any non-posted estimate or project transaction, you must edit the estimate or transaction in the
appropriate entry program.
For example, if you want to define a cost code for “Foundations”, you may determine that each foot of
Foundation has a cost of $30.00 in materials and $25.00 in Labour. In addition, you might have the rental fee
for the Forms at $5.00 per foot. To enter this as a cost code, you would use a number that is standard to your
industry (as in construction) or devise your own numbering system (i.e., Foundation = 10000; Drywall =
20000, etc.). After entering the appropriate number, enter the description, perhaps Cement Foundation. Then
for Labour, enter the unit cost of $25.00 with a U/M of “Hr”; for Materials $30.00 with U/M of “Ft”; and for
Other $5.00 with a U/M that is appropriate (i.e. Each, Hours, Days, FT).
The different cost code categories, Labour, Materials, Sub-contract, and Other, allow you to enter unit costs in
more than one category. For example, your cost code for tile flooring could have a labour cost per hour plus
the tile unit cost, and you can enter transactions separately for each category under the same cost code.
The Other category can be used for transactions such as rentals, lease payments, license fees, and similar items
which are not properly included in the first three categories.
Cost Categories are treated as a subdivision of cost codes in reports such as the estimate printout and the Job
Cost Analysis, where estimated costs are compared to actual costs by cost category.
Page 100
Chapter 6 – System Maintenance
Blue Link Solutions™
You can make your cost codes as detailed (numerous) or simple (few) as desired. However, the more codes
you have the better able you will be to keep track of costs.
For example, if you build homes you may have a good idea of the cost per foot to build. You could assign only
one cost code for the per foot cost. However, you won't be able to tell which areas ran over cost and which ran
under. On the flip side, you can get too detailed. Keeping track of each size of nail and quantity is probably
beyond the needs for most contractors. A better alternative is to determine how much detail you need, then
create the appropriate costs codes to go with it. As a final note, cost codes may be added at any time so that
your estimates may get more detailed as you become familiar with the Solutions Job Cost Management System.
Cost Code
The cost code can be up to 10 alphanumeric characters. Use a number or code that is standard to your industry
(as in construction) or devise your own numbering system (i.e., Foundation = 10000; Drywall = 20000, etc.).
Description
The Description can be up to 25 alphanumeric characters; it is displayed with the cost code in Enter Project
Estimates, and Enter Project Transactions.
Labour (Rate)
In the Labour column, type in the rate (in cost per unit) that you want to associate with the cost code you have
created or displayed. You will enter a Unit Cost here. When estimating, the unit cost is multiplied by the
number of units that you enter to calculate the extended cost.
Labour Unit of Measure
U/M (unit of measure) is a memo field that is displayed with the Unit Cost in other programs. These could be
“Hour”, “Each”, “Foot”, etc.
Materials (Rate)
In the Materials column, type in the rate (in cost per unit) that you want to associate with the cost code you
have created or displayed. You will enter a Unit Cost here. When estimating, the unit cost is multiplied by the
number of units that you enter to calculate the extended cost.
Materials Unit of Measure
U/M (unit of measure) is a memo field that is displayed with the Unit Cost in other programs. These could be
“Hour”, “Each”, “Foot”, etc.
Sub-Contract (Rate)
In the Sub-Contract column, type in the rate (in cost per unit) that you want to associate with the cost code you
have created or displayed. You will enter a Unit Cost here. When estimating, the unit cost is multiplied by the
number of units that you enter to calculate the extended cost.
Sub-Contract Unit of Measure
U/M (unit of measure) is a memo field that is displayed with the Unit Cost in other programs. These could be
“Hour”, “Each”, “Foot”, etc.
Other (Rate)
In the Other column, type in the rate (in cost per unit) that you want to associate with the cost code you have
created or displayed. You will enter a Unit Cost here. When estimating, the unit cost is multiplied by the
number of units that you enter to calculate the extended cost.
Other Unit of Measure
U/M (unit of measure) is a memo field that is displayed with the Unit Cost in other programs.
Chapter 6 – System Maintenance
Page 101
Blue Link Solutions™
Time Codes
Time codes define how employees are paid for work tracked through the job costing module’s time cards
function
Note:
This feature is fully integrated with the Payroll Module that ships with Blue Link Solutions, and uses the
employee’s regular and overtime rates as defined in that module.
All standard pay scales (Regular, Vacation, Sick, etc.) should have a time code defined here. Other variations
for pay scales, such as time and a half, shift premium, or a flat rate, can be added here. Any rates using the
regular pay rate as the basis for another rate will calculate the pay for an individual time card by using the
information in the employee record.
Code
This as a 2-character user defined code to distinguish this record.
Type
This determines type of pay for the hours entered. For example, if this is a type 4 then all hours and amounts
entered for this type will be added to the Sick Pay Amounts/Hours in the employee record and on the
employee's pay check. In the case of Overtime, it calculates rate on the Overtime rate listed in the employee
record.
1 – Regular Pay
2 – Overtime Pay
3 – Holiday Pay
4 – Sick Pay
5 – Other Pay
Description
This field is the user-defined name for the time code.
Rate
The rate can represent a multiplier, or a dollar amount. Its function is determined by the “Type” define next.
Enter a figure that will be used to calculate the pay amount in the time cards. The type of pay will determine
whether this is a Rate, Premium, or Flat Amount. You will choose the type after you enter the value.
Type
“R” for rate -
If you enter “R”, the pay for that line will be calculated as Rate (in this case, a
multiplier, defined above) x the employee’s pay rate for the type of pay (defined
above) x the number of hours worked.
“P” for Premium -
If you enter “P”, the program will add the value specified in the Rate to the
regular pay rate. Calculated as (Employee’s Pay + Rate) x the number of hours
worked.
“A” for Flat Amount -
If you enter “A”, then the calculation will be Rate x the number of hours worked.
(Payroll rates for this employee are ignored.)
Page 102
Chapter 6 – System Maintenance
Blue Link Solutions™
Account / Department
Enter the G/L account (and optionally department) to which time card entries under this code should default
(expense account).
When you select this function, you can edit existing time codes or define new ones. To find an existing entry,
you may use the standard record search keys or the F4 list key.
It is recommended that you set up your regular pay time code and 1.0 as the rate. In this way, the regular pay
calculated for any hourly employee will be 1 times the hourly pay amount set up in each employee's record.
Regular overtime should also be established as a rate (R) of 1.0 to multiply the overtime rate in the employee
record by 1.
Another possible use for Time Codes is for standard labour rate classifications. A journeyman plumber might
be paid $20 per hour where an apprentice is paid $15 per hour, etc. By using Time Codes, you can enter these
flat rates and then apply them to any employee in any time card entry.
When you charge an existing time code, remember that these time codes are the basis for calculating pay for all
employees. Update these codes with caution. Also remember that you don't need any codes at all. You may
also mix and match within a single employee's time card. You don't need any Time Code records to make
Time Card entries.
Chapter 6 – System Maintenance
Page 103
Blue Link Solutions™
6.3.7
MULTIPLE UOM
This tab will only appear if you have the Inventory Multiple Units of Measure flag checked on the Inventory
Information tab in System Master. This is intended for adding to Unit of Measure after you have gone
through the Inventory UOM Configuration wizard found in Utilities | Inventory UOM Configuration
Wizard. It is advised that you use the wizard for setting up UOM!
Units of Measure
This section displays all of your Units of Measure. The unit of measure configuration wizard will populate
this tab based on the entries made there. You may add to this list after using the configuration wizard. This
is a list of all of the units of measure you come in contact with and need to be available at the time of the
purchase order or the sales order. Examples include boxes, litres, gallons, cases, feet, inches, pounds, and
kilograms.
UOM Categories
Contained in this list are the categories of the above units of measure that are listed. For example, boxes
and containers may be included under a category of Containers. Therefore containers will be added.
Code
This is a 10 character code for this UOM.
Page 104
Chapter 6 – System Maintenance
Blue Link Solutions™
Description
This is a description of the UOM code.
Base UOM
For each category there needs to be a base unit of measure. This base UOM is how the inventory is stored
in Blue Link Solutions. When a transaction occurs in another UOM, it is calculated up or down from the
base UOM. This is explained in more detail in Chapter 12 on Unit of Measure.
Override Qty?
Per UOM category of inventory items, do you want to be able to override the quantity breakdown of each
inventory item as it relates to unit of measures. For example perhaps the standard breakdown of each to
boxes is 10:1. This means that 10 items with a UOM of “Each” make up 1 box. Perhaps there are a few
inventory items where this ratio does not apply. Then you would want to override the quantity.
UOM Conversion
In this section the units of measure are assigned to the various categories. As well the breakdown of
quantity ratios are displayed here. The base unit of measure will always have a quantity of “1”.
Chapter 6 – System Maintenance
Page 105
Blue Link Solutions™
6.3.8
INVENTORY CONFIGURATOR ?
The Configurator is an Elite feature.
It allows you to configure templates for categories. See Chapter 18 – Elite Features for more details.
Page 106
Chapter 6 – System Maintenance
Blue Link Solutions™
6.3.9
INVENTORY CATEGORIES
This section is designed to configure the sub categories found in Inventory Control. This is designed for
subcategories for Web.Venture™ but can be used as additional fields for reporting.
Chapter 6 – System Maintenance
Page 107
Blue Link Solutions™
The above example relates to a gift distributor:
Category
This field is shared with the category from the configurator tab. Any additions here will be added to the
Inventory Configurator tab. In this example we have types of products including a music box. We will
continue with the music box.
Sub Category 1
By clicking on a category, you may then add Sub Category 1. In this example we want to add the materials
that these music boxes are so we will add metal and wood. We will continue with wood.
Sub Category 2
By clicking on Sub Category 1 you may add a further sub category. In this example the types of wood are
available which include Ash, Maple, and Oak. We will continue with flat Ash.
Sub Category 3
By clicking on a specific item in Sub Category 2 you may add a third sub category. In this example Ash is
selected and available are the various types of Ash.
To Summarize:
Category – Music Box
Sub Category 1 – Wood
Sub Category 2 – Ash
Sub Category 3 – White
Then when in inventory you may select the appropriate categories as set up here.
Page 108
Chapter 6 – System Maintenance
Blue Link Solutions™
6.4 System Maintenance Purge Routines
This option is available only from the Explorer-style menu.
Chapter 6 – System Maintenance
Page 109
Blue Link Solutions™
6.4.1
CLEAR SYSTEM DATA
The purpose of this program is to delete data from one or more of the modules of Blue Link Solutions. This
feature should only be used in order to clear the demo data supplied with the package, prior to setting up
your own information. This is an extremely dangerous module, and should only be used if you are
certain that you know what you are doing.
When you select this option, the following screen is displayed:
For each of the modules listed on the screen, you have three options:
D – to delete all the data for that module
C – to clear transaction related data from the module, but leave the master files intact
N – to skip this module altogether and not clear any data
When you have finished making your selections, click on the Run Clear Data button to clear the data. You
will then see the following message box reminding you to make sure that you have backed up your data files
and logged all users out of the system.
Page 110
Chapter 6 – System Maintenance
Blue Link Solutions™
After clicking Yes to proceed, you will be prompted to enter in the word PURGE before you can purge your
data. This is designed to prevent the situation where you click ‘OK’ to messages without reading them.
Chapter 6 – System Maintenance
Page 111
Blue Link Solutions™
6.4.2
END OF MONTH ROUTINE
This program should be used at the end of every month in order to update certain of the monthly amounts.
The program also optionally allows you to purge old transaction data. If you do not perform this routine at
the end of every month, the only numbers that will be adversely affected will be the month to date numbers,
the customer, vendor and inventory files.
When you select this option from the menu the following screen is displayed:
Reset Month to Date Figures
The first three check boxes on this screen should always be checked when using this program at the end of
the month. This will cause the month to date amounts in the vendor, customer and inventory files to be
reset to zero.
Purge Old Data (Optional)
The last four options on this screen may be used to purge (or delete) transactions prior to a date specified by
you. This is optional, and it is recommended that these transactions not be purged until it becomes
necessary due to disk space limitations or volume of transactions.
If you intend using any of the transaction purge options, it is strongly recommended that you first perform a
separate backup of your data (DATA9_0.MDF). In order to select a transaction purge, simply check the
checkbox and enter the date prior to which you want all transactions to be purged. Please note the
following for the various options:
Page 112
Chapter 6 – System Maintenance
Blue Link Solutions™
General Ledger Detailed Trial Balance file
All General Ledger transactions prior to the date specified will be purged.
Accounts Receivable transaction purge
All transactions dated prior to the date specified, which have been fully paid, will be purged.
Accounts Payable transactions
All transactions which have been fully paid or allocated, and which are dated prior to the date specified,
will be purged.
Inventory Adjustments
All inventory adjustment records prior to the date specified will be purged.
Click the “Process” button to continue with the purge.
The following warning screen will be displayed:
Click Yes to continue with the purge; click No to reconsider any options, click Cancel to cancel the
operation.
Chapter 6 – System Maintenance
Page 113
Blue Link Solutions™
6.4.3
END OF YEAR ROUTINE
This program should be run at the end of your fiscal year, and is used to close off your books and bring
forward the appropriate balances in the General Ledger. In addition, it may be used to reset the month-todate and year-to-date figures in the customer, vendor and inventory files.
When you select this option from the menu the following screen displays:
The year end routine performs the following tasks:
REQUIRED TO CLOSE FISCAL YEAR:
Update the fiscal year date
Check this checkbox if you wish the system to automatically update your fiscal year start date. The current
fiscal year start date is displayed in the screen, and will be incremented by one year.
Update the General ledger Summary Files (Mandatory)
This box is always checked since these files need to be updated after a Year End is processed.
Page 114
Chapter 6 – System Maintenance
Blue Link Solutions™
OPTIONAL UPDATES (Recommended):
Update the Year to Date and Last Year figures in Accounts Receivable
Check this box if you wish to zero out the year-to-date figures in the customer file, and move them to the
previous year figures.
Update the Year to Date and Last Year figures in Accounts Payable
Check this box if you wish to move the year-to-date figures in the vendor file to the previous year fields,
and zero out the year-to-date fields.
Update the Year to Date and Last Year figures in Inventory
Check this box if you wish to zero out the year-to-date figures in the inventory file, after moving them to the
previous year fields.
OPTIONAL PURGE ROUTINES (Not Recommended):
Clear the General Ledger Transaction file
Check this box if you wish to clear out all history transactions for the General Ledger Module. We
recommend that you do not select this option unless it is absolutely necessary.
Clear the Bank Management History for the new year
Check this box if you wish to clear out all history transactions for the bank management module. We
recommend that you do not select this option unless it is absolutely necessary.
Once you have made your appropriate selections, click on the Process button to process your selections for
the End of Year program. The following warning screen will be displayed:
Click Yes to continue or No to cancel the operation and return to the previous screen.
Chapter 6 – System Maintenance
Page 115
Blue Link Solutions™
6.4.4
PURGE HISTORY INFORMATION
This program may be used to clear out historical data or posted transactions between a range of dates
specified by you. When you select this option from the menu, the following screen is displayed:
Caution:
Blue Link does NOT recommend purging history information unless transaction volumes are extremely
high (over 100000 transactions per month) and a noticible system slowdown has been noticed that cannot
be fixed by any of the regular maintenance methods. Only companies who’s compressed data file
EXCEEDS 150MB should consider the need to purge history information.
Clear Which Area?
Select the transactions which you wish to clear:
Sales Order
Select this if you wish to purge posted invoices from the sales order module.
Purchase Order
Select this option if you wish to clear the purchase order history, which comprises the detailed record of all
received purchase orders.
Bank Management
Select this option if you wish to purge all reconciled bank management transactions between the specified
dates.
Serialized Inventory
Select this option if you wish to clear the detailed records of all serial numbers sold through the sales order
module.
From/Thru Dates
Enter the transaction dates between which you wish the purge to commence.
Note:
Page 116
Before running this option, you should backup your data file (My Company DATA9_0.MDB) and
archive this backup in a safe place.
Chapter 6 – System Maintenance
Blue Link Solutions™
6.5 Utilities
To get to this function, choose System Maintenance | Utilities.
The Utilities section in System Maintenance, allows you to control the following procedures:
?
?
?
?
?
?
?
?
?
Check Control Account Balances
Recalculate A/R and A/P Balances
Recalculate General Ledger Summaries
Inventory UOM Configuration Wizard
Create/Verify Inventory Locations
Change Codes (Inventory, Customer, Vendor, G/L)
Contact Manager Maintenance
Import from Outlook
Check References
In addition to the end-user utilities mentioned above, Blue Link has added the following utilities for internal
use. These functions are password protected and are designed to facilitate product maintenance for Blue
Link Solutions dealers. Please do not use these items:
? Table Viewer
Chapter 6 – System Maintenance
Page 117
Blue Link Solutions™
6.5.1
CHECK CONTROL ACCOUNT BALANCES
Use this form to quickly check that your control accounts are in balance:
Should there be a variance (as is depicted above) further investigation is required:
1.
Did someone post to your control account?
2.
Did a system crash during the middle of a post routine?
3.
Did someone change inventory costing methods without taking the appropriate precautions?
4.
Is the variance due to rounding, or foreign currency transactions?
If you are unable to identify the source of the variance on your own, contact your dealer or Blue Link
Associates for assistance.
Page 118
Chapter 6 – System Maintenance
Blue Link Solutions™
6.5.2
RECALCULATE A/R AND A/P BALANCES
This function will recalculate the summary balances on the Customer and/or Vendor file from the detailed
transaction files. If you wish to use this function, please ensure that you are the only user on the system at
this time.
Choose the appropriate section to recalculate and click the Process button.
A message will appear when recalculation is complete.
Chapter 6 – System Maintenance
Page 119
Blue Link Solutions™
6.5.3
RECALCULATE GENERAL LEDGER SUMMARIES
The following window will be displayed, when you chose this option:
This function is designed to clear the General Ledger Chart of Account Totals and re-post the General
Ledger Transaction File to the Chart of Accounts.
Note:
This should only be run for fiscal years in which you have NOT cleared/purged any G/L transactions. If
you have purged transactions, this program will cause INCORRECT G/L BALANCES to be calculated and
saved.
Click the Process button to proceed; click the Cancel button cancel the request.
Do Previous Year?
Since the current year is always processed, checking this box will fix the previous year’s General Ledger
transactions.
Do 2YR totals (and Previous)?
Checking this box will recalculate General Ledger Transactions going back two years or more.
Page 120
Chapter 6 – System Maintenance
Blue Link Solutions™
6.5.4
INVENTORY UOM CONFIGURATION WIZARD
This is designed to assist you in setting up Unit of Measure for the first time. Please see Chapter 12 on Unit
of Measure Configuration for more details.
Chapter 6 – System Maintenance
Page 121
Blue Link Solutions™
6.5.5
CREATE/VERIFY INVENTORY LOCATIONS
This function is designed to create inventory location records for all inventory items, recalculate units on
sales order (including firmed production control lots), on hand, on back order and on purchase order, and
recalculate the inventory total value. The following window will describe the procedure to you:
1.
Create Inventory Locations – it is necessary to run this routine when you have created a new
warehouse location. It creates a location record for that warehouse for each inventory item.
a. Creates a corresponding record in [Inventory Location Information] table for each record
in [Inventory Master Locations]
The following are designed to fix data where there is a discrepancy between 2 sets of information (for
example detailed records do not correspond with summary records etc.)
2.
Recalculate units on sales order / on hand – this will recalculate the detailed tables of on hand
items and sales orders
? UOSO = Quantities allocated on Invoice Footer + quantity on Production Lots with type
“F”
? Used to bring [Invoice Footer], [Production Control Kit], [Inventory] and [Inventory
Location Information] tables into sync with each other
? Updates [Inventory] and [Inventory Location Information]![UOSO] with calculated
UOSO value
? Updates [Inventory]![UOH] with ([Inventory Location Information]![UOH]+ [Inventory
Location Information]![UOSO]-calculated UOSO)
? If the New [Inventory]!UOH value < 0 then set to 0
3.
Recalculate units on back order from sales orders – this ensures that the summary number of
items on backorder correspond with the detailed records
? Used to bring [Invoice Footer], [Inventory] and [Inventory Location Information] tables
into sync with each other
? Updates [Inventory] and [Inventory Location Information]![UBO] with calculated values
from [Invoice Footer]
Page 122
Chapter 6 – System Maintenance
Blue Link Solutions™
4.
Recalculate units on purchase order from purchase orders – this will recalculate the detailed
Purchase Order tables to give you a summary number
? Used to bring [Purchase Order Footer], [Inventory] and [Inventory Location Information]
tables into sync with each other
? Updates [Inventory] and [Inventory Location Information]![UOO] with calculated values
from [Purchase Order Footer]
5.
Synchronize inventory movement file – this will take into consideration items on hand and adjust
the movement log if necessary
? Used to bring [Inventory Movement] into sync with [Inventory Location Information]
table
? Appends record with net change amount to [Inventory Movement] to make the
BalanceAfter equal [Inventory Location Information]![UOH]+[UOSO]
6.
Synchronize FIFO layers with inventory totals – this will look at the detailed records of items
on hand and synchronize the FIFO layers table to correspond.
? Used to bring [Inventory Manufacturer Information] into sync with [Inventory]
? Records appended or layers exhausted in [Inventory Manufacturer Information] to equal
[Inventory]![UOH]+[UOSO]
Click the Process button to proceed; click the Cancel button cancel the request.
If you continue, a message indicating that the processing of locations records is complete. Click OK and
Cancel to exit this function.
Select “One Item” to re-calculate the figures for a particular inventory item.
Click the “Preview Summary Report” button for a summary of changes made to inventory items and
quantities as a result of running this function.
Chapter 6 – System Maintenance
Page 123
Blue Link Solutions™
6.5.6
CHANGE CODES
(CUSTOMER, INVENTORY, VENDOR, G/L)
This routine allows you to change a code (customer, inventory product code, vendor code, g/l account
number) from its current value, to a new value specified by you. All history will be updated.
You will enter the Customer or Inventory Code that is presently in Solutions, and then you will enter the
new Code, as indicated, then click the process button.
Once you click on the ‘Process’ button, the following screen will appear to confirm completion:
This window would appear if you made the change to an Inventory Code:
Page 124
Chapter 6 – System Maintenance
Blue Link Solutions™
6.5.7
CONTACT MANAGER MAINTENANCE
The contact manager maintenance form is used in conjunction with the features available in the Contact
Manager Module (see Chapter 15).
The basic features include the ability to:
Clear all contact manager data
Change Salesperson Numbers
Import all current Accounts Receivable (Customer) information to the Contact Manager
Purge Contact Notes associated with all contacts
With a date selection filter
Import all current Accounts Payable (Vendor) information to the contact manager
Export Contacts to Outlook
To perform any of these functions, select the option you want, and click the process button.
Chapter 6 – System Maintenance
Page 125
Blue Link Solutions™
6.5.8
IMPORT FROM OUTLOOK
When you click on this option, Blue Link Solutions will walk you importing your Outlook Contacts one
at a time.
You will then enter the contact’s first name, as the following depicts:
You will then enter the last name as follows:
You will then receive a confirmation message that the contact has been imported.
Page 126
Chapter 6 – System Maintenance
Blue Link Solutions™
6.5.9
CHECK REFERENCES
Microsoft code libraries are required for Solutions to work in harmony with other Microsoft Office
products. Unfortunately, as Microsoft product versions change, incompatibilities between versions can
arise.
The check references utility is included as a diagnostic tool that will allow users to quickly determine if the
version of files located on their machine match the versions of the files that Blue Link Solutions is
expecting to find.
When you select the check references option from the utilities menu, you’ll be asked if you’d like to see the
table of results. If so, click yes:
The table of results will list the various code libraries used with Blue Link Solutions, the compiled version #
expected, the current version # present on your machine, and the path to the files expected.
This information is intended for use by your dealer or Blue Link for troubleshooting the cause of problems
such as the appearance of “#name?” in date fields.
Chapter 6 – System Maintenance
Page 127
Blue Link Solutions™
6.5.10
TABLE VIEWER
This function is primarily for technical support and is NOT for the end user. The password required is NOT
the logon password.
Page 128
Chapter 6 – System Maintenance
Blue Link Solutions™
6.6 Current User Defaults
To set current user defaults, click on the user default button. It is located on the menu bar, toward
the right hand side of the screen. When you click on this button, the following screen will display:
Any settings on this screen will override the defaults set up in System Interface | Outlook and Word
Integration.
PDF File Generation
In System Maintenance | System Master | Data Entry & Other Defaults you can specify global settings
for PDF File Generation. The setting found under Current User Defaults, allows for these defaults to be
overridden at the user level.
Page 130
Chapter 7 – General Ledger
Blue Link Solutions™
7: General Ledger
The General Ledger module allows you to keep track of your overall accounting operations. In this module,
you can print your journals and a detailed trial balance, and enter and post adjusting entries.
Be sure that you have carefully set up your system according to Getting Started to use the programs in this
module correctly.
Access General Ledger through Administration | General Ledger.
Chapter 7 – General Ledger
Page 131
Blue Link Solutions™
7.1 Enter/Change General Ledger Accounts
Use this screen to view accounts from the General Ledger Chart of Accounts, input budget information, or
view detailed transactions for a particular G/L account for any current year period. The following sample
screen is followed by explanations of the screen fields:
Lookup
Use this pick list to select one of your current G/L accounts, or type a new G/L account number to create a new
account.
Page 132
Chapter 7 – General Ledger
Blue Link Solutions™
This field changes to the Account field after a selection has been made. If this field is not displayed, click on
the “New” button at the bottom of the screen.
Account
The actual General Ledger account code you are currently viewing. This field specifies which General Ledger
account you wish to view.
To view a different account, click the “New” button at the bottom of the screen to display the Lookup field
again.
Dept
Type in the General Ledger department code. This field specifies the department whose General Ledger
account is to be viewed. If you are not using General Ledger Departments, or if the account you wish to view
has no department name, leave this field blank.
Note:
G/L Departments are not created on this screen. To create a G/L Department, start by creating the
account code it will be based on here, then use the Create G/L Departments function described later to
generate the department codes for the G/L accounts that require departments.
Description
This field contains the title for this General Ledger account. This can be changed.
Chapter 7 – General Ledger
Page 133
Blue Link Solutions™
Type
The type of account:
A – Asset
I – Income
E – Expense.
L – Liability
O – Owner's Equity
Category for Financial Ratios
This field is a sub category for each account type. It is intended to be used for the ratio calculation on the
Executive Summary screen.
The following Types of GL accounts include these categories:
Assets
? Current Assets
? Inventory
? Long Term Asset
Liability
? Current Liability
? Long Term Liability
Owner Equity
? Equity
? Shareholder Equity
Income
? Abnormal Income
? Other Income
? Sales
Expense
? Abnormal Expense
? Cost of Sales
? Operating Expense
GIFI Code
These codes are maintained by the Canada Custom and Revenue Agency (CCRA). Visit their website for
more detail (www.ccra-adrc.gc.ca). You may link up your GL codes with these standardized codes.
Notes
You may want to write an explanation of what this account is used for. Enter that information into this memo
field.
Detail
This button, located next to each month, may be used to display the transaction detail for the selected month.
For example, if the current year column next to the month of November contains an amount of $3,730.68,
clicking on the detail button will display the details behind the $3,730.68.
Page 134
Chapter 7 – General Ledger
Blue Link Solutions™
Drill Down
By double-clicking on one of these fields you are able to view the entire journal entry for this
transaction.
Chapter 7 – General Ledger
Page 135
Blue Link Solutions™
The fields displayed are as follows:
Field Name
Date
Code
Invoice Code
Description
TT
Post Date
Entered By
Information Displayed
The transaction date posted (this date determines the month in
which the transaction has appeared).
Displays the customer code, vendor code, bank account number
or other reference depending on the source of the transaction.
The transaction reference number. Invoices show the invoice
code, purchase orders show the purchase order number, G/J
transactions show the “Number” (generated by the system, or
specified by the user)
A detailed description of the transaction (user specified from the
G/J, A/R & A/P Voucher screens, system generated from other
modules such as Purchase Order, Order Entry Invoices, RMA,
etc.)
Transaction Type – indicates the source / type of a transaction.
Type codes include:
CD – Cash Disbursements (i.e. A/P Cheques)
CR – Cash Receipts (i.e. A/R Customer Payments)
GJ – General Journal Entries
OT – Other Transactions (i.e. Inventory adjustments)
PR – Payroll
RP – Credit Purchases (i.e. Purchase Order Receipts)
RS – Credit Sales (i.e. Invoices)
The date the transaction was posted. This date is the system
date of the users’ system when the transaction was posted.
The username of the user who posted the transaction.
Current
These are the monthly amounts that have been posted from the various programs in the current year.
Budget
These are the monthly amounts that you have entered as comparisons for the actual (Current) amounts that will
be posted. Budget amounts may be changed in this program and used to compare financial statements. This is
to assist you in your projections or to review performance. Ensure that you select the Budget column when
setting up Column Definitions.
Note:
1. In setting up budgets for Income or Liability accounts enter them as negative.
2. To setup budgets for Balance Sheet accounts be sure to enter an opening balance as well as entering
the monthly movement per month.
1 Year Past
The monthly posted amounts from the previous year.
2 Years Past
The monthly posted amounts from 2 years past.
Last Updated By
At the bottom of the screen is the last updated by field. This identifies which user was the last one to
change information on this particular account.
7.1.1
1.
CREATING NEW ACCOUNTS
Click the “New” button at the bottom the screen.
Page 136
Chapter 7 – General Ledger
Blue Link Solutions™
2.
Click into the “Account” field and type a new account number and press Enter. The following
screen will be displayed, stating that it cannot find the account. Would you like to add (or create) a
new account.
3.
Click Yes to add the new account; click No to cancel the request.
4.
Enter the Department (if applicable), the Description for the account and select the Type from the
drop-down list.
5.
You can then enter budget amounts, if required.
6.
To save the new account, click on the Save button at the bottom of the screen. The following
screen will be displayed.
7.
Click Yes to save the new account to Blue Link Solutions; click No to cancel the request.
7.1.2
SETTING UP BUDGETS
You can change only the budget amounts in this program. The program will automatically calculate the Ending
Balance for that column. Credits should be entered as negative numbers, debits as positive numbers.
You must save the record before your budget changes are permanently updated in the file.
7.1.3
DELETING ACCOUNTS
1.
Click the down arrow in the Account pick list and select the account to be deleted.
2.
When it is displayed on the screen, click the “Delete” button at the bottom the screen. The
following screen will be displayed:
Chapter 7 – General Ledger
Page 137
Blue Link Solutions™
3.
Click Yes to delete the account; click No to cancel the request.
Note:
Page 138
You are NOT able to delete accounts with transactions on file. If an account is no longer used, you may
use the change G/L code utility and a prefix to the code which causes it to sort to the bottom.
Chapter 7 – General Ledger
Blue Link Solutions™
7.2 General Journal Entries
Use this screen to enter General Journal transactions. Since the majority of transactions are posted by the
various modules of Blue Link Solutions, this screen is most commonly used for adjustments, year-end
depreciation* adjustments, etc.
This screen should not be used to make adjustments to control accounts except in extreme cases, since the
control accounts will not be updated. Control accounts include:
Bank Accounts
Inventory Asset Accounts
A/R or A/P control accounts
PO’s Received, Not Invoiced
Note:
If an adjustment to a control account is required via a G/L entry, you will be prompted for the password
defined in the system interface. It may be necessary to make such adjusting entries, but such occasions
should be extremely rare.
The following screen is an example of an entry created in Enter General Journal Entry, followed by an
explanation of the screen fields.
Lookup
Allows you to lookup a previous transaction. If you have a transaction that you have not yet posted because it
did not balance or you did not have enough information, note down the transaction number and then you can
save it by clicking on the Save button. When you want to recall it again, click on the Lookup down arrow and
select it by transaction number from this list.
*
Blue Link’s Asset Register product can track fixed assets, and calculate depreciation automatically using straight-line,
or CCA methods.
Chapter 7 – General Ledger
Page 139
Blue Link Solutions™
Number
Enter the transaction number you would like to have for this G/J entry.
Note:
The system can automatically generate this number. To have the system generate the number for you,
skip this field and enter the trans. Date, G/J Transaction Code, and Details. The transaction number is
assigned when you move from the header to the order details. The next available number is pulled from
the “Next Numbers” section of the System Interface.
Trans Date
The date that determines what period the transaction will be posted to. You can enter transactions that affect
previous periods or years by entering the appropriate date. This is very useful at the beginning of the new year
when you're trying to keep up with the current work and still make adjusting entries to the previous year.
G/J Trans Code
This is generally the customer, vendor, employee, or product code, or the journal entry number. Enter a code
that will help you correctly identify this transaction. This is a 10 character alphanumeric field.
Details
The text you enter in this field becomes the default in the Description fields of each of the lines of the entry.
G/L Account
This is the General Ledger Account Code. When you post your transactions, the program will post each line
item to the account entered here.
Dept
The General Ledger Department Code specifies the department where the line item is to be posted, if
applicable.
Account Name
The name of the GL Account selected appears here.
Description
Use up to 30 characters to describe the transaction. This is automatically filled in with the contents of the
Details field, or the Description of the line above, if it has been modified. This description appears in the GL
transaction reports.
D/C
D - Debit this amount or C - Credit this amount. This field will default to whatever the normal status is for the
General Ledger Account, but you may change the entry. Press the Delete key to delete the letter and type in a
different letter.
Amount
The amount you want to debit or credit in this transaction, and the amount will be entered in the appropriate
field.
Debit Amount
The total amount of debit line items entered.
Credit Amount
The total amount of credit line items entered.
Page 140
Chapter 7 – General Ledger
Blue Link Solutions™
Amount to Balance
To assist you in entering long lists of line items, the program calculates the amount needed to balance the
transaction. The program displays the net amount and whether it is a debit (DR) or credit (CR). This is a
running total and is updated each time a new entry is made or changed.
To balance the transaction at any time, enter the appropriate account code and make the transaction specified.
For example, if you were entering petty cash transactions and the final Amount To Balance amount was
395.23 CR, then your last transaction would be to enter your Petty Cash Account code, a C at the D/C field,
and 395.23 for the amount. After you accept the transaction, the program will then display an Amount To
Balance amount of 0.00.
Notes
Enter Notes on this Journal Entry for a detailed description of what the entry is for. This field is a memo
field and therefore is unlimited. These notes print on the following reports:
1.
2.
3.
General Journal Transaction
General Ledger General (GJ) Journal
General Journal by Number/Date
Reverse? / Reverse Date
If this box is checked, then a second General Journal entry will be generated on the dated specified in the
Reverse Date field, reversing the entry - all current credits will become debits and vice versa. The reverse date
field will now become active and the date for reversal may now be entered.
Post Transaction
Clicking on this button posts the transaction to the General Ledger.
Print
You can print a copy of your General Journal entry prior to posting.
Print Preview
You can preview your General Journal Entry prior to printing.
7.2.1
CREATING A NEW TRANSACTION
If necessary, click on the “New” button at the bottom of the screen. The cursor will be on the Number
field. Press tab to bypass it and go to the Trans. Date field.
The Transaction Date field defaults to the current date. You may change this date if you are making a
prior period or prior year adjustment.
Enter a G/J Transaction code. This is generally the customer number, vendor number, employee number,
or product code, or the journal entry number. Enter a code that will help you correctly identify this
transaction.
After the top fields are filled in, the cursor is positioned in the G/L Account field in the entry. Now you are
ready to enter the individual line items. If you are not sure what the correct account number is, the program
can display your accounts. To use this feature, click on the arrow to the right of the G/L Account field, or
press F4 to display your options.
Enter the account number in the Account field. If this is the account you want, press Enter at this point and
the program will find and display the appropriate account information.
Chapter 7 – General Ledger
Page 141
Blue Link Solutions™
Enter the Amount for the line item.
Changing A Line Item
To change a line item that has been entered, place the cursor on the field of the line item that you wish to
change. You may change any or all of the field values. The Amount To Balance value will be updated
automatically.
Deleting a Line Item
There are two ways to delete a line item (record).
1.
Click on the line you want to delete. Click on Edit | Delete Record from the menu.
2.
or
Click the record selector to the left of the line item you wish to delete (the triangle). Then press the Delete
key, or choose Edit | Delete from the menu bar.
The record selector is the triangle to the left of the record.
Either method, the following screen will display, prompting you for confirmation and warning you that you will
NOT be able to undo this if you change your mind after.
3.
Click Yes to remove the line and the other lines will be properly updated; click No to cancel the request.
7.2.2
SAVING A TRANSACTION
You can save the transaction prior to posting so that you can recall it later to make changes to it. Once a
transaction is posted, it cannot be changed.
1.
Click on the Save button.
You are then asked if the transaction was entered correctly
If you don't want to save the transaction, choose No when you are asked if you want to save the transaction.
To save the transaction, press the Enter key or click Yes. The Next General Journal Number is incremented,
and the program enters the transaction into the General Journal.
Page 142
Chapter 7 – General Ledger
Blue Link Solutions™
7.2.3
CHANGING AN EXISTING TRANSACTION
A previously entered transaction may be changed repeatedly before it is posted. To find a previous transaction,
do one of the following:
1.
2.
Enter the correct transaction number in the Lookup field and press Enter
or
Use the standard record search from the Number or Trans. Date
fields
If the transaction exists, all the transaction information is displayed. You can change any of the fields. The
Amount To Balance fields keeps track of the amount needed to balance the transaction. From this point on,
the operation of the program is the same as entering a new transaction.
7.2.4
DELETING AN EXISTING TRANSACTION
1.
Find the existing transaction using the methods described above in Changing an Existing Transaction.
2.
click the Delete button to the right of the Save button.
The following message will be displayed:
3.
Click Yes to delete entire transaction; click No to cancel the request.
Note:
7.2.5
You may delete any transaction until it is posted. Deleting a transaction or line item removes the record
from the General Journal files.
POSTING AN EXISTING TRANSACTION
1.
To post an existing transaction, recall the transaction using methods described
Existing Transaction.
2.
Then click the Post Transaction Button to post
General Ledger. Note: This program only posts
in Changing an
the transaction to the
balanced transactions.
Posting a General Journal transaction writes it to the General Ledger, posts it to the General Journal, and
removes the transaction from the General Journal transaction file.
Chapter 7 – General Ledger
Page 143
Blue Link Solutions™
7.3 Enter Recurring General Journal Entries
This program provides you with a convenient way to post a periodic transaction without reentering the
transaction every time. Once the transaction "template" is entered through this program, the posting program
(Generate General Ledger Recurring Transactions) allows you to call up the “template” for subsequent
transactions to be filled in automatically. The current date is posted as the transaction date.
New Fields--Recurring Items Only
The following fields only occur in the entry screen for recurring General Journal transactions. For explanations
and instruction for the other fields, see section 7.3 Enter General Journal Entry.
# Of Occurrences
The entry in this field indicates the number of times per year that the transaction occurs. For example, the # of
Occurrences entry would be 52 for a weekly transaction or 12 for a monthly one. This field is used for
calculating the next transaction date.
Number Left
This entry indicates the number of transactions left, calculated from the initial # of occurrences entered and
how many transactions have been posted.
Page 144
Chapter 7 – General Ledger
Blue Link Solutions™
Next Date
The date the next transaction is scheduled calculated from the initial date entered and how frequently this
transaction occurs.
Transaction Notes
You may enter detailed transaction notes on this entry which will print for every entry generated from this
template. Similar to Enter General Journal Entry.
See 7.3.1 Creating a new Transaction for an explanation of how to enter a transaction in the General Journal.
The fields described above are required fields. You are not allowed to save a record that does not have the
required fields filled in.
Chapter 7 – General Ledger
Page 145
Blue Link Solutions™
7.4 Generate Recurring Transactions
Use this screen on a regular basis to post the recurring items entered in Enter General Ledger Recurring
Transactions.
When the preceding screen is displayed, you can generate and post all transactions up to the “thru” date on the
screen. You can generate and post transactions before their scheduled date by setting the Generate
Transactions due by date into the future. Then select the Generate button.
Page 146
Chapter 7 – General Ledger
Blue Link Solutions™
7.5 Create Departments
Use this screen to create departments for any or all of your General Ledger Accounts.
Select All or a range of G/L codes for which you want to create departments. Next, enter a four character
department code that you wish to add. Finally, press the Process Department button to add the department
code to the G/L.
Chapter 7 – General Ledger
Page 147
Blue Link Solutions™
7.6 EXECUTIVE SUMMARY SCREEN
The following is the window that will pop up when you request the Executive Summary Screen:
The Executive Summary Screen provides you with a very fast and effective overview of your critical
business issues.
7.6.1
INFORMATION INCLUDED
AR and AP Aging
This is summary information of your aging. You can also get this information from the bottom page of your
aging reports found under Accounts Receivable and Accounts Payable.
Drill Down
You may drill down on the summary number to see what the detailed information is behind that number.
Simply double click on any of the numbers found in the Aging sections.
Page 148
Chapter 7 – General Ledger
Blue Link Solutions™
Bank Management Deposits to be Processed
This is the amount of money that has been received but not yet deposited into the bank.
Current Bank Account Balances
For each bank account set up in Modules | Bank Management | Setup Bank Accounts, the ending balance is
displayed here.
Net Income for Current Month and Year
Displayed is the net income for the current month and the year to date income.
Inventory Value
This will display the value of your inventory using average costing or FIFO costing depending on the
method you are using.
Financial Ratios
Financial ratios are quick identifiers to inform you in how your business is doing by comparing the ratios to
the industry average and to prior years of business. These are calculated based on predefined formulas.
These formulas are aided by properly setting up your category for your chart of accounts. The Financial
Ratios Supporting Figures are found on the tab behind the Financial Ratios.
Chapter 7 – General Ledger
Page 149
Blue Link Solutions™
If you hover your cursor over the ratio you will see the calculation formula.
Note:
The key to using ratios successfully is to use them as a guide. The guidelines provided may or may not
be relevant for your company. Speak to your accountant for more information.
Liquidity
Liquidity ratios measure a company’s ability to meet its short-term obligations with its current or liquid
(ability to turn to cash) assets. The two ratios calculated are the Current ratio and the Acid Test or Quick
ratio. They both take into consideration a comparison of current assets compared with current liabilities.
The Quick ratio differs from the Current in that it excludes inventory. The idea is that some companies
may have a lot of money invested in inventory which is not as liquid as the other current assets, and
therefore this company should see how they fair with that taken into consideration.
Current ratios are generally found to be between 1 and 3 whereas the Quick ratio should be around 1. A
very high ratio is not good either as it indicates that you are not making good investment of your current
assets.
Asset Management
These ratios are also known as activity ratios.
The Average Collection Period ratio informs you in how well you are managing your Accounts Receivable.
A very high ratio indicates that you have a high percentage of sales not yet collected for, whereas a very low
Page 150
Chapter 7 – General Ledger
Blue Link Solutions™
ratio may mean that you are too strict on granting credit to your customers which may ultimately lead to lost
sales.
The Inventory Turnover ratio shows the relation to inventory and cost of sales. A high ratio indicates that a
lot of inventory can be sold without keeping very much inventory on hand. This means that you are
efficient in managing your inventory, whereas a low ratio may mean that you hold a lot of obsolete items in
stock or manage your inventory poorly.
The Long Term Asset Turnover ratio indicates how effective a company is in managing its long term assets
in relation to sales. All things being equal, a higher ratio means more efficient use.
Total Asset Turnover compares all assets in comparison to sales. It takes into consideration current assets
as well as fixed assets. A higher ratio is seen as more efficient management of assets.
Debt Management
Debt management ratios focus on the ability to manage debt
Debt to Asset ratio measures the ability to use creditors to finance the assets of your company. A larger
ratio shows that you are making more use of creditors to finance your business. Of course a very high ratio
is not good or it could cause insolvency.
Debt to Equity ratio measures the amount of debt in comparison to the amount of equity held by a company.
A higher ratio means that your creditors are financing more of the business than the owner’s which can
cause insolvency.
Long-Term Debt to Equity ratio measures the same as the Debt to Equity ratio except that it only takes into
account Long Term debt. This separates out current liabilities and its effect on the Debt to Equity ratio.
Note:
One ratio taken in isolation does not tell the picture of a company. You must take many ratios into
consideration when evaluating the performance of your company.
Chapter 7 – General Ledger
Page 151
Blue Link Solutions™
You can then choose to Preview a printout of the Executive Summary Screen, as follows
This will provide updated information about your Business at any time. If the Bank or your Accountant
wants to see an overview of your Business, then you can print off this report, and provide it to them in
moments.
Page 152
Chapter 7 – General Ledger
Blue Link Solutions™
7.7 Print Chart of Accounts
Use this program to print a list of General Ledger Account Codes, Departments, Account Types, and
Descriptions. The following screen will appear. You may print the report ordered by account number, or
grouped by department (if you have departments configured).
The program will print all account codes, departments, and descriptions. A letter indicating the account type
(Income, Expense, Owner's Equity, Asset, or Liability) is also printed. The report may be printed to the printer
or previewed on screen.
Print Where?
You may select for the report to be printed to the printer or to be previewed on screen. Click the “Print” button
to send it to the printer or the screen or the “Cancel” button to cancel the request.
Chapter 7 – General Ledger
Page 153
Blue Link Solutions™
Sample Report
General Ledger Chart of Accounts (Grouped by Department):
Page 154
Chapter 7 – General Ledger
Blue Link Solutions™
7.8 Print Journals
Use this screen to print a listing of all transactions of a certain type made on a certain day or range of days.
This will let you check that all transactions for that day have been recorded properly. For example, you could
use this screen to get a listing of all cash receipts on a certain day by choosing the Cash Receipts Journal and
limiting the report to the desired date. You can do the same with General Journal, Cash Disbursements
Journal, Credit Sales, Credit Purchases, Payroll, or Other Journal.
Each journal reports on a separate transaction type.
transactions they record.
Below is a list of the available journals and the
General Journal (GJ) records entries from Enter General Journal Entry.
Cash Receipts (CR) records entries from Enter General Journal Entry; cash terms type transactions from
invoices posted Order Entry, and receipt of payment by cheque from Record Payments.
Cash Disbursements (CD) records Accounts Payable cheque transactions (not including manual cheques).
Credit Sales (RS) records all non-cash transactions from invoicing, those that are on account.
Credit Purchases (RP) records all non-cash transactions from Accounts Payable, including sales tax and payroll
tax transfers to Accounts Payable, those that are on account.
Payroll (PR) records all payroll transactions by date.
Other (OT) Journal records Inventory Adjustment, Production Control, manual cheques and bank account
funds transfer.
Note:
To print the journal for all, or a range of transaction types, use the Print G/L Transaction report
(described in the next section).
Which Journal?
Choose the type of journal you want to print.
Reminder:
To print the journal for all, or a range of transaction types, use the Print G/L Transaction report
(described in the next section).
From/Thru Posting Dates
Enter the starting and ending dates of the journal entries you want printed. If you don't enter a date in the
From Post Date field, the program will default to the current date. The Thru Post Date field will default to
the entry in From Post Date.
Chapter 7 – General Ledger
Page 155
Blue Link Solutions™
Detail?
You may choose to print a journal in summary or in detail. Clear the detail field if a summary report is
required. This box is checked by default.
Note:
If you want to see a summary of the GL accounts which were affected for a particular date range and
transaction type (GJ, RS etc.) uncheck the detail flag to receive a summary.
Transaction #
Specifying a transaction number will limit the report to a specific transaction. This may be useful if, for
example, you wish to view just the General Ledger entry behind a specific invoice.
Print Where?
You may select for the report to be printed to the printer or to be previewed on screen. Click the “Print” button
to send it to the printer or the screen or the “Cancel” button to cancel the request.
Journals may be printed any number of times until the General Ledger Transaction file is cleared during
Month End Routines or Year End Routines.
Important:
If your organization purges detailed transaction histories due to very high
transaction volumes, make sure you print all the journals that you want before
purging the General Ledger Transaction file. Once it is cleared, you cannot recover
the information.
Sample Reports
General Ledger General Journal (with Detail)
Page 156
Chapter 7 – General Ledger
Blue Link Solutions™
Cash Receipts and Cash Disbursements are similar (with Detail)
Chapter 7 – General Ledger
Page 157
Blue Link Solutions™
Cash Receipts and Cash Disbursements are similar (Summary)
Credit Sales and Credit Purchases are similar (with Detail)
Page 158
Chapter 7 – General Ledger
Blue Link Solutions™
Credit Sales and Credit Purchases are similar (Summary)
Chapter 7 – General Ledger
Page 159
Blue Link Solutions™
Other (w/Detail)
Note: Payroll Reports display information if Paymate is integrated with Blue Link Solutions
Page 160
Chapter 7 – General Ledger
Blue Link Solutions™
7.9 Print GL Transaction Report
This screen allows you to print a General Ledger transaction list (similar layout to the GL Detailed Trial
Balance) with the transactions sorted by Transaction Type.
From/Thru Date
Type in the date range you want in the report.
From/Thru Transaction Type
Enter the Journal(s) that you want to see in the report.
Chapter 7 – General Ledger
Page 161
Blue Link Solutions™
7.9.1
Page 162
SAMPLE REPORT
Chapter 7 – General Ledger
Blue Link Solutions™
7.10 Print General Journal by Number/Date
Use this screen to print a listing of General Journal transactions for a particular date range, and/or for a
particular range of transaction numbers.
From/Thru Dates
Enter the From Date and Thru Dates, and the range of transaction numbers you wish to view.
Print Where?
You may select for the report to be printed to the printer or to be previewed on screen. Click the “Print” button
to send it to the printer or the screen or the “Cancel” button to cancel the request.
Chapter 7 – General Ledger
Page 163
Blue Link Solutions™
7.10.1
SAMPLE REPORTS
General Journal Transaction by Number
Page 164
Chapter 7 – General Ledger
Blue Link Solutions™
7.11 Print Recurring Journal Report
Use this program to print a list of Recurring General Journal Entries (originally created in Enter Recurring
General Journal Entries).
Next Recurring Date on/before:
Enter the next date for the recurring general journal entries. All entries to be posted on or before this date
will be selected.
Print Where?
You may select for the report to be printed to the printer or to be previewed on screen. Click the “Print” button
to send it to the printer or the screen or the “Cancel” button to cancel the request.
Chapter 7 – General Ledger
Page 165
Blue Link Solutions™
7.12 Print Trial Balance/Posting Analysis
This program parallels Print Journals. However, instead of printing by Journal Type, this program will print
in Account Code order. Using the reports generated by this program and the previous one provides you with a
complete audit trail. By following the transactions from this report to the individual posting journal, you can
see the entire results of any transaction. In this report you can see all the transactions for a single account; in
the appropriate journal you can see each transaction as a whole.
Type of Report
You may select Trial Balance, Transaction Listing or Posting Analysis.
Trial Balance
This report shows balances for each account from the beginning of the period specified as From Post Date to
the end of the period specified as the Thru Post Date. (Only entire periods may be specified).
Transaction Listing
This report shows all transactions between the specified dates and the net effect on the General Ledger account.
Posting Analysis
This report lists all transactions posted on or between the selected dates, and includes information on the user
who posted the transaction. Unlike the other reports, the date selection on this screen relates to the dates that
the transactions were actually posted and not the transaction dates. For example, you may post a transaction on
March 21st but date the transaction February 27th. In this case, the transaction will display as a Feb 27th
transaction on all the other reports, but the posting report will list this transaction as a March 21st transaction.
This report is only available for transactions that were posted after Release 2.70 was installed. This is a useful
report in order to review all the transactions that were posted on a specific day and by whom they were posted.
Detail/Summary
The report may be printed in detail by checking the Detail box
Prev. Year
Click the Prev. Year box automatically changes the From/Thru dates to the previous year for the same period.
Sort by Department
Click on the Departmental box to print the report sorted by department.
Page 166
Chapter 7 – General Ledger
Blue Link Solutions™
Accounts/Departments
You may enter From/Thru Account and From/Thru Post Dates to specify a range to print. You may limit
the report to one account, one department, and one day (if you wish) by using the same information in the
From and To fields. If you do not enter any limits, the program will report on all of the transactions in the file.
A Detailed Trial Balance may be printed any number of times until the General Ledger Transaction file is
cleared during Month End Routines or Year End Routines.
Posting Dates
Type in the date range you want in the report. You can click the “Today” button to change the date to the
current date.
Print Where?
You may select for the report to be printed to the printer or to be previewed on screen. Click the “Print” button
to send it to the printer or the screen or the “Cancel” button to cancel the request.
CAUTION:
7.12.1
Make sure you print all posting reports before clearing the General Ledger Transaction file. Once it is
cleared, you cannot recover the information.
SAMPLE REPORTS
Detailed Trial Balance
Chapter 7 – General Ledger
Page 167
Blue Link Solutions™
G/L Detail Transaction Listing
General Ledger Posting Analysis
Page 168
Chapter 7 – General Ledger
Blue Link Solutions™
7.13 Financial Report Generator
The Financial Report Generator allows you to define and store any number of financial statement formats.
You may define up to 4 columns on portrait layout pages and 8 columns on landscape layout pages. An
unlimited number of lines may also be defined. Groups of General Ledger accounts may be reported in
detail, or summarized into a single line.
The financial report generator contains three design tools and one print tool that tie the output of the three
tools together.
All financial statements include three attributes:
1. The type of report (Income statement, Balance Sheet, etc) and the line items that belong to it.
(For example, a Balance Sheet starts with the heading “Assets”, then lists the assets, prints a sub-total,
etc).
2. The columns or data area of the report. (Data for a particular month; a range of months; budget
figures; differences; percentages; etc.)
3. The companies (or “Groups”) you want to include or consolidate.
7.13.1
FINANCIAL REPORTS SYSTEM SETUP
Use this screen to specify the System Settings for your Financial Reports:
Chapter 7 – General Ledger
Page 169
Blue Link Solutions™
Fiscal Start Month
Enter the first month of your company’s fiscal year in this field.
Round to Nearest – Used by the system to control rounding (default is 1)
Note:
To round to the nearest enter the following:
2 decimal places - .01
1 decimal place - .1
0 decimal places – 1
$10 – 10
$1000 – 1000 etc.
Your Company Name – This company name will appear on Financial Reports
Page 170
Chapter 7 – General Ledger
Blue Link Solutions™
7.13.2
REPORT DEFINITIONS
Use the “report definitions” screen to define the structure of your financial reports.
Basic Concepts – How totals are calculated
The “report definitions” screen of the financial report generator is where you specify what Headings, G/L
Account Detail, and Totals will appear on your report.
Totals are calculated by taking the sum of all the values in an “update total” “basket” or “column”. The
spreadsheet example (above) helps to illustrate this concept visually by placing an “x” to represent the
values being placed in the “basket/column”.
Since a total calculation is the SUM of the column, values to be subtracted must be “flagged” for
subtraction. This represented on the spreadsheet with a “yes” in the “Subtract (Y/N)” column, and by a “-x”
in the Update Total columns.
Re-Using a Column
To re-use a column, make the sum of that column equal to zero:
take the total of that column
suppress the value (so it doesn’t print on the report)
place the result of that total in the same column
flag it to be subtracted
The spreadsheet illustrated previously reused columns 1, 2 and 3 using this technique.
The Report Definitions Screen in Solutions
Once you’ve defined the structure of your report in Excel, it’s easy to transfer that information to the
Solutions Report Definitions screen.
To begin, enter the name of the report you are about to define in the “Description” box. To recall a
previously defined report, select it from the “Find Definition” box. To create a new report, click the “new”
button at the bottom of the screen.
Chapter 7 – General Ledger
Page 171
Blue Link Solutions™
The “header” section of the screen (the top part) is where you define the name of the report and the
description you want to appear on the statement, the detail section (the bottom part) is where you define the
individual lines that will appear on the statement.
Headers
To define a financial statement format, enter a name in the “Description” field. This name should be
meaningful to you, as it is the name you will use when selecting this report format for printing (or for
modifying on this screen). An example description would be “Detailed Profit and Loss Statement”.
Then enter a title in the next field. Titles may be very long, and will print at the top of each report, under
your company name. The title is automatically centered on the screen and on the report. To force a new line
when entering the title, press Ctrl-Enter (hold down the “Ctrl” key and press the “Enter” key).
To recall an existing definition to the screen, in order to modify it, use the combo box labeled “Find
Definition”.
Details
Before entering details, you should have a good idea of the required layout of your financial statement. It is
recommended that you draft a sample layout using a spreadsheet (or pen and paper). Then label each line or
group of lines by type according to the “Type” field as described below. Then give each line or group a
sequence number, starting at 10 and incrementing by 10.
For example, a simple statement of Gross Profit might appear as follows:
SALES
Page 172
Type
Detail
Header
Sequence
10
20
Chapter 7 – General Ledger
Blue Link Solutions™
Less: COST OF SALES
Inventory
Freight
Duty
TOTAL COST OF SALES
Header
30
Detail
40
Total
50
GROSS PROFIT
Total
60
Although the above example may not be clear on first reading, we suggest you refer back to it after you
have read the remainder of this section.
The fields to be defined for detail items are:
Seq.
A unique sequence number, which determines the order in
which the lines will print. Sequence numbers are autoincremented by 10. To insert a line, simply change its number
to one between two existing numbers.
Type
There are 5 types:
?? Header: prints the contents of the Description field only.
?? Detail: prints and/or accumulates actual General Ledger
account values
?? Total: prints only an accumulated total
?? Line: prints an underline in each of the dollar value
columns (subtotal and total lines)
?? Page Break: forces the next line to print on a new page
Description
For header and totals, this description will print on the report.
For detail lines, this description will print only if the Summary
check box is checked (see later). Hint: to define a blank line,
create a heading but leave the description blank.
G/L
Accounts
From/Thru
For detail lines only: select the range of G/L accounts to be
included in the detail line.
Summary
For detail lines only: if this is checked, then the range of G/L
Accounts will be summarized into one amount, and only that
one amount will print next to the Description. If this is not
checked, each G/L account in the range will be printed on a
separate line.
Suppress
If Summary is checked, then you may check this box to
prevent the line from printing. Use this option if you wish to
summarize 2 or more non-consecutive ranges of G/L accounts
into one total.
Bold
Check if you want the entire line printed in boldface.
Underline
Check if you want the entire line underlined.
Print Total
For Total lines only: select the total level (1 through 9) that
you wish to print.
Chapter 7 – General Ledger
Page 173
Blue Link Solutions™
Update
Total
Hint: if you have a complex report, and need to track a large
number of totals if you wish to zero out a total level in order
to re-use it, enter a type “Total”, check both Summarize and
Suppress, select the total level you wish to zero in both the
Update Total and Total to Print fields, and check the Subtract
check box.
There are 9 total “levels”, numbered 1 through 9. If you enter
a number other than zero here, the amount of this line will be
added to the specified total level. You may add either detail
lines or totals to total levels.
Think of these total levels as invisible columns. If, for
example, you enter 5 as the Update Total for a detail or total
line, the value of that line will be added to invisible “column”
number 5 (or subtracted from it if you checked the Subtract
box). When you print a total line, if you enter number 5 as the
Total to Print, the accumulated amount in to invisible
“column” number 5 will be printed.
Subtract
Page 174
If this is checked, the amount will be subtracted from the total
level, rather than added to it.
Chapter 7 – General Ledger
Blue Link Solutions™
7.13.3
COLUMN DEFINITIONS
The following is the window that will appear when you choose the above. You will then be able to choose
different types of data for different columns depending on your specific requirements at the time of printing.
The following is an example of the types of definitions that can be used for different columns:
As you can observe from the above, you will be able to define each column very specifically.
Chapter 7 – General Ledger
Page 175
Blue Link Solutions™
7.13.4
GROUP DEFINITIONS
The following is the window that you will observe when you select the above:
This window will allow you to group various companies into one Financial Report. You are able to choose
the company, its associated file, and the departments to include. You must do this before you run your fist
financial statement.
Subsidiary Name
This is the name of the file which you will refer to when generating your financial statements.
File Specification
This is a selection of the various databases that you have entered into your config.mdb file.
Department Through
If you want to filter for a certain department you may do so here. (Optional)
Currency Code
Select the currency that this company is valued in.
Rate
You may adjust the exchange rate, which was defaulted from the System Interface.
Page 176
Chapter 7 – General Ledger
Blue Link Solutions™
7.13.5
PRINT REPORT
To print a report, or preview it on screen, you enter the appropriate selections on the following screen:
Select Report
Select the Report that you have defined on the previous screens.
Select Columns
Select the Columns that you have defined on the Column Definitions Screen.
Groups to Include
This is where you select the groups that you have created in the Group Definitions Screen.
Show G/L Account Numbers
If you wish for the GL account numbers to print on the financial statements beside the account names then
select this box.
Suppress Zero Dollar Values
If this box is selected and the amount of the account comes to zero, it will not print.
Chapter 7 – General Ledger
Page 177
Blue Link Solutions™
The following is an example of what the screen would look like once you have chosen your parameters:
% of
During the column definition stage of designing your custom financial report, you had the opportunity to
specify a column to be a “% of” calculation.
That column will be one of the columns listed under the select columns heading of this screen. Click in the
% of field for that column, and select the report definition total desired.
Example:
Page 178
This feature is most often used to show income and expenses as a percentage of gross profit or net
income. Since these values are defined on the report definition screen, not the column definition screen,
it is necessary to associate the two on the print selection screen.
Chapter 7 – General Ledger
Blue Link Solutions™
7.14 Print Historic FX Rates
This report allows you to view what the historic rates were if they were changed in the system interface. It
shows the original rate, the new rate, who changed it, and the date that it was changed, for the date range
selected.
Chapter 7 – General Ledger
Page 179
Blue Link Solutions™
7.15 Caseware™ Export
This utility allows you to export a text file which can then be uploaded into Caseware™.
You may specify the current fiscal year end period or the year previous. You may also specify the name
and location of the text file. This procedure may take a number of minutes.
Page 180
Chapter 7 – General Ledger
Blue Link Solutions™
8: Multiple Currencies
Blue Link Solutions is a multi-currency product, as such all transactions are recorded in both their native
currency, and in the local currency. The integrity of the General Ledger is maintained by recording all
transactions in the “Home” currency with the exception of foreign bank balances which are recorded in their
respective currencies, and adjusted to Home currency values with the Exchange Difference account.
Currency codes, names and rates are defined through System Maintenance | System Master Lists |
Currencies / Departments / Payment Methods.
Chapter 8 – Multiple Cuurencies
Page 181
Blue Link Solutions™
8.1 Setup Notes
When configuring Blue Link Solutions for multiple currencies, there are a few issues you should take into
account:
1.
Bank accounts, customers and vendors are permanently assigned to a specific currency creation, and
may not be changed. Therefore, if you inadvertently set up a customer under the wrong currency, you
will have to delete that customer and re-enter a new customer record under the correct currency.
2.
Payments from customers may only be recorded in a bank account of the same currency, and payments
to vendors may only be made out of a bank account of the same currency.
Note:
There is a way to handle payments actually made out of bank accounts or put into bank accounts of
different currencies, see Section 8.5 – Bank Transactions in Different Currencies.
3.
When initially configuring Blue Link Solutions, you defined the “Home” (local) currency under which
you operate your books (typically Canadian or US dollars). The home currency always has an
exchange rate of 1.0.
4.
All General Ledger accounts are maintained in the Home currency, with the exception of bank
accounts. The bank accounts are maintained in foreign currencies. Such bank accounts are represented
in the General Ledger in their own currency, with an associated General Ledger account (Exchange
Difference) which tracks the unrealized exchange gain or loss difference between the value in this
General Ledger account and the Home currency equivalent.
Page 182
Chapter 8 – Multiple Cuurencies
Blue Link Solutions™
8.2 Transaction Posting
This section explains the postings which take place when foreign currency transactions are processed in
Blue Link Solutions. To illustrate the postings, a series of accounts receivable transactions are used, but
note that accounts payable transactions in foreign currencies yield similar results.
8.2.1
RECORDING INVOICES TO CUSTOMERS IN FOREIGN
CURRENCIES
When posting an invoice (either through the Sale Order module or as an Accounts Receivable Voucher), the
transaction is posted as follows:
1.
The accounts receivable sub-ledger is updated in the customer’s native currency.
2.
Postings to the General Ledger are made in the Home currency.
3.
At this time, no exchange difference is recorded.
Note:
All screens in Blue Link Solutions that give you the option to modify the exchange rate start by setting the
rate to the default as specified in the system interface, but may be overridden for the specific transaction.
EXAMPLE
You record an invoice for US$100.00 to a customer set up in your books as a US$ customer. The exchange
rate in the currency file at the time you process the transaction is: $1 US equals $1.54 CA.
The amount posted to the customer’s account in the Accounts Receivable sub ledger is $100.00 US.
The posting to the General Ledger is:
Account
Accounts Receivable
(the appropriate sales account)
8.2.2
Debit
CA$154.00
Credit
CA$154.00
RECORDING PAYMENTS FROM CUSTOMERS IN FOREIGN
CURRENCIES
When recording a payment from a customer in a foreign currency, the transaction is posted as follows:
The accounts receivable sub-ledger is updated in the customer’s native currency.
Postings to the General Ledger are made in Home currency, except that any exchange difference is
recognized based on the difference between the amount received in native currency and the equivalent
amount in Home currency.
Chapter 8 – Multiple Cuurencies
Page 183
Blue Link Solutions™
EXAMPLE
A payment is subsequently received for the US$100.00.
The amount posted to the customer’s account in the accounts receivable sub-ledger is once again a payment
of US$100.00, leaving a remaining balance of zero.
Similarly, the amount posted to the US$ bank account (via the Deposit Clearing account) is US$100.00.
The General Ledger posting is as follows:
Account
Deposit Clearing
Exchange Difference
Accounts Receivable
Debit
CA$100.00
CA$ 54.00
Credit
CA$154.00
The exchange rate at the time the payment is received does not affect the transaction. (When a customer
who owes you $100.00 US pays you $100.00 US, no exchange transaction takes place).
8.2.3
TRANSFERRING FUNDS BETWEEN BANK ACCOUNTS IN
DIFFERENT CURRENCIES
The Cheque Register option to transfer funds between accounts may be used to record transfers of funds
between accounts of different currencies. When you use this program, each bank account’s balance in the
cheque register module is updated in its own currency. The General Ledger postings are:
1.
Each bank account is debited or credited in its own currency equivalent amount.
2.
The exchange difference account is debited or credited with the difference.
For example, if you transfer US$100.00 out of a US$ bank account into a CA$ bank account at a time when
the exchange rate is US$1 equals CA$1.56, then the entries made in the General Ledger are as follows:
Account
CA$ Bank Account
US$ Bank Account
Exchange Difference
Debit
CA$156.00
Credit
US$100.00
CA$ 56.00
At this stage the $54.00 is an unrealized exchange gain. If you subsequently transfer the funds back into the
US$ account and the rate has changed, this account will retain the realized exchange gain or loss.
Page 184
Chapter 8 – Multiple Cuurencies
Blue Link Solutions™
8.3 Reconciling the Exchange Difference Account
As amounts are posted to the debit and credit of the exchange difference account, some of these amounts
represent unrealized gains or losses on exchange, while others represent realized gains or losses on
exchange.
In order to perform the necessary analysis to update this account at fiscal year end (or other reporting
periods), it is necessary to understand the nature of the exchange difference account.
The exchange difference account, in this case, is intended to primarily be used for unrealized exchange
gains or losses, and is intended to give an approximate value, in Home currency, of your foreign
currency bank accounts. This is achieved by simply adding the General Ledger balances of those foreign
currency bank accounts to the balance on the exchange difference account.
For purposes of recognizing realized exchange gains or losses at a reporting period end, perform the
following steps:
1.
Add up the values of the foreign currency bank accounts as stated in the General Ledger (call this total
A)
2.
Recalculate these amounts in CA$ (or other Home currency) at the current exchange rate (call this total
B)
3.
The difference between A and B is your current unrealized exchange gain or loss (call this C)
4.
Adjust the balance on your exchange difference account to the value of C, by adjusting the difference
against an exchange gain/loss account that is located amongst the revenue or expense accounts in your
General Ledger.
Chapter 8 – Multiple Cuurencies
Page 185
Blue Link Solutions™
8.4 Revaluation Report
A report has been designed to assist in this process. In Accounts Receivable and Accounts Payable, print
the Aging report and choose the Retroactive Listing Report.
The Retroactive Listing Report, which can be printed in summary or in detail, prints information detailing
Invoice Date, Remaining Amount, Description, Terms Type and Age in days as of the date entered in the
date field of the selection screen. You cannot, however, view information on invoices in the system for a
date prior to having purged data (if you have purged any data).
You may also print a currency Revaluation Report, which may be very useful to revalue any foreign
currencies to the current value for Fiscal Year End Statement purposes. At Year End for adjustments, use
the Reversing Journal Entry program.
The Currency Revaluation Report may be run by selecting the Retroactive Listing Report in summary
(uncheck the Detail box), selecting the date, customer code range, currency and by checking the Revalue
box. This report shows (with one line per customer) the customer code and name, the amount in the foreign
currency, the value in Home currency dollars of the original transaction and the value in Home currency
dollars revalued to the current rate. The revalue amount is the difference between the current value and the
original value.
The Entry?
If you would like to record the entry based on the information from these reports then it is suggested that
you use an unrealized gain or loss account and offset it against a revaluation account for AR or AP. Then
reverse this entry at the beginning of the next month as this is unrealized.
For example:
You are a Canadian company with one outstanding US receivable. The invoice was for $1000.00 US which
was valued at $1500 CA$ at the time of posting. At the end of the reporting period the customer has not yet
paid and the exchange rate has moved to 1.6000. You want to reflect this exchange revaluation. By
printing the Accounts Receivable revaluation report, it tells you that there is a $100 difference.
The entry would be similar to this:
Account
Accounts Receivable Revaluation
Unrealized Gain or Loss on Foreign Exchange
Debit
$100
Credit
$100
Then reverse this entry by the beginning of the following month.
The reason that you do not affect the Accounts Receivable account is that it is a control account and this
will cause the control account to go out of balance with the sub ledger.
Tip:
In the set up of your financial statements you may want to group the Accounts Receivable account and
the AR Revaluation account together so that one number appears on the financial statements.
Print Where?
You may select for the report to be printed to the printer or to be previewed on screen. Click the “Print” button
to send it to the printer or the screen or the “Cancel” button to cancel the request.
Page 186
Chapter 8 – Multiple Cuurencies
Blue Link Solutions™
8.5 Bank Transactions in Different Currencies
As mentioned earlier in this document, Blue Link Solutions requires that payments in a specific currency
are recorded from a bank account of the same currency, and similarly payments received in a specific
currency must be deposited to a bank account maintained in that currency.
How to issue foreign currency payments when you only have a local currency bank account
Here is how to make a payment in US$ out of a CA$ bank account, when you don’t actually have a real
US$ bank account:
Create a “dummy” bank account designated as a US$ bank account.
Issue the payment to the vendor from the “dummy” US$ bank account you just created (instead of
recording it as a payment out of your regular CA$ bank account).
This makes sense since, at the time you write the cheque, you do not know what the CA$
equivalent of your US$100 cheque will be. Typically you will only find out the CA$ amount when
you receive your bank statement.
When you find out the CA$ equivalent, process a transfer between accounts (as described above),
recording the actual amount of Canadian funds transferred out of the CA$ bank account, and the
$100 transferred into the US$ banking account.
The unrealized exchange gain or loss at this stage is automatically recorded as discussed in Section
8.2.3 - Transferring Funds between Bank Accounts in Different Currencies.
If you use this method, and typically only find out the CA$ value of US$ payments from your bank
statement, perform the following steps before starting your bank reconciliation:
1.
2.
3.
Examine your US$ bank account on the bank reconciliation screen. Locate each transaction listed
there on the bank statement, and then process the transfer in each case.
“Reconcile” the US$ bank account by filling in the necessary amounts to make the reconciliation
balance, and clicking on the Reconcile button.
Process your bank reconciliation as usual.
Chapter 8 – Multiple Cuurencies
Page 187
Blue Link Solutions™
8.6 Conversion from a Previous System
When configuring your beginning balances in Blue Link Solutions, if you are recording beginning balances
on unpaid receivables or payables in foreign currencies, note the following:
As you enter the beginning balance transactions for each customer and vendor, it
is important to use the exchange rate prevalent at the time of the transaction and
not the current exchange rate. This is easy to accomplish if you have the
exchange rate handy, as you are able to override the exchange rate on any
transaction screen.
This ensures that when you record payments against these invoices, the appropriate exchange difference is
realized.
Page 188
Chapter 8 – Multiple Cuurencies
Blue Link Solutions™
Chapter 9 – Accounts Receivable
Page 189
Blue Link Solutions™
9: Accounts Receivable
The Accounts Receivable module allows you to enter, change, or print your customer information, A/R
vouchers and more. To use the Accounts Receivable module, you must have already completed the
configuration of the System Interface. For a complete list of what needs to be set up before using the Accounts
Receivable Module, see Chapter 4 – Getting Started.
Access Accounts Receivable through Administration | Accounts Receivable.
The Accounts Receivable Module records all information about Customers, and provides this information
to other Solutions Modules as required.
Page 190
Chapter 9 – Accounts Receivable
Blue Link Solutions™
9.1 Enter/Change Customer Information
Use this function when you begin selling to a new customer, or if there is a change in the customer name,
address, telephone number, or your customer’s contact information. This function is also used to assign tax
authorities for payment of sales tax liabilities.
9.1.1 GENERAL CUSTOMER INFORMATION
Code (Required)
The Customer Code is used to uniquely identify the customer within Solutions. This code can use a maximum
of 10 alphanumeric characters.
Company (Required)
The actual customer name. This is a 30 character alphanumeric field. Once the record is saved you may
lookup the customer by the customer name field.
Address 1
The first of 2 address lines. This is a 25 character alphanumeric field.
Address 2
The second of 2 address lines. This can be a second address or simply a suite number. This is a 25 character
alphanumeric field.
City
The customer's city. This is a 15 character alphanumeric field.
Chapter 9 – Accounts Receivable
Page 191
Blue Link Solutions™
Province/State/County
This field label and size depends on the Regional Settings that you have selected..
Postal Code/Zip Code
This field label and size depends on the Regional Settings that you have selected..
Country
The customer's country.
Comments
Enter any comments you wish to retain with this record. There is no practical limit on this field. To insert new
lines, begin typing and the text will word wrap to the next line if needed. To force the text to a new line use
<Ctrl+Enter>.
Outstanding (Invoices, Credits and Balance)
This information is filled in automatically by the system.
Active Flag
Uncheck this flag if this customer is no longer an active customer. This customer record will not appear in
any pick lists. This flag is defaulted as checked on.
Page 192
Chapter 9 – Accounts Receivable
Blue Link Solutions™
9.1.2 PHONE NUMBERS/INTERNET ADDRESSES
Clicking the list button allows you to select different field names if you wish to change them from the defaults.
The choices are:
Check Phone Number
Upon entering the customer’s phone number, if the number of digits is not recognized as a North American
phone number, the following “Check Phone Number” form will appear. This allows for formatting of
international phone numbers.
Office
The customer’s office number and extension.
Fax
The customer’s fax number and extension.
Mobile
The customer’s mobile number and.
Pager
The customer’s pager number and extension.
Email
The customer’s Email address. The text will turn blue.
Email Button
Click this button to start your Email program and send an Email directly from Blue Link Solutions.
Chapter 9 – Accounts Receivable
Page 193
Blue Link Solutions™
Web Address
The customer’s web address. You do not need to type in the “http://” in front of it. It is a hyperlink field. If
you click on it, your dial-up networking program will start in order to go directly to the customer’s web site on
the Internet.
Group Code ?
This is an Elite feature. If the customer is part of a group of customers for whom you wish to print
consolidated statements, enter the name of the group of customers in this field.
Fax/Email /Neither ?
This is an Elite feature. Select either fax or email for this customer. If you choose the fax/email option
when producing batches of Accounts Receivable Statements or Order Entry Invoices the appropriate format
for this customer will be produced. Note: Outlook Integration needs to be set up for this function to be
available. See Chapter 6 System Maintenance for details.
9.1.3 DEFAULTS
Tax and Currency Defaults
Tax Authority
You must enter the tax authorities for this customer. You must already have entered at least one tax authority
in Enter Tax Authorities before filling in this field.
Currency
Enter the currency the customer will use for transactions. The default setting is your home currency code.
Note: Once a currency is saved for a customer it can never be changed. If a customer you deal with is billed in
two or more currencies, you must set up a new customer code for each currency. If you set the customer up
initially with the wrong currency, you must delete them and add them in again.
PST Exempt #
Enter the Customer’s PST Exemption number in this field, to ensure that they are not charged PST.
Valid Until
Enter the Customer’s PST Exemption expiry date in this field. This is used for reporting purposes only. When
a customer is originally set-up the current date is defaulted.
Page 194
Chapter 9 – Accounts Receivable
Blue Link Solutions™
Report and Activity Defaults
Charge Interest
If you want this customer to be charged interest on past due invoices at the rate set in System Maintenance |
System Master, check this field; otherwise uncheck this field. This field is checked by default.
Keep Invoices in History
If you want your customer invoices to be added to the invoice history file after posting, check this field,
otherwise leave this field blank. This field is checked by default.
Print Statement
Check this field if this is a customer to be sent a statement. This field is checked by default.
Credit Information
Terms
Enter the terms of payment here, chosen from the terms menu. The payment terms entered here will appear as
a default entry when creating vouchers and sales orders.
Click the “Add” button to add a term that is not currently available.
Credit Limit
Enter the customer’s credit limit. If you use the credit warning (System Maintenance | Data Entry & Other
Defaults) you will be alerted when entering a sales order if the customer is going over their limit.
PO Required
If you or the customer requires that a Purchase Order number is required then check this flag. When
entering an order in Order Entry you will not be able to process the order without first entering a PO
number.
Avg. Pmt. Days
Calculated are and maintained by the system. This will indicate the average number of payment days based on
the specific customer’s payment history.
Credit High
Calculated and maintained by the system. This is the date that the customer attained their highest credit level,
and the amount of the highest credit.
Dates / Time Since
Start Date
The date you entered this customer into the system.
Last Sale
Last invoice creation date.
Last Payment
The last payment date.
Chapter 9 – Accounts Receivable
Page 195
Blue Link Solutions™
Sales Related
Customer Type
This is a 15 character alphanumeric field used as an additional means of grouping customers for reports. For
example, you might want to group all of your charge customers, or all of your customers who are resellers, into
a single report. Use this field to designate such a group. A class must be entered in order for this customer to
be printed on the customer list in Customer Information Reports.
Salesperson
Enter the salesperson that this customer belongs to. This salesperson will be the default for sales orders created
for this customer.
Price Matrix
The price level (number between 0-9) indicates the level of discounting you offer to a particular customer. In
Blue Link Solutions, this is a flexible way to set up a multi-tiered discount structure. The discount is set up in
Enter Price Matrix or as a part of the inventory item entry. The default entry, level 0, is the base price for the
inventory item. See Using A Price Matrix.
Contract ?
This is an Elite feature. See Chapter 18 for details.
Default Ship To
Of your multiple ship to addresses created for this customer, which one do you want to be defaulted when
creating a sales order.
Default Location
Select the warehouse which this customer will most likely be serviced from. This can be changed at the
time the sales order is created.
Department
If you are using a departmentalized General Ledger you may want to select the default department this
customer belongs to. This department will be the default on the Sales Order, which will post to the GL if
you have set up the System Interface to do so. Otherwise it will be used for a departmentalized aging.
Language for Product Descriptions
These choices will allow you to print either the default language or the second language located in the
Inventory Description fields, on the Enter/Change Inventory Screen.
Add Buttons
Scattered in the customer screen you will see Add buttons next to certain fields. By pressing these buttons, you
will be able to add items such as Terms and customer classes on the fly.
Page 196
Chapter 9 – Accounts Receivable
Blue Link Solutions™
9.1.4 MTD/YTD
The MTD/YTD information is updated as transactions are posted. These values are not calculated values.
MTD values are only as accurate as the last time you reset these values to zero through the month-end routine.
# of Invoices
The number of invoices this customer has generated in a specific month.
Gross Sales
The total sales for this customer; amounts are kept for each month, year-to-date, and total for last year.
Cost
The Cost of Goods Sold for this customer; amounts are kept for the month, year-to-date, and total for last year.
Net Profit
The net profit for the goods sold.
Net Percent
The net sales percentage or mark-up, calculated automatically after Net is entered. Amounts are kept for the
month, year to date, and total for last year.
Chapter 9 – Accounts Receivable
Page 197
Blue Link Solutions™
9.1.5 RMA’S?
This is an Elite feature. This screen shows the RMA information for any processed RMA’s. The information
shown includes: the invoice number, date received, product code, product description, quantity, unit price,
purchase order, reason and comments.
All items are listed in reverse date order.
The details on this screen can be sorted so that they display in ascending or descending order based
on any of the transaction fields. To do so, put the cursor in field that you want to sort by (Reason, for
example). Then click on one either the “Sort Ascending” or “Sort Descending” buttons. (These are located
on the menu bar at the top of the screen).
9.1.6 ORDERS
This screen shows the sales orders currently open for this customer, detailing the order number, product code,
product description, order quantity, B/O quantity, unit price, ship date and purchase order number.
Page 198
Chapter 9 – Accounts Receivable
Blue Link Solutions™
9.1.7 AGING
This screen lists all transactions relating to this customer, detailing the transaction date, reference, amount,
remaining amount, description and age of unpaid items in days.
GL Notes
This field displays any transaction notes regarding a particular invoice, if processed as an AR Voucher.
The details on this screen can be sorted so that they display in ascending or descending order based
on any of the transaction fields. To do so, put the cursor in field that you want to sort by (Reference, for
example). Then click on one either the “Sort Ascending” or “Sort Descending” buttons. (These are located
on the menu bar at the top of the screen).
9.1.8 SHIP TO ADDRESSES
When you select this option the following screen displays:
This option allows for multiple ship to addresses to be entered. If all the information is the same as the Bill
To information, simply click on “Same as Bill To” button and the information will be recorded. If any of
the information is different, type in the details in the relevant fields.
Chapter 9 – Accounts Receivable
Page 199
Blue Link Solutions™
Tax Authority
This tax authority will override the Bill To’s tax authority when this ship to address is selected on the sales
order.
9.1.9 CONTACT NOTES
This screen allows you to enter notes for this customer. These are useful for tracking and resolving
collection issues. All notes created include a date and time stamp, and record the login of the user who
created them. Default notes (such as “Called to collect”) can be created using the “Add” button and
selected using the drop down list. You may also wish to classify the type of contact it was (Sales,
Collections etc.) with the contact type field. There is also a flag to check if you wish the contact note to be
deleted. When you run the contact notes purge routine under Utilties | Contact Manager Maintenance |
Purge Contact Notes, these selected notes will be purged.
The “Set Task in Outlook” button calls up the following screen:
Solutions will save this task in your Private folder in Outlook.
Page 200
Chapter 9 – Accounts Receivable
Blue Link Solutions™
Subject
Type a subject for this task.
Body
Type the details of this task.
Due
Type the date the task it due.
Remind me in/Length of Time
Select the time period, either minutes, hours or days and then type a number in the Length of Time field.
Sound Reminder
If you wish to have an audible reminder, click this box.
Set Task
Click this button when you are finished filling in the information and Solutions will send the details to
Outlook Tasks.
9.1.10
MULTIPLE CONTACTS BUTTON
This form allows you enter other contacts which belong to this
customer. This tab is linked to the Prospect Contacts tab in
Contact Manager | Enter / View Prospects. An addition of a
contact record in one of these areas will automatically update the
other area upon saving of the record. On the sales order attention
field you may select from one of the multiple contacts.
9.1.11
DRILL DOWN BUTTON
This button opens the Customer Drill Down screen. The left hand
side of the screen, with the heading “History Invoices”, lists each
invoice on file for that customer in summary form. These invoices
are displayed in reverse date order (most recent at the top).
Chapter 9 – Accounts Receivable
Page 201
Blue Link Solutions™
The right hand side of the screen, with the heading “Invoice Detail”, lists the detail line items included on that
invoice. In order to change the Invoice Detail display, you need merely click once on the invoice that you wish
to display. You may also navigate through the History Invoices using the up and down arrow keys.
9.1.12
SALES ORDER BUTTON
This button is a shortcut to the Sales Order screen. See Chapter 14:
Order Entry for detailed information on entering sales orders.
9.1.13
PAYMENT HISTORY BUTTON
The Payment History button opens the Customer Payment
History report for this customer for the last year.
Page 202
Chapter 9 – Accounts Receivable
Blue Link Solutions™
9.1.14
SALES HISTORY
This button pops up a screen which gives the sales history for this customer, detailing the invoice number,
shipping date, product code, product description, quantity and price. All items are listed in reverse date order.
The details on this screen can be sorted so that they display in ascending or descending order based
on any of the transaction fields. To do so, put the cursor in field that you want to sort by (Product Code, for
example). Then right click and select the “Sort Ascending” or “Sort Descending” buttons.
Chapter 9 – Accounts Receivable
Page 203
Blue Link Solutions™
9.1.15
GROUP STATEMENT?
This is an Elite feature. The Group Statement button
opens the Accounts Receivable Statement for the group of
customers to which this customer is assigned.
Tip:
This feature can be used for customers belonging to a hierarchical group which requires a group
statement be sent. Or, you may use it as an internal resource, grouping types of customers together to
determine what is owed by the group.
9.1.16
CREATING A NEW CUSTOMER RECORD
1.
When the screen is first displayed, the cursor is located in the Code field.
2.
Enter a new Customer Code (maximum 10 characters) and press <Enter>. The following screen will be
displayed:
Note:
Use codes that will help you identify customers in group’s or alphabetical ranges for other operations in
Blue Link Solutions.
7.
3.
After you enter the new Customer Code, fill in the rest of the appropriate fields.
4.
When you are ready to save, click the “Save” button.
The next time and subsequent times you make changes to the customer’s information and click the “Save”
button, the following screen will be displayed.
Answer Yes to save the record. The customer record can’t be saved if required information is missing.
9.1.17
CHANGING AN EXISTING CUSTOMER RECORD
If you need to change a customer address or telephone number, or if some other important information has
changed, find the existing customer record, performing one of the following operations:
1.
Click the “New” button.
2.
Select the Customer Code or the Customer Name from the drop down list
Page 204
Chapter 9 – Accounts Receivable
Blue Link Solutions™
3.
Once the customer’s record is displayed, you may change customer data, except for specific fields
that do not allow for update such as the currency. .
4.
Click the “Save” button; the following screen will be displayed:
5.
Click Yes to save the customer record; click No to cancel the request.
9.1.18
DELETING AN EXISTING CUSTOMER RECORD
When you delete a customer record, the Outstanding Invoices Amount and Outstanding Credits Amount
for the customer must show a $0.00 balance.
Once it is deleted, the record cannot be recovered. You will have to re-enter the customer if it is deleted in
error.
To delete an existing record,
1.
To display the customer’s record, click the “New” button.
2.
Click the “Delete” button.
3.
The following screen will be displayed if the customer can be deleted:
4.
Click Yes to delete the customer; click No to cancel the request.
Note:
Customers with a transaction history cannot be deleted.
displayed:
Chapter 9 – Accounts Receivable
If you try to, the following message will be
Page 205
Blue Link Solutions™
9.1.19
INACTIVE FLAG
If you wish to mark a customer as inactive uncheck the active flag. This customer will no longer show up in
the pick lists such as in Order Entry or Record Payments. You will still be able to retrieve this customer by
looking up in this module. You may then re-check as active if the customer returns for business.
Page 206
Chapter 9 – Accounts Receivable
Blue Link Solutions™
9.2 Quick Customer Lookup
The quick customer lookup screen can be used to get customer address and phone information, or as starting
point for entering other types of transactions. To find a customer you can either scroll through the list or use the
lookup functionality at the top of the screen.
Tip:
To search for text in any part of the item add a “*” wildcard before or after the item (i.e. searching for
“L5N*” in the Postal Code would show all customers in that geographic region).
New Sales Order Button
This button is a shortcut to the Sales Order screen. See
Chapter 14 Order Entry for detailed information on
entering sales orders.
New A/R Voucher Button
This button is a shortcut to the Enter/Change A/R Voucher
screen. See 9.3 - Enter/Change A/R Voucher for detailed
information.
Edit Customer Button
This button is a shortcut to the Enter/Edit Customer screen.
Chapter 9 – Accounts Receivable
Page 207
Blue Link Solutions™
Enter/Change Customer Information for more detailed
information.
Sales History Button
This button displays the customer’s sales history.
Page 208
Chapter 9 – Accounts Receivable
Blue Link Solutions™
9.3 Enter/Change A/R Voucher
Use this function to enter transactions which will not go through Order Entry. For example: setting up
beginning balances, vouchers for rental or lease billing, credit memos, cash receipts and adjusting entries to
your customer accounts. If you are processing an inventory item (whether "regular" or "non- inventory") use
Enter Sales Orders module.
Code
The customer code. Use the drop down list to select the proper customer. The customer’s name is displayed
automatically in the adjacent field.
Customer Name
You may decide to create a new voucher with the customer’s name. The customer’s code will display
automatically upon selection of the customer name.
Lookup
The voucher number. By pressing the list button you may view existing vouchers that have not been posted.
Number
This is the voucher number field used for entering a new voucher. You may enter a voucher number or use the
default number.
Voucher Type
Choose the type of transaction by using the list window. You may select
1.
A/R Voucher
? This entry is for standard entries to the customer’s account
Chapter 9 – Accounts Receivable
Page 209
Blue Link Solutions™
Accounts Receivable
GL account selected
2.
Debit
Credit
Cash Transaction
? This entry is to record a transaction that has already been paid or is being paid for at the time of entry.
Thus this skips the Record Payments step.
Deposit Clearing
GL account selected
Debit
Credit
3.
Credit Memo
? This entry is to reverse a previous entry or to credit the customer’s account.
GL account selected
Debit
Accounts Receivable
Credit
Terms
The payment terms for the customer. The default terms from the customer record will be displayed in this
field. This can be changed for this voucher by selecting from the drop down list or entering the code for the
new terms.
Date
Enter the date for the transaction in standard date format, or you can use the current date default by simply
pressing <Enter>.
Net Amount
The net amount of the voucher without sales taxes. This is a 12 digit numeric field with two decimal digits.
Tax Authority
The default Tax Authority from the customer record will be displayed. This can be changed for this voucher
by selecting from the drop down list or entering the code for the new tax authority.
Tax Group 1 and 2 Name
These amounts will be calculated and filled in automatically by the system, however tax 1 and tax 2 can be
manually overridden and the total will be automatically recalculated.
You may double-click on the tax amount for tax authorities where there is more than one tax element assigned
to that tax group. You may then edit a specific level of tax and it will update the total.
Page 210
Chapter 9 – Accounts Receivable
Blue Link Solutions™
The names of these fields are based on the Tax Group Names set up for this tax authority in System Master
Lists | Tax Setup.
Job Code
If you are tracking jobs, the code for the specific job you are tracking may be entered here.
To Distribute
This is the total amount to be distributed (not including sales taxes). In order to enter a balanced transaction,
you will need to distribute the amount of the voucher to one or more General Ledger accounts. You will
specify the accounts you want the balancing amounts to post to using the fields below.
Transaction Description
Enter the transaction description in this field. All of the detail lines you enter in the bottom portion of the
screen will have their description fields defaulted to this value (which will appear in your GL as the journal
entry description). On the Aging tab in the Customer screen, the AR Voucher will have the description you
entered in this field.
Transaction Notes
Enter a description of this transaction in this memo field. It is available on various GL reports (see Chapter
7).
Account and Dept
The General Ledger Account(s) and Department(s) to which you want to apply this voucher. You can
distribute the amount of the voucher to any number of accounts.
Description
The description of the General Ledger Account is filled in automatically by Blue Link Solutions. You may
type in your own description to further describe the transaction.
D/C
The Debit/Credit field defaults to the normal setting for that account and you can change the entry if you wish.
Amount
The amount to distribute to the selected G/L account. These amounts, when added to the voucher amount, must
total zero.
Record Transaction
Posts the transaction to Accounts Receivable and
General Ledger.
If the amounts are in balance, the following screen will be displayed:
Click Yes to post the transaction; click No to cancel the request.
If the voucher is not in balance, the following screen will be displayed:
Chapter 9 – Accounts Receivable
Page 211
Blue Link Solutions™
Click OK and correct the entries to balance. Then try again.
Print Preview
Preview the information which is entered on this AR
Voucher form in a report format.
Print
Print the information which is entered on this AR
Voucher form in a report format.
Print Source Document for Customer
This is a report which can be sent to the customer. You
may use it if you have credited the customer’s account
and they wish to have a physical document portraying
that this was done.
9.3.1 ADDING A NEW VOUCHER
1.
Click the “New” button at the bottom of the screen.
Page 212
Chapter 9 – Accounts Receivable
Blue Link Solutions™
2.
Click on the code box and select a customer code. You may type in the customer’s code and press
<Enter>, or use the list display option.
3.
After selecting the customer, enter the invoice number or keep the system default.
4.
Select the type of voucher. You can choose an Accounts Receivable Voucher, a Credit Memo, or
Cash Transaction.
5.
Enter the date for the transaction
6.
The default terms for the customer will be displayed or you may select a different term from the
drop list. If you need other terms types, you can add them in System Maintenance | System
Master Lists | Terms / Types / RMA Reason Codes/ Other Lists.
7.
Enter the net amount of the voucher (less sales taxes)
8.
The default Tax Authority code will be displayed or you may select the different Tax Authority
code from the drop list. Note if the ship to address has a different Tax Authority than the Bill to’s
Tax Authority, than the Ship to’s Tax Authority will override.
9.
Optionally select a Department code to which this transaction should be assigned.
10. Optionally select a Job Code for which this transaction should be assigned.
11. The cursor is placed in the General Ledger Account field for the balancing accounts to be
entered.
In the case of a standard voucher, the Total Amount entry will be posted as a debit to your default Accounts
Receivable account. This means that the balancing transaction must be a credit or combination of debit and
credit amounts, for a total of a credit.
9.3.2 DISTRIBUTING THE AMOUNT TO G/L ACCOUNTS
The second half of the transaction is to distribute to the balancing accounts. The sum of the balancing account
amounts must equal the voucher amount before you can save the transaction. In other words, the debits must
equal the credits.
You may distribute the item to an unlimited number of General Ledger Accounts.
To enter the distribution amounts you must do the following:
1.
Select a General Ledger Account code. To display a list of General Ledger account codes, click
the list display button on the Account field. After you make your selection, the appropriate
account description is displayed.
2.
Enter whether the balancing account amount should be posted as a debit or credit by typing a “D”
or a “C”.
3.
In the Amount field, type in the amount from the account you want to use to balance the voucher
amount. The undistributed amount defaults here, but can be overridden.
4.
Continue to enter General Ledger Accounts and amounts until the voucher is balanced. Note - if
you are entering a transaction with a recalculated distribution amount (due to exchange difference),
make sure the amounts that are posted balance to the new distribution amount.
5.
When you have all the accounts entered and amounts
balanced, click the Record Transaction button.
Chapter 9 – Accounts Receivable
Page 213
Blue Link Solutions™
6.
If the items are in balance, the following screen will be displayed.
7.
Click Yes to post the voucher; click No to cancel the request.
8.
Posting a voucher adds it to the voucher records, adds the transaction to the Accounts Receivable
transaction file, updates the outstanding credit or invoice balances in the Customer file, and posts
the transaction to the General Ledger and to the Credit Sales Journal.
When the program is finished posting the transaction the screen is cleared and you are returned to the Code
field. You may then enter another voucher or exit by pressing the Exit button.
9.3.3 CHANGING AN EXISTING VOUCHER
1.
To change a previously entered voucher, you may choose the voucher to change by using the
Lookup field to display previously entered vouchers.
2.
If the voucher has been posted, you are not allowed to edit it (see Section 9.3.4 - Reversing a
Posted Voucher.
3.
Once the existing voucher is displayed, the entry routine is the same as creating a new voucher.
9.3.4 REVERSING A POSTED VOUCHER
A voucher that has been paid can be reversed with a "reversing voucher." Enter a new voucher using the
procedures from section 9.3.1 - Adding a New Voucher being sure to debit the accounts that were credited on
the original, and vice versa.
Accounts Receivable Voucher
1.
If the original voucher type was an “A/R Voucher”, enter a “Credit Memo”.
2.
Choose Record Payments
3.
Pick sufficient Accounts Receivable Vouchers for payment to balance the Credit Memo amount,
4.
Then pick the Credit Memo to apply the credit.
5.
The new transaction will offset the previous transaction items and the end result is zero.
Credit Memo
1.
If the original was a “Credit Memo”, enter an “A/R Voucher”.
2.
Choose Record Payments
3.
Pick the voucher for payment,
4.
Then pick the Credit Memo to apply the credit.
Page 214
Chapter 9 – Accounts Receivable
Blue Link Solutions™
5.
The new transaction will offset the previous transaction and the net result is zero.
Chapter 9 – Accounts Receivable
Page 215
Blue Link Solutions™
9.4 Record Payments
Use this function to record payments made by customers, take discounts on invoices paid, apply outstanding
credits, or to record NSF cheques. You can also enter partial payments on your invoices or spread a payment
over several invoices in any way you choose.
Lookup By Customer Code
Select the code of the customer whose payment is to be applied by typing it in or selecting it using the drop
down list.
Lookup By Customer Name
You may type in the customer name to select which invoices are to be paid.
Outstanding Invoices
This field displays the total dollar amount in outstanding invoices toward which payment may be applied.
Outstanding Credits
This field shows the total dollar amount in outstanding credits for this customer.
Payment Date
Today’s date will be filled in automatically but can be manually overridden.
Amount
Enter the amount of the cheque here. If this is a NSF cheque, enter this as a negative amount.
Page 216
Chapter 9 – Accounts Receivable
Blue Link Solutions™
Payment Method
Choose the payment method the customer used to make this payment.
Cheque #
The cheque number. This is a ten digit numeric field.
The first step in recording payments is to enter the code of the customer making the payment. This can be
accomplished in two ways:
8.
1.
Type the correct customer code into the Lookup field and press <Enter>. The corresponding
name will be displayed.
2.
Use the list display option and select the customer code or customer name.
3.
The customer you choose is placed in the Customer Code and Customer Name fields.
4.
Press <Enter> and the customer name, and any outstanding credits or invoices are displayed.
5.
Enter the cheque amount and the cheque’s number (optional). This information will be used
during the bank reconciliation to identify that the cheque has cleared the bank.
6.
You have the option of viewing only the unpaid invoices or all the items including historical data
for this customer. This option is determined by the Unpaid Items or All Items buttons at the
bottom of the screen.
To apply customer credits against outstanding invoices enter “0” for the payment amount. The function
allows this only if there is an outstanding credit amount.
9.4.1 CHOOSING INVOICES FOR PAYMENT
The window shows the invoice number, description and amount, with a field to enter your customer's discount
and the amount you wish to apply toward the invoice.
1.
If you wish for the system to allocate the funds to outstanding invoices, oldest first, then click on
the “Auto Allocate” button. The following screen will be displayed:
2.
Click Yes to apply the payment to the account; click No to cancel the request
3.
If you wish to allocate payments to individual invoices manually, then place your cursor in the
“Amt Applied” field and the amount of the invoice will default if there is enough on the cheque to
pay.
? For example:
?
The amount of the cheque is $5000.00. You have three invoices outstanding of $2,461.00, $1,070.00,
and $4,280.00. By placing your cursor in each of the “Amt Applied” fields, it will default to the
remaining amount until there isn’t enough left on the cheque to pay. In this example, there is an
invoice for $4,280.00 outstanding where only $1,469.00 was paid off as that was the amount remaining
after selecting the first two invoices.
Chapter 9 – Accounts Receivable
Page 217
Blue Link Solutions™
9.
4.
?
When your cursor is placed in the “Discount” field, enter the discount (if one applies). Repeat
these steps for any other invoices to which you wish to apply payment until you have used all the
funds.
Repeat these steps for any other invoices to which you wish to apply payment until you have used all
the funds.
10.
1.
If you want to change a line item which is out of the entry window, select the invoice using the Up
and Down scroll bars. This will bring the invoice into the viewing area.
2.
Either change the discount or amount paid. If you no longer want to apply payment against the
invoice, enter zeroes in the Discount and Applied fields. You can also press <Ctrl> and U (for
Undo) simultaneously to clear an entry field.
3.
To mark the transaction as complete and save your choices, click the Process Payment button.
If you answer Yes when asked if all of the entries are correct your payment transaction is then saved and the
General Ledger, Customer, Bank Management, and Accounts Receivable files will be updated. You are then
returned to the Customer Code field to begin another payment record.
9.4.2 UNAPPLIED PAYMENTS
You may record all or part of a payment as an unapplied payment. To do so, click on Process Payment
when the amount applied is less than the total payment amount. The following will display:
If you answer YES, a separate credit A/R transaction will be created for this unapplied amount.
9.4.3 RECORDING NSF CHEQUES
If a customer’s cheque bounces, do the following to reverse the payment:
1.
Open the A/R Record Payments Screen
2.
Select the customer from the pick list.
3.
Select the “All Items” option to view all current and paid items.
Page 218
Chapter 9 – Accounts Receivable
Blue Link Solutions™
4.
Enter the amount of the cheque as a negative dollar amount (i.e. -$100).
5.
Record the bad cheque number.
6.
In the list of transactions apply the negative amount to the item(s) that had previously been paid.
7.
Click Process Payment to restore the original invoice(s) owing.
Note:
If you aren’t sure what item(s) this cheque originally paid, print a customer payment history report. (See
9.1.13 - Payment History Button for more information.)
To apply a surcharge to the customer’s account for having issued a bad cheque, create an A/R debit memo
for the amount of the surcharge. (See 9.3 - Enter/Change A/R Voucher for more information on entering
A/R vouchers.)
Chapter 9 – Accounts Receivable
Page 219
Blue Link Solutions™
9.5 Collections Screen
Use this form to view collection information of all of your customers in an easy to view format. You may
also use filters to aid in your search for similar types of customers. You may also update information on
this screen such as contact notes and it will be added to the customer’s file.
Filters
The following fields are available for filtering:
? Customer ID
? Company Name
? Prov – the province or state or county
? Phone – enter without the mask
? Group Code – this is the Group Code found on the Phone #’s tab of Enter / Change Customer
? Remaining – the invoice amount remaining to be paid
? Age – age of the invoice
? Days SLC – this stands for Days Since Last Contacted - this is calculated based on the last time
this customer has a record entered for them in contact notes.
You may filter the information based on the following filter methods:
? Like
? Includes
? =Equals
? > Greater Than
? < Less Than
Page 220
Chapter 9 – Accounts Receivable
Blue Link Solutions™
?
Between – note when this is selected the Thru field is enabled.
Once you have the data selected that you want to filter select the Lookup button on the far right.
Custom Sort
In combination with or separate to filtering the information, you may also sort how the outstanding invoice
information is presented.
It will sort by the first field you select, then by the second, third, and fourth.
Outlook
Set Task in Outlook for selected item
By selecting a field on the outstanding information and then selecting this option, you can create a task in
Outlook that contains various pieces of information from this transaction so that you do not have to retype
it.
Chapter 9 – Accounts Receivable
Page 221
Blue Link Solutions™
Create Appointment in Outlook for Selected Item
This will perform a similar function as the task above but instead will block off time on your calendar for
the item selected.
Buttons
You have the option to print reports or view information that is available elsewhere in the Accounts
Receivable module but may be more convenient to print or view from here.
Print / E-Mail Report(s)
With this option you can select to print various reports for this selected customer.
? Dunning Notice – a custom letter stating how much they owe
? Detailed Aging Report – this will show each invoice they owe presented in an aging format
? Statement – this is a statement of their account
? Invoices
? Outstanding – this will be a reprint of all of the invoices that they owe money for, in the
case that they claim that they lost the invoice and as a result couldn’t pay.
? Specific Invoice – select one
? Print Where?
? Printer
? Screen – you can only print to screen if you have one item selected
? PDF – if you have a licensed copy of DocuCom PDF Driver and have set it up in System
Page 222
Chapter 9 – Accounts Receivable
Blue Link Solutions™
Maintenance | System Master | Data Entry & Other Defaults (see Chapter 6 for
details), then you can create a PDF file with the option of emailing it.
Print Aging Reports
This report option is described later in this chapter under Print Aging Reports.
Drill Down
This is a drill down of the selected customer’s sales history as described in the section on Enter / Change
Customer.
Chapter 9 – Accounts Receivable
Page 223
Blue Link Solutions™
Payment History
Print the payment history for the selected customer based on the date range.
Sales History
View the sales history for this customer.
Page 224
Chapter 9 – Accounts Receivable
Blue Link Solutions™
Group Statement
If the customer selected is setup with a Group Code (see the section on Enter / Change Customer |
Phone#’s tab, for information on setting up Group Codes) you can print a Group Statement.
Send New E-Mail Message to Customer
Create a new email message with the email address that is found in the Contact Info section of this
collections screen.
Chapter 9 – Accounts Receivable
Page 225
Blue Link Solutions™
9.6 Charge Interest
The charge interest function will levy interest charges on overdue A/R balances using the rules you’ve defined
in the system interface for customers you’ve configured to allow interest charges.
The system interface options define the monthly interest charge (A/R Interest Rate) and the number of days an
invoice should be overdue before interest charges are applied (A/R Interest Days).
The “charge interest” checkbox in the customer defaults tab determines whether or not a particular customer
will be included when interest charges are levied.
CAUTION:
Run this program once per month on the day you want to apply the interest charges. This function
does not keep track of who has been charged interest during what period; as a result, it will charge
interest every time it is run. Be careful not to run it for the same customer more than once in a given
time frame.
Use this function to add in interest charges before printing financial statements or customer statements.
1.
The date will default to the current system date.
2.
You may select which customer or range of customer to charge interest
3.
Click the Process button. The following screen will be displayed:
1.
Click Yes to continue posting the interest charges; click No to cancel the request
No other action is required and the program will automatically create the appropriate interest line items.
Page 226
Chapter 9 – Accounts Receivable
Blue Link Solutions™
Note:
Interest is not calculated on accounts with credit balances.
The function only applies interest to customers if Interest is checked in the Customer file.
Make sure that you have first set up the appropriate parameters in System Maintenance | System Master |
Company Information. These include the interest rate, the number of days until delinquent, the compound
interest flag, and the General Ledger account number for interest revenue charged.
Creating interest line items for your customers automatically updates the next invoice number, updates the
invoice balance in the Customer file, adds finance charge records to the Accounts Receivable transaction file,
and posts to the General Ledger and the Credit Sales Journal.
Chapter 9 – Accounts Receivable
Page 227
Blue Link Solutions™
9.7 Print Customer Information Reports
This function prints various customer information reports.
General Information
This report prints a listing of address and contact information from the Customer file. The report does not
include phone numbers.
Please note:
The General Information report will only print customers that have classes set up in the customer file.
Phone Number List
This report prints the company name, contact name, main phone number and fax number.
Mailing Labels
This report prints customer address information on standard mailing labels. When this choice is active, you
can choose also “Which Type of Label?”
1 across:
for Tractor-feed labels
Labels: 4” by 1.4375”
3 across:
for Laser sheet-fed labels (use Avery™ 5160)
Labels: 1” high, 2.63” wide
Margins: .5” top and bottom; .25” left and right
No. of Labels per page: 3 across by 10 down
Rolodex Cards
This report prints the Customer address, contact, and telephone information on standard Rolodex cards.
Page 228
Chapter 9 – Accounts Receivable
Blue Link Solutions™
Note:
This report has been designed for use with standard Avery™ Rolodex card paper.
Sales Report
This report provides customer name and currency, and the Gross Sales and COGS (Cost of Goods Sold)
figures for MTD (Month to date), YTD (Year to date) and LYR (Last year).
Ship To
This report lists all shipping addresses on file for the selected customer or customers.
Customer Type Filters
You may limit your report by entering a range of Customer Codes and/or type codes. If you do not change the
defaults, the program will print all the customers.
Sales by Customer
This report will list all customers by currency. It will detail each invoice by date, product, quantity, and $
amount. You may select a date range.
Note:
If you request a report for a customer with no data, you will see the following message:
Note:
The General Information report will only print customers that have classes set up in the customer file.
Any of the above reports may be printed to the printer or previewed on screen.
Sample Reports
General Customer Information
Chapter 9 – Accounts Receivable
Page 229
Blue Link Solutions™
Customer Phone Number List
Mailing Labels and Rolodex
Page 230
Chapter 9 – Accounts Receivable
Blue Link Solutions™
Sales Report
Customer Ship To Information
Chapter 9 – Accounts Receivable
Page 231
Blue Link Solutions™
9.7.1 PRINT CUSTOMER TAX REPORTS
Use this function to print customer tax reports including, Commodity Tax Report, PST Expiry by Date and
PST Expiry by Days.
For each of the reports you can select for a range of customers, classes and tax codes or individual records.
9.7.2 COMMODITY TAX REPORT
This report prints by tax authority all invoices that have been recorded for a customer. This report can be
selected for a date range.
You may also select a date range to run this report.
Page 232
Chapter 9 – Accounts Receivable
Blue Link Solutions™
9.7.3 PST EXPIRY BY DATE
This report prints a listing of customer’s who have a PST certificate that will expire within a specified date
range.
Chapter 9 – Accounts Receivable
Page 233
Blue Link Solutions™
9.7.4 PST EXPIRY BY DAYS
This report prints a listing of customer’s who have a PST certificate that will expire within the specified
number of days.
Page 234
Chapter 9 – Accounts Receivable
Blue Link Solutions™
9.8 Print Aging Reports
Use this function to print aging reports for one customer or for a list of customers. This report prints in a
landscape format that enables the entire company name and all other information to be displayed.
Which Report?
You can chose from one of six types of reports:
1.
2.
3.
4.
5.
6.
7.
Aging
Detailed Aging
Salesperson Aging
Listing
Detailed Transaction Report
Retroactive Listing
Retroactive Aging
Departmentalized?
Enter a department to limit the report to departments selected when sales orders were entered. Note: sales
orders not assigned to a department will be omitted when a range of departments is selected.
Detail/Summary and ‘As At’ Date
When you select a Retroactive Listing, you are given the choice to view all the details or just a summary.
Take the checkmark away from the Detail box to see a summary report. You can also select the “as at” date
for printing of transactions.
From/Thru Customer Codes
If you leave the defaults of “0” and “ZZ”, all customers will print. You can also limit the report by entering
a range of customer codes.
Currency?
If you are using multiple currencies, you have the following options:
1.
Leave this field blank to see all data in your Home currency (usually Canadian dollars)
2.
You can also choose a specific currency by using the drop down listing. This option will only print the
Customers who have that particular currency defined in the customer listing.
Revalue
With this option checked, you will see a Retroactive Report showing the original transaction valued
Canadian dollars, the value in Canadian dollars at the current exchange rate and the difference between the
two values.
Print Where?
You may select for the report to be printed to the printer or to be previewed on screen. Click the “Print” button
to send it to the printer or the screen or the “Cancel” button to cancel the request.
Chapter 9 – Accounts Receivable
Page 235
Blue Link Solutions™
9.8.1 ACCOUNTS RECEIVABLE AGING REPORT
The aging report lists the outstanding balances owing for each customer. The aging periods listed are those
defined in the “Aging Periods” portion of the System Master screen.
Selection Range
Enter the range of customer codes you want to print. If you do not change the defaults, the program will print
information for all customers.
Print Where?
You may select for the report to be printed to the printer or to be previewed on screen. Click the “Print” button
to send it to the printer or the screen or the “Cancel” button to cancel the request.
9.8.2 ACCOUNTS RECEIVABLE DETAILED AGING
The detailed aging report lists each customer’s invoices. The aging periods listed are those defined in the
“Aging Periods” portion of the System Master screen. Enter the range of customer codes you want to print. If
you do not change the defaults, the program will print information for all customers.
Print Where?
You may select for the report to be printed to the printer or to be previewed on screen. Click the “Print” button
to send it to the printer or the screen or the “Cancel” button to cancel the request.
Page 236
Chapter 9 – Accounts Receivable
Blue Link Solutions™
9.8.3 SALESPERSON AGING REPORT
The salesperson aging report lists the outstanding balances owing for each customer by salesperson. The aging
periods listed are those defined in the “Aging Periods” portion of the System Master screen.
Selection Range
Enter the range of customer codes you want to print. If you do not change the defaults, the program will print
information for all customers.
Similarly, select the range of salespersons that you want to print. If you do not change the defaults, the
program will print information for all salespeople.
NOTE: This report does not have the option to be printed “departmentalized”.
Print Where?
You may select for the report to be printed to the printer or to be previewed on screen. Click the “Print” button
to send it to the printer or the screen or the “Cancel” button to cancel the request.
Chapter 9 – Accounts Receivable
Page 237
Blue Link Solutions™
9.8.4 ACCOUNTS RECEIVABLE LISTING REPORT
The Accounts Receivable Listing gives other open invoice information, such as invoice description, along with
the age in days.
Enter the range of customer codes you want to print. If you do not change the defaults, the program will print
information for all customers.
Print Where?
You may select for the report to be printed to the printer or to be previewed on screen. Click the “Print” button
to send it to the printer or the screen or the “Cancel” button to cancel the request.
9.8.5 ACCOUNTS RECEIVABLE DETAILED TRANSACTIONS REPORT
The Accounts receivable Detailed Transactions Report shows the same information as provided in the
summary listing but with invoice information included.
Enter the range of customer codes you want to print. If you do not change the defaults, the program will print
information for all customers.
Print Where?
You may select for the report to be printed to the printer or to be previewed on screen. Click the “Print” button
to send it to the printer or the screen or the “Cancel” button to cancel the request.
Page 238
Chapter 9 – Accounts Receivable
Blue Link Solutions™
Chapter 9 – Accounts Receivable
Page 239
Blue Link Solutions™
9.8.6 RETROACTIVE LISTING REPORT
The Retroactive Listing Report, which may be printed in summary or in detail, prints information detailing
Invoice Date, Remaining Amount, Description, Terms Type and Age in days as of the date entered in the
“as at” date field of the selection screen. You may not, however, view information on invoices in the
system for a date prior to the date of the upgrade to Version 2.0 or to a date prior to your having purged
data (if you have purged any data).
You may also print a currency Revaluation Report which may be very useful to revalue any foreign
currencies to the current value for Fiscal Year End Statement purposes. For Year-End adjustments, use the
Reversing Journal Entry function. The Currency Revaluation Report may be run by selecting the
Retroactive Listing Report in summary (uncheck the detail box), selecting the date, customer code range,
currency and by checking the Revalue box. The report details show, with one line per customer, the
customer code and name, the amount in the foreign currency, the value in Canadian dollars of the original
transaction and the value in Canadian dollars revalued to the current rate. The revalue amount is the
difference between the current value and the original value.
Print Where?
You may select for the report to be printed to the printer or to be previewed on screen. Click the “Print” button
to send it to the printer or the screen or the “Cancel” button to cancel the request.
9.8.7
RETROACTIVE AGING REPORT
Print this report to retroactively present your aging at a particular time period. This is ideal for month-ends
and year-ends where invoices were entered after the month-end date but posted back into the prior period.
Page 240
Chapter 9 – Accounts Receivable
Blue Link Solutions™
Chapter 9 – Accounts Receivable
Page 241
Blue Link Solutions™
9.9 Statements
This function will print the Accounts Receivable transactions on pre-printed statement forms or on plain paper.
From/Thru Customer
You may enter a range of Customer Codes to print. If you do not change the default limits, the program will
print statements for all customers who have the Statement field in their customer record checked.
Thru Invoice Date
You may enter a statement date, or press <Enter> to default to the current date.
Print Where?
You may select for the report to be printed to the printer, to be previewed on screen, or to be faxed or emailed
to the customer’s number/email address. Click the “Print” button to send it to the printer, screen, or fax/email
or the “Cancel” button to cancel the request.
Fax/Email ?
This is an Elite feature. By selecting this button, the statements will be faxed or emailed depending on what
was selected in the customer setup. You must have Microsoft Outlook™ and MS Fax for this to work.
Configuring Outlook for Faxes
After opening Microsoft Outlook click on the Tools menu option and choose Email Accounts which will bring
you to the screen below.
Page 242
Chapter 9 – Accounts Receivable
Blue Link Solutions™
Under the E-mail heading select Add a new e-mail account and then click Next. Now select Additional Server
Types as shown below.
Click next and then choose Fax Mail Transport.
Chapter 9 – Accounts Receivable
Page 243
Blue Link Solutions™
Click on the Next button to finish configuring MS Outlook for faxes.
Customer Statement
Page 244
Chapter 9 – Accounts Receivable
Blue Link Solutions™
9.10 Dunning Notices
Use this function to print customer overdue account notices.
From/Thru Customer
Enter a range of Customer Codes
Invoices Older Than Date
Change the date or press <Enter> to accept today’s date.
If you do not enter customer or date limits, the program will print the entire customer’s listing with overdue
invoices.
Print Where?
You may select for the report to be printed to the printer, previewed on screen, faxed or e-mailed (if the
customer is set-up for this type of service). Click the “Print” button to e-mail/fax it, send it to the printer/screen,
or the “Cancel” button to cancel the request.
Mail Merge
Another option to printing this Dunning notice is to create your own in Microsoft Word™.
1.
To do so, you will select the Mail Merge button.
2.
You will then be asked to confirm that creating mail merge records is what you intend to do.
3.
If you select yes, Blue Link Solutions will go through and populate a table called
Chapter 9 – Accounts Receivable
Page 245
Blue Link Solutions™
“DunningNotices”
4.
Then in Microsoft Word™ you will select the table “DunningNotices” for your merge fields into
your Dunning Notice template which you have created.
Editing the Text of the Document
To edit the text of the Dunning Notice go to System Maintenance | System Master | Report Options and
enter the text that you wish to appear in the body of the letter, in the Dunning Notice field.
Page 246
Chapter 9 – Accounts Receivable
Blue Link Solutions™
Customer Dunning Notice Letter
Chapter 9 – Accounts Receivable
Page 247
Blue Link Solutions™
9.11 Customer Payment History
This report displays, for selected customers between selected dates, the payments received from those
customers and the invoices against which they were allocated. This enables you to track how a payment
received sometime in the past was applied against outstanding invoices at the time.
From/Thru Customer
Enter a range of Customer Codes or leave the defaults for all customers.
From/Thru Pmt. Date
Change the From or Thru Pmt. Dates or leave the default for today’s date.
If you do not change the default customer or date limits, all customers will be printed.
Print Where?
You may select for the report to be printed to the printer or to be previewed on screen. Click the “Print” button
to send it to the printer or the screen or the “Cancel” button to cancel the request.
Note:
This report can also be retrieved through the Enter/Change Customer Screen.
Accounts Receivable Payment History
Page 248
Chapter 9 – Accounts Receivable
Blue Link Solutions™
10: Accounts Payable
The Accounts Payable module allows you to enter, change, or print your vendor information and much of your
purchase information. To use Accounts Payable programs, you must already have necessary information
entered into System Interface, including your bank account(s), Purchase Order (P/O) defaults, and your
company name (for printing). You will also need the terms information entered into System Maintenance.
For a complete list of what needs to be set up before using Accounts Payable, see Getting Started.
Access Accounts Payable through Purchasing | Accounts Payable.
In Accounts Payable you can record all of your vendor information. You can find out which of your vendor
invoices are overdue, choose the ones you want to pay, and print the cheques to pay them. You can also print
your vendor information out as a simple list of names and codes, a list with addresses and telephone contacts
(on paper or Rolodex cards), or an extended list of vendors and purchase information. Any recurring noninventory type transactions such as rent, utilities, or lease payments can be handled in Accounts Payable, saving
time and freeing you from remembering. In addition, Blue Link Solutions makes all of this information
available throughout the system, so the vendor data you enter here can be called up instantly in another module.
Chapter 9 – Accounts Receivable
Page 249
Blue Link Solutions™
10.1 Enter/Change Vendor Information
Use this function when you begin purchasing from a new vendor, or if there is a change in the vendor name,
address, telephone number, or your company contact. Be sure any necessary purchase terms information has
already been entered in System Maintenance | System Master Lists | Terms / Types / RMA Reason Codes/
Other Lists This vendor information is accessible when you create purchase orders in Enter/Edit Purchase
Order.
10.1.1
VENDOR INFORMATION
Code (Required)
The code you assign to the vendor. This code is used in other parts of Blue Link Solutions. This is a 10
character alphanumeric field.
Note:
It is important to put some thought into the structure of Vendor Codes. You may use any form you desire,
but it is recommended that you do not use numbers. However, it is always best to set up any code in an
easy to remember format.
Company (Required)
The actual vendor name. This is a 25 character alphanumeric field.
Address 1
The first of 2 address lines. This is a 25 character alphanumeric field.
Page 250
Chapter 10 – Accounts Payable
Blue Link Solutions™
Address 2
The second of 2 address lines. This can be a second address or simply a suite number. This is a 25 character
alphanumeric field.
City
The vendor's city. This is a 15 character alphanumeric field.
Province/State/County
This field label and size depends on the Regional Settings that you have selected..
Postal Code/Zip Code
This field label and size depends on the Regional Settings that you have selected..
Country
The vendor’s country.
Contact
The person with whom you normally speak at your vendor's location. This is a 25 character alphanumeric
field.
Account #
Your account number assigned by the vendor.
Comments
Enter miscellaneous comments on the vendor. This is a memo field. These comments do not print anywhere.
10.1.2
PHONE NUMBERS
Clicking the list button allows you to select different field names if you wish to change them from the defaults.
The choices are:
Office
The vendor’s office number and extension.
Fax
The vendor’s fax number and extension.
Mobile
The vendor’s mobile number and extension.
Pager
The vendor’s pager number and extension.
Chapter 10 – Accounts Payable
Page 251
Blue Link Solutions™
Check Phone Number
Upon entering the vendor’s phone number, if the number of digits is not recognized as a North American
phone number, the following “Check Phone Number” form will appear. This allows for formatting of
international phone numbers.
Email
The customer’s Email address. The text will turn blue.
Email Button
Click this button to start your Email program and send an Email directly from Blue Link Solutions.
Web Address
The Vendor’s web address. You do not need to type in the “http://” in front of it. It is a hyperlink field. If you
click on it, your dial-up networking program will start in order to go directly to the vendor’s web site on the
Internet.
Active Flag
Uncheck this flag if this customer is no longer an active customer. This customer record will not appear in
any pick lists. This flag is defaulted as checked on.
1099 Options
If your regional setting is set to USA then this form will be enabled. Please see the reference guide for USA
for more information on setting up 1099’s.
10.1.3
Page 252
GENERAL INFO TAB
Chapter 10 – Accounts Payable
Blue Link Solutions™
Tax & Currency Defaults
Tax Authority (Required)
Enter the default tax authority for this vendor. This will be used in AP Vouchers and Purchase Orders.
Currency
Select the currency in which you pay the vendor. The default setting for this field is CA$. Once a currency is
selected for a vendor it cannot be changed.
New PO / AP Voucher Details
Default Location
When creating a Purchase Order for this vendor this is the warehouse location you most likely will receive
it into.
Default G/L Account for Vouchers
You may assign a default General Ledger account to any vendor. When entering a voucher for a vendor who
has a default General Ledger account defined and when you complete the top half of the voucher screen and
move into the distribution section, the default General Ledger account will be displayed and selected in the pull
down list. You may accept that account or alternatively select a different General Ledger account. For
example, Bell Canada may have the GL Account of 65300 for Communications Expense.
Credit Information
Terms (Required)
Payment terms for this vendor. The terms entered here are later offered as a default when you record a
Purchase Order for this vendor in Enter/Edit Purchase Order, Receive Purchase Order, as well as in AP
Voucher .
Credit Limit
This field provides information on the Detailed Aging Report as a Management tool, to see if outstanding
Payables per that Vendor are over a determined Credit Limit.
Dates / Times Since
Start Date
Automatically defaults to current date when entering new vendor.
Last Purch
The date of the last P/O or invoice received from this vendor. This field is automatically updated by the
system.
Last Pmt
The date of the last payment made to this vendor. This field is automatically updated by the system.
Alternate Payment Vendor
Alternate Payment Vendor
If this vendor is being designated as an alternate payment vendor then check off this box. This means that
you do not directly purchase anything from this vendor but you end up paying this vendor for the invoices
Chapter 10 – Accounts Payable
Page 253
Blue Link Solutions™
of other vendors. The best example for this is credit card purchases. You purchase from a supplier but pay
with your credit card. You do not owe the supplier anything but rather the balance of the invoice is
transferred to the credit card company. See more about this in section 10.3 Enter / Edit AP Voucher and
10.5 Alternate Vendor Payment.
Other Information
Vendor Type
This is a field used as an additional means of grouping vendors for reporting. For example, you might want to
group all of your vendors who are wholesalers into a single report. Use this field to designate such a group.
Choose a vendor type from the list box. The values for Vendor Types may be changed System Maintenance |
System Master Lists | Terms / Types / RMA Reason Codes/ Other Lists or simply click on the “Add”
button to edit the list from this screen and then hit F9 to refresh your screen.
Gross Purchases
The total purchases received from this vendor. The following amounts are recorded and automatically
updated:
?
?
?
Month to Date
Year to Date
Total for Last Year
10.1.4
HISTORY/P.O.’S TAB
The history of all items purchased from this vendor from P/O’s, in reverse date order, detailing invoice number,
product code, product description, quantity and price.
Page 254
Chapter 10 – Accounts Payable
Blue Link Solutions™
10.1.5
OUTSTANDING TAB AND FIELDS
Details all unpurged invoices relating to this vendor, in reverse date order, showing amounts still owing and the
due date. You may also modify the due date of an invoice after you have entered the voucher in
Enter/Change Payable Voucher.
Outstanding Purchases
The amount (in dollars) that you owe in outstanding invoices to a vendor. There could still be an amount in
this field even if you have a credit from the vendor. This field is filled in automatically.
Outstanding Credits
The amount (in dollars) of credits that have not been applied toward vendor invoices. If you receive a credit
from a vendor, this is where the amount is displayed. This field is filled in automatically.
10.1.6
CONTACT NOTES TAB
This screen allows you to enter notes for this vendor. These are useful for tracking and resolving collection
issues. All notes created are date and time stamped and record the login of the user who created them.
Default notes (such as “Called to collect”) can be created using the “Add” button and selected using the
drop down list in the notes field. You may also wish to classify the type of contact it was (Invoice Inquiry,
Delivery Inquiry etc.) with the contact type field. There is also a flag to check if you wish the contact note
to be deleted. When you run the contact notes purge routine under Utilties | Contact Manager
Maintenance | Purge Contact Notes, these selected notes will be purged.
Chapter 10 – Accounts Payable
Page 255
Blue Link Solutions™
The “Set Task in Outlook” button calls up the following screen:
Solutions will save this task in your Private folder in Outlook.
Subject
Type a subject for this task.
Body
Type the details of this task.
Due
Type the date the task it due.
Remind me in/Length of Time
Select the time period, either minutes, hours or days and then type a number in the Length of Time field.
Sound Reminder
If you wish to have an audible reminder, click this box.
Set Task
Click this button when you are finished filling in the information and Solutions will send the details to
Outlook Tasks.
10.1.7
PURCHASE ORDER BUTTON
If you click on this Purchase Order button with a vendor
the vendor maintenance screen, you will be given an option to
Page 256
currently displayed on
start a purchase order
Chapter 10 – Accounts Payable
Blue Link Solutions™
for that vendor.
If you click Yes, the purchase order screen will display with that vendor already selected, and you may proceed
to complete the purchase order. See the chapter on Purchase Orders. Click No to cancel the request.
Add Buttons
In the vendor screen you will see Add buttons next to certain fields. By pressing those buttons you will be able
to add items to those fields on the fly, such as Terms and Vendor Types.
10.1.8
PAYMENT HISTORY BUTTON
Clicking on this button opens the Vendor Payment History Report for the selected
vendor for the past year.
10.1.9
AP VOUCHER BUTTON
Clicking on this button opens the AP Voucher module for this vendor. This is a quick access to AP
Voucher which can also be accessed from Modules | Accounts Payable | AP Voucher.
You will then verify that you do want to create a new AP Voucher for this Vendor.
10.1.10
1.
CREATING A NEW VENDOR RECORD
When the screen is first displayed, the cursor is located in the Code field.
If it is not, then click the “New” button
Chapter 10 – Accounts Payable
Page 257
Blue Link Solutions™
2.
Enter a new Vendor Code and press <Enter>. Use codes that will help you identify the vendor by group or
alphabetical ranges for other operations in Blue Link Solutions. The following screen will be displayed:
3.
Click Yes to add a new vendor; click No to cancel the request
1.
After you enter the new Vendor Code, fill in the rest of the appropriate fields
4.
You can save a record by pressing the Save button at any time while entering data. The following screen
will be displayed:
5.
Click Yes to save the new vendor record; click No to cancel the request.
You must enter Yes when asked if you wish to save, or the record will not be permanently recorded in the file.
The program will not allow you to save a record that does not have a Vendor Code. The record is saved into
the Vendor file, and can then be accessed for P/O or voucher operations, for aging, and for printing vendor
information.
10.1.11
CHANGING AN EXISTING VENDOR RECORD
If you need to change a vendor address or telephone number, or if some other important information has
changed, find the existing vendor record.
1.
Click the “New” button.
2.
Select the Vendor code or Vendor Name from the drop down list.
3.
Once the vendor’s record is displayed, you can change the Name, Contact or Telephone Number fields.
You cannot change the currency once the original record is saved.
Page 258
Chapter 10 – Accounts Payable
Blue Link Solutions™
4.
Click the “Save” button and the following screen will be displayed:
5.
Click Yes to save the: click No to cancel the request.
The record is saved into the Vendor file, and is available to be accessed for P/O or voucher operations,
aging and printing vendor information.
10.1.12
DELETING AN EXISTING VENDOR RECORD
When you delete a vendor record in Blue Link Solutions, the Outstanding Purchases and the Outstanding
Credits fields must both show a $0.00 balance.
Once a record is deleted it cannot be recovered. You will have to re-enter the vendor record if it is deleted
in error.
To delete an existing vendor:
1.
Display the vendor recording by clicking on the “New” button.
2.
Click the “Delete” button
3.
The following screen will be displayed if the vendor can be deleted:
4.
Click Yes to delete the vendor; click No to cancel the request.
If the Outstanding Purchases and Outstanding Credits balances for the vendor are not $0.00 you will not
allowed to delete the record.
Chapter 10 – Accounts Payable
Page 259
Blue Link Solutions™
10.1.13
INACTIVE FLAG
If you wish to mark a vendor as inactive uncheck the active flag. This vendor will no longer show up in the
pick lists such as in Purchase Orders or AP Vouchers. You will still be able to retrieve this vendor by
looking up in this module. You may then re-check as active if use this vendor for business in the future.
Page 260
Chapter 10 – Accounts Payable
Blue Link Solutions™
10.2 Quick Vendor Lookup
The quick vendor lookup screen can be used to get vendor address and phone information, or as starting point
for entering other types of transactions. To find a vendor you can either scroll through the list or use the lookup
functionality at the top of the screen.
Tip:
To search for text in any part of the item add a “*” wildcard before or after the item (i.e. searching for
“L5N*” in the Postal Code/Zip Code field would show all customers in that geographic region).
New Purchase
This button is a shortcut to the Purchase Order screen. See
Chapter 13 on Purchase Orders for more information.
New A/P Voucher Button
This button is a shortcut to the Enter/Change A/P Voucher
screen. See 10.3 Enter / Change AP Voucher for detailed
information.
Edit Vendor Button
This button is a shortcut to the Enter/Edit Vendor screen.
See 10.1 Enter / Edit Vendors for more detailed information.
Chapter 10 – Accounts Payable
Page 261
Blue Link Solutions™
10.3 Enter/Change A/P Voucher
Use this function to enter transactions that do not require a paper printout. For example: entering vendor
vouchers that do not affect your inventory, you can also record vendor credits or enter reversing vouchers with
Credit Memos, and you can enter Manual Cheques, which updates the bank account in addition to the A/P
accounts. Normally, inventory items are processed through Enter/Edit Purchase Order.
The voucher entry screen is displayed, followed by descriptions of the fields.
10.3.1
VOUCHER ENTRY FIELDS
Code or Name (Required)
The vendor code. This is a 10 character alphanumeric field. The vendor name is filled in automatically from
the vendor file. You may also create a new AP Voucher by typing in the vendor’s name. The vendor code will
then be automatically filled in.
Lookup
This is a list box used to display existing vouchers. Type in the voucher number and press <Enter> to display
an existing voucher if you know the voucher number, or press F4 to display the list if you do not.
Number (Required)
The invoice/voucher number on the bill you received from the vendor. This is a fifteen character text field.
You may also keep the default number that the system provides. If you enter a duplicate number for that
vendor, the system will warn you of that fact, but will still allow its entry.
Page 262
Chapter 10 – Accounts Payable
Blue Link Solutions™
Voucher Type (Required)
The invoice/voucher type:
1.
A/P Voucher
? This is for standard entry of invoices where purchase orders are not required (utility invoices) or the
purchase orders were not received with an invoice. (This is the landed cost accrual feature which is
only available in Elite).
GL Account Selected
Accounts Payable
2.
Credit Memo
? This is used to credit your account with the vendor or to reverse out incorrect entries.
Accounts Payable
GL Account Selected
3.
Debit
Credit
Debit
Credit
Manual Cheque
? This is used to enter invoices which have already been paid. For example you may have gone to a
local hardware store to purchase some miscellaneous items. You have already paid with a cheque
before the invoice is entered back at the office. When you return with the invoice you will enter it with
this voucher type selected.
GL Account Selected
Bank
Debit
Credit
Terms (Required)
The payment terms allowed by the vendor. Make your selection from the menu, with the highlighted selection
being the default terms type for this vendor from Enter/Change Vendor Information.
Invoice Date
This is the date of the invoice from your vendor. The default entry is the current date.
Due Date
The due date of the invoice, based on the terms entered in the previous field. This may be overridden.
Discount %
You may enter the percentage discount information here if applicable. The amount will then appear in the
Discount Amount field. This may be overridden once you’ve picked this invoice to pay.
Dept
If you are using G/L Departments, enter the G/L Department for posting the Total Amount in this field. This
field also functions as a default for the distribution accounts.
Tax Authority
The tax authority is defaulted from the Vendor set up, but can be overridden by selecting from the drop down
list or by typing in the code.
Total Amount (Required)
Type in the total amount of the transaction including tax.
Chapter 10 – Accounts Payable
Page 263
Blue Link Solutions™
Tax Group 1 and 2 Name
These amounts will be calculated and filled in automatically by the system, however tax 1 and tax 2 can be
manually overridden and the total will be automatically recalculated.
You may double-click on the tax amount for tax authorities where there is more than one tax element assigned
to that tax group. You may then edit a specific level of tax and it will update the total.
The names of these fields are based on the Tax Group Names set up for this tax authority in System Master
Lists | Tax Setup.
.
Tax Group 2 Amount
This amount will be prorated over the expense accounts entered in the lower portion of the screen for all tax
authorities except for Group 2 tax elements which are flagged as inputs.
Net Amount
The net amount is calculated automatically by the system, taking the specified tax authority into account.
To Distribute
The amount you need to distribute to achieve a balanced transaction. This is calculated automatically by the
system.
Currency
The currency in which you pay this vendor defaults from the Vendor Information screen.
Rate
The exchange rate used if you pay this vendor with a different currency. If the currency is foreign, the rate
field will be active and can be manually overridden. The system will recalculate the distribution amount.
Transaction Description
Enter the transaction description in this field. All of the detail lines you enter in the bottom portion of the
screen will have their description fields defaulted to this value (which will appear in your GL as the journal
entry description). On the Outstanding tab in the Vendor screen, the AP Voucher will have the description you
entered in this field.
Notes
Enter notes about this transaction. These notes will appear on the GL reports listed in Chapter 7 which
were identified to print these notes. As well they will print on the two reports available to print from this
screen.
Page 264
Chapter 10 – Accounts Payable
Blue Link Solutions™
Alternate Payment
If it is known at the time of entering this invoice that it will be paid by an alternate vendor then you may
check this box and select one of the alternate payment vendors which were setup in Enter/ Change Vendor.
See more information on this in section 10.5.
10.3.2
DETAIL/DISTRIBUTION SECTION
In order to enter a balanced transaction, you will need to distribute the amount of the voucher to one or more
G/L accounts. You will specify the accounts you want the balancing amounts to post to using the fields below.
PLEASE NOTE: If there are any Landed Costs for the selected vendor, and you do not click on the “Landed
Costs” button at the bottom of the screen, then the Landed Cost screen will automatically appear when you
click in the Detail/Distribution Section.
Job Code
Used if you are using job costing to track jobs. This can now be set as the default entry field (Please see
Inventory Information in System Interface in CH. 6 for more details).
Cost Code & Cat
These fields are used in job costing. When you choose one of the following categories, the G/L Account for
that category automatically gets filled in. Categories are:
1 – Labour
2 – Materials
3 – Sub Contract
4 – Other
Account-Dept
The General Ledger Account(s) and Department(s) you are using to balance the voucher. You can distribute
the amount of the voucher to any number of G/L accounts.
Description
The description of each G/L Account is filled in automatically by the system and can be overridden with your
own description.
D/C
The Debit/Credit field defaults to the normal entry for the account you have selected. You can change the
entry if you wish.
Amount
The distribution amount. These amounts added to the Net Amount must total zero. The undistributed amount
defaults here and may be overridden.
Process Transaction
Posts the transaction to Accounts Payable and General Ledger.
Chapter 10 – Accounts Payable
Page 265
Blue Link Solutions™
If the amounts are in balance, the following screen will be displayed:
Click Yes to process the A/P Voucher; click No to cancel the request.
If the amounts are not in balance, the following screen will be displayed:
Click OK and correct the entries to balance. Then try again.
Landed Cost Button ?
This Elite module is intended to facilitate the inclusion of landed cost factors, such as duty, freight, etc., into
the inventory cost of received purchase orders. The estimated amount of each landed cost factor will be
added to the supplier cost on the one hand, and accrued as a liability on the other hand. When an invoice is
received from, for example, the carrier or broker, it will be set off against the accrued landed cost factor.
See Chapter 18 – Elite Features for more details on Landed Cost Tracking.
10.3.3
ADDING A NEW VOUCHER
1.
Click the “New” button at the bottom of the screen.
2.
Click on the code or vendor name box and select a vendor. You may type in the entire vendor code or
name and press <Enter>, or use the list display option.
3.
After selecting the vendor, enter the invoice number or keep the system default.
4.
Select the type of voucher.
A/P Voucher -
A record of an invoice you owe a vendor
Credit Memo -
A record of what a vendor owes you
Manual Cheque -
A record of a direct payment to a vendor
If you choose A/P Voucher or Credit Memo, a record will be added to the Accounts Payable file updating your
Outstanding Purchases or Outstanding Credits. Payment on vouchers or application of credits to vouchers is
performed in Pick Invoices to Pay.
Page 266
Chapter 10 – Accounts Payable
Blue Link Solutions™
If you choose Manual Cheque this will update the Bank Account simultaneously and therefore will skip
the step of ‘Pick toPay’.
Enter the date of the bill or for the transaction.
1.
Enter the due date.
2.
Enter the discount percentage that can be taken. The “Discount Amount” field will be calculated based on
the percentage in this field.
3.
The default terms for the customer will be displayed or you may select a different term from the drop list.
If you need other terms types, you can add them in System Maintenance | System Master Lists | Terms /
Types / RMA Reason Codes / Other Lists.
4.
Optionally select a Department code to which this transaction should be assigned.
5.
The default Tax Authority code will be displayed or you may select the different Tax Authority code from
the drop list.
6.
Enter the Total Amount (including taxes)
7.
Enter the amount of the GST paid on the bill. The Net Amount and Amount to Distribute are then
calculated.
In the case of a standard voucher, the Total Amount entry will be posted as a credit to your default A/P
account. This means that the balancing transaction must be a debit or combination of debit and credit amounts,
for a total of a debit.
If you have chosen to enter a Credit Memo, then the Total Amount entry will be posted as a debit to your
default A/P account and the balancing transaction must be a credit or combination of credit and debit amounts,
for a total of a credit.
The second half of the transaction is to enter the distribution amounts. The sum of the balancing account
amounts must equal the amount in the Net Amount field before you can save the item. In other words, the
debits must equal the credits.
To enter the distribution amounts you must do the following:
1.
Select an Account code. To display a list of G/L Account codes, press F4 while the cursor is in the
Account field. After you make your selection, the appropriate account description is displayed.
2.
Enter whether the balancing account amount should be posted as a debit or credit.
3.
In the Amount field, type in the amount from this account you want to use to balance the voucher amount.
Note: if you are entering a transaction with a recalculated distribution amount (due to exchange
difference), make sure the amounts that are posted balance to the new distribution amount. The
undistributed amount defaults here but may be overridden.
Process Transaction
Posts the transaction to Accounts Payable and General Ledger.
Chapter 10 – Accounts Payable
Page 267
Blue Link Solutions™
If the amounts are in balance, the following screen will be displayed:
Click Yes to process the A/P Voucher; click No to cancel the request. . Posting a voucher adds the transactions
to the A/P transaction file, and the voucher to the voucher records. It updates the outstanding credit/invoice
balance in the Vendor file, posts the transaction to the General Ledger and the Credit Purchases Journal, and
adds an A/P cheque to the bank account (for a Manual Cheque only).
If the amounts are not in balance, the following screen will be displayed:
Click OK and correct the entries to balance. Then try again.
When the program is finished the screen clears and you are returned to the Code field. You may then enter
another item or exit
10.3.4
CHANGING AN EXISTING VOUCHER
1.
To change a previously entered voucher, you may choose the voucher to change by using the Lookup
field to display previously entered vouchers.
2.
If the voucher has been posted, you are not allowed to edit it (see Section 10.3.5 - Reversing a Posted
Voucher.
3.
Once the existing voucher is displayed, the entry routine is the same as creating a new voucher.
4.
When you are done, click on the “Process Transaction” button (see the steps in “Process Transaction”
section
10.3.5
REVERSING A POSTED VOUCHER
A voucher that has been paid can be reversed with a "reversing voucher." Enter a new voucher using the
procedures from section 10.3.3 - Adding a New Voucher, being sure to debit the accounts that were credited
on the original, and vice versa.
Page 268
Chapter 10 – Accounts Payable
Blue Link Solutions™
A/P Voucher
1.
If the original voucher type was an “A/P Voucher”, create a “Credit Memo” transaction, save and exit.
2.
Go to the Pick Invoices to Pay function.
3.
Pick sufficient A/P Vouchers for payment to balance the Credit Memo amount,
4.
Then pick the Credit Memo to apply the credit.
5.
Click on the “Offset” button at the bottom of the screen. The following screen will be displayed:
6.
Solutions will ask you to verify that you want to apply the selected items against each other. Click Yes
and the offsetting transactions will be moved to the vendor’s history record. The new transaction will
offset the previous transaction items and the end result is zero; click No to cancel the request.
7.
The following screen will be displayed when the transaction is complete.
8. Click OK.
Credit Memo
1.
If the original was a “Credit Memo”, enter an “A/R Voucher” transaction., save and exit.
2.
Go to the Pick Invoices to Pay function
3.
Pick the voucher for payment,
4.
Then pick the Credit Memo to apply the credit.
5.
Click on the “Offset” button at the bottom of the screen. The following screen will be displayed:
Chapter 10 – Accounts Payable
Page 269
Blue Link Solutions™
6.
Solutions will ask you to verify that you want to apply the selected items against each other. Click Yes
and the offsetting transactions will be moved to the vendor’s history record. The new transaction will
offset the previous transaction items and the end result is zero; click No to cancel the request.
The following screen will be displayed when the transaction is complete. Click OK.
10.3.6
ACCOUNTS PAYABLE SOURCE DOCUMENT
You may print the source document for your vendor if they would like a hard copy.
Page 270
Chapter 10 – Accounts Payable
Blue Link Solutions™
10.4 Pick Invoices to Pay
Use this program to add vouchers/invoices to the Accounts Payable Bank Account so that cheques may be
printed for them. You have the option of making a partial payment on an invoice. Print Cheques will print
a cheque for an invoice only when it has been chosen here.
Vendor Code (Required)
Select the code of the vendor to be paid. The vendor’s name is filled in automatically from the vendor file.
Vendor Name
Alternatively, you may select a vendor to pay by typing in its name.
Bank Account
The account to be used to pay the invoice. The accounts currency must match the currency of the Vendor.
Outstanding Invoices
The amount in dollars of invoices due to this vendor, filled in automatically from the vendor file.
Outstanding Credits
The amount, in dollars, of credits to your account with this vendor, filled in automatically from the vendor
file.
Net Amount Owing
The net effect of the Outstanding Invoices and Outstanding Credits.
Chapter 10 – Accounts Payable
Page 271
Blue Link Solutions™
Date
The date of this invoice.
Reference
The Invoice or Voucher Number for this transaction.
Amount
The total of this invoice.
Remaining
The amount remaining unpaid for this invoice.
Description
The description of this invoice.
Amt Applied
The amount of payment you want to apply to this invoice.
Discount
The amount of the discount you have taken for this invoice.
You are also offered an option to show only unpaid items or all items for the specified vendor.
At the bottom of the screen there are five buttons which are explained as follows:
Press the “Process” button to record the payment.
Allows you to automatically select all invoices that have unpaid amounts.
Allows you to offset any invoices and credits against each other without triggering
any General Ledger transactions. However, this will only work if the total of
invoices and credits selected is equal to zero. If this is a foreign currency
transaction then there will be an exchange difference entry in the General Ledger.
Allows you to print the cheques directly from this screen.
Allows you to pay invoices for one or more vendors according to the due date of
the invoice.
This is a shortcut to the Pro Forma Bank Account report that is detailed later in
this Chapter.
10.4.1
Page 272
CHOOSING AN INDIVIDUAL INVOICE FOR PAYMENT
Chapter 10 – Accounts Payable
Blue Link Solutions™
1.
If you are not in the “Code” field, click the “New” button.
2.
Select the Vendor Code or Name from the drop down list or use the Standard Record Search keys, or
press F4
The vendor name and all other applicable information will be displayed in the remaining fields and you
can continue.
If you have outstanding credits with this vendor, your outstanding credit amount is displayed as a credit
invoice (with a negative balance) along with your other invoices. You cannot apply credits until after you
choose an invoice or invoices to pay, and then you can only apply an amount up to the amount of the
invoice chosen.
The program will display a list all outstanding invoices for this vendor in a menu format. You can also
choose to display all items (paid and unpaid).
The information displayed is Date, Reference, Amount, Remaining, and Description. The Amt Applied
field helps you to keep track of your payment during a session.
1.
You must choose an open invoice for payment before you can pick a credit to apply. To choose an
invoice, move the cursor over your choice with the arrow keys or mouse. The invoice number, date,
and amount are displayed.
2.
Type in the amount you want to pay on the invoice in the Amt Applied field. It can be up to the total
amount remaining on the invoice.
3.
You can change the amount, or press <Enter> to move the cursor to the Discount field.
4.
After entering the amount applied and discount and pressing <Enter>, you are moved to the next
invoice. The invoices to which you have already applied payment show the amount in the Amt
Applied column. If you choose to take a discount, remember to reduce the amount in the Amt Applied
field accordingly. If you have already entered the discount when you entered the voucher, the amount
will be defaulted here but may be overridden.
.
5.
To mark this transaction as complete and save your choices, press the “Process” button. The following
screen will be displayed:
6.
Click Yes and your session is saved and you are returned to the first screen to enter another code; click
No or Cancel to cancel the request.
Chapter 10 – Accounts Payable
Page 273
Blue Link Solutions™
10.4.2
SELECTING INVOICES BY DUE DATE
Click on the “Due Date Selection” button, and the following screen appears:
1.
Enter the required due date in MM/DD/YY format
2.
Click OK.
Note:
Before you pay by this method it is recommended that you print the Due Date Selection report so that you
know what is going to be processed. It is found under Accounts Payable | Print Due Date Selection
Report
You may check these invoices in the Pro Forma Bank Account and modify any that are incorrect. Using
this option assumes that the total of each invoice is to be paid. If you are only going to pay part of an
invoice, it may be better to select that individual invoice for payment.
You should run Print Pro-Forma Bank Account after you run this program, and before you run Print
Cheques. You may either run Pro-Forma Bank Account from the button located at the bottom of the
screen or from the Options menu.
If you find that too many items have been marked for payment, you can rerun this program using the Pro
forma bank account to help you.
To change the items picked for payment for a particular vendor, enter the vendor code as though it was a
new entry. You can then re-enter all of the amounts to apply.
Any outstanding credit that you apply for payment is deducted from the cheque written. If the credit is
equal to the amount marked to pay, no cheque will be written. Instead, use the Offset button at the bottom
of the screen. The outstanding invoice and credit amounts in the Vendor file are updated, and the A/P
Transaction file’s record of amounts remaining to be paid is updated.
10.4.3
EDIT/CHANGE INVOICES TO PAY
You have already processed your invoices to be paid but now realize after viewing the Pro-Forma Bank
Account that some should not be paid or the amount changed. Select the Vendor for which you wish to
change and then hit the “Unprocess” button to be able to edit the amount to be paid. This changed must
then be processed to save.
Page 274
Chapter 10 – Accounts Payable
Blue Link Solutions™
10.4.4
FINDING AN INVOICE TO PAY
The Pick Invoices to Pay screen can be sorted so that it displays the transactions in ascending or
descending order based on any of the transaction fields. To do so, put the cursor in field that you
want to sort by (Reference, for example). Then click on one either the “Sort Ascending” or “Sort
Descending” buttons. (These are located on the menu bar at the top of the screen).
Chapter 10 – Accounts Payable
Page 275
Blue Link Solutions™
10.5 Alternate Vendor Payment
The Alternate Vendor Payment feature is designed to allow you to transfer a balance of one vendor to that
of another vendor. This would be necessary if you purchased merchandise from Vendor ABC but are
required to pay Vendor DEF for this. This is most likely to arise from a credit card purchase. The purchase
is made to Vendor ABC, but you purchase with DEF’s credit card and therefore owe the money to DEF.
This will result in a paid invoice in ABC’s file, but a new invoice for DEF.
You may transfer balances between vendors of different currencies.
1.
Select the Vendor’s code of the invoice(s) of which you wish to transfer from. In this example it
is ABC.
2.
You may then record a reference number for this transaction.
3.
Enter the date you want referenced as this being paid as.
4.
You will be able to select which invoices you want to transfer to the alternate payment vendor.
Simply click your cursor in the “Amt Applied” field, similar to Pick Invoices to Pay.
5.
Select the Alternate Vendor to whom these balances will transfer to.
6.
Select process to post the transaction.
Page 276
Chapter 10 – Accounts Payable
Blue Link Solutions™
Note
If the currencies vary between the alternate vendor and the original vendor you are able to change
how much transfers. Simply edit the total amount field on the bottom right. This will be the actual
amount that transfers.
This is handy for credit card purchases in a foreign country. You usually don’t know the exchange
rate until you receive the statement.
10.5.1
ALTERNATE PAYMENT AT AP VOUCHER
If at the time of entering the AP Voucher you know that it is being paid by an alternate vendor, you may
mark it as paid to the original vendor but outstanding to the alternate vendor.
Chapter 10 – Accounts Payable
Page 277
Blue Link Solutions™
10.6 Enter Recurring Voucher
This program provides you with a convenient way to post a periodic transaction without re-entering the
transaction every time. Once the transaction is entered through this program, run the “Generate Recurring
Vouchers” function to allow you to call up the original entry as a “template” for the posting program to fill
in automatically. When posting, the current date is used as the transaction date.
The recurring transactions entered here are assigned a number from the Next Recurring A/P # field in
System Interface. This number identifies this “template” transaction only; the vouchers generated using
this entry are assigned a number from the Next A/P Invoice # default.
The following field explanations are limited to those that differ from Enter/Change Payable Voucher.
Number
The Number field has a slightly different function than the number of vouchers from Enter/Change
Vouchers. This Number uniquely identifies the recurring voucher “template”, and is assigned
automatically from the Next Recurring A/P # field in System Interface. You can override this number if
you wish. The Number field is a fifteen character text field.
Page 278
Chapter 10 – Accounts Payable
Blue Link Solutions™
# of Occurrences
The entry in this field indicates the number of times per year that the transaction occurs. For example, 52
for a weekly transaction or 12 for a monthly one. This field is used for calculating the next transaction date.
Number Left
The entry in this field is the maximum number of times in a year that this transaction may be posted. When
the Generate Recurring Vouchers program is run, only transactions due which have not yet reached their
maximum are posted. This field is used to determine whether or not to post the transaction.
Next Date
The date the next transaction is scheduled calculated from the initial date entered, and from how frequently
the transaction recurs.
Transaction Notes
Enter notes on this recurring transaction. These will print on various GL reports stated in Chapter 7.
See Enter/Change Payable Voucher for an explanation of how to enter an A/P voucher. The fields
described above are required fields. You are not allowed to save a record that does not have the required
fields filled in.
Chapter 10 – Accounts Payable
Page 279
Blue Link Solutions™
10.7 Generate Recurring Vouchers
Use this function on a regular basis to post the recurring items created through the “Enter Recurring
Voucher” function.
You can print the “Print Recurring Voucher” report prior to generating the recurring vouchers so that you
know which vouchers will be generated.
You can limit the posting by changing the “Generate Thru Date”. The “Generate Thru Date” defaults to the
current date but may be manually overridden.
Click on Generate button after you have entered the “Generate Thru” date. The following screen will be
displayed:
Click Yes to post the vouchers to A/P; click No to cancel the request.
If there are no recurring vouchers for the time period you specified, the following screen will be displayed:
If there are vouchers, a screen with the message: “Posting of recurring vouchers is complete.” will be
displayed.
Page 280
Chapter 10 – Accounts Payable
Blue Link Solutions™
10.8 Void Payable Cheque
Use this function to void an A/P cheque after it has already been printed and posted.
A/P cheques can be voided until they are reconciled using the Bank Account Reconciliation function.
1.
Select the bank account on which the cheque is drawn. Your choice is displayed in the Bank Account
field.
2.
Select the cheque number of the cheque you want to void from the drop down list or type in the
number.
3.
Enter the date that you are voiding the cheque.
4.
Click the Void button. The following screen will be displayed:
5.
If you click Yes, the program creates an adjusting entry in the Bank Account to offset the cheque
amount and creates an outstanding voucher in Accounts Payable; click No to cancel the request.
Chapter 10 – Accounts Payable
Page 281
Blue Link Solutions™
6.
When the cheque has been voided, the following screen will be displayed:
Page 282
Chapter 10 – Accounts Payable
Blue Link Solutions™
10.9 Prepare Tax Remittance
See your country specific guide for detailed examples suited to your tax jurisdictions.
Found under Modules | Accounts Payable | Prepare Tax Remittance this form is designed to help you
quickly remit your taxes.
Remit Taxes By – Tax Element or Tax Vendor.
For – the default start date is blank. This is because you may have back posted invoices and would not
want to exclude these. The ending date defaults to the last day of the previous month as it assumes that at
the time of processing this you are remitting for the last period. You may change these.
You will receive the following message if you enter a start date.
Update Tax Amounts – once your selection criteria is set, select this button to update the applicable tax
amounts to the screen. What will display is every tax detail that falls within the selected criteria.
Post Remittance By – you may choose to create an open AP Voucher or directly post an entry to AP. The
entry posted will be a debit to the tax liability account and a credit to accounts payable.
Chapter 10 – Accounts Payable
Page 283
Blue Link Solutions™
Options - Select the Vendor you remit taxes to. If posting directly to AP then select the posting date that
you for it to post to the General Ledger.
10.9.1
PRINT TAX REMITTANCE
If you require a report of what is being remitted you should print this report before you post the Tax
Remittance.
10.9.2
POST TAX REMITTANCE
Below is an example of the above Tax Remittance being posted as an Open AP Voucher. Recall the
voucher in the lookup, and then make any changes if necessary before posting.
Once this voucher is posted it is treated like any other payable in that it is ready to be paid and will display
on your AP aging report until paid.
Page 284
Chapter 10 – Accounts Payable
Blue Link Solutions™
10.9.3
?
NOTE
If you process the tax to an Open AP Voucher and then decide to delete the AP Voucher this
information for remitting will be flagged as being remitted.
Chapter 10 – Accounts Payable
Page 285
Blue Link Solutions™
10.10 Print Vendor Information Reports
Use the Vendor Information Reports function to get a report of the Vendor codes, names, addresses,
contacts, and telephone numbers. Use the Phone Listing report to generate a report listing customer name
and telephone number. The Purchase report will give a report of the Vendor Outstanding Credit,
Outstanding Invoices, and Purchases, calculating and displaying Year to Date and Last Year. Use the
Mailing Label program to print the Vendor address information on standard mailing labels. The Rolodex
card program will print the Vendor address, contact, and telephone information on Rolodex cards.
Enter a range of vendor codes or classifications to print. You can limit the report to one vendor. If you do
not change the default limits the program will print all the vendors.
Please note:
If you request Vendor Information for a Vendor with no data, you will receive the following error
message:
You may limit the reports by entering the range of vendor codes, postal codes/zip codes, or
Provinces/States/Counties. In the Mailing Label program, to facilitate printing large numbers of labels, the
Page 286
Chapter 10 – Accounts Payable
Blue Link Solutions™
program allows you to specify that number of labels across. You can print from 1 or 3 labels across on your
printer. Please note – the General Information report will only print vendors that have classes set up in the
vendor file. These reports may be printed to the printer or previewed on screen.
Vendor Information
Vendor Phone Listing
Chapter 10 – Accounts Payable
Page 287
Blue Link Solutions™
Vendor Mailing Labels
Vendor Rolodex Cards
Page 288
Chapter 10 – Accounts Payable
Blue Link Solutions™
Vendor Purchase Information
USA – 1099MISC
This report option is only enabled if your regional setting is set to USA. For more information see the USA
reference guide.
Chapter 10 – Accounts Payable
Page 289
Blue Link Solutions™
10.11 Print Aging
Use this program to print invoices and aging for one Vendor or for a list of Vendors, with flexible
presentation options. This report prints in a landscape format that enables the entire company name and all
other information to be displayed.
Which Report?
You can select one of three reports:
1.
2.
3.
4.
5.
Aging
a) Detail
b) Summary
Listing
Retroactive Listing
Retroactive Aging
Unpaid Invoice Report
From/Thru Customer Codes
If you leave the defaults of “0” and “ZZ”, all vendors will print. You can also limit the report by entering a
range of customer codes.
Detail/Summary and ‘As At’ Date
When you select a Retroactive Listing, you are given the choice to view all the details or just a summary.
Take the checkmark away from the Detail box to see a summary report. You can also select the “as at” date
for printing of transactions.
Currency?
If you are using multi currencies, you have the following options:
1.
Leave this field blank to see all data in your Home currency (usually CA$)
2.
Choose “CA$” – this will only print Canadian customers in Canadian dollars
3.
Choose “US” – this will only print US Customers in US dollars
Page 290
Chapter 10 – Accounts Payable
Blue Link Solutions™
Revalue
With this option checked, you will see a Retroactive Report showing the original transaction valued
Canadian dollars, the value in Canadian dollars at the current exchange rate and the difference between the
two values.
Print Where?
You may select for the report to be printed to the printer or to be previewed on screen. Click the “Print” button
to send it to the printer or the screen or the “Cancel” button to cancel the request.
10.11.1
AGING REPORT
The Aging report lists each Vendor’s invoice information in columns by the default aging periods, or for
periods you may have defined in your setup.
Aging:
Detailed Aging:
Chapter 10 – Accounts Payable
Page 291
Blue Link Solutions™
10.11.2
LISTING REPORT
The A/P Listing gives other open invoice information, such as invoice description, along with the aging in
days. Enter the range of Vendor codes you want to print. If you do not enter limits, the program will print
information for all Vendors.
10.11.3
RETROACTIVE LISTING REPORT
The Retroactive Listing Report, which may be printed in summary or in detail, prints information detailing
Invoice Date and Number, Description, Amount owing, Remaining amount, and Terms type. You may not
view information for a date prior to the date of upgrade to version 2.0 or to a date prior to your having
purged data.
You may also print a Currency Revaluation Report that may be useful to revalue any foreign currencies to
current values for Year End purposes. The Reversing General Journal Entry program may be used for these
adjustments. You may run the Currency Revaluation Report by selecting the Retroactive Listing Report in
summary, selecting the date and currency and checking the Revalue box. The report details, with one line
per vendor, the vendor code and name, the amount in the foreign currency, the value in Canadian dollars of
the original transaction and the value in Canadian dollars revalued to the current rate, the rate entered in
System Maintenance. The Revaluation amount is the difference between the current value and the original
value.
Currency Revaluation Report
1.
2.
3.
No Detail, in Summary
Select Currency
Click on “Revalue”
Page 292
Chapter 10 – Accounts Payable
Blue Link Solutions™
10.11.4
RETROACTIVE AGING REPORT
Use this report to state your Aging as of a particular date.
10.10.5 UNPAID INVOICE REPORT
This report can only be used if you are using the integration between Sales Order and Purchase Orders
(described in more detail in Chapter 14). From Order Entry, on the Create PO’s tab a Purchase Order can
be created if the item is on backorder. There is now an established link between that Sales Order and the
Purchase Order created. Once the purchase order is received and the invoice is received for that PO, as
well as the Invoice has been posted from Order Entry, then this report can be used. It will show all those
items where the AP invoice is received from the Purchase Order and the AR Invoice has been posted.
The purpose of this report is to determine if you have received money from your customer for the items you
Chapter 10 – Accounts Payable
Page 293
Blue Link Solutions™
purchased for them. Ideally you want them to pay you first before you pay your vendor.
Page 294
Chapter 10 – Accounts Payable
Blue Link Solutions™
10.12 Print Due Date Report
This program prints a listing of outstanding invoices by due date. The report details the Date, Invoice #,
Description, Amount, Remaining amount, Due Date and Total owing by the vendor.
Currency
Select the Currency of the vendor on which you wish to report
Due Date
Enter the Due Date that would limit the report.
Print Where?
You may select for the report to be printed to the printer or to be previewed on screen. Click the “Print” button
to send it to the printer or the screen or the “Cancel” button to cancel the request.
Chapter 10 – Accounts Payable
Page 295
Blue Link Solutions™
10.13 Print Pro-Forma Bank Account
Use this screen to print a listing of the items selected to be paid (from the Pick Invoices to Pay screen) and
the net effect of these items on the chequing account, before you print the actual cheques.
It is important to use this report to check that the proper items have been chosen for payment.
Which Report?
You may choose to print either of two reports:
Pro-Forma Bank Account:
shows all the Vendors and items chosen for payment.
Cheque Detail Sheets:
shows all the Vendors and items chosen for payment but with one
Vendor per page. The print out will show the amount to be paid for
each Vendor including discount and credit.
Which Bank Account
As is the case with all Blue Link Solutions programs which use a chequing account, you are prompted to
choose a bank account before beginning any account operations. This program automatically prints all the
items in the A/P Bank Account.
Print Where?
You may select for the report to be printed to the printer or to be previewed on screen. Click the “Print” button
to send it to the printer or the screen or the “Cancel” button to cancel the request.
Page 296
Chapter 10 – Accounts Payable
Blue Link Solutions™
Sample Reports
Pro Forma Bank Account
Cheque Details
Chapter 10 – Accounts Payable
Page 297
Blue Link Solutions™
10.14 Print Cheques
This program will print the cheques in the A/P Bank Account on either pre-printed or blank cheque forms.
You must have set the system to print to one or the other previously.
You should run the Print Pro-Forma Bank Account program before running this program, to make sure
that all the entries are correct.
The displayed bank account is the one selected in Print Pro-Forma Bank Account. If you have not
already printed the Pro-Forma Bank Account, you can do so at this time.
Next Cheque Number
You can change the beginning cheque number; this field defaults to the value in System Interface.
Cheque Date
The cheque date will default to the current date.
Print Where?
You may select for the report to be printed to the printer or to be previewed on screen. Click the “Print” button
to send it to the printer or the screen or the “Cancel” button to cancel the request.
After all the cheques have printed, the following screen will be displayed:
If you click Yes, the invoices or vouchers are then posted. When you post a payment to an A/P invoice or
voucher, the credits and invoice balances are updated in the Vendor file, A/P Bank Account (to be reconciled
with the bank statement), and the next cheque number is updated in System Interface.
Click No if you are not ready to post the transactions, or if anything went wrong with the printing so that you
Page 298
Chapter 10 – Accounts Payable
Blue Link Solutions™
can run the cheques again or if you want to make changes using Pick Invoice To Pay. Once you click Yes,
you cannot change any of the entries.
Note:
If the volume of invoices you have listed require a second cheque stub, then, based on your choice in the
System Interface – A/R & A/P Information for Multi-Part Cheques, a second cheque may be used (i.e.
voided) in order to continue the cheque detail information. (See CH 6 - System Maintenance, for details.)
Chapter 10 – Accounts Payable
Page 299
Blue Link Solutions™
Sample Reports
Sample Laser Cheque
Note:
Page 300
The date format that appears on this cheque is the “long date” as defined in your computer’s regional
settings. If you would like the date to appear in a different format, change your system’s long date format.
Chapter 10 – Accounts Payable
Blue Link Solutions™
10.15 Print Open Vouchers
This report lists all of the open AP Vouchers, which can be found in the Lookup box in AP Voucher.
Information on this report includes the Vendor, Terms, Due Date, Net Amount and Currency Amount, as
well as the GL Account it will offset to if this information is entered.
Chapter 10 – Accounts Payable
Page 301
Blue Link Solutions™
10.16 Print Recurring Voucher Report
Use this program to print a list of Recurring Vouchers (originally created in Enter Recurring Vouchers).
Which Report?
There are two versions of this report. The report is sorted either by Vendor or by Next Date.
From/Thru Vendor
You can limit the report by entering a range of Vendor codes.
Thru Next Date
Enter the next date for the recurring vouchers to report on.
Print Where?
You may select for the report to be printed to the printer or to be previewed on screen. Click the “Print” button
to send it to the printer or the screen or the “Cancel” button to cancel the request.
Page 302
Chapter 10 – Accounts Payable
Blue Link Solutions™
10.17 Print Vendor History Report
Use this program to obtain a listing of paid Accounts Payable cheques, in vendor code order, within the
range that you have specified.
For each Vendor, the listing includes the cheque number, date, invoice number(s), invoice date(s), invoice
amount(s), discount(s) taken, amount paid and cheque total. The report gives a detailed record of all the
invoices paid per cheque.
Blue Link Solutions provides this history file to maintain complete A/P payment records and to enable you
to void paid cheques. For more information on maintaining a history file, see Important Times.
From/Thru Vendor
You can limit this cheque history listing by entering a range of Vendor codes
From/Thru Chq. Date
You can limit this cheque history listing by entering a range of cheque dates.
Print Where?
You may select for the report to be printed to the printer or to be previewed on screen. Click the “Print” button
to send it to the printer or the screen or the “Cancel” button to cancel the request.
Chapter 10 – Accounts Payable
Page 303
Blue Link Solutions™
11: Bank Management
Use this function to review your account information and enter the starting balances from your bank
statement. You may review activity with this screen. When setting up your Blue Link Solutions System,
use the screen to enter the beginning balances for your bank account(s).
Access Bank Management through Administration | Bank Management
Page 304
Chapter 11 – Bank Management
Blue Link Solutions™
11.1 Bank Account Setup
In Bank Account Setup, you will add any bank accounts in which you have. Subsequently, this screen is
primarily to show you the activity on your account. It will display the Next Cheque number, Currency of
the Account, Opening Balance, Amount of Deposits made, Amount of Cheques written, and the current
available balance on each of your accounts.
Account Name
Type in the name of the account. Use any reference that is useful to you. It is not printed on any cheques,
but how you will identify which account you want whenever you are in a function that requires selection of
a bank account.
Next Chq
This can be set to a higher number than one during your initial setup; after that, the number is updated when
cheques are printed.
G/L Code/Dept (Asset Account)
Cash G/L account code or cash on hand (chequing account).
Currency
The currency of the bank account.
Opening
The opening balance. This was the closing balance before the last time your account was reconciled.
Deposits
Uncleared deposits made to this account since the last reconciliation.
Cheques
Uncleared cheques written in this account.
Chapter 11 – Bank Management
Page 305
Blue Link Solutions™
Balance
The period ending balance of each bank account. This figure is updated only after you use the Reconcile
Account function. When the account is reconciled, the closing balance is moved to the opening balance.
Address
By pressing Shift F2, an address window is accessed where you can type in the bank’s address. If you need
more space, press <Ctrl+Enter> to force a new line.
Transit #
The bank’s transit number (to facilitate MICR encoding with cheque printing as an option).
Account #
Your bank account number (to facilitate MICR encoding with cheque printing as an option).
At the bottom of the screen are buttons labeled Deposit, Transfer, Reconcile, Manual A/P, Manual A/R,
and History.
These are just short cuts to the corresponding program screens that are explained later in this chapter.
Page 306
Chapter 11 – Bank Management
Blue Link Solutions™
11.2 Process Deposit
Use this function to move the deposit from the clearing account to the bank, once the deposit to the bank
has been made.
Currency
Select the currency of the deposit
Deposit To
Select the bank account to which the deposit is being made
Date
Type the deposit date (defaulted to current date).
All unprocessed deposits relating to that currency are displayed on screen.
Select All Button
You may then select items that you want to be included by clicking on the box beside each one in the
Deposit? column above. If all of them are to be included, then click on the Select All button.
Your total appears at the bottom of the screen.
Deposit Summary Button
You may print a Deposit Summary report by clicking on the Deposit Summary button. This is
recommended prior to posting the deposit because the Deposit Summary report is no longer available for
printing after posting.
Chapter 11 – Bank Management
Page 307
Blue Link Solutions™
Post Deposit Button
Once you are satisfied with all the information, then click on the Post Deposit button. The following screen
will be displayed:
Click Yes to post the deposit; click No to cancel the request.
Once you have posted the deposit, the information is cleared from the screen and posted to the Bank.
Page 308
Chapter 11 – Bank Management
Blue Link Solutions™
11.3 Bank Activities
This screen enables quick and easy recording of miscellaneous payments and deposits to or from a bank
account. Use this Module when you want to affect the Bank in some way. For example, you could use this
screen to post a Bank Loan payment, an Interest Charge, or Bank interest earned.
Note:
All transactions posted to bank control accounts must be done via bank management. Items not posted
via bank management don’t appear on the bank reconciliation, and as a result, will result in the
reconciliation being out. (Printing cheques from A/P and recording deposits in A/R are exempted from this
general rule because they do also update the bank subledgers.)
Tip:
Use bank activities for getting outstanding cheques and deposits into your subledger at the time of GoLive. Simply select the Misc. Payment option, enter the date of the cheque, the cheque number, to whom
the cheque was for and the amount. Then for the offsetting GL account select the Bank’s control account.
This will debit the bank and credit the bank, effectively making an entry of zero, while updating the
subledger.
This will also update the GL. When you select this option the following screen displays:
Choose Bank Account
Select the appropriate bank account from the pick list. The description of that account is displayed.
Exchange Rate
You may adjust the exchange rate if it is not a Canadian dollar bank account.
Chapter 11 – Bank Management
Page 309
Blue Link Solutions™
Choose Activity
Select the type of transaction you want to make:
1.
Miscellaneous payment
? Select this option to make a cheque entry to the subledger (also to the GL). This may be
used for Bank Charges or miscellaneous adjustments to the subledger.
GL Account Selected
Bank
2.
Miscellaneous deposit.
? Select this option to make a deposit entry to the subledger. This may be used for Bank
Interest or other miscellaneous adjustments to the subledger.
Bank
GL Account Selected
3.
Debit
Credit
Debit
Credit
Miscellaneous Deposit – (To Deposit Summary Screen)
? Select this option to make a deposit entry to the subledger but for it also to make it in to
the Process Deposits. You would select this option if you had received a cheque (or other
payment method) and wanted this amount to go in with the “day’s” deposits.
Deposit Clearing
GL Account Selected
Debit
Credit
Date
Enter the date of the transaction
Transaction #
You may then enter transaction reference
Details
Enter a description for this transaction and/or the payee.
Amount
Enter the amount of the transaction.
G/L Account
Select the G/L account code and optional department code for this transaction to be assigned to.
Process Button
Click the “Process” button to continue processing the transaction and the following screen will be
displayed.
Page 310
Chapter 11 – Bank Management
Blue Link Solutions™
Click Yes to process the transaction; click No to cancel the request.
If you click yes, the following screen will be displayed when it is completed.
If you select “yes”, you will be back at the Bank Activities screen, and if you select “no”, the form will
close.
Chapter 11 – Bank Management
Page 311
Blue Link Solutions™
11.4 Transfer Funds
Use this function to record transfers from one of your chequing accounts to another.
Date of Funds Transfer
Select the date for the transaction.
Transaction Reference
Enter the transaction’s reference number (text field).
From Account/Amount
Select the account to transfer from and type in the amount to transfer. The balance before and after the
transfer is displayed.
To Account/Amount
Select the account to transfer to and type in the amount to transfer. The balance before and after the
transfer is displayed. If these amount is a different currency than the “From” account, the difference will be
calculated and displayed in the “Exchange Difference” field above.
Exchange Difference
This is automatically calculated based on the exchange rates set up in the System Interface. The amount
here will be deposited to the Exchange Difference G/L account.
Page 312
Chapter 11 – Bank Management
Blue Link Solutions™
Record Transfer Button
When you are ready to record the transfer, click the “Record Transfer” button and the following screen will
be displayed:
Click Yes to post the transfer; click No to cancel the request.
If the transfer was successful, the following screen will be displayed:
Example of reason for using this functionality:
You may want to transfer funds from your general account to your payroll account prior to running payroll
or to transfer funds from one currency to another. A completed transfer posts to the Other Journal and to
the G/L Transaction File, as well as creating deposit and withdrawal records in the Bank Management.
Chapter 11 – Bank Management
Page 313
Blue Link Solutions™
11.5 Reconcile Account
Use this function to reconcile the Blue Link Solutions bank to your bank statement. This function updates
the account balance in the System Master file, and deletes from the bank all cheques and deposits that have
cleared the bank.
CAUTION:
If you want a hard copy record of any cheques or deposits for archival purposes, print the bank
reconciliation report before running this function. Once the register is balanced, the processed cheques
and deposits are deleted from the file.
Account Information
Account
Select the account to reconcile (can be bank accounts or credit card accounts).
Opening Balance
The opening balance recorded from the opening balance in Bank Management.
Deposits
The total amount of deposits that have yet to be reconciled.
Cheques Written
The total amount of cheques written that have not been reconciled.
Ending Balance
The ending balance of this bank account (Opening Balance + Deposits - Cheques Written).
Page 314
Chapter 11 – Bank Management
Blue Link Solutions™
Bank Statement Information
This is what you enter as it appears on your bank statement(s).
Opening Balance
The opening balance as it appears on your bank statement.
Deposits
The total deposits as they appear on your bank statement (does not include Interest or other miscellaneous
deposits to your account).
Cheques written
The total amount of cheques that have cleared as it appears on your bank statement (this does not include
Bank Charges or other Payments out of your account).
Bank Fees
You may enter the amount of Bank Fees charged to your account. Do not use this field if you have entered
your bank fees under Bank Activities or you will end up duplicating the entry.
Interest
You may enter the amount of Bank Interest earned (if any), on your account.
Do not use this field if you have entered your bank interest under Bank Activities or you will end up
duplicating the entry.
Ending Balance
Calculated as Opening Balance + Deposits - Cheques Written - Bank Fees + Interest. This should be the
same as the ending balance in your bank statement.
Reconciliation Information
This information will update as you select which items have cleared.
As At Date
Enter the date at which you are reconciling as of. For example if today’s date were November 9, but you
were reconciling as of October 31, then enter 10/31/YY. This will then filter out any transactions which
have occurred past 10/31/YY that you would not wish displayed on your outstanding cheque reconciliation
report.
Opening Balance
The opening balance from the Bank Account.
Deposits
The calculated total of deposits you have marked as cleared.
Cheques/Charges
The calculated total of cheques that you have marked as cleared.
Bank Adjustments
Calculated as Interest - Bank Fees.
Ending Balance
Calculated as Opening Balance + Deposits - Cheques/Charges + Bank Adjustments.
Chapter 11 – Bank Management
Page 315
Blue Link Solutions™
Detail Information
Number
The item number or reference for this cheque or deposit.
Date
The transaction date for the cheque or deposit.
Name
The name of the customer or vendor.
Deposit
The amount will show here if this item is a deposit.
Cheque
The amount will show here if this item is a cheque.
Cleared?
Check this box if this item has cleared the bank. Leave it unchecked if this item has not cleared the bank.
Clear All Button
Checks all the boxes in the cleared field.
Unclear All Button
Unchecks all the boxes in the cleared field.
Report
Prints a detailed bank reconciliation report. It may be
printed either during or at conclusion of the bank
reconciliation, BUT prior to posting the reconciliation. It
will not be available after the reconciliation is complete.
Record Misc Payment or Deposit
This is a shortcut button to the Bank Activities screen.
Record Transfer
This is a shortcut to the record transfer screen.
Sort by
You are also offered an option to sort uncleared transactions by date or cheque number.
Choosing a Bank Account
If the account to reconcile is not displayed, click the “New” button or press F4 list display to highlight the
bank account you wish to reconcile, then select the account or press <Enter> to bring up that account’s
information.
After you uncheck all the items that have not cleared, the system will calculate the amount of deposits and
cheques that have been marked to reconcile. This should agree with your bank statement. If not, you may
wish to go back and check if you missed any items.
If you are in balance, you should print the Bank Reconciliation report. (This report is not available after
posting). When you choose to post the reconciliation, you will be reminded that you should have printed
the report.
Reconcile
Click to post the information.
Page 316
Chapter 11 – Bank Management
Blue Link Solutions™
The following screen will be displayed:
If you click Yes to proceed with the reconciliation, the posting procedure will remove items that were
marked as cleared, move them to history and reset your totals. Click No to cancel the request.
If your balances are not reconciled, and you press the ‘reconcile’ button, then the following error message
will appear:
To Reconcile
To reconcile your bank account for a given period, the Ending Balances of Bank Statement Information and
Reconciliation Information must be equal. The total deposits or the total cheques written may not agree as
there may be corrections on your part which the bank hasn’t seen. For example you may have $1000 in
extra deposits and $1000 in extra cheques written in Reconciliation Information section, but the ending
balances may balance because everything else is correct.
You are not likely to have all three Ending Balances agree either. That is not necessary. The difference in
the Ending Balance from the Account Information section and that of the other two sections are transactions
the bank has not received yet.
Note:
The Ending Balance under Account Information should agree with your GL account for that bank. If not,
they are out of balance due to them being set up incorrectly or entries made to the control account only.
Chapter 11 – Bank Management
Page 317
Blue Link Solutions™
11.6 Quick Cheque / Vendor Pre-Payment
This function allows you to write a cheque to a vendor bypassing the A/P module. This transaction is
posted to the Bank and General Ledger.
Bank
Select the bank account the cheque is being drawn against. The Current Bank Balance will be displayed.
To
Select the payee (vendor) to whom the cheque is being written.
For
Select the General Ledger account to which this transaction should be posted. Select the Accounts Payable
Control account (as defined in the System Interface) to have the cheque is treated as an advance to the
vendor’s account, and to have it posted to the A/P subledger.
Note:
A limitation of this function, however, is that you may use only one General Ledger account. For example,
you cannot post this cheque to an expense/income account and GST.
Cheque Number/Date
Enter the cheque number and cheque date. The date defaults to the current date.
This Cheque
Type in the amount of the cheque. The Total (beginning balance on the account) and Balance (beginning
balance – cheque amount) are filled in automatically by the system.
Page 318
Chapter 11 – Bank Management
Blue Link Solutions™
Save/Print Button
Once all the information is correctly filled in, press Save/Print . If you entered the Accounts Payable
Control Account in the FOR: field you will be asked to confirm that this cheque should be treated as an
advance.
If you have answer Yes, or if you have entered any other GL account in the FOR: field, the system will
prompt you to insert a cheque into the printer.
Click OK to continue once the cheque is in the printer; click Cancel to cancel the request. Once the cheque
is printed, the following screen will be displayed:
If the cheque printed correctly, click Yes and it will be posted. If it did not print correctly, click No.
If you have posted to the control account this entry will appear in the Vendor file and will be titled
“Advance-Cheque #”.
Caution:
No entry will appear in the Vendor file if you have not selected the control account. The GL entry will
simply lower the Bank and offset against the GL account which was selected.
Chapter 11 – Bank Management
Page 319
Blue Link Solutions™
11.7 Quick Cheque / Customer Refund
This function allows you to write a cheque to a customer bypassing the A/R module. This transaction is
posted to the Bank, the General Ledger, and potentially Accounts Receivable.
Bank
Select the bank account the cheque is being drawn against. The Current Bank Balance will be displayed.
To
Select the payee (customer) to whom the cheque is being written.
For
Select the General Ledger account this is for. If you select the Accounts Receivable Control account (as
defined in the System Interface), the cheque is treated as a refund against the customer’s account and
will appear in the A/R subledger for this customer. If any account other than the control account is
selected, then the A/R subledger is NOT updated.
Note:
A limitation of this function, however, is that you may use only one General Ledger account. For example,
you cannot post this cheque to an expense/income account and GST.
Cheque Number/Date
Enter the cheque number and cheque date. The date defaults to the current date.
This Cheque
Type in the amount of the cheque. The Total (beginning balance on the account) and Balance (beginning
balance – cheque amount) are filled in automatically by the system.
Page 320
Chapter 11 – Bank Management
Blue Link Solutions™
Save/Print Button
Once all the information is correctly filled in, press Save/Print Cheque. If you entered the Accounts
Receivable Control Account in the FOR: field you will be asked to confirm that this cheque should be
treated as a refund.
If you have answer Yes, or if you have entered any other GL account in the FOR: field, the system will
prompt you to insert a cheque into the printer.
Click OK to continue once the cheque is in the printer; click Cancel to cancel the request. Once the cheque
is printed, the following screen will be displayed:
If the cheque printed correctly, click Yes and it will be posted. If it did not print correctly, click No.
If you have posted to the control account this entry will appear in the Customer file and will be titled
“Refund – Cheque #”.
Chapter 11 – Bank Management
Page 321
Blue Link Solutions™
Caution:
Page 322
No entry will appear in the Customer file if you have not selected the control account. The GL entry will
simply lower the Bank and offset against the GL account which was selected.
Chapter 11 – Bank Management
Blue Link Solutions™
11.8 Bank History (Cleared Items)
This function is a list of all reconciled (cleared) transactions.
Account
The bank account you want to inquire on.
Number
The number of the cheque or deposit.
Date
The date of the cheque or deposit.
Name
If a cheque, the name of the payee. If a deposit, then usually the text “Deposit to Account” or other
descriptive text for the transaction.
Deposit
If this is a deposit, then this is the amount of the deposit.
Chapter 11 – Bank Management
Page 323
Blue Link Solutions™
Cheque
If this is a cheque, then this is the amount of the cheque or withdrawal.
Click the “Exit” button to exit the screen or click on the drop down list for Account to view the cleared
transactions in another account in the list.
Page 324
Chapter 11 – Bank Management
Blue Link Solutions™
11.9 Bank Account Balance Inquiry
Use this function to look up bank account balances as at a specific date. (This is useful for checking current
balances when posted cheques have been entered into the system.)
Balance On:
Enter the date for which you want to look up the bank account balances for. Hit Tab or Enter and the
screen will be updated with the account balances as at the end of that day.
Chapter 11 – Bank Management
Page 325
Blue Link Solutions™
11.10 Print Uncleared Items Report
Use this function to print a copy of all uncleared cheques and deposits entered during a specified period.
The most common need for this kind of report is to compare one month’s transactions to your bank
statement. Use this report and your bank statement to accurately update your account balance and
transaction records in Reconcile Account.
Select Account
Select the bank account that you wish to print. You can choose from any of the accounts set up in Bank
Account Setup.
From/Thru Cheque #
Select or type the cheque numbers you wish included in the report.
From/Thru Date
Type the range of dates for the cheques you wish included in the report.
Print Where?
You may select for the report to be printed to the printer or to be previewed on screen. Click the “Print” button
to send it to the printer or the screen or the “Cancel” button to cancel the request.
Page 326
Chapter 11 – Bank Management
Blue Link Solutions™
Chapter 11 – Bank Management
Page 327
Blue Link Solutions™
11.11 Print Cleared Items Report
Use this function to print a copy of all cleared cheques and deposits entered during a specified period. The
Bank Account History includes all items that have been reconciled and saved to the history system.
Select Account
Select the chequing account that you wish to print. You can choose from any of the accounts set up in
Bank Account Setup.
From/Thru Cheque #
Select or type the cheque numbers you wish included in the report.
From/Thru Date
Type the range of dates for the cheques you wish included in the report.
Page 328
Chapter 11 – Bank Management
Blue Link Solutions™
Print Where?
You may select for the report to be printed to the printer or to be previewed on screen. Click the “Print” button
to send it to the printer or the screen or the “Cancel” button to cancel the request.
Chapter 11 – Bank Management
Page 329
Blue Link Solutions™
11.12 Unrealized Exchange Difference
In the Blue Link Solutions multiple currency system, when transfers are made between local currency bank
accounts and foreign currency bank accounts, the difference in the value between the currencies is posted to
the Exchange Difference account, which represents unrealized exchange differences.
At the end of a reporting period, it is necessary to adjust the balance on this Exchange Difference account to
represent the current unrealized exchange difference on foreign currency bank accounts. The purpose of
this report is to assist in doing so.
When this report is selected, the following screen is displayed:
As at Date
Enter the cut off date at which you wish the report to print.
Print Where?
You may select for the report to be printed to the printer or to be previewed on screen. Click the “Print” button
to send it to the printer or the screen or the “Cancel” button to cancel the request.
NOTE:
Bank accounts for which there are no unreconciled items will not be included in this report. For such
accounts, which have had no activity since the last bank reconciliation was performed, you will have to
perform this calculation manually. If you select a report date prior to the date on which you last performed
the bank reconciliation, the report may not be accurate. It is therefore advisable to print this report and
make any necessary adjustments on or soon after the reporting date.
The report lists all bank accounts, and shows their local currency equivalent at the current rates per the
currency file. The report total shows what the balance on your unrealized exchange difference account in
the General Ledger should be. By comparing this with the actual balance, you will be able to make the
necessary adjustment for reporting purposes.
Unrealized Bank Exchange Difference Report
Page 330
Chapter 11 – Bank Management
Blue Link Solutions™
Chapter 11 – Bank Management
Page 331
Blue Link Solutions™
12: Inventory Control
You can maintain information about your inventory using this Module of Blue Link Solutions. In addition
to setting up a standard inventory by physical product, you can maintain inventory-type records for “noninventory” items such as labour, freight, or disposable parts. Blue Link Solutions allows you to begin with
a few pieces of this information so that you can later expand it to be a full-fledged inventory system when
you are ready.
Access Inventory Control through Production/Inventory Management | Inventory.
Page 332
Chapter 12 – Inventory Control
Blue Link Solutions™
12.1 Setup Notes
The summary below shows several options for implementing the Blue Link Solutions inventory control
system:
1.
If you do not want formal inventory control, you can run Blue Link Solutions using vouchers and not
utilize the sales order and purchase order modules of the system.
2.
If you do plan to use sales orders and purchase orders to reflect your transactions but do not need to
track units on hand, then you should assign product codes with prices and sales accounts in Inventory
Control. Mark your product types as N (non-inventory).
3.
You can handle a combination of physical inventory items and non-inventory items on sales orders with
standard prices associated with each. (You also have the opportunity to alter the price on any
individual sales order).
4.
You can set up your inventory with a unit of measure configuration which will allow you to buy in one
unit of measure and sell in another.
5.
You can set up a price matrix structure for your inventory. Use of a price matrix will allow you to
assign multiple price levels so that the price level assignment within the customer record can then be
used to determine the product or service price to a specific customer.
6.
The Blue Link Solutions Sales Order module can use the inventory file to maintain information on back
orders and reserving units for specific orders to be filled at a later date.
After you have set up your inventory records, the transactions from other parts of the system are
automatically reflected in your inventory history. In the same fashion, when you make adjustments to the
inventory record after you have made a physical inventory, your changes are automatically posted to the
appropriate General Ledger account.
Chapter 12 – Inventory Control
Page 333
Blue Link Solutions™
12.2
Enter/Change Inventory Item
Use this function to add new inventory records or change certain information about current ones. The
following screen displays the inventory entry/change record, followed by a description of each field.
Product Code
The Product Code field lets you assign a name/number that will identify this item for sales orders and
purchase orders. This is a 25 character alphanumeric field.
Search
To search for item(s) in inventory that match a certain criteria click the red search button. In the resulting
screen, enter a word to search by in the the search field, check relevant fields to search in and choose any
categories or subcategories to limit the search if desired. To return the search results click the look up
button. The results for a sample search are shown below.
Page 334
Chapter 12 – Inventory Control
Blue Link Solutions™
After highlighting the item you want to look up with an arrow left of the product code, click the
Return Product Code Selected and this will automatically populate the Enter/Change Inventory Item
with the chosen item details.
Description
The description of the product that will print on invoices and P/O’s. This is a 30 character alphanumeric
field. Both upper and lower case characters can be displayed in this field.
2nd Language
This is the alternate description language for the Inventory Item. It allows for 30 characters, and is
alphanumeric. This field would be used for customers who require the item description on their Orders and
Invoices to be different from the default language. This can be found under ‘Enter/Change Customer’, and
then under the ‘Defaults’ tab. (See CH. 9 for further details)
Type (Required)
Four types of products are allowed in the inventory file. They are:
R-
regular inventory keeps track of units on hand.
N-
non-inventory type keeps track of sales and price but disregards units on hand. You would use the
N type for items such as labour, freight, disposable parts, etc.
K-
kit items allow you to group finished good items (N or R types) together as one item. These items
will then be exploded when entered into a sales order. For example: a company that sells
computers may have a pre-made bundle that consists of a mouse, keyboard, monitor, CPU, sound
card, speakers, etc. These items are all tracked in inventory separately, but can be “exploded” onto
a sales order using the kit part number.
F-
finished or manufactured or assembled goods using production control.
Chapter 12 – Inventory Control
Page 335
Blue Link Solutions™
Note: Regular versus Non-Inventory Items
If you sell services, and therefore have no need to track how many units are on hand and how many units
are on reserve, your inventory would use type “N”. If you sell products primarily, you would probably use
type “R” when you sell physical items such as wrenches, cars, paper, etc.
Class
Classes need to be set up through System Maintenance | System Master | Inventory Information. This
is a 4 digit alphanumeric field. For example, a company may find HRDW (hardware) versus SFTW
(software) as a helpful class for dividing inventory types. Classifications control the General Ledger
Accounts that the item will use when posting the sales and assets to this inventory item.
Category
You may use this field as a selection criterion since the printing function allows you to limit reports by this
value. This is a four digit alphanumeric field. If you assign sequential categories such as a-f or 1-10 you
can then request reports based on these ranges.
Sub Categories
You may identify up to 3 different types of sub categories per inventory item. These can be used in external
reporting or Web.Venture configuration. These are set up in System Mater Lists | Inventory Categories.
You will configure a master category first. Then for that master category you will have multiple options in
sub category 1. In sub category 2 you will then have various options depending on what was setup for sub
category 1. Sub category 3 will be limited to what is selected in sub category 2.
Serialized
This is the Serial # flag which allows optional or mandatory serial numbering. If set to mandatory (the box
is checked), users will be required to supply serial #’s when receiving purchase orders and invoicing sales.
Active Flag
If this inventory is not being sold anymore, you may uncheck the active flag. This will remove this item
from any pick lists, such as Purchase Orders, and Sales Orders. However if you know the Product Code
you may type it specifically on a Sales Order and you will be allowed to sell if it, if stock is still available.
GST and Prov. Tax
Uncheck these boxes if this product code never has GST or PST assigned to it; otherwise leave them
checked.
Matrix
Each inventory item can be assigned a 9-level discount percentage structure. The discount percentage
structure can be assigned a number from 1 to 999.
A customer can belong to one of the 9 levels, or to none of the levels. When a customer who belongs to a
level purchases a part where a price matrix has been assigned, they will receive the percentage discount
contained therein.
Example:
Page 336
Chapter 12 – Inventory Control
Blue Link Solutions™
Inventory item ABC belongs to price matrix 1 defined as follows:
Matrix
1
Rate1
10%
Rate2
15%
Rate3
20%
Rate4
20%
Rate5
20%
Rate6
20%
Rate7
20%
Rate8
20%
Rate9
30%
Customer XYZ belongs to rate category 2.
When customer XYZ purchases product ABC, they will receive a 15% discount.
Commission Rate
If in the setup of salespeople in Employee & Sales Person | Enter / Setup Salespersons, you have selected
to select the Inventory Method a opposed to the Overall Method, then you will setup the commission rates
for the respective inventory item.
Price 1
The default sales price. Additional pricing structure information can be entered from the price matrix pop
up screen.
Price 2,3,4
The sales price when the product is ordered in quantity which is defined in Min Qty fields following the
corresponding price fields.
UPC Code
The UPC Code of the inventory item. If you do not track UPC codes, this field may be used for any
miscellaneous information that you wish to track.
Multiple UOM
See section 12.3 for more on Unit of Measure.
At the bottom of the screen are tab labeled: Comments, MTD/YTD, Purchases, Locations, Serial #’s, More
Info, Picture, Sales History, and Vendor per Product. Clicking on these tabs accesses and highlights these
areas of the inventory control screen.
12.2.1
COMMENTS & INFO TAB
Language 1 Comments
Click into the gray box and type your comments about the product. These comments default as an extended
note on the purchase order and sales orders, and may therefore be used as an unlimited length additional
product description field.
Language 2 Comments
This is the same as language 1 comments but will only print for language 2 customers.
Manufacturer Information
The following fields are currently for your information purposes only.
Manufacturer
Enter the manufacturer of this product (if applicable).
Manufacturer Part #
Enter the manufacturer’s product code number (if applicable).
Suggested Retail Price
Enter the manufacturer’s suggested retail selling price (if applicable).
Chapter 12 – Inventory Control
Page 337
Blue Link Solutions™
Shipping Information
Weight
Individual weight of the product.
Cube
This is the measurement of the package the Inventory Item resides in. This field is used for shipping the
product, and arriving at the freight charges.
Per
This is the number of units of the Inventory Item. This field is used if the item is sold in any quantity
beyond ‘1’. For example, you could be selling buttons in quantities off 100.
12.2.2
MTD/YTD TAB
Displays the month-to-date, year-to-date, last year and variance sales analysis for the selected product. This
information is updated when you run the Month-End-Routine.
Inv
The number of invoices generated monthly, yearly or last year for this item.
Units Sold
The total units sold for this item. Amounts are kept for month-to-date, year-to-date and total for last year.
A variation percentage is also calculated for this year compared to last year. ((Units YTD/Units
LYR)x100).
Avg Price
Average retail price of this item on a monthly, yearly and last year basis.
Gross Sales
The total sales in dollars for this item. Amounts are kept for the month, year-to-date and total for last year.
A variation percentage is also calculated for this year compared to last year ((Gross Sales YTD/Gross
Sales LYR)x100).
COGS
The cost of goods sold in dollars for this item. Amounts are kept for the month, year-to-date and total for
last year. A variation percentage is also calculated for this year compared to last year
((COGS
YTD/COGS LYR)x100).
Page 338
Chapter 12 – Inventory Control
Blue Link Solutions™
Net Sales
The net sales for each invoice for this item. Amounts are kept for the month, year-to-date and total for last
year. A variation percentage is also calculated for this year compared to last year. ((Net Sales YTD/Net
Sales LYR)x100).
Net / Gr.
The net sales percentage or markup.
Chapter 12 – Inventory Control
Page 339
Blue Link Solutions™
12.2.3
PURCHASES
Clicking on this tab accesses the Vendor purchases information screen.
This screen displays the vendors who you bought this product from, the cost, currency, any comments and
the last date purchased from them. FIFO layers, and Landed Cost overrides are also visible on this screen.
(See Chapter 19 – Elite Features for details)
12.2.4
LOCATIONS TAB
Clicking on this tab accesses a screen indicating the location of the inventory. The fields are described
below. Each field pertains to the location of the inventory.
Location
The warehouse or place where the inventory is stored.
On P/O
Displays the number of units on open purchase orders per location.
On Hand
The number of units on hand and available for sale per location.
On Backorder
The number of backorder units per location on sales orders. When a sale is invoiced/shipped, backorders
Page 340
Chapter 12 – Inventory Control
Blue Link Solutions™
can be filled from units on hand if inventory has the items available.
On Sales Order
Units on open sales order per location. These are the units that are on existing sales orders but have not yet
been invoiced/shipped. They are still in stock but not available for sale.
Bin/Shelf
The exact physical location of the inventory item in the warehouse or storage location.
12.2.5
SERIAL #’S TAB
Clicking on this button accesses the Serial Information screen. This is used if you are tracking individual
serial #’s for each item.
Serial Number
The serial number, either assigned by you or the vendor.
Vendor
The vendor from whom you purchased this particular item.
P/O Date
The date of purchase of the item.
P/O Number
The P/O number for the vendor of this serialized item.
Actual Cost
The actual cost of the item.
Chapter 12 – Inventory Control
Page 341
Blue Link Solutions™
12.2.6
MORE INFO TAB
Clicking on this button accesses the Other Information screen. These fields are described below.
It gives similar information as the location screen, but gives totals for all locations.
Units in Inventory
Total Units in Inventory
This is the amount of inventory on hand. If you were to count your inventory in your warehouse you should
find this amount.
Units On S/O
This is the total amount of inventory which is allocated against sales orders and has not yet been
shipped/invoiced. They are still in stock but not available for sale.
Note:
If the on sales order # is greater than zero, you can click on the dots beside this field to view a list of
outstanding Sales Orders where this item is ordered.
Expected Inventory Availability
Units on B/O
The number of back ordered units on open sales orders.
On Purchase Order
The number of units on open purchase order not yet received.
Note:
Page 342
If the on order # is greater than zero, you can click on the dots beside this field to view a list of outstanding
Purchase Orders where this item is ordered.
Chapter 12 – Inventory Control
Blue Link Solutions™
Relevant Dates
Last Sale
The date of the most recent sale of this item.
Last Order
The date of the most recent purchase order for this item.
Last Receipt
The date of the most recent receipt of this item from a purchase order.
Ordering Information
Days to Order
The average number of days from purchase order to receipt. This is the expected lead time. For example if
on average it takes 10 days from placing the order to receiving it, then you will enter “10” here. When the
purchase order is created Blue Link Solutions will calculate the expected ship date by using today’s date
plus the number entered here.
Reorder Level
Reorder this item if the number of units on hand falls below this value.
Reorder Amount
The usual amount that is ordered when the reorder level is reached. If using Unit of Measure you will need
to select the UOM in which you wish to reorder in.
Season Code
If this product is only available for a certain season such as Christmas, then fill in a season code. If it is
always needed anytime of the year then leave blank. This field will act as a filter when using Reorder
Inventory.
If the term “Season” does not fit your business you may be able to think of another classification for
grouping inventory items that you do not want to reorder all of the time even if it is below the reorder level.
Cost Information
Last Cost
The cost for one unit of this item as received on the last order.
Avg. Cost
The average cost for this item calculated from purchase order amounts or as set using Adjust Levels for
Physical.
Total Value
The total value of the inventory item calculated as (Units on Hand + Units on Sales Order) x Avg cost.
Chapter 12 – Inventory Control
Page 343
Blue Link Solutions™
FIFO Cost
Beside the FIFO cost field is a “Purchases” button. Clicking on this button will return you to the Purchases
tab.
12.2.7
BOM (BILL OF MATERIALS) TAB
This tab only appears if the inventory item is a Kit or Finished Goods. Clicking on this button accesses the
Kit or Bill of Material Information screen.
Qty
The quantity of individual components needed to make the kit or finished product.
Component
The component used in the kit or finished product.
Location
The location of each component used to make the kit or finished product.
12.2.8
PICTURE TAB
When you click on the ‘Picture’ Tab, this is the screen that you will see:
The picture files are not stored in the data file but rather are linked to another location on your network. In
System Maintenance | System Master | Inventory Information you can enter the path to the master
folder of these image files.
Click on the button
to.
Page 344
beside the area titled “This image File”, to select the image that this item belongs
Chapter 12 – Inventory Control
Blue Link Solutions™
You have three choices regarding the dimensions of the picture:
1.
2.
3.
Keep the original size; show as much as possible.
Stretch: distort the shape to fit the box.
Zoom: preserve proportions, and try to fit to the box.
12.2.9
VENDORS PER PRODUCT
Primary Vendor
Select who the primary vendor for this product is. This is the vendor for which Reorder Inventory and
Create PO’s use as the suggested vendor
Vendor Id – Enter the Vendor ID in this field
Vendor Product Code - Enter the respective product code for the Vendor.
UOM – enter the default unit of measure you purchase from this vendor in (If using Unit of Measure)
Vendor Cost – this is the price it costs to purchase this product from this vendor.
Vendor UPC Code – Enter the respective UPC Code for this Vendor
Print on PO? – Indicate whether you want the vendor’s product code to print on the Vendor’s PO’s.
12.2.10 MULTIPLE UOM TAB
The following tab will appear if you are using Unit of Measure. See section 12.3 Unit of Measure for more
information.
Chapter 12 – Inventory Control
Page 345
Blue Link Solutions™
12.2.11 SALES HISTORY BUTTON
When you click on the ‘Sales History’ button, the following screen will appear:
This is the sales history for this product sorted by invoice number descending.
You may change the sorting by right clicking in the form and selecting the sort
Ascending or sort descending options. Click in the column you want sorted.
12.2.12
1.
ADDING A NEW INVENTORY RECORD
When the screen is first displayed, the cursor is in the Code field.
If it is not, click the “New” button.
2.
Enter a new Inventory Code (maximum 10 characters) and press <Enter>.
The following screen will be displayed:
Page 346
Chapter 12 – Inventory Control
Blue Link Solutions™
Because Blue Link Solutions uses this product code in a number of functions, remember to design your
product code so that you can take the greatest advantage of the product code ranges used for printouts and
range-based searches. For example, all products of a specific manufacturer might use the same first three
letters so that they can all be located as a group; you might also group items that have associated parts with
the same prefix.
3.
After you enter the new product code, enter the rest of the appropriate fields.
When you have entered the base price and indicate that you want to use a price matrix, you will have the
opportunity to enter up to 9 fixed price levels (if you have a 0 or blank in the price matrix field). If,
however you have a number from 1-999 in the price matrix field, you may specify up to 9 discount
percentage levels.
4.
When you are ready to save, click the “Save” button. The following screen will be displayed:
5.
Click Yes to save the new inventory item; click No to cancel the request.
You must answer Yes when asked if you want to save the record before the record will be permanently
recorded in the customer file. The function will not allow you to save a record that does not have a
customer code or class assigned to it.
12.2.13 CHANGING AN EXISTING INVENTORY RECORD
If you need to change details for an inventory item, find the existing inventory item.
1.
Click the “New” button.
2.
Select the Inventory Item from the drop down list
Description.
3.
Once the inventory item’s record is displayed, you may change it.
4.
Click the “Save” button; the following screen will be displayed:
Chapter 12 – Inventory Control
You may lookup by Product Code or by Product
Page 347
Blue Link Solutions™
5.
Click Yes to save the customer record; click No to cancel the request.
12.2.14 DELETING AN EXISTING INVENTORY RECORD
When you delete a customer record, the Outstanding Inv Amt and Outstanding Credit Amt balance for the
customer must show a $0.00 balance.
ONCE IT IS DELETED, THE RECORD CANNOT BE RECOVERED. You will have to re-enter the
customer if it is deleted in error.
To delete an existing record:
1.
Display the inventory item record by click the “New” button.
2.
Click the “Delete” button.
The following screen will be displayed if the inventory item can be deleted:
3.
Click Yes to delete the inventory item; click No to cancel the request.
You cannot delete an inventory item until it has a total value of zero. If you try to, the following message will
be displayed:
Page 348
Chapter 12 – Inventory Control
Blue Link Solutions™
12.3 Unit of Measure
This section will describe how Unit of Measure (UOM) works, and how to set it up.
12.3.1
CONFIGURING UNIT OF MEASURE
Before you begin, you will have entered in all of your inventory items into Blue Link Solutions. You will
have also put in time preparing how you want Unit of Measure to work for you. This is an important step to
follow before you begin with the configuration. Once you have set up unit of measure it is difficult to
change the setup, so make sure you understand how it works before you begin with your live data.
Configuration Steps
1.
Manually think about how you are going to set up Unit of Measure in Blue Link Solutions. Map it
out on a whiteboard or on paper and ensure that you have discussed with all possible parties
involved.
2.
Have your inventory setup in regular Blue Link Solutions.
3.
Make a copy of your data file.
4.
Go to System Maintenance | System Master | Inventory Information and enable the Multiple
Unit of Measure feature.
Note:
By enabling Unit of Measure, you must use unit of measure for all of your inventory items. You may use a
UOM of one for items where this does not apply.
Chapter 12 – Inventory Control
Page 349
Blue Link Solutions™
5.
You will now notice that the Various UOM tabs and fields will appear. Most notably the
Inventory Multiple UOM tab in System Master Lists, as well as the Multiple UOM tab in Enter /
Change Inventory Item.
Unit of Measure Configuration Wizard
Found under Utilities | Unit of Measure Configuration Wizard, the wizard gives you step by step
instruction to set up UOM for the first time. After you have setup UOM for the first time for use, you can
append to the information by adding to the Inventory Multiple UOM tab in System Master Lists.
The following example will relate to a distributor of office products.
1 – Introduction
As you begin the wizard, you are greeted with an introduction page. It gives some examples of how to set
up the units of measure.
2 – UOM
Here you will enter all of the units of measure that you need to be stored. These will include what you will
use for purchasing and for selling. In this example, this office products distribution company uses the
following:
?
?
?
?
Each
Box
Case
Pallet
Page 350
Chapter 12 – Inventory Control
Blue Link Solutions™
Code – (10 characters, Text). This will be your primary reference to the unit of measure.
Description – (30 characters Text). The description may give more information on the code, if applicable.
3 - Category
The third step is where you categorize all of your Units of Measure. All of the UOM’s entered in the above
example could be related to a category of Packages. If this company also distributed a liquid product, they
may also have UOM’s of Pints, Quarts, Gallons, and Drums, which could fall under a category of Volume.
Categories are used as a quick method of assigning all of the units of measure to a product.
Category Code – (10 characters, text) – this code will be your primary reference to the category.
Category Description – (30 characters, text) – this is a description of the category.
Base UOM – this is the base unit of measure for this category. This is how Blue Link Solutions will store
the quantity on hand for inventory items belonging to this quantity.
Chapter 12 – Inventory Control
Page 351
Blue Link Solutions™
Note:
The base UOM does not have to be the lowest unit of measure. It can be the highest unit of measure or
even in the middle.
In the above example, “Each” will be the base UOM.
Allow Quantity Overrides? – in step 4 you assign the ratio of each unit of measure in relation to each
other for each category. If this box is checked, it means that you want to be able to override this ratio on an
inventory item basis.
For Example, perhaps for 80% of your items there are 12 units in a box. But for the other 20% there are 10
units per box. Checking this box will allow you to change the ratio for those other items in Enter / Change
Inventory Item.
4 - Conversions
This step is where you set up the relation of each unit of measure to each other.
In the above example the quantity figures were arrived at in the following manor:
? Each - this is the base unit of measure and therefore receives a quantity of one. For example this
may be a pen.
? Box – there are 12 pens contained in the box.
? Case – there are 50 boxes contained in the case (50 x 12 = 600)
? Pallet – 20 cases fit onto one pallet (600 x 20). Therefore there are 12,000 pens on one pallet.
5 – Quick Assign
At this stage you will then decide which inventory items you want to assign the various categories to. You
may repeat steps 1 through 3 as often as you would like, but you can only assign a category to an inventory
item once.
Page 352
Chapter 12 – Inventory Control
Blue Link Solutions™
1.
Select the products to update – you may select from a product range, class range or inventory
category range. In this example, all of the pens and pencils are being assigned the Packages
category.
2.
Select the UOM Category you wish to assign to these items. Packages will be assigned in this
update.
3.
Update inventory for the item range and category selected.
You may repeat this step to update the remaining items with unit of measure.
6 – Assign Remaining
This step allows you to assign the remaining inventory items to the categories setup in the previous steps.
This is designed for “one off” items which did not fall in the range. Assign the category to each remaining
item.
7 – Update Inventory
The final step is to update all inventory records with the assigned UOM and pricing records. You may
Chapter 12 – Inventory Control
Page 353
Blue Link Solutions™
select to update all currencies, or specify a specific currency to update only.
Update the base UOM for the home currency with the inventory price 1 – if this is checked then the price 1
for each inventory item will become the base price for the home currency. You will not check this, if you
were using Blue Link Solutions before, and you manually had a different base unit of measure.
Note:
12.3.2
Once you begin to use the Unit of Measure feature the Price and Quantity breaks set up in Enter / Change
Inventory Item is disabled.
INVENTORY
Once the initial configuration has been completed you will go back to Enter / Change Inventory Item |
Multiple UOM tab.
The following has been configured for this inventory item:
? Under UOM category, the category and the UOM’s belonging to that category have been
populated
? All of the currencies have been added for this company
? Price 1 for the base unit of measure (Each) has price 1 ($9.99) as this company’s home currency
price
? The original price and quantity breaks have been disabled
Page 354
Chapter 12 – Inventory Control
Blue Link Solutions™
To be Configured
UOM Multi-Currency Pricing
The only price which has been configured is that of the base unit of measure for the home currency. Each
UOM and its respective price list per currency may be filled in.
To update the price list, first place your cursor in the UOM of choice (Box) and then update the price list.
Repeat for the rest of the unit of measures.
UOM Multi-Currency Discounts
For each currency, from each UOM, you may enter in unlimited price and quantity breaks.
For this example:
? The UOM is Each
? The price is CA$
? And the quantity discounts are as follows:
o $1.00 for a quantity of 6
o $1.50 for a quantity of 7
o $1.75 for a quantity of 10
? The discounts can be either
o Dollar discount
o Percentage discount
Chapter 12 – Inventory Control
Page 355
Blue Link Solutions™
Vendors per Product
If applicable, you may now want to set up the vendors price list for this product on the vendors per product
tab.
In this example, the company purchases from FLETC, in a UOM of Case, at a cost of $300.00 per case.
12.3.3
PURCHASE ORDER
Next, this company will purchase two cases of these pens from FLETC.
If you check the inventory on order you will see the following:
Page 356
Chapter 12 – Inventory Control
Blue Link Solutions™
The amount on Purchase Order equals 1200. Blue link Solutions stores inventory in the base unit, and
therefore this equals the 600 pens which are in each case.
If you click for more detail you will see that 2 cases or 1200 units are on the P.O.
Once this P.O. is received this company will have an extra 1200 units.
12.3.4
SALES ORDER
A customer requests 5 boxes from this company. A sales order is created with the following details:
Chapter 12 – Inventory Control
Page 357
Blue Link Solutions™
Notice if you checked the units on sales order you would receive the following:
Clicking to get more detail reveals the following screen:
Notice that 5 boxes are on the sales order which translates to 60 in the base quantity.
After this transaction is posted there are 1280 base units left in inventory. This consists of:
? 140 beginning inventory
? add 1200 purchased (600 per case x 2 cases)
? less 60 sold (12 per box x 5 boxes)
? is 1280 units
Page 358
Chapter 12 – Inventory Control
Blue Link Solutions™
Chapter 12 – Inventory Control
Page 359
Blue Link Solutions™
12.4 Inventory Lookup
(without costs)
The Inventory Lookup function allows users without full access to the inventory module to be able to look
up quantities and description of inventory items without allowing them to change any of the information
presented.
The tabs on this screen are based on the information entered in the Enter / Change Inventory Item screen.
Description Tab
See Section 12.2 for information on these fields.
Page 360
Chapter 12 – Inventory Control
Blue Link Solutions™
Comments Tab
See Section 12.2.1 for information on this field.
Locations Tab
See Section 12.2.4 for information on these fields.
Serial #’s Tab
See Section 12.2.5 for information on these fields.
Chapter 12 – Inventory Control
Page 361
Blue Link Solutions™
Picture Tab
See Section 12.1.8 for more information.
Page 362
Chapter 12 – Inventory Control
Blue Link Solutions™
12.5 Quick Inventory Lookup
Use the quick inventory lookup feature to quickly find an inventory item and view on hand (OH), on sales
order (SO), on back order (BO) and on purchase order (PO) quantities.
Tip:
To find an item where you only know part of the code, add the “*” wildcard before, after or both before and
after the description you’re searching for. E.g. *DEB* would show all product codes including the word
Debeers:
Edit Inventory
After placing the cursor on a particular item you may get additional information by selecting this button. –
Chapter 12 – Inventory Control
Page 363
Blue Link Solutions™
instead of => If you have your cursor on a particular item you may get information by selecting this button.
You will be transferred to Enter / Change Inventory Items.
Double Click
You may also double click on the white fields to get more information. If you double click on the Product
Code you will receive the More About Inventory form.
If you double click on one of the numbers you will receive detailed information about that number.
Page 364
Chapter 12 – Inventory Control
Blue Link Solutions™
Chapter 12 – Inventory Control
Page 365
Blue Link Solutions™
12.6 Kit Availability Lookup
Use the kit availability lookup to quickly identify if you have everything you need to sell a particular kit.
Kit
Select the kit from the pick list (only kit items are shown).
Can be Made
The Can be Made field shows you how many kits can be made/sold given the inventory of other items on
hand.
Limiting Components
The Limiting Component field shows you all of the limiting items it identified as preventing the sale of
additional kits. By clicking one of the components you will see if there are any outstanding purchase orders
for that product.
Page 366
Chapter 12 – Inventory Control
Blue Link Solutions™
12.7 Adjust Inventory Values/Levels
Use this function to adjust the units on hand or cost per unit for an item and automatically update G/L Asset
and Expense accounts with these adjustments.
One typical use of the function is to decrease the amounts on hand due to loss, theft, or spoilage.
Note:
You may not adjust the total units or value for a Non-Inventory (N) type product.
Lookup
The item code being adjusted. You may also lookup by the item description.
Date
The transaction date of the adjustment, defaulted to the current date. Any adjusting entries posted to the
General Ledger will be posted as of this date.
Total Units Actual
When the record for this inventory item is first displayed, this is the same number as Total Units on Hand; if
the Actual Units number is changed in the lower half of the screen, this field will update the change in the
total.
Chapter 12 – Inventory Control
Page 367
Blue Link Solutions™
Average Cost
The amount displayed is the Average Cost per Unit for the inventory record. This amount is based on the
average cost calculated from purchase orders received or from the previous time this function was used to
adjust costs.
Tip:
Use this screen to move inventory between locations by placing a positive quantity in one location and a
negative quantity in the other location.
New Cost Per Unit (Visible with Average Costing Only)
When the record for this inventory item is first displayed, this is the same as the Average cost. You can
type a new amount to be used as the new cost for the item when a positive value adjustment is posted.
FIFO Adjustments… button (Visible with FIFO Costing Only)
Click this button to display the FIFO Adjustments screen shown above.
This screen allows you to adjust the quantities remaining on a FIFO layer basis. In this way, you can
control what costs are posted when adjustments are made.
Update Type
There are two ways to update inventory:
New Units Use this method to either increase or decrease inventory by a certain number in the Unit
Adjustment field.
Actual -
Use this method to adjust your inventory to the physical number of units in inventory in
the Unit Adjustment field.
Update Method
There are two method of updating inventory: Inventory Adjustment method or the Cost of Good Sold
method:
Debit/Credit Inventory Adjustment Account - using this method, the adjustment value of the inventory will
be posted to an Inventory Adjustment Account (Expense) that is setup in System Interface.
Debit/Credit Cost of Goods Sold Account for this item as defined by its class - using this method, the
adjustment value of the inventory will be posted to a Cost of Goods Sold account set up as a Class for the
product code you are adjusting.
Location
The physical location(s) of the inventory.
On Purchase Order
The number of units on purchase order that have not yet been received.
On Hand
The number of units on hand that are available for filling orders (i.e., they are not already allocated on an
open sales order).
Page 368
Chapter 12 – Inventory Control
Blue Link Solutions™
On Backorder
The number of units on backorder
On Sales Order
The number of units that are on sales orders that have not yet been invoiced. (Backordered units are not
counted in this field).
Unit Adjustment
The total number of units in inventory if the Actual Update Type is being used, and the number of units
added or subtracted from if the New Units Update Type is being used.
Totals
The total number of units in all locations for each column.
General Program Operation
1.
When the screen is first displayed, the cursor is located in the Code field.
If it is not, then click the “New” button.
2.
The function allows entry of New Cost/Unit. The default value will be the same as the Average
Cost per Unit, but you can type in a new cost here.
3.
Select which update type and update method that you wish to use, and enter the change in
inventory in the Unit Adjustment field.
4.
After you have made your selections, pressing the Save/Post button will display the following box:
5.
Click Yes to save and post the value change; click No to cancel the request.
If you choose Yes, the inventory record is updated for units on hand, cost, and value, and the
transaction posts to the Other Journal and the General Ledger.
Note:
The transaction made to the General Ledger is a debit to the G/L COGS or Inventory Adjustment account
(i.e. increase costs) and a credit to the G/L Asset account (i.e. decrease value) for this item if the total
value has decreased. If the total value has increased, the G/L Asset account will be debited (increased)
and the G/L COGS or Inventory Adjustment account will be credited (decreased).
Chapter 12 – Inventory Control
Page 369
Blue Link Solutions™
12.8
Enter/Change Price Matrix
A price matrix lets you define discount percentages or a set of nine prices for products. A particular level in
the matrix can then be matched to the price level in the customer record so that the appropriate discount can
be given when entering a sales order. If you are using a percentage discount and assigning a price matrix
number, it is strongly advised that you enter the matrix here, as this type of matrix information is available
to marketable products.
Matrix #
A three-digit numeric field. Up to 999 different discount matrices can be specified. The 9 discount levels
that you assign for each price matrix apply to any product with that price matrix number.
Rates 1-9
If you have entered a price matrix code number, you will be able to enter a series of discount percentages.
Note:
Page 370
The Matrix # is assigned to a product;
The Rates are assigned to customers.
Chapter 12 – Inventory Control
Blue Link Solutions™
12.9
Global Price Change
Use this function to change the selling price of a group of inventory items or all inventory items rather than
having to make a similar change to individual inventory items. You can limit the range of the products you
want to affect by specific product code ranges as well as category or class ranges. You can increase or
decrease prices by a flat amount or by a percentage.
How to Affect Prices
You can choose between an increase (I) or decrease (D) in your prices.
Affect Prices by
You can choose between a change based on a percentage (P) of the price base or a flat dollar amount (F).
Amount
The amount of the price change as a percentage or flat dollar amount.
Round to 2 Decimals
Allows you to choose to round figures to 2 decimal places
Product Code Range
From Product/Thru Product
You can limit the products to be affected by specifying product code ranges. Click on the down arrow or
press F4 to display a list to help you select the appropriate product range.
Class Range
From/Thru Class
If you want to limit the effect of your price to a subset of products, you can add class specifications. Click
on the down arrow or press F4 to display a list to help you select the appropriate product range.
Chapter 12 – Inventory Control
Page 371
Blue Link Solutions™
CAUTION:
Because this function can affect many products at once, be sure to backup your files before running this
function.
Contact Pricing
You can choose to update contract pricing after checking the box according to the menu item chosen.
Multiple UOM
If you are using Unit of Measure you can select a particular UOM to update prices for. You may also select
the currency that you want to update for this UOM. See section 12.3 for more information on UOM and
prices.
Only Update Items Marked “Active”
Allows you can choose to only update items marked active.
Preview Sample Change
Allows you to see the result of the price changes as entered in the Enter Details of the Price Change section.
Change Prices Button
When you are satisfied the information is correct, click on the Change Prices button. The following screen
will be displayed:
Click Yes to if you are sure you want the Global Price Change to proceed; click No to cancel the request.
This function changes the base price of the product selected as well as any associated price levels within a
flat rate price matrix. Use of this function updates the selling price in the inventory master file and updates
the price levels in any fixed price matrix.
Page 372
Chapter 12 – Inventory Control
Blue Link Solutions™
12.10 Review Inventory Sales Breakdown
You may obtain a summary of all products sold during a specified period. For all sales made during that
period, one line appears per product code summarizing the total number or units and the total dollar value
of sales for the selected date range. When you select this option, the following screen displays:
From/Thru Date
Enter a From and Thru dates that you want to see the details on
Process Button
Click on the Process button to have the details displayed in the bottom half of the screen.
Chapter 12 – Inventory Control
Page 373
Blue Link Solutions™
Double click on any of the displayed product codes to pop up a new screen which displays each invoice on
which that product was sold during the selected period. The following screen will be displayed:
Graph by Class Button
This button generates a graph based on sales by inventory class for the specified period.
Detail Report Button
This button appears when you are looking at the details of an inventory item. It will print a report showing
the Product Code, the Customer to whom the item was sold, the Invoice Date and Number.
Page 374
Chapter 12 – Inventory Control
Blue Link Solutions™
Print Where?
You may select for the report to be printed to the printer or to be previewed on screen. Click the “Print” button
to send it to the printer or the screen or the “Cancel” button to cancel the request.
Close Button
Click on the Close button to exit the screen.
Chapter 12 – Inventory Control
Page 375
Blue Link Solutions™
12.11 Review Inventory Sales by Year by Month
This form is a quick reference to view sales history for a particular item and compare data across the past 5
years in each month. You may also filter for a particular warehouse location.
You can select 3 display types:
1.
2.
3.
Total Units
Total Sales
Gross Margin
Page 376
Chapter 12 – Inventory Control
Blue Link Solutions™
12.12 Review Serialized History Information
Use this function to review specific information on individual serialized inventory records which have been
sold.
Lookup
The inventory product code for this entry. You may also lookup by product description.
Product
The inventory product code for this item.
Serial Number
The specific serial number you are interested in reviewing.
Description
The description of the inventory item.
Serial Number
The serial number for the inventory item
Vendor
The vendor code of the vendor from whom you purchased the item.
P/O Date
The date of purchase order of the item.
P/O Num
The P/O number on which you purchased the product.
Chapter 12 – Inventory Control
Page 377
Blue Link Solutions™
Cust. Code
The code of the customer to whom you sold the item.
Sold Date
The date you sold the item.
Inv #
The sales order number on which you sold this item.
Page 378
Chapter 12 – Inventory Control
Blue Link Solutions™
12.13 Inventory Count
The Inventory Count function allows you to enter inventory counts as of a moment in time, for all products,
or a subset of products. Full counts and cycle counts are supported, as is importing / exporting information
from/to Excel.
Location
Select a location from which products should be added.
Count Type
Cycle Count: Updates the inventory for products listed on screen only. Products not listed on screen are not
updated.
Full Count: Updates the inventory for all products whether listed or not. Products not listed on screen are
assumed to have a quantity on hand of zero.
Include Inactive Products
Check this box if you want the items that have been flagged in Enter / Change Inventory, to be displayed
and available for count.
From Class / Thru Class
Select the range of inventory product classes to be added when the Show/Add Inventory Records button is
pressed.
From Product / Thru Product
Select the range of inventory product codes to be added when the Show/Add Inventory Records button is
Chapter 12 – Inventory Control
Page 379
Blue Link Solutions™
pressed.
Count Date
The date that the count was performed. Inventory movements that occurred after that day will be added to
determine the quantities on hand as of today.
From Bin / Thru Bin
Select the range of bin locations to be added when the Show/Add Inventory Records button is pressed.
From Shelf / Thru Shelf
Select the range of shelf locations to be added when the Show/Add Inventory Records button is pressed.
1 – Show / Add Inventory Records (button)
Click this button to show the inventory records based on the selection criteria you’ve specified. If records
are already present, you’ll be asked if you want to replace the current selection, or append to it with the
products currently selected:
Click “Yes” to delete the items currently listed. The currently selected items will be added in their place.
Click “No” to append the currently selected items to those already there.
2 – Export Count to Excel (Optional) (button)
Click this button if you would like to export the information currently on screen to Microsoft Excel.
3 – Import Count from Excel (Optional) (button)
Click this button to import an Excel count sheet that was previously exported.
You will be prompted to identify the file and then you will be asked if any records currently on screen
should be deleted or appended to:
Step 4 – Show Movements Since (button)
Click this button to show all inventory movements that occurred AFTER the count date specified and
calculate the adjusted quantity to be posted.
Note:
Page 380
Movements that occurred on the count date are not shown. Solutions assumes that the count occurred
after business hours on the count date, and therefore does not include that day’s movements in the
calculation.
Chapter 12 – Inventory Control
Blue Link Solutions™
Step 5 – Print Variance Report (button)
Click this button to print the inventory variance report:
Step 6 – Process Inventory Count (button)
Click this button to post the inventory count as shown on screen.
This function posts changes to inventory as actual amounts on hand and to the general ledger against the
inventory asset accounts (as defined by the inventory class codes) and the inventory adjustment account as
defined in the System Interface.
Tab Through Count Field Only (button)
Click this button to toggle the operation of the tab key when in the sub-form. Specifically, press the button
to have the tab key move from directly from the count field in one record to the count field in the next
record. Raise the button to tab through the product code, count, bin and shelf fields before proceeding to
the next record.
12.13.1 GENERAL PROGRAM OPERATION
Method 1 – Entering quantities for ranges of products
1.
Select the location and range of products you want to enter counts for.
2.
Click on the “1-Show/Add Inventory Records” button.
3.
Optionally select additional ranges of products to be added to the count, and click the “1-Show/Add
Inventory Records” button again, answering “no” when asked if you want to delete the currently
selected products.
4.
Optionally, export the data to Excel, or later, import the file from Excel.
5.
Enter the count information, bin and shelf.
6.
If you encounter a serialized item and have to adjust it’s quantity, double-click the count field to
display the serialized inventory screen (described later).
Chapter 12 – Inventory Control
Page 381
Blue Link Solutions™
7.
When done entering actual count information, click the “Step 4 – Show Movements Since” button to
show the inventory movements since the count date and calculate the Adjusted QTY to be posted as of
today.
8.
Print the inventory variance report by clicking the “Step 5 – Print Variance Report” button.
9.
Confirm whether this is a Cycle Count or Full Count. A cycle count updates only the products listed on
screen. A full count will assume that products not explicitly listed on screen have a count quantity of
zero.
10. Process the inventory count by clicking the “Step 6 – Process Inventory Count” button.
Caution:
Be careful to select the correct count type before processing the count. Selecting a Full Count will assume
products not listed have a count quantity of zero. Backup your file before processing the count just in
case.
Method 2 – Entering ad-hoc inventory counts
1.
Select the location for which the inventory count is being performed.
2.
Specify the count date.
3.
Enter the product codes that were counted, the count, and optionally the Bin & Shelf, adjust serial
numbers on file as necessary for serialized items.
4.
Click “Step 4 – Show Movements Since” to update the movements and calculate the adjusted QTY
to be posted as of today.
5.
Click “Step 5 – Print Variance Report” to print the variance report for your records.
6.
Confirm whether this is a Cycle Count or Full Count. A cycle count updates only the products
listed on screen. A full count will assume that products not explicitly listed on screen have a count
quantity of zero.
7.
Click “Step 6 – Process Inventory Count” to process the inventory count as entered.
12.13.2 COUNTING SERIALIZED ITEMS
When an inventory count is performed of serialized items, it is important to track which serial numbers were
present when the count was performed, to delete incorrect serial numbers, and to add any new or corrected
serial numbers.
Caution:
Page 382
If the count is being performed after the fact, remember that the list of serial numbers presented will
include those items purchased since the count date. Do not delete those items unless necessary.
Chapter 12 – Inventory Control
Blue Link Solutions™
On the inventory count screen, double-click the count field for a serialized item to display the serial
numbers screen:
Selecting Serial Numbers to Match with Count Quantities
Click the “Select” button to match a serial number with the current location.
Modifying the location of serialized items
If you know what serial numbers belong in what warehouse locations, you can select those locations now
for all, or a few of the serial numbers.
Deleting Serial Numbers
To delete a serial number, click the “Select” check box twice. The first click will set the Location to the
same as the current location, the second click will un-select the item, and flag it for deletion.
Note:
To undo the delete selection, click in the “location” field and clear the location record, or change it to a
different warehouse location.
Chapter 12 – Inventory Control
Page 383
Blue Link Solutions™
12.14 Reorder Inventory
Note to previous Blue Link users: this replaces the Load Suggested Order function found in the Purchase
Order module.
Filtering Options
1.
2.
3.
4.
5.
Vendor - Select which vendor(s) you wish to check the reorder status for.
Location – for which location do you wish to reorder for
Category – if you wish to filter for a certain type of category or range
Class – if you wish to filter items that belong to a particular class or a range of classes.
Seasons – do you want to include items that belong to a season code (see explanation for Season Code
under Enter / Change Inventory | More Info.)
Update Amounts
Once your criteria are selected, select this button to view the data.
Page 384
Chapter 12 – Inventory Control
Blue Link Solutions™
Editable Fields
1.
2.
3.
4.
Select – you may uncheck items that you do NOT want to be reordered. By default all items are
checked.
Location – you may change the location that you wish to order for by selecting the location at the top of
the form. It will then change each items location to that warehouse.
Reorder UOM – You may change the UOM that you wish to order in. Remember that when you set up
the inventory item you had the option to select the UOM that you wish to reorder in (More Info tab).
Order Qty – you may override the quantity that you wish to reorder.
Preview Reorder Report
Preview this report to print a hard copy of what is being reordered.
Order Items By
1.
2.
Creating a new PO for the Vendor selected
Creating a new PO but for a different vendor than the default vendor indicated in the detail – once
selected the Vendor field is enabled
Chapter 12 – Inventory Control
Page 385
Blue Link Solutions™
3.
Assign these items to an existing PO – once selected the PO Number field is enabled.
Once ready, select the Create / Update PO button.
You will then receive a similar message stating that the items were placed on a Purchase Order.
Page 386
Chapter 12 – Inventory Control
Blue Link Solutions™
12.15 Production Control
This function allows you to take components in inventory and create new (finished) inventory product (only
for type “F” Finished Products).
Note:
1.
2.
3.
4.
If you are including a labour or overhead burden in your Bill of Materials, please follow the
following instructions.
Set up non-inventory items for these burdens.
Set up a separate inventory class for these items. For example LAB.
The Inventory account for this class should point to a contra account against your labour expense. This will
reduce your labour expense, which will offset the increase in Cost of Sales due to this burden.
In Inventory | Enter / Change Inventory Item | More Info Tab | Cost field, enter the burden rate.
Lot #
This is the number used to identify the production batch. The system creates this lot number for you.
Sales Order
This field is used for tying in a production batch to a specific sales order. The finished good product code
must be on the sales order.
Product Code
The name of the finished product you are producing. The description of the finished product follows.
Inventory Location (required)
If you are using multiple location inventory, this is the code of the location to use in this particular batch.
Quantity (required)
The quantity of the assembled/finished goods you are producing.
Chapter 12 – Inventory Control
Page 387
Blue Link Solutions™
Start Date
The date when the production batch is entered into the system. This date is defaulted to the current date.
Issue Date
The date when you open the batch. This date is defaulted to the current date.
Completed Date
The date when the batch is completed.
Production Status
Q (Quick)
Firms, opens and closes in one step.
F (Firm) Firms the batch, checks to see if there are enough components in stock
O (Open)
Opens the batch, pulls the components out of inventory to Work In Progress
C (Close)
Closes the batch, pulls components out of Work In Progress and back into
Inventory as a finished good
X (Cancel)
Cancels the batch.
Total Unit Cost
The total unit cost of the production batch.
Component
The inventory code of the components required for the production batch.
Required
The number of units of the components required for the production batch.
Assigned
Number of components that are reserved for the production batch.
Location
The physical location of the components.
Actual
The actual number of components physically taken out of inventory. If this number is different from the
assigned number, then enter it here before you open the batch to tell the system how many actual units were
taken.
Avg Cost
The average cost of the component parts.
12.15.1 CREATING A NEW PRODUCTION BATCH (NORMAL METHOD)
1.
When the screen is first displayed, the cursor is located in the Code field.
If it is not, then click the “New” button.
2.
Another option is to Choose an existing Sales Order from the Sales Order drop list if this production batch
Page 388
Chapter 12 – Inventory Control
Blue Link Solutions™
is to tie into a specific Sales Order.
3.
Choose a (finished) Product Code from the Product Code drop list. When it is selected, the Lot Number is
automatically assigned.
4.
Choose the Inventory Location for this batch or leave the default for “Main”.
5.
Type a Quantity to produce.
6.
Type the Start Date or leave the default for today’s date.
7.
Type the Issue Date or leave the default for today’s date.
8.
Choose the “F” (Firm) Production Status from the drop list, to firm up the order and reserve the
components. The following screen will be displayed:
9.
Click Yes to reserve the inventory components by moving the appropriate quantity from units on hand
to units on sales order reserve; click No to cancel the request.
10. When is has check that enough stock exists, the following screen will be displayed.
11. Click OK to close the screen.
Chapter 12 – Inventory Control
Page 389
Blue Link Solutions™
12. Choose the “O” (Open) Production Status from the drop list, to confirm that you want to open the
production batch. The function will produce a G/L transaction that moves the components out of
inventory and into the WIP account. The following screen will be displayed:
13. Click Yes to post the G/L transaction; click No to cancel the request. The following screen will be
displayed when it is complete.
14. Click OK to close the screen.
15. Choose the “C” (Close) Production Status from the drop list, to confirm that you want to close the
production batch. The function will produce a G/L transactions to move the inventory components
previously posted to the WIP account to Finished Goods inventory as the finished item. The following
screen will be displayed:
16. Click Yes to post the G/L transaction; click No to cancel the request.
The production of the finished inventory item is now complete and is available for sale.
12.15.2 CREATING A NEW PRODUCTION BATCH
(QUICK METHOD)
1.
When the screen is first displayed, the cursor is located in the Code field.
If it is not, then click the “New” button.
Page 390
Chapter 12 – Inventory Control
Blue Link Solutions™
2.
Another option is to Choose an existing Sales Order from the Sales Order drop list if this production batch
is to tie into a specific Sales Order.
3.
Choose a (finished) Product Code from the Product Code drop list. When it is selected, the Lot Number is
automatically assigned.
4.
Choose the Inventory Location for this batch or leave the default for “Main”.
5.
Type a Quantity to produce.
6.
Type the Start Date or leave the default for today’s date.
7.
Type the Issue Date or leave the default for today’s date.
Choose the “Q” (Quick) Production Status from the drop list, to firm, open and close in one step. The
following screen will be displayed:
8.
Click Yes to proceed; click No to cancel the request.
9.
The function will now automatically take you through the three steps as the normal method (firm, open,
close). You will need to click on the “Yes” and “OK” buttons to continue as each step is completed.
The production of the finished inventory item is now complete and is available for sale.
12.15.3 CHANGING A PRODUCTION BATCH
If you need to recall a Production Batch do the following:
1.
Click the “New” button.
2.
Select the Lot Number from the drop down list.
3.
Once the product information is displayed, you can make the appropriate changes and continue the process
by selecting a different Production Status code.
Chapter 12 – Inventory Control
Page 391
Blue Link Solutions™
12.15.4 DELETING A PRODUCTION BATCH
Only batches that have been “Opened” can be cancelled. They remain in the list and can be opened again to
complete the batch.
1.
Click the “New” button.
2.
Select the Lot Number from the drop down list.
3.
Select the “X" (Cancel) Production Status code. If you do so, all G/L transactions created to that point
are reversed.
Page 392
Chapter 12 – Inventory Control
Blue Link Solutions™
12.16 Print Inventory Information Reports
Use this function to run Inventory Listings of Price, Availability, Physical Checklist, Sales Report and
Adjustment Summaries.
Price List (with cost/no cost)
Use this function to get a price list report identified by product code, description, retail price, last cost and
average cost. The variation of this report without cost does not list the last cost or average cost.
You can select if you want to show the base UOM only or all available Units of Measure. You also need to
specify what currency you would like to see the price list in (this is dependent on you setting up a price list
per currency per unit of measure).
Availability
Use this function to get a report summarizing available units and recent order information. The report lists
the product code, description, location, units on hand, units on purchase order, total value (total units x
average cost), reorder level and date of last order. The total inventory value of the printed items displays at
the end of this report. (Note: Items that are not in stock, on sales order, or on back order do not appear on
this report.) Use this report to reconcile your inventory to the GL asset account balances if you are using
the average cost method. If you are using Elite and have chosen to use the FIFO costing method, use the
FIFO Costing Report.
Physical Checklist
Use this function to print a report format that you can fill in when you take a physical inventory count. The
report includes product code, description, and a space to fill out units by count and location.
Chapter 12 – Inventory Control
Page 393
Blue Link Solutions™
You also have the ability to filter for a bin and shelf location and to exclude Zero quantity items. You may
use this report when using the Inventory Count module.
Sales Report (current month)
Use this function to print a report detailing product code, description, sales, number of units sold and profit
for each inventory item for month-to-date and year-to-date.
Adjustments
Use this function to print an Inventory Adjustment report. The report details products, location, quantity
adjusted and average cost before and after adjustment.
FIFO Costing
See Chapter 18: Elite Features for details.
Valuation
Use this function to print an Inventory Valuation report. The report details products, quantity, average cost,
and total value of goods on hand. The information is grouped by inventory class to allow for reconciliation
when each class has its own inventory asset account in the General Ledger.
Slow Moving Items
Use this function to print a report detailing inventory items that have not been sold after a date you specify.
The report lists products, date of last sale, date of last PO issued, and date of last receipt. By default, the
report is based on items that have not been sold in the last three months.
Movement Report
The Movement Report provides you with a breakdown by Inventory Item, of the IN/OUT movement of the
item; to which Vendor, and which End User processed the transaction.
You are able to filter for a location and for a range of time.
Ending Balances
The Ending Balances report provides a moment in time inventory count sheet.
Page 394
Chapter 12 – Inventory Control
Blue Link Solutions™
How?
Choose how you want the report sorted, either by the Standard method or by Location.
From/Thru Product
From/Thru Class
You may enter ranges of product codes and classes to limit your report. If you do not enter limits, the report
will print all the inventory items.
From/Thru Location
You have the ability to filter by location.
Print Where?
You may select for the report to be printed to the printer or to be previewed on screen. Click the “Print” button
to send it to the printer or the screen or the “Cancel” button to cancel the request.
Chapter 12 – Inventory Control
Page 395
Blue Link Solutions™
Sample Reports
Inventory Price List with Cost
Inventory Availability
Page 396
Chapter 12 – Inventory Control
Blue Link Solutions™
Inventory on Hand (Physical Checklist)
Inventory Sales Report
Inventory Adjustments Report
Chapter 12 – Inventory Control
Page 397
Blue Link Solutions™
FIFO Costing
Page 398
Chapter 12 – Inventory Control
Blue Link Solutions™
Valuation
Slow Moving Items
Chapter 12 – Inventory Control
Page 399
Blue Link Solutions™
Inventory Movement Report
Inventory Ending Balances
Page 400
Chapter 12 – Inventory Control
Blue Link Solutions™
12.17 Serialized Inventory Report
Use this function to print a list of all serialized inventory items in inventory.
Which Report?
You may print a report of serialized inventory on hand or a serialized history report.
From/Thru Product
From/Thru Class
You may enter ranges of product codes and classes to limit your report. If you do not enter limits, the report
will print all the inventory items.
Print Where?
You may select for the report to be printed to the printer or to be previewed on screen. Click the “Print” button
to send it to the printer or the screen or the “Cancel” button to cancel the request.
The report lists the product code, description, serial #, purchase date and invoice number under which the
item was purchased.
Chapter 12 – Inventory Control
Page 401
Blue Link Solutions™
Serialized On Hand
Serialized History
Page 402
Chapter 12 – Inventory Control
Blue Link Solutions™
12.18 Print Production Control
Use this function to print a list of your Production Control Reports. These reports include the Bill of
Material for a finished good, the Availability of those components, which finished goods an individual
component is used is and Production Batch Status report.
Which Report?
The Production Control and Where Used Inquiry reports are selected by product code.
Select Product
Select a Product Code from the drop down list to print on the report.
1.
For Bill of Material, only finished goods are listed.
2.
For Where Used Inquiry, all inventory items that could be used to produce finished goods (eg. Regular,
Non-Inventory or Kit) are listed.
Which Report?
The Availability report requires a product code, quantity to build and inventory location and produces a
report that details the components, description, quantity of components required, units on hand, units on
P/O, units on B/O, and quantity short.
Chapter 12 – Inventory Control
Page 403
Blue Link Solutions™
Select Product
Select a Product Code from the drop down list to print on the report.
Quantity to Build
Type in the number of finished products you wish to build.
Inventory Location
Select the Inventory Location from the drop down list.
Which Report?
The Production Batch Status report may be limited by lot number and details the product lot #, code,
description, Production Status, quantity, location, customer code issue and ship date, start and completion
date. In addition, the description of the components of the BOM, the quantity of components required and
assigned and quantity short.
Print Where?
You may select for the report to be printed to the printer or to be previewed on screen. Click the “Print” button
to send it to the printer or the screen or the “Cancel” button to cancel the request.
Sample Reports
Bill of Materials Listing
Page 404
Chapter 12 – Inventory Control
Blue Link Solutions™
Bill of Materials – Where Used
Bill of Materials Availability
Production Batch Status
Chapter 12 – Inventory Control
Page 405
Blue Link Solutions™
Page 406
Chapter 12 – Inventory Control
Blue Link Solutions™
13: Purchase Order
The Purchase Order module allows you to enter, edit, delete or review your purchase orders (P.O.’s).
Access the Purchase Order screen through Purchasing | Purchase Orders.
You can record receipt of goods on P.O., keep track of partial receipts, delete an invalid P.O., and invoice
the received portion of an order separately. You can print your P.O.’s onto preprinted forms, or print them
formatted and titled onto blank paper. You can print a listing of open P.O.’s in order to track the orders you
have coming in.
In addition, the Purchase Order module keeps a complete history of all posted purchase orders for your
convenience. These history purchase orders are the same as the purchase order entry screen, with all entries
labeled. You can display individual purchase orders on the screen, or print within a specified range.
Before using the Purchase Order module, you need to set up your vendors in Enter/Change Vendor and
create your inventory items (Enter/Change Inventory Item). The defaults for the Accounts Payable and
Purchase Order can be set in the System Interface.
Chapter 13 – Purchase Order
Page 407
Blue Link Solutions™
13.1 Enter/Edit Purchase Order
Use this function to enter regular or credit purchase orders for your vendors. You can include both regular
and non-inventory items on one P.O. This program will also print a copy of the P.O.
13.1.1
ORDER INFORMATION
Create New Purchase Order / Change Vendor
Create new P.O. from selecting the vendor’s code or the vendor’s name.
Lookup Existing Purchase Order
Recall an existing purchase order, by selecting the P.O. number or search by vendor code.
Vendor Information
Name, Address 1, Address 2, C/P/P, Country
Filled in from the vendor record. You can make changes for this order if required.
Attention
To whom this P.O. is directed to.
Location and Shipping Information
Location
If you are using multiple inventory locations and you want the received goods from this P.O. to be added to
units on hand in a particular location, enter that location here. The offered default is the first location
entered when you set up your locations. Once you enter product items you may not change the location.
Page 408
Chapter 13 – Purchase Order
Blue Link Solutions™
Ship Via
The method of shipment. This is a 15 character alphanumeric field. The offered default is the entry used in
the Enter/Change Vendor Information screen.
FOB
This is the FOB destination for goods reflected on this order.
Vendor Terms / Tax Authority
Terms (Required)
The payment terms. The offered default is the terms type specified for the vendor in Enter/Change
Vendor Information.
Tax Authority (Required)
Enter the tax authority by code or from the drop down list under which this order is taxable. If you choose a
tax code with PST, then PST will be calculated on all type “N” inventory items.
Order information
P.O. # (Required)
The number of this P.O. To reduce the likelihood of fraud, the PO Number is assigned by the system. To
set the default for the starting P.O. number, please refer to System Maintenance. To look up an existing
P.O., enter the P.O. number or use the F4 list display option.
Date
The date this P.O. is entered. The entry in this field defaults to the current date.
Entered By
This will default to the Logon User ID.
Reference Information
Reference #
Enter the Vendor’s reference number if applicable. If there is a reference number entered, it will print on
the purchase order. (Text field)
Type of P.O.
The type of P.O. being entered which is for memo purposes only.
Dept
The department code you wish to reference for this P.O.
Order Details Defaults
Default Vendor’s Last Price
This will be defaulted based on the setup in System Interface | System Master | Data Entry & Other
Defaults. This section allows you to specify the defaults to be used when an item is added to the P.O.
1.
Vendor Cost Specified – if this is selected the price will default based on the price set up for this
vendor in Inventory | Enter / Change Inventory Item on the Vendors per product tab. This is
ideal if you have a price list from your vendors or major suppliers.
Chapter 13 – Purchase Order
Page 409
Blue Link Solutions™
2.
Last Price – if this is selected, the last price you purchased this product from this vendor will be
populated. This is ideal if you do not have vendor price list, but want Blue Link Solutions to
remember the price you last purchased at.
3.
None – if this is selected, neither of the above two options are applicable. This means that the
price is always $0 until changed. This is ideal if prices constantly change and therefore you want
your purchaser to check what the prices are and then enter them.
Item Description Language
This allows you to select whether the invoice descriptions are printed in the main language or the 2nd
language as described in the inventory file.
Job Costing
These relate to the Job Costing module. If you are not using Job Costing, then you may make these fields
inactive in System Maintenance | Master Lists | Job Costing and uncheck the “Show Job Detail On? |
PO”
? Job Code
You can select a job code that this P.O. relates to. This will default as the job for each line item.
? Cost Code
You can select a cost code that this P.O. relates to. This will default as the cost code for each line
item.
Internal Notes
Use this memo field to write a description of this purchase order. This does not print anywhere, but can be
used as a reference.
13.1.2
ORDER DETAILS
Product Code (Required)
The inventory product code for the line item, from Enter/Change Inventory Information. If the product
is not entered in the inventory files, you cannot use it here.
Product Description
The inventory product description is displayed here when the Product Code is entered. You can change this
description on the purchase order, without changing the description stored in the inventory file.
UOM
If you are using the Unit of Measure feature, select the UOM for which you are purchasing in from this
vendor. This may default if set up in Inventory | Enter / Change Inventory Item on the Vendors per
Product tab for this item and this vendor.
Quantity (Required)
The number of units ordered.
Taxable (T) (Required)
You can now choose whether each line item is taxable. You are offered a default from the inventory file.
Price
Type in the price of the item you are buying from your supplier. Click on the More About Inventory
button to view the last purchase cost.
Discount
You can type in a discount off the gross unit price for this line item. This is a Percentage numeric field.
Page 410
Chapter 13 – Purchase Order
Blue Link Solutions™
Extension
The price relating to the quantity entered. This field will be automatically calculated.
Est. Ship
The estimated date of receipt. The default is the system date. However if you know the lead time from
order to receipt for a particular item, you may enter in the days to order in Inventory | Enter / Change
Inventory Item | More Info tab.
GL Account
The GL expense account to which type “N” inventory item purchases should be posted. This allows the
Purchase Order system to handle items which are not tracked in the inventory system, such as Office
Supplies, or Subcontractor Labour. This field is not used with type “R”, “K”, or “F” items.
Dept
The department code for the GL account chosen in the GL Account field appears in this field
Vendor Prod Code
This is the vendor’s product code. If you have set up the vendor’s product code in Inventory | Enter /
Change Inventory Item | Vendors per Product tab, then it will default here. If you change the vendor’s
product code here, the system will prompt you to update the master record.
Extended Notes
This is a memo field. You may type in notes relating to that particular line item. This will print on the P.O.
just below the line item.
13.1.3
SHIP TO / DROP SHIP TO INFO
Step 1 – Select Ship to Address
Select one of the following options for the ship to address for this P.O.
? Our Company Address – this is defaulted. If this is selected, the company address set up in System
Maintenance | System Master | Company Information will be the ship to address to print on the
P.O.
? Drop Ship to Customer Billing Address - select a customer’s billing address this belongs to if this is
Chapter 13 – Purchase Order
Page 411
Blue Link Solutions™
a drop shipment. This billing address will then be the
? Drop Ship to Customer Ship to Address - first select the Customer Code, then select one of the
selected customer’s ship codes. This ship code will then be the ship to address for this P.O.
? Drop Ship to Vendor Address – if this shipment is going directly to another vendor then select the
vendor code applicable. This vendor’s address will appear as the ship to address on the P.O.
Step 2 – Click Button to Assign Address
Assign the address selected in Step 1, to the P.O.
Step 3 – Edit Ship to / Drop Ship Address
You may choose to edit the selected information for this P.O. It will not update the master information.
Subtotal
The subtotal amount for the P.O., displayed as a running subtotal during line item entry.
Freight
The freight charges for this P.O. You must remember to enter this before saving the P.O.
Tax Group 1
The amount of Tax Group 1 for this P.O., calculated when the P.O. is saved.
Tax Group 2
The amount of Tax Group 2 for this P.O., calculated when the P.O. is saved.
Total
The total amount of the P.O., subtotal + freight + Tax Group 1 + Tax Group 2. This is calculated and
displayed only after the P.O. is saved.
At the bottom of the screen are buttons labeled More About Inventory, Landed Cost Accruals, Receive
PO, Save/Print and Recalculate. These are described below.
More About Inventory Button
Clicking this button accesses an inventory summary screen for this item, detailing product code, description,
units of measure, last receipt date, retail price, last cost and average cost. You are also shown location and
quantity of the item on hand, on order, on back order and on sales order.
Page 412
Chapter 13 – Purchase Order
Blue Link Solutions™
Landed Cost Button ?
Clicking on this button displays the following screen where you can estimate your landed cost for the
purchase. See Chapter 19 – Elite Features for details.
Receive PO
By clicking on this button you will go straight to the Receive Purchase Order screen with this P.O. already
selected.
Chapter 13 – Purchase Order
Page 413
Blue Link Solutions™
Save/Print Button
Clicking on this button saves and posts the P.O. and allows you to print the P.O. This can be done at any
time during P.O. entry.
Click Yes to post and print the Purchase Order; click No to cancel the request. If you click Yes, the
following screen will be displayed:
Recalculate
By clicking on this button the figures at the bottom of the screen will be recalculated.
Purchase Order
Choosing this setting will print Solution’s Purchase Order format if you choose to send the document to the
printer or the screen. If you choose Microsoft Word, Blue Link Solutions will use the Word Template you
specified in System Maintenance | System Master | Outlook and Word.
Choose to direct the output to the printer, the screen, or to Microsoft Word. If you choose Microsoft Word
you will have the opportunity to specify where Word sends the document. If you choose to print to the
printer, the PO will be printed using the Word template specified in System Maintenance | System Master
| Outlook and Word. If you choose to print to the printer and choose “Mail It” or “Fax”, the PO will be
sent through the Internet using E-mail only if the following two criteria are met:
a)
Page 414
you are using Outlook for Email/Faxing
Chapter 13 – Purchase Order
Blue Link Solutions™
b) The Contact Person specified on the order is already in the Outlook Contact folder
with a valid Email address/Fax number.
If you choose to print to the screen, Microsoft Word will load and the invoice will be displayed. You can
then edit and/or print it from Microsoft Word.
Word Template
The Word Template option is similar to the Microsoft Word PO type. Blue Link Solutions will generate a
document from the information on the purchase order based on whatever format you specify. You can use
this function to generate customized documents.
Use the Browse button to specify the Word template file that you want to use. When printing to the printer
you have the option of directing the document to be faxed, emailed or printed.
To create a new document template, refer to Chapter 6 for details on the merge fields required.
13.1.4
ADDING A NEW P.O.
1.
When the screen is first displayed, the cursor is located in the Vendor field. If it is not, then click
the “New” button.
2.
Select a Vendor by clicking on the down arrow or press F4.
3.
You must enter a valid Vendor Code or Vendor Name. If the vendor you want to create this P.O.
does not exist then you will need to return to Enter/Change Vendor Information, to create a new
record in the vendor file.
4.
Verify the vendor information and you may change the information for this P.O.
5.
Verify the shipping and location information. This is defaulted from the setup of the vendor but
may be overridden. The location is the warehouse you will receive the items into.
6.
Verify terms and tax authority information. These are required fields so ensure that they are filled
out.
7.
For the Date field, today’s date is automatically entered. You may double click on this field to
select the calendar control option.
8.
Enter any reference information you feel is important or necessary.
9.
In the detail section of the P.O. screen, enter the product code for the item ordered. Use the drop
down list to view available choices.
Note:
The description of the item defaults to the description from the inventory file. You may change the
description that will be printed on the P.O. The change will not affect the inventory file.
10. Quantity defaults to 0. You must enter a non-zero quantity.
Note:
You must enter a product code before entering any quantity, discount, or description information.
11. If you entered a tax authority in the first Tax field, the program will allow you to enter whether an
individual line item is taxable. If it is, enter Y in the Taxable field. This will default to Yes.
12. You can change the price of the item using a current vendor price list or click on the More About
Inventory button to the Inventory Lookup information.
13. You may also enter a discount percentage for this line item that will appear on the P.O. Each line
item can have its own discount rate.
Chapter 13 – Purchase Order
Page 415
Blue Link Solutions™
14. If you have entered a type “N” product code, you will be able to enter a GL Account to which it
should be posted. This would normally be an expense account. NOTE: Do not post these items to
inventory asset accounts, as this will cause your inventory control account to go out of balance.
Generally these items are being expensed upon receipt and therefore an expense account is most
commonly used (unless this is an asset purchase).
The program will then return to the Product Code field and you may enter the next line item. You can
include both regular and non-inventory type items on a P.O.
Save and Exit
To mark the transaction as complete, press the Save/Print at any time during entry. The following screen
will be displayed:
Click Yes to print the P.O.; click No to cancel the request.
Saving a P.O. updates units on order for the specified location in the inventory location file, adds the P.O.
to the P.O. files, and updates the next P.O. number in System Interface. You then have the option of
printing the Purchase Order. You may print the Purchase Order now or later, using Print Purchase Order.
Page 416
Chapter 13 – Purchase Order
Blue Link Solutions™
A previously entered P.O. may be changed any number of times until it is received using Receive P.O.
The P.O. will NOT be posted to the G/L, Accounts Payable, or Inventory files until the P.O. is received
using Receive P.O.’s. Until then, the items will be reflected as “Units on P.O.”
13.1.5
CHANGING AN EXISTING P.O.
1.
Click the “New” button.
2.
Select the P.O. # from the drop down list under Lookup Existing Purchase Order. The information
for that P.O. is displayed, and the cursor is placed in the Vendor Code field.
3.
Make any changes that are required. A previously entered P.O. may be changed any number of
times until it is received using Receive P.O.
13.1.6
CHANGING A P.O. LINE ITEM
1.
To change a line that has been entered previously, move the line into the line item entry window.
2.
The entry procedure is the same as for a new line item. You may change any or all of the field
values, and the purchase order totals will be updated accordingly.
3.
To enter a new item on an existing order, click the pointer on the first empty Product Code field.
Entry is then the same as in Entering a P.O. Line Item.
13.1.7
DELETING A P.O. LINE ITEM
1.
To delete a previously entered line, move that line into the entry window.
2.
Either click on the Record Selector for that line item and press the Delete Key. Or, click on the
line, choose Edit, Delete Record.
3.
The following screen will be displayed, indicating the name of the item to be deleted:
4.
Click OK to delete the line item; click Cancel to cancel the request.
Deleting a line item removes the line from the P.O. Line Item file, recalculates the P.O. totals, and decreases
the units on order in the inventory file.
13.1.8
DELETING AN EXISTING P.O.
1.
Click the “New” button.
2.
Select the P.O. # from the drop down list.
Chapter 13 – Purchase Order
Page 417
Blue Link Solutions™
3.
Click on the Delete button at the bottom of the screen. The following screen will be displayed:
4.
Click Yes to delete the entire P.O. or click No to cancel the request.
Deleting a P.O. reverses the operations described under saving a P.O.
Page 418
Chapter 13 – Purchase Order
Blue Link Solutions™
13.2 Automatic Purchase Order Creation
There are 2 methods for creating purchase orders by not entering them in Enter / Change Purchase Order.
1.
2.
13.2.1
Reorder Inventory
Sales Order / Purchase Order Integration
REORDER INVENTORY
Recall from Chapter 12 under the section of Reorder Inventory that you can create Purchase Orders base on
reorder levels. Based on the Reorder Levels and Reorder Amounts, you can create a Purchase Order (s).
Below is the data that was transferred to a PO from the example done in the Reorder Inventory section in
Chapter 12.
13.2.2
SALES ORDER / PURCHASE ORDER INTEGRATION
See Chapter 14 Order Entry for more detail in creating Purchase Orders from Sales Orders. This option is
ideal for a business that purchases based on a customer’s order. This Purchase Order is then linked to that
Sales Order.
This is an example of data that was created from a Sales Order.
Notice that the last field references the Sales Order. If you do not see this field go to System Maintenance
| System Master | Data Entry & Other Defaults and click on the field “Display the PO/SO Cross
Reference”.
Chapter 13 – Purchase Order
Page 419
Blue Link Solutions™
Note: You cannot change the quantity of the item that was ordered because of this link. Otherwise the
integrity between the Sales Order and Purchase Order is sacrificed. Create another Purchase Order if you
need to change the Quantity.
Upon Receiving the Purchase Order, the value received will move from the Backordered column to the
Quantity column for the linked Sales Order. If you have received more of an item than ordered, the
difference will go into your inventory location.
Page 420
Chapter 13 – Purchase Order
Blue Link Solutions™
13.3 Receive Purchase Order
Use this screen to record the receipt of items against purchase orders. This process adds items to your
inventory units on hand, increases the value of your inventory accounts and posts the balance to A/P or to
POs Received, Not Invoiced. Inventory quantities received can be used to fill back orders in the Sales
Order module
If there are any other differences between the P.O. as entered and as received, other than freight or terms,
you must first make the appropriate changes to the P.O. in Enter/Change Purchase Orders, then return to
this program to record what actually got received into inventory. The sample screen below is followed by
an explanation of the screen fields.
The following fields are based on information entered on the P.O.
P/O Recall (Required)
The number of the P.O. being received.
Vendor Name
The vendor listed on the P.O.
Receive All Button
Click on this button if you wish to receive all line items as entered on the original P.O.’s. You can the make
additional changes to the “Received” column
Product Code, Product Description, UOM and Ordered field cannot be changed. They are from the
original Purchase Order.
Chapter 13 – Purchase Order
Page 421
Blue Link Solutions™
Received, Price, Discount and Extension fields located in the center of the screen can be changed to
reflect the actual quantity received, actual price and actual discount. The Extension is automatically
calculated.
Sales Order Reference
If you have checked the “Display the PO/SO Cross Reference” field found in System Maintenance |
System Master | Data Entry & Other Defaults this field will be visible.
Invoice Receipt
Check this box if the invoice arrived with the P.O. You can enter the Invoice # and Invoice Date, Taxes
and Freight at the bottom of the screen.
If the box is checked (the invoice WAS received with the order) the following G/L transaction is posted:
Inventory
Accounts Payable
Debit
X
Credit
X
If the box is unchecked (the invoice WAS NOT received with the order) the following G/L transaction is
posted:
Inventory
P/O’s Received Not Invoiced
Debit
X
Credit
X
When the invoice is received, you will need to enter a Payables Voucher with the following G/L transaction:
P/O’s Received Not Invoiced
Accounts Payable
Debit
X
Credit
X
COD/Invoice (C/I)
You have two choices here – “C” or “I”.
Select “C” -
if this is a COD shipment or if you picked the items up and paid for them with a cheque.
You be given the opportunity to type in the cheque number and the bank account from
which the cheque was drawn.
Select “I”
if you have been given credit terms by the vendor and you will be invoiced later. You will
be given the opportunity to type in the invoice number and
Cheque #/Invoice
If the entry in the COD/Invoice (C/I) field is “C”, enter the cheque number here.
If it is “I”, enter the vendor’s invoice number. If the invoice number from the supplier is a duplicate
number, the system will warn of the duplication, but will still allow its entry.
Exchange Rate
If the P.O. is in a different currency then this field is active. The default rate is the rate set up in System
Maintenance. This can be overridden.
Page 422
Chapter 13 – Purchase Order
Blue Link Solutions™
Terms/Bank
If the entry in the COD/Invoice (C/I) field is “C”, choose the bank account on which the cheque was
drawn.
If it is “I”, enter the vendor’s terms for the invoice using the list of terms available.
Invoice Date
Enter the date of the invoice. The default entry is the current date.
Tax
Select the applicable tax authority.
Received Total
The total value of the P.O. before freight charges and tax. This is automatically calculated and cannot be
changed.
Freight Charges
Enter the amount of the freight if the invoice was received with the shipment.
Tax Group 1
Enter the amount of Tax Group 1 charged if the invoice was received with the shipment.
Tax Group 2
Enter the amount of Tax Group 2 charged if the invoice was received with the shipment. Any tax in this
field will be prorated over all the type “N” items being received on this order and will be posted to the GL
account specified for those items on the PO.
Note: you may double click on a tax field to view the detail behind this
Important Note:
Endure that your tax elements are designated as Input taxes IF you do NOT want the tax to be included in
the value of the item received.
Total
The total amount as entered. This amount includes freight and tax. This is automatically calculated and
cannot be changed.
At the bottom of the screen are buttons labeled Process and Serial Numbers.
Chapter 13 – Purchase Order
Page 423
Blue Link Solutions™
Serial Numbers Button
Clicking on the Serial Number button accesses the serial number screen. You are able to enter the Serial
Numbers and the Actual Costs from the P.O. for each serialized item. The Last Serial # field is designed
to assist companies who assign their own Serial Numbers sequentially.
Note: If the item is flagged as serialized in the inventory file then serial numbers much be assigned for each
item received.
Process Button
Allows you to process and post the receipt of the P.O.
If you received the P.O. without an invoice, the following screen will be displayed:
Click Yes to proceed; click No to cancel the request. When the transaction is completed successfully, the
following screen will be displayed (for ProPlus 98):
If you are using Elite, the following screen will be displayed:
Page 424
Chapter 13 – Purchase Order
Blue Link Solutions™
You will then be asked if you want to receive another purchase order. If you say yes, you may then select
another purchase order. If you say no the receive PO screen will close out.
Landed Cost Button?
Each time you receive a P.O. without an invoice, Elite creates a landed cost accrual record and notifies you
what receipt number was automatically assigned. When processing an A/P voucher for the vendor, you are
able to specify which receipt(s) the invoice related to. See Chapter 18 – Elite Features for more details on
Landed Cost Tracking.
If you received the P.O. and the Invoice, the following screen will be displayed:
Click Yes to proceed; click No to cancel the request. When the transaction is completed successfully, the
following screen will be displayed:
Chapter 13 – Purchase Order
Page 425
Blue Link Solutions™
You will then be asked if you want to receive another purchase order. If you say yes, you may then select
another purchase order. If you say no the receive PO screen will close out.
Page 426
Chapter 13 – Purchase Order
Blue Link Solutions™
13.4 Display Purchase Order History
You can use this program to view or reprint your received P.O.’s one at a time.
Lookup Field
You may lookup a historical P.O. by one of the following criteria:
?
?
?
?
?
P.O. # (descending order)
Vendor Code (ascending order)
Vendor Name (ascending order)
PO Date (descending order)
Receipt # (descending order)
Order Information
This tab display information such as the address of the vendor, internal notes, shipping information, vendor
terms, order information and reference information.
Chapter 13 – Purchase Order
Page 427
Blue Link Solutions™
Order Details
This tab displays the products which were received on this P.O.
Ship To / Drop Ship To Info
This tab displays the ship to address for this P.O.
Page 428
Chapter 13 – Purchase Order
Blue Link Solutions™
More About Inventory Button
Clicking on More About Inventory button accesses an inventory summary screen detailing the product
code, description, units of measure, last receipt date, retail price, the last cost and average cost. You are
also shown the location and quantity of this item on hand, on order, on back order and on sales order. The
following screen will be displayed:
Re-Print History Purchase Orders Button
Clicking on Print History Purchase Order allows you to reprint the selected P.O. The following screen
will be displayed:
Click Yes to reprint the selected purchase order; click No to cancel the request. The Purchase Order will
then print to the default printer.
Chapter 13 – Purchase Order
Page 429
Blue Link Solutions™
13.5 Print Purchase Orders
This program will print the information entered in Enter/Change Purchase Order on preprinted P.O.
forms or plain paper. You may change this option in System Interface.
From/Thru P/O Number
Enter the starting and ending P.O. number values to limit the printout. If you do not enter any limits, all
previously entered P.O.’s still in the file will be reprinted.
Print Where?
You may select for the report to be printed to the printer or to be previewed on screen. Click the “Print” button
to send it to the printer or the screen or the “Cancel” button to cancel the request.
Page 430
Chapter 13 – Purchase Order
Blue Link Solutions™
Sample of Purchase Order
Chapter 13 – Purchase Order
Page 431
Blue Link Solutions™
13.6 Print Open Purchase Order Report
Use this program to print a listing of P.O.’s that have not yet been received.
Sort By? Options
You can choose to sort the report by Vendor Code, Product Code or Purchase Order Number.
From/Thru Product
Select the products you wish to limit the report to or leave the defaults for all products.
From/Thru Vendor
Select the vendors you wish to limit the report to or leave the defaults for all vendors.
From/Thru P/O Number
Select the P.O. Numbers you wish to limit the report to or leave the defaults for all P.O.’s.
Print Where?
You may select for the report to be printed to the printer or to be previewed on screen. Click the “Print” button
to send it to the printer or the screen or the “Cancel” button to cancel the request.
Page 432
Chapter 13 – Purchase Order
Blue Link Solutions™
Open Purchase Orders Report by Vendor Code
Open Purchase Order Report by Product
Chapter 13 – Purchase Order
Page 433
Blue Link Solutions™
Open Purchase Order by Purchase Order Number
Open Purchase Order Report by Job Code
Page 434
Chapter 13 – Purchase Order
Blue Link Solutions™
13.7 Print Purchase Order History
Use this program to print a listing of P.O.’s in the History System (P.O.’s that have been received).
Sort By?
You can choose to sort the report by Vendor Code, Product Code or Purchase Order Number.
From/Thru Product
Select the products you wish to limit the report to or leave the defaults for all products.
From/Thru Vendor
Select the vendors you wish to limit the report to or leave the defaults for all vendors.
From/Thru P/O Number
Select the P.O. Numbers you wish to limit the report to or leave the defaults for all P.O.’s.
Print Where?
You may select for the report to be printed to the printer or to be previewed on screen. Click the “Print” button
to send it to the printer or the screen or the “Cancel” button to cancel the request.
You may select ranges to limit the report. Product codes, vendor codes and P.O. numbers can be used to
limit the report. The report may be printed to the printer or reviewed on screen.
Sample Reports
Purchase Order History Report by Purchase Order Number
Purchase Order History Report by Vendor Code
Chapter 13 – Purchase Order
Page 435
Blue Link Solutions™
Purchase Order History Report by Product
Page 436
Chapter 13 – Purchase Order
Blue Link Solutions™
13.8 LANDED COST ACCRUALS REPORT
Please see Chapter 18 – Elite Features for a detailed description of this feature.
Chapter 13 – Purchase Order
Page 437
Blue Link Solutions™
13.9 PRINT PURCHASE RECEIPTS HISTORY
When you choose this option, the following screen will be displayed:
Date Range – Enter the Start/Thru Date for the report
Vendor Range – Enter the range of Vendors that you want to report on.
PO# Range – Enter the range of PO#’s that you want to review.
Receipt # Range – Enter the range of Receipt #’s that you want to review.
Print Where? Choose whether you want to print to screen or to hard copy.
Page 438
Chapter 13 – Purchase Order
Blue Link Solutions™
13.10 PRINT DELETED ORDERS
The following is the screen that will be displayed when you choose this feature:
You can Sort by either Sales Order, Purchase Order, or by All.
From/Thru Date – Choose the date range that you are interested in reviewing.
Depending on the selection type you may select the range of either the sales order number, purchase order
numbers, or order numbers.
Print Where? Choose whether you want to print to the screen or to hard copy.
Sample Reports
Sales Order Report
Chapter 13 – Purchase Order
Page 439
Blue Link Solutions™
Purchase Order Report
All
Page 440
Chapter 13 – Purchase Order
Blue Link Solutions™
Chapter 13 – Purchase Order
Page 441
Blue Link Solutions™
14: Order Entry
The Blue Link Solutions Sales Order Entry module provides a sophisticated and flexible way to track
customer orders while managing your inventory more efficiently.
This chapter begins with a brief introduction of some sales order entry scenarios, then proceeds with the
details of using the order entry module in Blue Link Solutions.
Enter the Order Entry screen through Sales | Order Entry.
Page 442
Chapter 14 – Order Entry
Blue Link Solutions™
Orders can be set to ship immediately or you can reserve stock from on hand for future shipping, backorders
can be filled automatically, and an open sales order (S/O) can have additional items added, or have products
invoiced from it, at any time.
The following is a sample of the Blue Link Solutions Order Entry screen:
Chapter 14 – Order Entry
Page 443
Blue Link Solutions™
14.1 Using an Order Entry System
The simplest transaction for a sales and inventory accounting system is the scenario where all items are in
stock, the invoice is printed and the items are shipped. However, complicating factors may arise. What do
you do when an ordered item is out of stock? How can you reserve items from inventory on hand without
shipping them? Can you add items to an open sales order if you receive a call from your customer
requesting additions to an earlier order?
The sales order system used in Blue Link Solutions provides you with powerful yet easy to use methods of
integrating your inventory and sales operations. Blue Link Solutions’ sales order system contains the
following elements:
1.
Purchase for Customer (Purchase Order / Sales Order Integration)
2.
Inventory reservation.
3.
Support for multiple invoices against a single sales order (i.e. when filling backorders)
The following sections will introduce you to the sales order features and describe three possible business
situations using these sales order features.
14.1.1 PURCHASE FOR CUSTOMER (PURCHASE ORDER / SALES ORDER
INTEGRATION)
In this scenario your business model, or at least part of it, involves taking orders from your customers and
then turning around and purchasing from your suppliers. You usually do not hold too much inventory on
hand. This means that most orders that come in begin in a backordered status, and then you purchase to fill
those backorders and then ship and invoice your customer. By using the integration of Purchase Orders
with Sales Orders, this process can become easier as well as seamless.
Order Entry
To begin, an order is placed in Order Entry for various products that you may represent. The order is
entered and since you do not stock this inventory, the item goes on backorder.
Create a Purchase Order
On the Create PO’s tab you will see the items that have gone on backorder from the order that was entered
above. Note that it only shows backordered items and backordered quantities.
Page 444
Chapter 14 – Order Entry
Blue Link Solutions™
Another thing to note is the vendor code that is found assigned to the items. This is based on the Primary
Vendor field that in the setup of inventory items in Enter / Change Inventory Items. Enter the Primary
Vendor on the Vendors per Product tab.
Check off which items that you want to create a Purchase Order for and then select the button Create PO.
For more information on the options on this form, see the Create PO’s section further on in this chapter.
Upon selecting the Create PO’s button you will be notified of the Purchase Order that was created.
Chapter 14 – Order Entry
Page 445
Blue Link Solutions™
Purchase Orders
I have pulled up Purchase Order 53 and can see the items are on order for the customer in the above
example. The prices are defaulted because I have the Vendor Cost Specified option selected and have
setup vendor prices on the Vendors per Product tab in Enter / Change Inventory Item.
The Link
If you scroll to the right on the Order Details tab you can see the Sales Order reference number. If you were
to go back to the Sales Order you could view the Purchase Order number that this Sales Order is linked to.
If you do not see this field, go to System Maintenance | System Master | Data Entry & Other Defaults
and select the option to Display PO/SO Cross Reference.
Receive Purchase Order
Page 446
Chapter 14 – Order Entry
Blue Link Solutions™
Once the Purchase Order is received it will fill the backorders on the Sales Order that created this process.
Any excess items received above the ordered quantity will go to inventory on hand.
Now you can complete the sales process.
14.1.2
RESERVE INVENTORY
Using the Ready to Ship Flag to Reserve Inventory
In Blue Link Solutions, when an item is added to a Sales Order, the quantity ordered is automatically
“allocated” to this order.
To reserve inventory for a period of time, enter the order, as usual, then clear the “ready to ship” flag to
prevent the order from being processed in any batch invoicing or shipping process used by your company.
For example, assume that a customer asks you to place some goods on hold for him until the first of the
month. You enter the sales order, but you set the ready-to-ship flag in the sales order header to No
(uncheck the box). The ordered items will be transferred from Units on Hand to Units on Sales Order so
that another order will not be able to use them.
When your customer is ready to receive the order, use the sales order program and change the ready-to-ship
flag to Yes (check the box) to indicate you are ready to release the items on hold. Then you can print your
shipping invoices and ship the order in the usual manner.
How Blue Link Solutions Handles Inventory Reserving
A default setting for the ready-to-ship flag can be stored in System Interface. You can also change these
settings as an individual order is entered. If you operate under a simple “ship if available” procedure, you
should set your default to Yes (the box will be checked).
If the setting for the header is No (the box will be unchecked), the quantities for the order will still be
reserved from on hand, and the order will not appear with the ready-to-ship items in the following
document/procedures:
1.
Packing slips
Chapter 14 – Order Entry
Page 447
Blue Link Solutions™
2.
3.
Invoice printing
Invoice posting.
The “not-ready-to-ship” orders will be held in the system until you release them to be shipped. To release
the order call it up in Enter/Change Sales Order. The cursor is placed immediately in the Ready field
(the ready-to-ship flag). Change the flag to a Yes (check the box).
For more examples of how to use the backorder and shipping flag features of Blue Link Solutions, see the
section on Model Sales Order Systems.
14.1.3
MULTIPLE INVOICING AND ADDING TO AN EXISTING SALES ORDER
An open sales order is any customer order that has at least one open item that has not been posted. In order
to allow you to recall a sales order for alteration or review, a sales order number is automatically assigned.
New line items can be added to an open sales order. You can also delete or change items that are on the
order if they have not yet been posted.
When all goods are invoiced on the sales order, the sales order is closed, and you can no longer add line
items or make any changes to it. This ability to add line items to an open sales order gives you a convenient
and flexible way to record your customer orders, as the date to enter line items onto a sales order is
independent of estimated shipping dates, and the date of the generated invoices.
14.1.4
EXAMPLES OF SALES ORDER SYSTEMS
Below are three sales order system examples ranging from a simple backorder system to a distributor’s
model that uses inventory reserving and releasing extensively.
Simple Backorder Example
This sort of operation might be used by a small retailer or reseller who does not handle large volumes of
goods, usually has a stock on hand to fill orders, but uses the backorder feature to keep track of orders when
a product is temporarily out of stock.
The following list of procedures represents the most common way that this sort of business can use the Blue
Link Solutions backorder feature. Use this procedure “as is” or adapt to your needs.
1.
Set the System Interface ready-to-ship default flag to Yes. This assures that all sales orders and
associated line items will be marked ready-to-ship as soon as they are entered.
2.
You can enter sales orders one at a time or several in one session. All line items on all sales orders that
have units on hand will be invoiced. The only orders that will not ship completely are orders with
backordered amounts.
3.
When you print and post your invoices, use Enter/Change Sales Order to automatically fill
backorders. Inventory receipts or order cancellations after the time the back orders were created make
more stock available for backordered items.
Simple Inventory Reserve Example
This model represents a medium reseller who can usually fill orders from inventory on hand but
occasionally needs some inventory reserve for a high priority customer or a customer with a large standing
order.
Page 448
Chapter 14 – Order Entry
Blue Link Solutions™
1.
Set the System Interface ready-to-ship default flag to Yes. This assures that all sales orders and
associated line items will be marked ready-to-ship as soon as they are entered.
2.
Enter sales orders one at a time or several in one session. When you enter the sales order and want to
reserve inventory for a later shipment or for a standing order, set the ready-to-ship flag to No. This will
hold the inventory until you are ready to release it.
3.
When you print and post your invoices, all ready-to-ship items will be processed. When you are ready
to send out the reserved order, use the sales order entry program to change the ready-to-ship flags to
Yes. The order is then printed and processed like a regular order.
These procedures still allow you to track any backordered items you may have on your sales orders.
Distributor’s Sales Order Example
This example is that of a high-volume distributor. Inventory stocks are generally low, or variable, and
orders are not often filled from stock on hand. Backordering and reserving inventory are the rule and not
the exception.
1.
Set the System Interface ready-to-ship default flag to No (uncheck the box). All sales orders items
will be flagged as not ready to ship.
2.
Enter sales orders one at a time or several in one session.
3.
Print shipping documents (packing slips) periodically and send them to the warehouse to stage and load
orders. Invoices can be prepared based on the information returned from the warehouse.
4.
When a receiving order comes in from a supplier print the backorder list. Use this list to release
selected invoices, using Enter/Change Sales Order.
5.
You will typically print and post invoices once or twice per day in large batches. When you do,
remember to fill whatever backorders remain on your ready-to-ship invoices.
Priority Invoices
You may need to bypass some of these procedures from time to time in order to rush an order. Blue Link
Solutions provides the means to process a single order from start to finish.
1.
Enter the sales order and note the sales order number assigned by the system.
2.
Be sure to set ready-to-ship flag to Yes on items to be shipped on that order.
3.
Select Save/Print, and print and post the invoice.
This procedure can be applied to any of the models described above.
Chapter 14 – Order Entry
Page 449
Blue Link Solutions™
14.2 Enter/Change Sales Order
Use this program to enter and modify sales order records for your customers. A sales order can include
both regular and non-inventory items. All shipping documents and invoices are printed from the
information entered in this program.
You can use the sales order program to automatically record and track backorders. You can also put
inventory on hold for a customer, or create multiple invoices against an open sales order.
Search By
The Bill To list will change depending on which option you choose to search by, either Customer Code or
Customer Name. The default is Code.
Bill To (required)
The code for the customer making the purchase. You can change the “Bill To” information by typing in the
appropriate information. You can maintain a separate “Bill To” and “Ship To” address in Accounts
Receivable and have multiple “Ship To’s” for the client. To activate the feature, press the Ship To button.
14.2.1
CUSTOMER INFO TAB
Name
Default entries from the customer record (created in Enter/Change Customer Information).
Page 450
Chapter 14 – Order Entry
Blue Link Solutions™
Address 1
Default entries from the customer record (created in Enter/Change Customer Information).
Address 2
Default entries from the customer record (created in Enter/Change Customer Information).
City
Province/State/County
Postal Code/Zip Code
Default entries from the customer record (created in Enter/Change Customer Information).
Attention
The person to whose attention this order should be addressed, with a default defined from the Contact field
in the customer record. If you print shipping labels, this information will automatically be printed on the
label.
Alternate Contact – you may select an alternate contact from the pick list, which was setup in Enter /
Change Customer | Multiple Contacts tab. Alternatively, you may click on the builder button which will
launch the screen below. This will allow you to add a new contact which will update your customer
records.
P/O #
If the customer has given you a P/O number, enter that number here.
Internal Notes
Use this memo field to enter notes on this particular sales order. These notes will not print anywhere.
AR Comments
These are the comments set up in Enter / Change Customer. They are not editable from Order Entry. The
purpose is to remind or warn the person taking the order about this customer, at the time of creating the
order.
Ready
If you want all line items on this sales order to be invoiced and shipped from units on hand, check this box.
Clearing the check from the box reserves inventory items from units on hand, and will not release them to
be invoiced or shipped until you return to the screen and change the check this box.
Job Code
This field is used in job costing. Select the job this Sales Order is related to. It will default the Job Code per
line item.
Cost Code
Cost code associated with Job. This will be the default cost code per line item.
Chapter 14 – Order Entry
Page 451
Blue Link Solutions™
Note:
If you are not using Job Costing, you can disable the Job and Cost Code fields by going into System
Maintenance | System Master Lists | Job Costing and uncheck the flag for “Show Job Detail On? | Sales
Order.”
FOB
This is the FOB destination for the goods reflected on this order.
Ent By
The person who entered the order. This is a three character alphanumeric field. This field will default to a
value set up in System Interface.
Slsp
An employee code for the sales person on this sales order. This is a three character numeric field. This
field will default to the sales person number associated with this customer in Enter/Change Customer
Information.
Location
The location of the specific inventory items being processed on this order. This will default based on the
location setup for this customer. You may change the location before begin to enter items onto the sales
order. Otherwise, you must delete the items if you wish to change the location.
Ship Via
The method of shipment. This is a 15 character alphanumeric field. This field will default to the value set
up in System Maintenance | System Master Lists | Shipping Related.
Terms (Required)
Chosen from a pop-up menu, with a default entry from the customer record highlighted.
Invoice #
This field will is populated when you print the invoice for the first time (to a printer or to the screen).
Invoice Date
This field is populated automatically by the system when the invoice is first printed. When the invoice is
posted, this date will be used as the transaction date. To post an invoice to a different period, enter the date
in this field.
Note:
This date is populated the first time that the invoice is printed to printer or screen. If the order is
filled at a later date, you may want to manually change the date.
Currency
The currency code associated with the customer’s account. The dollar amounts shown on this invoice are
assumed to be in the customer’s currency.
Tip:
To calculate prices for customers in different currencies, use price matrix discount levels, or contract
pricing (in Elite).
Rate
The exchange rate between this currency and your own currency.
Tax Auth.
Enter the tax authority under which you normally charge this customer. This is defaulted from the customer
record.
Order Date
The system date defaults here but may be changed. This date represents the order date, not the invoice date.
Page 452
Chapter 14 – Order Entry
Blue Link Solutions™
Dept
If you are using G/L departments, this field allows optional entry of a G/L Department Code to post the
sales to a specific department set up in your Chart of Accounts.
Note:
1.
2.
See System Maintenance | System Master | Data Entry & Other Defaults for more options:
You may have this department field required.
You may use this department field to post to the cost of sales account and revenue account for this inventory
class. This will override any other departments setup for this inventory class.
Quote #
If this Sales Order was created by a Contact Manger Quote, the quote number is recorded in this field
automatically.
Web.Venture Confirmation #
If this Sales Order was imported from a Web.Venture Internet Placed order, then the Web.Venture
Confirmation # will appear here.
Language
This is the customer’s language number. “1” represents the main number, “2” represents the alternate
language (in Canada, assumed to be French).
Add Buttons
In the sales order screen you will see Add buttons next to certain fields. By pressing those buttons you will
be able to add items to those fields “on the fly”, such as Terms.
Chapter 14 – Order Entry
Page 453
Blue Link Solutions™
14.2.2
ORDER DETAILS TAB
This screen shows information for items on the sales order. You can use the up and down arrow keys to
scroll a line item back into view if you need to modify any information.
Product Code (required)
This is the inventory product code for the line item. Inventory product codes are set up in Enter/Change
Inventory Information. You can select from a list of inventory items or you can type in a product code.
Product Description
The inventory product description is displayed. You can change the description for this particular sales
order.
UOM
If you are using the Unit of Measure Feature (See Chapter 12 on Inventory for more information) then
select the UOM that you are selling to the customer to.
Quantity (required)
The number of units ordered. This is a numeric field.
Note:
If you would like to enter an item line with a quantity of zero then go to System Maintenance | System
Master | Data Entry & Other Defaults and check the flag for allowing zero quantity on the sales order.
UBO
If the line item quantity ordered exceeds the inventory units on hand, the remaining units ordered are placed
on backorder, and the number of backordered units (per line item) is displayed here.
G (this is the first character of the Group 1 Name defined under the tax authority for this order)
Check this box if Tax Group 1 can be charged on this product.
P (this is the first character of the Group 2 Name defined under the tax authority for this order)
Check this box if Tax Group 2 can be charged on this product.
Page 454
Chapter 14 – Order Entry
Blue Link Solutions™
Price (Required)
The unit price for this customer. You are offered a default from the inventory file, using the price matrix
level associated with the price level in the customer record.
Disc
The percentage discount used to create the unit price for this line item (if you have set up a percentagebased price matrix for this inventory item). If there is no price matrix set up or if pricing is based on a
volume discount, 0% will be displayed. You can also enter or change a discount for a line item here.
Extension
This is the cost to the customer of that quantity of line items, taking discounts into account.
Ship Date
Enter the estimated shipping date for the order, if known. The default value in this field is the current date.
Scrolling to the right reveals more fields:
Extended Notes
The comment field for the inventory item will fill in the Extended Notes. These can be overwritten with
whatever comment you wish to add. The contents of this field will print on Invoices and Order
Confirmations. Use the TAB key to move to the next field.
Hint:
The Extended Notes filed is a memo field that can accept an almost unlimited amount of text notes. To
view multiple lines in this field, you have two options. The simplest is to press SHIFT+F2 to “zoom” the
field. The other option is to change the height of the detail lines. To force a new line in the field, press
CTRL+ENTER. You may change the font for viewing in the Zoom box.
PST INC ?
This is an Elite feature. Check this box if your company is required to calculate the PST on the cost price
of an item, and track it for PST reporting purposes. The PST is posted to a separate liability account (and is
not charged to the customer on the invoice).
Chapter 14 – Order Entry
Page 455
Blue Link Solutions™
If this field does not apply to your business, it may be hidden through the system interface options. (See
System Master | Inventory Information).
Job & C/Code
These fields will be visible if set as such in the System Master Lists | Job Costing tab. When visible, you
can use these lines to allocated individual order line items to a particular job or cost code.
Note:
Page 456
Column sizes may be changed by slowly moving your cursor between the column names until it becomes
a double arrow. Once your cursor is a double-arrow, you may click and drag to change the width of the
field.
Chapter 14 – Order Entry
Blue Link Solutions™
14.2.3
SHIP TO INFO TAB
This screen lets you select a different “Ship To’s” and assign it the sales order. If the delivery address for
this customer is different from the billing address (as in the case of a “drop ship”), then enter the
appropriate Ship To information for the customer here. To assign it to the current sales order, press the
Assign to Sales Order button.
Note:
Tax Authority – the tax authority for this ship to address can be setup in Enter / Change Customer
Information. This tax authority will override the bill to’s tax authority.
Chapter 14 – Order Entry
Page 457
Blue Link Solutions™
14.2.4
CREATE P/O’S TAB
This tab was referenced earlier in this chapter in the section on Purchasing for Customer (Purchase Order/
Sales Order Integration). See this section for more detail on a typical order process using this tab. This
section will detail the options that are available here.
Firstly, items will appear on this tab if the item went to the backordered (UBO) field on Order Details. You
will then have the option to create a Purchase Order for these items.
Order Items By
Creating a new PO for the selected items
This simply means that if this option is selected a purchase order will be created for the default Primary
Vendor that is assigned to the inventory item. One purchase order per vendor will be created.
Create a new PO using a specific vendor
This option allows you to create one purchase order for all of the selected items and assign it to one vendor.
This will override the default vendor that was assigned to the inventory item. When this option is selected,
the vendor field on the right is enabled allowing you to select a vendor to create a purchase order for.
Assign to an existing Purchase Order
This option is designed to allow you to add onto an existing purchase order that has already been created for
a particular vendor. When you select this option you can select a purchase order that is already open. If
you need to select various items to go to different purchase orders, be sure to only select the items that are
to go to one purchase order, and then begin selecting the other items.
Page 458
Chapter 14 – Order Entry
Blue Link Solutions™
Options
The other options that are available include:
Drop Ship
The drop ship option, if selected it will create the purchase order with the ship address as being the
customers shipping address.
Select All / Select None
These options check all of the items off as being selected or uncheck all of the items as being selected.
Create PO
This is the button that needs to be selected to create the purchase order(s).
14.2.5
FREIGHT CALCULATIONS TAB?
This is an Elite feature.
See Chapter 18 – Elite Features for details.
Chapter 14 – Order Entry
Page 459
Blue Link Solutions™
14.2.6
TOTALS SECTION
This section displays the various subtotals for the Sales Order.
Subtotal (Top Portion)
This is the amount before the discount. The subtotal amount for the sales order for all on-hand, ready-toship items (calculated automatically and displayed as a running subtotal).
Discount
This field is available if this sales order is applicable to a flat discount as opposed to a discount per product.
Subtotal (Bottom Portion)
This is the amount after the discount and is applicable for the sales tax calculations.
Freight
The freight charged for this sales order. You should fill in this field before saving the sales order.
Tax
The amount of tax for this sales order (calculated automatically when you leave the details section of the
screen, or when you save the sales order). You may double click on this field. If there is more than one tax
element in this tax group you will see multiple lines. You may edit the detail here and it will update the
total.
Ship Total
The total amount of the sales order for those items that can be delivered (on-hand and ready-to-ship). This
is the Subtotal + Tax + Freight.
Paid
If you have received payment on this sales order you may enter it here. When you click on Save/Print, if
there is a payment deposit, the deposit will be recorded and posted to the Deposit Clearing account.
Page 460
Chapter 14 – Order Entry
Blue Link Solutions™
Upon clicking OK from the above screen, you will be greeted with the following message.
Post the deposit now if:
1. You have received the payment
2. You are not going to print and post the invoice now. The reason for this is that it will post a
liability now if you say yes. Then upon posting the invoice it will reverse the liability. Therefore it
is unnecessary to post the deposit now if you are posting the invoice now.
Payment Posted
This box will only be checked when the deposit has been posted.
If the sales order is in a foreign currency, and you choose to post the deposit after clicking the Save/Print
button, note that an unrealized exchange difference will be recognized and posted to the exchange
difference account. The amount posted to the customer deposits liability account will be converted to local
currency.
Balance
The total amount owing on the sales order taking any payments into account.
B/O Sales
If there are items on backorder, the backorder sales value is filled in here.
Total Sales
The total sales value of the Sales Order, excluding freight and taxes, but including backorder value.
Chapter 14 – Order Entry
Page 461
Blue Link Solutions™
14.2.7
SALES HISTORY
This screen displays the customer’s previous sales. The following screen will be displayed:
Invoice
The invoice number used in historical sales.
SO#
The sales order which this invoice was generated from.
Date
The invoice date used in the previous sales.
Product Code/Product Description
The product codes and product descriptions purchased.
Qty
The quantity ordered on that invoice.
UOM
The unit of measure used for this invoice.
Unit Price
The Unit Price of each product.
Page 462
Chapter 14 – Order Entry
Blue Link Solutions™
Purchase Order
If there was a P/O assigned to this purchase, the P/O number will be displayed.
Extended Notes
The extended notes used for this invoice.
Ship Via
The shipping method used for this invoice.
Waybill #
The waybill referenced for this invoice.
Ship Date
This ship date of this invoice.
Ship Code
1. The ship code referenced for this invoice.
14.2.8
CUSTOMER AGING
This screen shows any payments and outstanding invoices not yet purged. The following screen will be
displayed:
Date
This is either the date of the cheque if it is a deposit or the date of the invoice if it is an invoice.
Reference
This is either the cheque number if it is a deposit or the invoice number of it is an invoice.
Amount
This is the original amount of the transaction.
Remaining
This is the balance owing on the transaction.
Chapter 14 – Order Entry
Page 463
Blue Link Solutions™
Description
This is the description of the transaction.
Days
This is the number of days the transaction is overdue.
G/L Notes
Any notes entered in AR voucher to print in the General Ledger reports.
14.2.9
RECALCULATE
If the numbers (especially taxes) have not recalculated after enter the line items, click on this button for the
numbers to update.
14.2.10 KIT/FG AVAILABILITY
This feature allows the user to call up a kit item (Inventory Type ‘K’) and see how many possible kits can
be sold. Since a kit contains other products within it the system will look at the availability of those units.
It will then determine the maximum number of kits or finished goods, which can be made form these units.
If there are Limiting Components to making more kits they will be displayed in the “Limiting Components”
field.
Page 464
Chapter 14 – Order Entry
Blue Link Solutions™
Product Code
Select the kit for which you want to determine the maximum available and thus how many can be sold.
Can Be Made
This is the maximum number, which can be sold of the selected kit.
Limiting Components
These are the components which prevent more kits or finished goods to be sold.
Outstanding Purchase Orders
For the component selected you will see the Purchase Order, the Ship Date, and the Quantity on Order.
14.2.11 ITEM LOOKUP BUTTON
Clicking this button displays a form for searching for inventory part numbers.
when you are in a product-related field.
This button only works
Search For
Enter a word in the Search For field that wish to find. You may broaden or narrow your search by selecting
More or Less options on the Fields to Search criteria selector.
Lookup
Once you have entered your criteria, select the Lookup button to process the selection.
Return Product Code Selected
Click on the product you want and then select this button. The screen will close and then insert this product
into the Order Details section of this sales order.
Chapter 14 – Order Entry
Page 465
Blue Link Solutions™
Page 466
Chapter 14 – Order Entry
Blue Link Solutions™
14.2.12 MORE ON INVENTORY BUTTON
To use this button, start by placing your cursor on the detail line containing the inventory item for which
you would like more information. Click this button to display the following screen:
Information displayed includes price, last cost, average cost, the last sale date, the last order date, the last
receipt date, the category the product belongs to, the unit of measure and the “days to order”.
You are able to view how many units are on order, on backorder, on sales order, available on hand, and on
hand total.
If you click on the “More” buttons for On Order or on S/O amounts you will see more detail.
Chapter 14 – Order Entry
Page 467
Blue Link Solutions™
You are also shown location and quantity of the items on hand, on order, on backorder and on sales order
per location.
Click the exit door button to exit this screen and return to the previous screen.
Page 468
Chapter 14 – Order Entry
Blue Link Solutions™
14.2.13 SERIAL #’S BUTTON
If you are on product code that has been marked in the Enter/Change Inventory screen as “serialized”,
then you can choose from available serial numbers for those products. Click on the Serial # button, and
the following screen will be displayed:
Available Serial Numbers
The left side of the screen displays the Serial Numbers available in inventory. The cost of the item is also
shown.
Assigned Serial Numbers
The right side of the screen displays Serial Numbers assigned for the product.
If you wish to assign a serial number from inventory to this Sales Order, double click on the serial number
you wish to move. This number then appears next to the next item in the assigned window.
Click the “OK” button to exit the screen and return to the previous screen.
Removing a Serial # from a Sales Order
If you wish to remove a serial number from the right hand side of the Sales Order, double click on it.
14.2.14 PROFIT BUTTON
This screen calculates the profit on this sales order based on the current cost of sales for the items being
sold and the current selling price on the order.
Chapter 14 – Order Entry
Page 469
Blue Link Solutions™
Page 470
Chapter 14 – Order Entry
Blue Link Solutions™
14.2.15 CONFIGURATOR BUTTON?
This is an Elite feature.
See Chapter 17 - Configurator for details.
14.2.16 FILL BACKORDERS BUTTON?
This is an Elite Feature. See 17 – Fill Backorders for details.
14.2.17 SAVE/PRINT
Clicking on this button saves the sales order and allows printing of the sales order. The following screen
will appear when you press Save/Print:
Click Yes to print the Sales Order (see details later in this chapter); click No, and the following screen
displays.
Chapter 14 – Order Entry
Page 471
Blue Link Solutions™
Click Yes and you may continue to edit the S/O. Click No, and the Sales Order is saved and the screen is
cleared.
Page 472
Chapter 14 – Order Entry
Blue Link Solutions™
14.2.18 PRINTING SALES ORDERS
If you answered “Yes” to printing the Sales Order prompt, the following screen is displayed.
Select Report(s) to Print
Select the appropriate printed document. You may optionally print multiple documents that will print
consecutively.
Invoice
If you print the invoice to the screen, the following screen will be displayed, warning you that even if you
print to the printer after viewing it on-screen, it will not be marked as printed. You must print to the printer
for this to happen.
Invoice Type
When printing Invoices, you can choose between three types:
Standard -
mainly used by a company that resells products
Service -
mainly used by a company that sells services
MS Word -
used to print the selected sales order to Microsoft Word. See Chapter 6 – System
Interface for more details.
Chapter 14 – Order Entry
Page 473
Blue Link Solutions™
If you choose to print to the printer, the invoice will be printed using the Word template
specified in System Maintenance | System Interface | Outlook and Word.
If you choose to print to the printer and choose “Mail It” or “Fax”, the invoice will be
sent through the Internet using Email or will be faxed if the following two criteria are met:
c) you are using Outlook for Email/Faxing
d) The Contact Person specified on the order is already in the Outlook Contact folder
with a valid E-mail address/Fax number.
If you choose to print to the screen, Microsoft Word will load and the invoice will be
displayed. You can then edit and/or print it from Microsoft Word.
Invoice Copies
You are also given an option to print multiple copies of the invoice. This is particularly useful if you use
laser printer invoices. The number of copies defaults to 1, and may be changed to any number up to a
maximum of 7. The system will then generate the report.
Print Where?
You may select for the report to be printed to the printer or to be previewed on screen. If you print an Invoice
to the screen, the following screen will be displayed, warning you that even if you print to the printer after
viewing it on-screen, it will not be marked as printed. Click the “Print” button to send it to the printer or the
screen or the “Cancel” button to cancel the request.
Sales Order Confirmation – Pro-Forma
This report shows a pro-forma invoice based on the quantity ordered (sum of the QTY + UBO). The
regular Sale Order Confirmation distinguishes between units on hand versus units on backorder and will
only calculate a total for units on hand.
Page 474
Chapter 14 – Order Entry
Blue Link Solutions™
Word Template
The Word Template option is similar to the Microsoft Word Invoice type. Solutions will generate a
document from the information on the sales order based on whatever format you specify. You can use this
function to generate customized packing slips, picking lists, or shipping documents.
Use the Browse button to specify the Word template file that you want to use. When printing to the printer
you have the option of directing the document to be faxed, emailed or printed.
To create a new document template, refer to Chapter 6 for details on the merge fields required.
Chapter 14 – Order Entry
Page 475
Blue Link Solutions™
Sample Reports
Invoice & Sales Order Confirmations (look identical except for the heading)
Page 476
Chapter 14 – Order Entry
Blue Link Solutions™
Picking Slip
Packing Slip
Chapter 14 – Order Entry
Page 477
Blue Link Solutions™
UPS COD Tag
Page 478
Chapter 14 – Order Entry
Blue Link Solutions™
14.3 Adding a New Sales Order
1.
When the screen is first displayed, the cursor is located in the Bill To field.
2.
Select the Customer Code from the drop down list and press <Enter>.
The customer’s credit history will be checked and a warning message will be displayed if the customer
is over their credit limit or is overdue on any invoices. This is optional and credit limits must be set up
in the customer file. The following Credit Warning screen may be displayed:
3.
Click OK and it warns you a second time.
4.
Click Yes to proceed with producing the Sales Order; click No to cancel the request.
The customer information will be displayed. You may change any field associated with this customer
for this particular sales order; however, the new information will not be saved in the customer record.
If you want to change information in the customer file, use Enter/Change Customer Information.
5.
You can enter the customer shipping information. If you need to change the shipping address
information for this sales order, change the information in the appropriate Ship To fields.
You can also enter or change the Attn name. This will appear on the sales order confirmation and any
invoices.
6.
Press <Enter> when you are in the Sales Order # field to accept the program assigned sales order
number.
The Ship Via information offers a default entry from System Interface.
The Terms field offers the default set in the customer record, but may be changed using the F4 list
display option.
Chapter 14 – Order Entry
Page 479
Blue Link Solutions™
7.
Click on the Order Details tab and enter items from the inventory file by typing in a selecting the
product code from the drop list or using the F4 list display option to select an item.
With this option, you will see the number of units available for sale and the price. The program will
place a product code in the appropriate field. To display the rest of the information for that item, press
<Enter>. The description from the inventory file will appear along with the price as listed in the
product record. You must enter a quantity other than zero.
Both regular (physical) and non-inventory type items can be entered on the same sales order. You can
use the ready-to-ship status for non-inventory line items as well as regular inventory, but backorder or
units on hand features do not apply.
8.
If you create a sales order and invoice for a regular inventory item, the quantity entered will be counted
against units on hand (at the location specified) until out of stock. Any remaining units on order will be
placed on backorder, with the backorder quantity displayed in the UBO field until this item is filled.
9.
After you enter the quantity, the price is filled in automatically from the inventory file. Any price
matrix information associated with the price level for that customer is already calculated in the price
displayed here.
10. If you entered a tax authority in the first Tax field, you are allowed to set the tax status for each line
item. You are offered a default from the Normally Taxable fields in the inventory record.
11. Enter the estimated shipping date, if known. The default date in this field is the current date. The ship
date is the basis for sorting or limiting reports within the Sales Order module of Blue Link Solutions.
12. Enter any additional notes you wish in the extended notes field. To enter a long description, press
<Shift+F2> and use the zoom window.
The program then returns you to the Product Code field, and you may enter the next line item.
Editing the Sales Order
You are free to edit the items on a sales order as often as you wish before you finally post the invoice.
However you will receive the following message if you have already printed a packing slip and now come
back and want to change n inventory item. This is to warn the user that a packing slip may have already
been shipped with the product and thus changing the sales order would necessitate a new packing slip.
14.3.1
CHANGING A S/O LINE ITEM
1.
Click on the Order Details tab and then click on a line item. The entry procedure is the same as for a
new line item. You may change any or all of the field values, and the sales order totals will be updated.
2.
To enter a new item on an existing order, press the down arrow key to scroll to the last existing line
item in the display window. Then place the cursor in the Product Code field and begin entering a new
line item.
Page 480
Chapter 14 – Order Entry
Blue Link Solutions™
14.3.2
DELETING A S/O LINE ITEM
1.
Click on the Order Details tab and then click on a line item.
2.
Click the arrow button to the right of the item you wish to delete and press the <Delete> key [on the
keyboard]. The following screen will be displayed:
3.
Click OK to delete the line item from the invoice; click Cancel to cancel the request and leave the line
item on the invoice.
14.3.3
SAVING THE SALES ORDER
1.
After you have entered all the line items for that sales order, click into the Freight field at the bottom
of the display and type in the freight amount.
2.
If any money has been paid on this invoice, or if it has been fully paid, click into the Paid field and
type the amount paid.
3.
Click the Save/Print button. The following screen will be displayed:
4.
Click Yes to display the Print Sales Order dialog box to proceed with printing; click No to print later.
Once printed, you may then post the one invoice.
5.
Select the report to print, the number of copies, and any other options required. Click the Print button
and the following screen will be displayed:
6.
Click Yes if the invoice printed correctly; click No to if it did not.
Once an invoice has printed, it will automatically be posted.
Chapter 14 – Order Entry
Page 481
Blue Link Solutions™
7.
Posting and saving a sales order updates the units on hand, units on Sales Orders, and units on
backorder in the inventory record and the inventory location fields, and increments the Next Sales
Order Number in System Interface.
Page 482
Chapter 14 – Order Entry
Blue Link Solutions™
14.4 Changing an Existing Sales Order
A previously entered sales order may be changed any number of times as long as there are unposted
invoice items remaining on the sales order. Once the shipment of goods on a sales order has been invoiced
and the invoice posted, however, the line items included on that invoice cannot be changed or deleted and
no new line items can be added. To make any modification after posting, you must enter a reversing sales
order (see Reversing a Sales Order).
Click the “New” button.
1.
In the Lookup Existing section, select the Order number to be changed from the drop down list.
2.
The line item information can now be changed by moving the cursor to the appropriate fields and
typing in the new information. You can delete a line item by moving that line into view, clicking the
button to the right of the item you wish to delete and pressing the Delete key [on the keyboard]. The
sales order number itself cannot be changed without deleting and re-entering the sales order.
3.
Click the “Save/Print” button; the following screen will be displayed:
4.
Click Yes to proceed with printing options; click No to just continue saving the Sales Order. If you
click No the following screen appears:
5.
If you click Yes, you will be returned to the Sales Order screen to continue editing this order; if you
click No, it clears that Sales Order from the screen and displays a new blank one to work on.
Chapter 14 – Order Entry
Page 483
Blue Link Solutions™
14.5 Reversing a Sales Order
If you need to reverse the effect of a posted invoice, (for example in the case of a customer return), do the
following:
1.
Click the “New” button to enter a new sales order with line items identical to those on the invoice,
except that you must enter negative Quantity amounts.
2.
When the invoice is posted, the second sales order adds offsetting detail line items to the General
Ledger inventory record, and customer record, balancing and reversing the first invoice.
This is sometimes known as a “Credit Sales Order”.
See also Reverse Posted Invoice section below.
Page 484
Chapter 14 – Order Entry
Blue Link Solutions™
14.6 Deleting an Existing Sales Order
Once it is deleted, the record cannot be recovered. You will have to re-enter the customer if it is deleted in
error.
To delete an existing record:
1.
Display the Sales Order by clicking the “New” button
2.
Selecting the Sales Order from the Lookup Existing drop list.
3.
Click the “Delete” button.
4.
The following screen will be displayed if the customer can be deleted:
5.
Click Yes to delete the Sales Order; click No to cancel the request.
The sales order will now be deleted from the file, and any unposted invoices are also deleted. Deleting a
sales order reverses the operations described above for saving a sales order.
Chapter 14 – Order Entry
Page 485
Blue Link Solutions™
14.7 Using Kit Explosion
A “Kit” type inventory item is similar to a Bill of Material, in that it is made up of a series of different
items.
What makes a kit unique is that the individual parts of the kit become part of the sales order.
By using the kit feature, you can set up an item and change the components on an order by order basis. In
addition, kits don’t display the retail price on the individual components.
When you enter a kit type item (type “K” in inventory), the system will explode the kit after you leave the
product line.
In the above example, product code “Kit” is the Kit type inventory item and it sells for $34.99. The two
lines below it are the inventory items that make the up the kit. They are displayed with the quantities and
backorders (if applicable), but no retail prices.
The items are removed from inventory when the Sales Order is processed.
Note:
Page 486
When a user deletes a kit item from a sales order, one of two things can happen: a) the line item is
removed, b) the entire kit is removed. This behaviour is configured on the Report Options & Other
Defaults tab of the system interface. See 6.2.4 - Report Options for more information.
Chapter 14 – Order Entry
Blue Link Solutions™
14.8 Enter Recurring Sales Orders
This screen provides you with a convenient way to post a periodic transaction without reentering the
transaction every time. Use this program when you have a periodic customer transaction such as a monthly
service call, or a rental or lease to a customer.
Once the transaction is entered through this program, the posting program Generate Recurring Sales
Orders allows you to call up the original entry as a template that the posting program fills in automatically.
The current date is posted as the transaction date. The following screen is used to create a recurring invoice
template.
Many of the fields on this screen are the same as those displayed in Enter/Change Sales Order.
Bill To/Ship To
Select the customer to Bill To from the drop down list. The Ship To address also appears.
change it if required.
You can
Sales Order #
When you create a recurring invoice, the number it is assigned is the Next Recurring Invoice Number set in
System Interface. When posted as an invoice the number it is assigned is the next Accounts Receivable
Invoice set in System Interface.
Chapter 14 – Order Entry
Page 487
Blue Link Solutions™
Terms
Select the terms for the sales order from the drop down list. It will default to the settings in the customer
file.
Ship Via
Select the method of shipment from the drop down list. It will default to the settings up in the customer file.
Salesperson
Select the salesperson from the drop down list.
Tax Auth
Select the tax authority code from the drop down list. It will default to the settings in the customer file.
Currency
This defaults to the setting in the customer file and it cannot be changed.
Dept
You can type in a Department Code.
Recurrence Button
Click the recurrence button to display the recurrence frequency options:
Recurrence Pattern
Complete this information to select the pattern of recurrence you prefer. Choose from Daily, Weekly,
Monthly, Yearly, etc.
Start
Enter the first date the pattern should go into effect.
Do Not Remind
Check this box if you don’t want to be reminded when this recurring item is due.
End Method
Specify when the recurrence should end:
Page 488
Chapter 14 – Order Entry
Blue Link Solutions™
- no end date
- after x number of occurrences
- on a specific date
See Enter/Change Sales Order for an explanation of how to fill in the invoice fields. The fields described
above are required fields.
Chapter 14 – Order Entry
Page 489
Blue Link Solutions™
14.9 Generate Recurring Sales Orders
Use this program on a regular basis to post the recurring items entered in Recurring Order Entry. You
can limit the posting based on the Next Invoice date associated with the specific recurring invoice
template. The date defaulted is the Generate Thru Date
Enter the date through which you want the sales order posted. Then click on the Generate button to post
the recurring invoice to Accounts Receivable.
Note: Limit the posting to the desired range of transactions by using the Next Invoice Date field.
Click Yes to generate the recurring sales orders; click No to cancel the request.
When the process is complete, the following screen will be displayed advising you that you will now find
the orders in the Enter/Change Sales Orders function.
If you wish to print all invoices now without previewing them, select “Print All Invoices” from the Report
Menu in Sales Orders.
Click OK to clear the screen.
Page 490
Chapter 14 – Order Entry
Blue Link Solutions™
14.10 Unmark an Invoice as Printed
The following screen will be displayed when you click on this option:
You will be able to select invoices that have been printed, but not posted. Once you have selected the
correct invoice #, you then click on the ‘Unmark’ button.
You will be able to process either a Screen Print or a hard copy of the invoice, if a Customer has requested
a copy.
Chapter 14 – Order Entry
Page 491
Blue Link Solutions™
14.11 Post Invoices
If you have printed your invoices but did not post them at the same time, you can post them using this
program.
Post What?
When you run this program, you can select from one of two options.
Post All Invoices That
Have Been Printed -
then the other fields are bypassed and all printed invoices are posted.
Post Only One Invoice - you will be allowed to specify a sales order number to limit the posting. Click
on the drop down list or press F4 to specify the sales order number you want to
post.
Post Button
Click on the Post button when you are finished making your selections. The invoice(s) will be posted to
Accounts Receivable.
Posting an invoice has the same results in this program as the posting process explained in Print Invoices.
CAUTION:
There is no confirmation screen from which to cancel to procedure once you have clicked the Post button.
Page 492
Chapter 14 – Order Entry
Blue Link Solutions™
14.12 Post Multiple Invoices
This feature allows you to post a range of invoices at one time. This is opposed to the Post Invoices module
where you can select one invoice or all invoices that have been printed, to post. This module is ideal if you
want to selectively choose which invoices you want to post.
You may select all or unselect all items instead of checking all of the items.
Chapter 14 – Order Entry
Page 493
Blue Link Solutions™
14.13 Copy History Invoice
This option allows you to select an order that has already been invoiced and to create a new sales order for
that customer with the same products that were on the original order. This works in a situation where your
customer calls and orders the same order that they purchase once before.
Page 494
Chapter 14 – Order Entry
Blue Link Solutions™
14.14 Reverse Posted Invoice
The purpose of this screen is to allow you to reverse an invoice that was posted in error with the option of
creating a new sales order based on the products that were originally invoiced.
What will occur:
? A credit invoice will be posted to history – if you need to print this then go to Enter/ Change
Customer and on the Drill Down button, double click on this invoice number.
? A credit will appear in AR which will offset the original amount of the invoice
? A reversing G/L entry will be made based on the invoice date that is selected. The invoice date
will default to the date the original invoice was made, but if you have already closed off that period
then you may want to override the date to a more current date.
Restore as an open sales order?
By selecting this option, you will reverse the invoice as noted, and then create an open sales order based on
the original order.
Chapter 14 – Order Entry
Page 495
Blue Link Solutions™
14.15 Review Sales Order History
You can use this program to view and print your posted invoices one at a time.
The fields that are unique to this screen are explained below.
Billed To
In the Billed To side of the screen are two lookup fields.
The left most field drop down list displays a list of posted invoices, sorted by customer name, code, name,
sales order #, and date. When the selection is made, the customer code displays in this field.
The right most field drop down list displays a list of posted invoices, sorted by sales order number, and
customer name. Once selected, the sales order # displays in this field.
You may select using either one of these two fields.
1st Invoice #
If more than one invoice is attached to the sales order, the first invoice # is displayed here.
Quote #
If the Sales Order was created from a Contact Manager Quote, the quote number will be displayed in this
field.
Deposit
The amount of the deposit paid by the customer.
When you run this program, you may enter a sales order number, select one from the drop down list or press
F4 to choose from a list of posted invoices. The invoices you choose are displayed on the screen.
Page 496
Chapter 14 – Order Entry
Blue Link Solutions™
You may not change any of the fields.
If more than one invoice is attached to the sales order, then all the invoice information for that sales order is
displayed.
For information on the other fields on this screen, see Section 14.2 above - Enter/Change Sales Order.
Chapter 14 – Order Entry
Page 497
Blue Link Solutions™
14.16 Print Open Order Reports
Use this program to print a listing of invoices that have not yet been posted. This report contains the
following information, divided and sorted by Customer Code, Product Code or Sales Order Number:
?
?
?
?
?
?
?
Customer name, code and currency
Sales order number, description, quantity, UBO, Price, Disc %, Ship Total and B/O Total
Product code and description
Total amount ready to ship
Total amount backordered
Total sales orders (including backorder amount)
Projected ship dates
You can have the report sorted by Customer Code, Product Code, or by Sales Order number. In addition,
you can specify ranges to limit the report. This report may be printed to the printer or previewed on screen.
Sort By?
You can choose to sort the report by Customer Code, Product Code or Sales Order Number.
From/Thru Product
Select the products you wish to limit the report to or leave the defaults for all products.
From/Thru Customer
Select the customer you wish to limit the report to or leave the defaults for all vendors.
From/Thru S/O Number
Select the Sales Order Numbers you wish to limit the report to or leave the defaults for all Sales Orders.
Print Where?
You may select for the report to be printed to the printer or to be previewed on screen. Click the “Print” button
to send it to the printer or the screen or the “Cancel” button to cancel the request.
Sample Open Order Reports
Sales Order Report by Customer Code
Page 498
Chapter 14 – Order Entry
Blue Link Solutions™
Chapter 14 – Order Entry
Page 499
Blue Link Solutions™
Sales Order Report by Product Code
Sales Order Report by Sales Order Number
Page 500
Chapter 14 – Order Entry
Blue Link Solutions™
14.17 Print Backorder Reports
Prints a list of items currently on backorder.
Sort By?
You can sort this report by Customer Code to make it easier to see at a glance all customers that need to be
shipped, or sort by Product Code to indicate how much of each product is backordered at one time or by
Sales Order Number.
Print Where?
You may select for the report to be printed to the printer or to be previewed on screen. Click the “Print” button
to send it to the printer or the screen or the “Cancel” button to cancel the request.
Choose the type of sorting you want for this report. The report by Customer details
?
?
?
?
?
?
?
?
?
customer code and customer name
currency
product code and description
sales order number,
quantity ordered
UBO (units on backorder)
price and discount
ship total and backorder total per customer
total amount ready to ship, total amount backordered and total sales order.
The report by product code details
?
?
?
?
?
?
?
?
?
product code and description
customer code
currency
sales order number
quantity ordered
price and discount
ship total
UBO and backordered total per customer
ship quantity (committed), quantity backordered and available (uncommitted) per product
code.
Chapter 14 – Order Entry
Page 501
Blue Link Solutions™
The report by sales order number details
?
?
?
?
?
?
?
?
?
?
Page 502
sales order number and date
customer code and name
currency
product code and description
quantity ordered
UBO (units on backorder)
price and discount
ship total
backordered total
sales order total.
Chapter 14 – Order Entry
Blue Link Solutions™
Sample Backorder Reports
Backorder Report by Customer Code
Backorder Report by Product
Chapter 14 – Order Entry
Page 503
Blue Link Solutions™
Backorder Report by Sales Order Number
Page 504
Chapter 14 – Order Entry
Blue Link Solutions™
14.18 Recurring Sales Order Reports
This program will print a listing of customers and invoices set up in recurring invoice system.
Sort By?
You may choose to sort this report by Customer Code or Next Due Date.
From/Thru Customer
If you choose to sort by Customer Code, select the range of customers. If you do not change the default
limits, the report will print for all customers.
Thru Date
If you choose to sort the report by Next Due Date, then you must also enter the Thru Date. The default is
the current date. The report will then print a listing of all recurring invoices whose next invoice date is on
or before the date you specified.
Print Where?
You may select for the report to be printed to the printer or to be previewed on screen.
Sample Recurring Sales Reports
Recurring Sales Order Report by Customer
Chapter 14 – Order Entry
Page 505
Blue Link Solutions™
Recurring Sales Order Report by Next Due Date
Page 506
Chapter 14 – Order Entry
Blue Link Solutions™
14.19 Print Shipping Labels
This program will print the Ship To information from the invoices on standard shipping labels. You can
generate these labels only for invoices that have not yet been posted.
Which Label?
You may print the labels with or without your company information.
From/Thru S/O Number
Enter a range of sales order numbers for printing on the screen displayed. If you do not change the default
limits, the program will print labels for all unposted invoices currently in the file.
Print Where?
You may select for the report to be printed to the printer or to be previewed on screen. Click the “Print” button
to send it to the printer or the screen or the “Cancel” button to cancel the request.
Chapter 14 – Order Entry
Page 507
Blue Link Solutions™
Sample Shipping Labels
With Company Information
Without Company Information
Page 508
Chapter 14 – Order Entry
Blue Link Solutions™
14.20 Print UPS COD Tags
Use this program to print tractor fed UPS COD Tags.
From/Thru S/O Number
You may specify a range of sales orders number to limit the report to.
Choose
You can choose to print the Open Sales Orders (unposted) or History Sales Order (posted). If you do not
change the default ranges the program will print COD tags for all open sales order.
Print Where?
You may select for the report to be printed to the printer or to be previewed on screen. Click the “Print” button
to send it to the printer or the screen or the “Cancel” button to cancel the request.
Chapter 14 – Order Entry
Page 509
Blue Link Solutions™
14.21 Print Packing Lists
Packing slips are provided as a convenience in Blue Link Solutions for a reference when you or your
shipping personnel stage and fill orders, prior to getting the actual printed invoice for delivery.
The packing slips show the following information:
?
?
?
?
?
?
?
?
?
?
?
customer name and address,
ship to name and address,
sales order number,
purchase order number if applicable,
order date,
product code and description,
exact location of the item,
quantity available to ship,
backorder quantity
total of the order.
space is provided to enter the quantity actually shipped.
The following screen will be displayed:
What to Print?
You can print all orders not yet invoiced or limit the packing slips printed to an individual sales order. If
you do not change the default limits, the program will print packing slips for all open sales orders.
Print Where?
You may select for the report to be printed to the printer or to be previewed on screen. Click the “Print” button
to send it to the printer or the screen or the “Cancel” button to cancel the request.
Date Range
This will filter the packing slips to be printed based on the packing slip date.
Sample Packing List Report
Page 510
Chapter 14 – Order Entry
Blue Link Solutions™
Chapter 14 – Order Entry
Page 511
Blue Link Solutions™
14.22 Print Invoices
After entering a sales order, all the available ready-to-ship items on that sales order are ready to invoice.
You must print the invoice to the printer before you can post it. Until all line items are posted, you can
continue to reprint it and you can also allow new items to be entered on the original sales order.
This program will print the invoices for available inventory line items entered in Enter/Change Sales
Order on either preprinted invoice forms or plain paper.
Only those sales order items that are available and ready-to-ship will be printed. Items on backorder and
items with a ready-to-ship flag unchecked will not appear on the invoice.
After printing, this program will also allow you to post all appropriate information to the General Ledger,
Customer file, Inventory file, and the Accounts Receivable file.
Print What?
You can choose to Print All in Orders Not Yet Invoiced, an individual sales order or a Range of
Invoices.
Invoice Type
When printing Invoices, you can choose between two types: Standard (for products) and Service (mainly for
services).
Print Where?
You may select for the report to be printed to the printer, to be previewed on screen, or to be faxed/emailed.
Click the “Print” button to send it to the printer or the screen or the “Cancel” button to cancel the request.
If you choose Fax/Email the invoices will be sent out to the appropriate fax number or email address as set up
in the customer file for each customer. Note: This feature requires Outlook and Word integration to be set up
prior to use. See Chapter 6 – System Maintenance for details.
If you print to the screen and then print to the printer from there, the invoices will not be marked as printed
AND not be posted.
Page 512
Chapter 14 – Order Entry
Blue Link Solutions™
Chapter 14 – Order Entry
Page 513
Blue Link Solutions™
Sample Invoice
Page 514
Chapter 14 – Order Entry
Blue Link Solutions™
14.23 Reprint an Invoice
Use this program to reprint an invoice saved in the history system. For an invoice to be available, the
following things must be done:
1.
You must have the customer set to “History – Yes”
2.
The history invoice detail must be available (i.e. not purged via the System Maintenance (End of
Month - Clear History Information)).
Select Invoice Number to reprint?
Select the invoice number to be reprinted.
Print Where?
You may select for the report to be printed to the printer or to be previewed on screen. Click the “Print” button
to send it to the printer or the screen or the “Cancel” button to cancel the request.
Chapter 14 – Order Entry
Page 515
Blue Link Solutions™
14.24 Sales History/Order Margin Reports
This option allows you to print various types of Sales History Reports
Type of Report
You may select one of three types of reports:
Margin by Invoice -
this report is selected by invoice # and date, the customer name, product code
and description, quantity, price, extension, CA$ Ext, cost and GP% margin are
displayed.
Margin Exception -
this report lists invoices dated between the Thru and From dates and only those
that fall BELOW the specified target GP%. It displays the invoice # and date,
the customer name, product code and description, quantity, price, extension,
CA$, extended, cost and GP% margin except
History by Customer -
is the same as the margin by invoice report, limited by product code, customer
code, salesperson, thru’ and from dates and may be shown with or without detail
and margins.
Select the type of report you wish to view and enter the relevant codes, dates, invoice numbers and Target
GP%. The report may be printed to the printer or previewed on screen.
Page 516
Chapter 14 – Order Entry
Blue Link Solutions™
Sample History/Order Margin Reports
Sales Order Margin Report (for a particular invoice)
Sales Order Margin Report (Margin below 10%)
Sales History
Chapter 14 – Order Entry
Page 517
Blue Link Solutions™
14.25 Sales Report
Use this program to print a daily or weekly sales report or graph. The report will only list invoices that
have been printed and posted, using the invoice date as the report date.
Which Report?
Daily Sales Report -
invoice number, customer, currency, terms, subtotal, tax, freight and total sales.
Daily Sales by Class -
invoice number and totals for each class that has been set up in System Interface
on a daily basis.
Weekly Sales Report -
date and totals for each class that has been set up on a weekly basis.
Start/Thru Date
Select the start date of the daily sales report to print.
Select the start and thru dates for the weekly sales report to print
Graph Button
The Graph button is available for the Weekly Sales Report. Click this to see a graph instead of a report.
Page 518
Chapter 14 – Order Entry
Blue Link Solutions™
Sample Sales Reports and Graphs
Sales Report by Day by Invoice Number
Daily Sales Report by Product Class
Note:
The columns that appear across the top of this report are the “report columns” that were identified during
the configuration of inventory classes in the System Interface.
Chapter 14 – Order Entry
Page 519
Blue Link Solutions™
Weekly Sales Report Graph
Page 520
Chapter 14 – Order Entry
Blue Link Solutions™
14.26 Print Deleted Orders
When you choose this option, the following screen will be diplayed:
You will be able to print either deleted Sales Orders or Purchase Orders for a specific Date and S/O or P/O
range. You can also choose to print all deleted orders.
Chapter 14 – Order Entry
Page 521
Blue Link Solutions™
15: Contact Manager
The Contact Manager module has been designed to assist you in maintaining prospect data PRIOR to
them doing business with your company. It is integrated with Microsoft Outlook.
Access Contact Manager through Sales | Contact Manager.
In addition, you can use the Contact Manager to continue to maintain contact information on your prospects
and customers after the sales have been made. The Contact Manager also allows you to maintain contact
information on your vendors.
Page 522
Chapter 15 – Contact Manager
Blue Link Solutions™
15.1 Enter/View Prospect
The Contact Manager main screen is shown as follows:
Search
The drop down list at the right of the Search box will change depending on whether you what to search by
Contact Name, by Prospect Code or by Company Name. Click on one the three options and then click on
the drop down list and select the appropriate contact.
15.1.1
PROSPECT INFORMATION TAB
Company (Required)
The actual vendor name. This is a 25 character alphanumeric field.
Address 1
The first of 2 address lines. This is a 25 character alphanumeric field.
Address 2
The second of 2 address lines. This can be a second address or simply a suite number. This is a 25 character
alphanumeric field.
City
The city the vendor is in. This is a 15 character alphanumeric field.
Province/State/County
This field label and size depends on the Regional Settings that you have selected..
Chapter 15 – Contact Manager
Page 523
Blue Link Solutions™
Postal Code/Zip Code
This field label and size depends on the Regional Settings that you have selected..
Country
The country the vendor is in.
Contact
The person with whom you normally speak at your vendor's location. This is a 25 character alphanumeric
field.
Active
This flag signals if this contact is active or not. If you uncheck the flag of this contact, they will not appear
in pick lists of contacts (in creating Quotes etc.). This flag is defaulted on.
15.1.2
PHONE NUMBERS/INTERNET ADDRESSES
Clicking the list button allows you to select different field names if you wish to change them from the defaults.
The choices are:
The following are the standard options for numbers you wish to store. If you click on the arrow you will be
able to select other options.
Office
The customer’s office number and extension. This is a 25 character alphanumeric field.
Fax
The customer’s fax number and extension. This is a 25 character alphanumeric field.
Mobile
The customer’s mobile number and extension. This is a 25 character alphanumeric field.
Pager
The customer’s pager number and extension. This is a 25 character alphanumeric field.
E-Mail
The customer’s E-mail address. The text will turn blue.
E-Mail Button
Click this button to start your E-mail program and send an E-mail directly from Blue Link Solutions.
Web Address
The customer’s web address. You do not need to type in the “http://” in front of it. It is a hyperlink field. If
you click on it, your dial-up networking program will start in order to go directly to the customer’s web site on
the Internet.
Page 524
Chapter 15 – Contact Manager
Blue Link Solutions™
Check Phone Number
Upon entering the contact’s phone number, if the number of digits is not recognized as a North American
phone number, the following “Check Phone Number” form will appear. This allows for formatting of
international phone numbers.
15.1.3
MISC. INFORMATION
This section allows you to choose the Prospect Request, Source, Class and the salesperson who is handling
the prospect. Next to each of these fields, you will find Add buttons. Use these buttons to add specific
criteria for the Source, Class and Request lookups.
Requests
This section lets you record what the contact is interested in, or the kind of information they have
requested. Select a request from the list or Add a new
one by clicking on the Add button and typing items into the list. Click the “X” to exit and save when you
are done.
Chapter 15 – Contact Manager
Page 525
Blue Link Solutions™
Source
This section lets you record how the contact heard about you, or their source. Select a source from the list
or Add a new one by clicking on the Add button and typing items into the list. Click the “X” to exit and
save when you are done.
Prospect Type
This section lets you record a class or category for the contact. Select a prospect type from the list
This is a field used as an additional means of grouping contacts for reports. For example, you might want to
group all of your contacts who are wholesalers into a single report. Use this field to designate such a group.
Choose a prospect type from the list box. The values for prospect types may be changed through System
Maintenance | System Master Lists | Terms / Types / RMA Reason Codes/ Other Lists.
The Request, Source and Prospect Type must be entered in order for this contact to be included on the any
Contact Reports.
Since
This is the date that the contact first came into your system. Type in an appropriate date in short date format.
Sales Rep
Choose the salesperson who is responsible for this contact from the drop down list. The values for Salesperson
list may be changed or added to through the Employee & Salesperson | Enter / Setup Salesperson.
Status
This section allows you to select why type of contact they are:
Page 526
Chapter 15 – Contact Manager
Blue Link Solutions™
?
?
?
?
Prospect – information remains in Contact Manager
Customer – information will be copied to Accounts Receivable
Vendor – information will be copied to Accounts Payable
Both (Customer and Vendor)
15.1.4
SET APPOINTMENT
This function lets you save an appointment for this contact in Outlook’s Calendar in your own Private
Calendar Folder.
Calendar
Select the month, year and then click on the day for the appointment.
Date
Click here and the date previous chosen in the Calendar will be displayed; otherwise, type a date in manually.
Start Time
Type a start time using the 24-hour clock method, i.e. 1:00pm = 13:00
Length of Appointment
Type the length of time the appointment should take in minutes, i.e. 1.5 hours = 90 minutes.
Chapter 15 – Contact Manager
Page 527
Blue Link Solutions™
Contact/Company
This is automatically filled in for you.
Location
Type in a location where the appointment will be held.
Notes
Type any notes of which you need to be reminded.
Remind me
Type the number of minutes prior to the appointment that you would like to be reminded.
Sound Reminder
If you wish to have an audible reminder, click this box.
Set Appointment
Click this button when you are finished filling in the information and Solutions will send the details to
Outlook Calendar.
15.1.5
SET TASK
Solutions will save this task in your Private folder in Outlook.
Subject
Type a subject for this task.
Body
Type the details of this task.
Due
Type the date the task it due.
Page 528
Chapter 15 – Contact Manager
Blue Link Solutions™
Remind me in/Length of Time
Select the time period, either minutes, hours or days and then type a number in the Length of Time field.
Sound Reminder
If you wish to have an audible reminder, click this box.
Set Task
Click this button when you are finished filling in the information and Solutions will send the details to
Outlook Tasks.
Chapter 15 – Contact Manager
Page 529
Blue Link Solutions™
15.1.6
PROSPECT CONTACT TAB
Clicking on this tab accesses a screen where you may enter more contacts for this Prospect. You may enter
Contact Name, Position, Address, Phone Numbers and Extensions, and Internet Web Page address and EMail address. You can also send an E-mail directly to the contact by clicking on the E-Mail button.
Note:
Page 530
This tab integrates with the Multiple Contacts tab in Enter/ Edit Customer. Any entries there will be added
here and any entries here will be entered there.
Chapter 15 – Contact Manager
Blue Link Solutions™
15.1.7
CONTACT NOTES
The Contact Notes tab allows you to enter conversational notes during your contact. The system will
automatically time and date stamp the contact.
This screen allows you to enter notes for this customer. These are useful for tracking and resolving
collection issues. All notes created include a date and time stamp, and record the login of the user who
created them. Default notes (such as “Called to collect”) can be created using the “Add” button and
selected using the drop down list. You may also wish to classify the type of contact it was (Sales,
Collections etc.) with the contact type field. There is also a flag to check if you wish the contact note to be
deleted. When you run the contact notes purge routine under Utilties | Contact Manager Maintenance |
Purge Contact Notes, these selected notes will be purged.
Chapter 15 – Contact Manager
Page 531
Blue Link Solutions™
Time There
This screen allows you to maintain the actual time zone and time for the prospect. You can modify the time
zones by pressing the Chg Zones button. The default settings are for Eastern Standard Time. By clicking
on the arrow to the right of the display you get a list of various time zones. You may select the one in which
your prospect is located.
To see the current time in the contact’s time zone, click the ”Time There” button.
Their time will display.
Things To Do
To Do Notes can be added for later recall. You may use this feature to remind yourself to send literature,
information etc.
Show All/Show Private Button
This button limits the list of activities displayed.
15.1.8
QUOTES TAB
When you have a contact on the main Contact Manager screen, you may display all quotes on file for that
contact by clicking on the Quote button.
NOTE:
You should always refresh the Quotes list to ensure that you are viewing the most current list. To do this,
press the F9 key on the keyboard.
The following screen is then displayed:
Page 532
Chapter 15 – Contact Manager
Blue Link Solutions™
View/Change a Quote
You may double click on the quote number column of any of the existing listed quotes in order to move
directly to that quote.
Adding a New Quote
You may click on the New button if you wish to enter a new quote for the prospect. You will then be
placed in the Quotes screen. See Section 15.2 - Enter/Edit Quotes for details on working in this screen.
The Quote system works just like the Sales Order Entry System with the following exceptions:
1.
The quote is generated using the prospect file instead of the customer file.
2.
When entering a quote for a prospect who is not a customer, the tax, currency and terms fields are not
defaulted and will need to be entered if you wish the quote to be converted to a sales order. However,
if the contact is already in the customer file then these fields are defaulted.
3.
The quote can be converted to a sales order only after you convert the prospect to a customer.
15.1.9
SALES HISTORY BUTTON
This function allows you to review any history sales if this contact is also a Customer.
Chapter 15 – Contact Manager
Page 533
Blue Link Solutions™
15.1.10 ENTERING A NEW PROSPECT
6.
When the screen is first displayed, the cursor is located in the Code field. If it is not, then click the
“New” button. Select to Search by Code.
7.
Enter a new Contact Code (maximum 10 characters) and press <Enter>. Use codes that will help you
identify customers in groups or alphabetical ranges for other operations in Blue Link Solutions.
The following screen will be displayed:
Note:
If the code you have entered matches that of an existing customer, you will be asked if you want to import
the customer’s information. If you say no, you will be able to create this prospect but it should be used as
a vendor.
1.
Click Yes to add the new contact to the system; click No to cancel the request.
2.
Continue by filling in the rest of the fields as appropriate.
3.
When you are ready to save, click the “Save” button. The following screen will be displayed the
first time.
4.
Click Yes to save the new contact; click No to cancel the request.
Page 534
Chapter 15 – Contact Manager
Blue Link Solutions™
Note:
You must answer Yes when asked if you want to save the record before the record will be permanently
recorded in the contact manager.
5.
Add any first conversation notes in the notes window or enter to do’s as necessary.
6.
Set an appointment for later follow up by selecting the date on the calendar and double click on the
date. Enter the time in the appropriate field as well if you desire.
15.1.11 CHANGING CONTACTS
If you need to change a contact’s address or telephone number, or if some other important information has
changed, find the existing contact record, performing one of the following operations:
1.
Click the “New” button and select the Code from the Search drop down list
2.
Once the contact’s record is displayed, you may change any data, except the contact code.
3.
Click the “Save” button; the following screen will be displayed:
4.
Click Yes to save the customer record; click No to cancel the request.
15.1.12 DELETING A CONTACT
When you delete a contact record, any associated Accounts Receivable or Accounts Payable records get
deleted as well.
Once it is deleted, the record cannot be recovered. You will have to re-enter the contact if it is deleted in
error.
To delete an existing record,
1.
Display the contact record by click the “New” button and selecting them from the list.
2.
Click the “Delete” button at the bottom of the screen or select Edit,
3.
The following screen will be displayed if the customer can be deleted:
Chapter 15 – Contact Manager
Page 535
Blue Link Solutions™
1.
Click Yes to delete the contact from the system; click No to cancel the request.
15.1.13 MERGE WITH WORD TEMPLATE
When you click this button, it will merge the current contact’s name and
address with the Microsoft Word Document Template (initially is it “C:\Program Files\Blue
Link\Solutions\Welcome.dot”) specified in System Maintenance | System Interface | Outlook and Word
tab.
Microsoft Word will open; the template will open and the data fields will be merged from the current
Contact Manager screen and a letter will be displayed. You can change this letter before printing. Use
Microsoft Word to save and print the letter.
Click “OK” to clear the screen and return to the Explorer Menu menu.
15.1.14 EXPORT CONTACTS TO OUTLOOK
When you click this button you will be asked to save all of your contacts
in outlook. Blue Link Solutions will save the contacts to the folder specified in System Master | System
Interface | Outlook and Word tab. If you have Microsoft Exchange Server you may save to a Public
Folder.
Page 536
Chapter 15 – Contact Manager
Blue Link Solutions™
15.2 Enter/Edit Quotes
You can enter a quote for the prospect by either selecting the Quote button on the lower button bar in the
contact screen or by selecting options and Enter/Edit Quote from the menu bar above. The following
screen will be displayed:
Entering a quote in the Contact Manager is identical to the Sales Order Quote system. You can print a
quote and recall it later using the recall button to the right of the Bill To Lookup. In addition, you can move
a quote to a sales order once the prospect becomes a customer. Once you move the quote to sales order you
will be asked if you want to delete the quote.
15.2.1
QUOTE INFORMATION
Prospect Information
Name
Default entries from the contact record (created in Enter/Change Contact Information).
Address 1
Default entries from the contact record (created in Enter/Change Contact Information).
Address 2
Default entries from the contact record (created in Enter/Change Contact Information).
Chapter 15 – Contact Manager
Page 537
Blue Link Solutions™
City
Province/State/County
Postal Code/Zip Code
Default entries from the contact record (created in Enter/Change Contact Information).
Attention
The person to whose attention this order should be addressed, with a default defined from the Contact field
in the contact record. If you print shipping labels, this information will automatically be printed on the
label.
Main Item Description vs. Second Language
Specify whether the description entered for items on this quote should appear using the primary or second
language description.
Location & Shipping Information
Location
The location of the specific inventory items being processed on this order.
Ship Via
The method of shipment. This is a 15 character alphanumeric field. This field will default to the value set
up in System Master Lists | Shipping Related.
Terms / Tax Authority / Currency
Terms (Required)
Chosen from a pop-up menu, with a default entry from the contact record highlighted.
Tax Authority
Enter the tax authority under which you normally charge this contact. This is defaulted from the contact
record.
Currency
The currency you use when dealing with this contact. This field is defaulted from the contact file.
Order Information
Ready
If you want all line items on this sales order to be invoiced and shipped from units on hand, check this box.
Clearing the check from the box reserves inventory items from units on hand, and will not release them to
be invoiced or shipped until you return to the screen and change the check this box.
Quote #
This is automatically assigned by the system.
Date
This is the date of the quote.
Entered By
The person who entered the order based on their login name.
Page 538
Chapter 15 – Contact Manager
Blue Link Solutions™
Salesperson
An employee code for the salesperson on this sales order. This is a three character numeric field. This field
will default to the sales person number associated with this contact in Enter/View Prospect.
Dept
If you are using G/L departments, this field allows optional entry of a G/L Department Code to post the
sales to a specific department set up in your Chart of Accounts.
Prospect’s P/O #
If the contact has given you a P/O number, enter that number here.
Internal Notes
Enter internal notes for this order. These will transfer to the Sales Order.
15.2.2
QUOTE DETAILS
Product Code (required)
The inventory product code for the line item. Inventory product codes are set up in Enter/Change
Inventory Information. You can select from a list of inventory items or you can type in a product code.
Product Description
The inventory product description is displayed. You can change the description for this particular sales
order.
UOM
If you are using the Unit of Measure feature, select the Unit of Measure applicable for this quote.
Chapter 15 – Contact Manager
Page 539
Blue Link Solutions™
Quantity (required)
The number of units ordered. This is a numeric field.
G
Check this box if the product attracts GST.
P
Check this box if the product attracts PST.
UBO
If you would like to place items on Backorder when they are transferred to Sales Order then enter the
quantity here.
Note:
Quotes do not commit inventory nor does it check to see if there is sufficient quantity on hand. Therefore
units will only go into the UBO field if you physically place the quantity there. However, when this quote is
converted to a Sales Order the quantity on hand is checked and units will go on backorder if there is not
sufficient quantities on hand.
Price (Required)
The unit price for this customer. You are offered a default price from the inventory file, using the price
matrix level associated with the price level in the customer record.
Disc
The percentage discount used to create the unit price for this line item (if you have set up a percentagebased price matrix for this inventory item). If there is no price matrix set up or if pricing is based on a
volume discount, 0% will be displayed. You can also enter or change a discount for a line item here.
Extension
The cost to the customer with respect to the quantity of line items with discounts included.
Accepted
This check box is used to select which items on the quote were accepted by the customer. Whichever items
are checked will be transferred to the Sales Order. Use the “Select All” button to check all of the items, if
all or most were accepted.
Extended Notes
These are extra notes that can be added on the fly and they will print on the Sales Quote.
15.2.3
SHIP TO INFO
Enter the ship to information relating to this order.
Page 540
Chapter 15 – Contact Manager
Blue Link Solutions™
15.2.4
TOTALS SECTION
This section displays the various subtotals for the Sales Order.
Subtotal
The subtotal amount for the sales order for all on-hand, ready-to-ship items (calculated automatically and
displayed as a running subtotal).
Freight
The freight charged for this sales order. You should type the freight amount in this field before saving the
sales order.
GST/PST
The amount of tax for this sales order (calculated automatically when you leave the details section of the
screen, or when you save the sales order).
Total Sales
The total sales value of the Sales Order, excluding freight and taxes, but including backorder value.
Chapter 15 – Contact Manager
Page 541
Blue Link Solutions™
15.2.5
SHOW SALES ORDERS
This form shows all of the sales orders which were generated by this quote. If you keep a persistent quote
open, this feature is a handy reference. You can view open sales orders and posted sales order which relate
to this quote.
15.2.6
MORE ABOUT INVENTORY BUTTON
When you are on a selected product code on the quote, clicking this button will access an inventory
summary screen for this item. The information provided is the product code, description, units of measure,
last sales date, last order and receipt dates, last cost, average cost and price, the category, days to order and
bin and shelf location. You are also shown location and quantity of the items on hand, on order, on
backorder and on sales order.
Page 542
Chapter 15 – Contact Manager
Blue Link Solutions™
Click the OK button to exit this screen and return to the previous screen.
15.2.7
SAVE/PRINT
Clicking on this button saves the sales quote and allows printing of the sales quote. The following screen
will appear when you press Save/Print:
Click Yes to print the Sales Quote (see details later in this chapter); click No, and the following screen
displays.
Chapter 15 – Contact Manager
Page 543
Blue Link Solutions™
Click Yes and you may continue to edit the Sales Quote. Click No, and the Sales Quote is saved and the
screen is cleared.
15.2.8
MOVE QUOTE TO SALES ORDER
When you are ready to make the quote an actual sales order, click the “Move Quote to Sales Order” button.
The following screen will be displayed:
Click Yes to transfer the quote to a sales order; click No to cancel the request.
You will also be asked if you want the quote deleted after moving this quote to sales order.
You will be placed in the Sales Order screen with the details already fill in from the quote. Complete the
sales order. For more details on completing the sales order screen, see Section 14.2 – Enter/Change Sales
Orders.
15.2.9
COPY QUOTE TO ANOTHER CONTACT
If you would like the option to copy the same quote to another prospect then select the “Copy Quote to…”
drop down box and select the prospect.
You will then be asked to verify that you want to copy this quote to another prospect.
Page 544
Chapter 15 – Contact Manager
Blue Link Solutions™
This new quote will then be assigned the next available quote number and will be an open quote for this
prospect.
15.2.10 SELECT ALL AND UNSELECT ALL
These buttons are for quickly checking or unchecking Accepted field on the order details section. Each
item that you want transferred must be selected to be transferred to sales order. The customer may partially
accept the quote and therefore only a portion of the items will be selected.
Chapter 15 – Contact Manager
Page 545
Blue Link Solutions™
15.3 Enter / View Contact Types
Use this screen to enter all of your types of contact notes. These will then be available on the contact notes
tab of Contact Manager, Accounts Receivable, and Accounts Payable.
Page 546
Chapter 15 – Contact Manager
Blue Link Solutions™
15.4 Print Prospect Report
Which Report?
General Information -
details company name, contact, address, city, province/state/county and code.
Phone Number List -
details company name, contact, phone, fax, mobile or pager - the main telephone
numbers from the Contact Manager main screen.
Mailing Labels -
prints the information on standard mailing labels and you may select between “1
across tractor” labels or “3 across laser” labels.
See the section on mailing labels for more details.
Rolodex Cards -
prints the information on standard Rolodex cards.
From/Thru Prospect
Select the prospects to include in your report from the drop down lists.
From/Thru Salesperson
Select the salespersons to include in your report from the drop down lists.
From/Thru Class
Select the classes to include in your report from the drop down lists.
From/Thru Request
Select the requests to include in your report from the drop down lists.
Print Where?
You may select for the report to be printed to the printer or to be previewed on screen. Click the “Print” button
to send it to the printer or the screen or the “Cancel” button to cancel the request.
Chapter 15 – Contact Manager
Page 547
Blue Link Solutions™
15.4.1
SAMPLE PROSPECT REPORTS
Prospect General Information
Page 548
Chapter 15 – Contact Manager
Blue Link Solutions™
Prospect Phone Number List
Mailing Labels (3 across)
Rolodex Cards
Chapter 15 – Contact Manager
Page 549
Blue Link Solutions™
15.5 Outstanging Quote Reports
View which quotes are outstanding from a particular date range. Use this report as a list to follow-up on
leads which are still open.
Quote Detail Report
Page 550
Chapter 15 – Contact Manager
Blue Link Solutions™
15.6 Source Analysis Report
The source analysis report gives you the may be sorted by prospect date and invoice date and details the
source of the prospect, the number of leads (from that source), the number of sales (generated from that
source), the Total and Average Sale and the Close Ratio for that source
From/Thru Prospect Date
Type in the From/Thru Prospect “Since” dates
From/Thru Invoice Date
Type in the invoice dates for the report.
Print Where?
You may select for the report to be printed to the printer or to be previewed on screen. Click the “Print”
button to send it to the printer or the screen or the “Cancel” button to cancel the request.
Chapter 15 – Contact Manager
Page 551
Blue Link Solutions™
15.6.1
SAMPLES OF SOURCE ANALYSIS REPORTS
Source Analysis
Page 552
Chapter 15 – Contact Manager
Blue Link Solutions™
Chapter 15 – Contact Manager
Page 553
Blue Link Solutions™
16: Job Costing
The Solutions Job Cost Management System provides job estimating and cost tracking capabilities.
Access Job Costing through Sales | Job Costing.
This versatile Job Cost Management System is fully integrated with all Blue Link Solutions functions, but you
may optionally run the system "stand-alone" for ease of installation and use. The Solutions Job Cost
Management System combines sophisticated job management features with the flexibility to customize the
system to your requirements.
Page 554
Chapter 16 – Job Costing
Blue Link Solutions™
16.1 Set-up Notes
With the Solutions Job Cost Management system, you'll be able to know what the job cost you and if you really
did come in under budget. The summary information from previous jobs will be an invaluable asset when
estimating new jobs. The flexibility of running either standalone or integrated with full accounting functions is
the icing on the cake. You can even start out stand-alone and when you gain confidence switch to an integrated
system. Everything looks and runs the same; lessons learned in one section transfer to another.
The first step is to consider how “integrated” you want your job management to be with the accounting
functions within Blue Link Solutions.
1.
The “integrated” approach will mean that you will use the Purchase Order and Accounts Payable functions
to enter your materials and subcontractor costs, the Sales Order and Accounts Receivable functions to
enter your billings and receipts, and the payroll functions to enter your labour costs. All of these
transactions are identified by the appropriate job information and automatically update your job records.
Because this method makes use of a General Ledger that coordinates and confirms that your transactions
are in balance, you will have a detailed audit trail for all your transactions. You will be able to produce
accurate financial statements based on the information in your system. You may also use this method
without having a formal inventory system. If so, you would use A/P vouchers rather than purchase orders
to charge the materials you order to a job.
2.
The “standalone” approach means that you are not using the various accounting functions in the base
product. Instead, you will use the job transactions option within the Job Cost Management module to
enter your billings, receipts, labour, etc. This approach means that you do not have to "balance" against a
General Ledger and will require fewer steps to get started. Your job records will be accurately recorded
on a per-job basis, but you will not be creating the overall summary information that is used to create
accurate financial statements about the overall health of your business. If you choose this approach you
need only one General Ledger Account. You may enter customers at the beginning or whenever you enter
a job or estimate for one not in the file.
You can start with the “standalone” approach and later set up the necessary information to get started with the
integrated approach; however, because of the way the transactions are handled, you should make this change at
the start of a job.
If you are starting with the standalone approach and later find you want to use another function (such as adding
inventory control or payroll information), return to the startup procedure discussed here and follow the steps
for the “integrated” approach.
The next three sections deal with initial information, which you will need to set up before you start entering
jobs.
Chapter 16 – Job Costing
Page 555
Blue Link Solutions™
16.2 Maintain Job Cost Defaults
This screen allows you to enter default information to be used in the Job Costing module. You get to this
screen from: System Maintenance | System Master Lists | Job Costing tab
See Chapter 6.3.6 - Job Costing for a detailed description of the default setup options and process.
In summary, you enter G/L accounts to default for Labour, Materials, Sub Contract and Other costs. You may
enter Labour and Overhead “burden” percentages, which will be added to cost estimates on various reports in
order to factor these indirect costs into overall job costing.
You may enter a default markup if job pricing is based on a markup from cost. Enter a starting transaction
number (usually 1), and define an existing Inventory item as the type “N” item for Labour. If you have not
created such an inventory item, do so now.
Once have performed the three steps listed below, you are ready to start entering your first job.
1.
Set up the G/L Integration Accounts
2.
Set up the Cost Codes
3.
Set up the Time Codes
Page 556
Chapter 16 – Job Costing
Blue Link Solutions™
16.3 Enter/Change Job Information
Use this program to enter, view, or revise your job records, estimates and standalone Job Cost transactions.
This screen allows you to create the Job Code. This code is used to identify the job for processing transactions
in other parts of Solutions. This screen can also be used to monitor the status of a job, throughout its life.
A typical screen is displayed, followed by an explanation of the screen fields.
Code
To recall an existing job to the screen, enter the code in this field if you know it, or use the drop down list to
select the appropriate job. If you are creating a new job, enter the code for the job and answer yes when
asked if you wish to create a new job.
Name
Enter a name for the job in this field.
Contact
Enter the name of the primary contact person for the job.
Site
You may enter any descriptive information about the site of the job.
Chapter 16 – Job Costing
Page 557
Blue Link Solutions™
Customer
Select the customer for whom the job is being performed, from the existing customers in the accounts
receivable customer file.
Type
You may enter a two-digit code to signify the type of job.
Phone Numbers
You may then enter up to four telephone numbers underneath the customer code, and you may change the
labels next to these telephone numbers. Space has also been provided for entering telephone extensions.
16.3.1
PROJECT DESCRIPTION TAB
Description
This is a free form memo field, into which you can enter an unlimited amount of descriptive information
about the job. This is useful for entering general notes, detailed instructions and other useful information.
Date of Bid
Enter the date of the original bid for the job in this field.
Estimated Start Date
Enter the date on which you anticipate starting the job when you first define this job code.
Actual Start Date
Enter the actual start date once the job has commenced.
Date Approved
You may enter an approval date if applicable in this field.
Last Billed
This field displays the most recent date on which an invoice was allocated to this job from the sales order
system. The information in this field is automatically updated and may not be modified on the screen.
Last Payment
The date on which you last received a payment from the customer for this job is displayed in this field. It is
automatically updated when recording payments, and may not be modified here.
Actual Completion Date
When the job is complete, enter the actual completion date in this field.
Estimated Completion Date
At the outset of the job enter your estimated completion date in this field.
Contract Price
Enter the initial contract price in this field. You may optionally enter contract price transactions using the
job cost transaction function (see later in this section). In this case, the contract price in this field will be
appropriately updated.
Estimated Costs
The estimated costs based on the transactions entered under “Enter Estimates” (see details later in this
section) is displayed here and may not be modified on the screen.
Actual Costs
The total actual costs accumulated against this job to date are displayed here and may not be modified.
Page 558
Chapter 16 – Job Costing
Blue Link Solutions™
Billed to Date
The total amount billed to date against this job is displayed in this field.
Retainage Held
The total amount of retainage currently held on this job is displayed in this field. Use Job Cost Transactions
(see details later in this section) to update these amounts.
Retainage Paid
The total amount of retainage paid on this job is displayed in this field. Use Job Cost Transactions (see
later) to update these amounts.
16.3.2
MORE INFORMATION TAB
When you click on the button labeled More Information, the following screen displays:
Contract Number
You may enter any text or numbers in this field, representing the contract number for this job if applicable.
Square Feet
For construction jobs, you may want to enter the number of square feet in this field. This is an optional
field.
Project Contact
Enter the name of the job contact in this field, if it differs from the contact entered at the top of the screen.
Employees Assigned To The Job
On the right hand side in the middle of the screen you have four fields in which you may allocate your own
employees, as defined in the employee file, to this job. There are five labels to choose from:
Chapter 16 – Job Costing
Page 559
Blue Link Solutions™
1.
2.
3.
4.
5.
Salesperson
Project Manager
Field Supervisor
Administrator
Project Coordinator.
You may alter these labels as required by using the drop down listing.
Estimated Costs
The total estimated costs are displayed again in this field for reference purposes.
To Date Estimated
You may enter in this field the amount of your original total estimated costs that you believe have been used
to date (optional).
Actual Costs
The total actual costs incurred so far in this job are displayed for your information.
Variance
The variance between actual and estimated costs to date is displayed in this field.
Percent Completed
You may enter here a percentage of completion, representing your estimate of the stage of completion of
this job at this stage. This is used on various reports to give you an estimate of how you are doing against
your cost estimates at the current stage of completion.
Percent Variance
This field displays the variance (see above) as a percentage of the total actual costs to date.
When creating a new job, enter the job code, name, contact, site and customer information, then click on the
Save button to save your new job. You may then recall it at any time to complete the additional information.
Usually, you will enter the general information first. Then you would begin recording estimates (see next
section), and finally you will be ready to enter job transactions, either from this program or from the other Blue
Link Solutions modules.
16.3.3
ENTER ESTIMATES
This function enables you to enter estimates for your jobs. You define your labour burden, overhead, and profit
markup percentages in this program; these percentages are printed on the estimate in Print Job Estimates. The
profit markup percentage can be defined to apply to the entire estimate or it can be applied individually at the
cost code level.
Page 560
Chapter 16 – Job Costing
Blue Link Solutions™
To enter estimates, use the Enter Job Information program, recall the required job to the screen, and then click
on the Enter Estimates button. The following screen displays:
Entered By/Date
In this field, record the employee who is actually entering this estimate. This employee must have been
defined in the Employee File, and may be selected from the drop down list. Next to this field, enter the date
that the estimate was entered.
Approved By/Date
This field is for the employee who has approved the estimate, and again that employee must be selected
from the Employee File. Next to this field, enter the date that the estimate was approved.
Overhead Percent
Type a percentage in for your overhead markup. This is the additional cost involved for overhead. For
example, if last year your total costs were one million dollars and your overhead expenses included therein
amount to a hundred thousand dollars, then your overhead markup should be approximately ten percent.
This is an approximate figure and may be adjusted for each job or as you gain experience in understanding
your costs. If you defined a default overhead percentage in Job Cost Defaults (see earlier in this chapter),
that percentage will be the default in this field.
Burden Percent
Type a percentage in for your labour burden. The labour burden dollar amount is calculated at this
percentage multiplied by the total labour amount. This could also be called your additional costs for labour
over and above the hourly rate. This would include benefits and taxes paid by the employer. If you have
defined a default labour burden percentage in the Job Cost Defaults file, that percentage will default here.
Chapter 16 – Job Costing
Page 561
Blue Link Solutions™
Markup Percent
If you enter a figure in this field, the total price will be calculated based on all cost code line items entered
for this particular change order. You may also specify a markup for each individual cost code that will
override this global value. The total price is calculated as the markup percentage multiplied by total costs,
added to total costs. For example, if your markup percentage is twenty percent and your total costs for this
change order are one hundred thousand dollars, then the total calculated price would be one hundred and
twenty thousand dollars. If you have defined a default markup in Job Cost Defaults, that percentage will
default here.
Change Number
This is the actual change order number. It is used to track each change order, starting from the original
estimate (which should be entered as change order number zero, the default value). You may use the list to
select a previously posted change order by number, in order to review it on screen. To enter a new change
order, click on the "New Change Order" button. This will automatically ally default the next sequential
change number in this field.
Cost Code
Type in one of the cost codes or use the drop down list to display a list of available cost codes. Once you
have selected the cost code, you will be entering estimates for this change order for that cost code. Once
you have completed entering all the estimates for the selected cost code, you may then select the next cost
code in order to continue entering estimated costs.
Cost Description
Once the cost code has been selected the cost code description is displayed automatically.
Markup Percent
If you want to vary your markup for some or all cost codes, type in a markup percentage here. The default
entry is the percentage entered in the markup field in the estimate header above.
Once you have selected the cost code and optionally entered the markup percentage, you may enter the
information described below for each of labour, materials, subcontract and other costs:
Units
This column is used to enter the number of units (such as hours, pounds or kilograms, square feet, etc.) in
the appropriate category. This amount will be multiplied by the rate to calculate the total estimate for this
particular item.
Rate
If you defined a default rate in the cost code file, that rate will default here but may be changed if necessary.
U/M
This is a memo field in which you can enter a three-character description of the unit of measure being used
for this cost code. The default is displayed from the cost code record.
Amount
The units are multiplied by the rates to automatically calculate the numbers in this column, which may not
be manually modified.
Once you have finished entering the units, rate and units of measure for the cost code on which you are
currently working, continue pressing enter or tab through the unit of measure column for the "other" line.
At this time the cost code fields will clear in order to allow you to enter information for the next cost code.
At the same time, the summary information to the right of these data entry fields will be updated to display
the total number of units, and total amount, for each of labour, materials, subcontract and other, for the
change order/estimate currently being entered. The total amount of the current change order is displayed at
the bottom of the amount column.
Page 562
Chapter 16 – Job Costing
Blue Link Solutions™
New Change Order Button
When you define a job, you would normally enter your initial estimates of the costs of completing that job.
When doing this for the first time, click on the "New Change Order" button and complete all the fields
described above. Repeat this for each of the cost codes for which you are building an estimate, and when
complete, click on the "Post Estimates" button to post these estimates, which will then be permanently
saved as your initial estimate for this job.
During the course of most jobs, provisions and updates are made to the original estimates. These may be
entered in Blue Link Solutions by way of "change orders", which allow you to add to or subtract from the
original estimates while maintaining a record of those original estimates and all the changes made to them.
When entering a change order representing a modification to the original estimates, you would again click
on the New Change Order button and complete the information; however this time you are entering only
the changes to the original information and not the total overall revised estimates. For example, your
original estimate for a particular cost code for labour was a hundred hours at twenty-five dollars per hour.
Now you believe the correct estimate would be one hundred and twenty hours at the same rate, you would
enter a change order for twenty hours at the original rate. This change order will be added to the original
estimate when working out the total revised job estimate.
Post Estimates
When you click on the Post Estimates button, the following screen will be displayed:
Click Yes to add this change order to this job; click No to cancel the request.
When the posting has completed successfully, the following screen will be displayed:
Note:
While entering a change order the summarized totals display the amounts for the current change order
only. However, after posting the change order (using the Post Estimates button) these amounts are
updated to display the overall total estimates including all change orders.
Chapter 16 – Job Costing
Page 563
Blue Link Solutions™
16.4 Enter Job Transactions
The purpose of this program will vary depending upon how you use the Blue Link Solutions job costing
module. Only those users using the "standalone" approach to job costing will use the additional transaction
types afforded by this program.
If you are using the integrated accounting functions for your job management, you will not update any costs
or billings using this program, unless processing corrections. All cost figures will be recorded using the
accounts payable, purchase order and payroll programs, and billing and payment receipt information would
be tracked through the sales order and accounts receivable modules.
In contrast, if you are using the job costing module as a standardized estimating/cost tracking system, you
will be using job transactions to update every phase of your job data. You can edit transactions until they
are posted.
To enter transactions, use the Enter Job Information program, recall the required job to the screen, and then
click on the Enter Transactions button. The following screen displays:
Transaction Type
You may enter any one of eleven transaction types, which may be listed by pulling down the drop down list.
The transaction types available are:
1.
2.
3.
4.
5.
Costs - Labour
Costs - Materials
Costs - Subcontractor
Costs - Other
Billings
Page 564
Chapter 16 – Job Costing
Blue Link Solutions™
6.
7.
8.
9.
10.
11.
Receipts
Retainage - Held
Retainage - Paid
Price - Original $
Price - Current $
Estimate - Total $
Transaction Number
All transactions entered through this program are sequentially numbered. The next available transaction
number for this job will default in this field, but may be overridden if you have a specific transaction
number which you need to allocate against this, such as a supplier's invoice.
Reference 1
This field is used to enter information that depends on the transaction time. See General Program Operation
below for a complete list and explanation.
Reference 2
This field is used to enter information that depends on the transaction time. See General Program Operation
below for a complete list and explanation.
Trans Type
(1) Labour
(2) Materials
(3) Sub-contract
(4) Other
(5) Billings
(6) Receipts
(7) Retainage Held
(8) Retainage Paid
(9) Original Price
(0) Current Price
(A) Estimated Costs
Reference 1
Employee
Vendor
Sub Code
User Defined
Customer Code
User Defined
Customer Code
Customer Code
Customer Code
Customer Code
Customer Code
Reference 2
Cheque #
Invoice #
Invoice #
User Defined
Invoice #
User Defined
Invoice #
Cheque #
Contract #
Chg. Order #
Chg. Order #
Date
The transaction is assigned the date entered in this field. The default entry is the system date.
Cost Code
Select the applicable cost code for this transaction, using the drop down list if necessary to display a list of
defined cost codes.
Every cost attributed to a job must be associated with a cost code. Transaction types 5 to A ("non-cost") have a
special cost code (00000) associated with them which is entered automatically when one of those transaction
types is selected. For transaction types 1-4, you must type in a cost code or press F4 and select from the list of
cost codes displayed.
Next, you can fill in the reference fields to associate the transaction with more complete information for your
records. The Reference 1 and Reference 2 fields serve a different purpose in different types of transactions. A
list of each type of transaction and the information required is listed on the following page. Only in type 4 are
the entries optional.
Once entry in the reference fields is completed, enter the transaction Date and a Description for the transaction.
Chapter 16 – Job Costing
Page 565
Blue Link Solutions™
When entering Cost type transactions (1-4), you must enter the number of Units for the transaction. The Rate
and U/M (unit of measure) for the cost code is displayed from the cost code record, but you can change either
one during transaction entry. The Extension is calculated automatically from the Units times the Rate.
U/M
The unit of measure from the cost code record is displayed, but may be changed for this transaction without
affecting the actual cost code definition.
Units
Enter the number of units (if applicable) for this transaction.
Rate
Enter the rate (or price per unit) for this transaction, if applicable.
Amount
The total amount of this transaction is displayed here, or in the case of certain transaction types may be
manually entered here.
Description
You may enter up to thirty characters of description in this field. The description prints along with the
transaction information when you print the job transactions report.
Each time you choose a cost code and enter or edit a transaction, the estimated costs for that cost code are
displayed in the field at the bottom of the screen. The actual transaction costs are also displayed as a
running total. If using the "standalone" approach and entering all your job costs using this program, you
may wish to update the job completion percentage for one of the four major cost categories: Labour,
materials, subcontract and other, using the "% Cmpl" column.
Selecting a Cost Code
For the other transaction types, only the Extension is entered. Record the amount of billing, payment,
retainage, price, or costs from your actual job records.
Page 566
Chapter 16 – Job Costing
Blue Link Solutions™
16.5 Enter/Change Time Card Information
Use this program to enter employee time cards for your current payroll. When you specify a job for a time
card, a transaction is created to update labour cost information for that job. The proper steps in processing
time card entries are as follows (this only applies if you are using the "integrated approach"):
1.
Enter time cards using Enter/Change Time Card Information.
2.
Print time card entries using Time Card Report. This program will let you verify that what you entered
in step 1 is correct. If you find errors in your entries you should return and edit the information entered for
the employee(s).
3.
Post the time card entries using Post Time Cards. This will update the employee's payroll (to be paid)
record and the time card history file. Make sure that everything is correct before you do this. Once the
time cards are posted the information is cleared from the time card file.
4.
Import the time cards into payroll program (if applicable). Blue Link Solutions integrates with Paymate’s
payroll program and therefore you can have the time cards entered for Job Costing become the timesheets
for payroll. Under Employee & Salesperson | Paymate -Job Cost Export, select the date range to export
and the employee range. Then identify where you want the file to export to and what the file name should
be. Then in Paymate, you will import this text file. See Chapter 19 on Employee & Salesperson for more
information.
5.
Complete the next payroll run. At this time the actual hours and amounts paid are added to the job
transactions and actual costs.
The following screen will be displayed when you select Enter/Change Time Cards
Chapter 16 – Job Costing
Page 567
Blue Link Solutions™
Employee Number
Enter the employee number of an existing employee, or select from the drop down list. Once you have
selected the employee card that person's name displays to the right hand side of this field.
Hourly
This box will be checked if the employee you have selected is an hourly rate employee, and will be blank if
it is a salaried employee. Although time cards will normally be entered for hourly rate employees, you may
use this for salaried employees in order to track their cost and/or record directly re billable time for a
salaried employee.
Department
The Payroll department to which the selected employee belongs is displayed here and may not be changed.
Regular Rate
The employee's regular hourly rate displays in this field and may not be changed here. However, you may
vary this rate for each individual item entered on the time card below.
Overtime Rate
The employee's normal hourly overtime rate, if defined in the employee file, is displayed here and may not
be modified. However, you may override the overtime rate if necessary when entering the time card details
below.
The main body of the time card entry screen is columnar, and a description of each of the columns follows:
Date
The date for individual time card line items is entered here. There is no limit to the number of time card
entries which may be entered per date, as you may need to make several entries for the same day for the
same employee in order to charge that employee's time to different jobs and/or different job cost codes.
Page 568
Chapter 16 – Job Costing
Blue Link Solutions™
Start and Stop
In these two columns, you may optionally enter the start and end times for the time card entry you are
currently entering. If you do so, the number of hours will automatically be calculated and placed in the next
column. If you wish to make use of these columns, please note that the time should be entered in any of the
standard Windows time formats, for example:
9:00 AM or 9:00
3:30 PM or 15:30
Hours
Type in the actual hours worked. If you enter the start and stop times, this number will automatically be
calculated and displayed but may be overridden in any event.
Chapter 16 – Job Costing
Page 569
Blue Link Solutions™
Type
Enter the type of time card code in this field, or select from the available codes using the drop down list.
Rate
The rate will default based on the type specified. This may be changed.
Extension
This column is automatically calculated as the number of hours multiplied by the rate.
Job
Enter the job code associated with this line of this time card. You may review the drop down list to see the
available job codes. If this field is left blank, then the cost code and craft fields will be bypassed and the
employee's time for this line will not be allocated to any job.
Task (Cost Code)
Select the cost code associated with this time card entry, if you are allocating this line to a job. You may
optionally use the time card entry program to create unposted invoices (i.e. sales orders) which directly rebill some or all of the employee's time to the customer for whom the job or job is being performed. If you
wish to do so, enter the number of billable hours in this column. If you are not directly re-billing time for
this job or for this line of the time card, leave this amount to zero.
Billable Rate
If you are re-billing some or all of this employee's time for the current line, enter the hourly rate at which
that time should be billed. The customer will be invoiced for the number of billable hours multiplied by this
rate.
Account
The General Ledger account to which the costs of the employee pay for this line should be allocated. This
account is defaulted based on the pay type, etc., but may be modified here.
Department
If you have a departmentalized General Ledger, you may optionally enter a valid department for the General
Ledger account defined above.
At the bottom of the screen, the following total fields display and may not be modified:
Average Rate
This field displays the average hourly rate for the above time card, and is based on the amounts in the next
two fields.
Total Hours
The total number of hours recorded on this time card for this employee is displayed here.
Total Amount
The total of the "Extension" column is displayed here. This amount is divided by the total hours to arrive at
the average rate.
Save/Move Next
After selecting an employee, any time card entries which have already been saved and not posted for this
employee will be displayed. You may modify this information if required. You may then enter any
additional lines for this employee's current time card.
The information entered in employee time cards will be retained on file, and may be recalled to the screen,
until those time card entries have been posted. Please refer to the Post Time Cards section of this manual
for more information on posting time cards.
Page 570
Chapter 16 – Job Costing
Blue Link Solutions™
16.6 Post Time Cards
This screen is used to process the time cards. Time cards can be posted for specified employees or for a
specified range of dates. This routine will generate the job cost transactions, post to the Payroll system (if
applicable), and create unposted invoices (sales orders) for billable time.
From Employee/Thru Employee
You may enter an individual employee, a range of employees, or leave the default in order to include all
employees in this posting run.
From Date/Thru Date
Enter a range of dates for this posting run. Only time card entries that fall between the selected dates will
be posted. It is very important that you enter the correct information here in order to have the appropriate
date included in the next payroll run.
Post Button
When you click on the “Post”, the following screen will be displayed:
When the posting completes successfully, the following screen will be displayed:
The selected time card records for the selected employees are posted. This entails the following:
1. Each time card is posted to the current payroll file, and will be ready for export to a text file.
2. Each posted entry is transferred to the time card history file, as a permanent record.
Chapter 16 – Job Costing
Page 571
Blue Link Solutions™
3.
4.
Any billable hours recorded on the time card entries will be grouped together by customer, and sales
orders will be created.
The time card entries, once posted, will be removed from the time cards and will no longer be
accessible from the time card entry screen.
CAUTION:
It is strongly suggested that, before you run this program, you print or review some of the time card
reports. At a minimum, you should review the Work Day time card report for the range of dates to be
entered on the posting screen, in order to ensure that the time cards that will actually be posted are
correct.
Note:
When the actual job costs are updated by the time cards depends on a setting in the System Interface. If
you leave the Post Time Cards to Job only (not Payroll) flag off, the time cards will not automatically be
reflected in the actual job costs until the next payroll run is complete and the amounts have actually been
paid. If you choose not to use Paymate, and you turn the flag on, the job costs will be updated
immediately upon posting the time cards.
Page 572
Chapter 16 – Job Costing
Blue Link Solutions™
16.7 Close Job
Use this program to close your jobs once they are finished. The job must be completely billed and paid, and all
job transactions must be posted, before you can close a job. Once a job has been closed you will not be able to
make any further transaction entries to it.
Choose Procedure
In order to close a job, enter a valid job code or select a job from the list display. Then select one of the
following two options:
Close Job, Move to History-
If you want a job's transactions and estimates preserved in the transaction
history file, select this option. All job transactions and estimates are then
saved and can be printed at any time.
Close Job, Don’t Move to History Select this option if you want this job to be permanently removed from the
system, with no history maintained at all.
When you click the Process button, the following screen will be displayed:
Chapter 16 – Job Costing
Page 573
Blue Link Solutions™
16.8 Print Job Information Reports
You can use this program to print your job cost reports. Select the report you wish and the destination.
Current Reports
Project Listing
Cost Code
lists summarized information, one line per open job.
a listing of all cost codes on file.
Work in Process
Job or Customer
lists summarized financial information for jobs currently in process, sorted and
grouped by customer or by job.
Project Transactions
reports on all transactions allocated to each selected job, whether entered via Job
Cost Transactions or other modules. This report is the detail behind the total cost
figures displayed on certain other reports and screens.
Job Cost Analysis
an analysis of actual costs versus estimates, showing variances
Estimate Report
shows the original estimates, all change orders, and the total current estimated costs
for each selected job.
Job Profit and Loss
summarizes costs and revenues, grouped by cost code, and presents a total
profit/loss figure for each job
Timecard Billing Report - an audit trail of amounts re-billed to the client from Time Card Entry.
Page 574
Chapter 16 – Job Costing
Blue Link Solutions™
History Reports
Closed Project Listing lists summarized information, one line per closed job.
Closed Project
Transactions
reports on all transactions allocated to each selected
job, whether entered via Job Cost Transactions or other modules. This report is the
detail behind the total cost figures displayed on certain other reports and screens.
Job Profit and Loss
Closed Jobs
summarizes costs and revenues, grouped by cost code,
and presents a total profit/loss figure for each closed job
From/Thru Job
Select the jobs you wish included in the report. If you leave the defaults, all jobs will be included. This
selection is made available when you choose the following reports:
1.
2.
3.
4.
5.
6.
Project Listing
Work in Progress, Job
Project Transaction
Job Cost Analysis
Estimate
Timecard Billing
From/Thru Cost Code
Select the cost codes you wish included in the report. If you leave the defaults, all jobs will be included. This
selection is made available when you choose the following reports:
1.
Cost Code
From/Thru Customer
Select the customers you wish included in the report. If you leave the defaults, all jobs will be included. This
selection is made available when you choose following reports:
1.
Work In Progress, Customer
Print Where?
You may select for the report to be printed to the printer or to be previewed on screen. Click the “Print” button
to send it to the printer or the screen or the “Cancel” button to cancel the request.
History Reports include:
Closed Project Listing
Closed Project Transactions
Job Profit & Loss – Closed Jobs
Sample Job Information Reports
Project Listing / Closed Project Listing
Chapter 16 – Job Costing
Page 575
Blue Link Solutions™
Page 576
Chapter 16 – Job Costing
Blue Link Solutions™
Cost Code Listing
Work In Progress Report by Customer
Project Transaction Listing/Closed Project Transaction Listing
Chapter 16 – Job Costing
Page 577
Blue Link Solutions™
Job Cost Analysis Report
Project Estimate Report
Job Profit and Loss / Closed Job Profit and Loss
Page 578
Chapter 16 – Job Costing
Blue Link Solutions™
Job Cost Time Card – Billing Report
Committed Cost Report
Chapter 16 – Job Costing
Page 579
Blue Link Solutions™
16.9 Time Card Reports
You can use this program to print your job cost reports. Select the report you wish and the destination.
Sort Selection
Select how you want the report sorted:
1.
2.
3.
4.
5.
Employee Number
Work Day
Pay Type
Job Code
History By Employee
NOTE:
Reports 1-4 are based on unposted time cards only. Report 5 is based on time cards posted and paid out
via the payroll system.
From/Thru Employee
Select the employees you wish included in the report. If you leave the defaults, all employees will be included.
This selection is made available when you choose to sort by “Employee Number” report.
From/Thru Day
Select the dates you wish included in the report. If you leave the defaults, only the current date will be included.
This selection is made available when you choose to sort by “Work Day” report.
From/Thru Pay Type
Select the pay types you wish included in the report. If you leave the defaults, all pay types will be included.
This selection is made available when you choose to sort by “Pay Type” report.
From/Thru Job Code
Select the jobs you wish included in the report. If you leave the defaults, all jobs will be included. This
selection is made available when you choose to sort by “Job Code” report.
Page 580
Chapter 16 – Job Costing
Blue Link Solutions™
Type of Report
Select how the information should be presented: in Detail or in Summary form.
Print Where?
You may select for the report to be printed to the printer or to be previewed on screen. Click the “Print” button
to send it to the printer or the screen or the “Cancel” button to cancel the request.
Job Cost Time Card -Employee
Chapter 16 – Job Costing
Page 581
Blue Link Solutions™
Page 582
Chapter 17 – Elite Items
Blue Link Solutions™
17: Elite Features
The Elite version of Blue Link Solutions includes the following extra feature and modules. They are
integrated into the various Blue Link Solutions modules:
RMA (Returned Merchandise Authorization) Module
This module is to track impending customer returns, primarily for big ticket items (including serialized
items), and process the returns back into inventory with all the appropriate accounting information.
In addition, the module prints a document for the customer (a form of receipt) and provides various reports.
Landed Cost Tracking
This Elite module is intended to facilitate the inclusion of landed cost factors, such as duty, freight, etc., into
the inventory cost of received purchase orders. The estimated amount of each landed cost factor will be
added to the supplier cost on the one hand, and accrued as a liability on the other hand. When an invoice is
received from, for example, the carrier or broker, it will be set off against the accrued landed cost factor.
The landed cost module is built into the Purchase Order Accounts Payable module of Blue Link Solutions.
In addition, there are set up options in the System Interface and Inventory screens.
Freight Management
This module, available in Elite and integrated with the sales order and inventory modules, facilitates
calculating freight charges to customers based on the carrier, the zone (usually based on postal code – only
applicable in Canada), and either the weight or the cubic measurement of the shipment.
The module also optionally facilitates tracking the shipper’s waybill number and additional shipping
information.
The Configurator
This elite feature facilitates the configuration an item on a Sales Order made up of several sub-items. For
example, if you sell computers you may need to configure the computer to the sub-components that make it
up. These may include the amount of memory, the hard drive, a monitor, etc.
Fill Backorders
A button has been added to the Sales Order screen labeled “Fill Backorders”. When you click this button
with a sales order on screen, it assists in filling the backorders for each detail item on that sales order which
has a backorder quantity.
Contract Pricing
A drop down list has been added to the A/R Enter/Change Customer screen on the Defaults tab. When you
choose a contract from the list, the contract’s special pricing on items you have defined will override the
default system pricing on all Sales Orders you create for this customer.
Chapter 17 – Elite Items
Page 583
Blue Link Solutions™
FIFO Costing
A flag has been added into the System Interface | Inventory tab that switches the inventory costing method
from Average to First In First Out.
Group Statements and Faxing / Emailing Customer Statements
See Chapter 9 – Accounts Receivable for details.
Special PST Calculation on Installed Products
See Chapter 14 – Order Entry for details.
Page 584
Chapter 17 – Elite Items
Blue Link Solutions™
17.1 Maintain Contract Pricing?
Contract Pricing is an Elite Feature.
In Elite, you can define special price lists for inventory items and assign these lists to one or more
customers. This allows you to group your customers based on any special pricing they may receive while
maintaining your default selling prices. For example, a contract called “US Pricing” could be defined to
automatically charge the US dollar price to US dollar customers.
Then in Enter / Change customer, you will assign a contract to this customer. This is on the defaults tab
under Sales Related. Then in Order Entry when the products that are on this contract are sold to the
customer with this contract assigned, the price will be that which was set up in Contract Pricing.
Chapter 17 – Elite Items
Page 585
Blue Link Solutions™
17.2 RMA (Returned Merchandise Authorization) ?
The RMA module is an Elite feature
The purpose of the RMA module is to track impending customer returns, primarily for big ticket items
(including serialized items), and process the returns back into inventory with all the appropriate accounting
information.
In addition, the module prints a document for the customer (a form of receipt) and provides various reports.
17.2.1
DEFINE REASON CODES
Every time you enter an RMA, you need to supply a reason for the return. This reason will be selected from
a set of standard reasons which you will define using the instructions in this section. You may then obtain
reports grouped by reason, so that you can determine the primary causes for returned merchandise.
Reason codes are defined in the System Interface on the Terms / Types/ RMA Reason Codes / Other
Lists tab in System Master Lists.
You can now define as many different reason codes as you require by listing them in the table.
17.2.2
SET RESTOCKING CHARGES & RMA WRITE-OFF G/L CODES
In System Maintenance | System Master | G/L Information choose the G/L codes you wish to use for:
Restocking Charges:
The difference between the invoiced amount of the returned merchandise and the actual amount of credit
you are giving the customer for the return.
For example, a customer may return a stereo that was originally invoiced for $1,000. If you are giving them
a credit of $800, the difference of $200 would be assigned to the “Restocking Charges” G/L code.
RMA Write-Offs:
The RMA module uses this account to write-off amounts that aren’t recoverable. Specify the expense
account you would like to use for losses due to RMA.
17.2.3
SEQUENCE OF EVENTS
A typical sequence of events would be as follows:
Enter an RMA as a customer request, usually received in advance of the product actually being returned.
An RMA number will be generated for the customer to reference.
1.
Optionally print or fax a RMA confirmation document to the customer and/or for your records.
2.
When the product is actually returned, recall the RMA record to the screen and process it.
3.
Again, optionally print the RMA confirmation document.
The following description assumes the sequence of events, but it is possible to enter and process the RMA
all in one step.
Page 586
Chapter 17 – Elite Items
Blue Link Solutions™
17.2.4
FIELD DESCRIPTIONS
The following is a brief description of the use of each field on the screen, based on the sequence of events
as described above.
Processed
This check box is automatically checked once an RMA has been processed, and may not be manually
modified by the user.
Processed By
This is the log in name of the user who actually processed the RMA, and is automatically set by the system.
It may not be manually edited.
Date Received
This reflects the date on which the RMA was actually processed and the product was received back into
inventory.
Freight Status
Use this field to enter brief notes concerning the freight status of the RMA.
Find Existing RMA
Use the “Find Existing RMA” drop down list to recall a previously-entered RMA record to the screen.
Show Processed RMA’s in Pick List
By checking off this flag you will also view the RMA’s which have been processed. By default, the ones
which have not been processed are show in the list.
Chapter 17 – Elite Items
Page 587
Blue Link Solutions™
Customer
From the drop down list, select the customer who is returning the merchandise. Note that this customer
must exist in the customer file. The customer’s name displays alongside the code.
You may select by code or by name.
Comments
Enter any comments relevant to this RMA request.
Tax Authority
Select the tax authority applicable for this customer. The customer’s default tax authority will be filled in
upon selecting the customer.
Date Entered
The date entered defaults to the current date, but may be manually changed.
Scheduled
Enter the date the item is to be returned.
Salesperson
Enter the salesperson who originally sold this product. This will reverse their commission. Then if you
resell the product the salesperson doesn’t benefit from this replacement sale.
Entered By
This field is automatically updated by the system, based on the login name.
Authorized by
Enter the initials of the person at your company responsible for authorizing RMAs.
Details Tab:
Product
Select the product code being returned from the drop down list. This product code must already exist in the
inventory file.
Description
This is the product description bound to the product code.
Original Invoice
Select the original invoice number on which the item was shipped from the drop down list, or enter it
manually. Although this is not a mandatory field, it is recommended that you do enter or find the original
invoice. When the invoice has been selected, the original sale price and cost of goods sold are recorded
based on the cost and selling price for these items on this invoice. If you do not select the original invoice,
you will have to fill these fields out manually.
Expected Quantity
Enter the quantity being returned. If you are returning a serialized product, you should enter a quantity of
one as you may only return one serialized item at a time.
UOM
If you are using Unit of Measure fill in this field. The UOM will default to that on the invoice being
referred to but you may override it. For instance you may have sold one case but your customer is returning
6 units.
Page 588
Chapter 17 – Elite Items
Blue Link Solutions™
Received:
Enter the quantity received.
Return to Inventory
Check this box if you would like the inventory item to be returned to the inventory.
Reason
Select the appropriate reason for this return from the drop down list. The entries that appear in the drop
down list are maintained in the system interface screen.
Serial Number
If this is a serialized item, enter the serial number manually or select it from the drop down list (the list will
display only those serial numbers that have been sold to the selected customer). You may, however, enter
any serial number in this field. If you enter a quantity other than one in the quantity field above, that field is
reset to one when you enter a serial number.
Original $
Enter the unit-selling price that the customer paid for the item. If the quantity is greater than one, the sale
amount should reflect the extended selling price and not the unit price. If you have selected an invoice the
sale price you sold this product at will default.
G and P
These stand for GST and PST. These are checked on or off based on inventory setup.
Received Total
This is the extension of the quantity received multiplied by the original sale price.
Restock Fee
The restocking charge is an automatically calculated field, reflecting the difference between the original sale
amount and the refund amount.
Refund
Enter the amount of the refund you would like to issue to the customer. For example, if the original sale was
$100.00, and you are charging the client a restocking fee of $15.00, you would enter $85.00 in this field.
Location
From the drop down list, select the inventory location to which this product is being returned.
Cost
This is the inventory cost per unit. It defaults from the cost of the original sale of this item. If the invoice is
not selected then the last cost of this inventory item is used.
Notes
This is an unlimited length memo field, in which you may enter as many notes and comments regarding this
return as are required.
Summary Information
Inventory Value
This amount represents the value at which the returned item is to be brought back into inventory. If you
selected the original invoice, the cost of goods sold as recorded on that invoice is automatically defaulted in
this field. When the return is processed, the returned items will be brought into inventory at that value, and
cost of goods sold will be reduced accordingly by the same amount.
Chapter 17 – Elite Items
Page 589
Blue Link Solutions™
Value of Items to be returned from original invoice
This is the sum of the Received Total
Less Restocking Charge
This is the sum of all restocking fees for this RMA.
Amount to be Refunded
This amount is the total amount to be refunded to the customer, excluding sales taxes.
Total Refund
This amount is the total amount to be refunded to the customer, including sales taxes. These are calculated
fields and may not be modified.
Recalculate Totals
If the totals have not refreshed after entering the RMA, then click on this button to update the totals.
Save the RMA
After entering this information, you would normally click on the “Save” button to save the RMA entry.
However, as previously mentioned you may continue from this point and immediately process the return.
STATUS SECTION
When you are ready to process the return, with the appropriate RMA number on screen, you would do the
following:
1.
Ensure that the Date Received field reflects the actual return date. If it is empty, the current date will
automatically be defaulted.
2.
Optionally click on the “Print” button to print preview the RMA confirmation document.
3.
Click on the “Process” button.
Print Button
You can click this button to print the RMA at any stage. Please note that you may print preview the RMA
confirmation at any time, both before and after the RMA has been processed.
Process Button
When you have received the merchandise and are ready to process and post the RMA to the G/L, click the
“Process” button. It will be grayed out if the RMA has already been processed. The following screen will
be displayed:
Click Yes to post the RMA transaction; click No to cancel the request.
Page 590
Chapter 17 – Elite Items
Blue Link Solutions™
17.2.5
RMA REPORTS
The RMA report selection screen gives you the option to print one of three reports, and for each report you
may enter a multitude of selection criteria. The selection criteria that may be entered are:
1.
2.
3.
4.
A range of products
A range of reasons
A range of RMA numbers
A range of dates (note this refers to the date entered, not the other dates).
The three variations of the report, which are selected by clicking the appropriate selection button in the Sort
By box on the selection screen, are as follows:
Report by Reason Code (Processed Only)
This lists under a sub heading for each Reason Code all the processed RMA’s for that Reason Code. Note
that this report only includes RMA’s which have been processed.
Report by Product (Unprocessed Only)
This report groups RMA’s by Product, and includes only processed RMA’s.
Report by RMA Number (All)
This report, which includes all RMA’s whether processed or not, lists information by individual RMA, and
is a summary of the information which displays on the RMA screen.
Chapter 17 – Elite Items
Page 591
Blue Link Solutions™
17.3 Landed Cost Tracking ?
Landed Cost Tracking is an Elite feature
This Elite module is intended to facilitate the inclusion of landed cost factors, such as duty, freight, etc., into
the inventory cost of received purchase orders.
The estimated amount of each landed cost factor will be added to the supplier cost on the one hand, and
accrued as a liability on the other hand. When an invoice is received from, for example, the carrier or
broker, it will be set off against the accrued landed cost factor.
The landed cost module is built into the Purchase Order Accounts Payable module of Blue Link Solutions.
In addition, there are set up options in the System Interface and Inventory screens.
17.3.1
SETTING UP LANDED COST FACTORS
Before making use of landed cost tracking, it is necessary to define the different landed cost factors that you
will use. In order to do this, go to System Maintenance | System Master Lists | Shipping Related tab.
The following screen is displayed:
Use this screen to define as many landed cost factors as you are likely to require. For each landed cost
factor you need to define the following fields of information:
Factor
Give the landed cost factor a name (such as Duty, Freight, etc.).
Percentage
If this factor is to be estimated as a percentage of the supplier cost, enter that percentage here.
Amount
Alternatively, if the factor is to be estimated based on a flat amount per purchase order, enter that amount
here. Note that if you enter an amount here, any previously entered percentage is reset to zero.
Default
Check this check box if you wish this landed cost factor to be automatically defaulted on every purchase
order for which landed costs are defined. If you do not check this box, you will have to manually add this
factor to purchase orders.
General Ledger Account
From the combo box (drop down list), select the General Ledger liability account to which the accrual for
any estimates of this factor should be credited.
Vendor
Enter the default Vendor for this factor. It may be overridden at the time of the purchase order or purchase
order receipt.
Page 592
Chapter 17 – Elite Items
Blue Link Solutions™
Inventory override
You may optionally enter a number between one and five in this field. Each number may only be entered
for one factor. This will be used to define inventory item overrides, if required (see below).
17.3.2
INVENTORY ITEM OVERRIDES
If you defined any of the landed cost factors as being subject to inventory item override, you may now
define the inventory items to which these factors are not to be applied. In order to do so, go to the
Inventory maintenance screen, and do the following for each item as required:
Recall the item to the screen
Click on the “Purchases” tab. The following screen will be displayed:
In the “LANDED COST OVERRIDE” section, select the check boxes next to the Landed Cost Factors
which are NOT to be applied to the current inventory item.
Remember to click on the “Save” button to save your changes.
17.3.3
SETTING UP LANDED COSTS FOR A PURCHASE ORDER
You may apply landed cost factors on purchase orders either when setting up the purchase order, or when
receiving the purchase order. Therefore, from each of the Purchase Order screen and the Receive Purchase
Order screen, you may click on the “Landed Costs...” button to pop up the Landed Costs accrual screen,
which appears as follows:
Chapter 17 – Elite Items
Page 593
Blue Link Solutions™
If you have not already defined any landed costs for the current purchase order, the default landed costs are
set up based on the “Default” check box in the Setup Landed Costs screen. If you have previously set up
landed costs for this purchase order, the records you previously set up now display. Note that for defaulted
costs you need to define the appropriate vendor.
You may add, delete or modify landed costs as required. Note that if you set up a percentage for any landed
cost factor, the amount calculated is based on the line items for which the factor applies (and excludes those
which have been set as override items for that factor). Please also note that, on the Received Purchase
Order screen, only the received quantity is taken into account in apportioning the landed costs.
17.3.4
POSTING LANDED COSTS
Before receiving a purchase order with landed costs, you must assign each landed cost factor to a vendor.
When you receive a purchase order for which landed costs have been defined, the landed costs that you
have set up are taken into account as follows:
Note:
For Landed Costs to apply to a Purchase Order, the Landed Costs button must be clicked at either the
creation of the Purchase Order or at the time of the receipt. If the Landed Costs button is not selected,
landed costs will not be applied to this order.
1.
Each landed cost amount is converted to home currency dollars if applicable, using the Exchange
Rate applied on the Received Purchase Order screen if the landed cost factor’s currency is the
same as the purchase order vendor’s currency, otherwise convert it at the rate set up in the
Currency’s file.
2.
The landed costs are pro rated over the received inventory items (excluding those for which the
factor has been set as an override). The pro-rated landed cost is then added to the supplier cost
(again converted to home currency dollars) and this is the value that is used to place the item in
inventory.
3.
For each landed cost factor, an accrual is set up (in home currency dollars) in a General Ledger
account as specified in the Setup Landed Costs screen
4.
A Landed Cost Accruals file is updated with each landed cost factor accrued, and the supplier’s
accrual amount, against which invoices from suppliers and for landed cost factors will be pro rated
on the Accounts Payable Voucher screen.
17.3.5
REPORTING ON ACCRUED LANDED COSTS
From the Elite Items menu, you may select the Landed Cost Accruals report. The following screen will be
displayed:
Page 594
Chapter 17 – Elite Items
Blue Link Solutions™
From/Thru Factor
You can select a range of factors (the default being all factors) to include in the report. The report displays
all currently accrued landed costs, grouped initially by General Ledger accrual account, and within each
account grouped by vendor.
Print Where?
You may select for the report to be printed to the printer or to be previewed on screen. Click the “Print” button
to send it to the printer or the screen or the “Cancel” button to cancel the request.
Sample Report
17.3.6
LANDED COST ACCRUALS CHANGE VENDOR
This form is designed to change the accrued vendor before the invoice is received. For example, when you
were accruing freight you may have accrued it to FedEx. Now when the invoice comes in you find out that
UPS actually shipped the product. By pulling up this form you may change the vendor from FedEx to UPS.
Chapter 17 – Elite Items
Page 595
Blue Link Solutions™
1.
2.
3.
4.
Select the Purchase Order this invoice relates to
Select the Receipt # from this Purchase Order
Select the factor whose vendor needs to be changed
Exit when you are done
Now the invoice will be accrued under the new vendor.
17.3.7
REPORTING ON LANDED COST VARIANCES
To track what variances have been posted by the Landed Cost Tracking system, choose the Landed Cost
Variances report from the Elite Items menu. The following screen will display:
From / Thru Date:
Choose the period for which you want to generate the report.
Note:
The dates referred to are dates of the accruals, i.e. the dates that the Accounts Payable vouchers were
processed using the Landed Costs on the report)
Print Where?
You may select for the report to be printed to the printer or to be previewed on screen. Click the “Print” button
to send it to the printer or the screen or the “Cancel” button to cancel the request.
Page 596
Chapter 17 – Elite Items
Blue Link Solutions™
Sample Report
17.3.8
APPLYING LANDED COST ACCRUALS AGAINST VENDOR INVOICES
When processing an invoice from a vendor for which landed costs have been accrued (this includes the
product supplier), use the Accounts Payable Voucher screen as usual. If there are Landed Costs on file for
this vendor then the following form will appear:
Each currently accrued landed cost for the vendor displays on this screen. Note that a separate line displays
for each receipt of a purchase order if one purchase order was received in multiple shipments.
Vendor
The vendor code, name and native currency.
Chapter 17 – Elite Items
Page 597
Blue Link Solutions™
Receipt
The receipt number assigned by the system.
P.O. #
The Purchase Order number this was received against.
Factor
Default to “Primary Vendor”. If it is a freight or duty factor then that description will display.
Accrued
The amount of the purchase order that was accrued.
Invoiced
Enter the actual amount (in the vendor’s native currency) billed on the current invoice.
Variance
The variance field calculates the difference between the amount you originally accrued and the actual
invoice amount.
Post Variance
If you want the variance posted then check this box otherwise the variance will remain open. This feature is
designed for times when the vendor will send you partial invoices for one receipt. If you posted the
variance, the difference will go to a Landed Cost Variance account. However, you know that there isn’t a
variance but rather that this is only the first portion of the invoice.
Totals Row
This row totals all the rows above it.
Post Variance to:
From the drop down list supplied for this purpose at the bottom of the screen, select the General Ledger
account to which you wish to allocate the variance. Please note that variances will not automatically change
inventory values, as it would be unclear as to whether the items have been sold or are still in inventory. It is
up to the user to determine how to apply any landed cost variance.
Process Button
When you have finished recording the invoiced amounts, and specified the variance account, click on the
“Process” button. The following screen will be displayed:
Click Yes to proceed or click No to cancel the request. If you click Yes you will return to the AP Voucher
screen.
The appropriate distribution lines are added to the details section of your Accounts Payable Voucher,
offsetting the accrued liability and allocating the variance to the specified account.
The accruals against which you applied invoiced amounts are marked as fully allocated, and will no longer
Page 598
Chapter 17 – Elite Items
Blue Link Solutions™
display on the landed cost screens.
Chapter 17 – Elite Items
Page 599
Blue Link Solutions™
You may then continue processing the accounts payable voucher as normal.
Page 600
Chapter 17 – Elite Items
Blue Link Solutions™
17.4 Freight Management ?
Freight Management is an Elite feature
This module, available in Elite and integrated with the sales order and inventory modules, facilitates
calculating freight charges to customers based on the carrier, the zone (usually based on postal code – this is
only applicable in Canada), and either the weight or the cubic measurement of the shipment.
The module also optionally facilitates tracking the shipper’s waybill number and additional shipping
information.
17.4.1
SET-UP AND PREPARATION
Rates/Zones
To define freight rates and zones, go to System Maintenance | System Master Lists | Shipping Related.
The following screen will be displayed:
Chapter 17 – Elite Items
Page 601
Blue Link Solutions™
For each Shipping Method defined, you can configure the rates and zones. Click on the shipping method on
the left and then enter the rates and zones on the right for that shipping method.
For each range of zones, you may enter the freight charge in local currency based on weight and/or based on
cubic measurement.
17.4.2
INVENTORY INFORMATION
Weight
Go to the Enter/Change Inventory Item screen to define the Weight if you intend to calculate freight
charges based on weight. The weight would be per selling unit of measure. It can be any kind of
measurement that you require.
Cube and Quantity
Additionally, if you intend to charge freight based on cubic measurement, you would enter the cubic
measurement in the “Cube” field, and the number of selling units of measure included in that cube in the
“per” field.
For example, if you typically package 12 units in a box with a dimension of 6 cubic feet, then you would
enter the dimension of the box as your cube, and 12 as the “per” amount.
17.4.3
CALCULATING FREIGHT CHARGES ON SALES ORDERS
After you have completed entering all the detail items for a Sales Order, click on the “Freight
Calculations” tab on the Sales Order screen. The following screen will be displayed:
Page 602
Chapter 17 – Elite Items
Blue Link Solutions™
Ship Via
This is the method of shipment selected on the Customer Info tab in Order Entry and the “Ship Via” field.
You can select different “Ship Via” methods in order to determine different freight charges for different
shipping methods to see which method would be most cost effective.
Package Weight
The total weight of the packaged product based on the information defined in the inventory file.
Package Dimensions
The total size in cubic measurement of the packaged product based on the information defined in the
inventory file.
Calculate by Weight Button
If you wish the system to calculate a freight charge based on weight, click on the “Calculate by Weight”
button.
Calculate by Cube
If you wish the system to calculate freight charges based on cube, click on the “Calculate by Cube” button.
Notes
You may enter miscellaneous notes related to shipping.
Waybill #
When actually shipping the order, you may enter the Waybill number, for future tracking purposes
Ship Date
When actually shipping the order, you may enter the shipping date, for future tracking purposes
Chapter 17 – Elite Items
Page 603
Blue Link Solutions™
17.4.4
TRACKING SHIPPING DETAILS
The History tab Enter/Change Customers and the History tab in Enter / View Prospect is available
from both the Maintain Customer screen, and Maintain Prospect screen (in the latter case, only for
prospects who are customers). It only shows up for posted invoice.
When displaying a customer’s invoice history on this screen, you may scroll to the right (using the
horizontal scroll bar) to view the waybill number and shipping date for each item on the list.
Page 604
Chapter 17 – Elite Items
Blue Link Solutions™
17.5 The Configurator ?
The Configurator is an Elite feature
The Configurator is based on Inventory Categories. Products belonging to a particular category can be
related to products belonging in another category.
Example: Selling Office Furniture ensembles
Let’s say you operate a office supply store. You sell furniture in addition to the various supplies and office
equipment. You have an item called the “walnut suite” where the purchaser can have their choice of a desk,
chair and a bookcase.
You’d like to simplify the life of your salespeople and limit the products they see when placing the order to
those relevant to this order.
In this case, you would define one product, the “Walnut Suite” and add it to a category called “Walnut
Suite”. (Categories are defined in the System Interface, Configurator tab).
You’d also define categories for the other standard products (chairs, desks, and bookshelves) and associate
those categories with the inventory items that should belong to those categories.
Once you’ve defined all the categories and associated them with inventory items, you then define the
configurator template.
In System Maintenance | System Master Lists | Inventory Configurator tab, select the “Walnut Suite”
tab from the categories list. On the template side, select those categories who’s products should appear
when an item from the Walnut Suite is sold. (In this example, the chair, desk and bookcase categories have
been added.)
Once a template has been designed, it can be used in the sales order module.
Chapter 17 – Elite Items
Page 605
Blue Link Solutions™
For this example, we’ve opened a new sales order and added a product that belonged to the Walnut Suite
category of products. We then clicked the configurator tab to display the following screen:
Notice how the categories defined in the template in System Master appear on the left, and a list of product
belonging to those categories appears in the middle.
The user is therefore prompted to select a chair, desk, and bookcase.
In addition, the user has the option to consolidate the price, or to list each product’s price individually.
The remainder of this section explores the screens introduced here in more detail.
Page 606
Chapter 17 – Elite Items
Blue Link Solutions™
17.5.1
INVENTORY CATEGORIES
Go to System Maintenance | System Master Lists | Inventory Configurator tab:
Categories
In the list on the left-hand side of the screen, you may define your standard inventory categories (which are
used exclusively by the Configurator function).
Templates
In the list on the right hand side, you may create a template of other categories for the category that is
currently selected on the left-hand side.
Creating New Templates
Select the required category on the left-hand side, and enter (or select from drop down lists) the appropriate
categories on the right hand side that make up the template.
For example, if you select the category “Computer” on the left-hand side, you may then enter the
appropriate categories on the right hand side for memory, hard drive, monitor, etc.
17.5.2
DEFINE INVENTORY ITEMS TO CATEGORIES
From the Production/Inventory Management | Inventory | Enter/Change Inventory Items screen,
select the appropriate category from the drop down list for each inventory item you wish to use with the
Configurator.
Chapter 17 – Elite Items
Page 607
Blue Link Solutions™
The following screen will be displayed:
This is a necessary prerequisite to using the Configurator feature.
17.5.3
USING THE CONFIGURATOR
1.
On the Sales Order screen, switch to the “Order Details” tab.
2.
Enter a detailed item which, in the Inventory file, belongs to a category which has a Configurator
template defined. (i.e. the “Walnut Suite”)
3.
With your cursor on that detailed item, click on the “Configurator” button near the bottom of the
screen.
4.
The following Configurator screen will be displayed:
5.
For each category defined as belonging to this template, a line appears on the Configurator screen.
6.
Next to each category there is a drop down list, from which you may select the product code for each
template category.
7.
On each line, the drop down list only shows inventory items which have been assigned to the applicable
Page 608
Chapter 17 – Elite Items
Blue Link Solutions™
category.
8.
When you have assigned product codes to all the template categories to be included for the sales order,
click on the “OK” button to have those detail items added to your sales order. Alternatively, you may
click on the “Cancel” button to cancel the configuration.
An additional option permits you to aggregate the suggested retail pricing of the template items under the
product originally entered on the sales order.
To do this:
1. Check the “Consolidate Pricing” check box before clicking on the “OK” button.
2.
This will add the selected template items to the sales order, but in this case, their retail price will be
added to the default price of the product entered on the sales order, and the template items will be
entered at a selling price of zero.
Chapter 17 – Elite Items
Page 609
Blue Link Solutions™
17.6 Fill Backorders ?
In Elite, a button has been added to the Sales Order screen labeled “Fill Backorders”. When you click this
button with a sales order on screen it does the following for each detail item on that sales order which has a
backorder quantity:
1.
Checks whether there is sufficient inventory available to fill the backorder
2.
If there is sufficient it moves the entire backorder quantity to the quantity column
3.
If there is insufficient inventory available it moves as much inventory as is available from the backorder
column to the quantity column
4.
In either case, the inventory and location information are updated accordingly
5.
The sales order is recalculated at the end of the process.
CAUTION:
Page 610
There is NO way to reverse the effects of the Fill Backorders screen, so it should NOT be used to perform
“what-if” scenarios. It should only be used when you really do wish to fill all the backorders on a sales
order.
Chapter 17 – Elite Items
Blue Link Solutions™
17.7 Contract Pricing ?
Contract Pricing is an Elite feature
In Elite, you can define special price lists for inventory items and assign these lists to one or more
customers. This allows you to group your customers based on any special pricing they may receive while
maintaining your default selling prices. For example, a contract called “US Pricing” could be defined to
automatically charge the US dollar price to US dollar customers.
As an alternative, if you don’t plan on using contract pricing for any particular customer, you could assign
all customers to a particular contract, then use that contract for promotions. Customers would automatically
receive the promotional pricing for any items purchased during the promotional period defined for the item
(i.e. before the contract pricing expires).
.
Chapter 17 – Elite Items
Page 611
Blue Link Solutions™
17.7.1
SETTING UP CONTRACTS
To define a new contract, go to Elite Items | Maintain Contract Pricing. The following screen displays:
Use this screen to define as many contracts as you require. For each contract you need to define the
following fields of information:
Contract Code
Give the contract a name (such as US Pricing, Spring Special, etc.).
Product
Choose the inventory item from the list that you are going to assign a special price to.
Cont Price
Enter the price you want to charge for this item for customers assigned to this contract.
Margin
This is a calculated field that will display the margin based on the Contract Price you entered.
Reg. Price
The default selling price (Price 1) defined in the Inventory records displays here.
Margin
This is a calculated field that will display the margin based on the Regular Price defined in the Inventory
records.
Valid From
Enter the date that this special pricing offer begins for this item.
Page 612
Chapter 17 – Elite Items
Blue Link Solutions™
Expiry
Enter the date that this special pricing offer expires for this item. Leave this field blank is the special
pricing is not time limited.
Note: Elite uses the computer’s system clock, NOT the order date as recorded on the order entry screen, to
determine whether or not the special pricing is still in effect.
17.7.2
EDITING AND DELETING CONTRACTS
To edit an existing contract, use the Contract Code lookup field to recall an existing contract to screen. At
this point you may modify Contract Prices, Valid From, and Expiry dates.
To add a new item, move the cursor to the blank field at the bottom of the list and choose an inventory item
from the drop down list. To delete an item, select the entire line by clicking on the square gray box to the
left of the product code, and then press the delete key on the keyboard. To delete the entire contract, click
on the Delete button at the bottom of the screen. To enter a new contract, or to look up an existing contract
after having entered or edited another contract, click on the New button to refresh the screen.
For a printed Contract Report, click on the preview button at the bottom of the screen.
17.7.3
ASSIGNING CONTRACTS TO CUSTOMERS
To assign a contract to a customer, you must open the customer record in Accounts Receivable. Go to the
Accounts Receivable | Enter / Change Customer screen. Recall the appropriate customer, and then go to
the Defaults tab. You will see the following:
To assign a contract to this customer, choose it from the drop down list. To remove a contract assigned to
this customer, click on the Clear Contract button.
Chapter 17 – Elite Items
Page 613
Blue Link Solutions™
17.8 FIFO Costing?
In Elite, the cost of goods sold postings from the Sales Order system are based on the average cost method
by default. A flag in the System Interface | Inventory tab can be set so that the system used the First In First
Out method instead.
When setting up a company, make sure that this flag is set to the method you intend to use BEFORE posting
any inventory purchases or sales.
If you intend to change costing methods for an existing company, you must change the flag in the System
Interface, and may need to post an adjusting G/L entry for any difference in the value of the FIFO vs.
Average Inventory.
FIFO Layers
Each time an inventory item is purchased, the transaction is logged by the inventory system. The system
tracks the vendor, purchase price, currency, landed cost, date purchased, and number of units purchased.
The Sales Order system uses this information to calculate the number of remaining units that were
purchased at that specific cost at the time of a sale. FIFO layers can be viewed on the Purchases tab of the
Inventory | Enter / Change Inventory Items screen as shown below:
NOTE:
Changing Inventory Costing methods will have a significant impact on your accounting system.
Any change in costing methods should be discussed with your account (and your Blue Link
Solutions Dealer) before making any changes.
FIFO Costing Report
This report is accessed from the Inventory Module, under Inventory Information Reports. Use this program
to get a report detailing available units and recent order information broken down on a layer by layer basis.
The report lists the product code, description, location, date of order, units on hand, and total value (total
units per layer x layer unit cost). The total inventory value of the printed items displays at the end of this
report.
Note:
Page 614
Items that are not in stock, on sales order, or on back order do not appear on this report.) Use this report
to reconcile your inventory to the GL asset account balances if you are using the FIFO costing method. If
have chosen to use the average costing method, use the Availability Report.
Chapter 17 – Elite Items
Blue Link Solutions™
18: Employee & Salesperson
The Employee and Salesperson module is designed to manage the functions related to payroll and
commission.
Access this module through Sales | Employee / Salesperson .
Chapter 17 – Elite Items
Page 615
Blue Link Solutions™
18.1 Enter / Setup Employees
Use this module to enter key Human Resources information about your employees.
18.1.1 EMPLOYEE INFORMATION
Enter information including:
?
?
?
?
?
Employee Name and Address information
Employee Phone Numbers
Emergency Contact Information
Important Dates
Other information – including warehouse location, region and picture of employee.
Page 616
Chapter 18 – Employee & Salesperson
Blue Link Solutions™
18.1.2 PAYROLL INFO / EMPLOYMENT REVIEW
Enter Information including:
?
?
?
?
Position /Title / Job Description
Payroll Information – including salary and SIN#
Employee Review – enter information on the employee’s last review or employment history
Other Payroll information
Chapter 18 – Employee & Salesperson
Page 617
Blue Link Solutions™
18.2 Enter/Setup Salespersons
A separate Salesperson system has been designed for you to maintain your salespeople and to calculate
commission.
A salesperson can either be an employee or a vendor.
Salesperson
These two fields are for the 3-digit alphanumeric salesperson number and their name.
Territory
The salesperson’s territory.
Employee Number
You will notice that the Employee filed is greyed out and disabled. Salesperson’s commissions do not
export to Paymate and thus the reason for this. If the salesperson is an employee, assign them to a generic
vendor.
Vendor Code
The vendor code should be selected if you are setting up your salesperson to be paid as a vendor.
Pay When?
You can either have Solutions calculate the commission and it to the Due column either on invoice
posting or payment receipt.
Pay How?
Select On Gross Sales if you are paying commission on the gross selling price of the item. Select On
Gross Margin if you are paying the commission on the gross margin of the item being sold.
Page 618
Chapter 18 – Employee & Salesperson
Blue Link Solutions™
Type Salesperson
Select either Employee or Vendor.
Commission Method
There are two different calculation methods.
Inventory Method -
This method will calculate the commission based on the rate set on each
inventory item in the inventory system.
Overall Percent -
This method will calculate the commission as entered in the field above this
selection.
Overall Rate
If using the “Overall Percent” method of calculating commissions, type in the percent to be used.
CAUTION:
Once you set up the commission system, do not change the Pay When selection. If you do, the
system may not properly function. If you need to change a salesperson’s way of when they are to be
paid, set up a new salesperson record with the new information.
Columns
Months
January through December rows
Quota
You can type in a sales quota for each month.
Gross Sales/COGS/Receipts
These numbers all are generated by the system based on actual sales related to this salesperson.
Due
This is the amount of commission currently due the salesperson.
To Pay
You can type the amount you intend to pay the salesperson.
Advances
Type in the amount of advances already paid to the salesperson.
Pay
This is a calculated field. The amounts in the “To Pay” column less any amounts in the “Advances”
field.
Process Commission Button
When you are ready to process commissions, click the “Process Commissions” button.
If the
salesperson is an “employee”, you will have to manually enter the commission into your payroll
program..
If the salesperson is a “vendor”, the previous screen indicates that the transaction has processed as an
A/P Voucher and will be in Accounts Payable | Pick Invoices to Pay module. The expense account set
up in System Maintenance | System Master | G/L Information | Outside Commission will be posted
to when the commissions are processed.
Chapter 18 – Employee & Salesperson
Page 619
Blue Link Solutions™
Prospects / Customers Button
Click this button to view a report listing this employee’s assigned prospects.
18.2.1 SETTING UP A SALESPERSON
Prior to setting up salespeople, make sure their information has either been entered in Payroll or
Accounts Payable.
1.
Click the “New” button.
2.
Click into the “Salesperson” field and type an up to a 3 character alphanumeric code to
identify your salesperson and press <Enter>. The following screen will be displayed:
3.
Click Yes to add the new salesperson; click No to cancel the request.
4.
Type in his/her name
5.
Type in his/her territory information.
6.
Select the appropriate vendor or employee number to relate the salesperson to the appropriate
files in the accounting system.
7.
Type in the overall Rate
8.
Select the Pay When?, Pay How?, Type Salesperson? And Commission Method options.
9.
Click the “Save” button. Once the salesperson record is saved, the salesperson selection will
become available to the entire accounting system wherever a salesperson lookup exists.
10. The following screen will be displayed:
11. Click Yes to save the salesperson; click No to cancel the request.
Page 620
Chapter 18 – Employee & Salesperson
Blue Link Solutions™
18.3 Paymate Payroll Import
The following is only applicable if you are using Paymate for your payroll and want the information to
be updated into Blue Link Solutions.
Step 1 Select the Path to the Paymate Data File
You must choose the current year folder beneath the *.CPY folder where your Paymate data resides. In
this example the demo data resides in the C:\Paymatew\DEMO.CPY\2002 folder.
Step 2 Select the Payroll Date
Select the cheque date which is already posted in Paymate.
Step 3 Select the Bank Account
Select the bank account where the cheques are drawn from.
Step 4 Create Pay Info
This step creates files from Paymate which Blue Link Solutions can read.
Chapter 18 – Employee & Salesperson
Page 621
Blue Link Solutions™
Step 5 Process Import
This final step reads those files and updates the general ledger and bank account sub ledger.
Note:
Page 622
Only process the import once per payroll date. The system updates your General Ledger each time
you process for that cheque run date. I.e. you may end up double posting your payroll.
Chapter 18 – Employee & Salesperson
Blue Link Solutions™
18.4 Paymate – Job Cost Export
Use this routine if you are using Paymate for payroll and Job Costing in Blue Link Solutions. This
routine will update the time cards entered in Job Costing | Enter / Change Time Cards
Step 1 Specify Criteria
The first step is to specify the date range of the posted time cards. Then select which employees of that
date range you want to be exported
Step 2 Specify Export File
The next step is to specify the path of the file you want created. In this example “C:\Program
Files\Blue Link\Payroll\2001-26-01PY.txt” was created, where “C:\Program Files\Blue Link\Payroll” is
the path and “2001-26-01PY.txt” is the name of the file created.
Step 3 Export Data
When you are ready, export the data file. This step will create a text file in the location you specified in
step 2. In Paymate you will import this text file for your payroll records.
Chapter 18 – Employee & Salesperson
Page 623
Blue Link Solutions™
18.5 Print Commission Report
Prints a report detailing the commission due to a salesperson. The report may either be reported in
detail or in summary and may be limited by date and salesperson. The sales report shows commission
on gross sales and the commission due report details the salesperson, invoice number, date, product
code and commission.
Which Type Report?
You can choose from Detail or Summary reports.
Which Report?
You can print either the Sales report or the Commissions Due report.
Sales Report -
shows commission on gross sales
Commissions Due Report -
details the salesperson, invoice number, date, product code and
commission. Each salesperson prints on a separate page.
From/Thru Date
Type the dates to limit the report to. If you leave the defaults, it will print from the current date through
the next week.
From/Thru Salesperson
Select the salespeople to limit the report to. If you leave the defaults, it will print all salespeople.
Print Where?
You may select for the report to be printed to the printer or to be previewed on screen. Click the “Print”
button to send it to the printer or the screen or the “Cancel” button to cancel the request.
Sample Salesperson Commission Reports
Page 624
Chapter 18 – Employee & Salesperson
Blue Link Solutions™
Detailed Salesperson Report
Note:
The inventory classes that appear across the top of this report are defined in the Inventory Class
configuration in System Interface.
Chapter 18 – Employee & Salesperson
Page 625
Blue Link Solutions™
Summary Sales Report
Detailed Commission Due Report
Summary Commission Due Report
Page 626
Chapter 18 – Employee & Salesperson
Blue Link Solutions™
Sales by Salesperson by Product
Detailed Sales by Salesperson by Prospect
Chapter 18 – Employee & Salesperson
Page 627
Blue Link Solutions™
Summary Sales by Salesperson by Prospect
Graph – Sales by Salesperson
Page 628
Chapter 18 – Employee & Salesperson
Blue Link Solutions™
19: Index
A
A/R and A/P Information ................................................................................................... 44, 51, 73, 452
Account Codes ................................................................. 43, 71, 133, 140, 141, 153, 166, 213, 305, 310
Accounts
Creating New Accounts.................................................................................................................... 136
Deleting Accounts ............................................................................................................................ 137
Actual Costs ......................................................................................................................... 424, 558, 560
Address Lines................................................................................. 63, 191, 250, 251, 408, 451, 523, 537
City, Prov, Postal Code .............................................................................................................. 63, 408
Adjust Inventory Values/Levels ............................................................................................... 46, 70, 367
Administration................................................................................................................ 21, 131, 190, 304
Aging
Periods................................................................................................................................ 63, 236, 237
Aging Reports ........................................................................................................ 47, 232, 235, 236, 291
Applied......................................................................................................................... 217, 218, 272, 273
Appointments ............................................................................................................................... 527, 528
assemble products ............................................................................................................................ 46, 87
Asset Accounts ......................................................................................... 44, 87, 134, 153, 305, 367, 369
Auto Allocate ....................................................................................................................................... 217
Availability....................................................................................... 46, 57, 393, 396, 403, 405, 464, 614
B
Backorders .... 55, 340, 369, 443, 444, 448, 449, 450, 454, 461, 467, 468, 471, 480, 482, 486, 498, 501,
502, 503, 504, 510, 512, 541, 542, 583, 610
Backup ............................................................................................................... 55, 57, 58, 112, 116, 372
Bank Accounts .. 40, 45, 71, 155, 182, 184, 185, 187, 281, 296, 298, 305, 306, 307, 309, 314, 316, 318,
320, 323, 325, 330, 422, 423
Bank Adjustments ................................................................................................................................ 315
Bank Charges ................................................................................................................................. 71, 315
Bank Fees ............................................................................................................................................. 315
Bank Statement .................................................................................... 187, 298, 304, 314, 315, 316, 326
Beginning Balances...................................................................... 43, 46, 47, 51, 188, 209, 304, 318, 320
Bill of Materials ......................................................................... 71, 83, 87, 337, 344, 403, 404, 405, 486
Budgets........................................................................................................................... 43, 137, 169, 555
Burden Percent ..................................................................................................................................... 561
C
C.O.D. .......................................................................................................................... 422, 423, 478, 509
Calendar ....................................................................................................................................... 527, 528
Change Job Number ............................................................................................................................. 562
Chart of Accounts....................................................................... 40, 43, 51, 120, 132, 153, 154, 453, 539
Checklist..................................................................................................................... 43, 46, 51, 393, 397
Cheque Number.................................................................................................................... 298, 318, 320
Cheque Register
Pro Forma................................................................................................... 55, 272, 274, 296, 297, 298
Quick Checks (AR & AP) ........................................................................................................ 318, 320
Chequing .......................................................................................................................................... 45, 51
Chapter 18 – Employee & Salesperson
Page 629
Blue Link Solutions™
Chequing Accounts .......................................................................................................................... 45, 51
Choose Company ............................................................................................................................. 18, 49
Clear Data .......................................................................................................................... 42, 43, 51, 110
Clearing Accounts .................................................................................................................................. 71
Comments............................................................................................. 192, 198, 337, 340, 361, 588, 589
Commission Report.............................................................................................................................. 624
Commissions .......................................................................................... 70, 337, 618, 619, 620, 624, 626
Company Information .......................................................................................... 44, 51, 60, 63, 227, 508
Company Name ........................................................................ 11, 63, 172, 204, 228, 235, 249, 290, 547
Components...................................................... 46, 83, 344, 387, 388, 389, 390, 403, 404, 464, 465, 486
Configurator ..................................................................................... 45, 61, 106, 471, 583, 605, 607, 608
Define Inventory Items to Categories............................................................................................... 607
Inventory Categories ................................................................................................................ 605, 607
Using ................................................................................................................................................ 608
consolidated statements........................................................................................................................ 194
Contacts.................................................... 64, 76, 200, 496, 522, 523, 527, 531, 532, 535, 536, 537, 547
Contract Number .................................................................................................................................. 559
Contract Price....................................................................................................................... 558, 612, 613
Contract Pricing ........................................................................................................... 583, 585, 611, 612
Cost Codes ............................................. 45, 100, 101, 410, 560, 562, 563, 565, 566, 568, 570, 574, 575
Cost of Goods Sold .......................................... 44, 86, 100, 197, 229, 338, 368, 369, 588, 589, 614, 619
Credit
Credit Limit ........................................................................................................................ 83, 195, 479
Credit Memo (see also A/R and A/P Vouchers)....................... 210, 213, 214, 262, 263, 266, 267, 269
Verify ................................................................................................................................................. 83
Warning...................................................................................................................................... 83, 195
Credits .......................................................................................................................... 140, 141, 211, 265
Currency................... 51, 82, 186, 194, 235, 240, 253, 264, 290, 292, 295, 305, 307, 452, 488, 538, 594
Current Year....................................................................................................... 47, 58, 66, 120, 134, 136
Customers
Changing a Customer ....................................................................................................................... 204
Creating New Customer ................................................................................................................... 204
Deleting a Customer ................................................................................................................. 205, 348
Information............................................................................... 191, 196, 228, 229, 450, 451, 452, 479
D
Daily Activities............................................................................................. 55, 87, 90, 93, 488, 518, 519
Departments ..................................................................................................................... 43, 51, 235, 263
Discounts. 45, 95, 196, 217, 218, 263, 267, 272, 273, 296, 303, 336, 347, 370, 410, 415, 422, 455, 460,
501, 502, 540
Distribution Fields.................................................................................... 46, 47, 211, 213, 264, 265, 267
Drill Down ........................................................................................................................................... 201
Drop Ship ............................................................................................................................................. 457
Due Date .......................................................................... 55, 64, 255, 263, 267, 272, 274, 295, 505, 506
Dunning Notices........................................................................................................................... 245, 247
E
Elite Features........ 45, 70, 71, 92, 106, 194, 196, 198, 204, 242, 455, 459, 471, 586, 592, 601, 605, 611
Fill Backorders ................................................................................................................. 471, 583, 610
Freight Management................................................................................................................. 583, 601
Landed Cost Tracking ...................................................................................... 266, 425, 583, 592, 596
RMA............................................................................... 45, 64, 71, 198, 583, 586, 587, 588, 590, 591
E-Mail .................................................................................................. 193, 252, 414, 415, 474, 524, 530
End of Month Routine................................................................................................ 39, 53, 57, 112, 515
Page 630
Index
Blue Link Solutions™
End of Year Routines (see also Year End) ......................................................................... 58, 114, 115
Ending Balances................................................................................................................... 306, 314, 315
Entering Initial Information................................................................................................................ 39
Equity Accounts (see also Owner’s Equity) ......................................................................................... 153
Estimated Costs .................................................................................................................... 558, 560, 565
Estimates .............................................................................. 101, 558, 560, 561, 563, 565, 574, 575, 578
Exchange Difference ...................................... 71, 182, 183, 184, 185, 188, 213, 267, 272, 312, 330, 461
Exchange Rate...................................................................................................................... 309, 422, 594
Expense Accounts ........................................................................................................ 134, 153, 367, 368
F
Favourites Folder ....................................................................................................................... 21, 27, 28
FIFO costing............................................................................... 57, 87, 88, 340, 393, 394, 398, 584, 614
Financial Report Generator (see also Financial Statements) ................................................................ 169
Financial Statements (see also Financial Report Generator) ................ 41, 51, 57, 58, 136, 169, 226, 555
Find Button........................................................................................................................................... 465
Finished Goods....................................................................................................................... 83, 387, 403
Fiscal Year
End Date............................................................................................................................. 58, 186, 240
Start Date............................................................................................................................................ 64
Freight Management..................................................................................................................... 583, 601
Freight on Sales Orders .................................................................................................................... 602
Tracking Shipping Details................................................................................................................ 604
G
General Journal Transactions40, 47, 56, 64, 139, 141, 142, 143, 144, 145, 155, 156, 163, 164, 165, 292
Getting Started ............................................................................................................... 39, 131, 190, 249
H
Heart (see also Favourites)......................................................................................................... 21, 27, 28
Home Currency ...................................................................................................................................... 82
I
Income Accounts............................................................................................................ 41, 134, 153, 169
Incorrect G/L Balances......................................................................................................................... 120
Installation
Network........................................................................................................................................ 15, 77
Interest.......................................................................................... 57, 64, 69, 71, 195, 226, 227, 309, 315
Interest Charges.............................................................................................................................. 57, 226
Interest Rate ................................................................................................................................... 64, 227
Internet
E-Mail Address ........................................................................................................ 193, 252, 524, 530
Web Address .................................................................................................................... 194, 252, 524
Inventory
Adding a New Item .......................................................................................................................... 346
Adjustments................................................................................ 70, 113, 155, 368, 369, 381, 394, 397
Changing an Inventory Item ............................................................................................................. 347
Classes.......................................................................................................................................... 51, 86
Control ............................................................................................................................... 46, 332, 333
Deleting an Inventory Item............................................................................................................... 348
Locations ........................................................ 51, 57, 87, 117, 122, 123, 337, 340, 342, 361, 369, 408
Management ............................................................................................................................. 332, 607
Reserving.......................................................................................................................................... 447
Serialized.................................................. 116, 336, 341, 377, 401, 402, 424, 469, 583, 586, 588, 589
Chapter 18 – Employee & Salesperson
Page 631
Blue Link Solutions™
Types................................................................................................................................................ 335
Update Method................................................................................................................................. 368
Invoice
Copies............................................................................................................................................... 474
Type ......................................................................................................................................... 473, 512
Item Lookup Button ............................................................................................................................. 465
J
Job Code............................................................................... 211, 213, 265, 410, 558, 560, 570, 573, 580
Job Costing
Defaults ............................................................................................................................ 556, 561, 562
Entering/Changing Jobs.................................................................................................................... 557
Job Transactions............................................................................................................................... 564
Print Reports..................................................................................................................................... 574
Transaction Types .................................................................................................................... 161, 564
K
Keys ....................... 23, 103, 141, 192, 262, 267, 273, 306, 316, 371, 409, 415, 479, 480, 492, 496, 565
F6 ....................................................................................................................................................... 23
F9 ......................................................................................................................................... 23, 50, 532
Shift+F2...................................................................................................................................... 23, 480
Shift+Tab Key.................................................................................................................................... 23
Tab Key..... 23, 252, 254, 255, 325, 337, 338, 340, 341, 342, 344, 346, 360, 361, 362, 450, 454, 457,
458, 459, 462, 478, 523, 530, 532, 558, 559, 588
Kits ................................................................................................................................... 46, 51, 464, 486
L
Labour 83, 87, 99, 100, 101, 103, 265, 332, 335, 411, 555, 556, 560, 561, 562, 563, 564, 565, 566, 567
Landed Cost
Applying Accruals against Vendor Invoices .................................................................................... 597
Inventory Item Overrides ................................................................................................................. 593
Posting.............................................................................................................................................. 594
Reporting Accruals........................................................................................................................... 594
Setting Up Factors............................................................................................................................ 592
Setting Up for Purchase Orders........................................................................................................ 593
Last Order ............................................................................................................................................ 343
Last Receipt.......................................................................................................................................... 343
Last Sale ....................................................................................................................................... 195, 343
Length of Appointment ........................................................................................................................ 527
Levels 1-9............................................................................................................................................. 370
Liability Accounts ........................................................................................................................ 134, 153
Load Suggested Order Button .............................................................................................................. 412
Local Currency (see also Home Currency) .............................................................. 82, 90, 330, 461, 602
Logging On ........................................................................................................ 17, 18, 20, 22, 31, 32, 37
Logo ....................................................................................................................................................... 73
Lookup Field ........................................................................................ 133, 143, 214, 217, 268, 496, 613
Lot Number .................................................................................................................................. 387, 404
M
Mailing labels............................................................................................... 228, 230, 286, 288, 547, 549
Manual Cheques................................................................................................... 155, 262, 263, 266, 268
Markup ................................................................................................... 99, 197, 339, 556, 560, 561, 562
Markup Percent .................................................................................................................................... 562
Microsoft Word.................................... 44, 60, 76, 77, 78, 79, 80, 81, 130, 414, 415, 474, 475, 512, 536
Page 632
Index
Blue Link Solutions™
Minimum System Requirements............................................................................................................. 15
Monthly .................................................................................. 57, 112, 136, 144, 226, 279, 338, 487, 488
Month-To-Date .............................................................................................................. 47, 114, 338, 394
More About Inventory Button ...................................................................................................... 412, 429
MTD (see also Month-to-Date)........................................................................ 47, 57, 197, 229, 337, 338
Multiple Invoicing................................................................................................................................ 448
N
Net Percent........................................................................................................................................... 197
Net Profit.............................................................................................................................................. 197
New Line ........................................................................................ 23, 172, 192, 306, 417, 455, 480, 483
Next Numbers ........................................................................................................................................ 63
O
Occurrences (see also Recurring)......................................................................................... 144, 279, 489
Office 97 ................................................................................................................................................ 76
Offset button................................................................................................................................. 269, 274
On Hand .. 46, 56, 122, 305, 333, 335, 336, 340, 341, 343, 367, 368, 369, 381, 389, 393, 394, 401, 402,
403, 408, 412, 421, 429, 443, 444, 447, 448, 449, 451, 454, 467, 468, 474, 480, 482, 538, 542, 614
Opening Balances................................................................................................... 47, 305, 306, 314, 315
Optimize database ................................................................................................................................ 56
Order Details ........................................................................................................ 454, 480, 481, 539, 608
Order Entry..................................................... 91, 100, 155, 194, 202, 207, 442, 444, 490, 533, 584, 603
Order Margin................................................................................................................................ 516, 517
Outlook... 15, 44, 60, 76, 77, 80, 117, 130, 194, 200, 201, 256, 414, 415, 474, 512, 522, 527, 528, 529,
536
Outstanding
Credits ...................................................................................................... 205, 216, 255, 259, 266, 271
Invoices .................................................................................................................... 205, 216, 271, 286
Over/Short .............................................................................................................................................. 70
Overdue Invoices...................................................................................................................... 57, 83, 245
Overhead Percent ................................................................................................................................. 561
P
Packing Slips (Lists)..................................................................................................... 447, 449, 475, 510
Passwords............................................................................... 11, 17, 18, 20, 31, 32, 33, 37, 65, 117, 128
Pay
Bonus ............................................................................................................................................... 102
Holiday............................................................................................................................................. 102
Overtime........................................................................................................................................... 102
Regular ............................................................................................................................................. 102
Sick................................................................................................................................................... 102
Paying Invoices .................................................................................................................................... 272
Payment History................................................................................................................... 202, 219, 248
Payments ........................................................................................................................ 56, 155, 214, 216
Payroll .......................................................... 100, 155, 313, 526, 555, 564, 567, 568, 571, 572, 619, 620
Permission .................................................................................................... 18, 31, 32, 33, 34, 35, 36, 77
Pick Invoices To Pay............................................................................................................ 269, 271, 296
Post Estimates ...................................................................................................................................... 563
Post Invoices ................................................................................................................................ 492, 493
Postal Code .................................................................................................................................... 63, 408
Post-Dated Cheques ............................................................................................................................. 56
Posting.......................................................................................................................................... 141, 143
Posting Analysis ..................................................................................................................... 55, 166, 168
Chapter 18 – Employee & Salesperson
Page 633
Blue Link Solutions™
Premium ............................................................................................................................................... 102
Preparing for Setup.............................................................................................................................. 39
Previous Year ........................................................................................... 58, 64, 115, 120, 136, 140, 166
Price Change ................................................................................................................................ 371, 372
Price Matrix.............................................................................................................. 45, 51, 196, 336, 370
Print Cheques ....................................................................................................................... 271, 274, 298
Printing Reports ..................................................................................................................................... 24
Priority Invoices ................................................................................................................................... 449
Private Folder......................................................................................................................................... 77
Pro Forma Cheque Register ........................................................................... 55, 272, 274, 296, 297, 298
Process Payments ................................................................................................................................. 218
Production Batch
Changing a Batch ............................................................................................................................. 391
Creating a New Batch............................................................................................................... 388, 390
Deleting a Batch ............................................................................................................................... 392
Production Control ............................................................................................. 71, 83, 87, 155, 387, 403
Production Status ......................................................................................... 388, 389, 390, 391, 392, 404
Project Contact..................................................................................................................................... 559
Prospect.................................................................. 76, 523, 525, 527, 530, 534, 547, 548, 549, 551, 604
Prospects
Printing a Report .............................................................................................................................. 547
Province ......................................................................................................................................... 63, 408
PST................................................. 80, 194, 210, 232, 233, 234, 264, 336, 454, 455, 518, 540, 541, 584
Public Folder .......................................................................................................................................... 77
Purchase Orders
Adding a New P.O............................................................................................................................ 415
Changing a P.O. Line Item ............................................................................................................... 417
Changing an Existing P.O. ............................................................................................................... 417
Creating P/O’s .................................................................................................................................. 458
Deleting an Existing P.O. ......................................................................................................... 417, 419
Open P.O.’s .............................................................................................................................. 432, 433
P.O. History...................................................................................................................... 427, 435, 436
P.O.’s Not Invoiced............................................................................................................................ 70
Print P.O.’s ....................................................................................................................................... 430
Receiving P.O.’s............................................................................................................... 253, 421, 593
Purchases...................................... 155, 158, 159, 254, 255, 259, 266, 268, 286, 337, 340, 411, 593, 614
Purchasing .................................................................................................................................... 249, 407
Purging ............................................................... 42, 57, 58, 109, 112, 113, 116, 120, 186, 240, 292, 463
Q
Quotes .................................................................................................................................. 532, 533, 537
Adding.............................................................................................................................................. 533
Move to Sales Order......................................................................................................................... 544
View/Change .................................................................................................................................... 533
R
Ready to Ship ................................................................................................................. 83, 449, 498, 501
Realized Exchange Difference ..................................................................................................... 184, 185
Recalculate ................................................................................................... 117, 119, 120, 122, 185, 264
Reconcile........................................................................................ 57, 187, 306, 314, 315, 316, 326, 393
Recurring Sales ................................................................................................ 54, 84, 487, 490, 505, 506
Recurring Transactions........................................................................................................... 54, 144, 146
Sales Orders ................................................................................................................. 54, 84, 487, 490
Recurring Vouchers...................................................................................................... 278, 279, 280, 302
Page 634
Index
Blue Link Solutions™
Reference...................................................................................................... 198, 199, 272, 273, 463, 565
Registering Software .............................................................................................................................. 11
Reorder Level............................................................................................................................... 343, 393
Requests ............................................................................................................................................... 525
Reserved............................................................................................................................... 388, 447, 449
Reserving.............................................................................................................................................. 447
Restocking Charges........................................................................................................................ 71, 586
Retainage
Held.......................................................................................................................................... 559, 565
Paid .......................................................................................................................................... 559, 565
Retained Earning .................................................................................................................................... 71
Retroactive Listing Report ........................................................................................... 186, 240, 292, 293
Revaluation Report............................................................................................................... 186, 240, 292
Revalue Box ......................................................................................................... 186, 235, 240, 291, 292
Reverse......................................................................................... 141, 198, 201, 203, 254, 255, 484, 610
Reversing a Posted Voucher......................................................................................................... 214, 268
Reversing Journal Entry ............................................................................................................... 186, 240
RMA................................................................................... 45, 64, 71, 198, 583, 586, 587, 588, 590, 591
Inventory Value for Restocking.................................................................................... 46, 70, 367, 589
Reason for Return............................................................................................................................. 589
Reports ............................................................................................................................................. 591
Restocking Charges G/L Code ................................................................................................... 71, 586
Rolodex Cards...................................................................................................... 228, 249, 286, 547, 549
S
Sales Breakdown .................................................................................................................................. 373
Sales Orders
Adding a New Sales Order ............................................................................................................... 479
Adding to an Existing Sales Order ................................................................................................... 448
Changing an Existing Sales Order.................................................................................................... 483
Changing Line Items ........................................................................................................................ 480
Deleting an Existing Sales Order...................................................................................................... 485
Deleting Line Items .......................................................................................................................... 481
Post Invoices ............................................................................................................................ 492, 493
Print Open Orders Report................................................................................................................. 498
Printing............................................................................................................................................. 473
Recurring Sales Orders................................................................................................. 54, 84, 487, 490
Review History................................................................................................................................. 496
Sales Price ............................................................................................................................................ 337
Sales Report ........................................................... 87, 229, 393, 394, 397, 505, 518, 519, 520, 624, 626
Salespeople
Setup......................................................................................................................................... 618, 620
Sample Data ....................................................................................................... 11, 39, 40, 41, 42, 43, 51
Security .................................................................................................................... 18, 20, 22, 29, 31, 32
Restricting Users ................................................................................................................................ 31
Selecting Invoices ................................................................................................................................ 274
Serial Numbers....................................................... 11, 116, 336, 337, 341, 361, 377, 423, 424, 469, 589
Service Manager..................................................................................................................................... 61
Set Task................................................................................................................ 200, 201, 256, 528, 529
Setup Procedure ......................................................................................................................... 40, 41, 47
Ship To................................................................... 80, 199, 229, 231, 450, 457, 460, 479, 487, 498, 507
Shipping Labels.................................................................................................................... 476, 507, 508
Shipping Method (Ship Via) .................................. 44, 80, 82, 83, 93, 409, 452, 479, 488, 538, 602, 603
Sound Reminder........................................................................................................... 201, 256, 528, 529
Chapter 18 – Employee & Salesperson
Page 635
Blue Link Solutions™
Source........................................................................................................................... 525, 526, 551, 552
Source Analysis Report ................................................................................................................ 551, 552
Square Feet........................................................................................................................................... 559
Start time .............................................................................................................................................. 527
Starting Solutions Accounting................................................................................................................ 17
Statements ...................................................................... 41, 51, 57, 58, 74, 136, 169, 194, 226, 242, 555
Status............................................................................ 388, 389, 390, 391, 392, 403, 404, 405, 526, 587
Sub-Contract .................................................................................................................................. 99, 101
Suggested Order Report ....................................................................................................................... 412
Summaries...................................................................................................................... 39, 117, 120, 393
System Administrator ............................................................................................................................. 32
T
Table Viewer................................................................................................................................ 117, 128
Task Code ............................................................................................................................................ 410
Tax Authorities......................................................................... 45, 82, 191, 194, 210, 213, 263, 267, 585
Telephone Numbers
Fax........................................................................................................ 63, 98, 193, 228, 251, 512, 524
Home ................................................................................................................................ 193, 251, 524
Mobile .............................................................................................................................. 193, 251, 524
Office................................................................................................................................................ 193
Pager................................................................................................................................. 193, 251, 524
Phone.......................................................................................................................................... 63, 228
Private ........................................................................................................ 77, 200, 256, 527, 528, 532
Templates ....................................................................................................................................... 44, 106
Terms .... 12, 44, 46, 51, 80, 82, 83, 94, 95, 155, 186, 195, 196, 210, 213, 240, 249, 250, 253, 257, 263,
267, 292, 409, 421, 422, 423, 452, 453, 479, 488, 518, 533, 538
Terms Information.................................................................................................................................. 51
Things To Do ....................................................................................................................................... 532
Time Card
Information....................................................................................................................................... 567
Posting.............................................................................................................. 100, 567, 570, 571, 572
Reports ............................................................................................................................................. 580
Time Codes .................................................................................................................... 45, 102, 103, 556
Trademarks............................................................................................................................................. 12
Transferring Funds ......................................................................................................... 71, 184, 312, 313
Trial Balance .......................................................................... 47, 51, 55, 57, 58, 113, 131, 161, 166, 167
U
U/M (Unit of Measure) ........................................................................................ 100, 101, 467, 562, 566
UBO (Units on Back Order)......................................................................... 454, 480, 498, 501, 502, 540
Unapplied Payments............................................................................................................................. 218
Unpost Transactions............................................................................................................................... 56
Unrealized Exchange Difference............................................................ 71, 182, 184, 185, 187, 330, 461
UPC Code .................................................................................................................................... 337, 345
Update Method (Inventory).................................................................................................................. 368
Updating Information during Setup ................................................................................................... 39
UPS COD Tags .................................................................................................................................... 509
User ID
Adding.......................................................................................................................................... 33, 36
Changing ............................................................................................................................................ 33
Default ID........................................................................................................................................... 18
Deleting .............................................................................................................................................. 33
Utilities..................................................................................................................................... 57, 87, 117
Page 636
Index
Blue Link Solutions™
V
Variances.......................................................................................... 57, 83, 118, 338, 560, 574, 596, 598
Vendor Information.............................................................................. 250, 263, 264, 286, 287, 409, 415
Vendors .............................................................................................................. 47, 51, 76, 290, 292, 296
Aging............................................................................................................................................ 47, 55
Changing an Existing Vendor........................................................................................................... 258
Creating a New Vendor .................................................................................................................... 257
Deleting an Existing Vendor ............................................................................................................ 259
Void Cheque......................................................................................................................................... 281
Voucher
Payables............................................................................................ 255, 262, 278, 279, 594, 597, 598
Vouchers
A/P Vouchers ......................................................................................... 48, 51, 55, 269, 279, 425, 555
A/R Vouchers................................................................................................................. 46, 51, 55, 190
Adding a New Voucher ............................................................................................ 212, 214, 266, 268
Changing a Voucher ................................................................................................................. 214, 268
Recurring Vouchers.................................................................................................. 278, 279, 280, 302
Reversing a Posted Voucher............................................................................................. 214, 262, 268
W
Weekly ..................................................................................................... 56, 87, 144, 279, 488, 518, 520
Weight.................................................................................................................. 338, 583, 601, 602, 603
Word
Template....................................................................................................................... 77, 79, 415, 475
Work In Progress.................................................................................................................... 71, 390, 575
Workstation............................................................................................................................................ 21
Y
year 2000 compliance............................................................................................................................. 68
Year End Routine (see also End of Year) .............................................................................. 58, 114, 185
Year-To-Date ................................................................................................. 58, 115, 197, 229, 254, 286
YTD (see also Year-to-Date) ................................................................... 47, 58, 197, 229, 337, 338, 339
Z
Zoom window......................................................................................................................... 23, 345, 480
Chapter 18 – Employee & Salesperson
Page 637