1
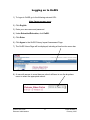
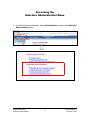
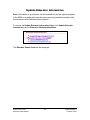
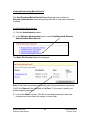
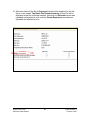
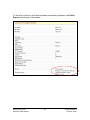
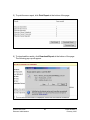
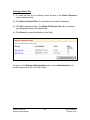
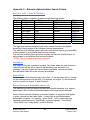
Ministry of Education
Information Management Branch
Educator Administration
User Guide
February 2007
This page is left intentionally blank.
OnSIS User Guide
Educator Administration
2
OnSIS Release 3
February 2007
Table of Contents
PURPOSE OF THE ONSIS APPLICATION EDUCATOR ADMINISTRATION USER GUIDE……4
MINISTRY SUPPORT..……………………………………………………………………………………5
LOGGING ON TO ONSIS..……………………………………………………………………………... 6
OVERVIEW OF THE EDUCATOR ADMINISTRATION MODULE………………….………..….......7
WHO IS ASSIGNED A MINISTRY EDUCATOR NUMBER?..........................................................8
ACCESSING THE EDUCATOR ADMINISTRATION MENU………………………………………….9
REQUESTING A MINISTRY EDUCATOR NUMBER……………………………………………….…10
Adding a New Educator……………………………………………………………………………...12
New Educator Match Form…....…………………………………………………………………….14
OVERVIEW OF CAREER EXPERIENCE……………………………………………….……………..18
Career Experience Form…………………………………………………………………………….21
UPDATE EDUCATOR INFORMATION………………………………………………………………...24
Educator Search Form………………………………………………………………….……………25
Searching for an Educator…………………………………………………………………………..26
Update Educator Information Form………………………………………………………………...30
Multiple MENs.………………………………………………………………………………………. 34
UPLOAD EDUCATOR BATCH FILE…………………………………………………………………...37
Viewing/Downloading Batch Results.………………………………………………....................39
Deleting a batch file..………………………………………………………………………………..44
APPENDIX A – EDUCATOR ADMINISTRATION SEARCH CRITERIA……………………………45
Request MEN Search Criteria………………………………………………………………………45
Update Educator Information Search Criteria……………………………………………………..47
OnSIS User Guide
Educator Administration
3
OnSIS Release 3
February 2007
Purpose of the OnSIS Application
Educator Administration User Guide
This guide has been developed as a resource to help users understand the
Educator Administration features of the Ontario School Information System
(OnSIS) application. The guide combines step-by-step instructions along with a
comprehensive look at each of the functions.
Users are strongly encouraged to read this user guide and all supplemental
documents, posted on the What’s New? section of the OnSIS application, to
ensure that they are aware of all aspects of OnSIS and related policies and
procedures.
OnSIS User Guide
Educator Administration
4
OnSIS Release 3
February 2007
Ministry Support
Inquiries regarding the Ontario School Information System and related policies
and procedures should be directed to:
Ontario School Information System (OnSIS) Coordination Group
Information Management Branch
Ministry of Education
Suite 422, 777 Bay Street
Toronto, ON M5G 2E5
Telephone: 1-888-275-5934 or 416-212-6366
Monday to Friday (excluding holidays)
8:30 am to 4:30 pm
Email: [email protected]
Fax: 416-212-2763
Extranet website: http://onsisinfo.edu.gov.on.ca
OnSIS User Guide
Educator Administration
5
OnSIS Release 3
February 2007
Logging on to OnSIS
1) To logon to OnSIS go to the following extranet URL:
https://www.gsa.gov.on.ca
2) Click English.
3) Enter your user name and password.
4) Under Education/Éducation, click OnSIS.
5) Click Enter.
6) Click Agree to the OnSIS Privacy Impact Assessment Page.
7) The OnSIS Home Page will be displayed, including a blue function menu bar.
8) A user with access to more than one school will have to use the dropdown
menu to select the appropriate school.
OnSIS User Guide
Educator Administration
6
OnSIS Release 3
February 2007
Overview of the Educator Administration Module
The Educator Administration module allows a user to request a Ministry
Educator Number (MEN) and maintain a base of biographical information on
Ontario educators.
Business processes that are included in the Educator Administration
application are:
¾
¾
¾
¾
Request New Ministry Educator Number (MEN)
Update Educator Information (including Career Experience)
Upload Batch File
View/Download Batch Results
When a new graduate from a faculty of education or a teacher from out-ofprovince is hired, the board or school must add the educator to OnSIS by
requesting a Ministry Educator Number.
The OnSIS application will perform a search for the possible prior existence of
the person in the system based on the biographical information submitted (i.e.,
names, including former names, date of birth, and gender). If no potential
matches are found or if the user confirms that none of the potential matches
displayed are that educator, OnSIS will then generate a unique identifier that will
be assigned to and remain with that educator as an identifier for all OnSIS
activities connected with that person.
When adding or changing biographical educator data, the user must validate the
legitimacy of the transaction by checking off a verification field indicating that an
appropriate source document was provided (e.g., Birth Certificate, Marriage
Certificate).
Once a user has created an MEN, OnSIS will not allow it to be deleted. A user
can only terminate an MEN and provide a reason for the MEN status change.
OnSIS User Guide
Educator Administration
7
OnSIS Release 3
February 2007
Who is assigned a Ministry Educator Number
(MEN)?
A Ministry Educator Number (MEN) is a unique identifier that is assigned to an
educator.
For public school boards, those requiring an MEN include qualified “teachers”
(excluding assistants) and also the following:
School Educators (reported through School Educator Data Submission)
• classroom teachers (an individual in charge of a class)
• teacher librarians
• guidance counsellors
• special education teachers
• itinerant teachers
• subject-specific/rotary teachers
• specialty teachers (e.g., physical education)
• long-term occasional (LTO) teachers assigned to a school for a longer,
specified time who are substitutes for absent teachers
• teachers on a letter of permission
• teachers who are on leave
• teachers visiting on exchange
• teachers away on exchange
• principals
• vice-principals
• instructors (private schools only)
For private schools, instructors also require an MEN.
Board Educators (reported through Board Educator Data Submission)
• educational/board consultants who are teachers
Board Personnel (reported through OnSIS Administration - Board
Personnel)
• supervisory officers (academic and business), including Directors of
Education and Secretaries of School Authorities
Note: Trustees do not require an MEN and are reported through Board
Personnel.
OnSIS User Guide
Educator Administration
8
OnSIS Release 3
February 2007
Accessing the
Educator Administration Menu
1) From the blue main menu bar, select Administration to access the Educator
Administration menu.
OnSIS User Guide
Educator Administration
9
OnSIS Release 3
February 2007
Requesting a Ministry Educator Number
The Request Ministry Educator Number Form allows a user to add a new
Ontario educator to the database.
1) To access the Request Ministry Educator Number Form, click Request
Ministry Educator Number from the Educator Administration menu.
The following form will be displayed.
OnSIS User Guide
Educator Administration
10
OnSIS Release 3
February 2007
The following mandatory field checklist highlights the information that a user will
require before completing the form.
Mandatory Field Checklist – (red asterisk)
Educator Information
Last Name
Gender
First Name
Source Document Verified?
Date of Birth
OCT Registry # is also required. See note below.
Note that OCT Registry # must have a valid value, unless:
a) the educator is on a Letter of Permission (i.e. is NOT Ontario College of
Teachers certified and has received a Letter of Permission from the
Ministry) OR
b) is newly qualified and his/her OCT Registry # is pending issuance from the
Ontario College of Teachers
c) is a private school teacher
In the above scenarios, enter 000000.
In the case of b), ensure that the OCT Registry # is updated if and when one is
issued.
Notes
a) Check the Source Document Verified? field only if a valid source document
was provided (e.g., Birth Certificate, Marriage Certificate). The name must be
entered into OnSIS according to the source document.
b) OnSIS retains the information exactly as entered, including upper and/or
lower case entries. For example,
Entered
Mary Ann Jones
MARY ANN JONES
Mary Ann JONES
Retained As
Mary Ann Jones
MARY ANN JONES
Mary Ann JONES
c) If the educator has multiple middle names, these should be entered under the
Second Name(s) field. For example,
Mary
First Name
Ann Elizabeth Catherine
Second Name(s)
Jones
Last Name
OnSIS User Guide
Educator Administration
11
OnSIS Release 3
February 2007
Adding a New Educator
1) Enter the educator’s biographical information, ensure that all of the mandatory
fields indicated by an asterisk (*) are completed.
2) Verify that the information entered reflects that of the source document (e.g.,
Birth Certificate, Marriage Certificate, etc.) Click the Source Document
Verified? field, if it does.
3) Enter the correct six-digit Ontario College of Teachers’ (OCT) Registry
Number for the educator. If the educator is not an OCT member or does not
yet have an OCT Registry Number, enter six zeroes (000000).
4) Click Submit MEN Request.
5) If an error message is displayed, follow the instructions on the screen to
correct the data, and click Submit MEN Request again.
6) If a warning message is displayed, check to ensure that what has been
entered is correct. If it is not, click Cancel, make any necessary changes, and
then click Submit MEN Request again. If the information is correct, click
Continue.
Note: When a form is submitted, OnSIS matches the data on the form to all
educator records in the database to see if that person is already on file with a
Ministry Educator Number (MEN).
OnSIS User Guide
Educator Administration
12
OnSIS Release 3
February 2007
7) If the submission is successful, the screen will be refreshed with the form
New Ministry Educator Number Assigned For and the message “MEN
Assignment Successful” will appear at the top of the screen along with a
unique identifier for that educator. Three buttons will also be displayed at the
bottom of the screen.
000000
8) Click PRINT as it is recommended that this page be kept on file in hard copy.
Note: Once an MEN has been assigned, the user can Add Career Experience
information or Request Another MEN. Add Career Experience is described in
a following section.
To return to the Educator Administration menu, select Administration from
the blue menu bar at the top of the screen.
OnSIS User Guide
Educator Administration
13
OnSIS Release 3
February 2007
New Educator Match Form
As previously mentioned, when a user submits the Request Ministry Educator
Number Form, OnSIS matches the data on the form to all educator records in
the database to see if that person is already on file with a Ministry Educator
Number (MEN).
If similar records are found, the Educator Information Submitted screen will be
displayed. This screen lists possible matching records found, based on the
information supplied by the user. (See next page.)
The upper part of the screen under the heading Educator Information
Submitted displays the educator’s name, date of birth, gender, and OCT
Registry Number as entered by the user. The lower part of the screen, under the
heading Matches Found, displays a list of matching records, separated by
Active and Terminated MEN matches. The MEN column provides hyperlinks to
read-only MEN details for the user to view before determining if a new MEN is
required for the educator.
The number of matching records is displayed in the Matches Found title bars
(Active/Terminated) and the list is ordered by best match criteria -high/medium/low. The best match criteria are determined by a combination of
matches between:
¾ Last/first/second name(s)
¾ Date of birth
¾ Gender
The different levels of best match criteria are colour-coordinated:
¾ strong match
¾ medium match
¾ weak match
– burgundy
– green
– blue
Note: Potential matching records may show the individual’s former name, if he or
she changes his or her name for any reason (marriage or divorce, for example).
OnSIS User Guide
Educator Administration
14
OnSIS Release 3
February 2007
Note: In the example below, the first two active matches are burgundy (strong
matches) and the last two are green (medium matches). Those matches
displayed in burgundy may be a potential match for the educator information that
was submitted. The names are similar and the birth dates are an exact match.
000000
000000
000000
000000
In this example, searching for a hyphenated name, Purton-Tsapralis, results in
matches for a former name (Purton).
Click on the MEN hyperlink of any records that are strong potential matches to
see more detailed information.
OnSIS User Guide
Educator Administration
15
OnSIS Release 3
February 2007
Looking at the detailed information provided, it appears that the first and second
MEN records are matches for this educator.
In cases such as this, when it appears that the same educator has been issued
more than one MEN, a user should cancel the request and contact the ministry to
assist in resolving the problem.
000000
OnSIS User Guide
Educator Administration
16
OnSIS Release 3
February 2007
The first part of the form lists former names and the board/school of the MEN
request.
The second part lists information on changes to the MEN, information on related
MENs, career experience, and assignments.
From this screen, a user can:
1) Click Print to create a printable version of the screen.
2) Click Modify Submitted Information and modify the data previously entered
on the Request Ministry Educator Number Form.
3) Click Issue MEN to force a request for an MEN, if it has been verified that the
educator does not match an existing MEN.
4) Click Educator Match Form to return to the list of potential matches.
To return to the Educator Administration menu, select Administration from
the blue menu bar at the top of the screen.
OnSIS User Guide
Educator Administration
17
OnSIS Release 3
February 2007
Overview of Career Experience
All teaching career experience, both within and outside of Ontario, is to be
recorded in OnSIS, including post-secondary and private school teaching
experience.
Career Experience can be added at the time that a Ministry Educator Number
(MEN) has been newly requested (e.g., if an educator is new to Ontario but has
experience outside of Ontario), or through Update Educator Information (e.g.,
to correct an existing record or add a new one).
The maximum total career experience is 60 for public school educators.
The maximum total career experience is 70 for private school educators.
Full Time Equivalency (FTE) is not a factor in determining the amount of career
experience. For example, an educator with an FTE of 0.50 who has worked for
the entire school year has one year of experience.
Career experience should be reported for all active educators, including those on
leave (e.g., health, parental, sabbatical).
If an educator taught both elementary and secondary levels simultaneously, the
school level for this career experience is Elementary/Secondary, to avoid
double reporting of experience in both the elementary and secondary panels.
The school level Other could include post-secondary teaching experience or
teaching in an ungraded school.
For convenience, all Career Experience records are also displayed (read-only)
when an educator is linked to a board or school through board or school
Educator Data submission. It is the responsibility of the board or school to
ensure that the displayed Career Experience records are accurate. Correct any
inaccuracies through Update Career Experience (via Update Educator
Information) in Educator Administration. Some boards or schools may choose
to correct/update or add Career Experience records via batch file submission.
OnSIS User Guide
Educator Administration
18
OnSIS Release 3
February 2007
Automatic Increment of Career Experience
At the beginning of each school year, OnSIS will automatically increment all
active educator Career Experience records based on the school level(s) for
which data was submitted in the previous school year through board or school
Educator Data submission.
Active educators with board personnel assignments which require an MEN (e.g.,
Supervisory Officers) will also have their career experience incremented, under
the school level Other.
If a Career Experience record does not exist for Ontario for a given school level
and if the board or school Educator Assignment data was submitted in the
previous school year, the system will automatically create the appropriate school
level record, if required, and increment the record accordingly.
Note: If an educator’s career experience is not provided, the experience will
default to 0 (zero) and show 1 (one) year in the appropriate school level for the
following school year. This may result in inaccurate data, if left uncorrected.
Always ensure that Career Experience is accurate and complete.
To simplify the OnSIS career experience auto-increment process, the following
rules are applied:
1. Only Active assignments are used to calculate the career experience increment,
(i.e., educator data was submitted during the previous school year via board or
school Educator Data submission). Active Supervisory Officer assignments
(from board personnel) are also used to calculate career experience increments.
2. Leave Assignments (e.g., health, parental, sabbatical) are Active and are used
to calculate the career experience increment.
3. Withdrawal Assignments (e.g., retired) are Inactive and are not used to calculate
the career experience increment (i.e., educator data was not submitted during
the previous school year via board or school Educator Data submission or
existing assignments were ended). Any existing Career Experience records will
remain unchanged.
4. Full Time Equivalency (FTE) is not used to calculate the career experience
increment.
OnSIS User Guide
Educator Administration
19
OnSIS Release 3
February 2007
The following provides examples of how the automated career experience
increments are calculated by the OnSIS system:
Scenario
Educator has elementary school
assignment only
Action
Ontario "elementary" experience is
incremented by 1.00
Educator has secondary school
assignment only
Ontario "secondary" experience is
incremented by 1.00
Educator has elementary and
secondary school assignment
Ontario “elementary/secondary”
experience is incremented by 1.00
(includes mixed panel schools such as
junior high schools)
Educator has board personnel
assignment only
Ontario “other” experience is
incremented by 1.00
Educator has board educator
assignment only
Ontario “other” experience is
incremented by 1.00
Educator has board personnel and
board educator assignment
Ontario “other” experience is
incremented by 1.00
Educator has elementary school
assignment and board educator
assignment
Ontario “elementary” experience is
incremented by 1.00
Educator has secondary school
assignment and board educator
assignment
Ontario “secondary” experience is
incremented by 1.00
OnSIS User Guide
Educator Administration
20
OnSIS Release 3
February 2007
Career Experience Form
This form allows the user to add an Ontario educator’s previous teaching career
experience (number of years at a specific school level and country or province).
Adding Career Experience
As previously mentioned, once a new Ministry Educator Number has been
successfully assigned, two buttons will appear at the bottom of the screen – Add
Career Experience and Request Another MEN.
1) Click Add Career Experience on the form New Ministry Educator Number
Assigned For to add career experience for a new educator.
000000
OnSIS User Guide
Educator Administration
21
OnSIS Release 3
February 2007
The Career Experience Form will be displayed.
The following mandatory field checklist highlights the information that a user will
require before completing the form.
Mandatory Field Checklist – (red asterisk)
Educator Career Experience
Country or Province (not both)
Number of Years
School Level
2) Enter the information.
Note: If career experience is from a Canadian province, leave the Country
field blank and select a province. If experience is from outside of Canada,
select a country – the Province field is then inaccessible.
3) Click Submit.
4) If an error message is displayed, follow the instructions on the screen to
correct the data, and click Submit again.
5) If a warning message is displayed, check to ensure that what has been
entered is correct. If it is not, click Cancel, make any necessary changes, and
then click Submit again. If the information is correct, click Continue.
OnSIS User Guide
Educator Administration
22
OnSIS Release 3
February 2007
6) If the submission is successful, the form will be refreshed with the updated
information, the message “Submit Successful” will appear at the top of the
screen, and the career experience that was just entered will be displayed in
the Career Experience List.
Information on how to update and delete career experience is presented in the
next section, Update Educator Information.
From this screen, a user can:
1) Click Add Another Career Experience to add additional experience in
another school level.
2) Click Request Another MEN to obtain an MEN for another new educator.
To return to the Educator Administration menu, select Administration from
the blue menu bar at the top of the screen.
OnSIS User Guide
Educator Administration
23
OnSIS Release 3
February 2007
Update Educator Information
Note: Information on an educator can be updated only by the original requestor
of the MEN or an authorized user who has previously submitted educator data
via a board or school educator data collection.
To access the Update Educator Information Form, click Update Educator
Information from the Educator Administration Menu.
The Educator Search Form will be displayed.
OnSIS User Guide
Educator Administration
24
OnSIS Release 3
February 2007
Educator Search Form
This form allows an authorized user to search the database for an educator in
order to make updates to the educator’s biographical information, including
career experience.
Note: Some users may have read-only access to this information, depending on
their level of authorization.
OnSIS User Guide
Educator Administration
25
OnSIS Release 3
February 2007
Searching for an Educator
a) Search by Ministry Educator Number (MEN)
Enter the entire MEN and click Search. The search result will display detailed
biographical information for that individual on the Update Educator Information
Form, if an exact match is found.
A search using a partial MEN is also possible.
1) Enter an asterisk in the MEN field with a partial Ministry Educator Number
and click Search. The search result appears on the Educator Match Form
which displays a list of all matching individuals with the partial MEN, if a
match is found.
Note: When searching with partial data, a message will be displayed if over
100 potential matches are found. It will ask the user to narrow the search by
adding additional information (i.e., more digits in the MEN or biographical data
associated with the educator).
Entered
123*
Potential Matches
1234-5-6789
1235-4-6789
1236-4-5789
etc.
*123
9876-5-4123
6789-4 -5123
etc.
*123*
4569-1-2378
9812-3-4567
9876-5-4123
6789-4 -5123
etc.
2) Click the hyperlink for the educator record that is to be updated, or to verify
whether the educator is an actual match. The Update Educator Information
Form will be displayed.
OnSIS User Guide
Educator Administration
26
OnSIS Release 3
February 2007
b) Search by Name, Date of Birth, and/or Gender
1) Enter the name and/or date of birth and/or gender. Click Search. If a potential
match is found, the search result appears on the Educator Match Form.
2) Click the hyperlink for the educator record that is to be updated, or to verify
that the educator is an actual match. The Update Educator Information
Form will be displayed.
Note: The system also searches former names in the educator database. For
this reason, the name displayed in the match list may not reflect the name
submitted by the user.
A search based on part of a name is also possible.
1) Enter an asterisk (*) in the name field with part of a name. Click Search. If a
potential match is found, a list of all matching individuals with the partial
names will be displayed on the Educator Match Form.
2) Click the hyperlink for the educator record that is to be updated, or to verify
that the educator is an actual match. The Update Educator Information
Form will be displayed.
Search criteria (partial name)
Beth*
*Beth
*Beth*
OnSIS User Guide
Educator Administration
Potential matches
Beth
Bethany
…
Beth
Elisabeth
Elizabeth
Mary Beth
…
Beth
Bethany
Elisabeth
Elizabeth
Mary Beth
Ilsabetha
…
27
OnSIS Release 3
February 2007
c) Special Characters, Spaces, Segment Names, etc.
The search results include any potential matches with:
• accents
• special characters (e.g., hyphen, apostrophe)
• spaces
• segment names (Last Name only)
• mixed upper/lower case
Search criteria:
No spaces in between
names
Example name:
MaryEllen
Potential matches:
MaryEllen
Mary Ellen
Mary-Ellen
Note: Ellen-Mary and Ellen
Mary would not result in a
potential match for the above
example.
A name with 3 or more
words is in a single name
field
Van de Kamp
Van de Kamp
VandeKamp
Vande Kamp
Van deKamp
Van
De
Kamp
Note: Van de (only) and
de Kamp (only) would not
result in a potential match for
the above example.
A name with special
characters
OnSIS User Guide
Educator Administration
O'Neil
O'Neil
ONeil
O Neil
Michèle
Michèle
Michele
Michéle
28
OnSIS Release 3
February 2007
In the above cases, when searching with partial information, the Educator Match
Form will be displayed. It displays a list of possible matching records found,
based on the information supplied in the Educator Search Form by the user.
The upper part of the screen under the heading Educator Search Information
Submitted displays the search information as it was entered by the user. The
lower part of the screen under the heading Matches Found displays a list of
matching records, separated by Active and Terminated MEN matches.
Strong matches will be displayed in burgundy, medium matches in green, and
weak matches in blue.
000000
000000
000000
000000
000000
OnSIS User Guide
Educator Administration
29
OnSIS Release 3
February 2007
Update Educator Information Form
The Update Educator Information Form is accessed either directly from the
Educator Search Form, if an exact match occurred, or from the Educator
Match Form by clicking the hyperlink for the educator.
This form allows an authorized user to update biographical data related to an
educator on the database. Some users may have read-only access to an
educator’s biographical information, depending on their level of authorization.
Note: An authorized user can update an educator’s record only if that user is
part of the organization that:
a) requested the educator’s MEN or
b) previously submitted Board or School Educator Data
Submission(s) for the educator.
The following mandatory field checklist highlights the information that a user will
require before completing the form.
Mandatory Field Checklist – (red asterisk)
Educator Information
Last Name
Gender
First Name
Source Document Verified?
Date of Birth
MEN Status
OCT Registry # is also required. See note below.
Note that OCT Registry # must have a valid value, unless:
a) the educator is on a Letter of Permission (i.e. is NOT Ontario College of
Teachers certified and has received a Letter of Permission from the Ministry)
OR
b) is newly qualified and his/her OCT Registry # is pending issuance from the
Ontario College of Teachers
c) is a private school teacher
In the above scenarios, enter 000000.
In the case of b), ensure that the OCT Registry # is updated once issued.
Note: A change to any mandatory field and/or to Second Name(s) requires that
the Source Document Verified? check box be checked. That is, the user
must ensure that supporting documentation is provided prior to updating
these fields. A value in Reason for Change drop-down menu must also
be provided.
OnSIS User Guide
Educator Administration
30
OnSIS Release 3
February 2007
OnSIS User Guide
Educator Administration
31
OnSIS Release 3
February 2007
Updating Educator Biographical Information
1) Make the necessary changes and click Submit.
Note: For changes made to biographical information, select a reason from the
drop-down menu in the Reason for Change drop-down menu and click the
Source Document Verified? check box. The changes entered must reflect
the source document.
2) If an error message is displayed, follow the instructions on the screen to
correct the data and click Submit again.
3) If a warning message is displayed, check to ensure that what has been
entered is correct. If it is not, click Cancel, make any necessary changes, and
then click Submit again. If the information is correct, click Continue.
4) If the submission is successful, the form will be refreshed with the updated
information and the message “Submit Successful” will appear at the top of
the screen.
OnSIS User Guide
Educator Administration
32
OnSIS Release 3
February 2007
Deleting an MEN
An MEN cannot be deleted from OnSIS. A user can only change the status of an
MEN from Active to Terminated or Terminated to Active with an accompanying
reason for the MEN status change. This is done in the Update Educator
Information Form. In the following example, the educator’s status has been
changed from Active to Terminated, the reason being that the educator is
deceased.
OnSIS User Guide
Educator Administration
33
OnSIS Release 3
February 2007
Multiple MENs
If it is found (and confirmed) that an educator has been assigned multiple MENs
over time, the MEN(s) that must no longer be used has/have to be terminated.
1) In the Reason for Change field, select Update Related MEN from the
drop-down menu.
2) In the MEN Status field, select Terminated from the drop-down menu.
3) In the Reason for MEN Status Change field, select Related MEN Exists
from the drop-down menu.
4) In the Related MEN field, enter the MEN number of the record that will
continue to be Active.
Before terminating an educator’s MEN, a user should contact the ministry to
determine whether data linked to the MEN(s) was submitted in previous school
or board data submissions prior to deciding which MEN(s) to terminate.
000000
OnSIS User Guide
Educator Administration
34
OnSIS Release 3
February 2007
Adding Additional/Updating Existing Career Experience
The following buttons appear at the bottom of the screen when the Update
Educator Information Form is displayed.
Click Career Experience.
Previously entered career experience information appears in the Career
Experience List under the Career Experience Form.
OnSIS User Guide
Educator Administration
35
OnSIS Release 3
February 2007
1) To add additional career experience for this educator, enter the information in
the blank form and click Submit.
2) To update existing career experience for this educator, click the blue
hyperlink for the career experience that is to be updated, make the necessary
changes, and click Submit.
3) If an error message is displayed, follow the instructions on the screen to
correct the data and click Submit again.
4) If the submission is successful, the form will be refreshed with the updated
information and the message “Submit Successful” will appear at the top of
the screen.
Deleting Career Experience Information
1) Click the blue hyperlink for the school level experience that is to be deleted.
The Career Experience Form for that experience will be displayed.
2) Click Delete at the bottom of the screen.
A confirmation message will be displayed asking, “Are you sure you wish to
delete…?” Click OK.
Note: An error message will appear, disallowing the Delete, if board or school
educator data submissions are linked to the educator and if it is the only Career
Experience record.
To return to the Educator Administration menu, select Administration from
the blue menu bar at the top of the screen.
OnSIS User Guide
Educator Administration
36
OnSIS Release 3
February 2007
Upload Educator Administration Batch File
Batch File Upload Form
The Batch File Upload Form allows authorized users to select an Educator
Administration batch file for uploading and subsequent processing within
OnSIS.
Accessing Batch File Upload
1) Click the Administration option.
2) In the Educator Administration menu, select Upload Educator
Administration Batch File.
The following form will appear:
3) Click the radio button for the file size that will be uploaded.
OnSIS User Guide
Educator Administration
37
OnSIS Release 3
February 2007
4) Click Browse to locate and select a file for uploading from the directory
listings associated within the current user. Once the file is selected, the Batch
File Upload Form reappears.
5) Click Submit File to upload the file. If the file upload is completed
successfully, the Batch File Upload Result is presented with the message,
“File has been uploaded successfully.” If no file was selected, the Batch File
Upload Form reappears with an error message.
6) To upload another file, click Upload another File.
To return to the Educator Administration menu, select Administration from
the blue menu bar at the top of the screen.
OnSIS User Guide
Educator Administration
38
OnSIS Release 3
February 2007
Viewing/Downloading Batch Results
The View/Download Batch Results Form allows the user to select an
Educator Administration batch-processing result file to view, print, download,
or delete.
View/Download Batch Results
1) Click the Administration option.
2) In the Educator Administration menu, select View/Download Educator
Administration Batch Results.
The Batch File Results List will be displayed.
Note: If the batch upload does not exactly match the specifications required by
OnSIS, the Status will be displayed as “In Error.” If this occurs, contact your
system support personnel.
3) Look at the Status column. If the file has not been processed, wait a few
moments and then refresh the screen, or return later.
OnSIS User Guide
Educator Administration
39
OnSIS Release 3
February 2007
4) When the status of the file is Processed, click the blue hyperlink for the file
that is to be viewed. The Batch File Results Summary for that file will be
displayed as per the following example. Note that one Educator record was
uploaded and rejected in error, and two Career Experience records were
uploaded and rejected in error.
OnSIS User Guide
Educator Administration
40
OnSIS Release 3
February 2007
To see a list of errors in a file that has been successfully uploaded, click Detail
Report at the bottom of the screen.
OnSIS User Guide
Educator Administration
41
OnSIS Release 3
February 2007
5) To print the error report, click Print Report at the bottom of the page.
6) To download the results, click Download Report at the bottom of the page.
The following pop-up will appear.
OnSIS User Guide
Educator Administration
42
OnSIS Release 3
February 2007
7) Click Save. Another pop-up screen will be displayed providing the option of
selecting where the file is to be saved.
8)
Select where the file is to be saved and click Save. A message will be
displayed stating that the download is complete. Click Close to return to the
Detail Report screen.
9)
Click Previous Page at the bottom of the screen to return to the Batch File
Results Summary.
10) Click Download Results from this screen. A pop-up window will be
displayed. Click Open.
The following form is an example of what may be displayed when the file is
opened:
11) Make any necessary corrections, recreate the file, and upload it again.
OnSIS User Guide
Educator Administration
43
OnSIS Release 3
February 2007
Deleting A Batch File
1) For each file that is to be deleted, check the box in the Delete Checkbox
column beside that file.
2) Click Delete Checked Files. A confirmation popup will be displayed.
3) Click OK to delete the file(s). The Batch File Results List will be refreshed
and redisplayed without the deleted files.
4) Click Cancel to cancel the deletion of the file(s).
To return to the Educator Administration menu, select Administration from
the blue menu bar at the top of the screen.
OnSIS User Guide
Educator Administration
44
OnSIS Release 3
February 2007
Appendix A – Educator Administration Search Criteria
REQUEST MEN – SEARCH CRITERIA
The following table contains the predefined matching logic criteria.
Criteria Field name 1
Field name 2
Field name 3
1
Last Name
Given Name
DOB
2
Last Name
Second Name
DOB
3
Last Name
Given Name
Second Name
4
Given Name
Second Name
DOB
5
Last Name
DOB
Gender
6
Given Name
DOB
Gender
7
Second Name DOB
Gender
8
Last Name
Second Name
Gender
9*
Given Name
Second Name
Gender
10
Last Name
Given Name
Gender
Match Level
HIGH
HIGH
MEDIUM
MEDIUM
MEDIUM
LOW
LOW
MEDIUM
LOW
MEDIUM
The high level matches (burgundy) will return records that have the highest
possibility of being related to an individual that has been entered.
The medium level matches (green) will return records that have a good possibility
of being related to an individual that has been entered.
The low level matches (blue) will return records that have an outside chance of
being related to an individual that has been entered.
*NOTE: Search Criteria #9 has been turned off.
Null Values
Null values will not be considered a match. Only fields where the user entered or
selected some values will be used by the Matching Logic Algorithm. For
example, if the user leaves the Second Name field blank, records with blank
Second Name fields will not be returned as matches.
Date of Birth
For the dates of birth where the day is less then 13, the algorithm will try to match
on the switched month and day also. For example, for August 10, the routine will
look for a match on August 10 and October 8.
Special Characters, Embedded Spaces, etc.
The matching process will support accents and special characters (e.g. hyphen,
apostrophe), with or without embedded spaces and mixed upper/lowercase.
Search without special characters (crunched together) is supported and applies
to given, second and last name fields. A name with an embedded space,
apostrophe or hyphen - for example, “Jones Smith” - will be treated as three
separate name searches of “JonesSmith” crunched together: “JonesSmith”,
“Jones Smith” and “Jones-Smith” would be located.
OnSIS User Guide
Educator Administration
45
OnSIS Release 3
February 2007
Segment name search is also supported in the case of an embedded space or
hyphen name: “Jones” and “Smith” would be located. Other combinations are not
supported (i.e. “Smith-Jones”, “Smith Jones”) would not be located. Segment
name search is applicable to the Last Name field, but not to the Given and
Second Name fields.
A name with an embedded space, apostrophe or hyphen of three or more words
in a single name field – for example, “Van de Kamp” - will be treated as three
separate name searches of “VandeKamp” crunched together.
Segment name search is also supported in the case of embedded space and
hyphen name: “Van”, “de”, and “Kamp” would also be located. Other
combinations are not supported (i.e. “Van de”, “de Kamp”) and would not be
located.
Example: Jones-Smith will return existing educators with the following last names
(provided other entered fields are also matched as per the high/med/low
matching algorithm):
Jones-Smith
Jones Smith
Smith
Jones
Example: O'Neil will return existing educators with the following last names
(provided other entered fields are also matched as per the high/med/low
matching algorithm):
O'Neil
ONeil
O Neil
Additional Notes
The matching process also includes historical educator records (former names).
A maximum of 100 (System Parameter) matches will be returned.
The OCT Registry # is not part of the Matching Logic Algorithm.
OnSIS User Guide
Educator Administration
46
OnSIS Release 3
February 2007
UPDATE EDUCATOR INFORMATION – SEARCH CRITERIA
The Educator Match List is ordered by best match criteria (high/medium/low).
1. If the input parameters are last name and first name:
A. If last name and first name are not empty and do not include "*", and
DOB is not empty: Matching records with these parameters are
considered "Strong match" (burgundy)
B. If last name and first name are not empty and do not include "*", and
DOB is empty. Matching records with these parameters are considered
"Medium match" (green)
2. All the other matched records are considered "Low match" (blue)
Search by MEN
Entering the Ministry Educator Number and clicking on the Search button will
display information for that individual on the “Update Educator Information
Form”.
Entering a partial Ministry Educator Number (i.e. user enters “*” as “123*” or
“*123” or *123* to locate an educator) and clicking on the Search button will
display a list of all matching individuals with the partial MEN.
Search by Name, Date of Birth, Gender
Entering the name and/or date of birth and/or gender and clicking on the Search
button will display a list of all matching individuals.
Entering “*” in a name field – for example, “Beth*” - will locate Beth, Bethany, etc.
“*Beth*” would locate Beth, Mary Beth, Elizabeth, Elisabeth, Bethany, etc.
Special Characters, Embedded Spaces, etc.
The search process will support accents and special characters (e.g. hyphen,
apostrophe), with or without embedded spaces and mixed upper/lowercase.
Search without special characters (crunched together) is supported and applies
to given, second and last name fields. A name with an embedded space,
apostrophe or hyphen - for example, “Jones Smith” - will be treated as three
separate name searches of “JonesSmith” crunched together: “JonesSmith”,
“Jones Smith” and “Jones-Smith” would be located.
Segment name search is also supported in the case of an embedded space or
hyphen name: “Jones” and “Smith” would be located. Other combinations are not
supported (i.e. “Smith-Jones”, “Smith Jones”) would not be located. Segment
name search is applicable to the Last Name field, but not to the Given and
Second Name fields.
OnSIS User Guide
Educator Administration
47
OnSIS Release 3
February 2007
A name with an embedded space, apostrophe or hyphen of three or more words
in a single name field – for example, “Van de Kamp” - will be treated as three
separate name searches of “VandeKamp” crunched together.
Segment name search is also supported in the case of embedded space and
hyphen name: “Van”, “de”, and “Kamp” would also be located. Other
combinations are not supported (i.e. “Van de”, “de Kamp”) and would not be
located.
Example: Jones-Smith will return existing educators with the following last names
(provided other entered fields are also matched as per the high/med/low
matching algorithm):
Jones-Smith
Jones Smith
Smith
Jones
Example: O'Neil will return existing educators with the following last names
(provided other entered fields are also matched as per the high/med/low
matching algorithm):
O'Neil
ONeil
O Neil
Additional Notes
The matching process also includes historical educator records (former names).
A maximum of 100 (System Parameter) matches will be returned.
It is recommended that a search by OCT Registry # be combined with other data
(e.g. name).
OnSIS User Guide
Educator Administration
48
OnSIS Release 3
February 2007