1
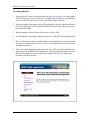
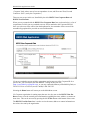
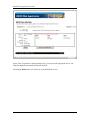
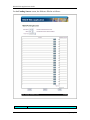
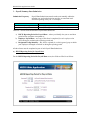
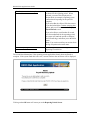
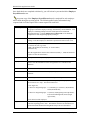
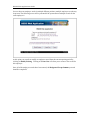
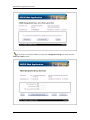
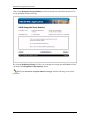
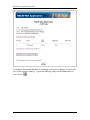
Ministry of Health HSCIS Web Application User Guide Author: HSCIS Team Creation Date: Last Updated: June 3, 2011 Document Number: Version: 1.16 Preface Purpose Audience Terms and Conventions This document provides information on the use of the HSCIS (Health Sector Compensation Information System) Web Application for submission of regular, required information to the Ministry and HEABC. This document is intended primarily for users requiring access to HSCIS Web Application site. This document uses standard conventions for displaying information. COURIER Indicates text that you type. ARIAL BOLD Indicates a label that appears on a screen (for example, a field name or push-button label). Italics Indicates variable text that you type when entering a command or a citation to another document. Use this style for emphasis. Bold Indicates a note to give you additional information or to emphasize a particular procedure. Indicates a warning or alert. To avoid making an error, you need to pay particular attention to the information contained in these alerts. Indicates a useful tip or shortcut, which you can use to save time and keystrokes. Indicates a Change in this version of the Manual. (ie. New field added to system or change in New definition). Integrated Position Indicate whether this is an integrated position. (eg.. the employee perf duties that cross two or more classification codes). If the position is a integrated position report “I”, if not, leave blank. Page 2 of 34 HSCIS v2 Data Entry Guide Contents Contents Introduction: .................................................................................................... 4 Before you get started: ...................................................................................... 4 Accessing the site: ............................................................................................ 5 Using 1. 2. 3. 4. the HSCIS Web Application: .................................................................... 7 View Organizational Information ............................................................ 7 Sources of Funding .............................................................................. 10 Payroll Summary Data Submission ...................................................... 13 a) HSCIS Reporting Period for Payroll Data: .......................................... 13 b) Employee Payroll Data: ..................................................................... 15 c) Designated Group Summary: ............................................................ 23 Signoff and View Audit Log ................................................................... 31 Page 3 of 34 HSCIS Web Application Guide HSCIS Web Application User Guide Introduction: Welcome to HSCIS on the web! This document provides a description of how to make use of the HSCIS secure data entry site (https://hscis.hnet.bc.ca) for submission of HSCIS data; viewing our records of your organizational information; and for submission of Sources of Funding data. The data requirements for this version of HSCIS have been simplified to make it easier and quicker for the users. However, there have been changes to the timing and content of submissions. These changes are discussed in the tables below. Before you get started: Have you considered submitting a payroll extract through HNFile? The Ministry of Health and HEABC have arranged with a number of payroll system vendors (Avanti Software, Blaeberry Solutions, Comvida, Eclipsys, GoldCare, ISM, Meditech, NOW Solutions, Ormed, Quadrant HR, and in some instances ADP) to have applications or reports available to extract the HSCIS data required. Once the application or report is installed on your system, submission of HSCIS data is as simple as pushing a button to generate the extract, then going to our HNFile site to submit the whole file in one go. Once the file has been validated and successfully loaded, your submission is complete! It‟s by far the simplest and easiest way to go. For more information, contact your payroll vendor representative. Have you received and installed your Digital Certificate? Access to the HSCIS Web Application site is secured and restricted. In order to use the site, you must have: a browser capable of 128-bit encrypted sessions (the Ministry of Health currently supports Internet Explorer version 6.0 and above.); a digital certificate (a small electronic file which attaches itself to your browser) from the Ministry of Health, installed on the PC which will be used to complete the submission. If you need a digital certificate, the HSCIS Registration Agreement is available at the HEABC web site (http://www.heabc.bc.ca/PageFactory.aspx?PageID=85). This is an electronic form which you complete and submit online. Once submitted, you will be contacted within approximately 4 weeks via email with your digital certificate and instructions on how to install it. Information on installation and activation is provided with the digital certificate. Page 4 of 34 HSCIS Web Application Guide Accessing the site: 1. To get to the site, open your browser and type https://hscis.hnet.bc.ca in the Address field. The first time you access this site, we suggest that you add it as a bookmark to your list of favorite sites for easy access the next time that you log on. 2. After pressing the Enter button, you will be prompted to select a digital certificate to use when connecting. Select the HSCIS certificate (which may be the only one you have) and click „OK‟. 3. When presented with the Security Alert screen, click on „Yes‟. 4. You should then be presented with the logon screen of the HSCIS Web Application. 5. Here, you should type in the User-ID and password supplied to you at the same time you got your digital certificate. (Note: This is not the password you used to activate the digital certificate.) 6. After successfully logging into the application, you will be presented with the main menu screen for the HSCIS Web Application. The main options available from the HSCIS Web Application web site are listed along the left side. The table below describes each of the options: Page 5 of 34 HSCIS Web Application Guide Option (link) Home Description Selecting this link will always return you to the Main Menu screen for the HSCIS Web Application. View Organizational Info Takes you to the screens to make changes to the name, address, or contacts for a reporting organization or its sites. (See section A. View Organizational Information below) Enter Payroll Summary Takes you to the screens to submit the quarterly HSCIS Payroll Summary information. (See section C. Payroll Summary Data Submission below) Enter Funding Sources These are the screens provide/update Sources of funding information. (See section B. Sources of Funding below) Change Password If you wish to change the password associated with your logon user-id, select this link and follow the on-screen directions. Help Takes you to the main page of the on-line Help file associated with the HSCIS Web Application site, and allows you to page through the document. View Audit Log When you select this option, the system check to determine if there is an existing audit log and a number of checks are completed as well and you may be asked a couple of questions. Sign Off Select this link to sign off the HSCIS Web Application site. Please Note: The site has timers built in which will automatically log you off after approximately 10 minutes of inactivity (no Save/Submit buttons being pressed). If this happens (you will see a message similar to “External Action Not Recognized: ‘JhscisLogin’), incomplete records will not appear in the audit log, and we will assume you have not completed your session. There are basically 3 screen sets associated with the HSCIS web application. View Org Info allows you to see the address and contact information we currently have on file for your organization. The other two, Enter Payroll Summary Data and Enter Funding Sources, are used to submit data to HSCIS. Page 6 of 34 HSCIS Web Application Guide Screen Set View Organizational Information Submission Requirement You can look at the information recorded by the Ministry and HEABC for your Corporate or Site location at any time. If changes are required, please contact the Ministry of Health Help Desk at 250-952-1234 or Toll Free (across Canada) 1-888-764-2323 Payroll Summary Data Submission This is submitted semi-annually on June 30, and December 31 showing accumulated totals as you move through the year (more on this later.) Sources of Funding These must be submitted annually, (or more frequently, if there are updates or changes to your funding sources) Please note that failure to submit this information on a regular basis could affect funding and collective bargaining provided on behalf of your facility from the Ministry of Health and/or the Health Authorities. The sections below provide more details on how to use each of the screen sets. Tables describing the codes used within the screen sets are available from the HEABC web site http://www.heabc.bc.ca/PageFactory.aspx?PageID=83 Questions regarding use of the HSCIS Data Entry Web Application should be directed to the Help Desk at the Ministry of Health. (250-952-1234) or or Toll Free (across Canada) 1-888-7642323. Using the HSCIS Web Application: 1. View Organizational Information Submission Frequency: This should be reviewed on a regular basis to ensure your organization information (name, address, and contacts) is correct and current. If you notice any errors or updates needed, please contact the Ministry of Health Help Desk at 250-952-1234 or or Toll Free (across Canada) 1-888-764-2323. In HSCIS, the term „Corporate‟ refers to the legal, organizational body that is registered with the Companies Registry. A „Site‟ refers to one or many facilities that may be run by the „Corporate‟ body in the provision of services. (E.g. “Silvercare, Inc.” runs three care facilities named “Silvercare East”, “Silvercare West” and “Silvercare Central”. In HSCIS, Silvercare, Inc. is the Page 7 of 34 HSCIS Web Application Guide „Corporate‟ body, where most of our correspondence is sent, and Silvercare West, East and Central are „Sites‟, run by the Corporation.) There are two screens in this set, identified by the titles HSCIS View Corporate Data and HSCIS View Site Data. When you are presented with the HSCIS View Corporate Data form (as shown below), a list of corporations to which you are permitted to access will be attached to the Corporate ID field. Once you select one of the entries from the dropdown list, the remainder of the screen will be automatically populated for you with our current information. If you are permitted to access multiple corporations and are not sure of the Corporate ID for a specific one, you can find this out from HEABC‟s listing on their web site. (http://www.heabc.bc.ca/Page28.aspx), or you may contact the Ministry of Health Help Desk, at 250-952-1234 or or Toll Free (across Canada) 1-888-764-2323. Selecting the Home button will return you to the Main Menu screen. If a Corporate organization is running more than one site, they can use the HSCIS View Site Data screen to view the currently stored information regarding the name, address, or contacts at those sites. This can be accessed by pressing the Go To Site button at the bottom of the screen. The HSCIS View Site Data form is used to review the name, address or contact information at the various sites run by the organization. Page 8 of 34 HSCIS Web Application Guide Again, if the Corporation is running multiple sites, you can select the appropriate one to view using the dropdown box attached to the Site ID field. Selecting the Home button will return you to the Main Menu screen. Page 9 of 34 HSCIS Web Application Guide 2. Sources of Funding Submission Frequency: Annually, by July 31st. If there are significant changes in the sources or amount of funding you receive during the year, you may „resubmit‟ this report at any time. On this screen, you identify all monies you receive from all sources for the current fiscal year. Fiscal years for the Ministry run from April 1st to March 31st, and so are identified as 2006/2007 2007/2008, etc. Each line (after Fiscal Year) represents a single source of funding. Page 10 of 34 HSCIS Web Application Guide For the Funding Sources screen, the fields are filled in as follows: Field Content Page 11 of 34 HSCIS Web Application Guide Corporate ID Site ID From the dropdown list, select the Corporation for which you are providing information. Once selected, the legal name of the Corporation will appear to the right. Note: Only entries from the dropdown list may be selected. The options available are based on the registration information provided. Once a Corporate ID is selected, the Site ID dropdown list will be populated with all Sites available within that Corporation. Select the one you are reporting for from the list. Note: In HSCIS, a Site ID that is the same as the Corporate ID identifies the information related to the Corporation as a whole. Thus, if you wish to report Funding Sources for the entire Corporation (rather than site by site), select the Site ID that is equal to the Corporate ID. Fiscal Year From the dropdown list, select the Ministry fiscal year for which you are reporting your funding sources (i.e. 2006/2007, 2007/2008, etc.). After the Fiscal Year has been selected, the rest of the screen will be populated with the information from our database. You may make changes as required. Source Projected Amount Note: The database stores this as a single „snapshot‟ for each fiscal year. So, if there are changes, all entries (including ones unchanged, must be included on this screen.) Use the list of values list to select the type of funding body. If the source is not shown in one of the selections, use „Miscellaneous - Other‟ Fill in the amount of money you are expecting during the fiscal year period. Enter dollar amounts only, no cents. Please do not include dollar signs ($), decimal points or commas. Once the information is complete, select the Save button at the bottom of the screen to update the database. A message will be displayed to tell you the information has been successfully saved. Then press the Home button to return to the Main Menu. Note: Selecting the Home button directly returns the user to the Main Menu with no save of the information on the screen. Selecting the Reset button will allow you to modify the information. Page 12 of 34 HSCIS Web Application Guide 3. Payroll Summary Data Submission Submission Frequency: Payroll Data Submissions must be made semi-annually within the calendar year, and each submission provides accumulated totals from the beginning of the year. For example: Payroll Data Submission Date On or before July 31st On or before January 31st Content January 1st through June 30th January 1st through December 31st (of previous year) There are 3 screens associated with the Payroll Data submission: a) HSCIS Reporting Period for Payroll Data – where you identify who you are and what period of time your data corresponds to; b) Employee Payroll Data – one copy of this form is completed for each employee who was working for you during the reporting period; and c) Designated Group Summary – this form is repeated for each designated group to which your employees belonged or worked in, during the reporting period. All three forms must be completed as part of each Payroll Data Submission. a) HSCIS Reporting Period for Payroll Data For the HSCIS Reporting Period for Payroll Data screen, the fields are filled in as follows: Page 13 of 34 HSCIS Web Application Guide Field Corporate ID Site ID Reporting From Reporting To Content From the dropdown list, select the Corporation for which you are providing information. Once selected, the legal name of the Corporation will appear to the right. Note: Only entries from the dropdown list may be selected. The options available are based on the registration information provided. Once a Corporate ID is selected, the Site ID dropdown list will be populated with all Sites available within that Corporation. Select the one you are reporting for from the list. This is the start date for the reporting period. Its format is: YYYY = year (i.e. 2007) MM = 2 digit number for the month (Jan = 01, Dec = 12) DD = 2 digit day of the month. So, January 1, 2007 would be 20070101. The Reporting From date must always be with twenty two (22) days of January 1 st. (ie: between December 10th and January 23rd) The only exception is when you are a new HSCIS employer, in which case you put the date in which you were requested to report for. The end date for the period being reported, in the same format as the Reporting From date. This will be the last date within the reporting period, covered by your payroll. It must be within twenty two (22) days before or after the end of the period. (between December 9th and January 22nd for December 31st and between June 8th and July 22nd for June 30th.) Note: For the final submission, the Reporting To date should agree with the year end cut off for payroll deductions as dictated by the Canada Revenue Agency (CRA). It cannot be greater than December 31st. Once you have completed this information, select the Employees button to move to the Employee Payroll Record screen or the Designated Group button to move to the Designated Group Summary. Selecting the Employees button will automatically „save‟ the information on the screen to the database before moving to the next screen. Selecting the Home button however, does not automatically save the screen information. It simply returns the user directly to the Main Menu Note: Only selected Corporate ID‟s are approved to submit HSCIS data in this summarized format. If your organization has not been approved for this input, a message screen will displayed after you supply your Corporate ID and the field is validated. If this happens, press OK on the message screen to return to the main menu, and contact the Ministry Help Desk at 250-952-1234 or Toll Free (across Canada) 1-888-764-2323. Page 14 of 34 HSCIS Web Application Guide b) Employee Payroll Data Once you have pressed the Employees button, the HSCIS Data Entry web site will perform 2 checks. The first check will determine if an existing audit log is available from a previous session. If one is found, this means that you have previously supplied information for this reporting period, but have not yet confirmed it as complete. In this case, the following screen of options will be presented: The table below provides a description of the actions associated with each of the options. Option (link) View the Audit Log Description Selecting this link will take you to a screen that displays the current audit log and allows you to print out a copy on your printer. See section D of this document for more details and examples of this display. Continue entering data Clicking on this link will take you to the Employee Payroll Record screen shown below, where you can start (or continue) entering data for this reporting period. Page 15 of 34 HSCIS Web Application Guide Confirm your session is complete Select this option if you have no further records to submit for this reporting period. When selected, a screen will be displayed (see Section D for an example) requesting you to confirm that all reporting for the period is complete. If you select No, the effect will be the same as if you had selected the Continue entering data option, and you will move on to the Employee Payroll Record screen. If you select Yes, to confirm that all records have been submitted for the reporting period, the system will mark the period as complete, clear all audit logs, and return you to the Main menu. Note: You can also confirm your session from the log off option on the main menu. Back to Reporting Period Screen Select this option if you want to go back to the Reporting Period Screen The second check determines if the reporting period supplied has already been confirmed as complete. If the system finds this is the case, a screen similar to the one below will be displayed. Clicking on the OK button will return you to the Reporting Period Screen. Page 16 of 34 HSCIS Web Application Guide Once both checks are completed satisfactorily, you will be then be presented with the Employee Payroll Record screen. A separate copy of the Employee Payroll Record must be completed for each employee who worked during the reporting period. The following table lists the information being requested and a brief description of the content required for each field. Field Des. Group Code Content Designated Group Code – Select the code from the dropdown list that describes the group to which the employee belongs, determined by union affiliation. If an employee is fulfilling multiple roles that would place them in different Designated Groups, a separate Employee Payroll Record screen should be completed for each designated group they belong to. Union Code Select the code from the dropdown list for the Union to which the employee belongs. Non-union employees should be reported with a Union Code of N1. Date of Birth This is the employee‟s birth date, in the format YYYYMMDD where: YYYY is the year (e.g. 1956) MM is the month (01 for January, 11 for November) DD is the day. The date supplied here must be after 19000101 (January 1, 1900) and cannot be equal to or after the current date) Employee # A unique identifier for your employee. Employee SIN Fill in the Employee‟s Social Insurance Number, in the format 999999999. (Please note: this information will be encrypted once it is entered into the database) Gender Select „M‟ for male, „F‟ for female. Job Title Fill in the title associated with the employee‟s job, if the classification code is „unlisted‟. Class. Code Select the job classification code from the dropdown list provided. Increment Select the increment level for the position occupied by the employee (it may also be known as a „step‟) The allowed values are: 0 for single rate; 1 thru 6 for designated groups: C (Community), F (Facilities), R (Residents) and P (Paramedicals); 1 thru 9 for designated groups: N (Nurses), B (Bargaining Unit Equivalents), E (Executive/Management) and S (Single Agreements); Wage Rate R for all red-circled employees. This is the hourly wage rate (in dollars and cents) paid to the employee at the end of the reporting period. Note: This number cannot be less than $6.00 nor greater then $100.00 unless the Designated Group Code is E (Executive). Page 17 of 34 HSCIS Web Application Guide Regular Paid Hours This is the total straight time (in hours) paid to the employee Year-to-Date. It includes all regular hours worked, plus all regular hours for time off (statutory holidays – worked and non-worked, vacation, sick days, and other paid leaves). It does not include hours paid while on overtime. This value must be greater than zero (0) and must be less than 3000. New Job Status Select the code from the dropdown list that describes the current status of the employee in this position. Vacation Hours used in the Year Enter the number of vacation hours used in the current year by this employee whether from the current entitlement, the previous bank, or any supplemental entitlements. These hours should also be included in Regular Paid Hours. Note that lump sum payouts of vacation should continue to be reported in Designated Group Summary under Retroactive and lump sum payout and not in this field. This is the date, in YYYYMMDD format, on which the employee was hired into this position on a regular basis. Original Date of Hire Leave this blank if the Job Status is C (Casual). This date must be provided if the Job Status is F (Full Time) or P (Part Time). Seniority Start Date This is the date, in YYYYMMDD format, at which the employee started accumulating „seniority‟ within your organization. In most cases, this will be the same as the Original Date of Hire. Termination Code Select the code from the dropdown list that best describes the reason for Termination. Termination Date This is the date, in YYYYMMDD format, on which the employee was terminated from the organization. Integrated Position Indicate whether this is an integrated position. (eg.. the employee performs duties that cross two or more classification codes). If the position is an integrated position report “I”, if not, leave blank. Where an employee is acting in a Layered over position include the classification of the higher position. (Otherwise leave this field blank). If the position is “Layered –over” also note that the employee should be reported in at their correct classification code, but at the wage rate should be at the higher level. Layered-over Positions – Class Code Note: In some cases there is no higher classification applicable to the position. In these cases, enter the employee‟s normal classification code in the Layered Over Position field as well, but enter the higher applicable pay rate in the wage rate field. Page 18 of 34 HSCIS Web Application Guide New Note: For all numeric fields listed below, do not include commas or dollar signs ($). The HSCIS Data Entry application has been enhanced so that you can retrieve some employee information from previously entered reports. The system will search for the employee number within the last completed report. Please note the system will only search the last two reporting periods. If a previously entered report was not completed the system will not retrieve data from that report. To enter an employee‟s information, simply enter their employee # in the field and hit the Tab key. The system will search for the employee # in your previously completed HSCIS submission. If the system finds a match to the employee number the following screen will be presented. Page 19 of 34 HSCIS Web Application Guide New The system retrieves much of the information previously entered for this employee. Due to privacy concerns, the Employee SIN number is not presented. The Wage Rate $ and Regular Paid Hours fields should be filled in. Update any of the remaining data fields only when it is necessary to do so. Click on the Save and Next Employee button and enter the next employee number. If the system did not find a match to the employee number you will see a screen as shown on the next page. Page 20 of 34 HSCIS Web Application Guide New Note: Selecting the Save and Next Employee or the Designated Group Sum buttons will automatically save the information on the screen to the database, before moving to the next screen. Selecting the Home button however, does not automatically save the screen information. It simply returns the user directly to the Main Menu. Once the screen is complete select the Save and Next Employee button to input information for the next employee, or select the Designated Group Sum button to begin inputting summary information for each of the designated groups within your organization. Page 21 of 34 HSCIS Web Application Guide In cases where an employee works in multiple different positions, multiple employee records may be present. The following screen will be presented if the system detects multiple records for the same employee #. At this point you can edit or modify an employee record from the current reporting period by clicking on Modify Existing. Clicking on Create New will allow you to create a new record for this employee. Once all of the employee records have been entered, the Designated Group Summary records should be completed. Page 22 of 34 HSCIS Web Application Guide c) Designated Group Summary The Designated Group Summary represents the total amounts, paid to all employees within the Designated Group. A separate Designated Group Summary is completed for each different Designated Group present in your organization. For example, if you have 2 employees who belong to code group „E‟ (Executives) and 10 employees who belong to code group „N‟ (Nurses), then you would fill out two Designated Group Summaries. The first would represent the total of the amounts paid to the two „E‟ employees; and the second would describe the total amounts paid to all of the ten „N‟s. The functionality to accept the industry averages has now been added to the system. Should you choose to have the Industry Averages applied to your file, the only actual amounts that you are required to enter on the Designated Group Summary, are Sick Leave Banks (hrs), Sick Leave $ paid, and Sick Leave cash payouts. These three amounts are required in order to conduct the annual sick and severance review. This screen will be presented for you to select the applicable Designated Group. At this point, pick the appropriate designated group from the dropdown menu and you will be prompted with a screen that looks like this: Page 23 of 34 HSCIS Web Application Guide If you chose to accept the industry averages for a Designated Group, you must enter the Sick Leave Only screen: Page 24 of 34 HSCIS Web Application Guide If an existing Designated Group Summary screen has already been entered for this period you will be prompted with the following: By selecting Modifying Existing will allow you to change the existing data and Cancel will take you back to the Designated Group Summary Screen. Should you elect not to accept the Industry averages, then the following screen will be presented. Page 25 of 34 HSCIS Web Application Guide Page 26 of 34 HSCIS Web Application Guide The fields in the Designated Group Summary screen are filled out as follows: Note: You may leave the default of 0.00 if it is not applicable. For all numeric fields listed below, do not include commas or dollar signs ($). This is a long screen, you will need to use the scroll bar at the right side to get to all the fields and the Save button at the bottom of the screen. Field Designated Group Paid Statutory Holidays Pay for Relief in Higher Posn. Premium Pay for Stats. Regular Work OT Regular Day Off OT OT for Insufficient Notice Content From the drop down list, select the code that describes the group to which the employees belong, determined by union affiliation. Total YTD dollar amount of Statutory Holiday Pay for all Regular employees in the designated group who did not work on the statutory holiday. This does not apply to Community Part-time and Regular Home Support Workers. Total YTD dollar amount of premiums paid for relief in a higher rated position for all employees in the designated group. Total YTD dollar amount of premium pay for hours worked on statutory holidays, for all the employees in the designated group (including the total wages paid to all Facilities, Nurse, Paramedical or Resident employees for working on any of the 8 regular statutory holidays, but excluding amounts earned on overtime. This field is broken down further into three categories – premiums paid at 1.5 times the current salary, 2 times the current salary and 2.5 times the current salary. Fill in the appropriate amounts under each of the columns. Regular Work Day Overtime – Total YTD dollar amount paid for overtime worked, for all employees in the designated group, including the total wage costs of amounts earned while on overtime – not just the premium portion. This field is broken down further into two categories – amounts paid at 1.5 times the current salary, and 2 times the current salary. Fill in the appropriate amounts under each of the columns. Total YTD dollar amount paid for regular day off overtime worked for all employees in the designated group. Include the total wage costs of amounts earned while on overtime – not just the premium portion. This field is broken down further into two categories – amounts paid at 1.5 times the current salary, and 2 times the current salary. Fill in the appropriate amounts under each of the columns. Total YTD dollar amount for overtime, due to insufficient notice, for all employees in the designated group. Include the total wage costs of amounts earned while on overtime – not just the premium portion. This field is broken down further into two categories – amount paid at 1.5 times the current salary, and 2 times the current salary. Fill in the appropriate amounts under each of the columns. Page 27 of 34 HSCIS Web Application Guide Call Back Total YTD dollar amount paid for call back overtime hours worked for all employees in the designated group. Include the total wage costs of amounts earned while on overtime – not just the premium portion. Other Overtime This field is broken down further into two categories – amount paid at 1.5 times the current salary, and 2 times the current salary. Fill in the appropriate amounts under each of the columns Total YTD dollar amount of other overtime paid for all employees in the designated group, which has not been captured in any other overtime field (including CTO payout). Also include the full wage costs of overtime worked on a statutory holiday. Total Overtime This field is broken down further into two categories – amount paid at 1.5 times the current salary, and 2 times the current salary. Fill in the appropriate amounts under each of the columns Total YTD dollar amount of all overtime paid for all employees within the designated group. This field should only be filled out if a breakdown of overtime is not possible in the above OT fields. DO NOT COMPLETE THIS FIELD IF YOU HAVE VALUES ALREADY IN THE OT FIELDS ABOVE. Sick Leave Bank Sick Leave Paid Sick Leave Cash Payout Special Leave Compassionate Leave Jury Duty Employer Paid Union Business Education Leave Time Off in Lieu (CTO) All other Paid Leaves Paid While on WCB On Call Meal Shift Prem. (Evening) Shift Prem (Night) Shift Prem (Weekend) This field is broken down further into two categories – amount paid at 1.5 times the current salary, and 2 times the current salary. Fill in the appropriate amounts under each of the columns Total number of sick leave hours accumulated for all employees in the designated group for all years – not just the amount in the current year. Total YTD dollar amount paid for sick leave used by all employees in the designated group. Total YTD dollar amount of sick leave cash that was paid out for all employees in the designated group. Total YTD dollar amount of special leave that was paid out for all employees in the designated group. Total YTD dollar amount of compassionate leave that was paid out for all employees in the designated group. Total YTD dollar amount paid to all employees in the designated group for Jury Duty Total YTD dollar amount paid for all employees in the designated group while away on union business. Total YTD dollar amount of education leave that was paid out for all employees in the designated group. Total YTD dollar amount of paid time off in lieu of receiving overtime pay, for all employees in the designated group. Total YTD dollar amount of other paid leave (not already captured in the fields above) for all employees in the designated group. Total YTD dollar amount paid (top up portion only) for all employees in the designated group who were away from work on WCB leave and qualified for WCB coverage. Total YTD dollar amount paid for on-call meal hours worked by all employees within the designated group. Total YTD dollar amount of Evening Shift premiums paid to all employees within the designated group. Total YTD dollar amount of Night Shift premiums paid to all employees within the designated group. Total YTD dollar amount of Weekend Shift premiums paid to all employees within the designated group. Page 28 of 34 HSCIS Web Application Guide On-call Differentials (Primary Rate) Qualification Differential Resp. Pay/Spec. Allowance Travel Allowance Uniform Allowance Isolation Allowance Meal Allowance Severance Allowance Paid Mat./Pat. Leave Other Premiums / Allowances Superannuation MSP Pension/RRSP CPP EI WCB Casual Stat. Vac. Pay Home Supp. Hol. Pay Dental Extended Health Group Life/ADD Long Term Disability Total dollar amount of on-call differential paid to this employee YTD, as the primary rate. If there is a second rate (eg..Nurses and Paramedicals after 72 hours, enter this in On Call Differentials Second Earning Rate) Total dollar amount of qualification differential paid to this employee YTD. Qualification differential is a premium paid to an employee who holds specialized training (such as Master Degree in nursing or Trades Qualification). Responsibility Pay / Special Allowance – Total YTD dollar amount paid to all employees within the designated group who received a premium for extra responsibilities or special allowances. Total YTD dollar amount of travel allowance paid to all employees within the designated group. Travel allowance is paid to an employee who is required to use their own vehicle for their work. This will include the $50 monthly payment made to Community Nurse positions. Total YTD dollar amount of uniform allowance paid to all employees within the designated group. Total YTD dollar amount of isolation allowance paid to all employees within the designated group. Total YTD dollar amount of meal allowance paid to all employees within the designated group. Total YTD dollar amount of severance allowance paid to all employees within the designated group. Total YTD dollar amount of maternity/paternity leave paid to all employees within the designated group. Total YTD dollar amount of allowances NOT ALREADY CAPTURED, for all employees within the designated group. Do not record Compensating Time Off (CTO) payments or lump sum payouts in this field. Total YTD dollar amount contributed by the employer to a Superannuation Plan on behalf of all the employees in the designated group. Total YTD dollar cost of MSP premiums paid by the employer for all employees in the designated group. Total YTD dollar amount paid by the employer to a pension plan or RRSP, on behalf of all the employees in the designated group. Total YTD dollar amount paid by the employer to CPP (Canada Pension Plan) for all employees in the designated group. Total YTD dollar amount paid by the employer to EI (Employment Insurance) for all employees in the designated group. Total YTD dollar amount paid to WCB (Workers Compensation Board) by the employer for the employees in the designated group. Casual Statutory Holiday / Vacation Pay – Total YTD dollar amount paid to all casual employees in the designated group, in lieu of scheduled vacations and statutory holidays. Home Support Holiday Lieu Pay – Total YTD dollar amount paid to regular part-time employees and regular home support workers in the designated group in lieu of statutory holidays. Total YTD dollar cost of employer-paid dental premiums for all employees in the designated group. Total YTD dollar cost of employer-paid extended health premiums for all employees in the designated group. Total YTD dollar cost of employer-paid premiums for Group Life/ADD coverage for all employees in the designated group. Total YTD dollar cost of employer-paid LTD premiums for all employees in the designated group. Page 29 of 34 HSCIS Web Application Guide Retro/Lump Sum Payout Super Shift Premium Difficult-to-Fill Unit Premium On-Call Differentials (Second earnings rate) Telephone Consultation Pay Live-In Pay Overnight Pay Retroactive and Lump Sum Payout – Total YTD dollar amount paid to employees in the designated group for retroactive lump sum payments, other lump sum payments, and payouts (including vacation, statutory holiday, flex leave and management leave payouts). Do not record CTO (Compensating Time Off) payouts here. Total YTD dollar amount paid for all employees in designated groups entitled to super-shift premiums. Such an employee is eligible for the Super Shift Premium for each hour worked between 2330 Friday and 0730 Saturday, and for each hour worked between 2330 Saturday and 0730 Sunday. Note: Designated Groups F (Facilities), C (Communities), and P (Paramedicals) must have 0.00 in this field. Total dollar amount paid YTD for positions in Difficult-to-Fill Units (applies primarily the Nurses Collective Agreement) Total dollar amount paid YTD for On-Call Differentials at that second earnings rate (eg.. for Nurses and Paramedical agreement after the first 72 hours per month) Total dollar amount paid YTD for Telephone Consultation Pay (applies primarily to the Paramedical Collective Agreement). Total dollar amount paid YTD for time worked on a “Live-In” shift. (This applies primarily to Community sub-sector positions.) Please continue to report the hours under Regular Paid Hours. Total dollar amount paid YTD for time worked on an “Overnight” shift. (This applies primarily to Community sub-sector positions.) Please continue to report the hours under Regular Paid Hours. Once you have completed this screen, select the Save button to update the database. Then select the Next Des Grp Summary button to clear the screen to input information for the next designated group within your organization. Note: Selecting the Next Des Grp Summary button will automatically save the information on the screen to the database, before moving to the next screen. Selecting the Home button however, does not automatically save the screen information. It simply returns the user directly to the Main Menu. If you are submitting Payroll Data for multiple sites – Please return to the Main Menu, and then go to Enter Payroll Summary to enter the new site number and reporting period, and then complete the Employee Payroll Record and Designated Group Summary sections for this site. This should be repeated for each site to be reported. Page 30 of 34 HSCIS Web Application Guide 4. View Audit Log When you request to view audit log, the system will check for the existence of an Audit Log. If no Audit Log is found, a screen will appear advising you that no audit log was found. If an Audit Log is found, this signals that records have been submitted for the reporting period, and the application will display the following. Page 31 of 34 HSCIS Web Application Guide It is highly recommended that prior to confirming your report is complete, you print off a copy of the complete audit log. To print the audit log, simply use the Print button on your browser. Page 32 of 34 HSCIS Web Application Guide Once you select Next from the Audit Log, the following is displayed. If you select Yes the application checks the relationship between employee payroll records and the designated groups. For every Designated Group Summary record entered there must be at least one employee record entered (and visa versa). If not, a message such as the following will be displayed. Page 33 of 34 HSCIS Web Application Guide If all is correct you will see the following, by selecting Exit you will be logged off. Should you experience problems with the application or require assistance when using he application, please call: Ministry of Health Help Desk Toll Free (across Canada) 1-250-952-1234 (8:00am-4:30pm Mon-Fri) 1-888-764-2323 Page 34 of 34