1
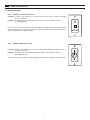
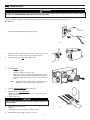
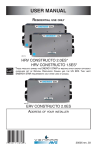
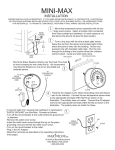
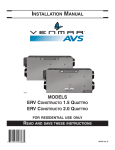
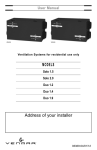
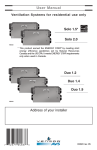
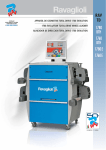
USER GUIDE
VB0100
MODELS
ERV CONSTRUCTO 1.5 QUATTRO
ERV CONSTRUCTO 2.0 QUATTRO
FOR RESIDENTIAL USE ONLY
READ
AND SAVE THESE INSTRUCTIONS
07919 rev. B
About this Guide
This guide uses the following symbols to emphasize particular information:
! WARNING
Identifies an instruction which, if not followed, might cause serious personal injuries including possibility
of death.
CAUTION
Denotes an instruction which, if not followed, may severely damage the unit and/or its components.
NOTE: Indicates additional information needed to fully complete an instruction.
TABLE OF CONTENTS
1.
UNIT DESCRIPTION . . . . . . . . . . . . . . . . . . . . . . . . . . . . . . . . . . . . . . . . . . . . . . . . . . . . . . . . . .3
1.1 SPECIFICATIONS . . . . . . . . . . . . . . . . . . . . . . . . . . . . . . . . . . . . . . . . . . . . . . . . . . . . . . . . . . . . . . . . . . . . . . . . . . .3
2.
FUNCTION OF THE ENERGY RECOVERY VENTILATOR . . . . . . . . . . . . . . . . . . . . . . . . . . . .3
2.1 ENERGY RECOVERY . . . . . . . . . . . . . . . . . . . . . . . . . . . . . . . . . . . . . . . . . . . . . . . . . . . . . . . . . . . . . . . . . . . . . . . .3
2.2 DEFROSTING . . . . . . . . . . . . . . . . . . . . . . . . . . . . . . . . . . . . . . . . . . . . . . . . . . . . . . . . . . . . . . . . . . . . . . . . . . . . .3
3.
CONTROLS . . . . . . . . . . . . . . . . . . . . . . . . . . . . . . . . . . . . . . . . . . . . . . . . . . . . . . . . . . . . . . .4-5
3.1 MAIN CONTROLS . . . . . . . . . . . . . . . . . . . . . . . . . . . . . . . . . . . . . . . . . . . . . . . . . . . . . . . . . . . . . . . . . . . . . . . . . .4
3.1.1 3-POSITION SWITCH . . . . . . . . . . . . . . . . . . . . . . . . . . . . . . . . . . . . . . . . . . . . . . . . . . . . . . . . . . . . . . . . . . .4
3.1.2 LITE-TOUCH CONSTRUCTO . . . . . . . . . . . . . . . . . . . . . . . . . . . . . . . . . . . . . . . . . . . . . . . . . . . . . . . . . . . . . . .4
3.2 AUXILIARY CONTROLS . . . . . . . . . . . . . . . . . . . . . . . . . . . . . . . . . . . . . . . . . . . . . . . . . . . . . . . . . . . . . . . . . . . . . .5
3.2.1 20-MINUTE LIGHTED PUSH-BUTTON . . . . . . . . . . . . . . . . . . . . . . . . . . . . . . . . . . . . . . . . . . . . . . . . . . . . . . . .5
3.2.2 60-MINUTE MECHANICAL TIMER . . . . . . . . . . . . . . . . . . . . . . . . . . . . . . . . . . . . . . . . . . . . . . . . . . . . . . . . . . .5
4.
MAINTENANCE . . . . . . . . . . . . . . . . . . . . . . . . . . . . . . . . . . . . . . . . . . . . . . . . . . . . . . . . . . . .6-7
4.1 REGULAR . . . . . . . . . . . . . . . . . . . . . . . . . . . . . . . . . . . . . . . . . . . . . . . . . . . . . . . . . . . . . . . . . . . . . . . . . . . . . . . .6
4.2 ANNUAL MAINTENANCE (FALL) . . . . . . . . . . . . . . . . . . . . . . . . . . . . . . . . . . . . . . . . . . . . . . . . . . . . . . . . . . . . . . . .7
5.
TROUBLESHOOTING . . . . . . . . . . . . . . . . . . . . . . . . . . . . . . . . . . . . . . . . . . . . . . . . . . . . . . . . .8
CONGRATULATIONS! You have made an excellent choice!
We have prepared this User Guide especially for you. Please read it carefully to ensure that you obtain full benefits from your
Energy Recovery Ventilator unit.
CAUTION
1. This unit is intended for residential use only.
2. Some activities create dust or vapors which may damage your unit. You must, therefore, turn off and unplug
your unit in the following situations:
• major renovation work • housing construction • sanding (e.g. gypsum joints, etc.) • varnishing
3. During heavy snowstorms, the unit should also be turned off to avoid problems caused by snow penetration,
even if it is equipped with anti-gust intake hood.
4. Power disturbances or very short power failures may cause the electronic control microprocessor to malfunction.
If it does, disconnect the power plug from the outlet and wait approximately 30 seconds, then plug it back in
to resume operation.
5. At least once a year, the unit mechanical and electric parts should be inspected by qualified service personnel.
2
1.
UNIT DESCRIPTION
1. Filters
2. Blower assembly
3. Energy recovery core
2
3
1
1
VB0101
1.1 SPECIFICATIONS
CONSTRUCTO 1.5 QUATTRO
34’’ (864 MM)
16½’’ (419 MM)
17¼’’ (438 MM)
74 LB (34 KG)
120 V, 60 HZ
150 W
MODEL
WIDTH
HEIGHT
DEPTH
WEIGHT
ELECTRICAL SUPPLY
POWER CONSUMPTION
2.
FUNCTION
OF THE
CONSTRUCTO 2.0 QUATTRO
34” (864 MM)
16½’’ (419 MM)
17¼’’ (438 MM)
76 LB (35 KG)
120 V, 60 HZ
240 W
ENERGY RECOVERY VENTILATOR
Your ventilation system will help eliminate poor air quality problems by
drawing the stale and humid air out of the house and replacing it with fresh
outside air. By eliminating accumulated pollutants and humidity, it maintains
an optimum air quality and an ideal relative humidity all-year round.
Shown with a forced air heating system; can also operate on its own.
Installation may vary.
VH0006
2.1 ENERGY RECOVERY
Units equipped with a heat and humidity recovery core (enthalpic core) can reduce ventilation costs in winter as well as in summer.
During the heating season, the unit draws the humidity and heat
from the stale air and tranfers them, in part, to the cold air entering
the house, thus avoiding dryness problems and providing
maximum comfort.
During the cooling season, the unit reverses the process, preventing
the humidity from the outside air from entering into the house.
Stale air to outside
4°C/40°F
EXAMPLE (IN WINTER):
Fresh air to building
18°C/64°F
EXAMPLE (IN
Stale air to outside
30°C/86°F
Fresh air from outside
0°C/32°F
Stale air from building
22°C/72°F
Fresh air from outside
32°C/90°F
VF0042
SUMMER WITH AIR CONDITIONING):
Fresh air to building
27°C/80°F
Stale air from building
25°C/77°F
VF0043
2.2 DEFROSTING
When the outside temperature is below -5°C (23°F), recovery (of heat or energy) creates frost in the core. To maintain its proper operation,
the unit is programmed to defrost the recovery core. The defrosting frequency varies according to outside temperature. Defrosting lasts
10 minutes. During the defrost cycle, the unit shifts to maximum speed and the dampers close.
After defrosting, the unit returns to the operating mode previously selected by the user.
3
3.
CONTROLS
3.1 Main Controls
3.1.1
3-POSITION SWITCH
Location: Located on the side of unit.
Purpose: To adjust air supply.
How to operate on a daily basis
• Select LOW SPEED for normal daily operation.
• Select HIGH SPEED for excess pollutants and humidity (parties, odors, smoke, etc.).
How to turn the unit off:
Push switch to the REMOTE position.
! WARNING
Optional controls can still activate the unit, even when in REMOTE position.
You must, therefore, unplug the unit to be absolutely sure it is off.
3.1.2
VC0091
LITE-TOUCH CONSTRUCTO
Location: Located in the busiest area of the house.
Purpose: To adjust air supply and select the desired indoor humidity level.
Activate the push-button. The color of the indicator shows the unit operating mode.
Color
Mode
Suggested Use
Green
Intermittent Select this mode when you are away from the house for a few days.
Also, when you deem the inside air is too dry in heating season, or too
humid in cooling season. In this mode, the unit is OFF for 40 minutes
per hour and ventilates at minimum speed the remaining 20 minutes of
the hour.
Yellow
Min. Speed For normal daily operation.
Ventilation
Red
Max. Speed For excess pollutants and humidity (parties, odors, smoke, etc.).
Ventilation
MAX
MIN
INTERMITTENT
L-T
VC0075
4
3.
CONTROLS (CONT’D)
3.2 Auxiliary Controls
3.2.1
20-MINUTE LIGHTED PUSH-BUTTON
Location: Located in the bathroom or in other locations where there is temporary humidity
excess or pollutants.
Purpose: To eliminate excess humidity produced by showers or other periodic activities
producing pollutants.
ON
Press once to activate the push-button. The unit will operate on high speed for 20 minutes and the
indicator will light up. To stop activation before the end of the 20-minute cycle, push one more time.
The unit will get back to its previous setting.
VC0082
3.2.2
60-MINUTE MECHANICAL TIMER
Location: Located in the bathroom or in other locations where temporary humidity excess or
pollutants are present.
Purpose: To eliminate excess humidity produced by showers or other periodic activities
generating pollutants.
TURN
PAST
20
OFF
10
20
30
This control activates the system to operate at high speed for periods varying from 10 to 60 minutes.
60
40
50
VC0017
5
4.
MAINTENANCE
! WARNING
In order to prevent personal injury, turn off the unit and unplug it before performing maintenance. When cleaning
the unit, it is recommended to wear safety glasses and gloves.
Regular maintenance should be performed every 3 months. Annual maintenance should also take place every fall.
4.1 REGULAR
1.
Turn the unit off and disconnect the power supply.
VD0005
2.
Unlatch the door. Lift the panel towards you. Hold it firmly and hit
the right side of the panel. The door should slide to the left.
3.
Clean the inside of the door with a damp cloth.
VD0144
4.
Clean the filters
•
Remove the filters.
•
Vacuum to remove most of the dust.
•
Wash with a mixture of warm water and mild soap. You may
add bleach if you wish to disinfect (one tablespoon per gallon).
Rinse thoroughly. Shake filters to remove excess water and
let dry.
NOTE:
Washing the filters in the top tray of the dishwasher is
possible, but the aluminum frame might tarnish.
5.
Clean the condensation tray with a damp cloth.
6.
Check the exterior air intake hood:
• Make sure there are no leaves, twigs, ice or snow that could be
drawn into the vent.
• Clean if necessary.
VO0113
CAUTION
Even a partial blocking of this air vent could cause the unit
to malfunction.
7.
8.
Reassemble the components:
• Filters
• Door (The door is secured when you hear a click.)
VD0191
Reconnect the power supply and turn on the unit.
6
4.
MAINTENANCE (CONT’D)
4.2 ANNUAL MAINTENANCE (FALL)
Repeat steps 1 to 6 from the previous section and continue with the
following steps:
1.
Clean the energy recovery core
CAUTION
When handling the energy recovery core, it is recommended to wear safety gloves. Handle the energy recovery
core with care. The energy recovery core cannot be washed with water.
•
Remove the recovery core.
•
Remove dust using a vacuum cleaner with a soft brush
attachment.
VO0114
2.
Clean the centrifugal fan wheels
2.1 Disconnect the fan motor wires.
VE0050
2.2 Disconnect the rod activating the square damper (A).
2.3 Remove both screws (B) securing the fan assembly.
C
2.4 Pull the fan assembly (C) out of the unit.
B
A
VO0115
2.5 Check for any dust accumulation on the blades.
CAUTION
Do not oil the motor! It is already permanently lubricated.
VD0139
2.6 Clean with a small brush if necessary.
3.
Put
•
•
•
•
the components back in place:
Fan assembly (screws, damper rod, fan motor wires)
Energy recovery core
Filters
Door
4.
Reconnect the power supply and turn the unit on.
VD0106
7
5.
TROUBLESHOOTING
If you think your unit is malfunctioning, check some of the following:
TYPE OF PROBLEM
Nothing works.
TRY THIS...
• See if the unit is plugged in.
• See if the unit is receiving power from the house circuit breaker.
2
Condensation on windows
(air too humid in wintertime).
• Operate the unit at maximum speed (MAX.) during activities generating excess humidity
(family gatherings, extra cooking, etc.)
• Leave curtains half-open to allow air circulation.
• Store all firewood in a closed room with a dehumidifier or in a well ventilated room or store
the wood outside.
• Do not adjust the thermostat of your heating system below 18°C (64°F).
3
Air too dry in winter or too
humid in summer.
4
Air too cold at the air
supply grille.
•
•
•
•
•
•
•
•
•
1
Temporarily switch the Lite-Touch Constructo on Intermittent mode.
Operate the unit at low speed (MIN).
Temporarily use a humidifier in wintertime.
Temporarily use a dehumidifier in summertime.
Make sure the stale air exhaust hood outside the house is not blocked.
Operate the unit at low speed (MIN.)
Have the system’s balancing checked.
Have the unit’s defrosting system checked.
Install a duct heater.
If the problem continues, contact your installer at the phone number or address listed below or call the following number to find an
authorized service center near you:
•
1-800-567-3855
YOUR INSTALLER’S ADDRESS