1
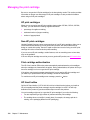
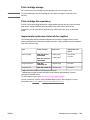
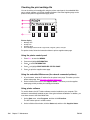
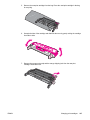
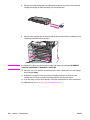
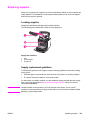
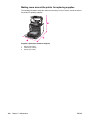
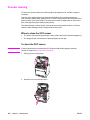
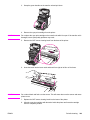
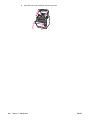
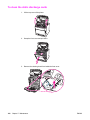
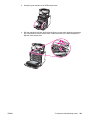
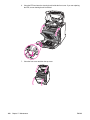
Maintenance This chapter describes ways to maintain your printer. The following topics are covered: ENWW ڗ Managing the print cartridge ڗ Changing print cartridges ڗ Replacing supplies ڗ Configuring e-mail alerts for supplies status ڗ Periodic cleaning ڗ When to clean the static discharge comb ڗ To clean the static discharge comb 131 Managing the print cartridge Be sure to use genuine HP print cartridges for the best printing results. This section provides information on proper use and storage of HP print cartridges. It also provides information about using non-HP print cartridges. HP print cartridges When you use a genuine new HP print cartridge (part number C9730A, C9731A, C9732A, C9733A), you can obtain the following supplies information: Ɣ percentage of supplies remaining Ɣ estimated number of pages remaining Ɣ number of pages printed Non-HP print cartridges Hewlett-Packard Company cannot recommend use of non-HP print cartridges, either new or remanufactured. Because they are not genuine HP products, HP cannot influence their design or control their quality. Service or repair required as a result of using a non-HP print cartridge will not be covered under the printer warranty. If you use a non-HP print cartridge, certain features, such as remaining toner volume data, may not be available. If the non-HP print cartridge was sold to you as a genuine HP product, see HP fraud hotline. Print cartridge authentication The HP Color LaserJet 5550 series printer automatically authenticates the print cartridges when the cartridges are inserted into the printer. During authentication, the printer will let you know if a cartridge is or is not a genuine HP print cartridge. If the printer control panel message states that this is not a genuine HP print cartridge and you believe you purchased an HP print cartridge, call the HP fraud hotline. To override a non-HP print cartridge error message, press the button. HP fraud hotline Call the HP fraud hotline (1-877-219-3183, toll-free in North America) when you install an HP print cartridge and the printer message says the cartridge is non-HP. HP will help determine if the product is genuine and take steps to resolve the problem. Your print cartridge might not be a genuine HP print cartridge if you notice the following: 132 Ɣ You are experiencing a high number of problems with the print cartridge. Ɣ The cartridge does not look like it usually does (for example, the orange pull tab is missing, or the packaging differs from HP packaging). Chapter 7 Maintenance ENWW Print cartridge storage Do not remove the print cartridge from its package until you are ready to use it. CAUTION To prevent damage to the print cartridge, do not expose it to light for more than a few minutes. Print cartridge life expectancy The life of the print cartridge depends on usage patterns and the amount of toner that print jobs require. Usage conditions and print patterns may cause actual results to vary. At any time, you can verify the life expectancy by checking the toner level, as described below. Approximate replacement intervals for supplies The following table lists the estimated replacement intervals for supplies and the control panel messages that prompt when to replace each item. Usage conditions and print patterns may cause results to vary. Item Printer message Page count Color cartridges REPLACE BLACK CARTRIDGE 13,000 pages2 12,000 pages Approximate time period1 2 3.25 months 3 months REPLACE <COLOR> CARTRIDGE Image Transfer kit REPLACE TRANSFER KIT 120,000 pages 40 months Image Fuser kit REPLACE FUSER KIT 150,000 pages 50 months 1 Approximate life is based on 4,000 pages per month. Approximate average A4-/letter-size page count based on approximately 5 percent coverage of individual colors. 2 To order supplies online, go to http://www.hp.com/supplies/clj5550. You can use the HP Toolbox or the embedded Web server to order supplies. For more information, see hp toolbox and Using the embedded Web server. ENWW Managing the print cartridge 133 Checking the print cartridge life You can check the print cartridge life using the printer control panel, the embedded Web server, printer software, or HP Web Jetadmin software. Check the supplies gauge on the printer control panel for approximate supply levels. Printer display 1 2 3 4 Message area Prompt area Supplies gauge Print cartridge colors from left to right: black, magenta, yellow, and cyan For precise levels, follow the instructions below to print a supplies status page. Using the printer control panel 1. Press MENU to enter the MENUS. 2. Press to highlight INFORMATION. 3. Press to select INFORMATION. 4. Press to highlight PRINT SUPPLIES STATUS PAGE. 5. Press to print the supplies status page. Using the embedded Web server (for network connected printers) 1. In your browser, enter the IP address for the printer home page. This takes you to the printer status page. See Using the embedded Web server. 2. On the left side of the screen click Supplies Status. This takes you to the supplies status page, which provides print cartridge information. Using printer software To use this feature, the HP Toolbox software must be installed on your computer. This software is automatically installed as part of the typical software installation. In addition, you must have access to the World Wide Web. 1. On the Start menu, select Programs, and then click HP toolbox. The HP Toolbox opens in a Web browser. 2. On the left side of the window, click the Status tab, and then click Supplies Status. 134 Chapter 7 Maintenance ENWW Note If you want to order supplies, click Order Supplies. This opens a browser that produces a URL from which to purchase supplies. Select the supplies you wish to order and follow the directions accordingly. Using HP Web Jetadmin In HP Web Jetadmin, select the printer device. The device status page shows print cartridge information. Changing print cartridges When a print cartridge approaches the end of useful life, the control panel displays a message recommending that you order a replacement. The printer can continue to print using the current print cartridge until the control panel displays a message instructing you to replace the cartridge. The printer uses four colors and has a different print cartridge for each color: black (K), magenta (M), yellow (Y), and cyan (C). Replace a print cartridge when the printer control panel displays a REPLACE <COLOR> CARTRIDGE message. The control panel display also indicates the color that should be replaced (unless a genuine HP cartridge is not currently installed). CAUTION If toner gets on clothing, wipe it off with a dry cloth and wash the clothes in cold water. Hot water sets toner into fabric. Note For information about recycling used print cartridges, see HP Printing Supplies Returns and Recycling Program Information, or visit the HP LaserJet Supplies website at http://www.hp.com/recycle. To change the print cartridge 1. Lift the top cover of the printer. ENWW Changing print cartridges 135 2. Grasp the front cover and pull down. 3. Grasp the green handles on the transfer unit and pull down. CAUTION Do not place any item on the transfer unit while it is open. If the transfer unit is damaged, severe print quality problems may result. 4. Remove the used print cartridge from the printer. 136 Chapter 7 Maintenance ENWW 5. Remove the new print cartridge from the bag. Place the used print cartridge in the bag for recycling. 6. Grasp both sides of the cartridge and distribute the toner by gently rocking the cartridge from side to side. 7. Remove the orange mylar strip and the orange shipping lock from the new print cartridge. Discard the lock. ENWW Changing print cartridges 137 8. Remove the inside sealing tape by breaking the orange tab on the end of the new print cartridge and pulling the tape completely out. Discard the tape. 9. Align the print cartridge with the tracks inside the printer and insert the cartridge until it is completely seated and clicks into place. Note If a cartridge is in the wrong slot, the control panel will display the message INCORRECT <COLOR> CARTRIDGE or INCORRECT SUPPLIES. 10. Close the front cover and then close the top cover. After a short while, the control panel should display Ready. 11. Installation is complete. Place the used print cartridge in the box in which the new cartridge arrived. See the enclosed recycling guide for recycling instructions. 12. If you are using a non-HP print cartridge, check the control panel for further instructions. For additional help, go to http://www.hp.com/support/clj5550. 138 Chapter 7 Maintenance ENWW Replacing supplies When you use genuine HP supplies, the printer automatically notifies you when supplies are nearly depleted. The notification to order supplies allows ample time to order new supplies before they need to be replaced. Locating supplies Supplies are identified by labeling and blue plastic handles. The following figure illustrates the location of each supply item. Supply item locations 1 2 3 fuser print cartridges transfer unit Supply replacement guidelines To facilitate the replacement of supplies, keep the following guidelines in mind when setting up the printer. Ɣ Sufficient space is required above and in the front of the printer for removing supplies. Ɣ The printer should be located on a flat, sturdy surface. For instructions on installing supplies, see the installation guides provided with each supply item or see more information at http://www.hp.com/support/clj5550. When you connect, select Solve a Problem. CAUTION ENWW Hewlett-Packard recommends the use of HP products in this printer. Use of non-HP products may cause problems requiring service that is not covered by the Hewlett-Packard warranty or service agreements. Replacing supplies 139 Making room around the printer for replacing supplies The following illustration shows the clearance necessary in front of, above, and to the side of the printer for replacing supplies. Supplies replacement clearance diagram 1 2 3 140 628 mm (25 inches) 1550 mm (61 inches) 940 mm (37 inches) Chapter 7 Maintenance ENWW Configuring e-mail alerts for supplies status You can use HP Web Jetadmin or the embedded Web server to configure the system to alert you of problems with the printer. The alerts take the form of e-mail messages to the email account(s) that you specify. You can configure the following: Ɣ the printer(s) you want to monitor Ɣ what alerts are to be received (for example, alerts for paper jams, paper out, supplies status, and cover open) Ɣ the e-mail account to which the alerts should be forwarded Software Information location HP Web Jetadmin See the HP Web Jetadmin Help system for details on alerts and how to set them up. Embedded Web server See Using the embedded Web server for general information about the embedded Web server. See the embedded Web server Help system for details on alerts and how to set them up. You can also receive alerts through the HP Toolbox software. These alerts display as either a pop-up window or an animated taskbar icon. The HP Toolbox software does not send alerts in the form of an e-mail message. You can configure the HP Toolbox software to deliver only the alerts you want to receive, and you can also specify how often the software checks the printer’s status. See Using the HP Toolbox for more information. ENWW Configuring e-mail alerts for supplies status 141 Periodic cleaning To ensure the printer continues to function properly throughout its life, periodic cleaning is necessary. One area of the printer that must be cleaned periodically is the overhead transparency (OHT) and two-sided printing (duplex) sensor. The OHT sensor detects and ensures that the printer uses the correct print mode. The sensor also corrects for paper skew on the second side of the page during two-sided (duplex) printing. The static discharge comb at the top of the printer also needs periodic cleaning. A brush to clean the static discharge comb is stored inside the front cover. When to clean the OHT sensor Ɣ The printer control panel reports paper is being used instead of the desired transparency. Ɣ The images on the front and back of the printed page do not align. To clean the OHT sensor Note If these instructions do not remedy the OHT and two-sided printing (duplex) problems, contact HP support at http://www.hp.com/support. 1. Lift the top cover of the printer. 2. Grasp the front cover and pull down. 142 Chapter 7 Maintenance ENWW 3. Grasp the green handles on the transfer unit and pull down. 4. Remove the cyan print cartridge from the printer. CAUTION Do not place the cyan print cartridge on the transfer unit while it is open. If the transfer unit is damaged, severe print quality problems may result. 5. Remove the OHT sensor cleaning brush from the base of the printer. 6. Insert the brush into the base notch and brush from right to left four or five times. CAUTION Do not brush back and forth over the sensor. This will smear dust over the sensor and cause printer errors. 7. Replace the OHT sensor cleaning brush into the base of the printer. 8. Align the cyan print cartridge with the tracks inside the printer and insert the cartridge until it is completely seated. ENWW Periodic cleaning 143 9. Close the front cover, and then close the top cover. 144 Chapter 7 Maintenance ENWW When to clean the static discharge comb Clean the static discharge comb when you replace the black print cartridge, when you replace the image transfer kit, or when print quality defects occur. Note If you are replacing the black print cartridge, clean the static discharge comb first and then replace the black print cartridge. (Toner might fall onto the black print cartridge during cleaning.) Be careful not to get toner on your clothes If you are replacing the image transfer kit, clean the static discharge comb with the new cleaning brush included with the replacement image transfer kit. ENWW When to clean the static discharge comb 145 To clean the static discharge comb 1. Lift the top cover of the printer. 2. Grasp the front cover and pull down. 3. Remove the cleaning brush from inside the front cover. 146 Chapter 7 Maintenance ENWW 4. Grasp the green handles on the ETB and pull down. 5. Rub the cleaning brush back and forth three times over the static discharge comb at the top of the printer to remove excess toner. Shake the brush over a waste receptacle to dispose of the excess toner. ENWW To clean the static discharge comb 147 6. Close the ETB and store the cleaning brush inside the front cover. If you are replacing the ETB, a new cleaning brush is included. 7. Close the front cover and then the top cover. 148 Chapter 7 Maintenance ENWW