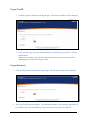
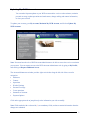
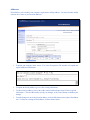
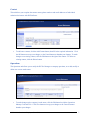
1
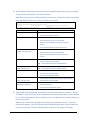
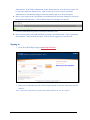
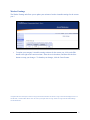
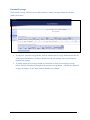
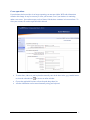
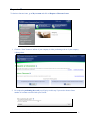
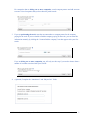
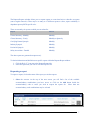
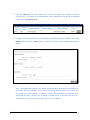
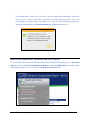
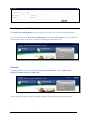
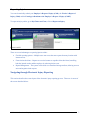
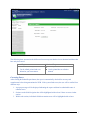
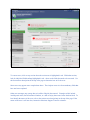
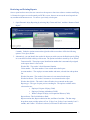
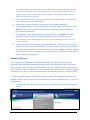
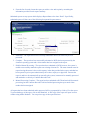
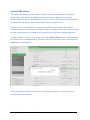
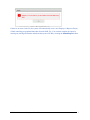
myWCB Online User Guide for Employers WCB REV NOVEMBER, 2014 eBusiness Support Team Phone: 780-498-7688 Fax: 780-498-7866 Email: [email protected] Hours: 8:00 a.m. to 4:30 p.m., Monday through Friday (excluding statutory holidays) Table of Contents WELCOME TO MYWCB’S ONLINE SERVICES................................................................................ 3 INTRODUCTION ........................................................................................................................................ 3 SYSTEM AVAILABILITY ........................................................................................................................... 3 SUPPORTED BROWSERS ........................................................................................................................... 3 TECHNICAL SUPPORT .............................................................................................................................. 3 SECURITY.................................................................................................................................................. 3 GETTING STARTED ................................................................................................................................ 5 SIGNING IN ................................................................................................................................................ 7 MAKING CHANGES TO MY PROFILE AND ACCESS ..................................................................... 9 UPDATING MY WCB ACCOUNT ........................................................................................................ 10 STATEMENT OF ACCOUNT ..................................................................................................................... 17 PAYMENT OPTIONS ................................................................................................................................ 18 SUBMITTING CHANGES TO WCB .......................................................................................................... 18 REQUEST A CLEARANCE ................................................................................................................... 19 MANAGE LISTS AND AUTOMATIC CLEARANCE NOTIFICATIONS (ACN) .......................... 22 FILE MY ANNUAL RETURN................................................................................................................ 25 REQUESTING CLAIM AND PREMIUM REPORTS ......................................................................... 26 REQUESTING A REPORT ......................................................................................................................... 27 RETRIEVING PREMIUM RATE STATEMENTS AND OTHER REPORTS ................................. 29 VIEWING INVOICES AND MAKING PAYMENTS .......................................................................... 31 REPORTING INJURIES ......................................................................................................................... 32 NAVIGATING THROUGH ELECTRONIC INJURY REPORTING ............................................................... 32 WORKING WITH REPORTS .................................................................................................................... 34 RETRIEVING AND PRINTING REPORTS ................................................................................................. 44 EMPLOYER/WORKER COPY (PINK COPY) ........................................................................................... 48 UPLOAD C040 SECTION ........................................................................................................................ 50 ADDITIONAL HELP ............................................................................................................................... 52 FREQUENTLY ASKED QUESTIONS ......................................................................................................... 52 CONTACT US .......................................................................................................................................... 54 WCB Online Services - Employer User Guide 2 Welcome to myWCB’s Online Services Introduction myWCB offers you a convenient and secure way of doing business with WCB-Alberta. With access to myWCB, employers can electronically submit injury reports, obtain claim cost summaries and premium reports, and update their WCB account information. The suite of online services include: My Account – Allows you to create a new account, update your account, request clearances and file your annual return. My Claims and Costs – Enables employers to electronically report injuries, and request and receive account specific reports. My Invoices and Payments – Allows easy access to view invoices and make payments. System Availability Please refer to the following page to view the availability time of various systems https://www.wcb.ab.ca/public/ebiz_schedule.asp Supported Browsers Please refer to following page to view the list of supported browsers https://www.wcb.ab.ca/public/ebiz_browsers.asp Technical Support Should you require assistance using myWCB online services, please contact the eBusiness Support Team. Email: [email protected] Phone: 780-498-7688 Fax: 780-498-7866 The team is available from 8:00 am to 4:30 pm (MST) Monday through Friday (closed on Statutory holidays). Security Each user requiring access to myWCB online services will be issued a unique UserID and password. When a UserID is issued, it is recommended that IDs not be shared with others. In addition, when an WCB Online Services - Employer User Guide 3 individual leaves an organization or no longer requires access to our systems, their UserID should be deactivated. myWCB online services are accessible via a secure web channel using 128-bit Secure Socket Layer (SSL) encryption. Users can be assured that all information transferred through the online services is transmitted using the highest level of security. To further enhance security, myWCB times out after 60 minutes. Any unsaved information will be lost. WCB Online Services - Employer User Guide 4 Getting Started To request access to myWCB online services, please follow the steps below: 1. Go to the myWCB Sign In page at https://my.wcb.ab.ca and click the Sign up now button. 2. Complete the required fields and click the Next button. 3. A suggested UserID will be provided. (It can be changed if required.) Enter and confirm the password. Click the Next button. The following window will appear. WCB Online Services - Employer User Guide 5 4. Select Employer radio button, enter the WCB account number and select the role(s) you perform for the account you identified. Click the Next button. Note: The role(s) you select will determine the level of access. Listed below are the roles and the associated myWCB online services they will allow you to access. Role Online Services General User obtain clearances for the account number access general statistical reports file annual returns obtain clearances for the account number update account information and access payment services access account statistical reports and invoices WCB Account Administrator file annual returns (cannot view injury data) obtain clearances for the account number update account information and access payment services create, modify and view injury reports he/she created access account statistical reports WCB Account Administrator WCB Claim Creator Note : cannot submit the reports to WCB-Alberta WCB Claim Creator (injury reporting only) create, modify and view injury reports he/she created Note : cannot submit the reports to WCB-Alberta WCB Claim Submitter create, modify, submit and view injury reports he/she created for the account number access account statistical reports WCB Claim Submitter (injury reporting only) create, modify, submit and view injury reports he/she created for the account number WCB Claims create, modify, submit and view all injury reports for Administrator/Manager the account number view all claim management reports 5. Answer ONE of the available key fact questions for the WCB account you identified. Click the Next button. If you are directed to the Confirmation screen, the key facts may have been disabled by your Online Administrator. Please complete steps six to eight and await an email advising you of your access status. Note: You are allowed three attempts to answer the key fact questions correctly. After three unsuccessful attempts, you will be directed to the Confirmation page where you may modify the access you requested or Click the Submit button to send the access request to the Online WCB Online Services - Employer User Guide 6 Administrator. If an Online Administrator for the account does not exist, the access request will be sent to the eBusiness Support Team. Upon receipt of your access request, the Online Administrator or the eBusiness Support Team may modify, approve or deny the request. 6. Review your request on the Confirmation screen and make any necessary changes by clicking on the applicable Modify button. Click the Submit button if no changes are required. 7. Click the Finish button to go to the Terms and Conditions screen. 8. Review and accept the terms and conditions by placing a checkmark beside “I agree to the terms and conditions” and click the Next button. You will now be logged on to your user ID. Signing in 1. Go to the myWCB Sign In page at https://my.wcb.ab.ca 2. Enter your UserID and password. Click the Sign In button. Please note, the password is case sensitive. Note: You will be required to accept the terms and conditions on your first sign in. WCB Online Services - Employer User Guide 7 Forgot UserID 1. Click the Forgot UserID link on the Sign In page. The following window will be displayed. 2. Enter your first name, last name and email address associated with your user ID. Click the Submit button. Note: If you are unable to provide the required information, please contact your Online Administrator or the eBusiness Support Team. Forgot Password 1. Click the Forgot Password link on the Sign In page. The following window will be displayed. 2. Enter your UserID and email address. Click the Submit button. A new temporary password will be emailed to you. The email address you enter must be the one you use for myWCB. WCB Online Services - Employer User Guide 8 Making changes to my profile and access The My Profile menu is found in the bottom left of the screen. The My Profile menu provides the following options: 1. 2. 3. 4. Change My Password or UserID Manage My Profile - changes to your personal and/or company information View My Access – view your current access to myWCB Request Additional Access – request or modify your current access. WCB Online Services - Employer User Guide 9 Updating My WCB Account You can make frequent updates to your WCB account online: revise worker estimates, maintain personal coverage, update operations and trade names, change mailing and contact information, or close your account. To update your account, go to My Account, Maintain My WCB Account, and click on Update My WCB Account. Note: You must have the role of WCB Account Administrator to be able to access the service to maintain your account. You can request access to the WCB Account Administrator role by going to My Profile, and clicking on Request Additional Access. The Account Maintenance window provides eight vertical tabs along the left side of the screen for navigation: Addresses Contact Operations Worker Earnings Personal Coverage Cease operations Statement of Account Payment Options Click on the appropriate tab to jump directly to the information you wish to modify. Note: Fields marked with a red asterisk (*) are mandatory fields, and must contain information when the changes are submitted. WCB Online Services - Employer User Guide 10 Addresses This tab allows you to modify your company's legal name or billing address. You may also add, modify or delete one or more of your location addresses. To update your company name, answer ‘Yes’ to the first question. The window will expand and request additional information. To update the billing address, type over the existing information. To add a location address, click on the Add Location Address button, then fill in the required information. Click the OK button to accept your changes, or the Cancel button to abandon your changes. To make changes to an existing location address, click the Edit button to the right of the address line. To delete an existing location address, click the Delete button. WCB Online Services - Employer User Guide 11 Contact This tab allows you to update the contact names, phone numbers and email addresses of individuals authorized to interact with WCB-Alberta. To add a new contact, click the Add Contact button, then fill in the required information. Click the OK button to accept your changes, or the Cancel button to abandon your changes. To make changes to an existing contact, click the Edit button to the right of the contact. To delete an existing contact, click the Delete button. Operations The Operations tab allows you to notify the WCB of changes to company operations, or to add, modify or delete one or more trade names. To make changes to the company’s trade name, click the Edit button beside the Operations Industry Code and Title. Click Save button to accept your changes or the Cancel button to abandon your changes. WCB Online Services - Employer User Guide 12 To request a change to your company operations classification, answer Yes to the question “In the past year, has your business changed in a way that would alter the general description of your operations?”, then type in the details for your request. WCB Online Services - Employer User Guide 13 Worker Earnings The Worker Earnings tab allows you to update your estimate of worker insurable earnings for the current year.* To update your company’s insurable earnings estimate for the current year, click on the Edit button to the right of the current estimate. Enter the revised estimate, and then click the Save button to accept your changes. To abandon your changes, click the Cancel button. *Companies that do not currently have worker coverage must contact the WCB to activate this coverage. Please call the Employer Services at 780-498-3999, or toll-free within Alberta 1-866- 922- 9221 if you require worker coverage. Worker coverage cannot be initiated through Account Maintenance. WCB Online Services - Employer User Guide 14 Personal Coverage The Personal Coverage tab allows you to add, terminate or modify coverage amounts for directors, partners and owners. To add a new personal coverage holder, click the Add Personal Coverage Holder button, then fill in the required information. Click Save button to accept your changes or the cancel button to abandon your changes. To change the personal coverage amount or to terminate coverage for an existing coverage holder, click the Edit button to the right of the personal coverage holder. Click the Save button to accept your changes, or the Cancel button to abandon your changes. WCB Online Services - Employer User Guide 15 Cease operations If your business has been sold or is no longer operating you must provide the WCB with information related to this change. It may be necessary to close your account, even if your business is continuing under a new owner. You need not report a sale of shares if the business continues in its current form. To close your account, fill out the required fields in this tab. To enter dates, either use your keyboard to manually enter in the dates in the yyyy/mm/dd format, or select the calendar icon ( ) to access an online calendar. Choose the applicable Province or State from the drop-down list. All other information can be entered manually using your keyboard. WCB Online Services - Employer User Guide 16 Statement of Account This tab allows you to view the transactions on your account going back one year from the current date and provides a list of payment options. WCB Online Services - Employer User Guide 17 Payment Options This tab allows you to make a one-time credit card payment to your account or setup/manage direct debit authorization. To manage your direct debit authorization: Place a checkmark beside the Authorize Direct Debit, or Make Changes to Your Direct Debit Authorization option. Select the first option to setup direct debit authorization or select the second option to deactivate an existing direct debit authorization. To make a one-time INTERAC online payment to your account: Place a checkmark beside the One-time Payment INTERAC Online Payment Option and click the “here” link. A new window will open. Complete all fields and click the Submit button. On the following screen, choose the bank and login to the bank account and follow the steps to make the payment. To make a one-time credit card payment to your account: Place a checkmark beside the One-time Credit Card Payment option and click the “here” link. A new window will open. Complete all fields and click the Submit button. On the following screen, click Yes to proceed with the payment or No to cancel the payment. Submitting Changes to WCB To send your information to WCB, click the Submit button in the lower right corner. All changes made during your session will be sent to WCB and you will be shown a summary page, along with a confirmation number. Please retain your confirmation number for future reference, or print a hard copy of the summary screen by clicking the Print button in the top right corner. WCB Online Services - Employer User Guide 18 Request a Clearance To obtain a clearance letter, go to My Account and click on Request a Clearance Letter. Request a Clearance Letter Manage Lists and Automatic Clearance Notifications 1. Click on a "Start" button to indicate if your company is either performing work or if your company is hiring others. 2. For companies performing the work you will only see this step if you need to choose from a number of accounts associated with your UserID. WCB Online Services - Employer User Guide 19 For companies that are hiring one or more companies, search company names and add accounts to create a list of companies that you have hired to perform work. 3. If you are performing the work, enter the account number or company name for the company paying for the work. If you are unable to find the company paying for the work, you can enter this information manually by clicking the “I cannot find the company” box that appears after your first search. If you are hiring one or more companies you will only see this step if you need to choose from a number of accounts associated with your UserID. 4. (Optional) Complete the “Attention to” and “Subject line” fields. WCB Online Services - Employer User Guide 20 Fill in the required delivery information for where and how you want this clearance letter sent. If the letter needs to be sent out of province, please use the email option. Note: If sending by fax, enter only the 10-digit dialing number (you do not need to include the 1 for long-distance or any special characters such as brackets, spaces or dashes). To receive the letter by email, you must have Adobe Reader (version 6.0 or higher) installed on your computer. 5. (Optional) The “View Letter PDF” button will open a PDF copy of the letter that you are able to print or save for your records. 6. (Optional) The “Send Letter” button will send the letter via your selected delivery method(s) within approximately 5 - 10 minutes. WCB Online Services - Employer User Guide 21 Manage Lists and Automatic Clearance Notifications (ACN) To Create, Modify or Delete WCB lists of hired account(s), go to My Account and click on Manage Lists and Automatic Clearance Notifications. Request a Clearance Letter Manage Lists and Automatic Clearance Notifications Create New List You can save lists under your myWCB UserID. Each list must have a unique name and a maximum of 1000 accounts. To create a new list, follow these steps: 1. Go to “My Account” and click on “Manage Lists and Automated Clearance Notifications”. 2. Click on the "Create new list" button. 3. Enter a unique list name into the "List Name" box. 4. Add accounts to your list by either entering a valid account number or a name in the "Account Number or Company Name" box. 5. Click on the "Save" button to save the list. WCB Online Services - Employer User Guide 22 Modifying a List Previously saved lists can be updated at any time. Accounts can be both added and removed from a list by John Doe following these steps: 1. Choose the list to be updated from the "List" dropdown box. 2. Click the "Modify" button and make any modifications required. 3. Click on the "Save" button to save the changes made to the list. Deleting a List If a list is no longer required, it can be permanently deleted. NOTE: Deleted lists cannot be restored once they have been deleted. To delete a list, follow these steps: 1. Choose the list to be deleted from the "List" dropdown box. 2. Click the "Delete" button. Note: Deleted lists cannot be recovered. WCB Online Services - Employer User Guide 23 To set up Automatic Clearance Notifications, click on the My Notifications button or select My Automatic Clearance Notifications (ACN) from the menu at the top of the screen Note: To set up ACN, you must have at least one list. John Doe 1. Select “Sign up” and enter the required information. Up to six email addresses can be entered per list and can be edited at any time. 2. Save the changes. Repeat for all lists you want to sign up for ACN. 1234567 YOUR COMPANY NAME WCB Online Services - Employer User Guide 24 File My Annual Return Each year employers are required to report their workers’ insurable earnings paid the previous year, along with an estimate of what earnings they expect to pay in the upcoming year. This is done via the Annual Return. To file your Annual Return go to My Account, click on File My Annual Return. A new window will open (see below) and you will be prompted to log in with your WCB account number and a password. Please note, this password is sent to all eligible employers via mail usually at the end of December or early January. WCB Online Services - Employer User Guide 25 Requesting Claim and Premium Reports To request various statistical reports on your company, go to My Claims and Costs, click on Request Claim and Premium Reports. A new window will open. (See screenshot below). WCB Online Services - Employer User Guide 26 The Request Reports window allows you to request reports on a one-time basis or subscribe to reports (sent at regular intervals). There may be as many as 15 different reports to select; report availability is dependent upon myWCB specific roles. There are currently six reports to which you can subscribe: Report Interval Claims Summary - Monthly Monthly Claims Summary - Yearly Monthly or Quarterly Certifying Partner Synopsis Monthly Industry Synopsis Monthly Provincial Synopsis Monthly Safety Association - Funded Monthly The other reports are generated on request only. To obtain information and definitions on specific reports within the Request Report window: 1. Click the Help “?” icon next to the Request Report title. 2. Select the report link you wish to view the help files for. Requesting a report To request a report, click on the name of the report you wish to request. 1. Select the account: At the top of the next screen, you will find a list of the available account/industry combinations you have access to. Click on the Add button beside the account/industry code or codes you wish to request the reports for. More than one account/industry code combinations may be selected. WCB Online Services - Employer User Guide 27 2. Once the Add button has been selected, the account will appear below under the Selected Accounts box. To remove an account/industry code combination from the list of requested reports, select the Remove button. 3. Complete relevant parameters such as report dates and delivery options, and then click on the Submit button. Use the Cancel button to return to the main screen without submitting the request. Note: The Comment field allows you to attach a notation that will help identify a particular run of a report when it is generated. Please note, if requesting multiple reports, every report will be given the exact same comment. In addition, comments are not editable once they have been assigned to the report. The only way to change a comment will be to first delete the report (or subscription), then request the report again with the correct comment. WCB Online Services - Employer User Guide 28 Upon submitting the request, you will receive a pop-up confirmation indicating the request has been received. As soon as the report is generated, an email notification may be sent to you advising that the requested report is available to be viewed. For more information regarding Email notification options, select E-mail notification under Reports and Invoices. Retrieving Premium Rate Statements and other Reports To view Premium Rate Statements and Partnerships in Injury Reduction (PIR) reports, go to My Claims and Costs, click on View My Premium Rate Statements or View My PIR Reports. You will be taken to the Reports and Invoices screen. Select the My Reports and Invoices link. WCB Online Services - Employer User Guide 29 The Retrieve Reports window provides a list of reports that are ready to be viewed. To view the details of a report, click on the report name below the Report name heading. The report will open in a new window where it can be printed or saved to the user’s hard drive in PDF format. A few notes regarding the retrieval of reports: 1. E-mail notifications are sent when new reports become available. They are sent to the email address provided during online registration. E-mail notifications are set as default unless you choose not to receive it. (see E-mail notification options under Reports and Invoices.) 2. The list of reports found within My Reports and Invoices can be sorted by clicking on any one of the column headings. 3. The Expiry Date represents the date when the report will be automatically deleted from the Retrieve Reports box. Reports can also be manually deleted by the user, by selecting the Remove button next to the appropriate report. 4. If there is a large selection of reports listed within the My reports and Invoices screen, use the Report Filter feature to find a specific report, or to narrow down the selection of choices. (See screenshot below). WCB Online Services - Employer User Guide 30 Viewing Invoices and Making Payments The My Invoices and Payments menu provides quick access to view invoices and make payments. To view an invoice, go to My Invoices and Payments, click on View My Invoice. A new window will open and you will see your invoice located in the My Reports and Invoices box. Payments To make payments to your account go to My Invoices and Payments, click on either Pay by INTERAC Online or Pay by Credit Card. A new window will open. Follow instructions on page 18 of this guide to process the payment. WCB Online Services - Employer User Guide 31 Reporting Injuries You can electronically submit your Employer’s Report of Injury (C040), the Worker’s Report of Injury (C060) and the Earnings Addendum to the Employer’s Report of Injury (C040E). To report an injury online, go to My Claims and Costs, click on Report an Injury. There are several advantages to reporting injuries online: Flexible reporting options – Multiple users can access the same reports from any location with internet access. Faster claims decisions – Reports are received sooner to expedite claims decisions, benefiting both the injured worker and the employer by reducing claims costs. Report Management – The system can be used as a centralized storage medium, allowing users to store and organize claim reports. Navigating through Electronic Injury Reporting This section describes the screen layout of the electronic injury reporting process. There are six areas of the screen described below: WCB Online Services - Employer User Guide 32 1. Electronic Injury Reporting menu – Provides access to different areas of electronic injury reporting. The menu allows the user to create a new Employer’s Report, create Worker Reports and C040 Earnings Addendum Reports, and Search to retrieve both completed reports and reports in progress. 2. Report name – Identifies the type of report currently being edited. 3. Side Navigation Bar – Used to toggle among the different sections of the report currently being edited. 4. Save Report and Submit Report – The Save Report button saves all information entered in the report that is being edited. At this stage, no data validation or error checking is performed, and the report cannot be reviewed by WCB staff for adjudication purposes. The Submit Report button checks all inputted data for completeness and correctness, and if no errors are found, will transmit the report to WCB for claim adjudication. 5. Help link - The Help link opens a new browser window containing a comprehensive help document. 6. Close link –The Close link will allow the user to securely exit the Reporting system and return them to the myWCB home screen. WCB Online Services - Employer User Guide 33 Working with Reports Employer’s Report of Injury (C040) Upon selecting My Claims and Costs and then Report an Injury, the user is automatically presented with a new blank Employer’s Report of Injury. This report should be submitted first for each injured worker, before any subsequent reports can be created. As per Workers’ Compensation Act legislation, employers are required to submit this report to WCB within 72 hours of being notified. General Layout The Employer’s Report is divided into 8 different sections, as indicated by the corresponding tabs on the Side Navigation bar. The user can navigate from one section to the next by scrolling, or by simply clicking from section to section. The sections of the report can be completed in any order; however, all sections of the report should be completed first before any attempt is made to submit the report. While the system will automatically save the report every five minutes, it is highly recommended that you also save regularly to avoid losing data due to timing out or lost internet connection. Entering Data Each section of the report contains a number of labeled question fields and a corresponding text box, pulldown menu, or set of radio buttons. Text boxes permit the user to enter and edit freehand information using a keyboard. Pull-down menus and radio buttons allow the user to select an answer from a simplified list of choices using a mouse. If the user does not find a specific answer they require in a pull-down menu, simply select the option that best matches the answer. In text fields where specific formatting is required (for instance, date fields), the system will display the formatting style in the field label. Note: Cutting and pasting text, tables, graphs, graphics, etc. directly from your word processor is not recommended. Advanced text editors such as Microsoft Word often contain special characters that cannot be interpreted. See the Frequently Asked Questions at the end of the document for more information about cutting and pasting text. For a detailed explanation of what a particular field is asking, or to find out if a specific field is mandatory, consult the online Help file. Because the Help file always opens in a new window, you can continue working on the report even while the Help file is open (please ensure all pop-up blockers are disabled in order to use this feature). The Help file also contains useful suggestions and examples for properly filling out individual fields. WCB Online Services - Employer User Guide 34 Saving and submitting When the Save Report button is clicked, all information that the user has entered in every section of the report will be saved remotely on our secure servers. No data is ever saved locally to the user’s machine. Should the user’s computer or network system crash or be compromised, no confidential information will be lost and all report data will remain safely accessible through any other machine having secure internet access. Keep in mind that when the Save Report button is clicked, nothing is ever submitted for review by WCB. The fact that the report is saved to a central location also means that a report does not have to be completed at once. Users can start filling out portions of a report, save a draft copy, then continue working on it at a later time or date, even from a different machine (provided it has Internet access). The first time a report is successfully saved, a Transaction ID will be automatically assigned to the report. The Transaction ID field can be found in the Report Overview section in the Side Navigation bar of the Employer’s Report of Injury. The Transaction ID is a unique report identifier that is assigned to each and every report that is saved in the system. While most employers will not need to record or reference this number, the eBusiness Support Team may request this number when a user calls for assistance. Once the user has completed all sections of the report and clicks on the Submit Report button, the following will occur: 1. All data in the report is saved. 2. The system checks the report for errors – either fields that contain invalid data, or mandatory fields that have been left blank. See the next section for details on how errors are identified by the system, and how to make corrections. 3. If the system finds errors, the user can make corrections and re-submit the report. If there are no errors, the user will be presented with the Submission Summary screen. There will be an option to View PDF. Please note that WCB does not examine the report until it has been successfully submitted. WCB Online Services - Employer User Guide 35 The following chart summarizes the differences between reports that have been submitted and those that have only been saved: Saved Reports Are not examined by WCB. Can be edited, printed and even deleted at your convenience. Submitted Reports Become part of an official claim file. Can be printed but not edited or deleted. Correcting Errors After clicking the Submit Report button, the report is automatically checked for accuracy and completeness before being transmitted to WCB. If the system finds errors, the user will be notified four different ways: 1. A pop-up message will be displayed indicating the report could not be submitted because it contains errors. 2. Sections on the Side Navigation bar will be highlighted with red text if there are errors in that section. 3. Within each section, individual fields that contain errors will be highlighted with red text. WCB Online Services - Employer User Guide 36 To correct errors, click on any section where the section text is highlighted in red. Within that section, look for individual field headings highlighted in red – these are the fields that need to be corrected. Use the Section Error descriptions at the top of the page to determine how to fix the error. Some errors may appear more complex than others. The simplest errors arise from mandatory fields that have not been completed. Other error messages may emerge due to invalid or illogical data entered. Examples of this include invalid postal codes, Social Insurance Numbers, or a date of injury that occurs before the date hired. To best identify the nature of the error, refer to the section error description(s) at the top of the page. If the nature of the error is still not clear, contact the eBusiness Support Team for assistance. WCB Online Services - Employer User Guide 37 Once all errors have been corrected, the system will allow the report to be submitted for processing. The user will be presented with the Submission Summary screen. The Report status field will indicate “Submitted” which indicates that the report has been successfully transmitted to WCB. Important note: Once a report has been submitted, the user is no longer able to make additions or modifications to the report. If there is any information that was mistakenly omitted or a correction needs to be made to the report, please refer to the Contact Us section below for this information. WCB Online Services - Employer User Guide 38 Worker’s Report of Injury or Occupational Disease (C060) After the Employer’s Report of Injury (C040) has been submitted, the Electronic Injury Reporting system will allow the Worker’s Report of Injury (C060) to be also submitted electronically. Electronic submissions of the Worker’s Report will replace the traditional faxing method, so there is no need to fax a copy of the report to WCB. There are two common methods by which electronic submission of the Worker’s Report can be done: 1. Employers can have the worker fill out a paper copy of the Worker’s report, then transpose the information onto the electronic version on behalf of the worker. Once the report is submitted, the employer can then print out a copy of the Worker’s Report to provide to the worker. 2. Alternatively, the worker can enter their report directly into the electronic system themselves, at the permission of the employer. Please note, the employer must be logged into the system when this is done, as WCB does not issue UserIDs and passwords to workers. Note: Even if the employer has submitted the Employer’s Report using the Electronic Injury Reporting system, it is not mandatory that the Worker’s Report also be submitted electronically. If either of the above methods for electronic submission of the Worker’s report does not work for your company, the worker can continue to fax in their report to WCB. WCB Online Services - Employer User Guide 39 Creating a Worker’s Report of Injury Prior to creating the Worker’s Report, the Employer’s Report (C040) must be successfully submitted. To create a Worker’s Report: 1. Click on My Claims and Costs and then Submit a Worker’s Report of Injury. 2. The Search Results screen will pre-populate with Employer Report of Injury (C040) reports that have been created in the last 6 months. Under the Actions menu on the right side of the screen, press Select next to the worker that you wish to create the Worker’s Report of Injury for. 3. Alternatively, you can identify the worker for whom the Worker’s Report is to be created by filling in a search criteria field at the top of the screen. The options available to search by are as follows: Transaction ID – The unique report identification number that is automatically assigned to the report when it is first saved. Worker SIN – The worker’s Social Insurance Number. Claim number – The claim number that was automatically assigned to the report (this may not be the same as the claim number you manually entered on the report). Account number – The employer account number and name, selected from a drop-down list. Worker first name – The worker’s first name as it was entered on the report. Worker last Name – The worker’s last name as it was entered on the report. Worker date of birth – The worker’s date of birth as it was entered on the report. Report type – This field will be pre-populated with Employer Report of Injury (C040). Report Status – The options available in this selection box are: Submitted – The report has been successfully submitted to WCB, but it has not yet been processed. Held for Manual Processing – The report has been successfully submitted to WCB; however, the system is unable to successfully match the report to an existing claim on file. Manual Processing Complete – The report has been submitted to WCB and was held for manual processing, but the Customer Records Clerk has finished processing the report and a claim number has been assigned. WCB Online Services - Employer User Guide 40 Complete – The report has been successfully submitted to WCB, was processed, and a claim number is assigned to the report. Report creation date, Report submission date, and Date of accident – The date range drop-down menu provides options of Last 15 days, Last 30 days, Last 6 months, Last 12 months, and Custom. If Custom is selected, a From and To date range can be entered. Note: Although electronic injury reporting provides the user with many options by which the worker may be identified, it is not necessary to fill in every search criteria field. In fact, the last name alone is usually sufficient to find the correct worker. The Search Results will be sorted by Transaction ID by default. 4. Click on the Search button. The system will now search for, and return, a summary of any submitted Employer’s Reports matching the search criteria entered. Each result summary will display: Transaction ID – The unique report identification number that was automatically assigned to the previous report when it is first saved. Worker name - The worker’s first and last name as it was entered on the report. WCB Online Services - Employer User Guide 41 Date of birth - The worker’s date of birth as it was entered on the report. Worker SIN - The worker’s Social Insurance Number. Date of accident – The worker’s date of accident as it was entered on the report. Report type - Employer Report of Injury (C040). Report status – Submitted, Held for Manual Processing, Manual Processing Complete, or Complete. Claim number – The claim number that was automatically assigned to the report (this may not be the same as the claim number you manually entered on the report). Submission date – The date that the report was submitted Actions – Select link. By clicking the + next to the Transaction ID number, further information regarding the claim is available i. Account number - The employer account number and name that was entered on the report. ii. Last Update – The date the report was last modified. iii. Claim Decision – Consists of one of the following values: Accepted – Entitlement accepted Not Accepted – Entitlement denied Pending – No adjudication decision has been made Medical Investigation – Entitlement is being accepted while further medical information is pursued to support decision Processed - claim costs are < $1,000 or worker returned to modified work without time loss - no adjudication decision required iv. Report claim number: The claim number that was entered on the report. v. Attached file(s) – Files that were attached to the report. 5. From the list of results, locate the correct worker and click on the corresponding Select link. 6. The system will create a new Worker’s Report for the worker that is automatically pre-populated with basic information taken from the initial report. From here the process of completing the Worker’s Report is the same as completing an Employer’s Report. Refer to the steps described in the previous section for entering data, saving and submitting the report, and correcting errors. WCB Online Services - Employer User Guide 42 Employer Earnings Addendum (C040E) The Employer Earnings Addendum is used as a method for providing wage and work schedule information to WCB for a worker who has been away from work since the initial Employer’s Report was submitted, so therefore, was previously considered as No Lost Time on the first report. Creating an Employer Earnings Addendum (C040E) Prior to being allowed to create an Employer Earnings Addendum Report, the Employer’s Report (C040) must have been already successfully submitted in the system. To create an Employer Earnings Addendum: 1. Click on My Claims and Costs and then Submit an Earnings Addendum. 2. The Search Results screen will pre-populate with Employer Report of Injury (C040) reports that have been created in the last 6 months. Under the Actions menu on the right side of the screen, press Select next to the worker that you wish to create the Earnings Addendum for. 3. Alternatively, you can identify the worker for whom the Earnings Addendum is to be created by filling in a search criteria field at the top of the screen. Refer to the section above, Creating a Worker’s Report of Injury, for a description of the various search criteria fields. Note: Although the system provides the user with many options by which the worker may be identified, it is not necessary to fill in every search criteria field. In fact, the last name alone is usually sufficient to find the correct worker. 4. Click on the Search button. The system will first search for, and then return, a summary of any submitted Employer’s Reports matching the search criteria entered. 5. From the list of results, locate the correct worker and click on the corresponding Select link. 6. The system will create a new Employer Earnings Addendum Report that is automatically prepopulated with basic information taken from the initial report. The Employer Earnings Addendum Report consists of six Section tabs, with the fields in the Participant Details section pre-populated with the employer details and worker details taken from the original Employer’s Report. Begin filling out the report starting with the Return to Work Details section. Once all sections have been filled out, click on the Submit Report button to submit your report. WCB Online Services - Employer User Guide 43 Retrieving and Printing Reports Once a report has been saved, the user can retrieve the report at a later time or date to continue modifying it. Because the reports are saved remotely on WCB’s servers, the user can access the saved report from any machine with Internet access. To retrieve a previously saved report: 1. Open Electronic Injury Reporting by selecting “My Claims and Costs” and then “Resume a Draft Report”. 2. The Search Results screen will pre-populate with Draft reports that have been created in the last 6 months. Under the Actions menu on the right side of the screen there will be the following options: View, Open, Delete. 3. Alternatively, you can identify the worker for whom you wish to access the Draft report by filling in a search criteria field at the top of the screen. The options available to search by are as follows: Transaction ID – The unique report identification number that is automatically assigned to the report when it is first saved. Worker SIN – The worker’s Social Insurance Number. Claim number – The claim number if one existed on the draft report. Account number – The employer account number and name, selected from a drop-down list. Worker first name – The worker’s first name as it was entered on the report. Worker last Name – The worker’s last name as it was entered on the report. Worker date of birth – The worker’s date of birth as it was entered on the report. Report type – The type of report you are searching for. The options available in this selection box are: Employer’s Report of Injury (C040) Employer Earnings Addendum (C040E) Worker’s Report of Injury or Occupational Disease (C060) Report Status –This field defaults to Draft. Report creation date, Report submission date, and Date of accident – The date range drop-down menu provides options of Last 15 days, Last 30 days, Last 6 months, Last 12 months, and Custom. If Custom is selected, a From and To date can be entered. WCB Online Services - Employer User Guide 44 4. 5. 6. 7. 8. Note: Although Electronic Injury Reporting provides the user with many options by which the worker may be identified, it is not necessary to fill in every search criteria field (however, at least one search criteria is required to perform a search). The last name alone is usually sufficient to find the correct worker. Click on the Search button. The system will first search for, and then return, a summary of all reports matching the search criteria entered. From the list of results, locate the exact report you wish to continue modifying. To resume modifying the report, under the Actions menu on the right side of the screen, select Open.The report will be re-opened for modification, containing all information that was previously entered and saved. To permanently remove the Draft report from the system, click on the Delete link. Before deleting the report, the system will ask you to confirm your choice to delete the report. Note: Doing this will permanently delete the report. You will no longer be able to access or retrieve the report. To print a hardcopy of the Draft report, click on the View link. A PDF copy of the report will open in a new window using Adobe Reader®. The user can print a copy of the report from here. Note that all Draft reports that are viewed or printed will contain a “Draft” watermark, indicating that the report has not yet been submitted. Once the report has been submitted and reprinted, the “Draft” watermark will disappear. Submitted Reports Once a report has been submitted to WCB through Electronic Injury Reporting, the system will immediately and automatically attempt to match the report to an existing claim on file. If the system finds a matching claim, it will assign the claim number to the report, which can be retrieved by the user (usually within one hour after submission). Reports that have been submitted may no longer be modified or deleted; however, they are still retrievable through the system for the purpose of viewing or printing. To retrieve a submitted report, you must first search for the report. Since submitted reports are saved remotely on WCB’s servers, they may be accessed from any computer with Internet access. To retrieve a submitted report: 1. Open Electronic Injury Reporting by selecting “My Claims and Costs” and then “the Search for Reports”. WCB Online Services - Employer User Guide 45 2. Identify the worker to whom the report belongs by filling in a search criteria field at the top of the screen. The options available to search by are as follows: Transaction ID – The unique report identification number that is automatically assigned to the report when it is first saved. Worker SIN – The worker’s Social Insurance Number. Claim number – The claim number if one exists. Account number – The employer account number and name, selected from a drop-down list. Worker first name – The worker’s first name as it was entered on the report. Worker last Name – The worker’s last name as it was entered on the report. Worker date of birth – The worker’s date of birth as it was entered on the report. Report type – The type of report you are searching for. The options available in this selection box are: Employer Report of Injury (C040) Employer Earnings Addendum (C040E) Worker Report of Injury or Occupational Disease (C060) Report Status – The options available in this selection box are: Draft – The report has not been submitted to the WCB Submitted – The report has been successfully submitted to the WCB, but it has not yet been processed. Held for Manual Processing – The report has been successfully submitted to the WCB; however, the system is unable to successfully match the report to an existing claim on file Manual Processing Complete – The report has been submitted to the WCB and was held for manual processing, but the Customer Records Clerk has finished processing the report and a claim number has been assigned. Complete – The report has been successfully submitted to the WCB, was processed, and a claim number is assigned to the report. Report creation date, Report submission date, and Date of accident – The date range drop-down menu provides options of Last 15 days, Last 30 days, Last 6 months, Last 12 months, and Custom. If Custom is selected, a From and To date can be entered. Note: Although electronic injury reporting provides the user with many options by which the worker may be identified, it is not necessary to fill in every search criteria field (however, at least one search criteria is required to perform a search). The last name alone is usually sufficient to find the correct worker. 3. Click on the Search button. The system will now search for and return a summary of all reports matching the search criteria entered. WCB Online Services - Employer User Guide 46 4. From the list of results, locate the report you wish to view and/or print by examining the information provided in each report summary. Submitted reports are any reports which display a Report Status other than “Draft”. Specifically, submitted reports will have one of the following four potential report statuses: 1. Submitted – The report has been successfully submitted to WCB, but it has not yet been processed. 2. Complete – The report has been successfully submitted to WCB, has been processed by the electronic reporting system and a claim number has been assigned to the report. 3. Held for Manual Processing – The report has been submitted to WCB; however, the system is unable to successfully match the report to an existing claim on file. The most common cause for reports having this status is due to a discrepancy in the data provided in the report, and what has been reported in prior report submissions by the worker, employer or physician. Because the report is unable to be automatically processed by the system, it must now be manually processed and matched to a claim by a Customer Records Clerk. 4. Manual Processing Complete – The report has been submitted to WCB and was held for manual processing, but the Customer Records Clerk has finished processing the report and a claim number has been assigned. All reports that have been submitted and/or processed will be accompanied by a link to View the report. To print a hardcopy of the report, click on the View link. A PDF copy of the report will open in a new window using Adobe Reader®. You can print a copy of the report from here. WCB Online Services - Employer User Guide 47 Employer/Worker Copy (Pink Copy) Users who submit the C040 – Employer’s Report of Injury electronically have access to the Employer/Worker copy of the following reports: Physician First Report OIS Physician First Report Physician Progress Report OIS Physician Progress Report Chiro First Report Chiro Progress/Discharge Report PT First Report PT Progress/Discharge Report In addition, any users with the WCB Claims Administrator/Manager role will also have access to these online reports. To check your assigned roles, within the myWCB window, select My Profile in the bottom left hand corner of your screen, and then select View My Access. For a description of the Assigned Roles, please refer to page 6 of this guide. To access the Employer/Worker Copy of the reports, select My Claims and Costs and then Search for Reports. Enter your search criteria, and then select the Search button. If there is an online Employer/Worker report available, you will see a Health Care Reports link in the Actions Menu. When you select the Health Care Reports link, you will see a list of the reports that you have access to. Select the report name to view & print a report. WCB Online Services - Employer User Guide 48 To return to the previous page, select the Close button. The following four criteria must be met in order for you to see the Employer/Worker copy online: 1. The C040 - Employer’s Report of Injury must be submitted electronically. 2. The Physician First Report, Physician Progress Report, Chiro First Report, Chiro Progress/Discharge Report, PT First Report, or PT Progress/Discharge Report must be submitted electronically. 3. The Claim must be charged to your WCB Account. 4. You must have either submitted the C040 – Employer’s Report of Injury with your myWCB user id, or you must have the WCB Claims Administrator/Manager role assigned to your myWCB user id. WCB Online Services - Employer User Guide 49 Upload C040 Section The Upload C040 interface provides a method to import electronic information into the Employer’s Report of Injury form (C040). By reading information directly from a human resource or injury management system, time is saved and data entry errors are avoided. For information on requirements to use the Upload C040 interface, please contact WCB’s eBusiness Support Team. Using this system, a selected XML file is imported using the screen shown below. The amount of information populated into the Employer’s Report of Injury from another system can be varied to suit the user. Any information that is not imported can be typed directly into the online reporting application To import an XML file into the system, simply click on the Upload C040 button on the Side Navigation bar, and then click on the Browse button. Navigate to the file to be uploaded, select it, and click on the Upload button to upload the file. If the system finds any problems with the file you are attempting to upload, it will display an error message similar to the one below: WCB Online Services - Employer User Guide 50 If there are no errors in the file, the system will automatically create a new Employer’s Report of Injury (C040) containing pre-populated data taken from the XML file. You can then complete the report by entering any missing information and submit the report to WCB by selecting the Submit Report button. WCB Online Services - Employer User Guide 51 Additional Help Frequently Asked Questions 1. I can’t log in! Here are a few things to keep in mind when trying to log in: Ensure that you are at the correct site. The address at the top of the login screen should read: https://my.wcb.ab.ca Ensure your UserID is correct. If you have forgotten your UserID, click on “Forgot UserID”, fill in the required information, and your UserID will be emailed to you. Ensure your password is correct. The password is case-sensitive. If you have forgotten your password, click the “Forgot Password?” link. The system will prompt you to enter the UserID and email address you selected when you registered online, and a new password will be emailed to you. If you still cannot log on, please contact your Online Administrator, or the eBusiness Support Team 2. Electronic Injury Reporting a. How do I attach additional information to the report? The Electronic Injury Reporting system allows for up to three attachments to be submitted with the Employer’s Report of Injury, the Worker’s Report of Injury, and the Employer Earnings Addendum. The attachments are attached on the “Other Information” section of the reports. Any additional information the user wishes to submit independently of their report must be faxed, phoned, emailed or mailed to: WCB – Alberta 9912-107 Street P.O. Box 2415 Edmonton, AB T5J 2S5 Email: Telephone: Toll-free: Fax: [email protected] 780-498-3999 1-866-922-9221 780-498-7999 b. I am unable to find a report using the search for reports feature. There are several reasons why users may not be able to successfully retrieve a report for a worker. The most common reason is simply due to incorrect information entered in the search criteria. In most cases, the report(s) can be found by searching using only the WCB Online Services - Employer User Guide 52 worker’s last name. If this produces too many search results, the search can be further narrowed by using a different search criteria. If you are still unable to find the report, contact the eBusiness Support Team before recreating the report. The eBusiness Support Team will be able to verify whether or not the report truly exists. c. Can I cut and paste text directly from my word processor? Most advanced word processor tools (such as Microsoft Word or Lotus WordPro) contain special characters that are incompatible with the Electronic Injury Reporting system. It is strongly advised that you do not cut and paste directly from such documents. If you do need to copy information from these types of files, there is an effective workaround to do this: 1. Highlight and copy the information from your word processor. 2. Paste the information into a simple text editing program such as Windows Notepad. Doing this will remove any special characters. 3. Highlight and copy the information again, this time from the Windows Notepad program. 4. Paste the information into the Electronic Injury Reporting system. 3. Claim and Premium Reports a. What output formats are available for reports? All reports are available in Portable Document Format (PDF). To view such types of reports, Adobe Reader software (version 6.0 or higher) is required. A few select reports can also be requested in other formats. The Yearly Claim Costs Summary, Monthly Claim Costs Summary and Claims Reporting Performance reports can be requested in either PDF or Comma Separated Values (CSV) format. b. How do I request Partnerships in Injury Reduction (PIR) reports? Participants in the PIR program who have access to myWCB do not need to request PIR reports. The reports will be automatically generated on a monthly basis with an email notification sent to you each time the report is generated. c. How long does it usually take to receive the report after I request it? The time it takes to receive a report after the request is made depends on both the type of report you are requesting, and the time of day the report is requested. Normally, reports will be generated within 30 minutes of your request; however, if it is a particularly large report, or if it is requested during a period of high demand, it may take a few hours before the report is created. WCB Online Services - Employer User Guide 53 d. Who do I contact if I have questions related to the data contained in my report? Please address any questions pertaining to the specific details of a report to the Employer Account Services team at 780 498 3999. If you have technical problems, please contact the eBusiness Support Team. 4. Common Questions a. How do I close my account if I only have Personal Coverage and I don't have any workers? On the Personal Coverage tab select the Edit button and click Yes in the Terminate box. Click the Save button to accept your changes or the cancel button to abandon your changes. b. I have made a change on the Personal Coverage tab but I am unable to submit because my submit button is not highlighted. You must confirm your changes by clicking the Save button to accept your changes and then you will be able to click the Submit button. c. I have questions. Please check the help file. If you still have questions, contact the eBusiness Support Team. Contact Us If this guide or the online help files do not answer your questions, the eBusiness Support Team is available for assistance. eBusiness Support Team Phone: 780-498-7688 Fax: 780-498-7866 Email: [email protected] The eBusiness Support Team is available from 8:00am to 4:30pm Monday through Friday (excluding statutory holidays). WCB Online Services - Employer User Guide 54