1
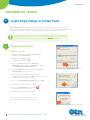
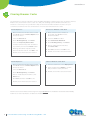
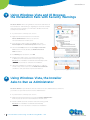
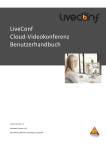
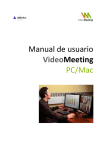
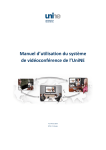
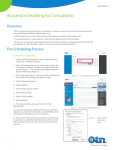
www.otn.ca
Personal Videoconferencing
Troubleshooting Guide
Version 4.4
Telemedicine’s Leader
www.otn.ca
Personal Videoconferencing:
Troubleshooting Guide
This guide provides step by step instructions to overcome the most
common problems when getting started and when using the software.
We’re here to help make sure your videoconferencing experience is
a good one! If you have a problem that does not match any of the
conditions described below, or you have attempted the corrective
action and the problem persists, please contact OTN’s Service Desk.
Table of Contents
Installation Issues
Telemedicine Centre (tm.otn.ca) Issues
1 Login Page Hangs or Install Fails....................................3
7 Web Page(s) Not Displaying Properly......................... 11
1.1
Clearing Java Cache..................................................3
8 Login Hangs & Home Page Doesn’t Appear............. 12
Windows Systems....................................................3
9 Pop-up Security Warning Appears.............................. 13
Mac OS X Systems...................................................4
1.2
Clearing Browser Cache..........................................5
2 Install Process Loops (the process
is running but with high CPU usage).............................6
10 User Has No Video Permission....................................... 14
Videoconferencing Issues
11 Checklist - What You Need to Succeed...................... 15
3 Using Windows Vista and IE Browser,
the Installation Fails with Security Warnings.............7
12 Audio Problems................................................................... 16
4 Using Windows Vista, the Installer
Asks to Run as Administrator ..........................................7
12.2 You Can’t Hear Others............................................ 17
12.1 Others Can’t Hear You............................................ 16
12.3 You Hear an Echo or Audio Feedback............. 18
5 Audio or Video Device Not Found.................................8
12.4 Poor Quality Sound................................................. 19
Windows Systems......................................................8
13 Video Problems...................................................................20
5.2 Mac OS X Systems.....................................................9
13.1 You See Others But They Don’t See You.......20
6 Can Install and Log in, but Can’t Connect.................10
13.2 Poor Quality Video.................................................. 21
5.1
For further assistance and technical support, contact OTN’s Service Desk:
Phone: 1.866.454.6861 (Option 1) Email: [email protected]
2
Personal Videoconferencing: Troubleshooting Guide v 4.4
Telemedicine’s Leader
www.otn.ca
Installation Issues
1
Login Page Hangs or Install Fails
The Short Answer: If you can’t get past the login page or the install doesn’t seem to work, it could be
because your browser’s Java plug-in is out of date. To ensure that your browser loads with the latest Java
applications and applets, you must clear both your computer’s Java cache and browser’s cache.
After clearing both types of cache, restart (close and re-open) the browser and return to
OTN’s personal computer videoconferencing home page tm.otn.ca. The installation should
start automatically. Follow the on-screen prompts to complete the installation.
1.1
Clearing Java Cache
Windows Systems
1. On your desktop, click the Windows Start button
and then select Control Panel.
2. Double-click the Java icon
.
The Java Control Panel opens.
3. Select the General tab and in the Temporary
Internet Files section click the Settings button (Figure 1).
The Temporary Files Settings panel opens.
4. Click the Delete Files button (Figure 2). The Delete
Temporary Files dialog box opens.
Figure 1: Java Control Panel general tab
5. To delete all the downloaded Java applications
and applets from the cache, click OK (Figure 3). The cache
is cleared and the dialog box closes.
6. To close the Temporary Files Settings panels, click OK.
7. To close the Java Control Panel, click OK.
8. To close the Control Panel window, click
in the window’s top-right corner.
Figure 2: Temporary Files Settings
9. Restart (close and re-open) the browser.
The next step is to clear your browser’s cache.
(See “Clearing Browser Cache” on page 5.)
Figure 3: Delete Temporary Files dialog box
3
Personal Videoconferencing: Troubleshooting Guide v 4.4
Telemedicine’s Leader
www.otn.ca
Mac OS X Systems
1. In your system’s dock, click the Finder icon (Figure 4).
2. In the Finder menu, click Applications and then click Utilities.
3. Double-click the Java Preferences icon (Figure 5).
Figure 4: Mac Finder in dock
4. Click the Network tab and then click the Delete Files button
(Figure 6).
5. Ensure that both checkboxes are selected and then
click the OK button (Figure 7).
6. To close the Java Preferences window, click
in the window’s top-left corner.
The next step is to clear your browser’s cache.
(See next page.)
Figure 5: Mac Applications Utilities
Figure 6: Mac Java Preferences
Figure 7: Mac Java delete files
4
Personal Videoconferencing: Troubleshooting Guide v 4.4
Telemedicine’s Leader
www.otn.ca
1.2
Clearing Browser Cache
The instructions to clear your browser’s cache can differ depending on which browser you use (Firefox, Internet
Explorer, etc.), the browser version (7, 8, 9, etc.), and your operating system (Windows 7, XP, Mac, etc.).
Therefore, it is best if you use your browser’s Help for the most accurate instructions. However, for your
convenience, below are a few sets of instructions on how to clear various browsers’ cache.
Internet Explorer 8
Firefox 3 for Windows or Mac OS X
1. Open an IE browser window, in the toolbar
click Tools and select Internet Options from
the pop-up menu.
1. Open a Firefox browser window, in
the toolbar click Tools and select
Clear Private Data.
2. Select the General tab.
2. Select the Cache checkbox.
3. Under Browsing History, click Delete.
3. Click Clear Private Data Now.
4. Select the Temporary Internet Files
checkbox (and as many other checkboxes
as you’d like), then click the Delete button.
4. Under Browsing history, click Delete.
5. Deleting cached files may take a while.
When the browser is done, click OK to exit.
6. Restart (close and re-open) the browser.
5. Next to “Temporary Internet Files”,
click Delete Files.
6. Click Close, and then click OK to exit.
7. Restart (close and re-open) the browser.
Internet Explorer 7
Safari for Windows or Mac OS X
1. Open an IE browser window, in the toolbar
click Tools and select Internet Options from
the pop-up menu.
1. From the Safari menu, select Empty Cache.
2. Select the General tab.
3. Under Browsing history, click Delete.
2. When prompted, click Empty to confirm
that you want to empty the cache.
3. Restart (close and re-open) the browser.
4. Next to “Temporary Internet Files”, click
Delete files.
5. Click Close, and then click OK to exit.
6. Restart (close and re-open) the browser.
Return to the Personal Videoconferencing home page (tm.otn.ca). The installation should start automatically.
Follow the on-screen prompts to complete the installation.
5
Personal Videoconferencing: Troubleshooting Guide v 4.4
Telemedicine’s Leader
www.otn.ca
2 Install Process Loops (the process
is running but with high CPU usage)
The Short Answer: The problem might be due to the ‘next-generation’ Java plug-in, which is enabled by
default. You can switch to the old Java plug-in.
1. On your desktop, click the Windows Start
button and then select Control Panel.
2. Double-click the Java icon
.
The Java Control Panel opens.
3. Click the “+” in front of the Java Plug-in entry
and uncheck Enable the Next Generation
Java Plug-in.
4. To close the Java Control Panel window
and apply the change, click OK.
5. Restart (close and re-open) the browser.
You can now return to the Personal Videoconferencing home
page (tm.otn.ca). The installation should start automatically.
Follow the on-screen prompts to complete the installation.
Figure 8: Java control panel, advanced tab
6
Personal Videoconferencing: Troubleshooting Guide v 4.4
Telemedicine’s Leader
www.otn.ca
3 Using Windows Vista and IE Browser,
the Installation Fails with Security Warnings
The Short Answer: When using Windows Vista Home and Microsoft
Internet Explorer and installing or upgrading the personal computer
videoconferencing software, you will need to disable the Internet
Security Protection Mode.
1. If your browser is currently open, close it.
2. Right-click the browser launch icon and select
Run as Administrator from the pop-up menu.
An Internet Explorer window opens.
3. In the browser’s main toolbar, click Tools, then select
Internet Options. The Internet Properties window opens.
4. Select the Security tab and in the Security Level for this
Zone section uncheck (disable) the Enable Protected
Mode checkbox.
5. If a Warning pop-up appears, click OK.
6. Restart (close and re-open) your browser and return
to OTN’s personal computer videoconferencing portal
tm.otn.ca. The installation should start automatically. Follow
the on-screen prompts to complete the installation.
7. When the installation is complete, repeat steps 1 – 4 above,
except in step 4 select (turn on) the Enable Protected Mode
checkbox to turn your browser’s protection back on.
Figure 9: Internet Properties, Security tab
Figure 10: IE warning pop-up
4 Using Windows Vista, the Installer
Asks to Run as Administrator
The Short Answer: If your Windows Vista user id does not have ‘Administrator’ permissions,
you need to set your web browser to ‘Run as Administrator’.
1. If your browser is currently open, close it.
2. Right-click the browser launch icon and select Run as Administrator
from the pop-up menu. An Internet Explorer window opens.
3. Return to OTN’s personal computer videoconferencing portal
tm.otn.ca. The installation should start automatically.
Follow the on-screen prompts to complete the installation.
7
Personal Videoconferencing: Troubleshooting Guide v 4.4
Telemedicine’s Leader
www.otn.ca
5 Audio or Video Device Not Found
5.1
Windows Systems
The Short Answer: First uninstall the device driver, then re-install it.
Finally restart your personal computer videoconferencing software.
1. Close the Personal Videoconferencing software application.
2. If the problem device is connected via a USB port, verify
that the device is properly plugged in and that the USB port
is active and functional. (That is, the port has been used
previously and worked for other devices.)
3. To access Windows hardware properties, click the Windows
Start button and select Control Panel. If not already in Classic
View, click the Switch to Classic View option (Figure 11).
Figure 11: Control Panel category view
4. Double-click the System icon (Figure 12). The System
Properties
window appears.
5. Select the Hardware tab and click the Device Manager
button (Figure 13). The Device Manager window appears.
6. To view the device drivers, click the ‘+’ in front of Sound,
video and game controllers.
7. To open the device properties, double-click the device name
that matches the one causing you problems (Figure 14). The
Device Properties window appears.
8. To uninstall the driver, click the Driver tab, then click the
Uninstall button and follow the on-screen prompts (Figure 15).
Figure 13: Hardware tab
8
Figure 14: Device Manager list
Personal Videoconferencing: Troubleshooting Guide v 4.4
Figure 12: Control Panel classic view
Figure 15: Device Properties window
Telemedicine’s Leader
www.otn.ca
9. After the uninstall completes, use the driver
provided by the device’s manufacturer to reinstall
(following the manufacturer’s instructions).
10.To restart the personal computer videoconferencing
software, right-click the taskbar icon (
) and
select Configuration from the pop-up menu. The
Configuration and Status window appears.
11. Click the Devices tab and select the device
that you reinstalled (Figure 16).
12.To apply the changes and close the window,
click Save. Or to apply the changes and leave
the window open, click Apply.
Figure 16: Configuration and Status window
5.2
Mac OS X Systems
The Short Answer: Ensure that you have the latest software updates and then
restart your personal computer videoconferencing software.
1. Close the Personal Videoconferencing software application.
2. If the problem device is connected via a USB port, verify
that the device is properly plugged in and that the USB port
is active and functional. (That is, the port has been used
previously and worked for other devices.)
3. From the Apple menu, choose Software Update (Figure 17).
4. Software Update checks for available updates. In the Software
Update window, select the items you want to install, then click
Install. Usually, you should install all available updates
Figure 17: Mac Software Update menu
5. Enter an administrator account name and password.
6. After installation is complete, restart the computer if required.
9
Personal Videoconferencing: Troubleshooting Guide v 4.4
Telemedicine’s Leader
www.otn.ca
6 Can Install and Log in, but Can’t Connect
The Short Answer: Occasionally an Internet Service Provider (ISP) provides an “internet
protection” program (software firewall) with their service. This might allow you to pass the
network port test, but might block the connection between the video desktop software
and the Personal Videoconferencing Video portal.
1. Check if a software firewall is running on your computer.
2. If yes, close the software firewall.
3. Try to make a video call.
10
Personal Videoconferencing: Troubleshooting Guide v 4.4
Telemedicine’s Leader
www.otn.ca
Telemedicine Centre (tm.otn.ca) Issues
7 Web Page(s) Not Displaying Properly
The Problem: You successfully log in, but the page that appears
is distorted and there may be missing sections (Figure 18).
The Short Answer: If you are using an Internet Explorer browser
that is set to use “Compatibility View” some web pages will not
display correctly. This is because Compatibility View displays
a web page as if you were using an earlier version of Internet
Explorer - but the web page was built for current browsers. To
fix the problem, turn off Compatibility View.
Figure 18: Web page appears distorted
1. Open Internet Explorer and to view the browser menu, press
the Alt button on the keyboard.
2. Click Tools and then select Compatibility View settings
(Figure 19).
3. In the Compatibility View Settings dialog box, ensure all
three checkboxes are not selected (Figure 20).
4. To apply the settings and close the dialog box, click Close.
5. Restart (close and re-open) the browser.
Figure 19: Internet Explorer tools menu
Figure 20:Compatibility View dialog box
11
Personal Videoconferencing: Troubleshooting Guide v 4.4
Telemedicine’s Leader
www.otn.ca
8 Login Hangs & Home Page Doesn’t Appear
The Problem: When logging in, the browser remains in a ‘busy’
state and the home page does not appear (Figure 21).
The Short Answer: This is a known issue for the Telemedicine
Centre (TMC) and a solution is in the works. Until it is fixed,
follow the steps below to resume normal activity.
1. To refresh the browser window, press F5 or click the
browser’s Refresh icon ( ). A TMC landing page appears,
but it might display slightly distorted (Figure 22).
Figure 21: Log in remains in busy state
2. To reset the TMC to a correct display, click the Calendar link
in the left navigation panel. The Calendar page appears with
the correct proportions (Figure 23).
Figure 22:TMC Landing page distorted
Figure 23:TMC calendar page
12
Personal Videoconferencing: Troubleshooting Guide v 4.4
Telemedicine’s Leader
www.otn.ca
9 Pop-up Security Warning Appears
The Problem: When trying to access a page at tm.otn.ca, a
security warning appears.
The Short Answer: Internet Explorer has a SmartScreen Filter
in place, that when on a secure server (https://) it warns about
non-secure content (for example, a link to an http web page).
The Telemedicine Centre does not contain any malicious
content and therefore you can safely display both its secure
and non-secure content.
1. If the warning says, “Do you want to view only the webpage
content that was delivered securely?”, click No (Figure 24).
Figure 24:View secure and
non-secure content
2. If the warning says, “Only secure content is displayed”,
click Show all content (Figure 25).
Figure 25:Show all content
13
Personal Videoconferencing: Troubleshooting Guide v 4.4
Telemedicine’s Leader
www.otn.ca
10 User Has No Video Permission
The Problem: After signing in to tm.otn.ca, a red error
message appears at the top of the middle panel that states,
“User has no video permission” (Figure 26).
The Short Answer: If you were previously signed in to tm.otn.ca
and closed the browser window without first signing out,
your user credentials might still be cached within the browser.
To ensure a clean start and finish, you will need to close and
then restart the videoconferencing program.
Figure 26:Error message - no video permission
1. To cleanly sign out from the Telemedicine Centre,
click the Sign Out link in the top right corner
(Figure 27) and then close the browser window.
2. To close the videoconferencing program, right-click
the Vidyo program icon in your system tray/taskbar
and select Quit from the pop-up menu (Figure 28).
Figure 27:Sign out from tm.otn.ca
3. To restart the videoconferencing program, click the
VidyoDestop program icon in your system Start menu
(Figure 29).
4. Open a browser window and log in at tm.otn.ca.
Figure 28:Quit via system tray
Vidyo program menu
Figure 29:Start menu Vidyo program menu
14
Personal Videoconferencing: Troubleshooting Guide v 4.4
Telemedicine’s Leader
www.otn.ca
Videoconferencing Issues
11 Checklist - What You Need to Succeed
Check the processing power of your computer
• Avoid running other programs while making a video call. If too many programs run
concurrently, the CPU usage remains high and this can reduce video quality.
• Always plug-in your laptop/notebook/MacBook to a power source for best video quality.
If your computer is battery-powered, set the performance plan to ‘high performance’.
Otherwise, the CPU performance is automatically lowered to save battery life .
• For detailed requirements, see the Personal Videoconferencing Technical Readiness
guide available from the Learn About section at otn.ca/en/members/pcvc.
Check your audio/video devices
• A speakerphone with “echo cancellation” or a headset is mandatory.
• Your camera should support ‘high definition’ (HD) video quality.
• If you plug-in or unplug your audio/video devices – you need to re‑select and save
the devices using Personal Videoconferencing software’s Configuration panel.
• For detailed requirements, see the Technical Readiness guide available from the
Learn About section at otn.ca/en/members/pcvc.
Verify your Internet connection
• You need a business-grade Internet connection.
• You can check your Internet connectivity at the following OTN web sites:
• Quality test at bandwidth.otn.ca
• Accessibility test at portcheck.otn.ca
• For detailed instructions, see the Technical Readiness guide available from the
Learn About section at otn.ca/en/members/pcvc
Verify your Configuration settings
• For the best quality video experience, ensure you are using the recommended
Configuration settings. To access the Configuration window, right-click
(control-click on a Mac) the Personal Videoconferencing program icon (
)
in your system tray/taskbar/dock.
Network panel:
PC: Always Use VidyoProxy - Unchecked
Web proxy
Select ‘Use setting from Internet Explorer’
Mac: Validate Server Certificate - Unchecked
Always Use VidyoProxy - Unchecked
Web proxy:
Select ‘Automatically detect settings.’
Options panel: Start Vidyo Desktop on Login - Checked
Incoming Calls - Auto Answer Enabled - Unchecked
Tones - Play Tone when Participants join/leave - Checked
Full Screen - Start Conference in Full screen - Unchecked
Full Screen - Always Display Toolbar - Checked
Display - Show Participant Names - Checked
Video panel:
15
Best Quality (recommended) - Selected
Personal Videoconferencing: Troubleshooting Guide v 4.4
Telemedicine’s Leader
www.otn.ca
12 Audio Problems
12.1
Others Can’t Hear You
The Short Answer: There might be a problem with your microphone
or the other caller’s speakers.
If there are multiple people on the call and none of them can hear
you, then it is a problem with your microphone.
1. If you are using an external microphone, check that it is
properly plugged into the correct socket on your computer.
2. Check that the Personal Videoconferencing software is using
the correct microphone.
i. Open your videoconferencing window’s Configuration
panel (
) and click the Devices tab (Figure 30).
ii. If there is a microphone listed with ‘Recommended’ in
parenthesis, select it.
Figure 30:Configuration, Devices, Microphone selection
iii. To apply the changes and close the panel, click the Save
button. Or to apply the changes and leave the panel
open, click the Apply button.
3. In your videoconference window, use the Microphone
control (
) to:
• Check that the microphone control is not muted (
• Increase the microphone volume (Figure 31).
).
Figure 31: Microphone volume slider
If there is only one person that cannot hear you, then it could
be a problem with their speakers.
Ask them to check their speakers by following the instructions
in the next section, “You Can’t Hear Others” on page 17.
16
Personal Videoconferencing: Troubleshooting Guide v 4.4
Telemedicine’s Leader
www.otn.ca
12.2
You Can’t Hear Others
The Short Answer: There might be a problem with your speakers
or the other caller’s microphone.
If there are multiple people on the call and you are the only one
who can’t hear, then it is a problem with your speakers.
1. If you are using external speakers, check that they are
properly plugged into the correct socket on your computer.
2. Check that the Personal Videoconferencing software is
using the correct speaker device.
i. Open the videoconferencing window’s Configuration
panel (
) and click the Devices tab (Figure 32).
ii. If there is a speaker listed with ‘Recommended’ in
parenthesis, select this device.
iii. To apply the changes and close the panel, click the
Save button. Or to apply the changes and leave the
panel open, click the Apply button.
Figure 32:Configuration, Devices, Speaker selection
3. In your videoconference window, use the Speaker
control (
) to:
• Check that the speaker control is not muted (
• Increase the speaker volume (Figure 16).
).
4. Check that your computer’s main audio settings are not
muted or turned to a low setting.
Figure 33:Speaker volume slider
If there is only one person that you cannot hear, then it could be
a problem with their microphone.
Ask them to check their microphone by following the instructions
in the previous section of this guide, “Others Can’t Hear You” on
page 16.
17
Personal Videoconferencing: Troubleshooting Guide v 4.4
Telemedicine’s Leader
www.otn.ca
12.3
You Hear an Echo or Audio Feedback
The Short Answer: Echoing or audio feedback is usually caused when the sound from a caller’s speaker is
‘looping’ back into their microphone.
• If you hear your own voice echoing, the problem is on the other person’s side.
• If the other person hears their voice echoing, the problem is on your side.
• If an echo happens during a videoconference, stop and ask who hears it. The participant who does
not hear the echo is the source.
1. Verify that everyone on the call is using a
USB-based audio device which has either:
• Built in echo-cancellation (e.g. Chat50
speaker phone); or
• Physically separate microphone and speaker
(e.g. USB Headset with microphone).
2. To test whether or not you are using a
particular microphone:
i. First activate the mute control on the device itself.
ii. Then ask other participants if they can
still hear you.
iii. If they can still hear you, the software
is using a different microphone.
Figure 34:Configuration and Status screen
3. Ensure everyone is either using ‘recommended’ audio and
video devices or has enabled the echo cancellation feature.
i. To see the list of devices recognized by the
videoconferencing application, open its Configuration
panel (
) and click the Devices tab.
ii. If a device has built-in echo cancellation,
‘Recommended’ will appear beside the name.
Select this device.
iii. If there are no ‘Recommended’ devices listed, select
the Echo Cancellation checkbox to enable the
videoconferencing software feature.
iv. To apply the changes and close the panel, click the
Save button. Or to apply the changes and leave the
panel open, click the Apply button.
4. To identify which participant(s) is/are causing the echo:
i. Ask all participants to mute their own microphone or
as host, use the Global Meeting Controls toolbar to
Mute All.
ii. Have each user un-mute their microphone one at a time
until you find which user(s) is/are causing the echo.
5. If the caller causing the echo does not have the
recommended equipment, ask them to try:
• Moving their microphone as far away as possible from
their speakers.
• Lowering their speaker volume.
18
Personal Videoconferencing: Troubleshooting Guide v 4.4
Telemedicine’s Leader
www.otn.ca
12.4
Poor Quality Sound
The Short Answer: There are a number of factors that can affect the sound quality in a videoconference.
Review the symptoms below to find a matching solution.
Symptom
Suggested Solution
You hear background noise.
• Ask the person to move to a quieter location.
• Ask the person to move closer to their microphone when
they speak, and to mute when they are not speaking.
• Use OTN recommended headsets, speakerphones, and
webcams. Built-in equipment is more likely to pick up
background noise.
You hear the sound at a very
low volume.
• In your videoconference window, use the Speaker Volume
control (
) to increase the volume.
• If it is a specific participant you can’t hear well, ask them
to use the Microphone Volume control (
) in their
videoconference window to increase the volume.
There are dropped or cut-off
words.
• Your CPU may be intermittently working on other tasks.
• To free-up your CPU, close all applications except
those necessary for your videoconference. (For
example, shut down Outlook which can use a lot
of bandwidth and CPU if it is downloading large
attachments.)
• Your Internet connection may be poor or highly variable.
• If you share a connection with others, another
application or another computer streaming video or
file downloading might be consuming bandwidth.
• If you are connected via a wireless connection, you
can improve the quality in most cases by moving to a
wired connection.
• To test the quality of your Internet connection, open a
browser window and go to bandwidth.otn.ca.
19
Personal Videoconferencing: Troubleshooting Guide v 4.4
Telemedicine’s Leader
www.otn.ca
13 Video Problems
13.1
You See Others But They Don’t See You
The Short Answer: Either your webcam is not working or the problem could be due
to your Self View or Privacy settings.
1. Check that your webcam is properly plugged into the correct
socket on your computer and that it is switched on.
• Ensure you are using the most current driver for your
webcam.
• Only one application at a time can use a webcam. Ensure
that you don’t have another application using the webcam.
2. Check that the Self View feature is ‘on’. If it is on, the Self View
button is green. If the button is grey, click it to enable Self View.
• There are two self view modes — ‘picture-in-picture’ and
‘same size’ as other participants.
Figure 35:Self View button on toolbar
Self view on
Self view off
Privacy off
Privacy on
3. If Self View is ‘on’ but you still do not see yourself, check to
make sure that your camera is plugged in and selected as the
proper device in the Devices tab of the Configuration panel.
4. If you see yourself, your device is properly connected and
configured, but others still can’t see your video broadcast, you
might need to update your camera drivers. Check your camera
manufacturer’s website for the latest drivers.
5. Check to make sure that the Privacy Mode button is green. If
the button is red, privacy mode is ‘on’ (and you are not video
broadcasting). Click the button to turn off privacy mode.
Figure 36:Privacy button on toolbar
20
Personal Videoconferencing: Troubleshooting Guide v 4.4
Telemedicine’s Leader
www.otn.ca
13.2
Poor Quality Video
The Short Answer: There are a number of factors that can affect the video quality in a videoconference.
Review the table below to understand some of the more common factors.
Possible factor affecting
video quality
Explanation and
Suggested Solution
Bad Lighting
• Good lighting is important for a good quality videoconference.
• Use a desk lamp to augment overhead lighting.
• Avoid sitting where there is a bright light behind you, such as
in front of a window.
• For best results, the light source should originate from behind
the webcam and shine on your face.
Slow or busy internet
connection.
• Avoid sharing a connection with others, another application or
another computer that’s streaming video or file downloading
which can consume bandwidth.
• If you are connected via a wireless connection, you can
improve the quality in most cases by moving to a wired
connection.
• To test the quality of your Internet connection, open a browser
window and go to bandwidth.otn.ca.
Computer running slowly
• Your CPU may be intermittently working on other tasks.
To free-up your CPU, close all applications except those
necessary for your videoconference. (For example, shut down
Outlook which can use a lot of bandwidth and CPU if it is
downloading large attachments.)
• If you’re using a laptop, you may have problems with
video calls when it’s in power saving mode. Change your
computer to AC power or switch your computer to maximum
performance.
USB hub
vs.
USB port on computer
21
• Plug the webcam directly into one of your computer’s USB
ports whenever possible rather than a USB hub (whether the
hub is one you added to your computer, is built into your flat
panel monitor, or is built into your laptop’s docking station).
If you need to use a USB hub, it should be externally powered
for the device to perform well.
Personal Videoconferencing: Troubleshooting Guide v 4.4
Telemedicine’s Leader