1
Installation Checklist and Troubleshooting Guide for Labs Audience This document is intended for computer lab administrators, field support personnel, and others responsible supporting Pearson’s Business Publishing MyLab series. It covers a wide range of possibilities, and institutions will vary in terms of how many of the following items will need to be addressed. THIS DOCUMENT DOES NOT COVER MYITLAB Overview The document details system and plug‐in requirements and other key information for ensuring optimal course performance for initial MyLab course installation and when application updates occur. Content Introduction......................................................................................................................................... 2 Installation Checklist............................................................................................................................ 2 “Deep Freeze” Considerations (if applicable)........................................................................................ 2 Installation Setup and Configuration.................................................................................................... 3 System Requirements .......................................................................................................................... 3 Plug‐ins and Players ..................................................................................................................................................4 Web Browser Configuration................................................................................................................. 4 Set Browser to Look for New Web Pages Automatically...........................................................................................4 Manage Pop‐Up Blockers ..........................................................................................................................................5 Allow Pop‐ups from Specific Sites .........................................................................................................................5 Disable Pop‐up Blockers for All Sites .....................................................................................................................5 Third‐party Pop‐Up Blockers (Google, AOL, Yahoo, and others)...........................................................................6 Enable JavaScript.......................................................................................................................................................7 Trusted Site Settings..................................................................................................................................................7 Add Trusted Sites and Security Level.....................................................................................................................7 Add Privacy Sites (if applicable) ............................................................................................................................7 Add Content Advisor Sites (if applicable) ..............................................................................................................8 Modify Parental Controls of Managed Accounts (if applicable) ...........................................................................8 Firewall Settings .................................................................................................................................. 8 Troubleshooting ................................................................................................................................ 10 General Troubleshooting ........................................................................................................................................10 Clear Browser Cache after MyLab [Pegasus] Updates ............................................................................................10 Check Proxy Server Settings ....................................................................................................................................11 Additional Troubleshooting Considerations............................................................................................................11 Ensure Web Files Open in the Browser ...............................................................................................................11 Ensure Flash Files Open in Flash/Shockwave ......................................................................................................12 Technical Support .............................................................................................................................. 14 Pegasus Version 3.x
Page 1 of 14
Doc Version 2.0 – Aug 5, 2009
Installation Checklist and Troubleshooting Guide for Labs
INTRODUCTION The MyLab product architecture consists of a server environment that houses the Web pages. A user logs in to the MyLab server through a browser and works with web pages to organize, administer, activate or launch specific content. Often, security settings on your network or browser may impact users’ ability to effectively work in their MyLab course. INSTALLATION CHECKLIST Pearson recommends that you complete the steps outlined in this guide prior to having any students log in to a course. You should also review this information if you notice frequent server errors, connection and access errors, or other issues related to content access and submission. Details are provided in this document, and a check list is provided below for you reference: 1) Confirm that your computer meets the system requirements. 2) Set the browser to look for new Web pages automatically 4) Manage pop‐up blockers (both browser and third‐party blockers) 6) If you are using Internet Explorer: 6a) Add trusted sites and set the security level. 6b) Add privacy sites. 6c) Add content advisor sites. 7) Ensure that your firewall is not blocking access to your course. “DEEP FREEZE” CONSIDERATIONS (IF APPLICABLE) If you have any type of “sweep” or “deep freeze” software on your computers: •
Be sure to complete all of the recommended procedures provided in this document and verify all required files are in place below the sweep threshold or prior to “freezing” the computer. •
If you make any changes to your browser settings, cache, or firewall after you capture the image your changes will not be included in the image. •
You should reimage the master image to include any new files or settings that you may have updated. A technical whitepaper that contains guidelines for retaining user data in a lab environment that uses a reboot or restore application is provided here for your reference: http://www.faronics.com/whitepapers/DF_RetainUserData.pdf
Note: If you do not image plug‐ins and/or changes, students and instructors will need to install them each time they log in. Pegasus Version 3.x
Page 2 of 14
Doc Version 2.0 - Aug 5, 2009
Installation Checklist and Troubleshooting Guide for Labs
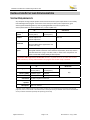
INSTALLATION SETUP AND CONFIGURATION SYSTEM REQUIREMENTS Any computer running a MyLab product must meet the minimum system requirements to successfully take advantage of the program. To find a list of the most up‐to‐date system requirements, go to www.mypearsonmarketinglab.com, www.mymanagementlab.com, www.mymislab.com, www.mybcommlab.com, www.mybizlab.com, or www.myIBlab.com. PC *Macintosh Operating System Windows® XP (service pack 3) Windows Vista (service pack 1) Browser Internet Explorer 7.0 Internet Explore 8.0 Safari 4.0 Screen Resolution 1024 x 768 (Note that 800 x 600 is supported for the Student view only.) 1280 x 960 Connection Speed Broadband connection [cable or DSL] or higher is recommended. Dial‐up/56K modem connection is the minimum requirement, which may result in slow download times trying to run video, audio, or other course components. It is better to have 128k modem (ISDN) per lab computer. Macintosh® OS 10.5.x * mymislab is NOT supported on the Mac OS. However, mymisab can be run on a Mac with an Intel‐
based architecture, running under Windows via a program such as Boot Camp or Parallels. Hardware* PC Operating System Macintosh Windows® XP (service pack 3) Windows Vista (service pack 1) Memory (RAM) 512MB or higher 1GB RAM Processor 1.4Ghz processor N/A 2.0Ghz processor Sound Card Any MCI compliant sound card Headphones or Built‐in or external speakers Microphone Built‐in or external * You may require additional memory and processor speed if you are simultaneously running other CPU‐intensive programs, such as a virus checker. The noted increase in the requirements for Windows Vista is due to the additional memory and CPU overheads imposed by the operating system itself. Pegasus Version 3.x
Page 3 of 14
Doc Version 2.0 - Aug 5, 2009
Installation Checklist and Troubleshooting Guide for Labs
Plug‐ins and Players To use all of MyLab’s capabilities, the all or some of the following software is needed: •
Java 1.4.2, 1.5 or 1.6 •
Active X Control •
QuickTime •
Macromedia® Flash™ player version 8 or higher •
Macromedia Shockwave® versions 7 through 10 •
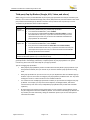
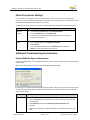
Adobe® Acrobat® Reader version 7 or higher WEB BROWSER CONFIGURATION Certain browser options and security settings can disable or interfere with MyLab functionality. To ensure that browser‐level options or policies do not affect MyLab, Pearson recommends the following settings. Set Browser to Look for New Web Pages Automatically Set your browser to check for newer versions of stored pages automatically instead of on every visit to the page. Browser Internet Explorer Safari Pegasus Version 3.x
Instructions 1. From the browser Tools menu, click Internet Options. 2. On the General tab, in the Browsing History section, click Settings. 3. Select Automatically, and click OK. You will need to clear your cache to see any updated pages (see the section on clearing cache). Page 4 of 14
Doc Version 2.0 - Aug 5, 2009
Installation Checklist and Troubleshooting Guide for Labs
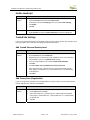
Manage Pop‐Up Blockers As pop‐up blockers may interfere with the installation of plug‐ins and players used in your course, depending on your preference, you can either allow pop‐ups from specific sites or disable browser pop‐up blockers for all web sites. Allow Pop‐ups from Specific Sites Browser Internet Explorer Safari Instructions When you see the yellow “Information Bar” at the top of the web page about a pop‐up being blocked, click the bar and select Always allow pop‐ups from this site, and click Yes to confirm. –or– 1. From the browser Tools menu, select Pop‐up Blocker, then Pop‐up Blocker Settings. 2. Add *.pearsoned.com, *.pearsoncmg.com, and the appropriate MyLab home pages (*.myitalianlab.com, *.myfrenchlab.com, or *.myspanishlab) as Allowed sites. 3. Click Close. In Safari you can either enable or disable the pop‐up blocker. There is no per‐
site control. See next section for details on how to disable pop‐up blocker. Disable Pop‐up Blockers for All Sites Browser Internet Explorer Instructions From the browser Tools menu, select Pop‐up Blocker, then Turn off Pop‐up Blocker. Safari From the Safari menu, clear the checkmark for Block pop‐up windows. Pegasus Version 3.x
Page 5 of 14
Doc Version 2.0 - Aug 5, 2009
Installation Checklist and Troubleshooting Guide for Labs
Third‐party Pop‐Up Blockers (Google, AOL, Yahoo, and others) While using your course you should disable any third‐party pop‐up blockers that may be installed in your browser, such as those included with Google, AOL, Yahoo, MSN, EarthLink, and other toolbars. Most third‐
party toolbars have hidden pop‐up blockers and other security features that may block your course. To check if any of these are active in Internet Explorer: Browser Internet Explorer 7.x Instructions To permanently disable third‐party toolbar pop‐up blockers: 1. From the browser View menu, select Toolbars. 2. If any entries are checked between Links and Lock the Toolbars, remove the checkmark for that entry. If you have more than one entry use must repeat this step for each entry to remove the checkmark and disable the pop‐up blocker for that toolbar. Internet Explorer 8.x To permanently disable third‐party toolbar pop‐up blockers: 1. From the browser View menu, select Toolbars. 2. If any entries are checked between Status Bar and Lock the Toolbars, remove the checkmark for that entry. If you have more than one entry use must repeat this step for each entry to remove the checkmark and disable the pop‐up blocker for that toolbar. Note: To temporarily disable many third‐party pop‐up blockers you can click the program's icon in either the Windows System Tray or in the browser itself. With most popular pop‐up blockers, you can allow pop‐ups from specific locations. This setting is generally found in the Settings, Preferences, or Options portion of your pop‐up blocker. For specific instructions, please refer to the online help for your pop‐up blocker. Tips for managing pop‐up blockers: •
Most popular pop‐up blockers produce an audio alert when they block a pop‐up window. If you have speakers installed, raise your volume so you can hear whether a pop‐up blocker is being used. •
Many pop‐up blockers let you use the "Ctrl" key on your keyboard to allow an individual pop‐up window. If you are unsure how to configure your pop‐up blocker, hold down the "Ctrl" key when clicking the "Install" or "Detect" buttons on the Installation Wizard. •
It is common to have multiple pop‐up blockers installed, so you will need to configure each pop‐
up blocker. For example, you may have Internet Explorer, the Google Toolbar, and Norton Internet Security. Each has its own, independent pop‐up blocker that you will have to disable separately. •
Be aware that if you install third‐party applications on your computer, the installation process may be configured to install new toolbars by default. You will have to disable pop‐up blockers for any toolbar you install. Alternately, during the installation process you can clear the option to install the new toolbar. Pegasus Version 3.x
Page 6 of 14
Doc Version 2.0 - Aug 5, 2009
Installation Checklist and Troubleshooting Guide for Labs
Enable JavaScript Browser Internet Explorer Instructions 1. From the browser Tools menu, click Internet Options. 2. Click the Security tab and then click Custom Level. 3. Scroll down to locate the Scripting section, and under Active Scripting, click Enable. 4. Click OK. Safari 1.
2.
From the browser Safari menu, click Preferences. Select Security and check to Enable JavaScript and close the dialog box. Trusted Site Settings If you are using Internet Explorer you can define various security levels to protect your computer from harmful programs and to still allow the appropriate MyLab functionality. Add Trusted Sites and Security Level Browser Instructions Internet Explorer 1.
2.
3.
4.
5.
6.
7.
8.
From the browser Tools menu, click Internet Options. On the Security tab, click Trusted Sites. Drag the slider to set the security level to Medium‐low or Low (the slider is only available if you are using Default Level settings). If you are using Windows Vista, uncheck Enable Protected Mode. Click Sites. Uncheck Require server verification for all sites in this zone. Add *.pearsoned.com, *.pearsoncmg.com, and the appropriate MyLab home pages (*.myitalianlab.com, *.myfrenchlab.com, or *.myspanishlab) as allowed sites. Click Close. Add Privacy Sites (if applicable) If you are using Privacy settings in IE to manage cookies on a per‐site basis, you will need to add the Pearson MyLab sites to this list as noted below. Browser Instructions Internet Explorer 1.
2.
3.
4.
Pegasus Version 3.x
From the browser Tools menu, click Internet Options. On the Privacy tab, click Sites. Add *.pearsoned.com, *.pearsoncmg.com, and the appropriate MyLab home pages (*.myitalianlab.com, *.myfrenchlab.com, or *.myspanishlab) as allowed sites. Click OK. Page 7 of 14
Doc Version 2.0 - Aug 5, 2009
Installation Checklist and Troubleshooting Guide for Labs
Add Content Advisor Sites (if applicable) If you are using Content Advisor in IE, which lets you specify a list of sites users can access on the Web, you will need to add the Pearson MyLab sites to this list as noted below. If the sites are not added to your Content Advisor list, this feature will prevent users from being able to access the course. Browser Instructions Internet Explorer 1.
2.
3.
From the browser Tools menu, click Internet Options. On the Content tab, click Enable. Click the Approved Sites tab, and add *.pearsoned.com, *.pearsoncmg.com, and the appropriate MyLab home pages (*.myitalianlab.com, *.myfrenchlab.com, or *.myspanishlab) as allowed sites. Click OK. When the window asking you to Create a Supervisor Password opens, click Cancel. 4.
5.
Modify Parental Controls of Managed Accounts (if applicable) If you are using managed accounts in your MAC OS, you will need to add the Pearson MyLab sites as noted below. Browser Instructions Safari 1.
2.
3.
From Apple menu, click System Preferences. Click Parental Controls. Follow the on‐screen instructions to unlock the settings. You are prompted to enter your Admin password. Select the managed account and click Content. Select Allow access only to these websites and add *.pearsoned.com, *.pearsoncmg.com, and the appropriate MyLab home pages (*.myitalianlab.com, *.myfrenchlab.com, or *.myspanishlab) as allowed sites. Close the window. 4.
5.
6.
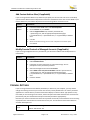
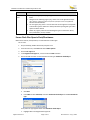
FIREWALL SETTINGS If you are using a firewall such as McAfee, ZoneAlarm, or Norton on your computer, you may need to change some settings to ensure your course runs correctly. Usually firewall users can “allow” permitted applications to transfer data. If you have a firewall that displays a “block or allow” type question at any time while you are accessing course content, choose the option that allows the firewall to access the site permanently and your firewall will set the ports and other parameters appropriately. Note that your course communicates via the HTTP protocol via Port 80, so workstations that are accessing any MyLab course must be able to communicate via this port. The full domain name and IP addresses associate with MyLabs are: Pearson Media Server Pegasus Version 3.x
Name: media.pearsoncmg.com Address: 209.202.161.170 Page 8 of 14
Doc Version 2.0 - Aug 5, 2009
Installation Checklist and Troubleshooting Guide for Labs
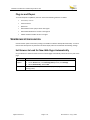
Pearson Log In Name: login.pearsoncmg.com Address: 209.202.161.140 Pearson Registration Name: register.pearsoncmg.com Address: 209.202.161.139 Pearson Support Name: 247.support.pearsoned.com Address: 63.240.89.10 Note that the domains and IP addresses listed above are subject to change. To verify you have the most current IP address you can contact Technical Support (contact information provided at the end of this document) or use the NSLookup function to return the current IP Address (you can search to find a web page that provides this function or from the command prompt, type nslookup <domain name> and press ENTER. For example: Ask your IT/Network staff to make sure access to the MyLab and Pearson IP addresses is not blocked, and if possible, have your IT/Network staff raise the priority of these IP addresses. This will increase overall performance if traffic shaping (or packet shaping) is used to control computer network traffic in your lab. Pegasus Version 3.x
Page 9 of 14
Doc Version 2.0 - Aug 5, 2009
Installation Checklist and Troubleshooting Guide for Labs
TROUBLESHOOTING General Troubleshooting Run the MyLab tune‐up browser tune‐up (see page Error! Bookmark not defined.). Most issues are quickly and easily addressed by running the browser tune‐up. Clear Browser Cache after MyLab [Pegasus] Updates Pegasus uses your browser cache to store application‐related JavaScript files, which support specific application functionality. Occasionally, after an application update you may experience usability issues because the files stored in your browser cache are out of date. For example, when you click on a link from a page, nothing happens or an error is displayed. This is because your web browser has cached (stored) the page on your hard drive and rather than going over the network to load the page, it has loaded the cached copy. Therefore, we recommend that if your course begins to exhibit unexpected behavior you should clear your browser cache to see if that resolves the error. Note: Pearson announces system updates on the Pegasus login page, where both students and instructors can see it. To delete all of the files currently stored in your browser cache, follow the directions provided for your specific browser. If you are using Profiles on the machine, each individual user will have to follow these steps to clear their browser cache. Browser Instructions Internet Explorer 7.x 1.
2.
3.
4.
From the browser Tools menu, click Internet Options. On the General tab, in the Browsing history section, click Delete. In the Temporary Internet Files section, click Delete files. To confirm the deletion, click Yes. Internet Explorer 8.x 1.
2.
3.
From the browser Tools menu, click Internet Options. On the General tab, in the Browsing history section, click Delete. Check Temporary Internet Files and click Delete. Safari 1.
2.
From browser Safari menu, click Empty Cache. To confirm the deletion, click Empty. Pegasus Version 3.x
Page 10 of 14
Doc Version 2.0 - Aug 5, 2009
Installation Checklist and Troubleshooting Guide for Labs
Check Proxy Server Settings If your network is using a proxy server you will also have to ensure that server has the appropriate permissions. Ask your network administrator to clear the cache on the proxy server, and allow the server to download the appropriate files types for your course. To determine if you are using a Proxy server, follow the directions provided for your specific browser. Browser Instructions Internet Explorer 1.
2.
3.
From the browser Tools menu, click Internet Options. On the Connections tab, click LAN Settings. In the Local Area Network (LAN) Settings window you can see if any Proxy servers are listed. Safari 1.
2.
3.
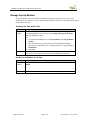
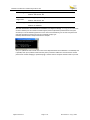
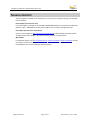
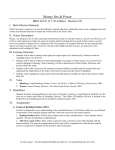
From the Apple Menu, select System Preferences. Click Network. From the Network window, click the Advanced button and select Proxies to see if any proxy servers are listed. Additional Troubleshooting Considerations Ensure Web Files Open in the Browser If you are using Windows, ensure that Web documents are set to open in the browser and not download automatically. When a user clicks to open a course file, the following dialog should appear: If a user clears the “Always ask before opening this type of file” option, the next time a user tries to open a course file, they may not be to locate the file on the machine. To reset this option to ensure the file opens in their course: OS Instructions Windows XP 1.
2.
3.
4.
5.
Pegasus Version 3.x
From the Start menu, click Run, type Control Folders, and click OK. Click the File Types tab, and select the file type or extension from the list (for example DOC). Click Advanced, and click the confirm open after download option. Click OK. Repeat for each file type or extension (Word, Excel, PowerPoint, Access, and PDF). Page 11 of 14
Doc Version 2.0 - Aug 5, 2009
Installation Checklist and Troubleshooting Guide for Labs
OS Instructions Windows Vista 1.
2.
To open the Registry Editor, type regedit in the Start Search bar, and press Enter. Navigate to the following registry key, which is for the IE application object: HKEY_CURRENT_USER\Software\Microsoft\Windows\Shell\AttachmentExecute\{0002DF01‐
0000‐0000‐C000‐000000000046} 3.
4.
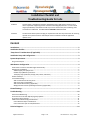
For this registry key, there is a list of value data on the right that corresponds to all the file types for which the “Always ask before opening this type of file” option has been cleared. Delete any registry values for the following file types or extensions: Word, Excel, PowerPoint, Access, and PDF. Ensure Flash Files Open in Flash/Shockwave Make sure that Flash, not QuickTime, is associated with .swf file types. For PC users: 1.
On your desktop, double‐click the My Computer icon. 2.
From the menu bar, click Tools and select Folder Options. 3.
Click the File Types tab. 4.
In the Registered file types list, scroll to locate the SWF extension. 5.
Ensure the SWF extension is associated with the file type: Shockwave Flash Object. If you cannot locate the SWF extension: a.
Click New. b.
Enter SWF and click Advanced, and select Shockwave Flash Object for the Associated File type. If any other File Type appears other than Shockwave Flash Object: a. Highlight SWF in the Registered file types list. Pegasus Version 3.x
Page 12 of 14
Doc Version 2.0 - Aug 5, 2009
Installation Checklist and Troubleshooting Guide for Labs
b. Click Delete and click Yes to confirm you want to remove the extension. c.
Confirm you have installed Adobe Shockwave (or reinstall the plug‐in) and follow the steps above. Pegasus Version 3.x
Page 13 of 14
Doc Version 2.0 - Aug 5, 2009
Installation Checklist and Troubleshooting Guide for Labs
TECHNICAL SUPPORT Technical Support is available for lab administrators, faculty, staff and students utilizing or working with Pearson products. Phone Support (for instructors only) Live, phone support is available at Toll Free 888‐378‐3486 (888‐ERUDITO). The phones are staffed from Monday ‐ Friday – 8AM‐8PM EST, Sunday 5PM‐12 AM EST. You can leave a message after hours. Chat support (for instructors and students) Contact our chat support at http://247pearsoned.custhelp.com, available Monday‐Thursday, 8:00am‐
11:00pm Eastern, Friday, 8:00am – 8pm Eastern, Sunday, 5:00 pm – 12:00am Eastern Web Support For additional support, visit www.myspanishlab.com, www.myfrenchlab, or www.myitalianlab and then click Support > Instructor or Support > Student. From there, select “Search FAQs in our Online Knowledgebase” and “contact Customer Technical Support.”. Pegasus Version 3.x
Page 14 of 14
Doc Version 2.0 - Aug 5, 2009