1
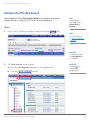
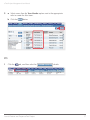
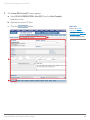
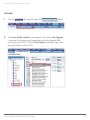
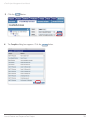
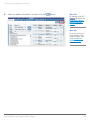
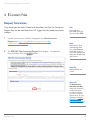
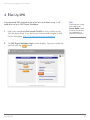
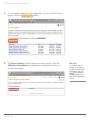
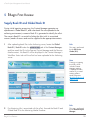
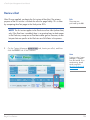
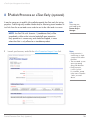
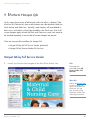
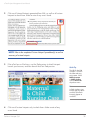
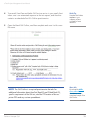
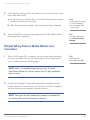
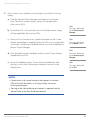
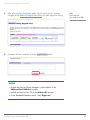
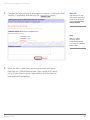
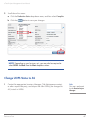
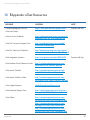
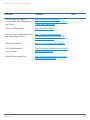
eText PROJECT MANAGEMENT USER MANUAL
Table of Contents
Overview3
1 Launch Parent Product and eText Project
Launch Parent Product
4
4
Launch eText Project
4
Maintain the PCS eText Record
6
Initiate Project with Vendor
13
2 Convert Files
Request Conversion
14
14
15
eText XML Creation, File Upload, and Ingestion
3 Prepare for Custom Linking
Populate Custom Spreadsheets
4 Set Up SMS
16
16
19
5 Begin First Review
Supply Book ID and Global Book ID
22
22
23
Review eText
6 Begin First Corrections
26
7 Ingest Custom Hotspot Spreadsheet for Custom Linking
27
Last Updated: January 2, 2013
8 Publish/Promote an eText Early (optional)
28
9 Perform Hotspot QA
Hotspot QA by Full Service Vendor
30
30
Hotspot QA by Pearson Media QA Services
32
10 Correct Errors from Hotspot QA
Hotspot QA by Full Service Vendor: Corrections
35
35
37
Hotspot QA by Pearson Media QA Services: Corrections
11 Begin Final Review
41
12 Begin Final Corrections
42
13 Release eText
Publish/Promote eText
44
44
Update PCS Record
46
Change UOPS Status to AS
47
14 Close eText Project
48
15 Appendix: eText Resources
49
eText Project Management User Manual
Overview
BACKGROUND
Pearson offers several types of eBooks, all of which effectively convey the
content of a printed book. eBooks are created for platforms and resellers
like CourseSmart, Amazon Kindle, Barnes & Noble NookStudy, etc.
Some eBooks are offered in a reflowable format, such as ePub (electronic
Publication), which can be read on Amazon’s Kindle device. Other eBook
formats maintain fidelity to the original printed page; this category of eBook
includes CourseSmart, uPDF (Universal PDF), and the Pearson eText platform.
More Info
To learn more about
the eText, refer to the
eText Interface Quick
Reference Guide,
and the eText videos:
Introduction to eText,
eText Search Feature,
eText Whiteboard View.
The eText is a Web-based platform developed and owned by Pearson.
In addition to displaying a visual representation of the book pages,
the eText format allows us to provide some custom navigation options,
and give users the ability to highlight and take notes on the content.
In addition, there is an instructor view that allows instructors to make
notes and share them with their students. The eText also offers multiple
integration scenarios for final delivery. As such, it is a platform that is
constantly evolving to produce efficiencies within Pearson and meet our
customers’ needs.
PURPOSE
The eText Project Management User Manual is intended to be used for
eText titles that are NOT part of the Integrated Workflow. It walks you
through the production procedures for an eText title from beginning to end.
RESULT
An eText title is published through one or more integration scenarios.
CONDITION
Vendor training for eText ingestion processing and use of the eText
applications, such as the Content Manager and the eText Authoring
environment, are not covered/supported by this manual and should
occur prior to the processes detailed in this manual.
Overview
3
eText Project Management User Manual
1 Launch Parent Product and eText Project
Launch Parent Product
During the parent product launch meeting, the acquisitions editor confirms all
required eBook formats. This meeting is the first opportunity to discuss any
specific plans for the eText.
Launch eText Project
The goal of the eText launch is to gather essential information about how
the eText will be linked to/from its associated courses/websites (e.g.,
MyLabs), when the eText needs to go live, and what types of custom hotspots
(i.e., media links) or custom baskets are desired. This information is then
recorded on the eText Launch Checklist.
1
Role
These steps are
performed by the
Pearson Project
Manager.
Launch the eText by holding a virtual launch via email or a live meeting.
NOTES
• The eText launch should happen at least two months in advance
of main text files to printer. The amount of lead time for the eText
launch will depend on business unit protocols and the needs of
the particular project.
• Roles to include in the eText Launch might be: the Full Service
Vendor (FSV) Project Manager; the Pearson Project Manager; and
Media contact(s) within Pearson (such as team members from Media
Production, Media Editorial, and/or the Mastering group).
• Although it is feasible to create a demo or sample eText using
a subset of book chapters, this can only be done using the PDF
workflow. If the full, final eText is created using the XML workflow,
it must be produced from scratch; the demo eText cannot be
repurposed.
Launch Product and Prepare eText Project
4
Launch
eText Project eText
Management
UserChecklist
Manual
1
Likely Contact
Which Integration Scenarios are required?
Editorial
Scenario 1: (Simple URL Linking/Stand-Alone)
Scenario 2: (Advanced URL Linking) Deprecated
2
Scenariogleaned
3: (Integrationfrom
API)
With information
the eText launch, complete the eText
Scenario 4: (Disaggregated)
LauncheText
Checklist.
The checklist is a PDF form that contains check boxes
Launch
Checklist
Scenario
5: (Self-Study)
and text boxes.
Scenario 6: (Disaggregated with Private Personalization)
Scenario 8: (Stand-Alone eText – No Parent LMS Platform)
More Info
Refer to the eText
Launch Checklist Guide
for information about
completing the checklist.
9: (Stand-Alone
eText Integration via TPI)
eTextScenario
Launch
Checklist
Scenario 10: (Disaggregated eText Integration via TPI)
1
Likely Contact
Scenario
11: (Disaggregated
Access)
Which
Integration
Scenarios are required?
Scenario
12:
(Simple
URL
Linking/Stand-Alone)
Scenario 1: (Simple URL Linking/Stand-Alone)
Editorial
Scenario
(iPad/Android)
Scenario 14:
2: (Advanced
URL Linking) Deprecated
Scenario 3: (Integration API)
Yes (default)
No
2
DoesScenario
there need
to be an iPad version?
4: (Disaggregated)
3
Is theScenario
eText associated
with a premium
coursePersonalization)
(such as MyLab
6: (Disaggregated
with Private
Yes
No
or Mastering)?
Scenario 8: (Stand-Alone eText – No Parent LMS Platform)
a Is a custom “No Access” or “Online Purchase” page needed?
Scenario 9: (Stand-Alone eText Integration via TPI)
Yes
No
Scenario 10: (Disaggregated eText Integration via TPI)
Editorial
Scenario 5: (Self-Study)
4
Scenario 11: (Disaggregated Access)
From what platform(s) will users be accessing the eText?
Scenario 12: (Simple URL Linking/Stand-Alone)
Editorial
Editorial/Media
Production
Media Production
Scenario 14: (iPad/Android)
2
Does there need to be an iPad version?
No
Editorial
5
What is the requested instock date?
Editorial
3
Is the eText associated with a premium course (such as MyLab
Yes
No
or Mastering)?
Editorial
a
Is a custom “No Access” or “Online Purchase” page needed?
Yes
4
3
Yes (default)
No
From what platform(s) will users be accessing the eText?
1
Editorial/Media
Production
Media Production
Click the
button to save the completed eText Launch Checklist to your
computer in PDF format.
5
What is the requested instock date?
Editorial
1
Launch Product and Prepare eText Project
5
eText Project Management User Manual
Maintain the PCS eText Record
Upon completion of the eText Launch Checklist, you perform several tasks
related, directly or indirectly, to PCS eText record maintenance.
Team
1
Log in to PCS, locate your program, and then click the
tab.
Role
These steps are
performed by the
Pearson Project
Manager.
Note
To log in to PCS, go
to: http://pcs.pearson.
com/pims.
Quick Tip
To access a program,
click My Programs or
run a search.
2
The Team Structure screen displays.
Quick Tip
a Click the eText Upgrade component in the program tree.
Click the
icon
to expand the
program tree.
b Click the
sub-tab.
b
a
Launch Product and Prepare eText Project
6
eText Project Management User Manual
3aSelect names from the Team Member options next to the appropriate
roles to create the eText team.
b Click the
button.
b
a
PO
1
Click the
tab, and then select the
Launch Product and Prepare eText Project
sub-tab.
7
eText Project Management User Manual
2
The Create/Edit Custom PO screen appears.
a Select PE-US HE PRODUCTION: eText (FSV) from the Select Template
drop-down menu.
b Populate the custom PO form.
c Click the
button.
More Info
a
Refer to the PE-NA
Prepress Module #9
available on the Pearson
Knowledge Base for
eText pricing guidelines.
b
c
Launch Product and Prepare eText Project
8
eText Project Management User Manual
Schedule
1
Click the
tab, and then select the
2
The Create/Modify Schedule screen appears. Ensure that eText Upgrade
is selected in the program tree (nomenclature for eText upgrade ISBN
varies by business unit). Click the Select Template drop-down menu, and
then select Pearson eText (USHE).
Launch Product and Prepare eText Project
sub-tab.
9
eText Project Management User Manual
3 Click the
4
button.
The Template dialog box appears. Click the
Launch Product and Prepare eText Project
button.
10
eText Project Management User Manual
5
Make any additional updates, and then click the
button.
More Info
For training on the PCS
tab refer to the
Create and/or Revise
Editorial Production
Schedule job aid.
More Info
To see an overview of
eText milestones and
turnaround times, refer
to the eText process/
schedule overview
document on Neo.
Launch Product and Prepare eText Project
11
eText Project Management User Manual
Budget
1
Click the
tab, and then select the
sub-tab.
2
The Create/Modify Budget screen appears. Ensure that eText Upgrade is
selected in the program tree. Enter the estimated eText budget, and then
click the
button.
Quick Tip
Enter the estimated
budget based on the
FSV’s purchase order,
plus any additional costs
not applicable to the
FSV, such as EMM time.
More Info
For training on the PCS
tab refer to the
Create and/or Revise
Detailed Budget per
Program Component
job aid.
3
Check with the Full Service Vendor (FSV) to confirm that s/he has access
to PCS for the purposes of updating the
tab.
NOTE If the FSV does not have access to PCS, submit a TPS request.
If the FSV does not have a V42 account, s/he will first need to be
onboarded. Refer to the Pearson Systems & Application Access flowchart
for more information.
Launch Product and Prepare eText Project
12
eText Project Management User Manual
Initiate Project with Vendor
After updating the eText Upgrade record in PCS, initiate the eText project
with the Full Service Vendor.
1
2
Within your email client, create a new mail message to the FSV and
attach the PO and the completed eText Launch Checklist. Also include the
contact information for all members of the Pearson project team.
Role
Examine the contents of the Project Initiation email and determine the
eText workflow.
Role
This step is performed
by the Pearson Project
Manager.
These steps are
performed by the FSV.
NOTE Most titles are composed with XML tagging and therefore
will follow the XML workflow. If no XML exists, the eText will follow
the PDF-only workflow.
3
Draft a production schedule and email it to the Pearson Project Manager.
4
Review the production schedule and either approve or provide revision
instructions via email.
Role
Once the production schedule is approved, contact all eText project team
members via email to inform them that the project is underway.
Role
5
NOTE This communication should ideally include the Pearson
project manager, FSV project manager, Media contact(s), and the
acquisitions editor.
Launch Product and Prepare eText Project
This step is performed
by the Pearson Project
Manager.
This step is performed
by either the Pearson
Project Manager or
the FSV, depending on
business protocols.
13
eText Project Management User Manual
2 Convert Files
Request Conversion
Once the project has been initiated with the vendor, the eText File Conversion
Request form can be submitted which will trigger the eText production process
to begin.
1
2
Launch your browser, and then navigate to the eText Conversion
Request form: http://etextdb.pearsoncmg.com/etextdb/
eTextConversionRequestHE.
The HED/INTL eText Conversion Request form displays. Complete the
form, and then click the
button.
Role
These steps are
performed by the full
service vendors (FSV).
Note
Data from this form
automatically feeds
into a CMS database,
which allows CMS to
track each eText project
that enters the authoring
environment.
Quick Tip
Required fields are
in red.
More Info
The Request eText
Conversion Job Aid is
coming soon and will
contain instructions
on how to complete
the eText Conversion
Request form. For now,
download a Sample
eText Conversion
Automated Response to
view a completed form.
Convert Files
14
eText Project Management User Manual
3
A confirmation email, containing the online eText conversion request,
arrives in your email client inbox.
NOTE Confirmation emails are sent to all valid email addresses
included in the Conversion request form address fields. If you do not
receive an email within 30 minutes of submitting a conversion request,
contact [email protected]. Do not submit another form
as this may create a duplicate record in the eText Production Database.
eText XML Creation, File Upload, and Ingestion
Upon completion of the eText File Conversion Request form, you can begin the
process of generating the XML, uploading all the required files to the Content
Manager FTP server, and ingesting these files using the Content Manager.
Role
These steps are
performed by the FSV.
NOTE See the eText Production Manual for a detailed outline of these
steps. If you need training in this process, please email a request to
[email protected].
Convert Files
15
eText Project Management User Manual
3 Prepare for Custom Linking
Populate Custom Spreadsheets
Any hotspots that are not automatically generated through ingestion of XML
must be specified on a custom hotspot spreadsheet. The spreadsheet contains
information for each individual link you want added to the eText. When XML
is used, this can be a fairly small list of additions, because the XML provides
the majority of the links automatically. When there is no XML, the spreadsheets
can be lengthy, depending on how many and what types of links you want
to add. Ultimately, using XML output whenever possible is the most efficient
approach to the linking stage.
NOTES Completion of the custom spreadsheets can be time-consuming
and labor-intensive; therefore two workflows exist for handling this task.
The eText Launch Checklist indicates which workflow to follow:
Quick Tip
A hotspot is a clickable
area on the page
(either over a word,
image, or media icon),
that links to a variety
of content, such as:
a glossary definition,
cross-reference on
another eText page,
static image, audio file,
document, other media
asset, or non-Pearson
website.
• FSV Workflow: The FSV populates the spreadsheet, using a media
correlation grid provided by the Pearson Media contact.
• Pearson Media Workflow: The Pearson Media contact populates
the custom spreadsheet.
Ingest XML and Prepare for Custom Linking
16
eText Project Management User Manual
FSV Workflow
1
Provide a media correlation grid to the FSV.
NOTE The media correlation grid must contain the following: location
of each custom hotspot in the book; location of media icon the hotspot
should link to (if applicable); valid URLs; and indicate if the hotspot should
appear in the iPad view (if applicable).
2
Provide all custom media icons (if applicable) in the correct format
to the FSV.
Role
These steps are
performed by the
Pearson Media contact.
More Info
Refer to the eText Art
Asset Guidelines for
more details.
NOTE Media icons must be in SWF format for the Flash view (online
eText), and in PNG format for the iPad view.
3
Using the materials provided by the Pearson Media contact, populate the
custom hotspot spreadsheet.
Role
These steps are
performed by the FSV.
NOTES Refer to the following templates and guidelines to help you start
and complete the custom spreadsheet:
• Guidelines for Preparing the Custom Hotspots Spreadsheet (These
instructions explain the format of the spreadsheet and what values
should be entered in each column for each link.)
• Blank Spreadsheet Template (This is the blank template that you must
populate using information from Pearson Media.)
• Sample Custom Hotspot Spreadsheet (This is an example of a
completed custom hotspot spreadsheet.)
Ingest XML and Prepare for Custom Linking
17
eText Project Management User Manual
4
Upload the completed Custom hotspot spreadsheet to the Content Manager
FTP Server.
Pearson Media Workflow
1
Populate the custom hotspot spreadsheet, according to established
specifications.
Role
These steps are
performed by the
Pearson Media contact.
NOTES Refer to the following templates and guidelines to help you start
and complete the custom spreadsheet:
• Guidelines for Preparing the Custom Hotspots Spreadsheet (These
instructions explain the format of the spreadsheet and what values
should be entered in each column for each link.)
• Blank Spreadsheet Template (This is the blank template that you must
populate, according to established specifications.)
• Sample Custom Hotspot Spreadsheet (This is an example of a
completed custom hotspot spreadsheet.)
2
Provide the completed hotspot spreadsheet to the FSV.
3
Upload the completed custom hotspot spreadsheet to the Content Manager
FTP Server.
Ingest XML and Prepare for Custom Linking
Role
This step is performed
by the FSV.
18
eText Project Management User Manual
4 Set Up SMS
If any back-end SMS required for the eText has not yet been set up, it will
need to be set up in SMS Project Workplace.
1
Refer to the completed eText Launch Checklist to verify whether or not
SMS has been set up. If not, launch your browser and navigate to SMS
Project Workplace: https://sms.pearsoncmg.com/workplace/.
2
The SMS Project Workplace Log In screen displays. Type your credentials,
and then click the
button.
Set Up SMS
Role
These steps are usually
performed by the
Pearson Media contact,
however, the role may
vary depending on
business unit protocol.
19
eText Project Management User Manual
3
Depending on your access, you may be able to select from several
different departments. Navigate to your department, and then select it.
Set Up SMS
Quick Tip
Click the
icon to
expand the departments.
20
eText Project Management User Manual
4
A list of projects displays for your department. To set up SMS for a new
project, click the
button.
5
The Project Summary screen displays for the new project. Click the
Add Project Information link to add project information, and then set
up SMS accordingly.
Set Up SMS
More Info
For detailed steps on
setting up subscription
products in SMS Project
Workplace, click the
link located in
the upper right of any
SMS Project Workplace
screen.
21
eText Project Management User Manual
5 Begin First Review
Supply Book ID and Global Book ID
During initial ingestion processing, the Content Manager generates an
alphanumeric Global Book ID, and when book files are uploaded to the
authoring environment, a numeric Book ID is generated to identify the eText.
The numeric Book ID is essential to linking the eText with its associated
courses/modes of access and must be supplied to the appropriate contacts.
1
After uploading book files to the Authoring server, locate the Global
Book ID / Book ID under the
tab of the Content Manager,
and then email the IDs to the Pearson Project Manager and the Pearson
Media contact. No Book ID will be displayed in the Content Manager’s
Workflow Status tab until the eText has been uploaded to the Authoring
server.
Role
This step is performed
by the Full Service
Vendor (FSV).
Note
Training on ingesting
book files, which
includes Content
Manager training,
is separate from this
manual. If you need
training, please
email a request to
eBookPlusProduction@
pearson.com.
Role
2
If a Mastering title is associated with the eText, forward the Book ID and
Global Book ID to the Mastering Media Producer.
Begin First Review
This step is performed
by the Pearson Project
Manager.
22
eText Project Management User Manual
Review eText
After IDs are supplied, you begin the first review of the eText. The primary
purpose of the first review is to check the eText for page fidelity. This is done
by comparing the eText pages to the final printer PDFs.
Role
These steps are
performed by the FSV.
NOTE The first review applies to the Flash view of an eText (online eText)
only. If the iPad view is enabled, there is no practical way to check pages
in the iPad view, except on an iPad device after go-live. However, custom
hotspots that are specific to the iPad view are QA’d later in the process.
1
On the Content Manager
click the PROD1 link in the S column.
tab, locate your eText, and then
Note
Training on the Content
Manager, is separate
from this manual. If you
need training, please
email a request to
eBookPlusProduction@
pearson.com.
Begin First Review
23
eText Project Management User Manual
2
The Pearson eText login screen opens in a new browser window. Enter
your login name and password, and then click the
button.
3
A preview (Flash view) of the eText displays in the browser.
Begin First Review
24
eText Project Management User Manual
4
5
Open the final printer PDFs. With both the eText viewer and the printer
PDFs open, navigate to the table of contents in the PDFs, and compare
the contents to the eText Table of Contents basket in the left navigation
pane. Check that the TOC titles, levels, and order match.
Note
Final printer PDFs should
include any corrections
that were made on
press.
Compare page fidelity of the eText first and last chapter to the
corresponding PDFs. Check the following:
a Pagination (page numbering, order, missing, blank).
b Verso/recto (left/right) pagination is correct.
c Page ingestion success (images, artwork, special characters).
6
Review the entire eText to verify that non-permissioned items have been
masked out with the text, Item not available in eText.
7
Review the entire eText for the presence of cross-references, key terms,
and any other hotspots generated from XML.
NOTE The hotspot review at this point is only to check that hotspots
generated from XML are present. This is not a check of individual
hotspot accuracy.
Begin First Review
25
eText Project Management User Manual
6 Begin First Corrections
If any errors are found during the first review, corrections must be made as
necessary. Typical errors found at this stage include art rendering anomalies,
incorrect recto-verso orientation, missing or blank pages, and missing hotspots
due to problematic XML. Some of these types of errors (especially rendering
errors) are often caused by faulty PDF construction.
1
Role
These steps are
performed by the Full
Service Vendor (FSV).
Correct all errors found during first review.
NOTE Depending on the error, you may need to manipulate the
application files to generate new PDFs. Training on this process
and reingesting files is not covered in this manual. Please refer to
the eText Production Manual.
2
Once all errors are resolved, notify the Pearson Project Manager that the
eText title is ready to proceed to the next stage.
Begin First Corrections
26
eText Project Management User Manual
7 Ingest Custom Hotspot Spreadsheet
for Custom Linking
At this stage, the custom hotspot spreadsheet is ingested into the eText
authoring environment for more efficient placement of custom hotspots.
1
Role
This step is performed
by the Full Service
Vendor (FSV).
Ingest the custom hotspot spreadsheet.
Quick Tip
NOTE Training on the eText ingestion process is not covered in
this manual. See the eText Production Manual for a detailed outline of
these steps.
Ingest Custom Hotspot Spreadsheet for Custom Linking
Skip this step if your
eText will not have
custom hotspots.
27
eText Project Management User Manual
8 Publish/Promote an eText Early (optional)
It may be necessary to publish (also called promote) the eText early for testing
purposes. Publishing early enables Media and/or Mastering team members to
test links from the associated course websites out to the eText and vice versa.
Role
These steps are
performed by the
Pearson Project
Manager.
NOTE An eText Title with Scenario 1 (standalone eText) will be
immediately visible on the instructor bookshelf upon promotion.
Early promotion is unnecessary, and should be skipped, in cases
where the eText is only offered as a standalone product.
1
Launch your browser, and click the eText Promotion Request Form link.
Notes
•Early
promotion is
unnecessary to check
content or links within
the eText.
•The
associated courses
are not promoted
along with the eText.
•Early
promotion
is not a “go-live”
for customers, except
in the case of Scenario
1 titles, as noted
above.
Publish/Promote eText Early (optional)
28
eText Project Management User Manual
2
Complete the form and specify all integration scenarios except the iPad
scenario, if applicable, then click the
button.
More Info
SMS Module IDs and
other details required in
the form can be found
in the completed eText
Launch Checklist.
Notes
•Be
sure to include
all email addresses
of team members
who will need to
perform testing, in
the Additional Email
Addresses text boxes.
•Upon
submitting
the form, data is
automatically passed
on to Pearson’s
Website Release team.
NOTE Do not specify the iPad scenario on the form because,
if Mastering or MyLab courses are live and in use by customers,
those customers will see the eText on their iPad bookshelf before
eText production is complete.
3
Within three business days, you and other team members specified in the
form will receive an email notification from Website Release that the eText
has been published.
Publish/Promote eText Early (optional)
29
eText Project Management User Manual
9 Perform Hotspot QA
At this stage, the accuracy of all hotspots within the eText is checked. If the
eText has an iPad version, then custom hotspots must be checked in both the
Flash (online) and iPad views. Typically, some hotspots will be available in
both views, while others will only be available in the Flash view. Even if all
custom hotspots apply to both the Flash and iPad views, each view needs to
be checked separately to ensure that all custom hotspots are present.
There are two possible workflows for hotspot QA:
• Hotspot QA by the Full Service Vendor (preferred)
• Hotspot QA by Pearson Media QA Services.
Hotspot QA by Full Service Vendor
1
Launch your browser and navigate to the eText Flash (online) view.
Role
These steps are
performed by the Full
Service Vendor (FSV)
QA Team.
More Info
Refer to the Review eText
section for details on
how to access the eText
Flash view. You can
also access the eText
Flash view via the eText
authoring environment.
Perform Hotspot QA
30
eText Project Management User Manual
2
Click on all internal hotspots generated from XML, as well as all custom
hotspots to check them. Make a note of any errors found.
NOTE Refer to the completed Custom Hotspot Spreadsheet(s) to confirm
accuracy of custom hotspots.
3
If the eText has an iPad view, use the iPad preview to check hotspots.
Launch your browser, and then launch the eText iPad preview.
Quick Tip
The URL for the iPad
simulator is found in
the eText authoring
environment. Select
Mobile Instructor
or Mobile Student
from the Review As
drop-down menu.
Note
In iPad simulator view,
hotspots that should be
turned off (like Flash
hotspots) appear as
turned off.
4
Click on all custom hotspots only to check them. Make a note of any
errors found.
Perform Hotspot QA
31
eText Project Management User Manual
Hotspot QA by Pearson Media QA Services
If the FSV is unable or not approved to perform QA, then Pearson Media QA
Services performs hotspot QA. However, the FSV initiates this workflow.
1
2
Launch your browser, and navigate to Pearson’s Website Testing
Request Form.
Complete the form, and then click the
Role
These steps are
performed by the Full
Service Vender (FSV).
button.
NOTES
• Include the Pearson Project Manager’s email address in the
Additional Email Addresses text box.
• Include the eText review URL in the Website URL text box.
• At the Test Level drop-down menu, select Functional.
Perform Hotspot QA
32
eText Project Management User Manual
4
5
Two emails from Pearson Media QA Services arrive in your email client
inbox: one is an automated response to the test request, and the other
contains an attached eText QA Outline questionnaire.
Quick Tip
Save the QA Outline
template to your
computer to have
on hand for future
reference.
Open the blank QA Outline, and then complete and save it with a new
file name.
NOTE The QA Outline is a required questionnaire that asks for
additional information about the eText (Book ID and Global Book ID),
specific requirements of the QA test, and the FTP location of low-res
printer PDFs and any custom spreadsheets.
Perform Hotspot QA
More Info
Download the Ball5e_
eText_outline.doc
document to view a
completed sample eText
QA Outline.
33
eText Project Management User Manual
6
Reply to the automated email from Pearson Media QA Services and
attach the completed eText QA Outline.
7
Upon receipt of the completed QA Outline, Pearson Media QA Services
manages the hotspot QA as per the eText testplan, and any additional
testing requirements provided in the outline.
Perform Hotspot QA
Note
The eText testplan is
an established plan
for standardized QA
testing of eText titles.
You do not need to
reference the plan.
34
eText Project Management User Manual
10 Correct Errors from Hotspot QA
When initial Hotspot QA testing is complete, any errors found are corrected
by the FSV. If needed, revisions are provided by the Media contact and
communicated by the Pearson Project Manager. The eText is then submitted
for regression testing.
Note
Follow the same
workflow that
was chosen in
9 Perform Hotspot QA.
Hotspot QA by Full Service Vendor: Corrections
1
When review of errors found during initial QA testing is complete, notify
Pearson Project Manager, and provide a list of content errors (i.e., errors
with custom hotspots), along with the applicable eText review URLs.
Role
These steps are
performed by the
FSV.
NOTE Content errors with custom hotspots usually pertain to
incorrect URLs for the link destination or missing/unclear instructions
for hotspot placement.
Correct Errors from Hotspot QA
35
eText Project Management User Manual
2
If content errors with custom hotspots were found during the initial
QA review:
Role
a Give the FSV’s list of content errors to the Media contact, along
with the applicable eText review URL(s).
This step is performed
by the Pearson Project
Manager.
b Review the list of content errors, update information on the
Custom Hotspot Spreadsheet as needed (replace link URLs
or update instructions for link placement), and then provide feedback
and/or a revised spreadsheet to the Pearson Project Manager.
Role
c Provide the Media contact’s feedback and/or revised Custom
Hotspot Spreadsheet to the FSV.
d Review the feedback and/or revised Custom Hotspot Spreadsheet,
and then log in to the eText Authoring environment to correct
custom hotspot errors.
This step is performed
by the Media contact.
Role
This step is performed
by the Pearson Project
Manager.
Role
This step is performed
by the FSV.
NOTE Training on the eText authoring environment is separate from
this manual. Refer to the eText Production Manual.
3
4
If general hotspot errors unrelated to content were found, launch your
browser, and then navigate to the eText Authoring environment to correct
the errors.
Role
These steps are
performed by the Full
Service Vendor (FSV).
After all corrections are made, initiate QA regression testing with your
internal QA team to confirm that all errors found during the initial QA
test have been fixed.
Correct Errors from Hotspot QA
36
eText Project Management User Manual
5
If QA regression testing shows that some errors are still not fixed, or new
errors have been found:
a Review the errors, and then log in to the eText Authoring environment
to make the necessary corrections.
b After all corrections are made, notify the Pearson Project Manager.
6
When all final QA corrections are implemented, tell the Media contact
that hotspot QA is complete.
Note
Further regression testing
to confirm remaining
errors have been fixed
is unnecessary.
Role
This step is performed
by the Pearson Project
Manager.
Hotspot QA by Pearson Media QA Services:
Corrections
1
When initial hotspot QA is complete, you receive an email notification
from Pearson Media QA Services containing a link to the Bug Report.
Log in to Mantis to access the Bug Report.
Role
These steps are
performed by the FSV.
NOTE Mantis is a web-based bug tracking system. The email
from Pearson Media QA Services contains the URL, login credentials,
and instructions.
2
Review the Bug Report. If general hotspot errors unrelated to custom
hotspot content were found, launch your browser, and then navigate to
the eText Authoring environment to correct the errors.
NOTE Training on the eText authoring environment is separate from
this manual. Refer to the eText Production Manual.
Correct Errors from Hotspot QA
37
eText Project Management User Manual
3
If any content errors related to custom hotspots were found in the Bug
Report:
a Email the Pearson Project Manager, and attach a list of content
errors found with custom hotspots, along with the applicable
eText review URL(s).
b Forward the FSV’s list of content errors to the Media contact, along
with the applicable eText review URL(s).
c Review the list of content errors, update information on the Custom
Hotspot Spreadsheet as needed (replace link URLs or revise placement
instructions), and then give feedback and/or a revised spreadsheet to
Pearson Project Manager.
Role
This step is performed
by the Pearson Project
Manager.
Role
This step is performed
by the Media contact.
Role
d Give the Media contact’s feedback and/or revised Custom Hotspot
Spreadsheet to the FSV.
e Review the feedback and/or Custom Hotspot Spreadsheet, and
then log in to the eText Authoring environment to correct custom
hotspot errors.
This step is performed
by the Pearson Project
Manager.
Role
This step is performed
by the FSV.
NOTES
• Content errors with custom hotspots usually pertain to incorrect
URLs for the link destination, or missing/unclear instructions
for hotspot placement.
• Training on the eText authoring environment is separate from this
manual. Refer to the eText Production Manual.
Correct Errors from Hotspot QA
38
eText Project Management User Manual
4
5
After all corrections have been made, launch your browser, and then
navigate to the Website Testing Request Form to initiate regression testing.
Complete the form, and then click the
Role
These steps are
performed by the FSV.
button.
NOTES
• Include the Pearson Project Manager’s email address in the
Additional Email Addresses text box.
• Include the eText review URL in the Website URL text box.
• At the Test Level drop-down menu, select Regression.
Correct Errors from Hotspot QA
39
eText Project Management User Manual
7
An automatic email confirmation from Pearson Media QA Services
arrives in your inbox.
8
When regression testing is complete, you will receive an automatic email
notification from Pearson Media QA Services. If QA regression testing
shows that some errors are still not fixed, or new errors are found:
a Access the Bug Report in Mantis.
Note
b Review the errors, and then log in to the eText Authoring
environment to make the necessary corrections.
Further regression
testing to confirm that
remaining errors are
fixed is unnecessary.
c After all corrections have been made, notify the Pearson
Project Manager.
9
When all final QA corrections have been implemented, tell the Media
contact that the hotspot QA is complete.
Correct Errors from Hotspot QA
Role
This step is performed
by the Pearson Project
Manager.
40
eText Project Management User Manual
11 Begin Final Review
After correcting the initial Hotspot QA errors and implementing regression
testing, the Full Service Vendor confirms the accuracy of all custom hotspots
that contained errors.
1
Launch your browser, and navigate to the eText review URL.
Role
These steps are
performed by the FSV.
2
With the eText preview open, refer to the Revised Custom Hotspot
spreadsheet. Confirm that all custom hotspot errors found during the
Hotspot QA have been corrected. As applicable, for each hotspot that
contained an error, confirm that the custom hotspot:
a media icon is accurate.
b is placed in the correct location on the page.
c is functioning correctly.
3
If the eText has an iPad view that contained corrections to custom
hotspots, repeat step 2 using the iPad preview.
4
Record any additional errors found.
Begin Final Review
41
eText Project Management User Manual
12 Begin Final Corrections
If Final Review yields additional content errors, they must be corrected
and approved.
1
If errors were found during Final Review, either make the corrections
when the errors are obvious. Or if the errors are more involved (for
example, hotspot URLs are incorrect), email the list of errors along with
the applicable eText review URL(s) to the Pearson Project Manager.
Role
This step is performed
by the FSV.
Role
2
Forward the list of errors to the Media contact, along with the eText
review URL(s).
This step is performed
by the Pearson Project
Manager.
3
Review the list of flagged custom hotspots and update information
on the Custom Hotspot spreadsheet, if necessary.
Role
4
Give the revised Custom Hotspot spreadsheet to the Pearson
Project Manager.
5
Forward the revised spreadsheet to the Full Service Vendor.
6
Log in to the eText Authoring environment and make final corrections,
as per the revised spreadsheet.
These steps are
performed by the Media
contact.
Role
This step is performed
by the Pearson Project
Manager.
Role
These steps are
performed by the FSV.
NOTES
• This correction process continues until all errors are addressed.
• When all errors are corrected, the eText is considered final.
Begin Final Corrections
42
eText Project Management User Manual
7
When all errors are corrected, notifiy the Pearson Project Manager that
the eText is final.
8
Notifiy the Media contact that the eText is final.
Role
This step is performed
by the Project Manager.
Begin Final Corrections
43
eText Project Management User Manual
13 Release eText
When the eText is considered final, it is published (or republished in the case
of early promotion) with all required integration scenarios (including the iPad
scenario, if applicable). Its record is then updated in PCS and HEPM.
Publish/Promote eText
1
Launch your browser, and then click the eText Promotion Request Form link.
Role
These steps are
performed by the
Pearson Project
Manager.
Release eText
44
eText Project Management User Manual
2
Complete the form and specify all integration scenarios including the iPad
scenario, if applicable, and then click the
button.
More Info
SMS Module IDs and
other details required in
the form can be found
in the completed eText
Launch Checklist.
Note
After you submit
the form, data is
automatically passed
on to Pearson’s Website
Release team.
3
When the eText is published, you receive an email notification
from Pearson’s Website Release team. Upon receipt of this email,
notify all other Pearson project team members that the eText has
been published/republished.
Release eText
45
eText Project Management User Manual
Update PCS Record
1
Log in to PCS, locate your program, and then click the
tab.
Role
These steps are
performed by the
Pearson Project
Manager.
Note
To log in to PCS, go
to: http://pcs.pearson.
com/pims.
Quick Tip
To access a program,
click My Programs or
run a search.
2
Expand the program tree, and then click the eText Upgrade component.
Quick Tip
Click the
icon
to expand the
program tree.
Release eText
46
eText Project Management User Manual
3
Scroll down the screen.
a Click the Production Status drop-down menu, and then select Complete.
b Click the
button to save your changes.
a
b
NOTE Depending on your business unit, you may also be required to
select GOLD - In Stock from the Alert drop-down menu.
Change UOPS Status to AS
1
Contact the appropriate Inventory Manager, Title Maintenance contact,
or other responsible party, and request the eText ISBN(s) be changed to
AS/instock in HEPM.
Release eText
Role
This step is performed
by the Pearson Project
Manager.
47
eText Project Management User Manual
14 Close eText Project
The final step of the eText production process is to submit all eText files to be
archived in Documentum.
1
2
Provide updated, final versions of all custom spreadsheets,
along with source files for any original custom media icon artwork,
to the Pearson Project Manager.
Role
Submit all files, provided by the Full Service Vendor, to be archived
in Documentum under the eText Upgrade ISBN. Refer to the Asset
Management Services website for submission guidelines.
Role
Close eText Project
This step is performed
by the FSV.
This step is performed
by the Pearson Project
Manager.
48
eText Project Management User Manual
15 Appendix: eText Resources
RESOURCE
LOCATION
NOTE
Content Management Services
eText Neo Group
https://neo.pearson.com/groups/etext
Pearson staff only
eText Art Asset Guidelines
http://media.pearsoncmg.com/cmg/intranet/
ebookplus/eText_Art_Asset_guidelines.pdf
eText File Conversion Request Form
http://etextdb.pearsoncmg.com/etextdb/
eTextConversionRequestHE
eText File Submission Guidelines
http://media.pearsoncmg.com/cmg/intranet/
ebookplus/eText_File_Submission_Guidelines.pdf
eText Integration Scenarios
https://neo.pearson.com/docs/DOC-66221
eText Interface Quick Reference Guide
http://contentmanagement.pearson.com/
etext/QRGs/eText_Interface_QRG.pdf
eText Launch Checklist
http://contentmanagement.pearson.com/
etext/QRGs/eText_Launch_Checklist.pdf
eText Launch Checklist Guide
http://contentmanagement.pearson.com/
etext/QRGs/eText_Launch_Checklist_QRG.pdf
eText Support Requests
[email protected]
eText Promotion Request Form
http://wpslive.pearsoncmg.com/cmg_forms_
library/116/29779/7623431.cw/index.html
eText Videos
http://contentmanagement.pearson.com/
training/eText/eText_Video_Introduction.html
Pearson staff only
http://contentmanagement.pearson.com/
training/eText/eText_Video_Search.html
http://contentmanagement.pearson.com/
training/eText/eText_Video_Whiteboard.html
Appendix
49
eText Project Management User Manual
RESOURCE
LOCATION
Pearson Higher Ed: eBook Full
Service Vendor Project Management
Neo Group
https://neo.pearson.com/groups/
pearson-higher-education-ebook-full-servicevendor-project-management
Pearson Knowledge Base
http://kb.pearsoned.com/
Pearson Systems & Application Access
(for onboarding new users)
http://contentmanagement.pearson.
com/documentum/pdf/CMS%20User%20
OnBoarding%202012.pdf
SMS Project Workplace
https://sms.pearsoncmg.com/workplace/
USHE Standard Media
Design Program
http://usheproduction.pearsoned.com/media/
media_design/index.cfm
Website Testing Request Form
http://wpslive.pearsoncmg.com/cmg_forms_
library/0,,1892799-,00.html
Appendix
NOTE
50