1
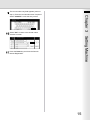
Operating Instructions
(For User Authentication)
Digital Imaging Systems
Model No.
DP-8060 / 8045 / 8035
Before operating this machine, please carefully read this manual completely and keep this manual for future reference.
(Illustration shows optional accessories that may not be installed on your machine.)
English
Operating Instructions
The following Operating Instruction manuals are included with this machine. Please refer to the appropriate manual
and keep all manuals in a safe place for future reference. If you lose a manual, contact an authorized Panasonic
dealer.
Operating Instructions (For Setting Up)
This manual contains essential information for setting
up the machine.
Accessories
Operating Instructions (For Basic Operations)
This manual contains essential information for proper
operation of the machine.
It describes basic Copy, Print, Network Scan,
Facsimile/Internet Fax/Email, and other functions.
Operating Instructions CD
Contains manuals with detailed information for Copy
& Function Parameters, Facsimile/Internet Fax/Email
Functions, and User Authentication.
Document Management System CD
Contains the Application Software, and manuals
with detailed information for the Print function, and
Application software.
Operating Instructions CD
Copy Function
Print Function
Describes how to make a copy with
creative features.
Describes how to print, change default
printer settings, or describes the course
of action to take when a problem
message appears, etc.
Function Parameters
Describes how to change the default
settings of each function using the
Control Panel of the machine.
Facsimile and Internet Fax/Email
Function
(The Facsimile function is available when
optional Fax Communication Board
(DA-FG600) is installed.)
Describes how to send/receive a
Facsimile/Internet Fax/Email, or
describes the course of action to take
when a trouble message appears, etc.
User Authentication
Describes how to enable, and use the
user authentication function.
2
Document Management System CD
Application Software
Describes how to use the application
software.
Ex: Quick Image Navigator, Network
Scanner, Utilities (Network Status
Monitor, Address Book Editor, Device
Configuration Editor)
Conventions
Icons
The following icons are used in this manual.
Icon
ATTENTION
NOTE
Description
Indicated important information that must be read in detail.
Indicates reference Information.
Notation
The following notations are used in this manual.
Notation
For Keys and Buttons
Description
Hard buttons on the Control Panel are depicted as **** key, soft buttons on the Touch
Panel are depicted as "xxx".
3
Table of Contents
Chapter 1
General Description
User Authentication .........................................................................................................................
Job Tracking ....................................................................................................................................
RightFax Server ..............................................................................................................................
Chapter 2
Using Machine
Login Procedure (Using Copy/Fax/Scanner/Printer) .......................................................................
Sending a Document via RightFax ..................................................................................................
Chapter 3
12
14
16
17
18
19
20
21
23
Appendix
Administrator Login .........................................................................................................................
Administrator Name & Password ....................................................................................................
Description of Job Tracking Notice..................................................................................................
4
9
11
Setting Machine
Authentication Setting .....................................................................................................................
Registration of Domain Name .........................................................................................................
ID Timeout Setting...........................................................................................................................
Auto Reset Time Setting .................................................................................................................
Logon Attempts Setting ...................................................................................................................
Lockout Time Setting.......................................................................................................................
Authentication Method Setting ........................................................................................................
Job Tracking Setting........................................................................................................................
RightFax Server Setting ..................................................................................................................
Chapter 4
6
7
8
24
25
26
Memo
5
User Authentication
Chapter 1
The User Authentication is a function to use devices under the management of a Windows server. As a result,
users must be authenticated before they can use the functions of the machine (copying, faxing, scanning, and
printing). *1 The supported authentication protocol is NTLM v2.
Windows Server
- Windows 2000 Server
- Windows Server 2003
or
- Windows NT Server 4.0 & Exchange 5.5 or later
General Description
User ID/Password
Authentication
LAN
Device
Users
Users login to the device using their Windows user account (user ID and password).
System administrator
The system administrator can manage user accounts by using the Windows Server.
User authentication can be set independently for each function (copying, faxing, scanning, and printing). *3
The Job Tracking function allows the system administrator to receive a machine usage log and send/receive log
via Email. *2
The Email to the administrator includes the name of the device user, destination, and communication time,
together with the image of the document that was sent or received.
NOTE
6
NTLM authentication is a user authentication protocol used in the Windows NT family of operating
systems.
NTLM uses a challenge/response method, and the password is encrypted when sending across the
network. In Windows 2000, this protocol can also be used to maintain compatibility between client
and server.
*1. User Authentication for printing function is only available for the function such as the Mailbox print
which involves the Touch Panel operation. PC printing without the Touch Panel Operation is not
authenticated.
*2. User Authentication needs to be activated for either Copy, Fax/Email, Scanner, or Print function
before setting the Job Tracking function.
*3. When the user authentication for fax function is set to valid, Email address is allocated and fixed
automatically.
Job Tracking
Chapter 1
The following logs can be tracked when the Job Tracking function is enabled.
1. Fax Transmission and Reception via General Telephone line (PSTN).
2. Email Transmission and Reception to/from an Internet Fax, or a PC.
Windows
Server
PNAM
System
Administrator
General Description
Login Data
Mail
Server
Tracking Image
Usage Log
LAN
PSTN
Usage Log and Tracking Image
NOTE
(See page 26)
1. When the Job Tracking function is enabled, the following functions are not available.
Manual Reception on Fax function
On-Hook Dialing
Fax Forward
For details, refer to the Operating Instructions (For Facsimile and Internet Fax).
2. If the system administrator cannot receive the Job Tracking Logs, check both Network Settings
and the connection of the LAN cable.
3. Ledger, or A3 sized communication logs may be reduced to a smaller size depending on the
condition of a job.
7
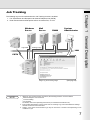
RightFax Server
Chapter 1
By enabling the RightFax Server function, all the faxes will be sent via the RightFax Server. All the fax logs can
be easily be managed by a single server.
When using it with the User Authentication function, it will increase the security by controlling the usage and
identifying the users.
Windows Server
Mail Server
RightFax Server
General Description
G3 Fax
PSTN
Send image data via PSTN
POP receive
content of fax
LAN
Authenticate
Send image data with the Fax Number
Check fax logs
When using User Authentications
The fax document to be sent is passed to the RightFax server via Email.
A user who sends a fax from a device can receive a send confirmation report on the PC from the RightFax
server.
NOTE
8
1. When the RightFax function is enabled, the following functions are not available.
Password Transmission
Deferred Polling
Sub-Address Transmission
LAN Relay Transmission
Polling
Fax Cover Sheet
Direct Transmission
Mailbox
The document(s) is always stored into memory when sending the document(s).
For details, refer to the Operating Instructions (For Facsimile and Copy Functions).
2. Requires RightFax Ver. 8.0 or later.
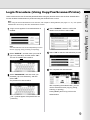
Login Procedure (Using Copy/Fax/Scanner/Printer)
Note:
When using the User Authentication for the first time, refer Chapter 3 Setting Machine (see pages 12 - 23 ). The System
Administrator should set up the User Authentication Function.
A login screen appears if user authentication is
enabled.
Select "DOMAIN", and then confirm the
domain name, and then select "OK".
Select "USER ID", and then enter your user ID
(Up to 40 characters), and then select "OK" .
Select "OK" to start the authentication process.
The user ID is NOT case-sensitive.
This completes the authentication.
Select "PASSWORD", and then enter your
password (Up to 40 characters), and then
select "OK" .
The password is case-sensitive.
After completing the authentication, you can
use the selected function (copying, faxing,
scanning, or printing) .
Press [ Reset ] twice to log out from the
authentication.
The * symbols appear if the password is set
previously.
9
Using Machine
Note:
User authentication can be set independently for each
function (copying, faxing, scanning, and printing).
Chapter 2
Users must enter the user ID and the password before using any devices which have the User Authentication
function enabled. Authentication is performed using the Windows user account.
NOTE
If the authentication fails, one of the following messages may appear.
Chapter 2
Message
Explanation
Using Machine
Authentication Failed
The login failed.
Check your user ID and password.
Check whether the Date and Time is set properly.
Logon attempts exceeded
The system has been locked because the permitted number of
login attempts has been exceeded. Please wait for a period of
time set in the Lockout Time setting. (see page 19)
Connection Failed
Unable to connect to the authentication server. Please contact
the system administrator.
Protocol Error
Unable to connect to the authentication server. Please contact
the system administrator.
Server not Found
Unable to locate the authentication server.
Check whether the DNS Domain Name is set properly
(see page 14).
Check whether the Internet Parameters are set properly.
TCP/IP Address
TCP/IP Subnet Mask
TCP/IP Default Gateway
DNS Server Addresses
Authentication is cancelled if no operation is performed on the machine within a certain period
of time after authentication is completed. The system administrator can specify the ID Timeout
Period. See "ID Timeout Setting" on page 16 for details, " Auto Reset Time Setting " on page 17
for details.
The system administrator can specify whether authentication is required independently for each
function (copying, faxing, scanning, and printing).See "Authentication Setting" on page 12 for
details.
10
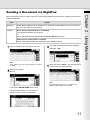
Sending a Document via RightFax
Field
Content
Station Name registered in the Address book. If manual number dialing is used, you can enter
the user name from the control panel.
Sender
When the user authentication is not enabled
Logo and Email Address of this device.
or
Name and Email Address selected with the Sender Selection function.
When the user authentication is enabled
Name of the authenticated user registered with the Windows Server.
Login, and then set document(s) on the ADF.
Note:
If you need to login, see "Login Procedure" on page 9
for details.
Check the recipient's name and the address,
and select " OK ".
When you press "START", the machine scans
the document and starts sending.
Specify the recipient.
Ex: 123
Note:
Password Transmission is not available if the
RightFax Server setting is set to valid.
If you select "ENTER NAME" when using
manual number dialing, you can enter the
recipient's name. (Up to 15 characters)
11
Using Machine
Recipient
Chapter 2
When the RightFax server is used to send a fax, the following details are entered in the recipient (TO) field and
sender (FROM) field.
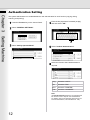
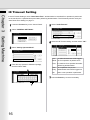
Authentication Setting
Chapter 3
The system administrator can enable/disable the user authentication for each function (copying, faxing,
scanning, and printing).
Press the Function key on the Control Panel.
Enter the Key Operator's Password (8-digit),
and then select "OK" .
Select "GENERAL SETTINGS".
Setting Machine
Select "09 Key Operator Mode".
Select "55 User Authentication".
Select the function where authentication is
required.
Copy
Fax
Printer
Scanner
Time Zone
Copy
Press the "COPY".
Fax
Press the "FAX".
Print
Press the "PRINTER".
Scan
Press the "SCANNER".
Note:
The Sender Selection feature is not enabled if the
fax function is set to require user authentication.
For details, refer to the Operating Instructions (For
Function Parameters, Fax Parameter No. 145).
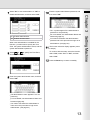
12
Select "On" to use authentication or "Off" to
disable authentication, and then select "OK" .
Enter the system administrator password, and
then select "OK".
Off Disables authentication.
When user authentication is enabled for the
first time, you also need to specify the Time
For more details, see Administrator Name and
Password (page 25).
You need to remember the administrator's
password set in this procedure to login as an
administrator. (see page 24)
Zone, the system administrator's name, and the
system administrator's password.
The function selection display appears (return
to step 6).
Select
or
to specify the Time Zone,
and then select "OK" .
To continue with the setup, select the function,
select "OK", select "On" or "Off", and then
select "OK".
Press the Reset key to return to standby.
Enter the system administrator name, and then
select "OK".
The administrator's name appears if it is set
previously.
For more details, see Administrator Name and
Password (page 25).
You need to remember the administrator's
name set in this procedure to login as an
administrator. (see page 24)
13
Setting Machine
On Enables authentication.
Chapter 3
The * symbols appear if the administrator's
password is set previously.
Registration of Domain Name
Chapter 3
This sets the NetBIOS domain names and DNS domain names to use for user authentication.
Press the Function key on the Control Panel.
Select "61 User Auth. Domain".
Select "GENERAL SETTINGS".
Setting Machine
Select the number ("No. 00" to "No. 09").
Select "09 Key Operator Mode".
You can set up to 10 domain names.
Enter the Key Operator's Password (8-digit ),
and then select "OK" .
Enter the NT domain name (NetBIOS
name), and then select the "OK" . (Up to 15
characters).
Enter the DNS domain name, and then select
the "OK". (Up to 60 characters).
Note:
If your Windows network is configured with Windows
NT Server 4.0 and Exchange Server 5.5, register the
Exchange Server Name (FQDN), or the IP Address
on the Step 8.
14
The next number entry field appears (return to
step 7). Enter the next domain name if required.
Chapter 3
Select "CANCEL" to exit the entry screen.
Select "OK" to return to the domain name
selection's screen.
Setting Machine
Press the Reset key and finish the Domain
Names Registration.
15
ID Timeout Setting
Chapter 3
If the ID Timeout Setting is set to "Auto Reset Time", authentication is cancelled if no operation is performed
on the machine for a specified time period after performing authentication. The ID timeout period is set by the
"Auto Reset Time Setting" on page 17.
Press the Function key on the Control Panel.
Select "58 ID Timeout".
Select "GENERAL SETTINGS".
Setting Machine
Select the ID Timeout setting, and then select "OK".
Select "09 Key Operator Mode".
Enter the Key Operator's Password (8-digit),
and then select "OK" .
Auto An authenticated user will be logged
Reset out if no operation is performed on
Time the machine for a specified time after
performing authentication.
After On completion of a job, the
Every authenticated user will be logged out
Job
when a new operation is performed.
Press the Reset key to return to standby.
16
Auto Reset Time Setting
Press the Function key on the Control Panel.
Chapter 3
This sets the ID timeout period when "Auto Reset Time" is selected for ID Timeout Setting.
Select "01 Auto Reset Time".
Select "GENERAL SETTINGS".
Select "09 Key Operator Mode".
Enter the Key Operator's ID Code (8-digit), and
then select "OK" .
Note:
When the selected "None", regardless of progress
time, the authentication is not cancelled.
Press the Reset key to return to standby.
17
Setting Machine
Select the timeout for canceling authentication,
and then select "OK".
Logon Attempts Setting
Chapter 3
The system is locked if the permitted number of logon attempts is exceeded during the user authentication. This
sets the number of permitted number of logon attempts.
Press the Function key on the Control Panel.
Select "59 Logon Attempts".
Select "GENERAL SETTINGS".
Setting Machine
Select "INPUT" and enter the number of
logon attempts, and then select "OK".
Select "09 Key Operator Mode".
Unlimited logon attempts is allowed if you set "0".
Enter the Key Operator's Password (8-digit),
and then select "OK" .
Press the Reset key to return to standby.
18
Lockout Time Setting
Press the Function key on the Control Panel.
Select "60 Lockout Time".
Select "GENERAL SETTINGS".
Select "09 Key Operator Mode".
Enter the Key Operator's Password (8-digit),
and then select "OK" .
Press the Reset key to return to standby.
19
Setting Machine
Select "INPUT" and enter the lockout time
(1 to 60 minutes), and then select "OK" .
Chapter 3
This sets the time period (minutes) for the system lockout when the permitted number of logon attempts is
exceeded during the user authentication. Wait for the Lockout Time period to lapse before you are permitted to
login to user authentication.
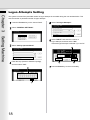
Authentication Method Setting
Chapter 3
This specifies which authentication method to use by the User Authentication function.
Press the Function key on the Control Panel.
Select "56 Authentication Method".
Select "GENERAL SETTINGS".
Setting Machine
Select the authentication method, and then
select "OK" .
Select "09 Key Operator Mode".
Enter the Key Operator's Password (8-digit),
and then select "OK" .
Clear Text
Select Clear Text if the server
does not support NTLM.
NTLM
Authenticate with NTLM.
Press the Reset key to return to standby.
20
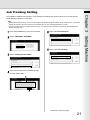
Job Tracking Setting
Note:
Before performing this setup, you first need to register the destination Email address in the address book. Furthermore,
change the setting of the Fax Forward (Fax Parameter No. 54, Fax Forward) parameter to Invalid.
The Job Tracking Setting is enabled when the Copy, Fax / Email, Scan, or Printer is selected on the Authentication
Setting (see page 12).
Press the Function key on the Control Panel.
Select "01 Fax Parameters".
Chapter 3
This enables or disables Job Tracking. If Job Tracking is enabled, also set the type of log to record and the
Email address to which it is to be sent.
Setting Machine
Select "FAX/EMAIL SETTINGS".
Select "131 Job Tracking".
Select "04 Key Operator Mode".
Enter the Key Operator's password (8-digit),
and then select "OK" .
Continued on the next page...
21
Select the Job Tracking function, and then
select "OK" .
Chapter 3
Setting Machine
None
Disables Job Tracking.
Tx
Records sending (Transmit) only.
Rx
Records receiving only.
Tx & Rx
Records sending and receiving.
Select the Email address to which to send the
log, and then select "OK".
Select the printout method for the received
document(s), and then select "OK".
This screen only appears if the Rx or Tx&Rx is
selected on the step 7.
Inc
Only
Prints only if the log was unable to
be sent to the specified destination
on the Step 8.
Always Always prints.
Press the Reset key to return to standby.
22
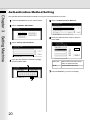
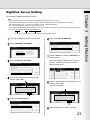
RightFax Server Setting
Note:
Password Transmission is not available if the RightFax Server setting is set to valid.
When the User Authentication function is enabled. See the following sections for details about how to login.
See "Administrator Login" on page 24 for Logging in as the system administrator.
See "Login Procedure" on page 9 for Logging in as a user.
The machine will generate the Email Address in the format as below, and then send the Email to the RightFax Server.
Ex: "Ifax=5551212/name=Jane/"<[email protected]>
Fax Number
Station Name
Chapter 3
This enables or disables the RightFax server.
Email Address of the RightFax Server
Select "132 VIA FAX SERVER".
Select "FAX/EMAIL SETTINGS".
Enable ("VALID") or disable ("INVALID") the
RightFax server.
Select "04 Key Operator Mode".
When you enable the RightFax server for the
first time, you also need to enter the Email
address of the server.
Enter the Key Operator's password (8-digit),
and then select "OK" .
Enter the Email address of the RightFax server,
and then press "OK".
(Up to 60 characters)
Select "01 Fax Parameters".
Press the Reset key to return to standby.
23
Setting Machine
Press the Function key on the Control Panel.
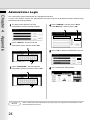
Administrator Login
Chapter 4
This confirms the system administrator who manages the machine.
In case of the network trouble, the administrator can login using the Local Machine domain without being
authenticated through the network.
The login screen appears if the user
authentication function has been enabled.
Select "DOMAIN", and then select "No.10
Local Machine", and then select "OK" .
Appendix
Select "USER ID", and then enter the
administrator name, and then select "OK" .
Select "OK" to start the authentication process.
Local Machine
Select "PASSWORD", and then Input the
administrator password, and then select "OK" .
NOTE
24
This completes the authentication.
Refer to Administrator Name & Password (see page 25) for the registration of Administrator's name
and Administrator's Password.
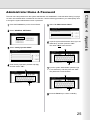
Administrator Name & Password
Press the Function key on the Control Panel.
Select "57 Administrator Name".
Select "GENERAL SETTINGS".
Select "09 Key Operator Mode".
Enter the Key Operator's password (8-digit),
and then select "OK" .
The name is NOT case-sensitive.
Input the system administrator password (up
to 40 characters), and then press the "OK".
The password is case-sensitive.
Press the Reset key to return to standby.
25
Appendix
Input the system administrator name (up to 40
characters), and then press the "OK".
Chapter 4
The user name and password for the system administrator are established in "Authentication Setting" on page
12 when user authentication is enabled for the first time. Use the following procedure if you subsequently wish
to change the system administrator name or password.
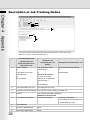
Description of Job Tracking Notice
Chapter 4
Appendix
( This is the sample screen from the Microsoft® Outlook Express®. There may be some
differences if you are using other Email clients. )
Fax Transmission via
general phone line
Email Transmission to
Internet Fax / PC
Reception via
General Phone Line
(PSTN)
Reception from Internet Fax / PC
1.
Sender’s Name
or
Login Name in the User
Authentication
or
Email Address
Fax: ID Number of the
remote station
or
Sender’s ID Unknown
(In case the remote
station has not registered
the ID number.)
or
Email Address
FWD: Sender’s Email Address
or
Email Address
2.
Transmitted Date and Time
Received Date and Time
3.
Recipient’s Email Address (as set in the Job Tracking Setting, see page 21)
4.
Subject
The following message is displayed.
IMAGE from Internet FAX
5.
Transmitted document(s)
Received document(s)
Received document(s)
* Email Body Text is included in the
attached file as image.
6.
Fixed Message
7.
Number of Destination(s)
None
8.
Transmitted Address(es)
None
26
Chapter 4
Memo
Appendix
27
The following trademarks and registered trademarks are used throughout this manual:
Microsoft, Windows, Windows NT, Windows Server, Outlook & Windows logo are either registered trademarks or
trademarks of Microsoft Corporation in the USA and other countries.
Adobe, Acrobat Reader & Adobe logo are either registered trademarks or trademarks of Adobe Systems
Incorporated.
All other trademarks identified herein are the property of their respective owners.
PEERLESSPageTM is a trademark of the PEERLESS Systems Corporation; and,
PEERLESSPrintTM and Memory Reduction Technology are registered trademarks PEERLESS Systems
Corporation; and, COPYRIGHT © 2002 PEERLESS Systems Corporation
Universal Font Scaling Technology (UFST) and all typefaces have been licensed from Monotype Imaging Inc.
Agfa® and the Agfa rhombus are registered trademarks of Agfa-Gevaert N.V. registered in the U.S. Patent and
Trademark Office and may be registered in other jurisdictions. Monotype® is a registered trademark of Monotype
Imaging Inc. registered in the U.S. Patent and Trademark Office and may be registered in other jurisdictions.
ColorSetTM, Profile Tool KitTM, Profile StudioTM and Profile OptimizerTM are trademarks of Monotype Imaging Inc.
and may be registered in certain jurisdictions.
COPYRIGHT © 2005 Monotype Imaging Inc. All Rights Reserved.
Novell and NetWare are registered trademarks of Novell, Inc. in the United States and other countries.
© 2006 Panasonic Communications Co., Ltd. All Rights Reserved.
Unauthorized copying and distribution is a violation of law.
The contents of these Operating Instructions are subject to change without notice.
USA Only
WARRANTY
PANASONIC DIGITAL DOCUMENT COMPANY MAKES NO WARRANTIES, GUARANTEES OR
REPRESENTATIONS, EXPRESSED OR IMPLIED, TO THE CUSTOMER WITH RESPECT TO THIS PANASONIC
MACHINE, INCLUDING BUT NOT LIMITED TO, ANY IMPLIED WARRANTY OF MERCHANTABILITY OR
FITNESS FOR A PARTICULAR PURPOSE.
PANASONIC DIGITAL DOCUMENT COMPANY ASSUMES NO RISK AND SHALL NOT BE SUBJECT
TO LIABILITY FOR ANY DAMAGE, INCLUDING, BUT NOT LIMITED TO DIRECT, INDIRECT, SPECIAL,
INCIDENTAL OR CONSEQUENTIAL DAMAGES OR LOSS OF PROFITS SUSTAINED BY THE CUSTOMER IN
CONNECTION WITH THE USE OR APPLICATION OF THIS PANASONIC MACHINE. SEE YOUR DEALER FOR
DETAILS OF DEALER’S WARRANTY.
For Service, Call:
Panasonic Digital Document Company,
Unit of Panasonic Corporation of North America
One Panasonic Way
Secaucus, New Jersey 07094
http://panasonic.co.jp/pcc/en/
Panasonic Canada Inc.
5770 Ambler Drive
Mississauga, Ontario L4W 2T3
http://www.panasonic.ca
T0806-1116 (10)
PJQMC0659ZB
November 2006
Published in Japan