1
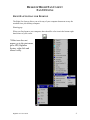
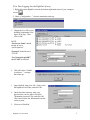
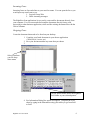
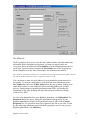
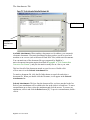
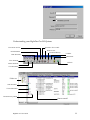
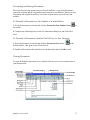
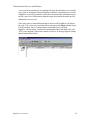
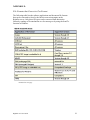
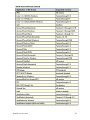
RightFax
8.5 User Guide
RightFax 8.5 User Guide
1
INTRODUCTION
ABOUT RIGHTFAX 8.5
RightFax is a comprehensive network fax solution for creating, sending,
receiving, and managing faxes directly from a user’s desktop computer. RightFax
features and intuitive design make faxing as easy as printing to a network printer.
A user can enhance the fax by adding a cover page and attaching documents.
FaxUtil™ is the RightFax mailbox where users create, view, print, and manage
faxes. With FaxUtil, users can forward, route, and delete faxes. They can view
other users’ fax mailboxes and delegate views into their personal fax mailboxes.
The RightFax fax server manages network print queues assigned to faxing,
converts outgoing faxes, schedules outgoing faxes, and routes incoming faxes.
RightFax 8.5 User Guide
2
TABLE OF CONTENTS
About RightFax 8.5............................................................................................................. 2
RightFax Systray for Desktop............................................................................................. 4
Starting up....................................................................................................................... 4
First Time Logging into the RightFax Systray ............................................................... 5
Incoming Faxes............................................................................................................... 6
Outgoing Faxes ............................................................................................................... 6
Using the Fax Information Dialog Box .............................................................................. 7
The Main tab ................................................................................................................... 8
The Cover Sheet Notes Tab .......................................................................................... 10
The Attachments Tab.................................................................................................... 11
The More Options Tab.................................................................................................. 12
Running Fax Utility .......................................................................................................... 13
Getting Started .............................................................................................................. 13
Understanding your RightFax FaxUtil Options............................................................ 14
Creating and Sending Documents................................................................................. 15
To Send Your Document to a Fax Address .................................................................. 15
To Send Your Document to an E-mail Address ........................................................... 15
To Include a Cover Sheet with Your Document........................................................... 15
To Attach Files to Your Document............................................................................... 16
To Create an Individual Phonebook Entry.................................................................... 16
To Create a Group Phonebook Entry............................................................................ 16
Forwarding and Routing Documents ............................................................................ 17
To Forward a Document to a Fax Number or E-mail Address..................................... 17
To Forward a Document to Another FaxUtil User on Your Network.......................... 17
Viewing Documents...................................................................................................... 17
Transmission Success and Failure ................................................................................ 18
Appendix A....................................................................................................................... 19
File Formats that Convert to Fax Format...................................................................... 19
RightFax 8.5 User Guide
3
DESKTOP RIGHTFAX CLIENT
FAX OPTIONS
RIGHTFAX SYSTRAY FOR DESKTOP
The Right Fax Systray allows you to fax any of your computer documents to any fax
machine from your desktop computer.
Starting up
When you first logon to your computer, there should be a fax icon in the bottom right
hand corner of your screen.
*If this icon does not
appear, go to the start menu,
go to APS, RightFax
Systray, right click and
choose verify.
RightFax 8.5 User Guide
4
First Time Logging into the RightFax Systray
1. Right click on the RightFax icon on the bottom right hand corner of your computer
screen.
2. Chose “Configuration…” from the menu that comes up.
1. Change the User ID to your
building’s/department’s fax
login, all in caps. Then
click on OK
NOTE:
“Fax Server Name” should
already be set to
“spsfax.spsd.net”.
“Protocol” should be set to
“TCP/IP”
“Use Network Login ID?”
should NOT be checked
2. Click OK on the “Unable
to add port…” message
that comes up
3. Open NotePad, then go to File > Print, select
the RightFax Fax Printer, and click OK.
4. On the box that comes up, enter your
password for your fax login, Check the
”Remember password” box, and click OK.
Click cancel on the fax Information box that
comes up next.
5. Close out of NotePad.
RightFax 8.5 User Guide
5
Incoming Faxes
Incoming faxes are forwarded into to your email accounts. You can open the fax as you
would open any email sent to you.
1. Log into Group Wise
2. Check incoming messages
The RightFax client applications let you easily create and fax documents directly from
your computer. You can create and send complex documents directly from a word
processing or other business application, select and fax existing document files with the
click of a button.
Outgoing Faxes
Create the document that needs to be faxed on your desktop
1. Complete your faxed document in your chosen application
(Word, Excel, Access, etc.)
2. Save your document under any name that you choose
3.
Select Print from
your file drop
down menu
In your printer menu choose the RightFax
Fax Printer as your selected printer.
4. Fax Information Dialog Box option will appear. Complete the cover
sheet by typing in the information using your tab key to go from field
to field.
RightFax 8.5 User Guide
6
USING THE FAX INFORMATION DIALOG BOX
Whatever method you use to create a new fax, you must provide the RightFax
server with fax addressing information (such as the destination fax number).
When you print a document to the fax printer, it opens the Fax Information
dialog box. This dialog box prompts you for fax addressing information and also
lets you attach files, library documents, and your own notes.
The Fax Information dialog box also provides several options that let you
control when and how the document is sent.
Boxes that appear in bold are required. If you send a fax before completing all the
required boxes, the fax will remain in your FaxUtil mailbox with the status “Info
Not Complete” until the required boxes are completed. In most cases, To Name
and Fax Number are the only required boxes.
When you have completed all the required boxes and other optional information,
click Send to send the fax.
RightFax 8.5 User Guide
7
The Main tab
The To group box needs you to enter the name, phone number, and other addressing
information for the intended fax recipient as you want it to appear on the fax
cover sheet. Boxes in bold (such as Fax Number) must be completed before the fax
can be sent. You must always complete the Fax Number box in the To group box
because RightFax uses this when connecting to the destination fax machine.
Note: Hyphens, parentheses, and spaces are acceptable when entering a destination fax number. You can
also type the number without any spaces or separator characters at all.
You can choose to enter an e-mail address for your intended recipient instead of a
fax number. To enter an e-mail address, click the down-arrow button next to the
Fax Number box and select E-Mail Address from the pop-up menu. Sending to an
email address allows several additional options including sending via certified
delivery, sending images in portable document format (PDF), and sending file
attachments of any type, including file types that cannot be rendered as images
(such as WAV files).
To select a fax destination from your RightFax phonebook, click Phonebook. The
Phonebook dialog box opens, listing the individual and group entries in your
RightFax phonebooks. Double-click a phonebook entry to add it to the Current
Recipients list. You can add as many fax recipients to this list as you want. To add
the fax addressing information entered in the To group box as a new entry in your
RightFax phonebook, click Add Entry.
RightFax 8.5 User Guide
8
Fine mode. Using this resolution takes longer to generate and send the fax but produces a
clearer fax image.
Use cover sheet. Adds a cover sheet to the beginning of the fax. RightFax uses the cover
sheet file specified as your user or group default.
Hold for preview. Examine the final version of the outgoing fax before you send it. The
fax will be held in your FaxUtil mailbox with the status “Held for Preview”
and can be viewed from there. To send the fax after you have previewed it, click
the fax in FaxUtil and select Release from the Fax menu.
Use smart resume. Allows the fax server to intelligently resend only the portion of a fax
which failed to send. For example, if the connection is broken after 40 pages
of a 50 page fax, normally all 50 pages have to be resent. By enabling Smart-Resume, the
server will only resend the last 10 pages.
Create PDF image. When sending your document to an e-mail address, check this
option to send a PDF file, this will allow the document to remain unaltered when the
person receiving the file opens it.
Use cheap rates. Tells RightFax to delay sending the fax until a specified time
(typically in the late evening when long distance rates are lower). The Cheap Rates
time can be specified by selecting Options in the FaxUtil Tools menu, and then
clicking the Other Options tab.
Delay send. Tells RightFax to postpone the transmission of your fax to a later day
or time. This lets you take advantage of off-peak phone rates or ensure that the fax
recipient is available at the other end. If you select this check box, you must also
specify a date and time to queue the fax for transmission. If you specify a time and
date that has already passed, the fax will be scheduled to send as soon as possible.
Note: The fax is queued at the time you specify, but will not actually be sent until it reaches the
top of the queue. This can cause a delay between the time you specify in this field and the time
that the fax is actually sent.
RightFax 8.5 User Guide
9
The Cover Sheet Notes Tab
Click this tab to add notes or comments to the cover sheet.
Notes to be Placed on the Cover Sheet. Type the notes that you want to appear on your
fax cover sheet. You can enter up to 21 lines.
Text Limit. This displays the current number of lines in your note and the number
of lines remaining. Although it is possible to enter more than 21 lines of text, only
21 can be displayed on the cover sheet. If you exceed 21 lines, the computer will
beep and an error message will appear in this box.
Comments for your Records. This is a comment for your own use only. This text is not
sent to the fax recipient. Text you enter in this field will be displayed in your
FaxUtil mailbox under the Comments column.
RightFax 8.5 User Guide
10
The Attachments Tab
Folder button
Selected
Attachments
area
Available Attachments. When sending a document to a fax address, you can attach
electronic documents. Electronic document files that you have saved on your local
machine or on a server (such as Microsoft Word DOC files) called native documents.
You can attach any of the document file types supported by RightFax’s
native document conversion engine (described in Appendix A, ”File Formats that
Convert to Fax Format”), and you can attach as many files to a fax as you want.
This box lists all of the documents stored on your fax server. Double-click
a file to move it to the Selected Attachments list.
To attach a document file, click the file folder button to search for and select a
document file. When you double-click the file name, it will appear in the Selected
Attachments list.
Selected Attachments. This box lists the document files you have attached to the fax.
Each of your attachments will be added to the fax in the order it is listed here. To move
an attachment up or down, select the attachment and click the arrows. To remove an
attachment, select it and click the Delete button [X]. To preview an attachment, doubleclick it.
RightFax 8.5 User Guide
11
The More Options Tab
Recipient Fax ID. Leave this field blank
Use Form. Leave this field blank
Cover Sheet File. If the fax administrator has granted you permission to change
your fax cover sheets, you can select the cover sheet model to use here.
Priority. Specify the priority that is assigned to the fax. Select low, normal, or high
priority from the list. High Priority usage is based on District Policy.
Automatic Deletion. Specify when sent faxes should be automatically deleted from
your FaxUtil mailbox.
From. Enter your name, fax number, phone number, and other contact
information. These boxes are only used for display on the fax cover sheet.
RightFax 8.5 User Guide
12
RIGHT FAX 8.5 FAXUTIL
RUNNING FAX UTILITY
FaxUtil™ is the RightFax mailbox where users create, view, print, and manage
faxes. With FaxUtil, users can forward, route, and delete faxes. They can view
other users’ fax mailboxes and delegate views into their personal fax mailboxes.
Getting Started
To open FaxUtil, on your Start Menu select Programs > FaxUtil
For the very first time you open the utility you will Click on File > Close Server
1. Click on File > Open Server.
2. In the box that comes up, enter
"spsfax.spsd.net" for the Server Name and make
sure the Protocol is set to TCP/IP.
3. Click OK for the "Access is
denied" message.
4. Enter your fax User ID (all caps) and Password
on the next box that comes up, check the
"Remember password" checkbox, and click OK.
RightFax 8.5 User Guide
13
Understanding your RightFax FaxUtil Options
Forward to user fax
OCR document
Print document
Forward to fax or email
Route to user
Document History
Combine
Phonebook
New document
Refresh
Delete document
View document
Folder tree
Sent document
Viewed document
Received document
Document was printed
RightFax 8.5 User Guide
Sent to e-mail
14
Creating and Sending Documents
1. Click the New Document button. This opens the Fax Information dialog box.
2. In the Fax Information dialog box, add one or more fax or e-mail recipients.
Specify your cover sheet notes and options, file and library document
attachments, and other sending preferences.
3. Click Send to send the document.
To Send Your Document to a Fax Address
1. In the Fax Information dialog box, click the Main tab.
2. Enter the recipient’s name, fax number, and other contact information.
Entries marked in bold are required.
To Send Your Document to an E-mail Address
1. In the Fax Information dialog box, click the Main tab.
2. Click the arrow next to Fax Number and select E-mail Address on the
shortcut menu. Enter the recipient’s name, e-mail address, and other contact
information. Entries marked in bold are required.
To Include a Cover Sheet with Your Document
1. In the Fax Information dialog box, click the Main tab and select the Use
cover sheet option.
2. Click the Cover Sheet Notes tab.
3. In the Notes box, type any notes that you want added to the cover sheet. You
can enter up to 21 lines of text.
4. Click the More Options tab.
5. In the Cover Sheet File box, select a cover sheet from the list. The cover sheet
can only be changed if you have been granted permission by the RightFax
administrator.
6. In the From boxes, enter the contact information that you want on the cover
sheet.
RightFax 8.5 User Guide
15
To Attach Files to Your Document
1. In the Fax Information dialog box, click the Attachments tab.
2. Click the Browse button
to search for the files to attach. Attach as many
files as you want. Each selected file is displayed in the Selected Attachments list.
File attachments will be added to the end of the document in the order they appear
in the Selected Attachments list. When sending to an e-mail address, you can
check the Native option in the Selected Attachments list to send an attached file
in its native file format, rather than being converted to fax format.
To Create an Individual Phonebook Entry
1. Click the Open Phonebook button in the FaxUtil toolbar.
2. Click New Entry.
3. Enter a name for the phonebook entry in the ID box.
4. To create an entry for a fax address, enter the fax number in the Fax Number 1
box, and then complete the remaining address boxes. To create an entry for an email address, click the arrow next to Fax Number 1 and select E-mail Address
on the shortcut menu. Enter the e-mail address, and then complete the remaining
addressing boxes.
5. Check any options you want and click OK. The new entry will immediately
appear in your phonebook preceded by an Individual Fax Address icon or an
Individual E-mail Address icon .
To Create a Group Phonebook Entry
1. Click the Open Phonebook button in the FaxUtil toolbar.
2. Click New Group.
3. Enter a name for the group phonebook entry in the ID box.
4. In the list of existing phonebook entries, select each entry you want to add to the new
group, and click the Add to Group button to move the entry to the Group Members list.
You can add both individual phonebook entries and group phonebook entries to the new
group.
5. Check any options you want and click OK. The new entry will immediately appear in
your phonebook preceded by a Group icon .
RightFax 8.5 User Guide
16
Forwarding and Routing Documents
When you forward a document from your FaxUtil mailbox, a copy of the document is
sent to the recipient and the original document remains in your mailbox. When you route
a document, the original document is sent to the recipient and is removed from your
mailbox.
To Forward a Document to a Fax Number or E-mail Address
1. Select the document to forward and click the Forward to New Number button
the toolbar.
in
2. Complete the addressing boxes in the Fax Information dialog box and click OK to
send.
To Forward a Document to Another FaxUtil User on Your Network
1. Select the document to forward and click the Forward to User button
FaxUtil toolbar. This opens a list of FaxUtil users.
in the
2. Double-click each user that should receive the document and click OK to send.
Viewing Documents
To open the RightFax document viewer, double-click any sent or received document in
your document list.
RightFax 8.5 User Guide
17
Transmission Success and Failure
A successful fax transmission is not defined by how the information was actually
received at its destination. Instead, RightFax considers a transmission successful
if RightFax successfully made the connection, transmitted the information across
the line, and received information from the target fax machine that indicated fax
information was received.
If for some reason a transmission attempt is unsuccessful, RightFax will display
the code “ER” (error-retry) and a brief error message in the Status column in you
FaxUtil mailbox. After a certain number of attempts (five by default),
RightFax will stop trying, consider the transmission failed, and display the code
“ED” (error-dropped) in the status column of FaxUtil. A message appears stating
that the transmission failed.
RightFax 8.5 User Guide
18
APPENDIX A
File Formats that Convert to Fax Format
The following table lists the software applications and document file formats
that can be converted to faxes by the built-in conversion engine on the
RightFax server. Only these file types can be converted from their native
format by sending as file attachments to a fax message or by using the Send To
function in Windows.
continued on next page
RightFax 8.5 User Guide
19
RightFax 8.5 User Guide
20