1
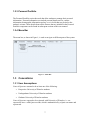
University of Waterloo Software Engineering Quest System User Manual Prepared By: Francis Ian Mendiola Anton Lopyrev Prabhdeep Gill Raheel Govindji (as a part of SE 463 group project.) Fall 2008 Table of Contents Preface.........................................................................................................................................5 1.0 Introduction....................................................................................................................6 1.1 Product Overview .................................................................................................................. 6 1.2 Basic Features ......................................................................................................................... 6 1.2.1 Academics ........................................................................................................................................... 6 1.2.2 Finances ............................................................................................................................................... 6 1.2.3 Personal Portfolio............................................................................................................................ 7 1.2.4 Menu Bar ............................................................................................................................................. 7 1.3 Conventions ............................................................................................................................. 7 1.3.1 User Assumptions............................................................................................................................ 7 1.3.2 Terminology....................................................................................................................................... 8 1.3.3 Abbreviations ................................................................................................................................. 12 1.3.4 Notational Conventions ............................................................................................................. 12 2.0 Getting Started ............................................................................................................ 14 2.1 Signon.....................................................................................................................................14 2.2 Help Mode...............................................................................................................................14 3.0 Basic Use Cases............................................................................................................ 15 3.1 Viewing and modifying academics.................................................................................15 3.1.1 Undergraduate Pre‐Enrollment Course Selection.......................................................... 15 3.1.1.1 Viewing Future Term Course Offerings............................................................................................15 3.1.1.2 Pre‐enrolling for a Future Term ..........................................................................................................18 3.1.1.3 Viewing Future Term Course Selections..........................................................................................19 3.1.1.3 Viewing Pre-enrollment Results .............................................................................................................20 3.1.2 Enrollment....................................................................................................................................... 20 3.1.2.1 Viewing Undergrad Enrollment Appointment ..............................................................................20 3.1.2.2 Enrolling in a Class ....................................................................................................................................21 3.1.2.3 Viewing Class Schedule............................................................................................................................23 3.1.2.4 Viewing Weekly Schedule.......................................................................................................................23 3.1.3 Course Catalog and Schedule................................................................................................... 24 3.1.3.1 Viewing the Course Catalog ...................................................................................................................25 3.1.3.2 Viewing the Schedule of Classes ..........................................................................................................26 3.1.3.3 Viewing the Examination Schedule ....................................................................................................27 3.1.4 Academic Record .......................................................................................................................... 28 3.1.4.1 Viewing Grades ...........................................................................................................................................28 3.1.4.2 Viewing Unofficial Transcript...............................................................................................................28 3.1.4.3 Viewing Advisors........................................................................................................................................29 3.1.5 Distance Education ...................................................................................................................... 29 3.1.5.1 Viewing/Changing Exam Schedule Details .....................................................................................29 3.1.5.2 Viewing Materials Information ............................................................................................................30 3.1.5.3 Viewing Assignment Information .......................................................................................................30 3.2 Viewing Admission Information.....................................................................................30 3.2.1 View Admission Offers ............................................................................................................... 30 3.2.1.1 Accepting an Admission Offer...............................................................................................................31 3.3 Viewing and Modifying Personal Profile .....................................................................31 3.3.1 Viewing and Modifying Contact Information ................................................................... 31 3.3.1.1 View and Modify Names..........................................................................................................................31 3.3.1.2 View and Modify Addresses ..................................................................................................................31 3.3.1.3 View and Modify Phone Numbers ......................................................................................................33 2 3.3.1.4 View and Modify Email Address .....................................................................................................34 3.3.2 Viewing Demographic Information ...................................................................................... 34 3.3.3 Viewing Service Holds ................................................................................................................ 34 3.4 Viewing Financial Information .......................................................................................35 3.4.1 Viewing Account Information ................................................................................................. 35 3.4.1.1 Viewing Account Summary....................................................................................................................35 3.4.1.2 Viewing Financial Aid...............................................................................................................................35 3.4.1.3 Viewing Earnings .......................................................................................................................................36 3.4.1.4 Viewing Useful Links ................................................................................................................................36 4.0 Advanced Features .................................................................................................... 37 4.1 Homepage Personalization ..............................................................................................37 4.1.1 Overview of Feature .................................................................................................................... 37 4.1.2 Feature Usage................................................................................................................................. 37 4.1.2.1 Adding Widgets ......................................................................................................................................37 4.1.2.2 Removing Widgets.....................................................................................................................................38 4.1.2.3 Adding Items to Widgets....................................................................................................................38 4.1.2.4 Moving Widgets between Columns ...............................................................................................38 4.2 Enrollment Planner.............................................................................................................39 4.2.1 Feature Overview ......................................................................................................................... 39 4.2.2 Feature Usage................................................................................................................................. 39 4.2.2.1 Adding courses .......................................................................................................................................39 4.2.2.2 Removing Course...................................................................................................................................40 5.0 Troubleshooting and Tips ....................................................................................... 41 5.1 Troubleshooting...................................................................................................................41 5.2 Tips ...........................................................................................................................................41 6.0 Limitations ................................................................................................................... 42 3 List of Figures Figure 1 ‐ Menu Bar .................................................................................................................................. 7 Figure 2 ‐ Quest Login Fields..............................................................................................................14 Figure 3 ‐ Course Offering Search.....................................................................................................16 Figure 4 ‐ Term Lookup Page .............................................................................................................17 Figure 5 ‐ Subject Area Lookup Page ..............................................................................................17 Figure 6 ‐ Add Course Page .................................................................................................................19 Figure 7 ‐ Course Search Page............................................................................................................22 Figure 8 – Section Lookup Page ........................................................................................................23 Figure 9 ‐ View Weekly Schedule Page ..........................................................................................24 Figure 10 ‐ Course Catalog Search ...................................................................................................25 Figure 11 – View Schedule of Classes .............................................................................................27 Figure 12 ‐ Change Address Page .....................................................................................................32 Figure 13 ‐ Search State/Province Page ........................................................................................33 Figure 14 ‐ Personalized Homepage ...............................................................................................37 Figure 15 ‐ Quest Enrollment Planner ...........................................................................................39 4 Preface The new system of Quest described in this user manual has some differences from the current system of Quest. To begin with, the new system has menu bars for navigation. This allows a user to not have to click on links like Back to Academics page, to get back to the Academics page. With the new menu bar, the user will be able to access any part of the Quest system without having to go back to a main home page. Next, this system has the login screen for Quest on the Quest home page. This will save the user the inconvenience of navigating through various links to finally log in. Also, the new system is compatible with not just Internet Explorer, but with other browsers as well that are mentioned in the document. Furthermore, the new system eliminates the need for a user to enter term codes like 1091, 1095, etc. Instead, the user has the option to select Fall, Winter, and Spring from a dropdown list, and select the year from a dropdown list as well. This will make it more convenient for the user to select a term, instead of memorizing term codes or having to look them up. It helps save time for the user. However, if the user would still prefer to enter term codes, then the option will still exist for the user to do so. Finally, the new system has two advanced features. The first advanced feature is a personalized homepage that allows the user to add widgets to their home page such as class schedule and account summary. The second advanced feature is an enrollment planner that allows you to plan your enrollment for all future terms to fulfill your degree requirements. A more detailed description for both features can be found in the document. 5 1.0 Introduction 1.1 Product Overview Quest is a system that allows current students to manage information and perform key tasks pertaining to their involvement at the University of Waterloo. It comes equipped with a deep set of rich tools and features that enables the user to perform common tasks such as: updating ones personal profile, viewing academic records, organizing ones academic schedule, managing financial information and much more. One of the notable observations of Quest is that it is a Web-based service therefore it is available from any device that has access to the internet by navigating to the URL, http://www.quest.uwaterloo.ca and signing in with a unique account. Quest works with an ever-growing list of browsers, initially Internet Explorer, Firefox, Mozilla, Safari, and Chrome. The University of Waterloo is a large institution composed of many students, each one having both common and unique tasks concerning their enrollment at the university. Providing students with an effective and user-friendly service, that encompasses the distinct needs of each student, is important to ensuring a manageable and thus successful experience for all students at the University of Waterloo. 1.2 Basic Features Quest is a large system that contains a wide array of services that can be divided into three fundamental components: Academics, Finances and Personal Portfolio. Each core component contains a number of useful features that provide students with the tools necessary to manage information and carry out essential tasks. 1.2.1 Academics As the name suggests, the Academics portion of Quest allows users to manage all areas applicable to their academic enrollment at the university. For instance, just to name a few, the Academics section allows students to manage enrollment details, view academic records and view course schedules. More details about related to all the features included in the Academic component can be found in subsequent sections of this user manual. 1.2.2 Finances The Finances component enables students to view all financial information regarding their enrollment at the university. Through the Finances section you can perform functions such as: viewing a comprehensive breakdown of enrollments fees, obtaining information about your financial aids and more. Additional details related to all the features included in the Finances component can be found in subsequent section of this user manual. 6 1.2.3 Personal Portfolio The Personal Portfolio section has tools that allow students to manage their personal information. Personal information can include personal details such as: contact information, demographic information and any service holds that may be tied to the student's account. More details about all the features that are included in the Personal Portfolio component can be found in subsequent sections of this user manual. 1.2.4 Menu Bar The menu bar, as shown in Figure 1, is used to navigate to different parts of the system. Figure 1 - Menu Bar 1.3 Conventions 1.3.1 User Assumptions Users of Quest are assumed to be at least one of the following: • Prospective University of Waterloo students • Undergraduate University of Waterloo students • Graduate University of Waterloo students Users of Quest are expected to be registered with University of Waterloo, i.e. are expected to have a valid Quest account, which is authenticated by a Quest user name and a password. 7 Quest user name - is a unique sequence of lowercase letter and numbers 8 or less in length that is usually composed of the first letter of the user's first name and the user's last name. For instance, a user with a name, John Green, would have a Quest user name jgreen. In case, the Quest user name formed using the aforementioned technique is taken, a number is added after the first letter of the user's first name. For instance, Jane Green would have a Quest user name j2green, since jgreen is taken by John Green. Finally, if the Quest user name formed using the aforementioned technique is longer than 8 symbols, it is truncated to be exactly 8 symbols long. For instance, Stephen Chingalinga would have a Quest user name schingal and Sam Chingalinga would have a Quest user name s2chinga. Quest password - is a sequence of lowercase and uppercase characters and numbers 6 or more length. 1.3.2 Terminology The following terms are used throughout the manual. This list is taken from www.quest.uwaterloo.ca/help/glossary.html and has a few additions to it. • Academic Career - Undergraduate or Graduate • Academic Level o For Undergraduate - current study term - 1A, 1B, 2A, 2B, 3A, 3B, 4A, 4B. o For Graduate - "M" for masters and "D" for doctorate (PhD). • Academic Program - a set of courses, a number of which may be mandatory and of a specialized nature, leading toward a particular degree, option or minor • Antirequisite - a condition preventing enrollment in a course. • Audit - If a student audits a course, the student is allowed to participate in the course without being examined on its content • Campus - the campus indicates which institution offers the course. Most courses are offered through the main University of Waterloo campus, but some are offered through a University college such as Renison, or in cooperation with another university, such as WLU (Wilfrid Laurier University) • Catalog Number - the 3-digit number that identifies a particular course (e.g., ACC121). It sometimes has a single letter as a suffix (e.g., FR 252A). • Class Enrollment - the process of selecting and enrolling in courses for a particular term via Quest prior to final date for fee arrangement, having them approved, and recorded with the Registrar's Office. Some programs may require mandatory core courses to be entered by the Registrar's Office. 8 • Class Number - a 4-digit number that identifies a particular course component/meet and class section (e.g., 1597 LEC 001; 1879 LAB 101). • Component - the term used to refer to the various parts of courses (e.g., lectures, labs, tutorials, etc.). • Corequisite - a course that must be taken concurrently, if it has not been taken in a prior term. • Course - a unit of study relating to a specific academic discipline and identified by a course/subject name and number. All course names have abbreviations (e.g., Psychology 101 is often abbreviated to PSYCH 101). • Course Abbreviation - a maximum of five letters is used to identify course subjects. • Course Catalog - the listing of courses, which includes the description, requisites, terms offered, and special notes. • Course ID (Number) - the 6-digit number identifying the course; leading 0s are ignored. • Course Title - the title of the course. When searching for courses in Quest, you may specify the course title under the description field. • Credential - a degree, diploma, or certificate. • Credit - see Unit • Department - a smaller subset within a Faculty, such as the Mechanical Engineering, in the Faculty of Engineering. • Drop - drops the course from your schedule. • Elective - a course not specifically required for a degree but counting towards it, to be chosen freely by the student either from within a specified group of courses or more broadly from courses offered anywhere across the University. • Enrollment Appointment - a block of time during which you can enroll in classes before Open Enrollment begins for the term. Applicable to continuing undergraduate students only. • Enrollment Capacity – at the maximum number of students allowed to enroll in each section. • Enrollment Requirement Group - a group of requisites for the course that restricts the course to certain students. • Enrollment Total - the number of students currently enrolled in each section. 9 • Faculty - one of Math, Engineering, Arts, Applied Health Sciences (AHS), Environmental Studies (ES), and Science. • Grade Point Average - a direct calculation of student's unit-weighted average using your numeric grades and the weight/value of each grade in units. • Location - indicates where the actual course takes place, or if the courses is offered through Distance Education (DE) whether it is offered online (WEB) or not online (HOME). • Major - the area(s) of academic emphasis selected in either an Honours or a General plan. Applicable to undergraduate students only. • Minor - a group of approved courses taken by a student in an Honours or a fouryear General plan in a subject outside the "major" area. Applicable to undergraduate students only. • Official Transcript - a record of student's courses, grades earned, units obtained towards degree, and more. If graduate schools or employers require student's transcript, an official transcript is usually required. • Open Enrollment - during this period, enrollment is open to all students; this period is usually longer than enrollment appointments. • Option - a specified combination or grouping of courses which provides a secondary emphasis in certain plans. The emphasis may be in another academic subject or in a career-oriented area. • Pre-Enrollment - the process of making course requests for future terms using Quest. Faculties will make teaching plans using this course demand data. • Prerequisite - the requirement(s) that must be met in order to be eligible to enroll in a course. Prerequisites may include passed courses, registration in a specific program or plan and an academic level or academic standing. • Primary Component - the main component for the course. It's the first component listed for every course, and the class section number beings with a "0" (e.g., LEC 001). • Priority Enrollment - for courses designated as "priority enrollment," preference in scheduling is given to students who require such courses to satisfy specific degree requirements. • Quest - the name of the service. • Registered Status - under student finances, the status of their arrangement with the University for payment is shown here: o Enroll Request - fees have not been arranged. Full payment is expected at the specified deadline 10 o Fees Arranged - fees have been arranged and payment is expected when the student has received funds (e.g., from OSAP, or scholarships) o Coop - student is on coop term • Related Component 1 - the second component of the course. It begins with a "1" in the leading position of the class section number (e.g., LAB 101). • Related Component 2 - the third component of the course. It begins with a "2" in the leading position of the class section number (e.g., TUT 201). • Reserve Capacity - the portion of a class enrollment capacity that is reserved for a particular group of students. This designation appears on the schedule of classes, directly beneath each section that has a reserve capacity assigned. • Schedule of Classes - the online list of classes offered for a particular term, with details such as times, locations, and instructors. • Section - the 3-digit number that identifies a particular section of a course component/meet (e.g., LEC 001). • Service Hold - is a notice that may affect your use of Quest, or your interaction with the University. For instance, if you owe fees or other goods, or have committed an academic offence, you may find a Hold placed on your account. Holds may prevent you from receiving transcripts, or enrolling yourself using Quest. • Session - an invocation of Quest from the time a user signs on to the system until the time he/she signs offs. • Specialization - a specified combination or grouping of courses which provides a primary emphasis within a plan. • Status - the status of a class may be open for enrollment if spaces are available; otherwise, it is closed. • Student ID - a unique 8-digit number assigned to every student when they apply to the University. • Term - is a particular 4-month period within which sessions are defined and fees are arranged. It is also used with reference to work terms for students in the cooperative system of study. For undergraduate students, an academic year is usually 2 academic terms if you are in the regular system of study in which fulltime students take 5 courses per term. Fall F September to December Winter W January to April Spring S May to August 11 The breakdown of the 4-digit number for terms is as follows: • The first digit is the century; that is, "1" means the 21st century. • The middle 2 digits represent the year; that is, "08" represents the year 2008. • The last digit represents the first month of the term; that is, "1" represents January, "5" represents May and "9" represents September. • Unit - the credit value associated with a course. Unit weights are used in the calculation of averages for academic standing. Most courses have unit weights of 0.5, but some have other weights, such as 0.25, 1.0 and 2.0. • Unofficial Transcript - record of student's courses, grades earned, units obtained towards your degree, and more. Unofficial transcripts are for viewing purposes only and can be obtained through UW's online student information system: Quest. • User - the person who uses Quest as defined in User Assumptions section. 1.3.3 Abbreviations System UW - University of Waterloo LMC - left mouse click RMC - right mouse click Application UG - undergraduate GRAD - graduate GPA - Grade Point Average 1.3.4 Notational Conventions The following texts are used in the manual: • Times New Roman is used for normal text • Times Italics is used for emphasis and new terms in normal text • Times Bold is used for section names • Arial is used for page names. • Arial Italics is used for drop-down list values. 12 • Arial Bold is used for screen entities. • Arial Bold and Italics is used for keyboard keys. • Menu Item->MenuItemB is used to specify the menu item MenuItemB in the menu MenuA 13 2.0 Getting Started 2.1 Sign-on In order to begin using Quest you must sign-on with a valid user account. Typically, your account credentials are assigned to you by the University of Waterloo. For this particular example we will assume that your user name is: j2smith with password: 56G9r2F. The following are steps outline how to sign-on to quest. • Using your browser go to: http://www.quest.uwaterloo.ca. • You are presented with two input fields. Type the user name and password you were assigned. • LMC submit to log in. After you have logged in, you are directed to the main Quest page. The Quest Login fields are shown in Figure 2 below. Figure 2 - Quest Login Fields 2.2 Help Mode When you are logged into Quest there is a Help button available situated at the top menu of the Quest interface. When the Help button is clicked another window is opened containing relevant help content for the page you are currently on. For instance, if you are on the Academics page, clicking on the Help button displays help content related to the Academic page, such as definitions, and what each feature under the Academic component does. 14 3.0 Basic Use Cases The following section explains all the basic use cases of the Quest system. 3.1 Viewing and modifying academics In order to view and modify academics, LMC Academics Tab in the menu bar. 3.1.1 Undergraduate Pre-Enrollment Course Selection Once the Academics Tab in the menu bar is selected, LMC the Pre-Enrollment menu option to see a list of options for pre-enrollment. 3.1.1.1 Viewing Future Term Course Offerings To view future term course offerings, 1. LMC View Future Term Course Offerings. 2. LMC in the Term box, shown in Figure 3, and enter the term number. [Alternative exists] 3. LMC in the Subject Area, and enter the abbreviated subject area that you would like to search for. For example, “CS”. [Alternative exists] 4. LMC on the Search button to execute the search query. 5. A page returning all the courses for the subject area are displayed, with the Course Number, Title, Units, Instruction Mode, and Campus. 15 Figure 3 - Course Offering Search To View All Future Term Course Offerings, LMC the link View All Future Term Course Offerings. This takes you to the following page: http://www.adm.uwaterloo.ca/infocour/CIR/SA/uwpcshtm.html Alternatives: 2.1. If you do not know the term number, LMC on the magnifying glass icon to search for the term number on the Term Lookup Page. On the Term Lookup Page, shown in Figure 4, 1. Select one of the three term identifiers from the Term drop-down list: Fall, Winter, Spring. 2. Select the year from the Year drop-down list. 3. LMC the Lookup Button or Cancel to return back to the View Future Term Course Offerings Page. 4. If the Lookup Button was selected, the Term Box shall be automatically populated with the correct term number from the Term Lookup Page. 3.1. If you do not know the subject area abbreviation, LMC on the magnifying glass icon to search for the subject area on the Subject Area Lookup Page. 16 Figure 4 - Term Lookup Page On the Subject Area Lookup Page, shown in Figure 5, 1. Enter the full name of the subject area you are looking for. For example, “Computer Science”. 2. To return back to the View Future Term Course Offerings Page, LMC the Cancel Button, otherwise LMC the Lookup Button. 3. A list of subject area abbreviations is returned that match your query. If no subject areas match the search query, a message saying “No results found” will be displayed, and you may execute your search again. 4. LMC the subject abbreviation code that you want from the list to be returned back to the View Future Term Course Offerings Page with the Subject Area Box automatically populated. 5. Figure 5 - Subject Area Lookup Page 17 3.1.1.2 Pre-enrolling for a Future Term To pre-enroll for a future term, 1. LMC Pre-enroll for a Future Term. [Exception exists] 2. A list of the courses that you are currently enrolled in for the future term shall be displayed. [Exception exists] 3. LMC the Add Courses button. 4. On the Add Courses Page, shown in Figure 6, Add/Delete Rows to the number of courses you would like to pre-enroll in by doing a LMC on either Add Row or Delete Row. 5. LMC Add Course within the row to add a specific course. 6. On the Add Course Page, select the faculty from the Faculty drop-down list. 7. A list of the courses being offered that term shall be populated in the Course Number drop-down list. Select the course you would like to enroll in. (Note: To get the faculty and course number for the course, see the View Future Term Course Offerings Section.) 8. Under the Time of Day section, LMC the radio button indicating whether you would prefer a Day or Evening Class, or an Evening class. 9. Under the Campus section, LMC the faculty you would prefer from the Campus drop-down list. 10. LMC the Submit button to return back to the Add Courses Page, with the course recently selected appearing in the row. Select Cancel to return back to the Add Courses Page with no changes made. 11. Perform steps 5-10, until you have selected all the courses you would like to preenroll in. 12. On the Add Courses Page, rank all the courses selected from 1-9 under the Priority column to indicate which course is of most importance for you to enroll in. [Exception exists] 13. LMC on the Submit button to finish pre-enrolling for the courses you selected in your table. [Exception exists] 14. To remove any pre-enrolled courses you selected, LMC the Remove Courses button. [Exception exists] 15. You shall be presented with the list of courses you pre-enrolled in. 16. LMC the checkboxes beside all the courses you would like to remove. 17. LMC on the Submit button to finish removing these courses from your preenrollment courses. 18 Figure 6 - Add Course Page Exceptions 1.1. You can only Pre-enroll for a future term during a certain designated time period (approximately a week). If you try to go to the Pre-enroll for a Future Term during any other time, you receive an error page stating the issue. You can only Pre-enroll for a future term if you have room for electives for that term. If you try to go to the Pre-enroll for a Future Term when you have no electives, you will receive an error page stating the issue. 1.2. 2.1. No courses will be displayed if you are not automatically registered in courses already by the registrar. 12.1. There can only be one course associated with each rank. 13.1. Attempting to pre-enroll in a course that you do not have the pre-requisite for results in an error. An error message is displayed with the course(s) that failed to add. A message containing any successful pre-enrollment courses, if any, is displayed. 14.1. The Remove Courses button becomes inactive if you have not pre-enrolled for any courses yet. 3.1.1.3 Viewing Future Term Course Selections To view future term course selections, 1. LMC View Future Term Course Selections. 2. A list of all the terms where pre-enrollment was active are displayed. [Exception exists] 3. LMC the term you would like to see. 19 4. A list of all the pre-enrolled course selections are displayed. [Exception exists] Exceptions 2.1. If there have not been any terms where pre-enrollment was allowed, no terms will are displayed. 4.1. If you have not pre-enrolled in any courses for a specific term, no courses are displayed. 3.1.1.3 Viewing Pre-enrollment Results To view pre-enrollment results, 1. LMC View My Pre-Enrollment Results. 2. LMC the term you would like to see results for. [Exception exists] 3. A list of the Successful Course Enrollments (with Subject, Catalog Number and Section) and Unsuccessful Course Enrollments (with Subject, Catalog Number, and Error Message) are displayed. [Exception exists] Exceptions 2.1. If you have not pre-enrolled in any terms, you shall not see any terms to select. 3.1. If the term has not done enrollment yet, there are no results. A message is displayed to you to check again another time after enrollment takes place for the term. 3.1.2 Enrollment Once the Academics Tab in the menu bar is selected, LMC the Enrollment menu option to see a list of options for enrollment. 3.1.2.1 Viewing Undergrad Enrollment Appointment To view your UG enrollment appointment, 1. LMC View Undergrad Enrollment Appointment 2. A list of all the terms that you have been enrolled in and will want to enroll in is displayed. [Exception exists] 3. LMC the term you would like to see your UG enrollment appointment for. 4. The Undergrad Enrollment Page displays the following information: Session, Appointment Number, Start Date/Time, End Date/Time, and Unit Limits (for the term, for this session, and for this appointment). [Exception exists] 20 Exceptions 2.1. If you have not been enrolled into UW yet, you do not see any terms. 4.1. For a future term, an enrollment appointment may not be scheduled yet. If this is the case, a message is displayed telling you to check back another time. 3.1.2.2 Enrolling in a Class Once you have a valid enrollment appointment, you are able to enroll in classes for an upcoming term. To enroll in a class, 1. LMC Enroll in a Class to navigate to the Select Enrollment Term page. 2. LMC the academic term that you need to add a class to. The browser navigates you to the View My Schedule page. [Exception exists] 3. If any classes have already been added to your schedule then you see a list of them here. At the bottom of the page LMC the Add a Class link to navigate to the Add a Course page. 4. In the box with columns subject, class number and section you must enter the correct class subject, class number and section in the text boxes to add the class that you want. a. LMC the subject box and enter the subject of the class that you want to add. [Alternative exists] b. LMC the class number box and enter the class number of the class that you want to add. [Alternative exists] c. LMC the section box and enter the section number for the class you want to add. [Alternative and Exception exists] 5. LMC the Add button to add the class to your schedule. [Exception exists] Alternatives 4.a.1. If you do not know the subject then LMC the magnifying glass icon beside the textbox to search for the subject you want. The browser navigates you to the Subject Area Lookup page. On the Subject Area Lookup page, as shown previously in Figure 5, 1. In the search box type in words that relate to the subject that you are interested in. For example, type “Computer Science” to find the subject “CS”. 2. LMC the Search button to search for the subject name. 21 3. If results were found, a list of subjects is populated in the list box next to the search box. LMC the appropriate one and LMC the OK button to return back to the Add a Course page. 4.b.1. If you do not know the class number then LMC the magnifying glass icon beside the textbox to search for the class number you want. The browser navigates you to the Course Search page. On the Course Search page, shown in Figure 7, 1. In the search box type in words that relate to the class that you are interested in. For example, type “Algorithms” to find the class number “341” 2. LMC the Search button to search for the class number. 3. If results were found a list of numbers are populated in the list box next to the search box. LMC the appropriate number and LMC the OK button to return back to the Add a Course page. Figure 7 - Course Search Page 4.c.1. If you do not know the section then LMC the magnifying glass icon beside the textbox to search for the section. The browser navigates you to the Section Lookup page. On the Section Lookup page, shown in Figure 8, 1. LMC the section that you want to join. 2. LMC the OK button to return back to the Add a Course page. 22 Figure 8 – Section Lookup Page Exceptions 2.1. You cannot add classes to previously attended terms. 4.1. You will not be able to add the class if the section is full. 5.1. Class will not be able to be added to your schedule if your schedule is full. 5.2. Class will not be able to be added to your schedule if you do not have the prerequisites for the class. 3.1.2.3 Viewing Class Schedule To view your class schedule, 1. LMC View Class Schedule. 2. A list of all the terms you have been enrolled in are displayed. [Exception exists] 3. LMC the term you would like to see your class schedule for. 4. A list of all enrolled, waitlisted, and dropped classes are shown with the following information: Course Name and Number, Section, Component, Description, Grading Option, Units, Status, Schedule, Instructor, Location and Date). Exceptions 1.1 If you have not been enrolled into UW yet, no terms are displayed. 3.1.2.4 Viewing Weekly Schedule To view your weekly schedule, 23 1. LMC View Weekly Schedule. 2. In the As Of Date box, as shown in Figure 9, enter the date of the week you are interested in seeing. [Alternative exists] 3. In the Start Time box, enter the start time in military time or with AM/PM. 4. In the End Time box, enter the end time in military time or with AM/PM. 5. In the Display Options section, select the days of the week you would like to see the weekly schedule for by selecting/unselecting the checkboxes beside each day. 6. LMC Go to your weekly schedule displayed for the date and times specified. [Exception exists] Figure 9 - View Weekly Schedule Page Alternatives 2.1 You can enter the date alternatively by clicking the calendar icon and selecting the date from there. Exceptions 6.1 If a period of time or date is selected where you are not enrolled in a class, an empty schedule is returned. 3.1.3 Course Catalog and Schedule 24 Once the Academics Tab in the menu bar is selected, LMC the Course Catalog and Schedule menu option to see a list of options for enrollment. 3.1.3.1 Viewing the Course Catalog To view the course catalog, 1. LMC View Course Catalog. 2. Select the academic institution from the Academic Institution drop-down list, shown in Figure 10. 3. Enter the subject area abbreviation in the Subject Area box. [Alternative exists] 4. Optional: Enter the catalog number in the Catalog Nbr box. 5. Select Exact Match or Wildcard from the Search Type drop-down list. 6. Enter the term number in the Term box. [Alternative exists] 7. LMC Search. [Exception exists] 8. If a catalog number was entered, only the specific course is displayed. If there is no catalog number, all courses in the subject area specified are displayed. Information about the course(s) is/are presented on this page. [Exception exists] Figure 10 - Course Catalog Search Alternatives 3.1. If you do not know the subject area abbreviation, LMC on the magnifying glass icon to search for the subject area on the Subject Area Lookup Page. 25 On the Subject Area Lookup Page, as shown previously in Figure 5 1. Enter the full name of the subject area you are looking for. For example, “Computer Science”. 2. To return back to the View Future Term Course Offerings Page, LMC the Cancel Button, otherwise LMC the Lookup Button. 3. A list of subject area abbreviations will be returned that match your query. If no subject areas match the search query, a message saying “No results found” will be displayed, and you may execute your search again. 4. LMC the subject abbreviation code that you want from the list to be returned back to the View Future Term Course Offerings Page with the Subject Area Box automatically populated. 6.1. If you do not know the term number, LMC on the magnifying glass icon to search for the term number on the Term Lookup Page. On the Term Lookup Page, as shown previously in Figure 4, 1. Select one of the three term identifiers from the Term drop-down list: Fall, Winter, Spring. 2. Select the year from the Year drop-down list. 3. LMC the Lookup Button or Cancel to return back to the View Future Term Course Offerings Page. 4. If the Lookup Button was selected, the Term box automatically populates with the correct term number from the Term Lookup Page. Exceptions 7.1 All required fields must be entered; otherwise an error is displayed to fill in the remaining fields. 8.1 If there are no results matching the search query, a message saying ‘No results were found’ is displayed and you can execute a new search. 3.1.3.2 Viewing the Schedule of Classes To view the schedule of classes, 1. 2. 3. 4. 5. LMC View Schedule of Classes. Select the institution from the Institution drop-down list, shown in Figure 11. Enter the term number in the Term box. [Alternative exists] LMC Search. [Exception exists] On the Class Search Page, enter values for any of the following to execute your search: Subject Area, Catalog Number, Description, Course Component, Course Career, Session, Campus, and Location Code. 26 6. All classes that match the search query are displayed with the following information: Class Number, Subject, Catalog Number, Section, Description, Units, Component, Status, Available, Wait, Time, Dates, Room and Instructor. [Exception exists] Figure 11 – View Schedule of Classes Alternatives 3.1. If you do not know the term number, LMC on the magnifying glass icon to search for the term number on the Term Lookup Page. On the Term Lookup Page, as shown previously in Figure 4, 1. Select one of the three term identifiers from the Term drop-down list: Fall, Winter, Spring. 2. Select the year from the Year drop-down list. 3. LMC the Lookup Button or Cancel to return back to the View Future Term Course Offerings Page. 4. If the Lookup Button was selected, the Term box will automatically populate with the correct term number from the Term Lookup Page. Exceptions 4.1. All required fields must be entered and must have valid values; otherwise an error is displayed. 6.1. If there are no results matching the search query, a message saying ‘No results were found’ is displayed and you can execute a new search. 3.1.3.3 Viewing the Examination Schedule 27 To view the examination schedule, 1. LMC View Examination Schedule. 2. This links to the Registrar’s page and a PDF file can be downloaded to see the examination schedule. [Exception exists] Exceptions 2.1. The examination schedule may not be up yet. 3.1.4 Academic Record Once the Academics Tab in the menu bar is selected, LMC the Academic Record menu option to see a list of options for enrollment. 3.1.4.1 Viewing Grades To view your grades, 1. 2. 3. 4. LMC View My Grades. A list of all the terms you have been enrolled in is displayed. [Exception exists] LMC the term you would like to see your grades for. [Exception exists.] The list of your courses for the term specified are displayed with Class Number, Section, Course Title, Component, Grading Basis, Official Grade, Units Earned, Courses Attempted, Units Taken Toward GP, Units Passed Towards GPA, Grade Points, Current GPA, and Cumulative Statistics. [Exception exists.] Exceptions 2.1. If you have not been enrolled into UW yet, no terms are displayed. 3.1. Clicking on a term that has not posted its marks yet results in an error page telling you when the marks will be posted for that term. 4.1. Some courses may not have grades yet. ‘NR’ is displayed for these instances. 3.1.4.2 Viewing Unofficial Transcript To view your unofficial transcript, 1. LMC View Unofficial Transcript. 28 2. Select your academic institution from the Academic Institution drop-down list. 3. Select your report type from the Report Type drop-down list. 4. LMC Go to generate your unofficial transcript. 3.1.4.3 Viewing Advisors For Graduate Students only, to view your advisors 1. LMC View My Advisors. 2. LMC the term you would like to see your advisors for. 3. A detailed description of your advisors is shown for that term. 3.1.5 Distance Education Once the Academics Tab in the menu bar is selected, LMC the Distance Education menu option to see a list of options for enrollment. 3.1.5.1 Viewing/Changing Exam Schedule Details To view/change exam schedule details, 1. LMC View/Change Exam Schedule Details. 2. A list of your Distance Education courses appears along with the date, time and location of your exam. [Exception exists] 3. To change the exam schedule, click the Change button that takes you to a PDF form to fill out for a request to change exam date/time. [Exception exists] Exceptions 2.1. If you do not have any Distance Education courses, you get a page saying no information about this transaction you requested. 2.2. Not all dates, times and locations may be final, therefore you may be told to check back again later. 3.1. Not all courses allow for a change in exam date and/or time. 29 3.1.5.2 Viewing Materials Information To view material information 1. LMC View Materials Information. 2. A list of all the materials for all Distance Education courses is displayed. [Exception exists] Exceptions 2.1. If you do not have any Distance Education courses, you get a page saying there is no information about this transaction you requested. 3.1.5.3 Viewing Assignment Information To view material information 1. LMC View Assignment Information. 2. A list of all the assignment information for all Distance Education courses is displayed. [Exception exists] Exceptions 2.1. If you do not have any Distance Education courses, you will get a page saying no information about this transaction you requested. 3.2 Viewing Admission Information In order to view and modify academics, LMC Admissions Tab in the menu bar. 3.2.1 View Admission Offers To view admission offers 1. LMC View Admission Offers 2. A list of all the offers for all programs that you have been accepted to is displayed. [Exception exists] Exceptions 2.1. If you do not have any admission offers, a page saying no admission offers available is displayed. 30 3.2.1.1 Accepting an Admission Offer To accept an admission offer 1. LMC Accept Offer, next to a program of which you were offered acceptance. 2. The Accept Offer that you clicked on changes to “Offer Accepted” to distinguish the program from the other offers (The decision is finalized after the offer deadline.) [Alternative exists] Alternatives 2.1. If you LMC on another Accept Offer, this becomes the newly accepted offer. (The decision is finalized after the offer deadline.) 3.3 Viewing and Modifying Personal Profile In order to view and modify personal profile, LMC Personal Profile Tab in the menu bar. 3.3.1 Viewing and Modifying Contact Information The contact information section has a tabular menu system which changes the content of the page based on the currently selected tab. 3.3.1.1 View and Modify Names LMC the Names tab and you are presented with a table for each of your preferred and primary names. To edit your names, follow the instructions in the Name Change Form. You can retrieve this form by LMC Name Change Form. 3.3.1.2 View and Modify Addresses To view and modify your address 1. LMC the Addresses tab and you are presented with a table containing your address information. 2. LMC Change Mail and Home Addresses(s) to make the fields in the table editable, as shown in Figure 12. [Alternative exists] 31 3. Enter your street addresses into the corresponding Address boxes (At least one address box needs to have information) (required) 4. Enter your city into the City box (required). 5. Enter your country into the Country box. 6. Enter the short form version of your province or state in the Province or State box (required). [Alternative Exists] 7. Enter your postal code or zip code [Exception exists] 8. Enter the date the address change will take effect in the Date box. 9. To add or change your country LMC Add/Change Country. From the lookup country page 1. Select the search criteria from the dropdown box: Name or Description. 2. Enter the description into the Description box or the country name into the Name box. 3. LMC Lookup to search for results. 4. If there are results LMC on one of them to select it and return back to previous page. 10. LMC Save button to save your change. [Exception exists] Figure 12 - Change Address Page Alternatives 2.1 If no address exists LMC Add a new Address to view the editable address fields. 32 2.2 Select if this address is either Mail or Home by LMC on either (or both) of the checkbox’s (at least one must be checked). 2.3 Follow steps from above 3-9 as above. 6.1 To search for a province/state LMC on the magnifying glass icon next to the province box. On the Search state/province search page, as shown in Figure 13, 1. From the first dropdown box select either to search by State/province or Description. 2. Enter the state/province in the State/province box or the description in the description box. 3. LMC Lookup to search for matching results. [Exception exists] 4. If results were found LMC one of them to select that value. Figure 13 - Search State/Province Page Exceptions 3.1 Results may not be found based on your search criteria 8.1 Use the calendar to select a date 1. Select the month from the Month dropdown box. [Alternative] 2. Select the year from the Year dropdown box. 3. LMC on a date on the calendar to select a day. [Alternative] Alternatives 1.1 Use the arrow icons to change the month. 3.1 You can select the current date by LMC on Current Date. 3.3.1.3 View and Modify Phone Numbers LMC the Phone Numbers tab to view a list of all the phone numbers that have been added 33 To add a phone number: 1. 2. 3. 4. 5. LMC Add a Phone Number box. Select a phone type from the Phone Type dropdown box. Enter a phone number in the Phone Number box. Enter an extension in the Extension box. Select if it is your preferred phone number. Only one phone number can be your preferred number. 6. LMC the Save button to add the number to the list. To delete a phone number LMC the Delete box next to the phone number you want to delete. 3.3.1.4 View and Modify Email Address To view e-mail addresses LMC E-mail Address tab. To edit your e-mail address you must update it via https://ego.uwaterloo.ca/~uwdir/Update 3.3.2 Viewing Demographic Information To view demographic information, 1. LMC View Demographic Information. 2. All demographic information pertaining to you is displayed here. [Exception exists] Exceptions 2.1. If Quest does not have all your demographic information some fields may be empty. 3.3.3 Viewing Service Holds To view demographic information, 1. LMC View Service Holds. 2. All your service holds are displayed here. [Exception exists] Exceptions 34 2.1. If you do not have any service holds, no holds are displayed. 3.4 Viewing Financial Information In order to view financial information, LMC the Finance tab in the menu bar. 3.4.1 Viewing Account Information Once the Finance tab has been selected, LMC Account Information. 3.4.1.1 Viewing Account Summary To view your account summary, 1. 2. 3. 4. LMC View Account Summary. A list of all your current and past-enrolled terms is displayed. [Exception exists] LMC the term you are interested in seeing your account summary for. Your balance is then shown, and to see more detailed information, LMC the Detailed Account Summary link. [Exception exists] 5. Now a detailed account summary is shown showing your Status, Tuition Fees, Financial Aid, OSAP Information, and all Balances. 6. For fee payment instructions, LMC the Fee Payment Instructions link to be taken to a page that links to various banks and tells you how to pay your fees. Exceptions 2.1. If you are not enrolled in any term yet, no terms are displayed. 4.1. If you click on a term that has not calculated its fees yet, no account summary information is shown yet. You are told to come back a later time. 3.4.1.2 Viewing Financial Aid To view your financial aid, 1. 2. 3. 4. LMC View Financial Aid. A list of all your current and past-enrolled terms is displayed. [Exception exists] LMC the term you are interested in seeing your financial aid for. A detailed description of all your financial aid is shown. [Exception exists] Exceptions 2.1. If you are not enrolled in any term yet, no terms are displayed. 35 4.1. If you do not have any financial aid, no information are displayed. 3.4.1.3 Viewing Earnings To view your earnings, 1. 2. 3. 4. LMC View Earnings. A list of all your current and past-enrolled terms are displayed. [Exception exists] LMC the term you are interested in seeing your earnings for. A detailed description of all your earnings is shown. [Exception exists] Exceptions 2.1. If you are not enrolled in any term yet, no terms are displayed. 4.1. If you do not have any earnings, no information are displayed. 3.4.1.4 Viewing Useful Links To view some useful links, 1. LMC View Useful Links. 2. A list of useful links are displayed such as links to Earnings, Financial Aid, OSAP, and Graduate Student Award Regulations 36 4.0 Advanced Features 4.1 Homepage Personalization 4.1.1 Overview of Feature The personalized homepage allows you to customize what is displayed on the next page subsequent to logging in. That is, you are able to add custom widgets to the main Quest page. Widgets can contain information and tools from various parts of the Quest system. For example, you can add a widget that contains your class schedule. Quest is a very large system, where depending on the user some features and tools are viewed and used more frequently than others. The personalized Quest homepage enables you to customize what part of Quest they see first. An example of a personalized homepage is shown below in Figure 14 . The screen is divided into two sections. On the left there are the widgets added by the user. On the right, there is a list of actions that control the widget list. Figure 14 - Personalized Homepage 4.1.2 Feature Usage 4.1.2.1 Adding Widgets To begin adding custom widgets to the personalized Quest homepage: 1. LMC on the Add Widget button located on the top right corner of the main Quest account page. 37 2. Upon clicking on the Add Widget button a prompt containing a list of widgets appears where one can then be selected and added to the custom homepage. 3. After selecting a widget LMC Add to Left button to add the selected widget to the left column or LMC Add to Right button to add widget to the right column. 4. Quest will ask to confirm whether or not the widget should be added to the personalized homepage. LMC Yes to continue. Each widget in the list is accompanied with a description indicating what part of quest you have chosen to display on your personalized homepage. 4.1.2.2 Removing Widgets To remove a widget from the personalized Quest homepage: 1. LMC on the 'X' symbol in the widget that you wish to remove. 2. Quest will ask you to confirm whether or not the widget should be deleted. LMC Yes to continue. 4.1.2.3 Adding Items to Widgets To add more items to a particular widget: 1. LMC on Add Item option in the selected widget. 2. Upon clicking on the Add Item option a prompt containing a list of items appear, where one can then be selected and added to the widget. 3. A pop-up window appears asking to confirm whether or not the item should be added to the widget. LMC Yes to continue. 4.1.2.4 Moving Widgets between Columns To move a widget to a different column (Left or Right): 1. LMC and hold on the header of the widget that needs to be moved to a different column. 2. Start dragging the widget by moving the mouse. A dotted line then appears indicating the new place of the widget. 3. When the dotted line represents the desired new location of the widget, release the left mouse button. 38 4.2 Enrollment Planner 4.2.1 Feature Overview The idea of the enrollment planner is to allow you to plan your enrollment for all future terms, easily manage prerequisites and co requisites and track the fulfillment status of your degree requirements. To access this feature LMC Advanced -> Enrollment Planner in the menu bar. The display of the Enrollment Planner feature is shown below in Figure 15. The screen is divided into two sections. On the left the 8 terms from 1A to 4B are shown. On the right, there is a list of the degree requirements. Figure 15 - Quest Enrollment Planner 4.2.2 Feature Usage 4.2.2.1 Adding courses To add a course to a specific term: 1. Move the mouse pointer to the section of the screen that corresponds to the term of interest. 2. LMC the Add Course button. [Exception exists] 3. Upon clicking the Add Course button a prompt containing a course search form appears. 39 4. Use the course search form to select a desired course. Refer to the section on Enrolling in a Class for more information. 5. Upon course selection, a prompt appears stating whether or not the course satisfies any degree requirements. LMC Yes to finalize course selection. LMC Back to return to the course search form and return to step 4. Exceptions 2.1 You cannot add courses to past terms; hence, the Add Course button only appears on future terms. 4.2.2.2 Removing Course To remove a course from a specific term: 1. Move the mouse pointer to the section of the screen that corresponds to the term of interest. 2. LMC the Remove Course button beside the course of interest. 3. Quest will ask to confirm whether or not the select course should be removed from the selected term. LMC Yes to proceed. 40 5.0 Troubleshooting and Tips 5.1 Troubleshooting LMC the Help tab in the menu bar or press F1 to be presented with a Help page that allows you to search for what you are having trouble with. 5.2 Tips • Navigate using the navigation menu or the toolbar. Avoid the use of Back and Forward buttons on the browser, because you get a lot of dialog boxes asking if you would like to resend information. • Quest logs you out after 20 minutes, so do not leave it inactive. • Always save your work in case you get logged out due to inactivity. 41 6.0 Limitations • The system is available only from 1:00 am to 11:59 pm Eastern Time, Monday, Tuesday, and Thursday through Saturday and 1:00 am to 6:59 am and 8:00 am to 11:59 pm Eastern Time, Wednesdays. • Some changes take a few days to process or show up on Quest due to administrative policies such as approvals and sign-offs. • Access to different functionalities of Quest depend on the user’s access level 42