1
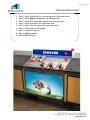
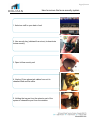
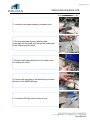
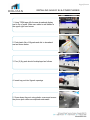
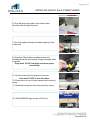
April 19
2013
This manual outlines the step-by-step installation of the Galaxy
S4 Phone on display.
Galaxy S4
Walmart
Installation
Manual
Page | 1
BEFORE INSTALLATION & PROTOCOL
BEFORE INSTALLATION
1. Confirm install date 1 – 2 days in advance
2. Obtain Manager’s name and number for day of
installation
PROTOCOL
3. Arrive to store on time and be polite and
professional with store employees and
customers
4. Wear clean HOLMAN shirt and pants
5. Foul language and unprofessional conduct will
not be tolerated
6. Damage to devices, graphics or displays must be
reported to HOLMAN immediately. HOLMAN is
not responsible for any damages that occur onsite. Any costs incurred to repair or replace
properties will be charged to installer.
PLEASE NOTE: WORK AREA MUST BE
COMPLETELY CLEANED BEFORE LEAVING
JOB SITE
**FAILURE TO COMPLY WITH THE ABOVE WILL
RESULT IN NON-PAYMENT**
UPON ARRIVAL TO STORE
1. Ask an available sales associate to speak with the Manager
2. Introduce yourself to Manager and explain why you are
there and provide them with Holman Business Card
3. Ask Manager for Vanguard Security Wrench
Page | 2
INSTALLATION LAYOUT
1.
2.
3.
4.
5.
6.
7.
8.
9.
One (1) White Galaxy S4 live or mock phone & lily pad spec card
One (1) Mock Black GS4 phone & lily pad spec card
One (1) Mock GS3 white/black phone & lily pad spec card
One (1) Mock Ace phone & lily pad spec card
One (1) Mock Discover phone & lily pad spec card
One (1) New back lite LED header
One (1) Alucabond panel
One (1) Balloon graphic
Rear SAMSUNG sign
Page | 3
New Samsung fixture will replace the Android display unit or the fixture left
of the Blackberry display. Remove all items and return to store staff. Keep
5 security units.
Page | 4
How to remove the Invue security system
1. Ask store staff to open back of unit
2. Use security key (obtained from strore) to deactivate
Inview security
3. Open InView secuirty unit
4. Unplug (2) two phone jack cables from unit to
release coiled and flat cable.
5. Holding the top post turn the retractor part of the
system to release the post from the retractor
Page | 5
INSTALLING LED BACK LITE
1. Remove all phones and graphic covers to reveal
metal
2. Place new SAMSUNG top sign and make sure it fits
properly
3. Using trust bolts and washers and bolts underneath
secure the sign down with atleast 6 screws as pictured
above
4. Ensure washers are placed under nuts before
tightenting otherwise SAMSUNG header will fall out
6. Remove back cover of samsung sign to expose
wiring
Page | 6
INSTALLING LED BACK LITE
1. Locate the new power adapter (included in box)
2. Run the male lead of power adapter cable
underneath the the metal and through the middle hole
of the left side from the back
3. Run the male lead cable around to the back of the
unit (hiding the cable)
4. Connect the male lead to the female plug located in
the back of the SAMSUNG sign
5. Locate the LED light unit (included in box)
Page | 7
INSTALLING LED BACK LITE
6. Affix Tesa tape to the 2 corners of the LED light unit
7. Center and affix the LED light unit with the lights
towards the SAMSUNG sign to the top inside of the
back cover
8. Once unit is affixed make sure the cable on left side
is not obstructing LED lights. Connect the cable
9. Run the cable from LED unit through the guide, and
close the back cover (make sure cable is concealed as
shown)
10. Front SAMSUNG sign should be glowing
Page | 8
INSTALLING GALAXY S4 & OTHER PHONES
1. Using TESA tape affix the new alucabond display
mat to top of metal. Make sure cable is well hidden in
the upper right hand corner
2. Peel plastic film of lillypads and afix to alucabond
mat as shown below.
3. Five (5) lily-pads should be displayed as follows.
4. Insert top post into lilypads openings
5. Screw down the post using plastic covers and ensure
the phone jack cables are exposed underneath
Page | 9
INSTALLING GALAXY S4s & OTHER PHONES
6. Slowly slide the new bracket onto GS4 (live device
only) and unscrew two (2) security screws using
secuirty bit provided by Holman
***New Bracket on live device only***
7. Attachd the phone power coupler to the disc sensor
**Must do before installing disc sensor on phone**
8. Slide disc sensor with coupler into place, and insert
metal security tab (it must slide through the opening on
the disc sensor)
9. Fasten all security screws on bracket using security
bit provided by Holman. If your unit has a 'safety'
sensor attach it to the front of the phone
10. Attach phone power coupler to phone. Check that
your 'safety' sensor is attached.
Safety Sensor
Page | 10
INSTALLING GALAXY S4s & OTHER PHONES
6. Drop the phone jack side of the coiled Inview
Security down through the posts
7. Run both cables through the middle opening of the
Inview unit
8. Wrap the Coiled cable around the Inview unit
following the arrow and connect. Plug the straight cable
in directly.
Plugs must 'CLICK' into place to ensure proper
connectivity
9. Join the Inview secuirty retractor to top post.
Unit must 'CLICK' to lock into place
10. Place cover on top of Inview system and connect to
power.
11. Reactivate Inview security using store key sensor
12. Affix SAMSUNG sign to back of LED unit.
Page | 11
CLEANING & FINAL INSTRUCTIONS
Cleaning Instructions
1. Make sure all protective plastic has been removed
from contents and devices
2. Gently wipe down any dirt, dust, and fingerprints on
contents and devices (Cleaning products?)
PLEASE NOTE: WORK AREA MUST BE
COMPLETELY CLEANED WITH NO BOXES OR
PLASTIC LAYING AROUND BEFORE LEAVING
JOB SITE AS HOLMAN WILL BE NOTIFIED IF THIS
IS NOT THE CASE
Final Instructions
1. Voluntary Bag Check: All installers must notify Store
Manager upon leaving and present/open their tool
bags voluntarily for a bag check.
2. Complete Sign-Off Sheet with Manager’s signature
3. Take 3-4 QUALITY Photos of the completed
installation from different angles (1 Full Shot & 1
Close up)
4. Take a photo of signed Sign-Off Sheet
5. Email all photos including photo of Sign-Off sheet to:
Ontario: [email protected]
Rest of Can: [email protected]
6. Report completion of installation. Provide HOLMAN
business card if you did not already do so.