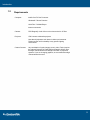
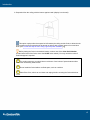
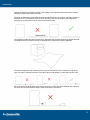
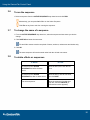
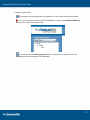
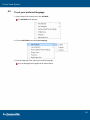
1
Immersive
Therapy
SuiteGuide
Manual
Kiosk
GestureFX
Hardware
Cube
Installation
User
Manual
Documentation Version
2.4.M01
Version 1.1.M01
3.1m00
Copyright and Legal Matters
GestureTek is a registered trademark of GestureTek Inc. All rights reserved.
The contents of this documentation are the property of GestureTek Inc. and are for the exclusive use of
registered users of the GestureFX Cube.
GestureFX Cube and Cube are trademarks of GestureTek Inc. All rights reserved.
Microsoft and Windows are either registered trademarks or trademarks of Microsoft Corporation in the
United States and/or other countries.
The Cube has been certified by TUV and CE.
Table of Contents
Introduction
1
1 this ..................................................................................................................................1
Using
Guide
2
Requirements
..................................................................................................................................2
3
Positioning
the Cube
..................................................................................................................................3
4
Securing
the
Cube
..................................................................................................................................6
Operating the Cube
7
To 1monitor..................................................................................................................................7
the projector operation
To 2start and
stop the Cube
..................................................................................................................................8
To 3start and
stop the Cube using a general power shutdown
..................................................................................................................................9
To 4reset the
Cube
..................................................................................................................................9
To 5correct..................................................................................................................................10
Keystone distortion
Using the GestureTek Control Panel
11
To 1preview
effects
..................................................................................................................................11
To 2add effects
to an existing sequence
..................................................................................................................................12
To 3create..................................................................................................................................13
a new sequence of effects
To 4change
the duration of effects
..................................................................................................................................14
To 5rearrange
the sequence of effects
..................................................................................................................................14
To 6run the
sequence
..................................................................................................................................15
To 7change
the name of a sequence
..................................................................................................................................15
To 8delete..................................................................................................................................15
effects or sequences
To 9catalog
effects
..................................................................................................................................16
To10change
background images
..................................................................................................................................18
Control Panel Options
20
To 1access
the Control Panel
..................................................................................................................................20
To 2set your
preferred language
..................................................................................................................................21
To 3set the..................................................................................................................................22
image orientation
To 4restore
the default Tracker settings
..................................................................................................................................23
To 5access
the logs
..................................................................................................................................24
To 6check..................................................................................................................................25
the projector lamp life
To 7upload..................................................................................................................................26
spot lists
Appendix A - Upgrading GestureFX Cube Software
28
What's New?
29
I
Troubleshooting
30
GestureTek Contact Information
31
II
Introduction
1
Introduction
The GestureFX Cube is a compact, "plug and play" unit that brings the power of gesture control to a
variety of display spaces. The Cube can project an 80" diagonal image on any floor, wall, table or
counter and is ideal for branding, advertising, entertainment and product promotion.
Any number of Cubes can be linked to a central location using the GestureTek Network Package (sold
separately). An administrator with a Cube can upload content from the Cube to the GestureTek server
and then, from the server, can download that content to any or all of the Cubes in his/her network.
User metrics and system information are also sent to the server and stored there to be accessed when
required. For more information on the GestureTek Network Package, contact your sales
representative.
This guide provides instructions for operating the Cube and for using the GestureTek Control Panel
and all its options.
1.1
Using this Guide
To help you work through the procedures, there is additional information provided. This information is
identified with icons as follows:
This is a note that gives additional information to aid your
understanding of the procedure or concept.
This is a tip that provides alternate methods or shortcuts.
This is a result statement which indicates what you can expect to see
or happen after performing a step.
This is a caution symbol that alerts you to the possibility that an action
or inaction may lead to loss of data or damage to equipment.
This is a cross-reference to another page.
1
Introduction
1.2
Requirements
Computer:
Intel® Core™2 Duo Processor
Windows® 7 Home Premium
QuickTime 7.6 MediaPlayer
Internet connection
Camera:
PGR Dragonfly 2 with 2.0 mm micro lens and a No. 87 filter
Projector:
2700 Lumens multimedia projector
Note that all projectors work better in darker environments.
Please test the unit for suitability in any specific lighting
environment.
Custom Content:
Any combination of static images, sound, video, Flash (requires
the optional GestureTek Flash SDK) and Dazzler effects. Note
that high contrast artwork will always look better on projection
systems. If you are changing graphics, we recommend that high
contrast artwork be used.
2
Introduction
1.3
Positioning the Cube
There are three ways to position the Cube:
1. Sitting upright on the floor or another horizontal surface (display is on the floor or the horizontal
surface).
2. Lying on its back on the floor or another horizontal surface, with the bottom against a wall (display is
on the wall).
This option requires that the image be rotated so that the effects are viewed right side up. See
To set the image orientation 22 in this User Guide.
3
Introduction
3. Suspended from the ceiling, with the bottom against a wall (display is on the wall).
This option requires either that space be left between the ceiling and the Cube, to allow the unit
to be turned on and off or that the unit be turned on and off with a general power turn on and shut
down (see To start and stop the Cube using a general power shutdown 9 ).
Before placing the Cube in the desired location, make a note of the Cube Serial Number
(located at the back of the Cube, above the On/Off rocker switch). You may need this number if
technical support is required.
For venting purposes, you should leave a minimum of two inches of space between either
side of the unit and any other surface.
Do not install the Cube inside a confined space, such as a cabinet.
Shut off the Cube, allow it to cool down and unplug it before covering the Cube with a dust
cover.
4
Introduction
Certain conditions may affect the quality of the display or the responsiveness of the Cube. Keep the
following in mind when locating the Cube:
The Cube is designed to project either directly onto the floor/wall or onto a floor mat with a maximum
thickness of 1/8". If a thicker floor mat or tile is used the Cube must be raised to the height of the
flooring (e.g. by placing the Cube on a piece of the thicker mat).
The projection surface should be flat and even. Otherwise the projected image may appear distorted.
The projector does not feature controls or adjustments to correct for this type of distortion.
The Cube's response to the movement of feet may be reduced if the Cube is placed in a dip in the
floor, or if there is a hump in the floor. Place the Cube on a flat surface, or shim and level the Cube.
Do not cover the slot at the base of the front of the Cube, or place any object between the Cube and
the user's feet, as it will interfere with the Cube's response to movement.
5
Introduction
1.4
Securing the Cube
The GestureFX Cube can be secured to the floor if desired, using either the mounting plate or a
security cable.
Using the mounting plate
1. Lay the Cube on its front on the floor.
2. Attach the mounting plate to the bottom of the Cube by lining up the four holes on the plate with the
four holes on the bottom of the Cube and inserting and securing four #6-32 x 0.500 Flat Head
mounting screws (not provided).
3. Position the Cube in the desired location.
4. Screw two additional mounting bolts, appropriate for the surface to which you are mounting the
Cube, through the two holes in the opposite side of the mounting plate and into the floor.
Using a security cable
1. Attach one end of a security cable (not provided) to the handle at the bottom back of the Cube.
2. Attach the other end of the cable to a stationary object such as a pillar, a post or other heavy,
immovable item.
6
Operating the Cube
2
Operating the Cube
The Cube is simple to operate. Within just a few minutes you can have the preset GestureFX Cube
demos running. It is helpful to know what is happening with the projector when you are operating the
Cube. This section provides instructions for monitoring the projector operation and starting and
stopping the Cube. If power to the Cube is interrupted by a power failure, you will have to reset the
Cube. Instructions are also provided for this.
In some cases, it might be desirable to shut the Cube off using a general power shutdown (for
example, where the Cube is just one of many exhibits and you would like to shut them all down at the
same time by shutting off the power). This can be done, but requires additional hardware (not
provided) and several additional steps. Instructions are provided in the section To start and stop the
Cube using a general power shutdown 9 in this User Guide.
It is important that the Cube be shut off for a few hours each day to avoid overheating. It is not
meant to run 24 hours a day.
A display surface (floor or wall) that is not level may cause the image to be distorted, making it look like
a trapezoid. This can be fixed using the Keystone correction function of the projector, as described in
To correct Keystone distortion 10 . Anytime the Cube is moved to a new location, it is possible that the
image will become distorted and have to be corrected again.
2.1
To monitor the projector operation
1. Look at the array of indicator lights on the front of the Cube.
You will have to look through the holes on the front panel at an angle to see the lights.
Do not look into the projector lens while checking the indicator lights.
2. Identify the color of each light and refer to the following diagram to determine what the lights are
indicating.
7
Operating the Cube
If you are unable to reach the Power button at the back of the Cube and need to turn the
projector on, you can insert a straightened-out paper clip in the hole on the left and use it to push
the Projector On/Off button.
2.2
To start and stop the Cube
To start the Cube
1. Plug one end of the power cord into the back of the Cube and the other end into a power outlet.
2. Press the round rubber-capped Power button at the back of the Cube.
The green LED light will come on and after about two minutes, the projector display will be
visible.
3. Allow the Control Panel to autostart, unless you want to create or run a different content set. In that
case, see Using the GestureTek Control Panel 11 .
To stop the Cube
To maintain the projector lamp life, once you turn the unit on, wait at least five minutes before
turning it off.
§ Press the round rubber-capped Power button at the back of the Cube to turn the computer and
projector off.
If you want the Cube to be shut off automatically by a general power shutdown, see the next
section for further information.
8
Operating the Cube
2.3
To start and stop the Cube using a general power shutdown
1. Plug the Cube power cable into a UPS (not provided) that is rated at 1500 VA or higher.
2. Plug the UPS into the power source.
3. Plug the UPS's USB cable into the Cube's rear USB port.
4. Configure the Cube's PC as per the UPS system's instructions.
You may also have to configure the Cube PC's BIOS to turn the PC on automatically when
power is restored.
You can now start and stop the Cube by shutting off the general power source.
2.4
To reset the Cube
1. At the back of the Cube, on the bottom right side, insert a pen or similar object into the hole in the
plate that covers the rocker switch.
2. Press the rocker switch back to the ON (|) position.
3. Press the round rubber-capped Power button at the back of the Cube.
The green LED light will come on and after about two minutes, the projector display will be
visible.
4. Allow the Control Panel to autostart, unless you want to create or run a different content set. In that
case, see Using the GestureTek Control Panel 11 .
9
Operating the Cube
2.5
To correct Keystone distortion
1. Point the projector remote at the front of the Cube and press the Keystone button on the remote.
The Keystone dialog box appears in the center of the screen.
2. Use the up and down arrows on the remote to correct the Keystone distortion. Aim for a rectangular
image.
If you pause for more than four seconds, the Keystone function disappears.
Pressing the KEYSTONE button a second time while the function is active, restores the default
Keystone setting.
By default, the last Keystone setting will be stored and reapplied even if the Cube has been
unplugged.
10
Using the GestureTek Control Panel
3
Using the GestureTek Control Panel
A flexible feature offered with the Cube is the ability to run as many different effects as you want, for as
long as you want. You can also change the sequence in which the effects run and the duration of each
effect through the GestureTek Control Panel. If desired, you can change the background image(s) in
most of the effects to another image contained in the Demos or to one of your own. The Cube has
been pre-configured with a set of 74 Demos called the GestureFX Cube Demos. The Cube is set up to
run the entire set of Demos automatically. However, you can also choose individual effects from any of
the suites to set up and save as many sequences as you like, catalog the effects in a way that makes it
easier to find the ones you want and preview individual effects. The GestureTek Control Panel is
accessed from the desktop. The following instructions take you through the steps for managing
effects.
3.1
To preview effects
1. If the Autostart countdown is running, click CANCEL to access the GestureTek Control Panel.
OR
If the effects are running, press the Esc key.
Dazzler closes and the Control Panel appears.
11
Using the GestureTek Control Panel
2. In the AVAILABLE EFFECTS window, right-click on an effect and select Preview Effect from the
context menu.
3.2
To add effects to an existing sequence
1. If the Autostart countdown is running, click CANCEL to access the GestureTek Control Panel.
OR
If the effects are running, press the Esc key.
Dazzler closes and the Control Panel appears.
2. From the ACTIVE SEQUENCE drop-down list on the right side of the Control Panel, select the
sequence to which you would like to add an effect(s).
3. From the AVAILABLE EFFECTS drop-down list on the left side of the Control Panel, browse to the
effect(s) you would like to add, click on it and then click on the right arrow button in the middle to
move it to the sequence you have chosen.
4. Click SAVE.
12
Using the GestureTek Control Panel
3.3
To create a new sequence of effects
1. If the Autostart countdown is running, click CANCEL to access the GestureTek Control Panel.
OR
If the effects are running, press the Esc key.
Dazzler closes and the Control Panel appears.
2. On the right side of the Control Panel, click NEW.
3. Click OK in the confirmation dialog box asking if you want to proceed with clearing the items in the
ACTIVE SEQUENCE window.
By default, the GestureFXCubeDemos sequence is displayed in the ACTIVE SEQUENCE
window. Clicking OK will not delete the GestureFXCubeDemos sequence. It will still be available in
the ACTIVE SEQUENCE drop-down text box.
4. In the DEFAULT DURATION field, on the lower left side of the Control Panel, enter the desired time
(in seconds) for each effect to run and click OK.
5. In the AVAILABLE EFFECTS drop-down box, select a folder to view, (either All, Demos or
Manual_Samples) and then click on the subfolders to view the effects.
It is possible to catalog the effects to make it easier to find the ones you want. See To catalog
effects 16 .
You can preview an effect, by right-clicking on it and selecting Preview Effect from the context
menu.
A thumbnail of the effect you have selected appears in the image window below the
AVAILABLE EFFECTS window.
6. Select any number of individual effects and copy them to the ACTIVE SEQUENCE window by
clicking on the right arrow.
If you've added an effect and change your mind, you can remove it from the new sequence by
selecting it and then clicking on the left arrow.
13
Using the GestureTek Control Panel
7. When you have completed your sequence of effects, click SAVE, enter a name for the sequence in
the pop-up box (shown below) and click OK.
3.4
To change the duration of effects
1. In the ACTIVE SEQUENCE window, select the effect(s) you want to change.
2. Click in the DURATION field and enter a new time (in seconds).
3. Click SET SELECTED.
You can change the duration of several effects at once, by holding the Ctrl key while selecting
the effects, entering a new time (in seconds) in the DURATION field and clicking SET SELECTED.
Change all of the effects at once, by clicking SELECT ALL, entering a new time (in seconds) in
the DURATION field and clicking SET SELECTED.
3.5
To rearrange the sequence of effects
1. Click and drag the effect you wish to move.
2. Release it when it's in the correct location.
3. Click SAVE.
If you try to exit before saving any changes, a pop-up box appears prompting you to SAVE
them, REVERT to the original sequence, or CANCEL your exit.
14
Using the GestureTek Control Panel
3.6
To run the sequence
§ Select a sequence from the ACTIVE SEQUENCE drop-down box and click RUN.
Alternatively, you can press Ctrl + R to run the Active Sequence.
Click Esc at any time to exit from running the sequence.
3.7
To change the name of a sequence
1. From the ACTIVE SEQUENCE drop-down box, select the sequence whose name you wish to
change.
2. Click SAVE AS and enter the new name.
File and folder names must be comprised of letters, numbers, underscores and dashes only.
3. Click OK.
The same sequence will now be saved under both the old and new names.
3.8
To delete effects or sequences
To Delete:
Do This:
An effect from the ACTIVE
SEQUENCE list before it's been
saved.
Select the effect, then click the left
arrow.
An effect from the ACTIVE
SEQUENCE list after it's been saved.
Select the effect, click the left arrow,
then click SAVE.
The entire sequence.
Select the sequence from the dropdown box, and click DELETE (a
confirmation text box appears).
15
Using the GestureTek Control Panel
3.9
To catalog effects
1. Browse to the Resources folder of your GestureTek Cube software.
The default location is C:\GestureTek\GestureFXCube\Resources.
2. Browse through the folders to the effect you would like to catalog and open the Config folder.
3. Open the config.gcf file with Notepad or another text editor.
4. Assign the effect to one or more catalogs by adding a line(s) between the opening and closing
catalog tags in the following format:
<catalog type="CatalogName"/> (Include quotation marks around the catalog name.)
Replace "CatalogName" with the name of the catalog you want to use. For example, if you want to
be able to find the effect "Coral" by looking in the "WaterEffects" catalog, you would insert the
following line:
<catalog type="WaterEffects"/> (shown below)
5. Click File>Save and close the text editor.
16
Using the GestureTek Control Panel
6. Start the Control Panel.
Any changes made to catalogs will only be applied once the Control Panel has been started.
The "Coral" effect will now show up in the "WaterEffects" catalog in the AVAILABLE EFFECTS
window of the Control Panel, shown below.
If you remove the line <catalog type="Demos"/>, the effect will no longer show up in the
Demos catalog but will still appear in the All catalog.
17
Using the GestureTek Control Panel
3.10
To change background images
1. In the AVAILABLE EFFECTS drop-down box, select a folder to view, (either All, Demos or
Manual_Samples) and then click on the subfolders to view the effects.
You can preview an effect, by right-clicking on it and selecting Preview Effect from the context
menu.
A thumbnail of the effect you have selected appears in the image window below the
AVAILABLE EFFECTS window.
2. Right-click on the effect whose background you would like to change and select Change
Background Image(s)... from the context menu.
Most effects can be changed this way. Where they cannot be changed (Flash effects for
example), this option will be unavailable. See the Dazzler User Guide (located in the Documentation
folder of the GestureFX Cube software or on the Documentation CD) for more information.
The Change Background Image(s) dialog box appears with the image name and a thumbnail
(if the file format allows for the thumbnail to be displayed) of the current background image, as
shown below. If you change the background image of a Demo or Manual_Sample, you will create a
new effect based on the existing Demo or Manual_Sample. The original effect remains unchanged.
18
Using the GestureTek Control Panel
3. Click CHANGE and browse to the location of your new background image (image files must have a
resolution of 1024 x 768 and be in one of the supported image file formats [TGA, BMP, JPG or
PNG]).
TGA files are fully supported if no transparency is present. If they contain transparency, they
will still work, but may not display as expected in the dialog box.
Image file names must be comprised of letters, numbers, underscores and dashes only.
4. Open the image file.
The name and thumbnail (if the file format allows for the thumbnail to be displayed) of the new
image now appears in the dialog box.
5. Click PREVIEW to view the new effect before saving it.
6. If you are satisfied with the new effect, click SAVE to update the effect (the original will be
overwritten) or SAVE AS to give the new effect a name, thus creating a new effect.
The Demo and Manual_Samples effects will never be overwritten, even if you give your
updated effect the same name as an existing Demo or Manual_Sample effect. However, if you
create a new effect, then change the background image of the new effect and save it with the same
name, it will be overwritten.
7. Click OK and in the Change Background Image dialog box, click EXIT.
You will be prompted to confirm that you want to exit. Click OK again.
Your new effect will now be stored in a Custom folder in the AVAILABLE EFFECTS window and
a thumbnail will appear in the image window when the new effect is selected.
19
Control Panel Options
4
Control Panel Options
There are six options available with the GestureTek Control Panel to enhance the user experience.
These options allow you to:
§ Set your preferred language (English, French or Spanish).
§ Set the image orientation (floor or wall).
§ Restore the default Tracker settings. The Tracker settings are pre-calibrated. If for some reason
your Tracker settings need to be reset to their factory defaults, use this feature.
§ Access the logs for troubleshooting purposes.
§ Check the projector lamp life, so you will know when to replace the projector bulb.
§ Upload spot lists (sequences) to the GestureTek server. This is an option that requires the
purchase of the GestureTek Network Package. Please contact your sales representative for more
information.
Instructions for using these options follow.
4.1
To access the Control Panel
1. If the Autostart countdown is running, click CANCEL to access the GestureTek Control Panel.
OR
If the effects are running, press the Esc key.
Dazzler closes and the Control Panel appears.
20
Control Panel Options
4.2
To set your preferred language
1. On the GestureTek Control Panel, click OPTIONS.
The OPTIONS menu appears.
2. From the OPTIONS menu select Set Language.
3. From the language menu, select your preferred language.
The new language will be applied to the Control Panel.
21
Control Panel Options
4.3
To set the image orientation
1. On the GestureTek Control Panel, click OPTIONS.
The OPTIONS menu appears.
2. From the OPTIONS menu select Set Orientation and from the context menu select either Floor or
Wall, depending on the position of the Cube.
Select Floor if the Cube is sitting upright on the floor or suspended from the ceiling.
OR
Select Wall if the Cube is lying on its back on the floor, projecting the display onto the wall.
A dialog box appears indicating that the files are being copied and asking you to wait. Then the
image will flip so that you are viewing it right side up.
You can also change the image orientation without going into the OPTIONS menu, by pressing
Ctrl + F (Floor) or Ctrl + W (Wall), as long as the Control Panel screen is currently displayed.
If you change the image orientation, the stored Keystone settings will be lost and you may have
to correct the Keystone distortion again. See To correct Keystone distortion 10 .
22
Control Panel Options
4.4
To restore the default Tracker settings
1. On the GestureTek Control Panel, click OPTIONS.
The OPTIONS menu appears.
2. From the OPTIONS menu select Restore Default Tracker Settings.
3. Click OK in the confirmation dialog box.
A dialog box appears indicating that the files are being copied and asking you to wait.
23
Control Panel Options
4.5
To access the logs
1. On the GestureTek Control Panel, click OPTIONS.
The OPTIONS menu appears.
2. From the OPTIONS menu select Display Logs.
A screen appears displaying the logs for the camera, Control Panel, Dazzler, the Tracker and the
projector.
3. Click on an individual log file name to display the text file for that item.
The logs are useful tools for troubleshooting and may be requested if you contact GestureTek
Technical Support.
4. Click on the X in the top right corner to close this screen.
24
Control Panel Options
4.6
To check the projector lamp life
1. On the GestureTek Control Panel, click OPTIONS.
The OPTIONS menu appears.
2. From the OPTIONS menu select Projector.
The PROJECTOR LAMP LIFE indicator appears displaying the number of hours that the
projector bulb has been working.
3. If the projector lamp is close to needing replacement (industry standard for lamp life is 2000 hours
at full power, or 3000 hours at low power), do so, following the steps in the GestureFX Cube
Projector Lamp and Filter Replacement Guide.
4. Click OK to close the Projector message box.
25
Control Panel Options
4.7
To upload spot lists
1. On the Control Panel, in the ACTIVE SEQUENCE drop-down box, select the sequence (or "spot
list") you want to upload.
2. Click OPTIONS.
The OPTIONS menu appears.
3. From the OPTIONS menu select Upload Spot List.
4. In the URL field, enter www.GTSystemMonitor.com/rxtx.php.
5. Enter your Username and Password (the ones you receive when you purchase the GestureTek
Network Package).
6. Select Save Password if you wish to do so.
26
Control Panel Options
7. Click Upload.
If the Username and Password you entered has multiple Client privileges, a dialog box with a
drop-down menu will appear, from which you can select the client to which you want to upload the
spot list.
Your spot list will be transferred to the GestureTek server and in the Status window, a message
appears to let you know that the spot list was uploaded successfully.
27
Appendix A - Upgrading GestureFX Cube Software
5
Appendix A - Upgrading GestureFX Cube Software
1. Create a Temp folder on your desktop.
2. Copy the following folders/files to the Temp folder.
§
The folder containing any custom content you've created (and name by you to identify it as
your own content), found in
C:\GestureTek\GestureFXCube\Resources.
§
The C:\GestureTek\GestureFXCube\Config folder.
§
The sequence spark file(s) generated by your custom content found in
C:\GestureTek\GestureFXCube\Resources\Sequences.
Sequences you've created using the demo files may not run in the new version.
3. Uninstall the old version of the software.
4. Install the new version.
5. Copy the folders/files from the Temp folder into the same locations in the new version.
Keep the same folder name.
6. Launch the GestureTek Control Panel and select OPTIONS.
7. From the OPTIONS menu select Restore Default Tracker Settings and click OK in the
confirmation dialog box.
A dialog box appears indicating that the files are being copied and asking you to wait. Once the
files have been copied, your custom folder will appear in the AVAILABLE EFFECTS window when
ALL is selected from the drop-down menu and your custom sequences will be available in the
ACTIVE SEQUENCE drop-down text box, provided that all the files referenced in your custom
sequences are available in the Resources folder.
28
What's New?
6
What's New?
Version 3.1
§ The Cube now runs on Windows 7 Home Premium.
Version 3.0
§ The Cube now has the ability to be linked to a server using the GestureTek Network Package (if this
service has been purchased), from which content can be changed and user metrics and system
information can be retrieved.
· User metrics include Effect Name, Effect Start Time, Effect End Time and Interactions Per
Second.
· System information includes the System Resource Utilization, Tracker Resource Utilization
and Dazzler Resource Utilization.
§ The Control Panel that comes with the Cube has three new features:
· Background images in the Demos can be changed.
· Individual effects can now be previewed
· Sequences (spot lists) can be uploaded to a server (if the GestureTek Network Package has
been purchased) from the OPTIONS menu.
29
Troubleshooting
7
Troubleshooting
Problem
Resolution
The Cube display doesn't respond.
Restart the Cube by first pressing and holding
the round rubber-capped Power button at the
back of the Cube, for at least eight seconds.
Then press the Power button again.
Projector shuts off by itself.
This feature protects the projector from
overheating. The projector will shut off
automatically if the temperature sensors reach
an unsafe level.
The warning indicator light on the front of the
Cube will blink red when this happens (see To
monitor the projector operation 7 for indicator
light placement). If this happens, allow the
projector to cool down. (The warning indicator
light will continue to blink until the projector is
turned on again.)
Then check the filter and clean if necessary (see
GestureFX Projector Lamp and Filter
Replacement Guide).
Make sure that the exhaust vents are not being
blocked by anything.
Make sure there is no heating/air conditioning
duct or vent near the Cube.
Restart the projector by pressing the round
rubber-capped Power button at the back of the
Cube.
The warning indicator light will go off.
Tracking appears inconsistent or does not
closely follow movement.
See To restore the default Tracker settings.
after restoring the settings, the tracking still
doesn't seem right, contact GestureTek
Technical Support 31 .
23
If
30
GestureTek Contact Information
8
GestureTek Contact Information
GestureTek Website: http://www.gesturetek.com
GestureTek Addresses: http://www.gesturetek.com/aboutus/worldwide-locations.php
Technical Support: http://www.gesturetek.com/support/index.php
Technical Support (Tel.): 1-800-315-1189 (Toll Free) or 1-416-340-9290, ext. 225
31
Index
A
O
Accessing the Control Panel 20
Adding effects to existing sequences
12
C
Cataloging effects 16
Changing Background Images 18
Changing duration of effects
Select all 14
Set selected 14
Changing sequence name 15
Control Panel Options 20
Accessing the Control Panel 20
Accessing the logs 24
Checking the projector lamp life 25
Restoring default Tracker settings 23
Rotating the image 22
Setting the language 21
Uploading sequences 26
Uploading spot lists 26
Correcting Keystone distortion 10
Creating new sequences
Active sequence 13
Cataloging effects 16
Default duration 13
Previewing effects 13
Running individual effects 13
Saving a sequence 13
Selecting effects 13
D
Deleting effects 15
Deleting sequences 15
31
18
L
Language
Logs 24
21
M
Monitoring the projector operation
Positioning the Cube 3
Previewing effects 11, 18
Projector lamp 25
Projector operation
Turning the projector on manually
7
R
Rearranging effect sequence 14
Requirements 2
Resetting the Cube 9
Restoring default Tracker settings
Rotating the image 22
Running effect sequence 15
23
S
Securing the Cube 6
Starting the Cube 8
Starting/stopping the Cube with a general power
shutdown 9
Stopping the Cube 8
Supported image file formats 18
Troubleshooting 30
Turning the projector on manually
I
Image file formats
Introduction 1
P
T
G
GestureTek Contact Information
Operating the Cube 7
Correcting Keystone distortion 10
Monitoring the projector operation 7
Resetting the Cube 9
Starting the Cube 8
Starting/stopping the Cube with a general power
shutdown 9
Stopping the Cube 8
7
7
U
Upgrading GestureFX Cube Software 28
Uploading sequences 26
Uploading spot lists 26
Using the GestureTek Control Panel 11
Adding effects to existing sequences 12
Previewing effects 11
Using the GestureTekControl Panel
Changing duration of effects 14
Changing sequence name 15
32
Index
Using the GestureTekControl Panel
Creating new sequences 13
Deleting effects or sequences 15
Rearranging effect sequence 14
Running effect sequence 15
Using this Guide 1
W
What's New?
29
33