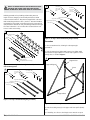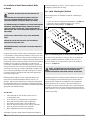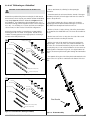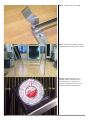
1
english
Operating and Installation Instructions
FLAT PLATE SOLAR COLLECTOR
›› SOL 25 PLUS
WWW.STIEBEL-ELTRON-USA.COM
SOL 25 PLUS | 1
1. CONTENTS
SECTION
PAGE
1.Contents___________________________________________________________ 2
2.
Safety Instructions________________________________________________ 3
3.
Assembly Instructions for the Professional_____________________ 4
3.1
Equipment Description_________________________________________________ 4
3.2
Important Information__________________________________________________ 4
3.3
Technical Data & Specifications_______________________________________ 5
4.
Installation Instructions___________________________________________ 6
4.1Accessories________________________________________________________________ 6
4.2
Planning and Installation______________________________________________ 8
5.
Mounting Systems_______________________________________________ 12
5.1
Installation of 45° Mounts on Roofs, Walls, or Ground_________13
5.1.1 45° Mounting on a Flat Roof_________________________________________13
5.1.2 45° Mounting on a Wall_______________________________________________16
5.1.3 45° Mounting on the Ground________________________________________16
5.1.4 45° Mounting on a Pitched Roof_____________________________________17
5.1.5 Detailed Assembly Instructions for 45° Mounting kit____________17
5.2
Installation of 30/60° Mounts on Roofs, Walls, or Ground_____28
5.2.1 30/60° Mounting on a Flat Roof_____________________________________28
5.2.2 30/60° Mounting on a Wall___________________________________________30
5.2.3 30/60° Mounting on the Ground_____________________________________31
5.2.4 30/60° Mounting on a Pitched Roof_________________________________32
5.2.5 Detailed Assembly Instructions for 60° Mounting kit____________32
5.3
Flush Mounting on a Pitched Roof__________________________________40
5.3.1 Detailed Assembly Instructions for Flush Mounting kit_________40
5.4
15-30° Tilt Mounting on a Pitched Roof____________________________47
5.4.1 Detailed Assembly Instructions for Tilt Mounting kit____________48
6.
Lightning Protection and Bonding______________________________ 60
7.
Setting Up and Interconnecting the Collectors_________________ 61
8.
Commissioning the System______________________________________ 62
8.1
Pressure and Leak Test________________________________________________62
8.2
Setting the Expansion Tank Pre-charge Pressure_________________62
8.3
Flushing the System___________________________________________________62
8.4
Final Charging and Venting The System___________________________63
8.5Start-up__________________________________________________________________63
8.6
Checklist for start-up of Solar Installations________________________64
9.
Maintenance and Care___________________________________________ 65
10.Troubleshooting__________________________________________________ 65
11.
Glossary of Terms________________________________________________ 67
APP. A Roof Mounting Detials___________________________________________ 71
APP. B Certification______________________________________________________ 73
APP. C Contact____________________________________________________________ 74
12.Warranty__________________________________________________________ 76
2 | SOL 25 PLUS
WWW.STIEBEL-ELTRON-USA.COM
General Information
Read this entire manual. Failure to follow all the guides,
instructions and rules could cause personal injury or property
damage. Improper installation, adjustment, alteration, service and
use of this unit can result in serious injury.
This unit must be installed by a professional installer. The
installation must comply with all national, state and local plumbing
and electric codes. Proper installation is the responsibility of the
installer. Failure to comply with the installation and operating
instructions or improper use voids the warranty.
Save these instructions for future reference. Installer should leave
these instructions with the consumer.
If you have any questions regarding the installation, use or operation
of this water heater, or if you need any additional installation
manuals, please call our technical service line at 800-582-8423
(USA and Canada only). If you are calling from outside the USA or
Canada, please call USA 413-247-3380 and we will refer you to a
qualified Stiebel Eltron service representative in your area.
english
2. SAFETY INSTRUCTIONS
Safety Instructions
THIS IS THE SAFETY ALERT SYMBOL. IT IS USED TO ALERT YOU
TO POTENTIAL PERSONAL INJURY HAZARD. OBEYALLSAFETY
MESSAGES THAT FOLLOW THIS SYMBOL TO AVOID POSSIBLE INJURY OR
DEATH.
COLLECTOR WARNING: A solar collector generates heat
from sunlight and all other types of light. This leads
to collector connectors getting very hot, even when they
are not filled, which creates a risk of burn injury. Cover the
collectors with opaque material until the installation has
been completed. It is recommended that you leave the collector
inside its packaging until it is installed.
SAFETY VALVE WARNING: Never install any valves or shutoff devices in the piping between the collectors and the
safety valve. The safety valve is actuated at 87 psi pressure.
Never set the solar loop pressure greater than potable
(domestic) water supply pressure. If the potable water
pressure is too low, a booster pump may be needed to assure
that it exceeds the required solar loop pressure.
The solar system must not bypass auxiliary system safety devices.
Check Valve
The Flowstar pump station is equipped with two check valves to
prevent heat loss from thermo-siphoning between the storage tanks
and the solar loop and collectors.
Drain Facility
Install a drain valve at the lowest point of the system.
Expansion Tanks
The diaphragm-type expansion tanks are designed for an operating
pressure of 87 psi and are resistant to deterioration from propylene
glycol mixtures.
The air-side inlet pressure should be set to 5-7 psi less than the system start-up (cold) pressure; check it when the system has not been
filled. This pressure must not be reduced.
WWW.STIEBEL-ELTRON-USA.COM
SOL 25 PLUS | 3
2. SAFETY INSTRUCTIONS (CONT.)
WARNING: Neither drop the collector nor anything onto
the collector.
Never step onto or stand on the collector.
Never leave the collector unsupported or unsecured. The
glass could break if the collector falls over CAUSING SERIOUS
INJURY OR DEATH.
WARNING: Setting the maximum tank temperature higher
than 140°F at the control unit is permissible only in
conjunction with a thermostatically-controlled DHW mixing
valve. Otherwise there can be a risk of scalding at the drawoff
point.
IMPORTANT: All sensor wiring should be rated for
expected temperatures and must be protected from
degradation and electrical interference.
Solar Loop
Use only a mixture of 50% GRAS (food grade) Propylene Glycol and
de-ionized water. (Heat Exchanger type SW, AWWA Fluid Class II see MSDS for handling instructions.)
WARNING: Fluid may be discharged at high temperature
and/or pressure.
No other fluid shall be used that would change the original
classification of this system. Unauthorized alterations to this
system could result in a hazardous condition.
Shut-Down
Use only a mixture of 50% GRAS (food grade) Propylene Glycol and
de-ionized water. (Heat Exchanger type SW, AWWA Fluid Class II see MSDS for handling instructions.)
Except for repair and/or emergency, the control unit and the pump
must remain powered and activated in order to avoid overheating
the collectors. Prior to shutting down the system for repairs, cover
the solar collectors or work at night.
If EMERGENCY SHUT-DOWN is needed, the system should be placed
in manual operating mode (set HND: OFF - see SOM controller
manual), then call for service. There are three isolation valves on
the Flowstar pump unit (see Flowstar manual).
4 | SOL 25 PLUS
3. Assembly Instructions
for the Professional
3.1 Equipment Description
The SOL 25 Plus flat-plate collector converts sunlight
(radiation) into heat. Light penetrates the glass cover, which is
pre-stressed, highly transparent single pane safety glass. As the
light strikes the absorber plate, it is converted into heat. The highly
selective vacuum coating of the absorber and the thermal insulation
on the back of the absorber reduce heat losses to the environment to
a minimum.
The thermal energy produced by the collector is transported by the
heat transfer medium (solar loop fluid), via a circulating pump, to
the storage tank(s). The inside of the collector can mist up under
certain operating conditions (e.g., large tank with low temperature
compared to the outdoor temperature and/or high relative
humidity). Vent holes are provided in the collectors for venting
humidity and equalizing air pressure.
3.2 Important Information
WARNING: RISK OF SCALDING. To prevent the solar fluid
from boiling in the collectors, the system should not be
flushed or filled during periods of strong sunshine.
System Pressure
Regularly check the pressure gauge of the heat transfer circuit at the
SE Flowstar pump station; it should indicate 50 psi when the system
is cold (below 86°F).
A 2-tank system should include bypass valves to bypass the solar
storage tanks. All valves should be labeled with operating position
indicated.
After-heating Backup
The backup heater should be of adequate capacity to provide sufficient hot water. The backup water heater must be certified, listed,
and labeled by an accredited safety certification organization.
Expansion Tank
The standard, 1.5-gallon expansion tank for the solar loop is sized
for up to 10 gallons of total system fluid volume and up to 60 feet in
overall system height.
WWW.STIEBEL-ELTRON-USA.COM
Model
Part no.
Height
Width
Depth
Grid dimension (incl. fitting)
Weight, empty
Standing temperature (at 1000 W/m²)
Operating pressure, min.
Permissible operating overpressure
Tested pressure (absorber, ex factory)
Test medium (ex factory)
Pressure test of complete solar system (with Tyfocor LS)
Flow rate - rated capacity
Pressure drop of collector (@26 gal/hr and 68°F fluid temp.)
Pressure drop of collector (@52 gal/hr and 68°F fluid temp.)
Connection
Heat-transfer medium
Heat-transfer medium (fluid) content, incl. manifold
Total area
Effective collector (aperture) area
Absorber area
Installation angle
Housing
Cover
Absorber
Pipe
Thermal insulation, rear wall
Thermal insulation, side wall
Seal
Connection fittings
Thermal power generated (per collector)*
Conversion factor h0
Heat loss value a0
Heat loss value a1
WWW.STIEBEL-ELTRON-USA.COM
SOL 25 Plus
185541
English Units
Unit Dim.
SI Units
Unit Dim.
87-15/16
48-1/8
3-1/16
48-1/8 x 91.46
108
410
50
87
160
inches
inches
inches
inches
lbs
°F
psi
psi
psi
2233
1223
78
1223 x 2327
49
210
3.5
6.0
11.0
mm
mm
mm
kg
°C
bar
bar
bar
115
13 - 80
~0.029
~0.087
0.43
29
27
27
0 to 6830
0.500
0.0027
mm
water
psi
7.8
gal/hr
50 - 300
psi
~2.0
psi
~6.0
G ¾¨ male BSPP (British Standard Pipe Parallel Thread)
Propylene Glycol, ready-mixed
gal
1.6
sq ft
2.7
sq ft
2.5
sq ft
2.5
20° - 90°
aluminum (saltwater-proof)
low-iron, tempered, 0.16” safety glass; super-transparent
copper, highly-selectively vacuum-coated
copper, header pipe ∅ 3/4, pot pipe ∅ 5/16
mineral wool, 1.57 inches / 40 mm thick
mineral wool, 0.39 inches / 10mm thick
EPDM
pipe bend (stainless steel) with union nut (brass) G ¾¨
BTU/hr
0 to 2000
0.781
BTU/(hr•ft²•°F)
2.838
BTU/(hr•ft²•°F)
0.0154
bar
l/hr
mbar
mbar
l
m2
m2
m2
W
W/(m²•K²)
W/(m²•K²)
SOL 25 PLUS | 5
english
3.3 Technical Data & Specifications
4. INSTALLATION INSTRUCTIONS FOR THE PROFESSIONAL
4.1 Accessories
Table 4.1.1 shows the mounting accessories available for several common arrangements of SOL 25 PLUS collectors.
* NOTE: All fasteners in these kits are of stainless steel.
Item
R1 frame for one SOL 25 plus collector, vertical installation. In combination with the mounting
hardware sets, permits installation on pantile roofs, corrugated sheet roofs, flat roofs or walls.
R2 frame for one collector, horizontal installation, or two collectors, vertical installation. In
combination with the mounting hardware sets, permits installation on sloped roofs, flat roofs or
walls.
Frame Connector kit for SOL 25 Plus. Connects two collector frames together.
Flush mounting kit for vertical installation on a roof or a wall for SOL 25 Plus Collector.
Flush mounting kit for horizontal installation on a roof or a wall for SOL 25 Plus Collector.
Frame tilt mounting kit for vertical installation of SOL 25 Plus (TWO NEEDED PER FRAME).
Frame tilt mounting kit for horizontal installation of SOL 25 Plus (TWO NEEDED PER FRAME).
45° mounting frame for vertical installation of SOL 25 Plus (TWO NEEDED PER FRAME)
45° mounting frame for horizontal installation of SOL 25 Plus (TWO NEEDED PER FRAME)
60° mounting frame for vertical installation of SOL 25 Plus (TWO NEEDED PER FRAME)
Aluminum Clamp for metal roof
6 | SOL 25 PLUS
Parts Included
Part No.
(2) profile rails
(8) anchor brackets
(8) sets M10-20 nuts and bolts
(2) profile rails
(16) anchor brackets
(16) sets M10-20 nuts and bolts
(1) compensator (flexible stainless steel tube
#170804) with vent screw and 2 seals
(2) S113 frame connectors
(8) sets M10-20 bolts and nuts
(2) S101 collector rails (vertical)
(4) S102 L-brackets
(8) sets M10-20 nuts and bolts
(2) S201 collector rails (horizontal)
(4) S102 L-brackets
(8) sets M10-20 nuts and bolts
(1) adjustable riser strut set (S103U, S103L)
(4) S102 L-brackets
(1) S109 cross-brace
(1) S101 collector rail (vertical)
(5) sets M10-30 nuts and bolts
(5) sets 1/4“-20 x 3/4“ bolts, nuts, and washers
(1) adjustable riser strut set (S103HU, S103HL)
(4) S102 L-brackets
(1) S109 cross-brace
(1) S201 collector rail (horizontal)
(5) sets M10-30 nuts and bolts
(5) sets 1/4“-20 x 3/4“ bolts, nuts, and washers
(1) SE45-110R support riser
(1) SE45-110B support base
(1) SE45-111 collector rail (vertical)
(1) S109 cross-brace
(2) sets M10-20 nuts and bolts
(3) sets 1/4“-20 x 3/4“ bolts, nuts, and washers
(3) sets 3/8“-16 x 3“ flange bolts and nuts
(1) S4528R support riser
(1) S4518B support base
(1) S107H collector rail (horizontal)
(1) S109 cross-brace
(2) sets M10-20 nuts and bolts
(3) sets 1/4“-20 x 3/4“ bolts, nuts, and washers
(3) sets 1/4“-20 x 2-1/2“ bolts, nuts, and washers
(1) SE60-110 support riser
(1) SE60-108 support base
(1) S101 collector rail (vertical)
(1) S109 cross-brace
(2) sets M10-20 nuts and bolts
(3) sets 1/4“-20 x 3/4“ bolts, nuts, and washers
(3) sets 3/8“-16 x 3“ flange bolts and nuts
(1) clamp
(2) 3/8“ bullet nosed setscrews
(1) M10 bolt with washer
185545
185546
SFC001
SFM001
SFM001H
SFT004
SFT004H
185543
074324
SE60
S5U
WWW.STIEBEL-ELTRON-USA.COM
Item
SE Flowstar Pump Station kit, including: circulator, expansion tank, pressure relief valve, 2 boiler
drains, temperature/pressure gauge, flowmeter, check valve, return line thermometer, air vent
SOM 6 SI differential temperature controller for one control function and 3 sensor inputs; (2)
FKP6 temperature sensors included
SOM 7 SI differential temperature controller for two control functions and 4 sensor inputs; V-bus;
(4) FKP6 temperature sensors included
SOM 8 SI, temperature differential controller for nine control functions and 15 sensor inputs;
V-bus; (6) FKP6 temperature sensors included
Collector sensor well (use one per control unit)
Pt1000 (1K RTD type) temperature sensor for SOM controllers
Purgomat air vent
Flexible stainless steel tube for SOL 25 PLUS panels
Dowfrost™ 50 ready-mixed propylene glycol heat transfer medium, (5.0 U.S. gallons, 19 liters,
contains 50% propylene glycol) - jug
Expansion tank, diaphragm-type (2.0 gal.)
SB 150 S (150 liter, 40-gal.) solar storage tank, single HX
SB 200 S (200 liter, 52-gal.) solar storage tank, single HX
SBB 300 S (300 liter, 82-gal.) solar storage tank, single HX; includes STAK-003 connection kit
SBB 400 S (400 liter, 110-gal.) solar storage tank, single HX; includes STAK-003 connection kit
SBB 300 Plus (300 liter, 82-gal.) solar storage tank, double HX; includes STAK-002 connection kit
SBB 400 Plus (400 liter, 110-gal.) solar storage tank, double HX; includes STAK-002 connection kit
SBB 600 Plus (600 liter, 163-gal.) solar storage tank, double HX; includes STAK-002 connection kit
Red indicator anode rod for SBB tanks
Anode rod for SBB 300-400 tanks
Anode rod for SBB 600 tank
Segmented (flexible) replacement anode for SBB tanks
Gasket for anode rod
Thermometer for SBB Tanks
WWW.STIEBEL-ELTRON-USA.COM
english
Table 4.1.2 shows the mounting accessories available for several common arrangements of SOL 25 PLUS collectors.
Parts No.
221339
222140
222141
227535
185307
165818
S10043
170804
074200
ST116
221220
221221
221219
221222
187873
187874
187875
140919
249041
249042
143499
036770
165967
SOL 25 PLUS | 7
8 | SOL 25 PLUS
SS
MV
Check Valve
Disconnect
Valve
Pressure
Rel. Valve
Pressure
& Temperature
Rel. Valve
Fill & Drain
Valve
Ball valve
PT
Coil-in-tank
Heat Exchanger
Two-way
flow
active
valve
closed
Flow Meter
AV Automatic
Vent
Pump
(3-speed)
Flexible Stainless Steel Tube with
3/4" BSPP thread union fittings
and manual vent
Pipe Fittings
Pressure
gauge
T
P
check
valve
active
Temperature Sensor
(RTD)
Thermometer
BC 1
S
T
BC 1 = ball valve with
integrated check &
thermometer well
LEGEND
Pre-charged pressure, measured
when open to atmosphere.
†
Air Fill
Valve
45 psi†
Expansion
Tank
Disconnect
Valve
SS
MV
Flow Meter
Fill &
Drain
Valve
Throttle and
isolation
valve
Pump
(3-speed)
BC 1
Fill &
Drain
Valve
BC 1
S1
TCS (tank connection
set) - 2 pcs.
Part no. 222418
Fill &
Drain
Valve
1" twin
nipples (2)
T
SS
MV
HX2
outlet
HX2
inlet
S2
S3
Solar
Storage
Tank
PT
Purg-O-Mat (auto-vent and
anti-steaming valve)
1" union fitting (STAK)
AV
1" union
fitting
(STAK)
overflow
container
mixing
valve
*For more information on the pump station and storage tank, please refer to “SBB Storage Tanks for Solar Applications” installation manual.
T/S4
Pressure Rel.
Valve
Pressure
Gauge &
Valve
50 psi
P
Pump
Station
Part no. 221339
Solar Collectors
SS
MV
MV
domestic water
supply
to field-supplied
supplemental DHW
heater (tankless or
tank-type)
4.2 Planning and Installation
System Schematic
A schematic diagram of components and pipe arrangements for a typical Stiebel Eltron SOLKIT system is shown in Figure 1.
1
Figure 1: SOLKIT System Schematic Diagram
WWW.STIEBEL-ELTRON-USA.COM
Pipework Installation
Use copper or stainless steel pipes or corrugated stainless steel
hoses for the supply and return lines. Pipe diameter is dependent
on length of run and expected flow rates. Recommended pipe
diameter for systems of up to 10 collectors is 3/4”. If the pipe run is
longer than 60 feet, a larger pipe diameter may be needed.
All pipe runs to the building interior shall be supplied by the
installer. Vent tiles are recommended for the roof penetrations on
steeply pitched tile roofs; for flat roofs, corrugated sheet roofs, and
roofs with shallow pitch, passing the pipes through an external
wall is recommended to avoid water leaks. Pipe hangers must
provide correct support and pitch and must meet building codes.
Hangers must not compress insulation and should allow for thermal
contraction and expansion of the pipework. Installers must comply
with all Local, State and National Codes.
We recommend trimming pipes with pipe cutters to avoid creating
metal filings. Electrically ground the pipework in accordance with
electrical codes. Connect all pipework to the building’s ground over
the shortest possible distance.
Soldered Pipe
Soldered pipe must be hard-soldered using 95/5 lead-free solder.
Alternative Piping
Piping made with locking ring fittings, press fittings, and corrugated
hoses must be sealed using suitable sealants. Seals must be
resistant to propylene glycol and temperatures up to 356°F.
Rated Volumetric Flow Rate
The rated volumetric flow rate for a collector array (max. 5 collectors)
is 27-80 gallons/hour or 0.45-1.33 GPM. All collector arrays must be
connected in parallel. The flow rate for every additional collector
array is added to the total, so in a system with 3 x 3 collectors, the
flow rate would be 80-240 gallons/hour.
Use the following recommended temperature and UV-resistant
thermal insulation to insulate the external pipework:
•
Polyiscocyanurate, PVC cover
•
Armaflex®
•
Mineral wool backed by aluminum mesh foil
•
Flexible EPDM hose (e.g. type Aeroflex®)
A rigid aluminum sheath is recommended as protection for the
mineral wool. The EPDM hose can be finished with UV-resistant
paint. Where required, protect the thermal insulation against bird
or rodent attack. Insulate all lines of the solar loop. Apply the
thermal insulation after pressure testing and checking the system for
leaks (see Section 8).
Extremely cold climates that experience nighttime winter
temperatures below -30°F may need thicker-than-standard pipe
insulation to prevent freeze-ups or slushing of the anti-freeze
mixture.
Minimum Insulation Thickness
Normal Diameter of Pipes
Less than 3/4”
3/4” to 1-1/4”
1-1/4” to 4”
Greater than 4”
Min. thickness of insulation layer, based
on thermal conductivity of 0.035 W/(m•K)
3/4”
1”
identical to pipe diameter
4”
Collector Temperature Sensor Well
The collector sensor well is threaded onto the outlet pipe of the
collector array (i.e., positioned at the hot side). The outlet
can be the upper left or right side of the collector, depending on
how the array is plumbed to the pump station. After installing
the sensor well on the collector, coat the sensor probe with heatconducting paste and insert it into the sensor well until it bottoms
out. Secure the lead to the outside of the insulation (to avoid
melting under high temperature operation) and under a protective
cover.
Cover the collector sensor well and the roof outlet with thermal
insulation, which must be tightly sealed and must be temperatureand UV-resistant. Also protect the thermal insulation against bird
attack. See Figure 2 for details.
Thermal Insulation
All hot water (and final 5 feet of cold water) piping requires
insulation of at least R-2.6. All exterior piping also requires UV and
moisture protection. Insulation must be resistant to temperatures up
to 356°F.
WWW.STIEBEL-ELTRON-USA.COM
SOL 25 PLUS | 9
english
IMPORTANT: To protect the system against frost and
corrosion, fill the solar heating system exclusively with
the recommended Propylene Glycol mixture (section 2.1.2). These
instructions are applicable only to single hydraulic assemblies
of no more than 30 individual collectors. Larger systems
require individual approval. Commercial systems must adhere
to local regulations.
2
Temperature sensor
with heat conducting paste
Thermal insulation
Roof outlet/duct
(corrugated hose)
Heat transfer medium
(flow direction)
Collector sensor well
Fitting
Figure 2: Collector Temperature Sensor Well
Storage Tank
In a standard residential solar heating system, one to three
collectors are connected in series to a solar storage tank of 80163 gallons capacity. Refer to the tank installation instructions for
details.
Storage Tank Temperature Sensor
The temperature sensor for the SBB tanks is inserted into the sensor
well of the lower internal smooth-tube heat exchanger (only the SBB
Plus tanks have an upper heat exchanger). Coat the collector sensor
with heat-conducting paste and insert it into the sensor well until it
bottoms out. It is very important that the sensor make full contact
(without gaps or voids) to the inside of the sensor well’s walls.
Secure the sensor and its lead (e.g. cable tie).
Installation Example
A general system schematic diagram of components and pipe
arrangements for a typical Stiebel Eltron SOLKIT domestic hot water
(DHW) heating system with both solar heating and alternative
afterheating (or reheating) with a boiler is shown in Figure 3.
10 | SOL 25 PLUS
WWW.STIEBEL-ELTRON-USA.COM
WWW.STIEBEL-ELTRON-USA.COM
SS
MV
P
T
S
T
check
valve
active
Check Valve
Disconnect
Valve
Pressure
Rel. Valve
Pressure
& Temperature
Rel. Valve
Fill & Drain
Valve
Ball valve
PT
Coil-in-tank
Heat Exchanger
Two-way
flow
active
valve
closed
Flow Meter
AV Automatic
Vent
Pump
(3-speed)
Flexible Stainless Steel Tube with
3/4" BSPP thread union fittings
and manual vent
Pipe Fittings
Pressure
gauge
Temperature Sensor
(RTD)
Thermometer
BC 1
BC 1 = ball valve with
integrated check &
thermometer well
LEGEND
Air Fill
Valve
45 psi†
Expansion
Tank
Disconnect
Valve
SS
MV
Flow Meter
Fill &
Drain
Valve
Throttle and
isolation
valve
Pump
(3-speed)
BC 1
Fill &
Drain
Valve
S1
BC 1
TCS (tank connection
set) - 2 pcs.
Part no. 222418
Afterheat Loop
to heating zones
S2
S3
Solar
Storage
Tank
1" union fitting (STAK)
Purg-O-Mat
(auto-vent
and
anti-steaming
valve)
Fill &
Drain
Valve
1" twin
nipples (2)
T
AV
PT
EX
mixing
valve
mixing
valve
overflow
container
1" union
fitting
(STAK)
Pump
Pump
*For more information on the pump station and storage tank, please refer to “SBB Storage Tanks for Solar Applications” installation manual.
T/S4
P
Pressure Rel.
Valve
Pressure
Gauge &
Valve
Pump
Station
Part no. 221339
Solar Collectors
SS
MV
Pre-charged pressure, measured
when open to atmosphere.
†
SS
MV
MV
P
english
domestic water
supply
to DHW piping
Afterheating
System
(boiler)
3
Figure 3: Collector Temperature Sensor Well
SOL 25 PLUS | 11
5. Mounting Systems
Mounting hardware for Stiebel Eltron SOL 25 PLUS solar collectors is available in the following configurations:
•
•
•
•
•
•
•
45° fixed mount, vertical orientation
45° fixed mount, horizontal orientation
30/60° fixed mount, vertical orientation
flush mount, vertical orientation
flush mount, horizontal orientation
15-30° tilt mount, vertical orientation
15-30° tilt mount, horizontal orientation
Select the collector mounting kit that is capable of providing the required tilt and azimuth in a mounting location that is not subject to
excessive shading of the solar collectors. The mounting kit must be securely attached to a structure capable of supporting and maintaining
its integrity under the static and dynamic (e.g., high wind) loading conditions.
The type of mounting system that is best-suited to the installation must be determined by the designer, and must take into consideration the
details of the roof, wall, or ground upon which the collectors are to be placed, the latitude and orientation of the site, the space available
for the collectors, possible shading from nearby structures or vegetation, etc. The intended use of the system should also be an important
consideration. For example, if the house is a summer residence that requires only domestic hot water during summer months, and it is
located near 45° north latitude, the best performance can be gained by mounting the collectors tilted between 10° and 30° from horizontal,
as the best solar gain will be obtained for summertime use1. In contrast, if most of the water heating (and some space heating) is required
during winter months, the best angle for collectors would be approximately 60° from horizontal, thus maximizing wintertime solar gain.
Stiebel Eltron furnishes mounting kits for each of the above arrangements and for each SOLKIT system. Table 5.1, below, gives details of the
kits and their components:
Table 5.1 Mounting Hardware Kits For SOLKIT Systems
No. of Panels in Array Vertical / Horizontal
1
Vertical
1
Horizontal
2
Vertical
2
Horizontal
3
Vertical
3
Horizontal
4
Flush Mount
(1) 185545
(1) SFM001
(1) 185546
(1) SFM001H
(1) 185546
(1) SFM001
(2) 185546
(1) SFC001*
(2) SFM001H
(1) 185546
(1) 185545
(1) SFC001
(1) 170804
(2) SFM001
(3) 185546
(2) SFC001
(3) SFM001H
15-30° Tilt Mount
45° Mount
(1) 185545
(1) 185545
(2) SFT004
(2) 185543
(1) 185546
(1) 185546
(2) SFT004H
(2) 074324
(1) 185546
(1) 185546
(2) SFT004
(2) 185543
(2) 185546
(2) 185546
(1) SFC001*
(1) SFC001*
(4) SFT004H
(4) 074324
(1) 185546
(1) 185546
(1) 185545
(1) 185545
(1) SFC001
(1) SFC001
(1) 170804
(1) 170804
(3) SFT004
(3) 185543
(1) S104
(1) S109
(3) 185546
(3) 185546
(2) SFC001
(2) SFC001
(6) SFT004H
(6) 074324
No kit available; requires custom design.
30/60° Mount
(1) 185545
(2) SE60
N/A
(1) 185546
(2) SE60
N/A
(1) 185546
(1) 185545
(1) SFC001
(1) 170804
(3) SE60
(1) S109
N/A
* If mounting horizontally in one row.
1
Peak altitude angle of the sun at noon, at 45° north latitude, at summer solstice, is about 68°. Maximum gain occurs with panels normal (perpendicular) to this angle, or
tilted 22° from horizontal, facing true south. Overall gain is not reduced significantly if collectors are within ±10° of the optimum tilt angle and within ±15° of true south.
12 | SOL 25 PLUS
WWW.STIEBEL-ELTRON-USA.COM
Flush Mount
15-30° Tilt Mount
Flat Roof
NR
NR
Wall
NR
NR
Ground
NR
NR
Pitched Roof
•
(Sec. 5.3)
•
(Sec. 5.4)
45° Mount
•
(Sec. 5.1.1)
•
(Sec. 5.1.2)
•
(Sec. 5.1.3)
•
(Sec. 5.1.4)
30/60° Mount
•
(Sec. 5.2.1)
•2
(Sec. 5.2.2)
•
(Sec. 5.2.3)
•
(Sec. 5.2.4)
Table 5.2: Mounting Configurations Available (NR = not recommended for most applications).
5.1 Installation of 45° Mounts on Roofs, Walls,
or Ground
IMPORTANT: Installed height must not exceed 60 feet.
Check the roof structure to ensure proper support for
collectors, mounting hardware, wind loads, etc. (static
calculation required; if necessary, contact the builder).
All roofing work must be carried out by a professional roofing
contractor. When working on roofs, observe all relevant
safety regulations, in particular: “Safety regulations for
work on roofs” and “Safety and recovery harnesses”v (or local
regulations).
Installers must comply with all Local, State, and National
Codes.
Rope may be used to hoist collectors, but must never be
attached to the collectors’ pipes.
Tools Needed:
1.
2.
3.
4.
5.
6.
7.
Power drill with 1/4” drill bit. Bits of other sizes are recommended as well.
11/16” drill bit for corrugated sheet roof installations.
Two 17mm wrenches and/or sockets for M10 bolts.
Two 15mm wrenches and/or sockets for M10 nuts.
Two 7/16” wrenches/sockets for 7/16” and 1/4” nuts/bolts.
Two 9/16” wrenches/sockets for 3/8” nuts/bolts.
One 2” adjustable wrench for collector fittings.
5.1.1 Mounting on a Flat Roof
Two mounting frames are available for fixed, 45-degree collector tilt:
R1 for one collector installed vertically (185545). See Figure 4.
R2 for two collectors installed vertically or one collector installed horizontally (185546). See Figure 5.
•
•
4
Anchor brackets (panel clips)
M10 nuts
M10 bolts
M6 nuts
When working on roofs, all relevant safety regulations must
be observed.
Designers and installers should consider how rainwater, snow, and
ice accumulation is affected by the installation of the collectors and
mounting hardware. Collectors affect the flow of rainwater around
them, so appropriate means for conducting the water away from the
vicinity of the collectors must be provided. Collectors and mounting
hardware are also subject to accumulation of snow and ice in
cold climates. Installations must provide protection to people and
structures below the solar collectors to avoid hazards due to falling
snow and ice as it melts (or is blown off by winds). Installers must
also consider the possibility of snow and ice falling onto collectors
from any structures located above them and provide appropriate
means of protecting them.
Building materials adjacent to solar components must not be
exposed to the elevated temperatures that the collectors can
generate. Exposed components (that can readily be reached) must
be maintained below 140°F or otherwise be insulated/isolated. All
other exposed surfaces that can exceed 140°F should be labeled with
appropriate burn hazard warnings.
Profile rails
Figure 4: R1 Mounting Frame for Vertical Collector Arrangement
For 45° vertical mounting on a flat roof, two sets of (185543) flatroof/wall mounting hardware are needed; for two collectors or
more, the number of sets required is the same as the number of
collectors. See Figure 6.
For 45° horizontal mounting on a flat roof or a wall, the number
of BF W (074324) flat-roof/wall mounting hardware sets needed is
twice the number of collectors. See Figure 7.
2
30° mounting is not recommended for wall mounting without additional
supporting structures.
WWW.STIEBEL-ELTRON-USA.COM
SOL 25 PLUS | 13
english
Recommended mounting kits for installation sites, and corresponding section numbers:
NOTICE: To prevent excessive pressure drop in the solar
loop, never link up more than 5 collectors in series.
Arrange the individual linear arrays parallel to each other.
7
1/4" washers
M10 nuts
M10 bolts
Building penetrations for plumbing and mounting must not
impair enclosure integrity or functionality and must not allow
rodent or vermin intrusion. They must meet applicable codes and
National Roofing Contractors Assoc. practices. Structural members
penetrated by solar system components must not be compromised
and penetrations must meet code, particularly penetrations through
fire-rated construction. Do not reduce fire resistance below code.
Protect control sensor wiring.
1/4"-20 nuts
1/4" washers
1/4"-20x3/4"
bolts
1/4"-20 nuts
1/4"-20 x
2-1/2" bolts
Support Riser (S4528R)
Support Base (S4518B)
Support Diagonal (S107H)
Brace (S109)
5
Anchor brackets (panel clips)
M10 nuts
M10 bolts
M6 nuts
Figure 7: 45-degree Horizontal Mounting Kit (p/n 074324).
Proceedure
1. Choose attachment site, allowing for subsequent pipe
penetration.
2. Bolt the support base (SE45-110B), support riser (SE45-110R)
and transverse support (SE45-111 collector rail) together to form a
triangle truss, as shown in Figure 8.
Profile rails
Seals
Compensator
(Flexible Stainless Steel Pipe)
Figure 5: R2 Mounting Frame for Single Horizontal (or Two Vertical)
Collector Arrangement.
6
1/4" washers
1/4"-20 nuts
M10 nuts
1/4"-20x3/4"
bolts
M10 bolts
8
Support Riser
Support Diagonal
Brace
3/8"-16 flange nuts
3/8"-16 x 3" bolts
Support Riser (SE45-110R)
Support Base (SE45-110B)
Support Diagonal (SE45-111)
Brace (S109)
Support Base
Figure 6: 45-degree Vertical Mounting Kit (p/n 185543).
Figure 8: Assembled triangle trusses with cross-braces.
3. Bolt the resulting truss(es) to the upper and lower profile (frame)
rails.
4. If installing one collector, the triangle trusses must be set up at
14 | SOL 25 PLUS
WWW.STIEBEL-ELTRON-USA.COM
9
R2 Profile Rail
(2-collector width)
R1 Profile Rail
(1-collector width)
Frame
Splice
5. If installing two or more collectors, the
triangle trusses are to be positioned at the
midpoint, behind the collectors.
6. Whenever two or more triangle trusses
are installed, brace the center span with a
cross-brace, as shown in Figure 8.
R2 Profile Rail
(2-collector width)
Brace
7. When installing four or five trusses, brace
both end spans with crossbraces, as shown
in Figure 9. For six or more trusses, crossbraces should also be placed in an inside
span.
48.1 in.
8. If multiple flat-roof mounting frames are
being set up next to one another, use frame
connector (splice) kits (SFC001, shown in
Figure 10) to join them, as shown in Figures
9 and 11. Line up the mounting supports
with a string so that the mounting frames
will be aligned properly.
9. Fasten the flat-roof mounting racks to the
roof in an appropriate manner, or weight
them down with at least 400 lbs. (180 kg) of
solid, dead weight (e.g. concrete slab) per
collector if the installed height is less than
25 ft (8 m). Remember to take the static and
dynamic (e.g., wind) loading into account for
the roof structure.
24 in.
24 in.
48.1 in.
96.3 in.
48.1 in.
144.4 in.
Figure 9: Multiple-collector framing arrangement, with frame connectors and cross-bracing.
10
M10 nuts
M10 bolts
Frame Connectors
10. For installed heights above 25 ft. (8 m),
weighting is not advisable due to the higher
wind loading conditions. In this case, the
holes in the horizontal support base (SE45110B) should be used to fasten the mounting
hardware to the roof (six M6 bolts per
horizontal support).
Multiple Rows of Collectors:
If multiple arrays of collectors are being
installed on a flat roof, one behind another,
the recommended spacing between them
should be:
• at least 25 ft. (7.6 m) for vertical installation, as shown in Figure 12; or
• at least 14 ft. (4.0 m) for horizontal installation, as shown in Figure 13.
This spacing prevents excessive shading
from adjacent rows for latitudes of up to
50°. For latitudes significantly higher than
50°, multiple rows of collectors may not be
practical due to low sun altitude angles.
Figure 10: SFC001 Frame Connector (Splice) Kit.
11
Frame Connector (splice) to
join two profile rails
Profile rails
Figure 11: SFC001 Frame Connector (Splice) Kit.
WWW.STIEBEL-ELTRON-USA.COM
SOL 25 PLUS | 15
english
intervals of ≤ 82 in. (210 cm) for horizontal
installation or ≤ 43 in. (110 cm) for vertical
installation.
Fastening To Structures
Array spacing for 45° Vertical Mounting
on a flat roof or ground.
The type of roof or wall is a crucial factor in
the choice of fasteners. Remember to take
the static and dynamic (live load) forces into
account.
The 45° vertical mounting racks can develop
significant pull-out forces under heavy wind
conditions; therefore it is important to take
wind loads into account.
At least 25 ft. (7.6 m)
Figure 12: Recommended row spacing for 45° vertical arrays for latitudes up to 50°.
Force data for each collector:
Mounting Ht.
Shear Force
Tensile Force
Up to 26 ft.
(8m)
Up to 65 ft.
(20m)
470 lbs.
(2.1 kN)
790 lbs.
(3.5 kN)
250 lbs.
(1.1 kN)
700 lbs.
(3.1 kN)
Array spacing for 45° Horizontal Mounting
on a flat roof or ground.
To handle shear forces along the fastening
surface, 6 fasteners over which the shear
force is distributed are recommended.
To handle tensile forces perpendicular
to the fastening surface, 6 fasteners over
which the tensile force is distributed are
recommended.
Figure 13: Recommended row spacing for 45° horizontal arrays for latitudes up to 50°.
For anchoring in concrete, use six M8 UPAT
Multicones or SM M10 anchors, both of
stainless steel, per collector.
ice or nearby vehicles or other hazards.
Appropriate precautions should be taken to
mitigate these hazards.
For anchoring in wood, use six wood screws
in accordance with DIN 571, at least 10 x 80,
of stainless steel, per collector.
5.1.3 45° Mounting On The Ground
5.1.2 45° Mounting On A Wall
Procedures described above for mounting
of collectors upon a flat roof apply to wall
mounting, except for the following:
1. If multiple wall-mounting frames are
being set up next to one another, use frame
connector (splice) kits (SFC001) to join them.
Line up the mounting supports with a string
so that the mounting frames will be aligned
properly.
2. Fasten the wall mounting supports to the
wall in a suitable manner, using the holes in
support riser (SE45-110R), then tighten all
bolts and screws.
3. Maintain the spacing between connection
points (as specified by the manufacturer).
4. Low elevation mounting configurations
may be prone to damage from falling
16 | SOL 25 PLUS
At least 14 ft. (4.0 m)
and protection of collector piping essential.
Installers should consider laying pipe runs
below grade to avoid damage and to mark
the location of these runs to avoid damage
from digging operations.
Procedures described above for mounting of
collectors upon a flat roof apply to ground
mounting, except for the following:
1. Installer must ensure that the mounting
foundation for the system is not subject to
movement, such as frost heaves. Therefore,
it is necessary to install footings below the
frost line in locations subject to freezing
weather. If it is not possible or practicable
to avoid movement due to frost, etc., it will
be necessary to provide a floating frame
that does not flex or warp the collectors’
mounting frames if the ground shifts or
heaves.
2. Ground mounting configurations may be
prone to damage from falling ice or nearby
vehicles or other hazards. Appropriate
precautions should be taken to mitigate
these hazards.
3. Ground mounting often requires longer
outside piping runs, so proper insulation
WWW.STIEBEL-ELTRON-USA.COM
english
5.1.4 45° Mounting On A Pitched Roof
Procedures described above for mounting of collectors upon a flat
roof apply to mounting on a pitched (sloped) roof, except for the
following:
1. Use of weights to secure collectors and mounting hardware is
not advisable. Collector mounting frames should be fastened to all
pitched roofs in an appropriate manner.
2. The 45° mounting kits add 45° to an existing roof pitch, as shown
in the table below. Roofs with pitches above 9-in-12 generally
should not use this mounting kit, as the resulting collector tilt angle
will be too steep for almost any location.
Roof Pitch (rise-to-run)
Roof Pitch Angle
Resulting Collector Tilt Angle with 45° Mount
1-in-12
4.8°
49.8°
2-in-12
3-in-12
4-in-12
5-in-12
6-in-12
7-in-12
8-in-12
9-in-12
10-in-12
11-in-12
12-in-12
9.5°
14.0°
18.4°
22.6°
26.6°
30.3°
33.7°
36.9°
39.8°
42.5°
45.0°
54.5°
59.0°
63.4°
67.6°
71.6°
75.3°
78.7°
not recommended
not recommended
not recommended
not recommended
5.1.5 Detailed Assembly Instructions for 45° Mounting Kit
Step 01: Major components for assembly of
the Stiebel Eltron 45° mounting kit (single
panel vertical version displayed).
Step 02: Align the mounting system
components upside down as shown. The
longer cutout surface (approx. 1”) should
be facing toward the center of the rectangle
and be parallel to the ground on both the
top and bottom. This is the surface on which
the back of the collector will rest.
WWW.STIEBEL-ELTRON-USA.COM
SOL 25 PLUS | 17
Step 03: Prepare to assemble the top left
corner.
Step 04: Slide M10 bolt into slot of profile
rail.
Step 05: Position the diagonal support such
that the M10 bolt protrudes through the hole
closest to the end.
Note 1: If assembling a 45° horizontal
mounting system, there is only one hole on
either end of the diagonal support.
Note 2: If assembling a mounting system
using the longer profile rails (p/n 185546)
the diagonal supports should not be fastened to the ends of the profile rails, but
should be assembled such that the supports
are approximately 2’ from each side of the
profile rail and are therefore approximately
4 feet from each other.
18 | SOL 25 PLUS
WWW.STIEBEL-ELTRON-USA.COM
Step 07: Prepare to assemble the bottom 2
corners. Remember to double check that the
longer cutout surface (approx. 1”) is facing
toward the center of the rectangle and is
parallel to the ground.
Step 08: : Prepare to assemble the bottom
left corner.
WWW.STIEBEL-ELTRON-USA.COM
SOL 25 PLUS | 19
english
Step 06: Install M10 nut. Repeat the last 4
steps for the top right corner.
Step 09: Slide M10 bolt into slot of profile
rail.
Step 10: Position the diagonal support such
that the M10 bolt protrudes through the hole
furthest from the end.
Step 11: Install M10 nut. Repeat the last 4
steps for the bottom right corner.
20 | SOL 25 PLUS
WWW.STIEBEL-ELTRON-USA.COM
english
Step 12: Resulting assembly.
Step 13: When performing assembly steps
involving the base support, make sure to use
the same end of said supports for analogous
parts of each half of the assembly, as they
appear to be symmetrical but are not. To
check, line them up as shown. This is the
correct orientation.
NOTE: This is the incorrect orientation.
WWW.STIEBEL-ELTRON-USA.COM
SOL 25 PLUS | 21
Step 13: Prepare to assemble one of the 90°
joints.
Step 14: Align the holes of the two supports
and insert one of the 3/8”-16 x 3” bolts.
Step 15: Install one of the 3/8”-16 nuts.
22 | SOL 25 PLUS
WWW.STIEBEL-ELTRON-USA.COM
Step 17: Repeat this process for the top of
the rectangle.
WWW.STIEBEL-ELTRON-USA.COM
SOL 25 PLUS | 23
english
Step 16: Install the base support to the
to the bottom of the assembled rectangle
by repeating the two previous steps.
Remember that the bottom is the end in
which the diagonal support is attached to
the profile rail using the hole furthest from
the end (vertical kit only).
Step 18: Resulting assembly.
Step 19: Repeat these processes for the
other half of the rectangle.
24 | SOL 25 PLUS
WWW.STIEBEL-ELTRON-USA.COM
Step 21: Align the cross braces and
fasteners as shown and loosely attach the 2
cross braces.
WWW.STIEBEL-ELTRON-USA.COM
SOL 25 PLUS | 25
english
Step 20: Rotate the assembly so that it is
resting on the base.
Step 22: Loosely attach one of the corners
of the ‘X’ to one of the upper slots of the
kit’s vertical support using a ¼” nut, bolt,
and washer. The preferable slot to use is
dependent upon the distance between the
two triangles, which in turn is dependent
upon the specificities of each installation. If
the collectors are being mounted on a wall
it is usually preferable to install the cross
braces between the two base supports.
Step 23: Loosely attach the ‘X’ to the same
slot on the other vertical support (base
support if performing a wall mount).
26 | SOL 25 PLUS
WWW.STIEBEL-ELTRON-USA.COM
WWW.STIEBEL-ELTRON-USA.COM
SOL 25 PLUS | 27
english
Step 24: Attach the bottom of the ‘X’ to the
requisite lower slots and tighten all nuts and
bolts. The unit is now assembled and ready
for mounting.
5.2 Installation of 30/60° Mounts on Roofs, Walls,
or Ground
IMPORTANT: Installed height must not exceed 60 feet.
Check the roof structure to ensure proper support for
collectors, mounting hardware, wind loads, etc. (static
calculation required; if necessary, contact the builder).
All roofing work must be carried out by a professional roofing
contractor. When working on roofs, observe all relevant
safety regulations, in particular: “Safety regulations for
work on roofs” and “Safety and recovery harnesses”v (or local
regulations).
Installers must comply with all Local, State, and National
Codes.
vertical arrangement of collectors. The truss that the kit forms can
be flipped to provide either tilt angle.
5.2.1 30/60° Mounting On A Flat Roof
Two mounting frames are available for fixed 30- and 60-degree
collector tilt:
• R1 for one collector installed vertically (185545). See Figure 14.
• R2 for two collectors installed vertically or one collector installed horizontally (185546). See Figure 15.
14
Anchor brackets (panel clips)
M10 nuts
M10 bolts
M6 nuts
Profile rails
Rope may be used to hoist collectors, but must never be
attached to the collectors’ pipes.
When working on roofs, all relevant safety regulations must
be observed.
Designers and installers should consider how rainwater, snow, and
ice accumulation is affected by the installation of the collectors and
mounting hardware. Collectors affect the flow of rainwater around
them, so appropriate means for conducting the water away from the
vicinity of the collectors must be provided. Collectors and mounting
hardware are also subject to accumulation of snow and ice in
cold climates. Installations must provide protection to people and
structures below the solar collectors to avoid hazards due to falling
snow and ice as it melts (or is blown off by winds). Installers must
also consider the possibility of snow and ice falling onto collectors
from any structures located above them and provide appropriate
means of protecting them.
Figure 14: R1 Mounting Frame for Vertical Collector Arrangement
Building materials adjacent to solar components must not be
exposed to the elevated temperatures that the collectors can
generate. Exposed components (that can readily be reached) must
be maintained below 140°F or otherwise be insulated/isolated. All
other exposed surfaces that can exceed 140°F should be labeled with
appropriate burn hazard warnings.
Building penetrations for plumbing and mounting must not impair
enclosure integrity or functionality and must not allow rodent or
vermin intrusion. They must meet applicable codes and National
Roofing Contractors Assoc. practices. Structural members penetrated by solar system components must not be compromised and
penetrations must meet code, particularly penetrations through firerated construction. Do not reduce fire resistance below code. Protect
control sensor wiring.
Tools Needed:
1.
2.
3.
4.
5.
6.
7.
For 30/60° vertical mounting on a flat roof, two sets of (SE60) flatroof/wall mounting hardware are needed; for two collectors or
more, the number of sets required is the same as the number of
collectors. See Figure 16.
NOTICE: To prevent excessive pressure drop in the solar
loop, never link up more than 5 collectors in series.
Arrange the individual linear arrays parallel to each other.
Power drill with 1/4” drill bit. Bits of other sizes are recommended as well.
11/16” drill bit for corrugated sheet roof installations.
Two 17mm wrenches and/or sockets for M10 bolts.
Two 15mm wrenches and/or sockets for M10 nuts.
Two 7/16” wrenches/sockets for 7/16” and 1/4” nuts/bolts.
Two 9/16” wrenches/sockets for 3/8” nuts/bolts.
One 2” adjustable wrench for collector fittings.
Stiebel Eltron provides a 30/60° fixed mounting kit (p/n SE60) for
28 | SOL 25 PLUS
WWW.STIEBEL-ELTRON-USA.COM
Anchor brackets (panel clips)
6. Whenever two or more triangle trusses are installed, brace the
center span with a cross-brace, as shown in Figure 17.
M10 nuts
M10 bolts
M6 nuts
7. When installing four or five trusses, brace both end spans with
crossbraces, as shown in Figure 18. For six or more trusses, crossbraces should also be placed in an inside span.
17
Support Riser
Support Diagonal
Profile rails
Seals
Brace
Compensator
(Flexible Stainless Steel Pipe)
Figure 15: R2 Mounting Frame for Single Horizontal
(or Two Vertical) Collector Arrangement.
16
1/4" washers
1/4"-20 nuts
M10 nuts
1/4"-20x3/4"
bolts
M10 bolts
3/8"-16 flange nuts
3/8"-16 x 3" bolts
Support Riser (SE60-110)
Support Base (SE60-108)
Support Base
Support Diagonal (S101)
Brace (S109)
Figure 17: Assembled triangle trusses with cross-braces.
NOTE: Riser and Base interchange for 30-degree tilt.
Figure 16: Vertical 30/60° Mounting Kit (p/n SE60).
Procedure:
1. Choose attachment site, allowing for subsequent pipe
penetration.
2. Bolt the support base (SE60-108), support riser (SE60-110) and
transverse support (S101 collector rail) together to form a triangle
truss, as shown in Figure 17.
3. Bolt the resulting truss(es) to the upper and lower profile (frame)
rails.
8. If multiple flat-roof mounting frames are being set up next to
one another, use frame connector (splice) kits (SFC001, shown in
Figure 19) to join them, as shown in Figures 18 and 20. Line up the
mounting supports with a string so that the mounting frames will be
aligned properly.
9. Fasten the flat-roof mounting racks to the roof in an appropriate
manner, or weight them down with at least 400 lbs. (180 kg) of solid,
dead weight (e.g. concrete slab) per collector if the installed height
is less than 25 ft (8 m). Remember to take the static and dynamic
(e.g., wind) loading into account for the roof structure.
10. For installed heights above 25 ft. (8 m), weighting is not
advisable due to the higher wind loading conditions. In this case,
the holes in the horizontal support base (SE60-108, or SE60-110 if
flipped for 30 degree tilt) should be used to fasten the mounting
hardware to the roof (six M6 bolts per horizontal support).
4. If installing one collector, the triangle trusses must be set up at
intervals of ≤ 82 in. (210 cm) for horizontal installation or ≤ 43 in.
(110 cm) for vertical installation.
WWW.STIEBEL-ELTRON-USA.COM
SOL 25 PLUS | 29
english
5. If installing two or more collectors, the triangle trusses are to be
positioned at the midpoint, behind the collectors.
15
18
R2 Profile Rail
(2-collector width)
R1 Profile Rail
(1-collector width)
Frame
Splice
R2 Profile Rail
(2-collector width)
Brace
If multiple arrays of collectors are being
installed on a flat roof, one behind another,
the recommended spacing between them
should be:
• at least 30 ft. (9.3 m) for 60° vertical installation, as shown in Figure 21; or
• at least 18 ft. (5.3 m) for 30° vertical installation, as shown in Figure 22.
This spacing prevents excessive shading
from adjacent rows for latitudes of up to
50°. For latitudes significantly higher than
50°, multiple rows of collectors may not be
practical due to low sun altitude angles.
Fastening To Structures
48.1 in.
24 in.
24 in.
48.1 in.
96.3 in.
48.1 in.
144.4 in.
Figure 18: Multiple-collector framing arrangement, with frame connectors and
cross-bracing.
19
M10 nuts
M10 bolts
Frame Connectors
The type of roof or wall is a crucial factor in
the choice of fasteners. Remember to take
the static and dynamic (live load) forces into
account.
The 30/60° vertical mounting racks can
develop significant pull-out forces under
heavy wind conditions, particularly in the
60° tilt orientation; therefore it is important
to take wind loads into account.
Mounting Ht.
Shear Force
Tensile Force
Up to 26 ft.
(8m)
Up to 65 ft.
(20m)
470 lbs.
(2.1 kN)
790 lbs.
(3.5 kN)
250 lbs.
(1.1 kN)
700 lbs.
(3.1 kN)
To handle shear forces along the fastening
surface, 6 fasteners over which the shear
force is distributed are recommended.
To handle tensile forces perpendicular
to the fastening surface, 6 fasteners over
which the tensile force is distributed are
recommended.
Figure 19: SFC001 Frame Connector (Splice) Kit.
20
Frame Connector (splice) to
join two profile rails
For anchoring in concrete, use six M8 UPAT
Multicones or SM M10 anchors, both of
stainless steel, per collector.
For anchoring in wood, use six wood screws
in accordance with DIN 571, at least 10 x 80,
of stainless steel, per collector.
5.2.2 30/60° Mounting on a Wall
Profile rails
Figure 20: SFC001 Frame Connector (Splice) Kit.
30 | SOL 25 PLUS
It is not generally advisable to use the 30°
mounting orientation on a wall unless
additional supporting structures are
installed to bear the loads. Installers should
consult with a structural engineer.
Procedures described above for mounting
WWW.STIEBEL-ELTRON-USA.COM
21
Array spacing for 60° Vertical Mounting
on a flat roof or ground.
At least 30 ft. (9.3 m)
At least 30 ft. (9.3 m)
1. If multiple wall-mounting frames are
being set up next to one another, use frame
connector (splice) kits (SFC001) to join them.
Line up the mounting supports with a string
so that the mounting frames will be aligned
properly.
Array spacing for 30° Vertical Mounting
on a flat roof or ground.
2. Connect the wall mounting supports
to the wall in a suitable manner, using
the holes in support riser (SE60-110) ,
then tighten all bolts and screws. (or
support base, SE60-108, if installing as a
30° system), and transverse support (S101
collector rail).
Array spacing for 30° Vertical Mounting
on a flat roof or ground.
3. Maintain the spacing between connection
points (as specified by the manufacturer).
Figure 21: Recommended row spacing for 60° vertical arrays for latitudes up to 50°.
22
of collectors upon a flat roof apply to wall
mounting, except for the following:
At least 18 ft. (5.3 m)
Figure 22: Recommended row spacing
forft.30°
arrays for latitudes up to 50°.
At least 18
(5.3 vertical
m)
23
4. Low elevation mounting configurations
may be prone to damage from falling
ice or nearby vehicles or other hazards.
Appropriate precautions should be taken to
mitigate these hazards.
Figure 23 shows a typical wall-mount
installation of a 60° collector array.
5.2.3 30/60° Mounting on the
Ground
Procedures described above for mounting of
collectors upon a flat roof apply to ground
mounting, except for the following:
1. Installer must ensure that the mounting
foundation for the system is not subject to
movement, such as frost heaves. Therefore,
it is necessary to install footings below the
frost line in locations subject to freezing
weather. If it is not possible or practicable
to avoid movement due to frost, etc., it will
be necessary to provide a floating frame
that does not flex or warp the collectors’
mounting frames if the ground shifts or
heaves.
2. Ground mounting configurations may be
prone to damage from falling ice or nearby
vehicles or other hazards. Appropriate
precautions should be taken to mitigate
these hazards.
Figure 23: Typical wall-mount installation of a 60° collector array.
WWW.STIEBEL-ELTRON-USA.COM
SOL 25 PLUS | 31
english
Array spacing for 60° Vertical Mounting
on a flat roof or ground.
3. Ground mounting often requires longer outside piping runs,
so proper insulation and protection of collector piping essential.
Installers should consider laying pipe runs below grade to avoid
damage and to mark the location of these runs to avoid damage
from digging operations.
5.2.4 30/60° Mounting On A Pitched Roof
Procedures described above for mounting of collectors upon a flat
roof apply to mounting on a pitched (sloped) roof, except for the
following:
1. Use of weights to secure collectors and mounting hardware is
not advisable. Collector mounting frames should be fastened to all
pitched roofs in an appropriate manner.
2. The 30° mounting kits add 30° to an existing roof pitch, as shown
in the table below. Roofs with pitches above 12-in-12 generally
should not use this mounting kit, as the resulting collector tilt angle
will be too steep for almost any location.
Roof Pitch (rise-to-run) Roof Pitch Angle
1-in-12
4.8°
2-in-12
9.5°
3-in-12
14.0°
4-in-12
18.4°
5-in-12
22.6°
6-in-12
26.6°
7-in-12
30.3°
8-in-12
33.7°
9-in-12
36.9°
10-in-12
39.8°
11-in-12
42.5°
12-in-12
45.0°
Resulting Collector Tilt Angle w/ 30° Mount
34.8°
39.5°
44.0°
48.4°
52.6°
56.6°
60.3°
63.7°
66.9°
69.8°
72.5°
75.0°
Resulting Collector Tilt Angle w/ 60° Mount
64.8°
69.5°
74.0°
78.4°
not recommended
not recommended
not recommended
not recommended
not recommended
not recommended
not recommended
not recommended
5.2.5 Detailed Assembly Instructions for 60° Mounting Kit
Step 01: Major components for assembly
of the Stiebel Eltron 30/60° mounting kit
(single panel vertical version displayed).
32 | SOL 25 PLUS
WWW.STIEBEL-ELTRON-USA.COM
Step 03: Slide one of the M10 bolts into the
slot of the profile rail as shown.
Step 04: Prepare to assemble the top left
corner of the rectangle. The end of the
support rail with the hole closer to the edge
is the top side of the rail.
Note: If assembling a mounting system
using the longer profile rails (p/n 185546)
the support rails should not be fastened
to the ends of the profile rails, but should
be assembled such that the supports are
approximately 2’ from each side of the
profile rail and are therefore approximately
4 feet from each other.
WWW.STIEBEL-ELTRON-USA.COM
SOL 25 PLUS | 33
english
Step 02: Place the profile rail upside down
as shown. The longer cutout surface
(approx. 1”) should be facing toward the
center of the rectangle and be parallel to
the ground. This is the surface on which the
back of the collector will rest.
Step 05: Insert the threads of the M10 bolt
through the hole in the support rail.
Step 06: Install M10 nut. Repeat the
preceding 4 steps for the top right corner of
the rectangle.
Step 07: Align the profile rail in the same
manner as the top (The longer cutout
surface should be facing toward the center
of the rectangle and be parallel to the
ground).
34 | SOL 25 PLUS
WWW.STIEBEL-ELTRON-USA.COM
Step 09: Slide one of the M10 bolts into the
slot of the profile rail as shown.
Step 10: Insert the threads of the M10 bolt
through the hole in the support rail.
WWW.STIEBEL-ELTRON-USA.COM
SOL 25 PLUS | 35
english
Step 08: Prepare to assemble the bottom
right corner.
Step 11: Install M10 nut. Repeat the
preceding 4 steps for the bottom left corner
of the rectangle.
Step 12: Resulting assembly to which the
remaining components will be attached to
form a 60° mounting system.
Step 13: Align the base support and the
riser support in the manner shown. Note
that the end of the riser which is attached in
this step is the end without the cutout.
36 | SOL 25 PLUS
WWW.STIEBEL-ELTRON-USA.COM
Step 16: Close up view of assembly.
Step 17: Attach the riser support of one of
the right angle assemblies which were just
assembled to the top of the rectanglular
assembly using of the 3/8”–16 x 3” bolts
and a 3/8” serrated flange nut. Note that
the top is the part in which the diagonal
support does not protrude past the edge of
the profile rail.
WWW.STIEBEL-ELTRON-USA.COM
SOL 25 PLUS | 37
english
Step 14: Align the holes and insert one of
the 3/8”–16 x 3” bolts and install a 3/8”
serrated flange nut. Repeat these steps for
the remaining riser and base supports.
Step 18: Attach the other end of the
right angle assembly to the bottom of
the rectangular assembly using the same
fasteners. Repeat these steps for the
remaining right angle assembly.
Step 19: Rotate the assembly so that it is
resting on the base.
38 | SOL 25 PLUS
WWW.STIEBEL-ELTRON-USA.COM
Step 21: Align the remaining cross brace to
the oppisite attachment slots and fasten it to
the riser support using the same fasteners
and attattach the two cross braces together
in the middle using one ¼” nut, bolts and
washer. The assembly is now ready to be
installed at the installation site.
WWW.STIEBEL-ELTRON-USA.COM
SOL 25 PLUS | 39
english
Step 20: Install one of the cross braces to
the riser support using two ¼” nuts, bolts
and washers. If the collectors are being
mounted on a wall it is usually preferable
to install the cross braces between the two
base supports.
5.3 Flush Mounting On A Pitched Roof
Stiebel Eltron provides flush-mounting kits for both vertical and
horizontal collector layouts, part numbers SFM001 and SFM001H,
respectively. Figure 24 shows the SFM001 kit and Figure 25 shows
the SFM001H kit. Stiebel Eltron flush mount kits are generally not
recommended for mounting upon flat roofs, walls, or the ground.
Instead, the 45° or 30/60° mounting systems are more appropriate
for mounting to structures other than pitched roofs.
24
Mounting L-bracket (S102)
The collector mounting frames (p/n 185545 and/or 185546) may be
used as templates for locating the support rails and L-brackets. The
locations of fasteners may be determined from these templates.
After the mounting L-brackets are installed, assemble the frame
profile rails to the support rails (S101) with the included fasteners,
then bolt the assembly to the L-brackets.
25
Mounting L-bracket (S102)
M10 nuts
M10 bolts
Support Rail (S101)
M10 nuts
M10 bolts
Support Rail (S201)
Figure 25: Horizontal Flush Mount Kit (p/n SFM001H).
Figure 24: Vertical Flush Mount Kit (p/n SFM001).
5.3.1 Detailed Assembly Instructions for Flush Mounting Kit
Step 01: Major components for assembly of
the Stiebel Eltron flush mounting kit (single
panel vertical version displayed).
40 | SOL 25 PLUS
WWW.STIEBEL-ELTRON-USA.COM
Step 03: Slide one of the M10 bolts into the
slot of the profile rail as shown.
Step 04: Prepare to assemble the top left
corner of the rectangle. The end of the
support rail with the hole closer to the edge
is the top side of the rail.
Note 1: If assembling a horizontal flush
mounting system, the holes on either end of
the support rail are equidistant from each
end.
Note 2: If assembling a mounting system
using the longer profile rails (p/n 185546)
the support rails should not be fastened
to the ends of the profile rails, but should
be assembled such that the supports are
approximately 2’ from each side of the
profile rail and are therefore approximately
4 feet from each other.
WWW.STIEBEL-ELTRON-USA.COM
SOL 25 PLUS | 41
english
Step 02: Place the profile rail upside down
as shown. The longer cutout surface
(approx. 1”) should be facing toward the
center of the rectangle and be parallel to
the ground. This is the surface on which the
back of the collector will rest.
Step 05: Insert the threads of the M10 bolt
through the hole in the support rail.
Step 06: Install M10 nut. Repeat the
preceding 4 steps for the top right corner of
the rectangle.
Step 07: Align the profile rail in the same
manner as the top (The longer cutout
surface should be facing toward the center
of the rectangle and be parallel to the
ground).
42 | SOL 25 PLUS
WWW.STIEBEL-ELTRON-USA.COM
Step 09: Slide one of the M10 bolts into the
slot of the profile rail as shown.
Step 10: Insert the threads of the M10 bolt
through the hole in the support rail.
WWW.STIEBEL-ELTRON-USA.COM
SOL 25 PLUS | 43
english
Step 08: Prepare to assemble the bottom
right corner.
Step 11: Install M10 nut. Repeat the
preceding 4 steps for the bottom left corner
of the rectangle.
Step 12: The resulting assembly. Turn this
assembly over so that the support rails are
on the ground and the and the profile rails
are slightly elevated before proceeding to
the next step.
Step 13: Prepare to install the lower right
hand ‘L’ bracket. The vertical portion should
contain the hole which is closest to the edge
of the bracket.
44 | SOL 25 PLUS
WWW.STIEBEL-ELTRON-USA.COM
Step 15: Insert the threads of the M10 bolt
through the hole in the vertical portion of
the ‘L’ bracket.
WWW.STIEBEL-ELTRON-USA.COM
SOL 25 PLUS | 45
english
Step 14: Slide one of the M10 bolts into the
slot of the profile rail as shown.
Step 16: Install M10 nut. Repeat the
preceding 3 steps for the remaining 3 ‘L’
brackets.
Step 17: Finished product, top view.
46 | SOL 25 PLUS
WWW.STIEBEL-ELTRON-USA.COM
IMPORTANT: Installed height must not exceed 60 feet.
Stiebel Eltron provides tilting frame mounting kits for both vertical
and horizontal collector layouts, part numbers SFT004 and SFT004H,
respectively. Figure 26 shows the SFT004 kit and Figure 27 shows
the SFT004H kit. The SFT004 frame tilt kit (SFT004H in the case of
horizontal mounting) provides adjustment of the collector array from
15° to 30°). For mounting on a roof, two (2) tilt kits are needed per
collector frame, for either vertical or horizontal configurations.
Stiebel Eltron tilt mount kits are generally not recommended for
mounting upon flat roofs, walls, or the ground. Instead, the 45°
or 30/60° mounting systems are more appropriate for mounting to
structures other than pitched roofs.
26
Procedure:
1. Choose attachment site, allowing for subsequent pipe
penetration.
2. Ensure that two bolts are inserted into the channel of the upper
and lower profile rails, before the upper and lower riser struts are
bolted to the profile rails.
3. The distance between the collector support rails should be
slightly larger than the distance between the upper roof hooks / U
strips which have already been installed on the roof.
4. On the roof hooks / U strips, the long sides of the pivot brackets
are screwed into the middle drill holes. The short side should be at
the top.
5. On the lower roof hooks / U strips, the short side of the second
pivot bracket is bolted to the first pivot bracket.
Mounting L-bracket (S102)
M10 nuts
M10x30 bolts
Support Rail (S101)
1/4" washers
1/4"-20 nuts
Brace (S109)
1/4"-20x3/4"
bolts
6. Cut the riser struts of the standoff to the proper length for the
required angle. For 15° tilt, in the case of vertical installation (or
30° in the case of horizontal installation), only one strut is needed
for each pivot point. For 30° vertical installation, the riser struts are
bolted together as illustrated in Figure 28. For angles between 15°
and 30°, the struts may be bolted together through the intermediate
holes.
7. The upwards facing short side of the pivot bracket attached to the
upper roof hook / U profile is now bolted to the bottom of the riser
strut.
Upper Riser Strut (S103U)
Lower Riser Strut (S103L)
Figure 26: Vertical Frame Tilt Kit (p/n SFT004).
27
Mounting L-bracket (S102)
M10 nuts
M10x30 bolts
Support Rail (S201)
1/4" washers
1/4"-20 nuts
Brace (S109)
1/4"-20x3/4"
bolts
Pivot Bracket
Upper Riser Strut (S103HU)
Lower Riser Strut (S103HL)
Figure 27: Horizontal Frame Tilt Kit (p/n SFT004H).
Figure 28: Tilt Strut Assembly.
WWW.STIEBEL-ELTRON-USA.COM
SOL 25 PLUS | 47
english
5.4 15-30° Tilt Mounting on a Pitched Roof
8. As illustrated, another pivot bracket is connected to the top of the
standoff strip.
9. When installing two or more collectors, brace the center span.
When setting up four or more collectors, brace both end spans.
With six or more collectors, braces (S109) should also be placed in
an inside span.
10. The frame created from the support rails (S101) and collector
profile rails is now bolted to the pivot brackets (34). The bolt located
in the channel of the profile rails is bolted into the middle hole of
the pivot bracket. (Before bolting together the support rails and
profile rails, two bolts must be inserted into the channel of each
profile rail).
11. If more than one rooftop frame is used, mount the frames to
one another using frame connector (splice) kits (SFC001, shown in
Figure 19) to join them, as shown in Figures 18 and 20. Line up the
mounting supports with a string so that the mounting frames will be
aligned properly.
12. Then tighten all bolts and screws.
5.4.1 Detailed Assembly Instructions for Tilt Mounting Kit
Step 01: Major components of the Stiebel
Eltron Tilt Mounting System (single panel
vertical version displayed).
Step 02: Align the mounting system
components upside down as shown. The
longer cutout surface (approx. 1”) should
be facing toward the center of the rectangle
and be parallel to the ground on both the
top and bottom. This is the surface on
which the back of the collector will rest. The
end of the support rail with the hole closer
to the edge is the top side of the rail.
48 | SOL 25 PLUS
WWW.STIEBEL-ELTRON-USA.COM
Step 04: Slide M10 x 30 bolt into the groove
of the profile rail as shown.
Step 05: Slide the threads of the bolt
through the hole of the ‘L’ bracket. Note
that the hole which is closer to the edge is
installed on the vertical side of said bracket.
WWW.STIEBEL-ELTRON-USA.COM
SOL 25 PLUS | 49
english
Step 03: Prepare to assemble top left corner
with illustrated components.
Step 06: Slide the threads of the bolt
through the hole in the top side of the of the
support rail.
Step 07: Install the M10 serrated flange nut.
Repeat this procedure for the remaining
three corners of the rectangle, making sure
that the top sides of the profile rails are each
attached to the same profile rail.
Note 1: If assembling a horizontal tilt
mounting system, there is only one hole on
either end of the diagonal support.
Note 2: If assembling a mounting system
using the longer profile rails (p/n 185546)
the diagonal supports should not be
fastened to the ends of the profile rails, but
should be assembled such that the supports
are approximately 2’ from each side of the
profile rail and are therefore approximately
4 feet from each other.
Step 08: Displayed is the completed
rectangle (top view).
50 | SOL 25 PLUS
WWW.STIEBEL-ELTRON-USA.COM
Step 10: Proper alignment (side view).
Step 11: Prepare to assemble S103U and
S103L with displayed fasteners.
Step 12: Slide the 2 components together
as shown.
Step 13: Slide 2 of the ¼” bolts though the
slots of one component and the holes of the
other.
Step 14: Install two ¼” nuts and washers.
Repeat this procedure for the remaining two
riser struts.
WWW.STIEBEL-ELTRON-USA.COM
SOL 25 PLUS | 51
english
Step 09: Align an S103U and an S103L.
Displayed is the proper alignment (rear
view).
Step 15: Align the two riser assemblies
with the top side of the assembled support
rectangle as shown. Note that the slotted
sides of the risers are adjacent to the sides
of the rectangle, the sides with the circular
holes are flat on the ground, and the bottom
of the ‘L’ of the risers are both facing away
from the rectangle.
Step 16: Install an M10 x 30 bolt through the
holes one of the ‘L’ brackets and one of the
riser assemblies.
Step 17: Install an M10 serrated flange nut.
Repeat this procedure for the other side.
52 | SOL 25 PLUS
WWW.STIEBEL-ELTRON-USA.COM
Step 19: Prepare to install the bottom right
rear ‘L’ bracket.
Step 20: Prepare to install the bottom right
rear ‘L’ bracket.
WWW.STIEBEL-ELTRON-USA.COM
SOL 25 PLUS | 53
english
Step 18: Assembly thus far including
‘L’ brackets to be installed during the
subsequent steps.
Step 21: Install an M10 serrated flange nut.
Repeat this procedure for the other side.
Step 22: Align the bottom front ‘L’ brackets
as shown.
Step 23: Prepare to install the front left ‘L’
bracket. Note that the side of the ‘L’ bracket
with the hole closer to the edge is aligned
parallel to the support rails.
54 | SOL 25 PLUS
WWW.STIEBEL-ELTRON-USA.COM
Step 25: Prepare to install the front right ‘L’
bracket. Note that the side of the ‘L’ bracket
with the hole closer to the edge is aligned
parallel to the support rails.
Step 26: Install an M10 x 30 bolt and an
M10 serrated flange nut.
WWW.STIEBEL-ELTRON-USA.COM
SOL 25 PLUS | 55
english
Step 24: Install an M10 x 30 bolt and an
M10 serrated flange nut.
Step 27: Diagonal view of front right.
Step 28: At this point the entire assembly
may be flipped over and stood up as shown.
Step 28a: Measure the angle of the
assembly to make sure that it is at the
required angle. If it is not, then it is
necessary to adjust the riser struts. The
illustrated assembly is adjusted to 30°.
56 | SOL 25 PLUS
WWW.STIEBEL-ELTRON-USA.COM
english
Step 29: Front view.
Step 30: Install one of the cross braces
using two ¼” nuts, bolts and washers.
WWW.STIEBEL-ELTRON-USA.COM
SOL 25 PLUS | 57
Step 31: Loosely attach the two cross braces
together using ¼” fasteners. The small part
of the ‘L’ shapes should be facing away from
each other.
Step 32: Align and attach the two ends of
this cross brace to the risers.
58 | SOL 25 PLUS
WWW.STIEBEL-ELTRON-USA.COM
english
Step 33: Stiebel Eltron tilt mounting system.
WWW.STIEBEL-ELTRON-USA.COM
SOL 25 PLUS | 59
6. LIGHTNING PROTECTION AND BONDING
WARNING: Have lightning protection measures carried
out by professionals.
If there is an existing lightning protection system, the collector
casing, their mounting frames, and the piping must be tied into the
lightning protection measures by professionals.
Piping
Make the piping connection by means of pipe clamps in the
immediate vicinity of the collectors (above the roof). (Note
possibility of corrosion. Use only compatible metals for fastening to
the aluminum collector pans and mounting hardware.)
Mounting Frame
Collector Casing (Pan)
Drill into each collector from the bottom and use screw-type devices
to tie it into the lightning protection measures. Use two 1/4” (6.3
mm) diameter stainless-steel sheet metal screws for each collector.
The drill holes should be predrilled to a diameter of 3/16” (5 mm).
See Figure 29 for locations of holes.
Connect the mounting frame to the lightning protection equipment
separately via screw-type or clamp connections. Connect the
forward and return piping to the building’s equipotential bonding
system (ground) at frequent intervals.
29
On each collector, drill two 3/16"
diameter holes in the hatched
area and make the connection to
the lightning protection equipment
with two 1/4" diameter stainless
steel sheet metal screws.
Min. 4 inches
Figure 29: Attachment of bonding wire for lightning protection.
60 | SOL 25 PLUS
WWW.STIEBEL-ELTRON-USA.COM
WARNING: Have lightning protection measures carried
out by professionals.
Secure each collector at the top and bottom with eight (8) angle
brackets – four along the top profile frame and four along the
bottom – by inserting M10 bolts (from kit 185545 or kit 185546)
into the profile rail’s bolt channel, placing the angle brackets into
position, and tightening the bolts. See Figure 30. (For horizontal
mounting systems, secure each collector at the top and bottom with
sixteen (16) angle brackets – eight along the top profile frame and
eight along the bottom.)
31
english
7. SETTING UP AND INTERCONNECTING THE COLLECTORS
Air Vent
S.S. Tube with
3/4 " G Union
Seals
Collector Nipple
(3/4" BSPP male thread *)
* Mating threads include:
• 3/4" G (European)
• 3/4" BSPP
• (7/8" UFT)
30
Angle Brackets
Figure 31: Interconnection of collectors using flexible compensator
tube (p/n 170804).
Install the collector immersion sleeve (sensor well) at the outlet of
the collector array, as shown in Figure 2. It is imperative that the
sensor be placed at the collector/array outlet, not inlet, so that the
collector temperature can be properly detected by the controller.
The system will not work properly without the correct location of the
sensor.
IMPORTANT: The sensor must be placed at the collector/
array outlet, not inlet, so that the collector
temperature can be properly detected by the controller.
Figure 30: Securing Collectors To Frame Using Angle Brackets.
The collector pipe nipple connections are located on the top of
the collector in the case of vertical mounting or on the sides
with horizontal mounting. It is recommended that collectors be
interconnected by means of a “compensator” (flexible stainless steel
tube, p/n 170804), which comes with every R2 (185546) mounting
frame. One should also be ordered with every SFC001 frame splice
kit if connectors are to be connected in a row. The compensator
allows thermal expansion of the collectors, support frames, and
piping to occur without over-stressing the fittings and seals. The
collector pipe nipples may also be connected to field-supplied
piping with either 7/8” UFT, 3/4” G (European), or 3/4” BSPP thread.
See Figure 31.
Coat the collector sensor with thermally conductive paste and push
it into the immersion sleeve as far as it will go. Do not attempt to
twist or readjust the connections once they have been installed. The
return piping can now be connected to the unoccupied external
thread of the R 3/4” adapter on the collector immersion sleeve
(sensor well).
Immediately after installation, run a pressure/leak test, fill and flush
the system with propylene glycol mixture (heat transfer medium),
and place the system into service as described in Section 8.0.
Installation of the compensator tube is followed by placement of
thermal insulation (supplied by the customer).
WWW.STIEBEL-ELTRON-USA.COM
SOL 25 PLUS | 61
8. Commissioning the System
WARNING: PRESSURE TEST SYSTEM ONLY WITH
COMPRESSED AIR.
Never fill and pressure test the system with water
where there is a risk of frost. (Collectors can freeze
at temperatures significantly above air temperature if
radiational cooling is strong, such as with clear skies.)
After the installation is complete, the system may be commissioned
for service. Commissioning involves the following procedures, which
are explained in detail in this section:
• Pressure and Leak Test (Section 8.1)
• Setting The Expansion Tank Pre-charge Pressure (Section 8.2)
• Flushing The System (Section 8.3)
• Final Charging and Venting The System (Section 8.4)
• Start-up (Section 8.5)
8.1 Pressure and Leak Test
After the pipework has been installed and the collectors have been
connected it will be necessary to pressure-test the system to detect
leaks before filling the solar loop with heat transfer fluid. Propylene
glycol solutions can leak from much smaller gaps than can water,
so such testing is critical to assuring a successful installation.
Recommended test pressure is 80 psi. The thermal insulation should
be installed only after the leak test has been successfully completed.
It is recommended that compressed air be used to test the system
for leaks, as it is very easy to make repairs and it will prevent
loss of solar medium, spills, property damage, and messy cleanup problems. Air is also capable of revealing very small leaks,
that water may not reveal, through which propylene glycol will
often leak. Leaks will be evident from the sound of escaping air,
observation of bubbles emanating from fittings and other leak-prone
components that are coated with soapy water, and watching the
pressure gauge over time. Bear in mind that the pressure gauge
will vary based on temperature of the air, so one must try to read
the pressure on successive nights when the system cools down to
ambient temperature. The following procedure is recommended:
7. The second phase of the leak test detects smaller leaks and requires a wait time. Pressurize the system to 80 psi and watch the pressure gauge over a period of 15-60 minutes to see if any pressure loss occurs.
8. After any leaks have been repaired, repeat this test. If pressure appears steady, line up the red dial of the pressure gauge with the needle indication. Check again to see if the pressure holds, relative to the lowest pressure previously indicated by the red dial. Small leaks may be detected by covering suspected locations with soapy water and looking for bubbles.
9. After all known leaks have been repaired, the final phase of
the leak test requires waiting a day or more to see if pressure
is holding steady. Use the red dial to mark the pressure
and see that the gauge returns to the same indication each
evening. Remember that the air pressure will vary based on
the temperature of the loop, so it will be necessary to read the
pressure at night, after the system cools down.
At the conclusion of the leak test, check all fittings and vent the
system.
8.2 Setting the Expansion Tank Pre-charge Pressure
While the leak testing (described above) is being performed, the
installer should set the expansion tank’s precharge pressure. Make
sure that the “wet” side of the expansion tank (pipe connection)
is vented to atmosphere. Using a compressor, pre-charge the tank
with air (or use pressurized nitrogen) to a final pressure of 5 psi
less than the target system pressure. For example, if the final target
system (solar loop) pressure is to be 50 psig, fill the expansion
tank to 45 psig (which is the recommended default value). When
complete, cap the Schrader valve fitting and re-attach the tank to the
pump station. Make sure the expansion tank always faces up (the
Schrader valve must be pointed down).
8.3 Flushing the System
The next step of the commissioning process involves flushing the
solar loop to purge contaminants and air.
Preparations:
1. Isolate the Purg-O-Mat and expansion tank by shutting their isolation valves.
• Use only 50/50 Dowfrost propylene glycol solution for flushing
2. Turn check valves in the pumping station to their 45° position the system. Use of water or any other fluid may adversely affect
to allow two-way flow.
the operation of the system.
3. Close the bottom fill & drain valve.
4. Connect hose with a Schrader valve to the upper fill & drain • Wear protective gloves and goggles when handling propylene
valve.
glycol mixtures. Never fill the system when it is subject to strong
5. Connect an air compressor and raise the solar loop system solar irradiation. This could lead to steam hammer inside the
pressure to 80 psi.
collectors and possible burns from escaping steam. If the sun
6. The first phase of the leak test, which detects gross leaks or shines during start-up, cover the collectors or wait until there is
inadvertently open valves, involves listening for leaks or observing some shade.
if pressure does not immediately reach 80 psi. Repair any such gross leaks.
62 | SOL 25 PLUS
WWW.STIEBEL-ELTRON-USA.COM
1. Connect the charging pump’s outlet to the to fill & drain valve
in the pumping station.
2. Connect a hose to the boiler drain at the bottom of the loop
(bottom fill & drain valve), at the outlet side of the storage tank’s
heat exchanger.
3. Use a clean, dry pail or catch basin and fill it with sufficient
Dowfrost medium (propylene glycol mixture) to fill the entire
system’s volume, plus some extra.
4. Keep all other vents and valves closed during the flushing
operation.
5. Close the flow meter adjusting screw at the pump assembly
(horizontal position).
6. Start charging the system and observe the loop fluid draining
back into the pail. Make sure that the fluid level in the container
always remains higher than the intake hose.
7. The flushing process should continue until the fluid draining
back appears clean and free of contaminants. The screens/filters
may require cleaning during this process.
8. When the system is fully flushed, proceed to the final charging
phase, described below.
8.4 Final Charging and Venting The System
The solar heating system must be filled exclusively with the
premixed propylene glycol heat transfer medium. The bottles
have been premixed and require no further treatment. Never
admix water or alternative process media: otherwise the essential
characteristics and corrosion protection can no longer be
guaranteed. For this reason, the system must not be topped off with
water.
Follow these steps to complete the final charging and venting
(purging of air) of the system:
1. Energize the pump station to activate the electric pump to
circulate the solar medium through the system.
2. Open the air vent valves and Purg-O-Mat at the highest point of
the system and open the ball valve for the flow meter.
3. To purge air from the system, the size of the air bubbles can
be reduced (as the system loop pressure increases), by slowly
constricting the return flow to the drain bucket via partially closing
the lower drain & fill valve while the pump is operating. Also
open the bleed screw on the circulator pump.
4. Continue purging the system until no more bubbles are
expelled from the drain hose. Allow system pressure to build up
to approx. 20-44 psi. This process usually takes 20-30 minutes.
Continue looking for leaks.
5. Tighten the anti-steaming valve fully and then back off 1/4turn.
6. Close the bottom fill & drain valve after completing this
ventilation step, but before shutting off the pump.
7. Keep the circulator pump running and then close the top fill &
WWW.STIEBEL-ELTRON-USA.COM
drain valve.
8. Open the air vent valve at the highest point, until only solar
medium is expelled.
9. Shut off the circulating pump.
10. Open the valve to the expansion tank to connect it to the solar
loop. The system pressure will drop slightly.
11. Use the charging pump to raise the system pressure (in a
cold state) to its operating pressure of 50 psi (or other target
pressure). (As there is sometimes still a little air remaining in
the system, which will eventually be purged via the Purg-O-Mat,
it is recommended that this pressure be a few psi higher than the
target.)
12. Use a permanent marker to record the pressure and the date/
time on the expansion tank.
13. It is further recommended that the installer measure
and record the glycol/water mixture using a refractometer or
hydrometer. It is critically important that the mixture be correct
before turning the system over to the final customer.
14. Set the red dial on the pressure gauge to the expansion tank’s
precharge pressure. This should be the lowest pressure that the
system ever reaches in normal operation.
15. Let the solar heating system rest overnight and vent again in
the morning, via the air vent valve, before solar radiation warms
the collectors. Close the air vent valve again.
16. Turn check valves in the pumping station to their normal 90°
position to allow one-way flow.
17. Make sure the controller and pumping station are energized
and that the proper settings for the controller have been entered.
18. Cover both fill & drain valves with the caps supplied.
19. If the system does not start automatically, there may still be
air in the system. Repeat the venting process, if required.
8.5 Start-up
Re-tighten all fittings prior to start-up.
Complete the Start-up report (Section 8.6) after the first Start-up.
Set the integral controller to “manual” mode to check whether all
required relays of the solar control unit are connected, according to
the controller’s operating instructions. Then set the control unit back
to “automatic” mode. The system should then start automatically,
subject to all starting conditions being met. If that is not the case,
check in Section 10.0, Troubleshooting, for a possible cause for this
fault. See that the solar system places no excessive temperature or
pressure on auxiliary system.
Have owner check the system daily to observe pressure,
temperature, and flow rate while the pump is on, and to look for
evidence of overflows from pressure relief valves. It is also wise to
continue checking for leaks periodically. Any deviation from normal
should prompt immediate corrective action by the installer.
SOL 25 PLUS | 63
english
The following procedure makes use of a charging pump, screen,
filter, and large pail or trough to circulate fluid through the system.
The sump can have a coarse-mesh screen to prevent large particles
from entering the pump. The outlet of the pump should be fitted
with 5-micron sediment filter. The intake sump should be set near
the bottom of the pail.
8.6 Checklist for Start-up Of Solar Installations
Caution: It is mandatory to perform the work
in compliance with the “Safety Regulations for
Work On and Involving Roofs“ and the instructions
“Safety and Rescue Harnesses“ published by the trade
association. These assembly and operating instructions
and the assembly and operating instructions for the SOM
controller and the storage system are to be followed
diligently during the assembly work.
Upon the start-up of solar installations provided with Stiebel Eltron
Flat Plate Collectors, the following checklist should be reviewed to
help ensure successful completion of the installation.
Installation Operator:
Name:
Fitting Company:
Name:
Street:
Street:
City:
City:
Solar Circuit
Yes
No
Yes
No
Are the collectors installed in their mounting frames in the proper position and secured tightly (free of play) with the top and the bottom screws?
Has the installation of the pipework between the collectors and the pumping station been performed according to Stiebel Eltron installation
instructions?
Has all the pipework in the solar collector loop been hard-soldered?
Has all the pipework been insulated?
Is the pressure relief safety valve (87 psi) and the vent installed according to Stiebel Eltron installation instructions?
Was the pressure and leak test performed?
Is the solar loop filled using only the premixed 50% GRAS Propylene Glycol and deionized water heat-transfer medium?
Have labels been installed on all valves, tank and pipework?
Are the shut-off valves open, and is the check valve set (per pumping station assembly instructions)?
Is the collector temperature sensor mounted at the specified position at the outlet pipe of the collector(s) and electrically connected to the
controller?
Has the electrical wiring been performed in accordance with the Stiebel Eltron controller wiring diagram?
Is the solar controller set according to the assembly and operating instructions?
Has the test run of the circulation pump been performed? Checked for excessive/unusual noise? Checked for proper heat collection and storage
during insolation?
Hot Water Circuit
Has the solar storage system (tank) been installed to the domestic water pipes according to Stiebel Eltron instructions and all local regulations?
Has the temperature sensor in the solar storage system (tank) been mounted and electrically connected to the controller according to Stiebel
Eltron instructions and all local regulations?
Has the backup water heater (afterheating or reheating) been tested and properly installed for re-heating?
If so, specify the equipment connected and its temperature settings:
Is the SOM controller properly grounded electrically?
Was the lightning protection equipment connected by authorized skilled personnel?
Is the solar controller set according to the assembly and operating instructions?
Has the test run of the circulation pump been performed? Checked for excessive/unusual noise? Checked for proper heat collection and storage
during insolation?
Place / Date:
64 | SOL 25 PLUS
Inspected by (Company name):
WWW.STIEBEL-ELTRON-USA.COM
english
9. MAINTENANCE AND CARE
Specialists should carry out an annual inspection of the solar heating system to ensure proper functioning of the system and its components,
including the control unit, safety equipment, and tank. System components (fittings, thermal insulation, mounting hardware, fasteners, etc.)
exposed to the weather must also be checked periodically for their condition. Look for signs of abrasion, wear, corrosion, contamination, or
damage. Check the pH value (> 7) and frost protection level (< -20°F) of the heat transfer medium annually.
10. TROUBLESHOOTING
Refer to the table below for general fault identification troubleshooting.
Fault
Cause
Remedy
Fault/error message at the controller.
System fault; sensor faulty or incorrectly connected.
Pressure fluctuations in the system immediately after
commissioning.
Collectors mist up.
Air pockets in the solar circuit.
See installation and operating instructions for the
controller.
Vent the system again.
Moisture ingress during storage.
Overnight condensation of humidity during certain
weather conditions.
The pump does not run, even though the collector is
warmer than the tank (neither motor noise nor
vibrations are discernible).
Maximum tank or collector temperature exceeded.
Indicator lamp or display at the controller activated.
No electrical power.
Excessive temperature differential (>30°F) selected or
the controller does not work.
Pump shaft blocked.
Pump contaminated.
Sensor faulty or incorrectly installed.
WWW.STIEBEL-ELTRON-USA.COM
The internal mist will evaporate after a few weeks in
operation by moisture progressively escaping through the
integral ventilation slots.
Moisture will usually evaporate; persistent misting may
require the addition of weep holes in the bottoms of
collector pans.
The controller has shut down correctly and restarts again
automatically when the actual temperatures drop below
their selected maximum temperatures.
Check cables and fuses.
• Check the controller.
• Check the temperature sensor. Make sure sensor has
been mounted to the outlet pipe of the collector(s).
• Reduce the temperature differential.
Briefly switch over to max. speed or insert a screwdriver
into the slot and turn manually.
Dismantle and clean the pump. Close the throughput
limiter and pump ball valve.
• Make sure sensor has been mounted on the (hot) outlet
(not inlet) pipe of the collector.
• Check the sensor position, installation and resistance
curves; the collector sensor must be securely and fully
inserted into the sensor well.
SOL 25 PLUS | 65
Fault
Cause
Remedy
The pump is running, but no flow rate is discernible
at the flow meter with balancing valve. The flow and
return temperatures are identical or the tank
temperature does not rise or rises only slowly.
There is air in the pipework.
Check the system pressure. Operate the pump in intervals
at maximum pump rate. Open the air-vent valves at the
collector, at the pump, and at the solar tank and vent
these items. Should this fail to provide any improvement:
• Flush the system in both directions; clean fittings, such
as flow meters, with balancing valve and dirt traps.
• Check the line routing; in case of “up and down”, e.g.
at balcony protrusions or around water pipes, change
the line routing, if required or insert additional air vent
valves.
• Check the function of the automatic air vent valve.
For this, remove the protective cap and check the float
movement with a blunt needle. If necessary, replace the
air vent valve.
Check the function of the flow meter with balancing
valve. A jammed ring can block the display in the sight
glass, even if the flow rate is correctly adjusted. Start
the pump in manual mode; the pump piston movement
should be discernible. Release the piston through
tapping it lightly; in emergencies, replace the flow meter
with balancing valve.
Open the shut-off valve.
Check for faults again when there is strong solar
irradiation.
Check for faults again when there is strong solar
irradiation.
Reduce the pump rate.
Increase the switching temperature differential at the
controller.
Insulate the pipework.
Connect the temperature sensors to the correct sensor
terminals (see the control unit installation and operating
instructions).
Check to be sure that the automatic shut-off valve is
closed.
System pressure too low.
System contaminated.
The pump is running, but no flow rate is discernible at
the flow meter with balancing valve.
Flow meter with balancing valve stuck or faulty.
Clog in system.
Pump appears to start late and stop early.
The pump starts and switches itself off again shortly
afterwards (“short cycling”). This is repeated a few
times until the system runs correctly. The same
happens in the evening.
The pressure gauge indicates a loss of pressure.
The pump runs noisily.
System is noisy.
66 | SOL 25 PLUS
Shut-off valve closed.
The temperature differential between the collector
and the tank is too large.
The solar irradiation is insufficient to heat up the
entire pipework.
The flow rate is excessive (pump set too high).
The switching temperature differential of the
controller is set too low.
Pipework not fully insulated.
The tank and collector sensor wiring is reversed
(problem occurs after commissioning).
A drop in pressure seen shortly after the system is
filled is normal, as air is still being vented from the
system. A subsequent pressure drop can be caused
by an air pocket that has shifted later on. In standard
operation, the pressure can fluctuate by 3 to 4 psi,
subject to system temperature.
If the pressure falls continuously, a leak exists at
some point in the system.
Fluid loss occurs via operation of the safety valve. The
expansion vessel is too small and/or without pressure
or is faulty.
Collectors have been damaged by icing/frost as a result
of insufficient frost protection and have developed leaks.
Air in the pump.
Insufficient system pressure causes voids and cavitation.
This is normal in the first few days after filling the
system. If this occurs later, two possible causes:
System pressure too low. The pump draws in air via
the air vent valve.
The pump rate is set too high.
• First check the fittings, glands at shut-off valves and all
threaded connections, then all solder fittings.
• Check the expansion vessel inlet pressure and the
diaphragm for leaks.
• Check the vessel size and precharge pressure.
• Check the antifreeze level and the pH value.
Vent the pump.
Increase the system pressure.
Increase the system pressure.
Change to a lower pump rate and check the flow rate at
the flow meter with balancing valve.
WWW.STIEBEL-ELTRON-USA.COM
Cause
Remedy
The tank cools down excessively overnight. After the
pump has stopped, the flow and return operate at
different temperatures; the collector temperature is
higher at night than the outside temperature.
The check valve is not closed or not closing, thereby
causing thermosiphoning and heat loss from the tank
to the solar loop.
• Check the position of the check valve handle, which
should be set for one-way flow.
• Inspect the check valve (gravity brake) for leaks
(jammed swarf, dirt particle in the sealing surface).
• Make sure the tank’s heat exchanger’s supply lines
are configured in a U (downwards) shape to prevent
thermosiphoning.
• If required, install a two-way valve that is switched off
simultaneously with the pump to block thermosiphoning
in the solar loop.
Install a check valve (gravity brake) in the flow or a heat
insulating loop.
Vent the re-heat heat exchanger.
Compare the details supplied by the boiler manufacturer
and those of the tank manufacturer. The problem may be
resolved by selecting a higher flow temperature at
the boiler.
Check the insulation; insulate the tank connections.
Check the boiler controller setting.
Check the switching times and interval operation.
Check the sensor position, installation, and resistance
curves.
Note: The variable speed pump does not stop
immediately, but only after it reaches its lowest speed.
Re-heating does not work. The boiler runs for a
short while, stops and restarts again. This
repeats frequently, until the tank has reached its
setpoint temperature.
The tank cools down excessively.
The pump does not stop.
Single pipe thermosiphoning circulation occurs in
short pipework with low pressure drop.
Air in the re-heat heat exchanger.
Heat exchanger area is too small.
Insulation faulty or incorrectly fitted.
Re-heating controller setting is incorrect.
DHW circulation runs too frequently and/or at night.
Sensor faulty or sensor position incorrect.
Control unit not OK.
11. GLOSSARY OF TERMS
The following is a glossary of terms, definitions of abbreviations and
acronyms which appear in this manual:
absorber plate: a metal plate (typically made of copper) which has a
selective coating to efficiently convert sunlight into heat and transfer
this heat to liquid that circulates through copper pipes attached to
the plate.
after-heating: a method to add heat from a non-solar source, such
as a fuel-fired boiler, to raise the temperature of water in a storage
tank to the minimum required for end use.
BSPP: British Standard Pipe (Parallel) Thread for tubes and fittings
where the threads do not provide pressure-tight sealing.
bypass valves: valves that are installed in solar heating and
afterheating systems to allow portions of the system to be bypassed
for maintenance and repair. Bypass valves are typically installed in
2-tank systems to allow flow to bypass the solar storage tanks.
charging (of system): the process of filling the solar loop with heat
transfer medium (fluid).
charging pump: a pump used to fill (charge or recharge) the solar
loop with heat transfer medium.
altitude angle: angle of sun above the horizontal plane.
anode rod: a metallic rod that is installed in a water storage tank in
order to reduce corrosion of the tank and its internal components
by serving as a sacrificial electrolytic anode. An anode rod must be
replaced when it is depleted, otherwise the tank and/or its internal
components will start to corrode.
boiler drains: drain cocks installed in solar and hydronic heating
systems to allow portions or all of the system to be drained of their
working fluids (heat transfer media).
WWW.STIEBEL-ELTRON-USA.COM
check valve: a special type of valve that permits fluid to flow in
one direction but not the other. It is typically used in solar heating
systems to prevent undesired thermosiphoning of heat transfer
medium when the collector pump is switched off.
compensator: a flexible stainless steel tube that is installed between
solar collectors and used to connect them to solar loop piping. The
compensator allows piping to expand and contract and mounting
hardware to move slightly under loads and thermal expansion
without placing undue stress on collector fittings. It is very
important to avoid repeated stress cycles upon fittings, as leaks may
SOL 25 PLUS | 67
english
Fault
develop which would cause the system to stop working properly.
controller: an electronic device that senses temperatures and uses
control algorithms (rules) to determine when to activate pumps and
relays and various warnings and alarms. The controller serves as
the “brain” of a solar thermal system and controls how and when
the system collects heat, sheds excessive heat, and shuts down to
protect various components.
DHW: domestic hot water
DHW mixing valve: a temperature-sensitive regulating valve that
mixes cold water with incoming hot water to limit its temperature to
prevent scalding and other problems for end users.
Dowfrost™ 50: ready-mixed propylene glycol heat transfer medium
that contains approximately 50% propylene glycol anti-freeze fluid.
EPDM: ethylene propylene diene monomer (M-class) rubber, a
synthetic rubber that exhibits outstanding heat, ozone and weather
resistance and is often used for sealing components in heating
systems.
hard-solder: 95/5 lead-free solder used to join piping in the solar
loop. It is capable of withstanding the elevated temperatures that
solar collectors are capable of generating.
heat-conducting paste: a thermally-conductive paste that aids in
transferring heat between components. This paste is typically used
in solar thermal systems to allow temperature sensors to read
temperatures of components more accurately.
heat exchanger: a device used to efficiently transfer heat between
one component and another. In heating systems, heat exchangers
are most often used to transfer heat between two separate fluids.
There are liquid-to-liquid, liquid-to-gas, and other types of HX.
heat transfer medium: fluid that is used to collect and transport heat
energy between solar collectors and storage tanks or other devices
in a solar loop.
horizontal collector mounting: a mounting arrangement in which
the short dimension of each collector is oriented up/down; the
collector’s pipe fittings (nipples) point horizontally (to the sides).
HX: heat exchanger
expansion tank: a tank that is attached to heating systems to allow
normal expansion of liquids that undergo heating and cooling
cycles in order to prevent undue stress on (and failure of) piping,
tanks, fittings, and other vessels. Most modern expansion tanks
have a chamber filled with air or nitrogen that provides a cushion
against which the system liquid may expand; this chamber is
typically isolated fluidically by a rubber membrane (diaphragm)
that is chemically compatible with the system liquid and capable of
withstanding the temperatures of that liquid.
flowmeter: a device used to measure or display fluid flow rates in a
fluidic system. They may be electronic or mechanical. Mechanical
flowmeters often use an annular orifice/venturi/float system for
measuring flow rates.
Flowstar: brand of pump station used in Stiebel Eltron SOLKIT solar
systems. The contain a circulator (pump), expansion tank, pressure
relief valve, 2 boiler drains, temperature/pressure gauge, flowmeter,
check valve, return line thermometer, and air vent.
frame connector (splice): a set of hardware that allows the collector
profile (frame) rails to be connected, end-to-end, to form a row
array of solar collectors.
hydrometer: an instrument used to measure the specific gravity (or
relative density) of liquids; that is, the ratio of the density of the
liquid to the density of water. In solar thermal systems, it is often
used to test the composition of the heat transfer medium.
insolation: incoming solar radiation that impinges upon a solar
collector or other surface.
installed height: the height above surrounding grade, usually in
reference to the height of the solar collectors.
isolation valve: a valve used to cut off and isolate a device (e.g., a
vent valve or an expansion tank) from the rest of a fluidic system.
lightning protection: equipment and measures used to ensure that
particular equipment and attached structures are protected from
lightning strikes and induced charges; these often include special
grounding cables and clamps to safely conduct current to earth
ground.
MSDS: material safety data sheet – a data sheet that usually
accompanies many chemicals and other materials to allow users to
take appropriate measures to ensure their safe use.
GPH: gallons per hour
GPM: gallons per minute
GRAS: Generally recognized as safe (GRAS) is an American Food and
Drug Administration (FDA) designation that a chemical or substance
added to food is considered safe by experts, and so is exempted
from the usual Federal Food, Drug, and Cosmetic Act (FFDCA) food
additive tolerance requirements. For solar thermal systems, the
GRAS (non-toxic, food grade) designation is often required of the
propylene glycol heat transfer medium if there is a possibility of the
medium’s being introduced into the potable water.
mounting frame: an assembly of hardware that forms a frame in
which solar collectors are held in place on a roof or other structure.
pipe run: the piping in a solar loop (circuit) that connects the
collector(s), pump station, and heat exchanger(s) in storage tank(s).
polyisocyanurate: foam typically used as rigid thermal insulation.
Its thermal conductivity has a typical value of 0.16 BTU*in/hr*ft2*°F
(0.023 W/mK). It has superior resistance to breakdown at high
temperatures, which is necessary for solar loops.
pre-charge pressure (of expansion tank): the pressure of the gas
68 | SOL 25 PLUS
WWW.STIEBEL-ELTRON-USA.COM
pressure drop: the loss of pressure of a fluid as it flows through
pipes and other components, caused by its viscosity or “friction”.
Pressure drops must be taken into account when determining pump
sizes, system pressures, and other design factors.
profile (frame) rails: extruded aluminum members that form the
frame in which to hold collectors and that provide slots for bolt
attachments.
propylene glycol: a non-toxic type of heat transfer medium and
anti-freeze solution that is often used in closed-loop solar collector
systems to prevent freezing of the liquid and related damage to
components in very cold temperatures. The correct percentage of
propylene glycol in a mixture with water is critical to the proper
functioning and safe operation of solar thermal systems.
Schrader valves are used on many refrigeration and air conditioning
systems to allow servicing, including recharging with refrigerant.
They are also used to conduct leak-down pressure tests on pipe
installations. Stiebel Eltron expansion tanks are fitted with Schrader
valves to permit easy charging with pressurized air or nitrogen.
sensor well: a cylindrical bore made in a component to allow
insertion of a cylindrical temperature sensor that is to measure the
component’s temperature. An external sensor well is integrated
with pipe fittings to attach to the Stiebel Eltron SOL 25 PLUS solar
collector.
shear force: force acting perpendicular to a fastener or member
which would shear it off if sufficiently high (above the member’s or
fastener’s shear strength)
smooth-tube heat exchanger: a type of immersed-tube HX that does
not employ fins to help conduct heat. Stiebel Eltron’s SBB storage
tanks employ smooth-tube heat exchangers.
psi (psia, psig): pounds (force) per square inch (typically for pressure
or stress measurement); psia is absolute pressure; psig is gauge
pressure. Sea-level atmospheric pressure is approximately 14.7 psia
– or 0 psig, as read by a gauge.
solar loop: the fluidic loop that closed-loop solar systems employ to
transport solar-heated liquid from solar collectors to solar storage
tanks and/or other devices. The loop may also be used to shed heat
if temperatures in the system exceed safe limits.
Purgomat air vent: an automatic, float-type air vent that is used to
purge a hydronic system or solar loop of air and allow efficient heat
transfer to take place.
SOLKIT: Stiebel Eltron solar hot water system kit, which includes one
or more solar collectors, a solar storage tank, a pumping station, a
controller, and related accessories.
PVC: polyvinyl chloride, a thermoplastic polymer. It is often used as
a jacket or cover for solar loop piping and other components.
SOM 6 SI differential temperature controller: a solar system
controller providing one control function (e.g., one pump) and 3
sensor inputs.
refractometer: a device used to measure of an index of refraction.
For solar thermal systems, the index of refraction is translated to
degrees of freeze protection that an anti-freeze solution provides.
reheating: the addition of more heat to the outlet domestic hot water
of a solar storage tank to raise it to the desired temperature for final
use by a building’s occupants.
RTD: resistance temperature detector or resistance thermometer, a
temperature sensor that exploits the predictable change in electrical
resistance of some materials with changing temperature. They
are most often made of platinum (‘Pt’ is the symbol for platinum).
Stiebel Eltron’s SOM 6, 7, and 8 use RTD temperature sensors to
measure temperatures of solar collectors, heat exchangers, and
storage tanks. RTDs are manufactured to achieve a particular
resistance curve vs. temperature.
R-value (insulation): a measure of thermal resistance used in the
building and construction industry. The bigger the number, the
better the insulation’s effectiveness. R-value is the reciprocal of
U-value. In the U.S., the units of measure of R-value are degrees
Fahrenheit, square feet hours per BTU, (ft²·°F·h/BTU). Converting
to/from SI units, 1 ft²·°F·h/BTU ≈ 0.1761t K·m²/W, or 1 K·m²/W ≈
5.67446 ft²·°F·h/BTU.
SBB: Stiebel Eltron solar storage tank models.
Schrader valve: most often found on tube-type and tubeless tires,
WWW.STIEBEL-ELTRON-USA.COM
SOM 7 SI differential temperature controller: a solar system
controller providing two control functions (e.g., two pumps or one
pump and one valve) and 4 sensor inputs.
SOM 8 SI differential temperature controller: a sophisticated solar
system controller providing up to nine control functions (pumps,
valves, etc.) and 15 sensor inputs. They are typically used for larger,
more complex (and/or commercial) systems.
STAK: storage tank accessory kit.
temperature/pressure gauge: a special mechanical gauge that
integrates both temperature and pressure indicators.
tensile force: force acting in-line with a fastener or member, placing
it in tension, which would pull it apart if sufficiently high (above
its tensile strength). Tensile force acts in opposite direction than
compressive force (which would buckle or crush the member).
thermal conductivity: the ability of a material to conduct heat,
typically in units of W/(m.K); it is the inverse of thermal resistance.
thermo-siphoning: the passive convection or flow of a fluid
through a conduit that is caused by density changes due to
differences in temperature from one point in the conduit to another.
Thermosiphons are particularly prevalent in vertical loops of pipe
carrying liquids where one side of the loop is exposed to a warmer
SOL 25 PLUS | 69
english
(typically air or nitrogen) cushion on the “dry” side of an expansion
tank’s diaphragm. It helps to regulate the system pressure and must
be set according to the instructions.
temperature than the other. In some cases thermo-siphoning
is undesirable when it causes heat to be transported away from
storage.
truss: a triangular-shaped structure used to tilt (incline) solar
collectors at an angle relative to the structure (inclination angle) on
which they are mounted.
Units of Measure:
BTU: British thermal unit
°C: degrees Celsius
°F: degrees Fahrenheit
ft: foot/feet of distance
K: Kelvin (degree of absolute temperature)
kg: kilogram
kN: kiloNewton (thousand Newtons) of force
lb: pound force or weight
m: meter
mm: millimeter
psi: pounds per square inch
psia: pounds per square inch, absolute
psig: pounds per square inch, gauge
W: watt
UV: ultraviolet radiation (typically a component sunlight).
venting: the process of purging air from the solar loop or other parts
of a heating system.
vertical collector mounting: a mounting arrangement in which the
long dimension of each collector is oriented up/down; the collector’s
pipe fittings (nipples) typically point upward.
wind loads: forces generated by winds impinging upon solar
collectors and related components.
70 | SOL 25 PLUS
WWW.STIEBEL-ELTRON-USA.COM
english
Appendix a
Roof Mounting Details
If the roof attic is accessible, we recommend fastening the solar collector mounting hardware using carriage bolts through the roof
sheathing and a spanner block that spans across rafters, as shown in Figure A.1. It is important to provide adequate support for the spanner
to keep it from buckling, as shown in the diagram, with two spacer blocks to allow the carriage bolt to clamp tightly to the structure.
Choose large enough carriage screws to allow adequate load-bearing for the snow, ice, and wind conditions likely to be present at the site.
Keep in mind that solar collectors that are not flush to the roof – particularly those that are inclined steeply – can develop significant wind
forces in certain locales.
Pre-drill holes through the roof and mounting blocks. The spacer blocks should be sized to fit snugly between the underside of the roof
decking (sheathing) and the spanner block. Apply liberal amounts of silicone sealant to the bolt hole and underneath the mounting block to
prevent leaks.
It is extremely important to use galvanically-compatible fasteners. Stiebel Eltron mounting hardware (L-brackets, frames, etc.) are made of
aluminum; therefore, stainless steel fasteners are strongly recommended to provide the required strength and protection from corrosion in
harsh rooftop environments.
roof cement
mounting L-bracket
mounting block
stainless steel nut,
bolt, & washer
neoprene washer
shingles
silicone sealant
sheathing
spanner
wood blocks
sized to fit
2 stainless steel
nuts & washer
Figure A.1: Roof Attachment Using Spanner Block And Carriage Bolt.
WWW.STIEBEL-ELTRON-USA.COM
SOL 25 PLUS | 71
If the roof deck is inaccessible from below, the collector mounting hardware may be fastened using lag bolts through the roof sheathing
and into rafters from above, as shown in Figure A.2. Lag bolts must solidly penetrate rafters or other structural members to provide solid
anchoring strength. The location of these may be determined by tapping the roof with a hammer. Drill holes through the roof (several
sizes smaller than the bolt) to assure a tight fit. The threads of the lag bolt should penetrate at least two inches (2”) into the structural
member itself (below the roof sheathing)A1. It is therefore critical that the installer determine the length of bolt necessary to give the depth of
penetration required. Apply liberal amounts of silicone sealant to the bolt hole and underneath the mounting block to prevent leaks. After
tightening the bolt, apply more sealant over the entire assembly.
roof cement
mounting L-bracket
stainless steel lag bolt
& washer
neoprene washer
mounting block
shingles
silicone sealant
sheathing
2" min.
rafter
Figure A.2: Roof Attachment Using Lag Bolt Into Rafter.
There are other, well-engineered roof fastening systems available that the installer may wish to consider. In all cases, it is prudent to contact
the local code enforcement office to determine the appropriate means of attachment to roofs or other structures.
A1
NOTE: Installers must ensure that no deterioration (e.g., rot or water damage) has occurred to the underlying members; if the roof structure is compromised by deterioration
or cracking, it will be necessary to repair it before mounting the solar equipment.
72 | SOL 25 PLUS
WWW.STIEBEL-ELTRON-USA.COM
english
Appendix B
Certification
S17
WWW.STIEBEL-ELTRON-USA.COM
SOL 25 PLUS | 73
Appendix c
Contact
USA
Netherlands
Stiebel Eltron Inc.
17 West Street
West Hatfield MA 01088
Tel: 413-247-3380
Fax: 413-247-3369
E-Mail: [email protected]
Internet: www.stiebel-eltron-usa.com
Stiebel Eltron Nederland B.V.
Daviottenweg 36
Postbus 2020 NL-5202 CA‘s-Hertogenbosch
Tel: 073-6 2300 00
Fax: 073-6 23 1141
E-Mail: [email protected]
Internet: www.stiebel-eltron.nl
Germany
Austria
Stiebel Eltron International GmbH
Dr.-Stiebel-Str.
37603 Holzminden
Tel: 0 5531/702-0
Fax: 0 5531/702-479
E-Mail: [email protected]
Internet: www.stiebel-eltron.com
Stiebel Eltron Ges.m.b.H.
Eferdinger Str. 73
A-4600 Wels
Tel: 072 42-47367-0
Fax: 07242-47367-42
E-Mail: [email protected]
Internet: www.stiebel-eltron.at
Great Britain
Czech Republic
Stiebel Eltron Ltd.
Lyveden Road
Brackmills GB-Northampton NN4 7ED
Tel: 016 04-766421
Fax: 016 04-765283
E-Mail: [email protected]
Internet: www.stiebel-eltron.co.uk
Stiebel Eltron spol. s r.o.
K Hájum 946
CZ-15500 Praha 5-Stodulky
Tel: 02-5111 / 6111
Fax: 02-355 12122
E-Mail: [email protected]
Internet: www.stiebel-eltron.cz
France
Hungary (Magyarország)
Stiebel Eltron SAS
7-9, rue des Selliers
BP 85107 F-57073 Metz-Cédex 3
Tel: 03-87-74 3888x
Fax: 03-87-74 6826
E-Mail: [email protected]
Internet: www.stiebel-eltron.fr
Stiebel Eltron Kft.
Pacsirtamezo´ u. 41
H-1036 Budapest
Tel: 012 50-6055
Fax: 013 68-8097
E-Mail: [email protected]
Internet: www.stiebel-eltron.hu
Belgium
Poland
Stiebel Eltron Sprl /Pvba
Rue Mitoyenne 897
B-4840 Welkenraedt
Tel: 087-88 1465
Fax 087-88 1597
E-Mail: [email protected]
Internet: www.stiebel-eltron.com
Stiebel Eltron sp.z. o.o
ul. Instalatorów 9
PL-02-237 Warszawa
Tel: 022-8 4648 20
Fax: 022-8 466703
E-Mail: [email protected]
Internet: www.stiebel-eltron.com.pl
74 | SOL 25 PLUS
WWW.STIEBEL-ELTRON-USA.COM
english
Switzerland
Stiebel Eltron AG
Netzibodenstr. 23c
CH-4133 Pratteln
Tel: 061-8 169333
Fax: 061-8 169344
E-Mail: [email protected]
Sweden (Sverige)
Stiebel Eltron AB
Box 206
SE-641 22 Katrineholm
Tel: 0150-487900
Fax: 0150-487901
E-Mail: [email protected]
Internet: www.stiebel-eltron.se
Thailand
Stiebel Eltron Ltd.
469 Building 77, Bond Street
Tambon Bangpood
Ampur Pakkred Nonthaburi 11120
Tel: 02-960 1602-4
Fax: 02-960 1605
E-Mail: [email protected]
Internet: www.stiebeleltronasia.com
WWW.STIEBEL-ELTRON-USA.COM
SOL 25 PLUS | 75
13. Warranty
WARRANTY
Stiebel Eltron warrants to the original owner that the SOL 25 plus - Flat Plate Solar Collector will be free from defects
in workmanship and materials for a period of ten (10) years from the date of purchase.
Should the part(s) prove to be defective under normal use during this period, Stiebel Eltron, Inc. will be responsible
for replacement of the defective part(s) only. Stiebel Eltron, Inc. will not be liable for any costs of transportation,
removal, reinstallation, or any other labor or freight charges that may arise in connection with a warranty claim or
any incidental or consequential expenses.
This warranty does not apply:
1. to conditions resulting from a failed component or part that is not part of the solar collector or absorber plate.
2. to freeze damage
3. to conditions resulting from misuse, abuse, neglect, accident, or alteration
4. to minor discoloration of the collector framewall or absorber plate
5. to glass breakage
6. to conditions resulting from the introduction of harmful chemicals, caustic fluids, or liquids deleterious
to copper tubing, including improperly applied or maintained heat transfer fluids
7. to propylene glycol pH levels above 10 or below 8
8. to periods of stagnation in excess of 60 days
9. to excessive pressure
10. to clouding or similar occurrence resulting from the normal intrusion of moisture into
11. to conditions resulting from floods, earthquakes, winds, fire, lightning, or circumstances beyond the manufacturer‘s control
12. to installation methods which do not conform to relevant national, state or local
codes and ordinances, good industry practices or applicable manuals, diagrams, technical bulletins or written installation instructions; and, to applications other than medium temperature.
To obtain service under this warranty, the owner must first secure written authorization from Stiebel Eltron, Inc. The
owner shall be required to show proof of purchase date, and to pay all transportation costs to return the defective
part(s) for repair or replacement.
STIEBEL ELTRON, INC.
17 West Street
West Hatfield, MA 01088, USA
PHONE: 800.582.8423 or 413.247.3380
FAX:
413.247.3369
[email protected]
www.stiebel-eltron-usa.com
76 | SOL 25 PLUS
WWW.STIEBEL-ELTRON-USA.COM
english
WWW.STIEBEL-ELTRON-USA.COM
SOL 25 PLUS | 77