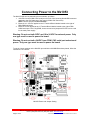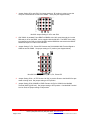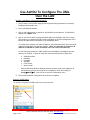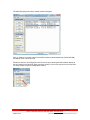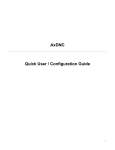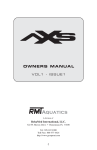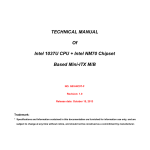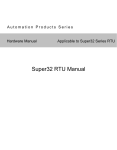
1
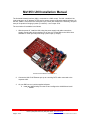
Mx1053 UNI Installation Manual (Ax2200 Board) The Universal Network Interface (UNI) is connected to a CNC control. The UNI “virtualizes” the local serial port to an IP Address & TCP port for remote access by Ethernet enabled software. On the UNI, COM1 is reserved for the serial port to the control (also called Port D internally). All ports have pin 9 capable of bringing in power (12-24VDC) – see Jumper JP33. The usual order of installation is as follows: 1. With the power off, install the UNI noting the power supply and cable connections. Usually a serial cable will be supplied, but in case it is not the DB9 on the UNI is like a standard PC serial port with pin 9 being a power input (or output). Mx1053 Universal Network Interface – Rev 7 2. Connect the UNI RJ-45 Ethernet port up to a working CAT5 cable connected to the corporate LAN. 3. On your DNC server, load the supplied software: a. Install the AxHDU Utility from the CD and configure the Ax2200 then install i. AxDNC Memex Automation Inc., 200 – 3425 Harvester Rd., Burlington, ON Canada L7N 3N1 Phone: (905) 635-1540 Fax: (905) 631-9640 www.memex.ca Page 1 of 25 \ISO9000\DOCs\M100728F - UNI Pictorial Installation Manual - MAI.doc Connecting Power to the Mx1053 The Mx1053 UNI can be powered by three methods, as follows: 1. +24 VDC from the COM1 CNC serial port on Pin 9 of the incoming female DB9 connector attached to the CNC data port of the control (COM1 CNC Connector) NOTE: Use this option for Fanuc Controls. 2. External +18 – 24 VDC applied to the J7 Terminal Block Header located to the right of DB9 COM3 serial port. 3. External +5 VDC applied to the J7 Terminal Block Header located to the right of DB9 COM3 serial port. JP10, Reg ENBL, does not need to be jumpered if 5VDC is to be used for the main power supply. Warning: Do not use both 5VDC and 18 to 24 VDC for external power. Only one type must be used to power the board. Warning: Do not use both +24VDC from COM1 CNC serial port and external power. Only one type must be used to power the board. To set the jumper settings on the Mx1053 upon which the Ax2200HS has been placed, follow the instructions 1 to 8 below. Mx1053 Power and Jumper Setting Memex Automation Inc., 200 – 3425 Harvester Rd., Burlington, ON Canada L7N 3N1 Phone: (905) 635-1540 Fax: (905) 631-9640 www.memex.ca Page 2 of 25 \ISO9000\DOCs\M100728F - UNI Pictorial Installation Manual - MAI.doc 1. Jumper Setting JP31 and JP32: Set jumper setting to “B” position in order to route the com port of the Ethernet module to the COM1 – CNC port (see diagram below). Mx1053 Jumper Setting for JP31 and JP32 2. CNC COM1: A standard Fanuc DB9F to DB25M, with +24V routed through pin 9 on the DB9 and pin 25 on the DB25, can be supplied with the Mx1053. The DB9F of the cable is connected to the CNC port of the Mx1053 and the DB25M is connected to the DB25F RS232 serial port of a Fanuc CNC machine. 3. Jumper Setting P1, P3, P4 and P5: Reroutes the RJ12 Mx2000 HOI Terminal Signal to COM2 as well as COM3. Set jumper setting to “D” position (see diagram below). Mx1053 RJ12 Jumper Setting for P1, P3, P4 and P5 4. Jumper Setting JP16 + 24 TR: Routes +24 VDC to provide Power to the Mx1053 if a tape reader is being used. Set jumper setting to OFF position. 5. Jumper Setting JP33 COM3/RJ12 PWR: Routes +9 VDC to COM3 for the Mx2000 Terminal (9VDC @ 350 mA). Set jumper setting to OFF position. If an Mx2000 Terminal is to be used, set jumper setting to ON position. Memex Automation Inc., 200 – 3425 Harvester Rd., Burlington, ON Canada L7N 3N1 Phone: (905) 635-1540 Fax: (905) 631-9640 www.memex.ca Page 3 of 25 \ISO9000\DOCs\M100728F - UNI Pictorial Installation Manual - MAI.doc Described below are the three power options. Please choose the option that best describes your scenario. Option 1 - +24 VDC from the COM1 CNC serial port on Pin 9 of the incoming female DB9 connector attached to the CNC data port of the control (COM1 CNC Connector) 6. Jumper Setting JP10 REG ENBL: Enables the 5V DC Voltage Regulator to provide power to the Ethernet module. Set jumper setting to ON position. 7. Terminal Block for Power J7: Do not connect any POWER to this connector. Mx1053 Terminal Block for =18-24 VDC or 5VDC Option J7 8. Jumper Setting JP1 PWR DB9-COM1: Routes +24 VDC from Pin 9 of COM1 DB9 connector to provide power to the board. Set jumper setting to ON position if routed through DB9 COM1 cable. Note: The option to use +24V on the CNC COM1port is available if +24VDC has been routed through the cable from the Control’s RS232 connector. Memex Automation Inc., 200 – 3425 Harvester Rd., Burlington, ON Canada L7N 3N1 Phone: (905) 635-1540 Fax: (905) 631-9640 www.memex.ca Page 4 of 25 \ISO9000\DOCs\M100728F - UNI Pictorial Installation Manual - MAI.doc Option 2 - External +18 – 24 VDC applied to the J7 Terminal Block Header located to the right of DB9 COM3 serial port. 6. Jumper Setting JP10 REG ENBL: Enables the 5V DC Voltage Regulator to provide power to the Ethernet module. Set jumper setting to ON position. 7. Terminal Block for Power J7: Route external power to provide power to the Mx1053. +18 to 24 VDC and GND on Pin 3 (see Item 3, below). Mx1053 Terminal Block for =18-24 VDC or 5VDC Option J7 8. Jumper Setting JP1 PWR DB9-COM1: Routes +24 VDC from Pin 9 of COM1 DB9 connector to provide power to the board. Set jumper setting to OFF position if +24VDC is not being routed through DB9 Connector. 9. Note: The option to use +24V on the CNC COM1port is available if +24VDC has been routed through the cable from the Control’s RS232 connector. Memex Automation Inc., 200 – 3425 Harvester Rd., Burlington, ON Canada L7N 3N1 Phone: (905) 635-1540 Fax: (905) 631-9640 www.memex.ca Page 5 of 25 \ISO9000\DOCs\M100728F - UNI Pictorial Installation Manual - MAI.doc Option 3 - External +5 VDC applied to the J7 Terminal Block Header located to the right of DB9 COM3 serial port. JP10, Reg ENBL, does not need to be jumpered if 5VDC is to be used for the main power supply. 6. Jumper Setting JP10 REG ENBL: Enables the 5V DC Voltage Regulator to provide power to the Ethernet module. Set jumper setting to OFF position. 7. Terminal Block for Power J7: Route external power to provide power to the Mx1053. +5 VDC on Pin 2 (see Item 2, below) and GND on Pin 3 (see Item 3, below). Mx1053 Terminal Block for =18-24 VDC or 5VDC Option J7 8. Jumper Setting JP1 PWR DB9-COM1: Routes +24 VDC from Pin 9 of COM1 DB9 connector to provide power to the board. Set jumper setting to OFF position if +24VDC is not being routed through DB9 Connector. Note: The option to use +24V on the CNC COM1port is available if +24VDC has been routed through the cable from the Control’s RS232 connector. Memex Automation Inc., 200 – 3425 Harvester Rd., Burlington, ON Canada L7N 3N1 Phone: (905) 635-1540 Fax: (905) 631-9640 www.memex.ca Page 6 of 25 \ISO9000\DOCs\M100728F - UNI Pictorial Installation Manual - MAI.doc Use AxHDU To Configure The UNIs Over the LAN Mx1053 – Ax2200HS - Configuration Summary 1. At a PC station, if the AxHDU (High Speed Deployment Utility) software is not already installed, please install it now. 2. Launch the AxHDU software. 3. Click on the Search button to search for any Mx1053s on the Network. The Mx1053 is shipped using DHCP mode. 4. Click on the Device with the appropriate MAC address to highlight it and click on setup. This will bring up a window that will provide information on the serial configuration of the Mx1053 and the Network information of the Ax2200HS device. To change the IP address to a Static IP address, uncheck Enable DHCP and insert the IP Address, Subnet Mask and Gateway Address. (Note: It is advisable to change the IP address from DHCP to a static IP address once it is seen on the network.) For the Serial port settings, the CNC setting for the Ax2200HS is the only section that needs to be modified. It needs to match the control that the Mx1053 is attached to. a. b. c. d. e. f. Serial Baud Rate. Data Bits. Parity Bits. Stop Bits. Flow Control. Wait for XON. After the Serial and Network Settings has been updated, write the configuration to the Mx1053 by going to the top left of the configuration menu and clicking on Config Write All. Click on Exit to leave the configuration menu. 5. The serial and network configuration has now been completed. Using the AxHDU Utility Go to Start > Programs > AxHDU and click on the menu item. Memex Automation Inc., 200 – 3425 Harvester Rd., Burlington, ON Canada L7N 3N1 Phone: (905) 635-1540 Fax: (905) 631-9640 www.memex.ca Page 7 of 25 \ISO9000\DOCs\M100728F - UNI Pictorial Installation Manual - MAI.doc The UMI HS Deployment utility’s search window will appear. Click on “Search” to poll the network for Ax2200 network modules attached to the Mx1053 UNI and display a list of devices found. Identify the device to be configured on the Device list by comparing the MAC address display to the one printed on the Mx1053 (Silver Lantronix module). Click on the device on the list and click on ‘Setup’ button to open its configuration window. Memex Automation Inc., 200 – 3425 Harvester Rd., Burlington, ON Canada L7N 3N1 Phone: (905) 635-1540 Fax: (905) 631-9640 www.memex.ca Page 8 of 25 \ISO9000\DOCs\M100728F - UNI Pictorial Installation Manual - MAI.doc The Setup utility window appears. Click Config > Read > All The status window will refresh and the device will respond in the list. Note: This will fail to connect to the AxHS2200 if other application is currently connected to this machine’s 4444 port, such as AxDNC. You must disconnect or turn off the other application in order to configure the board. Memex Automation Inc., 200 – 3425 Harvester Rd., Burlington, ON Canada L7N 3N1 Phone: (905) 635-1540 Fax: (905) 631-9640 www.memex.ca Page 9 of 25 \ISO9000\DOCs\M100728F - UNI Pictorial Installation Manual - MAI.doc The IP address is now displayed for the device to be setup. Note the IP address for setup in AxDNC. Configure the settings shown above to set the serial port settings for this Mx1053. Use “Config-> Write All” to save any changes to the Mx1053. Click exit when finished to disconnect to the board. Memex Automation Inc., 200 – 3425 Harvester Rd., Burlington, ON Canada L7N 3N1 Phone: (905) 635-1540 Fax: (905) 631-9640 www.memex.ca Page 10 of 25 \ISO9000\DOCs\M100728F - UNI Pictorial Installation Manual - MAI.doc Installing AxDNC Locate the AxDNC installer file Double Click on the file, AxDNC_Setup_x.x.x.x.exe If prompted by your security Click “Run” Select the preferred language and click OK The Welcome setup screen will appear Click Next. Memex Automation Inc., 200 – 3425 Harvester Rd., Burlington, ON Canada L7N 3N1 Phone: (905) 635-1540 Fax: (905) 631-9640 www.memex.ca Page 11 of 25 \ISO9000\DOCs\M100728F - UNI Pictorial Installation Manual - MAI.doc The software license agreement window will appear Please review the End-User License Agreement content. To continue, click “I Agree” button. You will be presented with the file location window. The Destination Folder contains the Default file location. This can be changed by clicking on the Browse button and selecting a new file location/ creating a new folder, if desired and clicking OK Memex Automation Inc., 200 – 3425 Harvester Rd., Burlington, ON Canada L7N 3N1 Phone: (905) 635-1540 Fax: (905) 631-9640 www.memex.ca Page 12 of 25 \ISO9000\DOCs\M100728F - UNI Pictorial Installation Manual - MAI.doc Once you have selected the location of chosen the default location, click “Install” You are presented with an installation progress window which displays the files being installed. Once complete you will be presented with the following window: Click “Finish” to close the installer and run the AxDNC application for the first time. Uncheck mark the “Run AxDNC” radio button if you do not want to run AxDNC at this time. Memex Automation Inc., 200 – 3425 Harvester Rd., Burlington, ON Canada L7N 3N1 Phone: (905) 635-1540 Fax: (905) 631-9640 www.memex.ca Page 13 of 25 \ISO9000\DOCs\M100728F - UNI Pictorial Installation Manual - MAI.doc Running AxDNC for the first time To run AxDNC click on the AxDNC icon created on your desktop Or, click the Start button and select AxDNC from the programs list. The AxDNC application will start and the AxDNC Machine window will appear. Memex Automation Inc., 200 – 3425 Harvester Rd., Burlington, ON Canada L7N 3N1 Phone: (905) 635-1540 Fax: (905) 631-9640 www.memex.ca Page 14 of 25 \ISO9000\DOCs\M100728F - UNI Pictorial Installation Manual - MAI.doc Menu Bar File: Edit: Event Logs: Machine Connection: Operation: Memex Automation Inc., 200 – 3425 Harvester Rd., Burlington, ON Canada L7N 3N1 Phone: (905) 635-1540 Fax: (905) 631-9640 www.memex.ca Page 15 of 25 \ISO9000\DOCs\M100728F - UNI Pictorial Installation Manual - MAI.doc Help: Navigation Bar Machine List window The default machine (Sample 1) is listed and is shown as “offline”. When machines are setup on AxDNC you will see: 1. 2. 3. 4. 5. 6. 7. CNC Machine Name Current state (On Line or Off Line) Operation Port Settings File Send Progress File Receive Progress Machine Type Memex Automation Inc., 200 – 3425 Harvester Rd., Burlington, ON Canada L7N 3N1 Phone: (905) 635-1540 Fax: (905) 631-9640 www.memex.ca Page 16 of 25 \ISO9000\DOCs\M100728F - UNI Pictorial Installation Manual - MAI.doc Adding a Machine Before you can add a machine to which you can connect you must first install the machine. AxDNC will support direct serial connected machines. However, the purpose of this Quick Start Manual is to connect AxDNC to the Mx1053 universal network interface via TCP/IP. Once you have installed the Mx1053 UNI and confirmed that the interface is set up and visible on the network, you can add the Mx1053 equipped machine tool to AxDNC. NOTE: If you are running the unregistered evaluation copy of AxDNC, a sample machine already exists. The sample cannot be deleted in this mode. Therefore you will modify the existing “Sample” machine record. If you have a multiport license then you can create a new machine. For this quick start manual you will modify the “Sample” Click the “Machine Connection” menu item and then click “Edit” The machine Properties window will appear. Memex Automation Inc., 200 – 3425 Harvester Rd., Burlington, ON Canada L7N 3N1 Phone: (905) 635-1540 Fax: (905) 631-9640 www.memex.ca Page 17 of 25 \ISO9000\DOCs\M100728F - UNI Pictorial Installation Manual - MAI.doc Select the TCP/IP tab displayed across the top of the Properties Window. There are 6 parameters which are available on the TCP/IP tab view. 1. TCP/IP address 2. Port assignment (Default port is 4444) 3. Poll interval in milliseconds (1/1000th of a second- Default is 2000 ms which is 2 seconds) 4. Reconnect Interval in seconds (Default 10 seconds) 5. Use TCP 6. Use TCP Poll/ Keep Alive Memex Automation Inc., 200 – 3425 Harvester Rd., Burlington, ON Canada L7N 3N1 Phone: (905) 635-1540 Fax: (905) 631-9640 www.memex.ca Page 18 of 25 \ISO9000\DOCs\M100728F - UNI Pictorial Installation Manual - MAI.doc The 6 parameters can now be populated on the TCP/IP tab view. 1. TCP/IP address – the address reported in the UMI deployment utility which in this case was 10.10.1.39 2. Port assignment (Default port is 4444) 3. Poll interval in milliseconds (1/1000th of a second- Default is 2000 ms which is 2 seconds) 4. Reconnect Interval in seconds (Default 10 seconds) 5. Use TCP – check marked 6. Use TCP Poll/ Keep Alive- unchecked unless network timeouts are a problem Before the machine setup is complete the following tabs need to be populated. Memex Automation Inc., 200 – 3425 Harvester Rd., Burlington, ON Canada L7N 3N1 Phone: (905) 635-1540 Fax: (905) 631-9640 www.memex.ca Page 19 of 25 \ISO9000\DOCs\M100728F - UNI Pictorial Installation Manual - MAI.doc If there is only one send folder used then set both the primary and secondary send folder to the same folder. If there is only one receive folder used then set both the primary and secondary receive folder to the same folder. Set the default file extension used for NC part program files. Set the correct delimiters used in the existing NC part program files. Memex Automation Inc., 200 – 3425 Harvester Rd., Burlington, ON Canada L7N 3N1 Phone: (905) 635-1540 Fax: (905) 631-9640 www.memex.ca Page 20 of 25 \ISO9000\DOCs\M100728F - UNI Pictorial Installation Manual - MAI.doc The remote call and remote request commands used on the target control must be duplicated in the fields indicated above on the Commands tab. Proper syntax is required for the DNC software to process a file punched from the control. Click the OK button on the Machine Properties window. Memex Automation Inc., 200 – 3425 Harvester Rd., Burlington, ON Canada L7N 3N1 Phone: (905) 635-1540 Fax: (905) 631-9640 www.memex.ca Page 21 of 25 \ISO9000\DOCs\M100728F - UNI Pictorial Installation Manual - MAI.doc You will be returned to the AxDNC main window. Click on the icon indicated by #1. This is the “connect to machine” icon. It will grey out and the “disconnect machine” icon will become visible. The machine will now change it’s state from “off line” to “In Remote”. The machine is now online. To rename the listed machine from “Sample” to a name more relevant, click on the “Disconnect machine” icon to take it offline. Then click on Machine Connection > Rename Rename the machine to whatever you want. Do not use spaces or special characters such as underlines. Click OK Memex Automation Inc., 200 – 3425 Harvester Rd., Burlington, ON Canada L7N 3N1 Phone: (905) 635-1540 Fax: (905) 631-9640 www.memex.ca Page 22 of 25 \ISO9000\DOCs\M100728F - UNI Pictorial Installation Manual - MAI.doc The new name is now displayed. You have now setup a machine using a Mx1053 UNI connecting to AxDNC software. Details of settings can be found in the full user manuals for the respective software or devices. This completes the installation and basic configuration of AxDNC. Memex Automation Inc., 200 – 3425 Harvester Rd., Burlington, ON Canada L7N 3N1 Phone: (905) 635-1540 Fax: (905) 631-9640 www.memex.ca Page 23 of 25 \ISO9000\DOCs\M100728F - UNI Pictorial Installation Manual - MAI.doc Troubleshooting Q. Why can’t I find the Ax2200HS on the network when I do a Search using Broadcast? A. Use IP Scan to scan for a particular IP Range and identify the Lantronix device on the Ax2200HS. 1. Open AxHDU. Diagram H.1 – AxHDU Using IP Scan 2. Default search configuration is to Use Broadcast. Select Use IP Scan (see Item 1, Diagram H.1, above). The IP Scan Setting can now be selected. Click on IP Scan Setting (see Item 2, Diagram H.1, above). 3. The IP range can then be set to a particular range to search for a Lantronix device (see Item 3 and 4, Diagram H.1, above). For example, if the local PC IP is set to 10.10.1.5, a Lantronix device could have been provided by the DHCP server for a range between 10.10.1.1 up to 10.10.1.255. The search can be expanded by modifying the start and end IP addresses. 4. Click on Set (see Item 5 Diagram H.1 above) to accept the settings and click on Exit (see Item 6 Diagram K.1 above) to return to the main AxHDU window. 5. At this point, click on Search to initiate a poll of the Lantronix devices on the network based on the IP address provided in IP Scan Settings. Once the search has been completed, a list of the Lantronix devices will be shown under the Device List. Choose the appropriate device by referring back to either the MAC address of the device or the unique Hostname given to the device. Memex Automation Inc., 200 – 3425 Harvester Rd., Burlington, ON Canada L7N 3N1 Phone: (905) 635-1540 Fax: (905) 631-9640 www.memex.ca Page 24 of 25 \ISO9000\DOCs\M100728F - UNI Pictorial Installation Manual - MAI.doc Memex Automation Inc. 200 – 3425 Harvester Rd., Burlington, Ontario Canada L7N 3N1 Phone: 905-635-1540 Fax: 905-631-9640 www.memex.ca [email protected] (905) 635-3041 [email protected] (905) 635-3043 Thank you for using Memex products Memex Automation Inc., 200 – 3425 Harvester Rd., Burlington, ON Canada L7N 3N1 Phone: (905) 635-1540 Fax: (905) 631-9640 www.memex.ca Page 25 of 25 \ISO9000\DOCs\M100728F - UNI Pictorial Installation Manual - MAI.doc