1
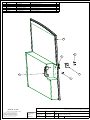
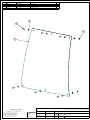
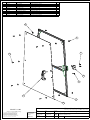
March 2009©
John Deere 7700 Series ROPS Operator Manual
John Deere 7700 Series ROPS
** Shown with optional Golf Ball Mesh Package
John Deere 7700 Series ROPS
This ROPS is designed and built to
fit the John Deere 7500, 7700, 850
and 8700.
Designed and Built by:
Tektite Manufacturing Inc:
24157 Hwy 3
P.O. Box 639
Winkler, MB
R6W 4A8
Canada
PH: 204-331-3463
Fax: 204-331-4159
[email protected]
One year standard product
warranty provided by Tektite.
Caution
** Please read installation instructions and follow all safety statements before attempting operating
this ROPS product.
** A copy of this operator manual should be kept with the machine operating manuals.
** If this manual is lost, please contact your local John Deere dealer for a replacement.
March 2009©
John Deere 7700 Series ROPS Operator Manual
Tektite Manufacturing Incorporated thanks you for purchasing a John Deere 7700 series ROPS!
Tektite has worked very hard to design and build this ROPS product and we hope that it
provides you with many years of ROPS protection.
Tektite’s ROPS products are designed to provide safe and dependable service during operation
when they are properly maintained according to the instructions. Please read this operator
manual carefully before using this ROPS product.
The photos/illustrations provided in this manual may not provide all the detail needed, and are
for reference only.
All directions provided are from the reference point of the tractor seat facing the steering
wheel. All left and right references are from this view point.
For reference, please fill in the information below. This will assist your dealer in providing
service for this ROPS. It is advisable that this information be provided to your insurance
company as well in the event that the tractor is lost or damaged.
Vehicle Model: _________________________________________________________
ROPS Serial Number: ___________________________________________________
Date of Purchase: _______________________________________________________
Dealer Name: ___________________________________________________________
March 2009©
John Deere 7700 Series ROPS Operator Manual
Safety Precautions
Safety First
Read these instructions carefully. It is essential that you read the instructions and safety
regulations before you attempt to assemble or use the features that are on this cab/ROPS.
Danger: Indicates an immediate hazardous situation which, if not avoided, will result in death
or serious injury.
Warning: Indicates a potentially hazardous situation which, if not avoided, may result in death
or serious injury.
Caution: Indicates a potentially hazardous situation which, if not avoided, may result in minor
or moderate injury.
Important: Indicates that cab or property damage may result if instructions are not carefully
followed.
NOTE: All products are designed to give safe, dependable service if they are operated and
maintained according to instructions. It is the owner’s responsibility to be certain anyone
operating this product reads this manual, and all other applicable manuals, to become familiar
with this cab and all safety precautions. Failure to do so could result in serious personal injury
or cab damage. If you have any questions, consult your dealer. Read and understand this
manual before operation.
NOTE: A safe operator is the best assurance against accidents. All operators, no matter how
experienced they may be, should read this operator manual and all other related manuals
before attempting to operate features in this cab/ROPS and operate the base tractor. Please
read the following section and pay particular attention to all safety recommendations
contained in this manual and those labelled on the cab and on the tractor.
March 2009©
John Deere 7700 Series ROPS Operator Manual
General Safety
1. Never let an unqualified or untrained driver operate the reel mower.
2. Keep a fire extinguisher, with ABC rating securely fastened in the ROPS. Maintain it and be
familiar with its use.
3. Do not carry passengers.
4. Never operate the mower in a closed building for a prolonged period. Ensure adequate
ventilation is present, as engine exhaust fumes are poisonous and can kill.
5. Always keep sleeves, jackets or other loose clothing relatively tight and belted. Loose clothing
may catch on moving parts and result in severe personal injury or death.
6. Provide a first-aid kit, securely attached inside of the ROPS for use in case of accident.
7. Never jump from the mower. There is a danger of tripping or falling on protruding parts.
8. Use steps and hand holds when mounting and dismounting the mower, or for servicing
components too high to reach from the ground.
9. When seated in the ROPS, fasten seat belt before starting the engine. A proper seat belt must
be worn at all times when using a ROPS.
10. Safety devices and shields are intended to protect operators from injury or death. Under no
circumstances should they be modified, disabled or removed.
Operating Safety
1. Always operate the mower controls while sitting in the operator’s seat.
2. Lock seat in position and buckle seat belt before operating the mower.
3. Avoid abrupt sharp turns at high speeds.
4. On sloped terrain, do not make sharp turns as machine stability could be compromised.
5. Operate the mower smoothly, avoid abrupt starts and stops.
6. Keep all shields in place when operating the mower.
7. Do not operate the mower when you are tired, sick, or impaired.
8. Never operate the mower in confined areas; visibility next to the tractor is reduced. Injury to
bystanders or damage to the ROPS or equipment may result.
Safety
Carefully review the procedures given in this manual and the reel mower operator’s manual
with all operators annually. It is important that all operators become familiar with, and follow
safety precautions. Operating instructions must be given to everyone using the tractor before
operation and at least once yearly thereafter in compliance with OSHA Regulations 1928.57
(United States).
March 2009©
John Deere 7700 Series ROPS Operator Manual
Safe Operation on Rough Terrain
1. Drive the mower slowly on hillsides and curves to eliminate the danger of tipping. Avoid
slopes which are too steep for safe operation. Avoid sharp uphill turns.
2. Always drive slowly enough over rough ground or obstructions. Drive at speeds slows enough
to ensure your safety.
3. When driving out of a ditch, gully, or up a steep hillside, engage the clutch slowly. Avoid
sharp uphill turns.
4. When descending steep grades, select a sufficiently low gear to maintain control with
minimum use of braking.
5. Use caution when driving near the edge of a ditch or gully. It may cave in, causing the mower
to roll over.
6. Be alert when operating near trees, slopes and around obstructions. Tree branches can cause
damage to ROPS components.
Maintenance Safety
1. Remove mud, crop residue, chains, and tools from steps and operator’s platform. They may
interfere with pedal operation or entry/exit from mower.
2. When servicing components are too high to reach from the ground use steps and handholds.
Do not use fenders or shields that are not designed as steps.
Safe Highway Operation
1. Before operating the mower on, or near, public roadways check with your local authorities
for any local regulations that will affect you.
2. Equip towed implements with slow moving vehicle (SMV) signs when traveling on public
roads.
3. Install additional lights on implement rear to safeguard against rear end collisions.
4. Use hazard warning flashers as required by law when transporting or driving on public roads.
If the mower had warning flashers removed when mounting the ROPS, they must be replaced
prior to operation on public roads.
5. Keep to the right, yielding right-of-way traffic, especially if pulling implements. Pull off the
road and stop to allow motorists to pass. Drive on the road shoulder, if permitted by law.
6. Use extreme caution when pulling heavy loads at road speeds. Avoid hard application of the
mower brakes at high speed.
7. Always drive slowly near curbs, approaches or ditches.
8. If equipped, ensure headlights are aligned so they will not blind the operator’s of oncoming
vehicles. If the mower is not equipped with turn signals and law requires them, install them
prior to operating on or near public roads.
March 2009©
John Deere 7700 Series ROPS Operator Manual
9. Use your turn signals, checking for traffic well in advance of turning. If the mower is not
equipped with turn signals and law requires them, install them prior to operating on or near
public roads.
Safety Decals
1. Keep decals clean. Remove dirt with a wet clean cloth when necessary.
2. Replace safety decals if destroyed, missing, painted over or unreadable. If any safety decals
are covered or obscured when the ROPS is mounted, it is recommended that you purchase
replacement decals from the mower manufacturer. Mount them in a readable location at, or
near, their original location before operating the mower.
3. New ROPS decals and mower decals are available from your mower dealer.
ROPS Safety
1. Install the ROPS in accordance with Tektite mounting instructions. Failure to do so may affect
the ROPS ability to withstand a roll over.
2. If the ROPS is subjected to alteration, structural damage or involved in an over turn accident,
the entire structure must be replaced. Failure to do so may result in injury or death in the event
of a roll over.
3. If the mower in not equipped with seat belts, purchase approved seat belts from the mower
manufacturer or Tektite prior to operating the mower.
4. Always fasten seat belts prior to operating the mower.
5. Always operate the mower from the operator’s seat.
6. Remove mud, crop residue, chains and tools from steps and operator’s platform. They may
interfere with pedal operation or entry/exit from the mower.
7. Remove all loose chains, tools, and equipment from the operator’s platform. Failure to do so
may cause injury or death in the event of a roll over.
8. Do not install the ROPS on a mower model that the ROPS is not designated for (compatible
mower designations are printed on the ROPS serial number plate). The ROPS is designed
specifically for individual models to ensure ROPS requirements will be met. Installing the ROPS
on a non designated mower may result in injury or death.
Emergency Exits
This ROPS has 2 exits, which may be used in an emergency: left and right side doors.
March 2009©
John Deere 7700 Series ROPS Operator Manual
Operating Instructions
Important
The following section locates, identifies and briefly describes the functions of all ROPS controls.
All operators should familiarize themselves with control location and function prior to operating
the mower. Failure to do so may result in unsafe operation of the mower and possible injury or
death to operators and bystanders.
The switch plate is located beside the upper A-A cross member near the ROPS roof. The
following switches are available and their functionality is described.
1. Front Work Lights Rocker Switch (optional)
Low position: Off
High position: On
2. Rear Work Light (s) Rocker Switch (optional)
Low position: Off
High position: On
3. 4 - way Flashers Rocker Switch (optional)
Low position: Off
High position: On
4. Turn Signal Rocker Switch (optional)
Left position: Left
Centre position: Off
Right position: Right
5. Front Wiper Rocker Switch (optional)
Low position: Low speed
Center position: Off
High position: High speed
6. Head Lights Rocker Switch (optional)
Low position: Off
High position: On
7. Beacon Rocker Switch (optional)
Low position: Off
High position: On
March 2009©
John Deere 7700 Series ROPS Operator Manual
After your ROPS has been installed:
Before starting a reel mower equipped with a Tektite ROPS:
1. Clear the operator platform of all tools. Tools left in or around the ROPS and mower can
cause operator interference which could lead to bodily injury and/or damage the machine.
2. Inspect the ROPS and mower to ensure all bolts are tight and re-tighten if required.
3. Ensure that all pedals, levers, and controls have adequate clearance for normal operation.
4. Ensure that all electrical components of both the ROPS and mower operate normally.
5. Ensure your door latches properly onto the striker pin. Immediately after installation, the
ROPS frame may flex slightly from installation, and the door latch will need to be re-aligned for
proper operation. Loosen the striker pin, striker mounting plate and door latch as necessary to
get a proper alignment of the door striker.
Service Parts Breakdowns:
Following are parts breakdowns for components that may require service parts replacement
during the life of the ROPS. If you require replacement parts, please contact the dealer that
you purchased the ROPS from and indicate which parts you require.
Index
File Name
Description
Qty
1
A00-0001
Service Part #
DLP-HANDLE
Outside Push Button Handle
1
2
A00-0002
LEFT-LATCH
Suicide Door Left Latch
1
3
A00-0021
FLANGE-NUT-1-4
Flange Nut, 1/4", YD
2
4
A00-0022
FLANGE_BOLT_M6X25
Flange Bolt, M6x25, YD
1
5
A00-0023
FLANGE_BOLT_1-4X3-4
Flange Bolt, 1/4" x 3/4", YD
2
6
J02-0001
JD7700-ASM-006
Door Frame Weldment
1
1
4
3
2
5
6
Tektite Manufacturing Inc.
SCALE 0.200
24157 Hwy 3, Box 639, Winkler MB, R6W 4A8, Canada
Notice of Confidentiality
This material is property of Tektite Manufacturing
Inc and is not to be used by the recipient for any
purpose other than the purpose for which it was
transmitted. The material remains the property of
Tektite and shall be returned upon request. The
material may not be reproduced or disclosed to third
parties without the written consent of Tektite.
Tolerances:
Unless otherwise
specified
X.X = ±1/16"
Angular = ± 1.0°
Req'd:
CNC:
Description:
Drawn By:
Date:
Units:
Left Door Assembly V2010
Daryl Furkalo
Checked By:
2010-03-23
Date:
File Name:
Imp. JD7700-ASM-007
Size:
B
Index
File Name
Description
Qty
1
A00-0001
Service Part #
DLP-HANDLE
Outside Push Button Handle
1
2
A00-0003
RIGHT-LATCH
Suicide Door Right Latch
1
3
A00-0021
FLANGE-NUT-1-4
Flange Nut, 1/4", YD
2
4
A00-0022
FLANGE_BOLT_M6X25
Flange Bolt, M6x25, YD
1
5
A00-0023
FLANGE_BOLT_1-4X3-4
Flange Bolt, 1/4" x 3/4", YD
2
6
J02-0002
JD7700-ASM-014
Door Frame Weldment V1
1
6
5
3
2
1
4
Tektite Manufacturing Inc.
SCALE 0.200
Notice of Confidentiality
This material is property of Tektite Manufacturing
Inc and is not to be used by the recipient for any
purpose other than the purpose for which it was
transmitted. The material remains the property of
Tektite and shall be returned upon request. The
material may not be reproduced or disclosed to third
parties without the written consent of Tektite.
24157 Hwy 3, Box 639, Winkler MB, R6W 4A8, Canada
Tolerances:
Unless otherwise
specified
X.X = ±1/16"
Angular = ± 1.0°
Req'd:
CNC:
Description:
Drawn By:
Date:
Units:
Daryl Furkalo
Checked By:
2010-03-23
Date:
Right Door Assembly V2010
File Name:
Imp. JD7700-ASM-018
Size:
B
Index
File Name
Description
Qty
1
A00-0013
Service Part #
TEKT-0009
5MM Bushing
12
2
A00-0020
STEP-BOLT1-4X1-1-4
Step Bolt, 1/4" x 1 1/4", MB
6
3
A00-0021
FLANGE-NUT-1-4
Flange Nut, 1/4", YD
6
4
T03-0021
JD7700-078
Fixed Front Window
1
1
2
3
4
Tektite Manufacturing Inc.
SCALE 0.180
Notice of Confidentiality
This material is property of Tektite Manufacturing
Inc and is not to be used by the recipient for any
purpose other than the purpose for which it was
transmitted. The material remains the property of
Tektite and shall be returned upon request. The
material may not be reproduced or disclosed to third
parties without the written consent of Tektite.
24157 Hwy 3, Box 639, Winkler MB, R6W 4A8, Canada
Tolerances:
Unless otherwise
specified
X.X = ±1/16"
Angular = ± 1.0°
Req'd:
CNC:
Description:
Drawn By:
Date:
Units:
Daryl Furkalo
Checked By:
2010-03-24
Date:
Front Fixed Lexan Assembly
File Name:
Imp. JD7700-ASM-020
Size:
B
Index
File Name
Description
Qty
1
A00-0001
Service Part #
DLP-HANDLE
Outside Push Button Handle
1
2
A00-0003
RIGHT-LATCH
Suicide Door Right Latch
1
3
A00-0013
TEKT-0009
5MM Bushing
10
4
A00-0019
STEP-BOLT1-4X1
Step Bolt, 1/4" x 1", MB
5
5
A00-0021
FLANGE-NUT-1-4
Flange Nut, 1/4", YD
7
6
A00-0022
FLANGE_BOLT_M6X25
Flange Bolt, M6x25, YD
1
7
A00-0023
FLANGE_BOLT_1-4X3-4
Flange Bolt, 1/4" x 3/4", YD
2
8
J02-0009
JD7700-062
Opening Front Door Lexan
1
9
J02-0010
JD7700-ASM-010
Front Door Frame Weldment
1
3
5
7
4
2
6
1
9
8
Tektite Manufacturing Inc.
SCALE 0.180
Notice of Confidentiality
This material is property of Tektite Manufacturing
Inc and is not to be used by the recipient for any
purpose other than the purpose for which it was
transmitted. The material remains the property of
Tektite and shall be returned upon request. The
material may not be reproduced or disclosed to third
parties without the written consent of Tektite.
24157 Hwy 3, Box 639, Winkler MB, R6W 4A8, Canada
Tolerances:
Unless otherwise
specified
X.X = ±1/16"
Angular = ± 1.0°
Req'd:
CNC:
Description:
Drawn By:
Date:
Units:
Daryl Furkalo
Checked By:
2010-03-24
Date:
Front Opening Door Assembly
File Name:
Imp. JD7700-ASM-021
Size:
B