1
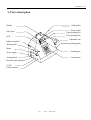
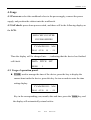
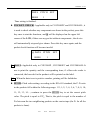
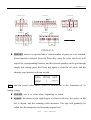
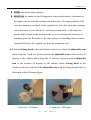
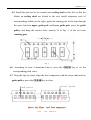
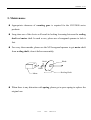
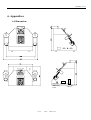
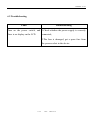
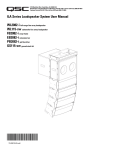
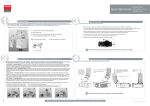
VERSION: .4.11 E
SMD CHIP COUNTER
COU2000 B
USER MANUAL
1/18
14:06
2005-12-10
VERSION: .4.11 E
Preface
Thank you very much for you choosing TOPOINT SMD Chip Counter! You can
make use of the COU2000 series products to achieve fast, convenient and error free
SMD chip counting, so as to better manage materials. Before using this device, please
first read this User Manual carefully, and keep it properly.
This product is subject to improvement and partial update without prior notice.
Please contact our dealers or us if you have any questions.
We recommend that you keep the packing materials for this device for
handling it in the future. Improper packing for this device may lead to its damage.
Damage of the warranty label resulting from unauthorized disassembling of the
device parts will not apply to warranty services.
2/18
14:06
2005-12-10
VERSION: .4.11 E
Contents
1. Matters for attention
4
2. Overview
2.1 Application
5
2.2 Features
5
2.3 Specifications
6
3. Parts description
7
4. Usage
8-14
5. Maintenance
15
6. Appendixes
6.1 Outline dimensions
16
6.2 Troubleshooting
17
6.3 Numerical part list
18
3/18
14:06
2005-12-10
VERSION: .4.11 E
1. Matters for attention
After unpacking, please check the parts against the packing list.
Incorrect power supply may damage the device, so please make sure that the
power supply is in compliance with the specification.
Please position the device at a stable and solid place.
In the light of ergonomics, we recommend that you use the device on a platform
lower than 75 cm, it is regarded as the optimal when the user is able to sit at ease and
see the display and the components in the pocket.
4/18
14:06
2005-12-10
VERSION: .4.11 E
2. Overview
2.1 Application
COU2000 series products is a high efficiency assisting equipment of SMD
materials control, it is based on photoelectric theory. It make use of the corresponding
relationship between the tractive hole of the carrier tape and the pockets, so as to
accurately determine the quantity of SMD parts, and achieve fast and convenient
counting of the parts. It is undoubtedly a good help for materials management.
2.2 Features
2.2.1 High precision and free from counting errors.
2.2.2 All SMD general-purpose reeling packing parts are applicable.
2.2.3 Countable for in both forward and reverse directions, with double check
feature; able to preset the quantity.
2.2.4 Simple operation and unique pocket falling-proof design will minimize
the damage to the tape.
2.2.5 The patented inclined operation panel enables users to see the parts in
both the display and the pockets.
5/18
14:06
2005-12-10
VERSION: .4.11 E
2.3 Specifications
Electric Source
110V AC﹝50hz﹞25W
Counting range
-59999----+59999 PCS
Dimension(outer) 450*240*272mm (W*D*H)
Weight
9.5 kg
6/18
14:06
2005-12-10
VERSION: .4.11 E
3. Parts description
Guide pulley
Handle
Power switch
Fibr- Optic
Upper guiding Pole
Lower guiding Pole
LCD
Adjustalbe arm
Inductor amplifier
Enclosure grounding point
Reeling shaft
Motor
Counting gear
Power supply
Locking knob
Control panel
Barcode reader interface
5V DC
Printer interface
7/18
14:06
2005-12-10
VERSION: .4.11 E
4.Usage
4.1 Power on: select the workbench close to the power supply, connect the power
supply, and position the cabinet onto the workbench.
4.2 Self check: press down power switch, and there will be the following display on
the LCD:
SMD CHIP COUNTER
COU2000 SERIES
YY MM DD HH :MM
20 04 05 26 14 : 59
Then the display will be changed into….., indicating that the device has finished
self check.
DATA PITCH
00000
SET
1
4.3. Usage of operation panel:
z TIME: used to manage the time of the device; press the key to display the
current time inside the device; press this key for ten seconds to enter the time
setting display:
YY MM DD HH :MM
20 04 05 26 14 : 59
Key in the corresponding year, month, date and time, press the TIME key, and
the display will automatically return back to:
8/18
14:06
2005-12-10
VERSION: .4.11 E
DATA PITCH SET
00000
1
Time setting is finished.
z POCKET CHECK: Applicable only to COU2000PC and COU2000ALL, it
is used to check whether any components are absent in the pocket; press this
key once to start the functions, and @ will be displayed on the upper left
corner of the LCD; if there are any pocket without components , the device
will automatically stop and give alarms. Press this key once again, and the
pocket check function will become invalid.
@ DATA PITCH
00000
SET
1
z PRINT: Applicable only to COU2000P , COU2000PC and COU2000ALL.It
use to print the quantity and the corresponding time; if a Bar-code reader is
connected, the barcode for the product will be printed on the label.
Note: When the data is not a positive number, printing will be forbidden.
z PITCH: Pitch value setting: according to the EIA-481 standard, the P: P0 ratio
in the pockets fall within the following range: 1/2; 1; 2; 3; 4; 5; 6; 7; 8; 9; 10;
11; 12; 13; 14…; continue to press the PITCH key to set the correct pitch
value. The pitch is equal to P/P0. That is, the pitch is equal to the number of
P0s between the two neighboring pockets on the carrier tape (the P0 for all the
pockets is 4mm).
9/18
14:06
2005-12-10
VERSION: .4.11 E
2
=
h
c
t
i
p
1
=
h
c
t
i
p
o
P
2
/
1o
=P
h
c
t
i
p
Po
o
P
4
=
h
c
t
i
p
o
P
3
=
h
c
t
i
p
PITCH=P/ P0
z PRESET: when it is expected that a certain number of parts are to be counted,
Preset function is helpful. Press the Preset key, enter the value, the device will
stop at the corresponding location, and the desired quantity can be got through
simple fine tuning; press the Preset key again to clear the set value, and the
advance stop function will turn invalid.
DATA PITCH SET
00000
1
*****
Note: that the preset value above 59999 is invalid due to the Limitation of co
unting range.
z CLEAR: use it to clear when beginning to count.
z START: the motor on the right begins to rotate clockwise, the motor on the
left is driven, and the counting value increases. The tape will gradually be
rolled into the temporary reel from the original reel.
10/18
14:06
2005-12-10
VERSION: .4.11 E
z STOP: the motor stops rotating.
z REWIND: the motor on the left begins to rotate anticlockwise, the motor on
the right is driven, and the counting value decreases. The tape gradually rolls
from the temporary reel back to the original reel. Note that when the counting
value decreases to zero, the device will stop automatically, at the time, the
pocket shall be back to the starting point, so as to reconfirm the accuracy of
counting; press the Rewind key, the tape will go on rewinding, until it returns
completely back to the original reel from the temporary reel.
4.4. Rotate locking knob in the anticlockwise direction, adjust the adjustable arm:
when using the 7 inch reel, please position the adjustable arm at the location 45
degrees to the cabinet; when using the 13 inch reel, please position adjustable
arm at the location 45 degrees to the cabinet; rotate locking knob in the
clockwise direction, and lock the adjustable arm with the fixing bracket fast, as
illustrated in the following figure:
7 inch reel / 45 Degree
11/18
13 inch reel / 90 Degree
14:06
2005-12-10
VERSION: .4.11 E
4.5. Install the part reel to be counted onto reeling shaft on the left, so that the
blades on reeling shaft are locked to the reel; install temporary reels of
corresponding widths on the right; guide the starting part of the tape through
the space between upper guide pole and lower guide pole, press the guide
pulley, and hang the tractive hole, namely, D in Fig. 1, of the reel onto
counting gear.
Fig. 1
4.6. According to item 4 mentioned above, press the PITCH key to set the
corresponding pitch value.
4.7. Drag the tape by hand, align the first component with the arrow indicated on
guide pulley; press the CLEAR key to clear.
start point
end point
About the first and last component
12/18
14:06
2005-12-10
VERSION: .4.11 E
4.8.Drag the tape and lead the tape into the temporary reel on the right and hang it
to the hub of reel. Now, the value is increasing.
4.9.Press START key, and the motor will drag the tape in the forward direction,
and the counting value will being to increase.
Note: whether in cases of manual or motor dragging of the tape, the counting value
will be increased in the forward direction, and decreased in the reverse
direction. The counting will be accurate only if the tape does not fall down
from the counting gear.
4.10. If there is the preset value, the device will stop at the corresponding location,
drag the tape manually, until the last component is aligned with the arrow
indicated on the guide pulley.
.
Note: because of the inertia of the motor and the different tensile forces of the pocket,
the counting value where the device stops is often greater than the preset value.
4.11.If no value is preset, please press the STOP key to stop running when the tape
is to come to an end, and drag the tape manually, until the last component is
aligned with the arrow indicated on guide pulley.
4.12. At the time, the data displayed on the device is the quantity for the
components in the tape. Please record it onto the original reel.
13/18
14:06
2005-12-10
VERSION: .4.11 E
4.13. If a label printer is equipped, press the PRINT key to print the label; if a
bar-code reader is equipped, scan the barcode on the original reel into the
device, then the printed label will cover information such as time, quantity and
bar-code, as shown in the following figure:
without bar-code of component
V
with bar-code of component
4.14.Press the REWIND key, and the tape will be rolled back from the temporary
reel to the original reel. When the counting is decreased to zero, the device will
stop automatically; drag the tape manually, and check whether the
corresponding location zero at this time is consistent with location zero at start.
This is called double check.
4.15. Press the REWIND key again, and all the tape will return back to the
original reel.
14/18
14:06
2005-12-10
VERSION: .4.11 E
5. Maintenance
z Appropriate cleanness of counting gear is required for the COU2000 series
products.
z Long time use of the device will result in locking loosening between the reeling
shaft and motor shaft. In such a case, please use a hexagonal spanner to lock it
fast.
z For every three months, please use the M3 hexagonal spanner to get motor shaft
from reeling shaft, clean it before reassembly.
Bolt1
Blade
Bolt2
Reeling Shaft
Motor
z When there is any distortion with spring, please get a spare spring to replace the
original one.
15/18
14:06
2005-12-10
VERSION: .4.11 E
6. Appendixes
6.1 Dimension:
110V
220V
Enclosure Battery Power
Grounding
Option
Point
16/18
14:06
2005-12-10
VERSION: .4.11 E
6.2 Troubleshooting
Fault
Troubleshooting
Turn on the power switch, and 1.Check whether the power supply is correctly
there is no display on the LCD
connected;
2.The fuse is damaged, get a spare fuse from
the power socket in the device.
17/18
14:06
2005-12-10
VERSION: .4.11 E
6.3 Numerical part list
Part
Cou2k-b
Description
Cou2000 cabinet without communication board,
without pocket check kit
Spring cou
Spring of guide pulley
18/18
14:06
2005-12-10