1
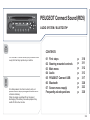
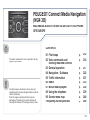
PEUGEOT Connect Media Navigation
(NG4 3D)
MULTIMEDIA AUDIO SYSTEM / BLUETOOTH TELEPHONE
GPS EUROPE
CONTENTS
The system is protected in such a way that it will only
operate in your vehicle.
For safety reasons, the driver must only carry out
operations which require prolonged attention while the
vehicle is stationary.
When the engine is switched off and to prevent
discharging of the battery, the system switches off
following the activation of the energy economy mode.
01 First steps
02 Voice commands and
steering mounted controls
03 General operation
04 Navigation - Guidance
05 Traffic information
06 Radio
07 Music media players
08 Using the telephone
09 Screen menu map
Frequently asked questions
p.
p.
212
214
p.
p.
p.
p.
p.
p.
p.
p.
217
222
231
233
234
239
244
249
211
STEPS
01 FIRST
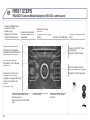
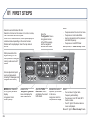
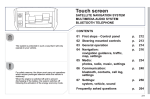
PEUGEOT Connect Media Navigation (NG4 3D) control panel
Access to the Media Menu
(audio CD, Jukebox,
Auxiliary input).
Display the list of tracks.
Change the audio source.
Access to the Navigation
Menu and display recent
destinations.
Abandon the current
operation.
Long press: return to main
display.
Access to the Traffic Menu.
Access to the Radio Menu
Display the list of stations in
alphabetical order (FM band) or
frequency order (AM band).
Access to the "SETUP" menu
(configuration).
Long press: GPS coverage.
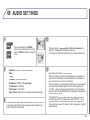
Audio settings (Balance /
Fader, Bass / Treble, Musical
ambience...).
Enter the numbers or letters
using the alpha-numeric keypad.
Presetting 10 radio frequencies.
Adjust volume (each source
is independent, including
navigation messages and alerts).
Long press: reinitialise the
system.
Short press: mute.
Automatic search down/up for
radio frequencies.
Select previous/next CD or MP3
track.
212
Access to the Address book
Menu.
SD card reader.
Short press: clears the last
character.
STEPS
01 FIRST
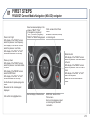
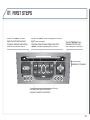
PEUGEOT Connect Media Navigation (NG4 3D) navigator
Press to left / right:
With display of the "RADIO" screen:
select the previous / next frequency.
With display of the "MEDIA" screen:
select the previous / next track.
With display of the "MAP" or "NAV":
horizontal movement on the map.
Select successive display in the
screen of "MAP" / "NAV"
(if navigation in progress) /
"TEL" (if a call is in progress) /
"RADIO" or "MEDIA" being played.
CALL: access to the Phone
menu.
Bluetooth connection, accept
an incoming call.
Rotate the dial:
With display of the "RADIO" screen:
select the previous / next radio station
in the list.
With display of the "MEDIA" screen:
select the previous / next CD or MP3
track.
With display of the "MAP" or "NAV":
zoom the map in/out.
Movement of the menu selection
cursor.
Press up / down:
With display of the "RADIO" screen:
select the previous / next radio station
in the list.
With display of the "MEDIA" screen:
select the MP3 folder.
With display of the "MAP" or "NAV":
vertical movement on the map.
Go the the next or previous page in a
menu.
Movement on the virtual keypad
displayed.
OK: confirm the highlighted item.
Normal display or black screen.
END CALL: access to the
Phone menu.
End a call in progress or reject
an incoming call, Bluetooth
connection.
213
02 VOICE COMMANDS AND STEERING MOUNTED CONTROLS
CONTEXT
Initiation of voice commands
Voice recognition
Press the SETUP button and select
the "Language & Speech" function.
Turn the ring and select "Voice control".
Activate voice recognition.
Select "Tutorial".
NAV
TRAFFIC
ADDR
BOOK
1
4
GHI
7
Help address book
Help voice control
Help media
Help navigation
Help telephone
Help radio
Cancel
Correction
Access to the address book help
Access to the voice recognition help
Access to the media management help
Access to the guidance, navigation help
Access to the telephone help
Access to the radio help
To cancel a voice command which is in
progress
Request to correct the last voice recognition
carried out
Clear
RADIO
Select station
Station <tts:stationName>
Read out station list
Enter frequency
Select wave band
AM
FM
TA on
TA off
Select a radio station
Select a radio station using its RDS
description <tts:station Name> from the
RADIO list
Listen to the list of stations available
Listen to the frequency of the current radio
station
Choose the frequency waveband (AM or FM)
Change the frequency waveband to AM
Change the frequency waveband to FM
Activate Traffic Info (TA)
Deactivate Traffic Info
NAVIGATION
Destination input
Voice advice off
Voice advice on
Save address
Start guidance
Abort guidance
Navigate entry
POI Search
Command to enter a new destination
address
Deactivate the spoken guidance instructions
Activate the spoken guidance instructions
Save an address in the address book
Start guidance (once the address has been
entered)
Stop the guidance
Start guidance to an entry in the address
book
Start guidance to a point of interest
SETUP
2
ABC
5
JKL
8
3
DEF
6
MNO
9
PQRS
TUV
WXYZ
*
0
#
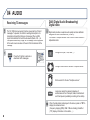
The phrases to be spoken according to the context are indicated in
the tables below.
Speak and PEUGEOT Connect Media Navigation (NG4 3D) acts.
Pressing the end of the lighting
control stalk activates voice
recognition.
214
ACTION
GENERAL
Before using the system for the first time, you are advised to listen
to, say and practice the tutorial.
SETUP
SAY
02 VOICE COMMANDS AND STEERING MOUNTED CONTROLS
Initiation of voice commands
Voice recognition
CONTEXT
MEDIA
TELEPHONE
ADDRESS
BOOK
SAY
ACTION
Media
Select the MEDIA source
Select media
Choose a source
Single slot
Select the CD player source
Jukebox
Select the Jukebox source
USB
Select the USB player source
External device
Select the audio AUX input source
SD-Card
Select the SD card source
Track <1 - 1000>
Folder <1 - 1000>
Select a specific track (number between 1
and 1 000) on the active MEDIUM
Phone menu
Open the Telephone Menu
Enter number
Enter a telephone number to be called
Phone book
Open the phone book
Dial
Make a call
Save number
Save a number in the phone book
Accept
Accept an incoming call
Reject
Reject an incoming call
Address book menu
Open the address book
Call <entry>
Call file using its <file> description as
described in the address book
Navigate <entry>
Select a Folder (number between 1 and
1 000) on the active MEDIUM
Start guidance to an address in the address
book using its <file> description
215
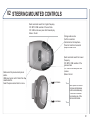
02 VOICE COMMANDS AND STEERING MOUNTED CONTROLS
Steering mounted controls
Wiper stalk: display "RADIO" and "MEDIA".
Lighting stalk: activate voice commands with a short press; indication of the
current navigation instruction with a long press.
Radio: automatic search for a higher frequency.
Radio: select the previous/next pre-set
CD / SD CARD / JUKEBOX: select the next track.
station.
CD / SD CARD / JUKEBOX: continuous press: fast
CD audio: select the previous/next track
forwards.
If "MEDIA" is displayed in the screen:
MP3 CD / SD CARD / JUKEBOX: select the
previous/next folder.
Select the previous/next item in the contacts list.
Volume increase.
Change audio source.
Start a call from the contacts list.
Call/hang up the telephone.
Confirm a selection.
Press for more than 2 seconds:
telephone menu.
Volume decrease.
Radio: automatic search for a lower frequency.
CD / SD CARD / JUKEBOX: select the previous track.
CD / SD CARD / JUKEBOX: continuous press: fast
backwards.
216
Mute: press the volume
increase and decrease
buttons simultaneously.
The sound is restored
by pressing one of the
two volume buttons.
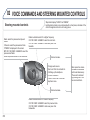
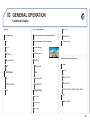
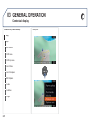
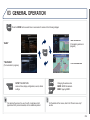
03 GENERAL OPERATION
Contextual display
Press the MODE button several times in succession to gain access to the following displays:
RADIO / MUSIC MEDIA / VIDEO
FULL SCREEN MAP
TELEPHONE
(If a conversation is in progress)
NAVIGATION (If guidance is in
progress)
TRAFFIC
SETUP
SETUP:
access to the "SETUP" Menu: system language*
and voice functions*, voice initialisation (section 09),
date and time*, display, unit and system parameters.
* Available according to model.
Long press: access to the GPS coverage and to the demonstration
mode.
For maintenance of the screen, the use of a soft, non-abrasive cloth
(spectacles cloth) is recommended, without any additional product.
MEDIA
TRAFFIC:
access to the Traffic Menu: display of the current
traffic alerts.
MEDIA:
"DVD-audio" menu
"DVD-Video" menu
For a detailed global view of the menus available, refer to the
"Screen menu map" section of this handbook.
217
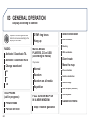
03 GENERAL OPERATION
Contextual display
Pressing OK gives access to short-cut
menus according to the display on the
screen.
3
NAVIGATION (IF GUIDANCE IS IN PROGRESS):
1
1
1
2
2
2
2
2
2
1
2
218
Trip info
2
3
Abort guidance
3
Repeat advice
3
Block road
2
Unblock
2
More
1
Less
1
2
Zoom/Scroll
2
Browse route
2
Route info
2
Show destination
Route type
1
Avoid
1
Satellites
1
Stopovers
1
End call
Hold call
Dial
DTMF-Tones
Private mode
Browse route
1
Zoom/Scroll
1
Voice advice
MUSIC MEDIA PLAYERS:
Route options
Calculate
TELEPHONE:
Route type
Micro off
TA
1
Play options
1
Route dynamics
2
Avoidance criteria
2
Recalculate
2
1
Normal order
Random track
Scan
Select media
03 GENERAL OPERATION
Contextual display
RADIO:
In FM mode
1
2
2
2
2
2
TA
RDS
Radiotext
FULL SCREEN MAP:
Abort guidance / Resume guidance
1
Set destination / Add stopover
1
2
2
2
Options
2
AM
3
3
TA
3
Refresh AM list
FM
Heading Up
Zoom/Scroll
1
Position info
1
In AM mode
1
2
North Up
POIs nearby
1
Regional prog.
2
3
Navigate to
AUDIO DVD (LONG PRESS):
Stop
1
Dial
Save position
3
Zoom/Scroll
2
2
2
2D Map
2.5D Map
Group 1 .2/n
Play options
2
Map Settings
1
Group
2
3
Normal order / Random track / Scan
TA
1
2
Select media
3D Map
219
03 GENERAL OPERATION
Contextual display
VIDEO DVD (LONG PRESS):
Play
1
Stop
2
DVD menus
2
3
3
3
3
DVD top menu
List of titles
List of chapters
DVD Options
2
3
3
3
220
DVD menu
Audio
Subtitles
Angle
Examples:
PEUGEOT Connect Media IS:
-
the map setting which allows the map to be displayed flat, in perspective or in 3D.
Flat map
Map in perspective
Map in 3D
-
configuration of the system by means of voice commands.
221
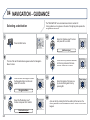
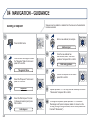
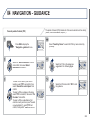
04 NAVIGATION - GUIDANCE
The "NAVIGATION" voice commands are listed in section 02.
During guidance, a long press on the end of the lighting stalk repeats the
last guidance instruction.
Selecting a destination
RADIO
NAV
MEDIA
NAV
TRAFFIC
Press the NAV button.
ADDR
BOOK
1
4
SETUP
2
ABC
5
3
DEF
6
GHI
JKL
MNO
7
8
9
PQRS
TUV
WXYZ
*
0
#
Select the "Address input" function
and press OK to confirm.
RADIO
MEDIA
NAV
TRAFFIC
ADDR
BOOK
1
4
GHI
7
SETUP
2
ABC
5
JKL
8
3
DEF
6
MNO
9
PQRS
TUV
WXYZ
*
0
#
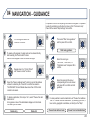
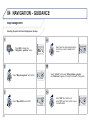
Address input
Once the country has been selected,
turn the ring and select the town
function. Press OK to confirm.
The list of the last 20 destinations appears under the Navigation
Menu function.
Press the NAV button again or select
the Navigation Menu function and
press OK to confirm.
RADIO
MEDIA
NAV
TRAFFIC
ADDR
BOOK
1
4
GHI
7
SETUP
2
ABC
5
JKL
8
3
DEF
6
MNO
9
PQRS
TUV
WXYZ
*
0
#
Select the letters of the town one
by one confirming each time by
pressing OK.
RADIO
MEDIA
NAV
TRAFFIC
ADDR
BOOK
1
4
GHI
7
RADIO
MEDIA
NAV
TRAFFIC
SETUP
2
ABC
5
JKL
8
RADIO
MEDIA
NAV
TRAFFIC
ADDR
BOOK
1
4
GHI
7
Destination input
222
SETUP
2
ABC
5
JKL
8
3
DEF
6
MNO
9
PQRS
TUV
WXYZ
*
0
#
6
MNO
9
TUV
WXYZ
*
0
#
ADDR
BOOK
1
4
GHI
7
SETUP
2
ABC
5
JKL
8
3
DEF
6
MNO
9
PQRS
TUV
WXYZ
*
0
#
Navigation Menu
Select the "Destination input"
function and press OK to confirm.
3
DEF
PQRS
A pre-set list (by entering the first few letters) of the towns in the
country selected can be accessed via the LIST button on the virtual
keypad.
04 NAVIGATION - GUIDANCE
It is possible to scroll the map using the 4-direction navigator. It is possible
to select its orientation via the short-cut menu of the "Full screen map".
Press OK then select "Map Settings" and confirm.
RADIO
Turn the ring and select OK.
Press OK to confirm.
MEDIA
NAV
TRAFFIC
ADDR
BOOK
1
4
GHI
7
SETUP
2
ABC
5
JKL
8
3
DEF
6
MNO
9
PQRS
TUV
WXYZ
*
0
#
MEDIA
NAV
TRAFFIC
ADDR
BOOK
1
4
GHI
7
SETUP
2
ABC
5
JKL
8
3
DEF
NAV
TRAFFIC
ADDR
BOOK
1
4
GHI
SETUP
2
ABC
5
JKL
8
3
DEF
6
MNO
9
PQRS
TUV
WXYZ
*
0
#
RADIO
MEDIA
NAV
TRAFFIC
ADDR
BOOK
1
4
GHI
7
SETUP
2
ABC
5
JKL
8
3
DEF
6
MNO
9
PQRS
TUV
WXYZ
*
0
#
6
9
TUV
WXYZ
*
0
#
To delete a destination; from steps 1 to 3, select "Choose from last
destinations".
A long press on one of the destinations displays a list of actions
from which you can select:
Select the route type:
"Fast route", "Short route", or
"Optimized route" and press OK to
confirm.
MNO
PQRS
Select the "Save to address book" function to record the address
entered in a directory file. Press OK to confirm the selection.
The PEUGEOT Connect Media allows more than 4 000 contact
records to be saved.
Delete list
MEDIA
Start route guidance
Repeat steps 5 to 7 for the "Street"
and "House number" functions.
Delete entry
RADIO
7
To speed up the process, the post code can be entered directly
after selecting the "Postal code" function.
Use the virtual keypad to enter the letters and digits.
RADIO
Then select "Start route guidance"
and the press OK to confirm.
Select the road with the colour
corresponding to the route chosen
and press OK to confirm and start
guidance.
RADIO
MEDIA
NAV
TRAFFIC
ADDR
BOOK
1
4
GHI
7
SETUP
2
ABC
5
JKL
8
3
DEF
6
MNO
9
PQRS
TUV
WXYZ
*
0
#
It is also possible to select a destination via "Choose from address
book" or "Choose from last destinations", by selecting a junction, a
town centre, geographic coordinates, or directly on the "Map".
Choose from address book
Choose from last destinations
223
04 NAVIGATION - GUIDANCE
Setting and navigating to my "Home
address"
Select your home address and confirm.
Then select "Edit entry" and confirm.
To be set as the "Home address", an address must first be
entered in the address book, for example from "Destination
input" / "Address input" then "Save to address book".
NAV
Press the NAV button twice to display
the Navigation Menu.
RADIO
MEDIA
NAV
TRAFFIC
Navigation Menu
ADDR
BOOK
TRAFFIC
2
5
JKL
8
3
DEF
6
Select "Set as Home address" and
confirm to save.
RADIO
MEDIA
NAV
TRAFFIC
2
5
JKL
8
3
DEF
6
MNO
9
PQRS
TUV
WXYZ
*
0
#
ADDR
BOOK
1
4
MNO
GHI
9
7
SETUP
2
ABC
5
JKL
8
3
DEF
6
MNO
9
TUV
WXYZ
PQRS
TUV
WXYZ
*
0
#
*
0
#
ADDR
BOOK
1
4
7
224
SETUP
ABC
SETUP
ABC
PQRS
GHI
Destination input
ADDR
BOOK
1
Edit entry
7
NAV
TRAFFIC
4
4
MEDIA
NAV
7
1
RADIO
MEDIA
GHI
GHI
Select "Destination input" and confirm.
Then select "Choose from address
book" and confirm.
RADIO
SETUP
2
ABC
5
JKL
8
3
DEF
6
MNO
9
PQRS
TUV
WXYZ
*
0
#
Set as home address
To start navigation towards "Home", press NAV twice to display the
Navigation Menu, select "Destination input" and confirm.
Then select "Navigate HOME" and confirm to start guidance.
04 NAVIGATION - GUIDANCE
When the map is displayed on the screen, you can select "Map Settings"
then "2D Map / 2.5D Map / 3D Map / North Up / Heading Up". The display
of buildings in 3D mode depends on the progress in town mapping.
Route options
RADIO
NAV
MEDIA
NAV
TRAFFIC
1
Press the NAV button.
Press the NAV button again or select
the Navigation Menu function and
press OK to confirm.
ADDR
BOOK
4
GHI
7
SETUP
2
ABC
5
JKL
8
3
DEF
6
MNO
9
PQRS
TUV
WXYZ
*
0
#
RADIO
MEDIA
NAV
TRAFFIC
ADDR
BOOK
1
4
GHI
7
SETUP
2
ABC
5
JKL
8
3
DEF
6
MNO
9
PQRS
TUV
WXYZ
*
0
#
Route dynamics
RADIO
MEDIA
NAV
TRAFFIC
ADDR
BOOK
1
4
GHI
7
SETUP
2
ABC
5
JKL
8
3
DEF
6
MNO
9
PQRS
TUV
WXYZ
*
0
#
Navigation Menu
Select the "Route options" function
and press OK to confirm.
Select the "Route dynamics"
function.
This function provides access to
the "Traffic independent", "Semidynamic" and "Dynamic" options.
RADIO
MEDIA
NAV
TRAFFIC
ADDR
BOOK
1
4
GHI
7
Select the "Avoidance criteria"
function. This function provides
access to the "Avoid" options
(motorways, toll roads, ferries,
tunnels).
RADIO
MEDIA
NAV
TRAFFIC
ADDR
BOOK
1
4
GHI
7
SETUP
2
ABC
5
JKL
8
3
DEF
6
MNO
9
PQRS
TUV
WXYZ
*
0
#
SETUP
2
ABC
5
JKL
8
3
DEF
6
MNO
9
PQRS
TUV
WXYZ
*
0
#
Avoidance criteria
Route options
Select the "Route type" function and
press OK to confirm. This function
allows you to change the route type.
Route type
RADIO
MEDIA
NAV
TRAFFIC
ADDR
BOOK
1
4
SETUP
2
ABC
5
3
DEF
Turn the ring and select the
"Recalculate" function to take into
account the route options selected.
Press OK to confirm.
6
GHI
JKL
MNO
7
8
9
PQRS
TUV
WXYZ
*
0
#
RADIO
MEDIA
NAV
TRAFFIC
ADDR
BOOK
1
4
GHI
7
SETUP
2
ABC
5
JKL
8
3
DEF
6
MNO
9
PQRS
TUV
WXYZ
*
0
#
Recalculate
225
04 NAVIGATION - GUIDANCE
Stopovers can be added to or deleted from the route once the destination
has been selected.
Adding a stopover
RADIO
NAV
MEDIA
NAV
TRAFFIC
1
Press the NAV button.
Press the NAV button again or select
the "Navigation" Menu function and
press OK to confirm.
ADDR
BOOK
4
RADIO
MEDIA
NAV
TRAFFIC
Enter a new address, for example.
SETUP
2
ABC
5
WXYZ
*
0
#
7
8
2
5
JKL
8
3
DEF
6
MNO
9
Address input
Once the new address has
been entered, select "Start route
guidance" and press OK to confirm.
SETUP
5
SETUP
ABC
#
TUV
JKL
4
7
WXYZ
PQRS
4
1
GHI
0
9
GHI
ADDR
BOOK
*
MNO
8
2
TRAFFIC
TUV
JKL
ABC
NAV
PQRS
7
1
MEDIA
6
GHI
ADDR
BOOK
RADIO
3
DEF
RADIO
MEDIA
NAV
TRAFFIC
ADDR
BOOK
1
4
GHI
7
3
SETUP
2
ABC
5
JKL
8
3
DEF
6
MNO
9
PQRS
TUV
WXYZ
*
0
#
DEF
6
MNO
9
PQRS
TUV
WXYZ
*
0
#
Start route guidance
"Navigation" Menu
Select the "Stopovers" function and
press OK to confirm.
Position the stopover on the list and
press OK to confirm.
RADIO
MEDIA
NAV
TRAFFIC
ADDR
BOOK
1
4
GHI
7
Add stopover
226
MEDIA
NAV
TRAFFIC
ADDR
BOOK
1
4
GHI
7
2
ABC
5
JKL
8
Repeat operations 1 to 7 as many times as necessary then select
"Recalculate" and press OK to confirm.
RADIO
MEDIA
NAV
TRAFFIC
ADDR
BOOK
1
4
GHI
7
SETUP
2
ABC
5
JKL
8
3
DEF
6
MNO
9
PQRS
TUV
WXYZ
*
0
#
6
MNO
9
#
9
#
3
DEF
WXYZ
6
WXYZ
0
8
0
MNO
TUV
5
TUV
3
*
2
JKL
*
DEF
PQRS
SETUP
ABC
PQRS
SETUP
Stopovers
Select the "Add stopover" function
(5 stopovers maximum) and press
OK to confirm.
RADIO
To change the stopovers, repeat operations 1 to 3 and select
"Rearrange route" (select a stopover, delete it or move it on the
list using the ring to change the order, confirm its new position and
finish with "Recalculate").
04 NAVIGATION - GUIDANCE
The points of interest (POIs) indicate all of the service locations in the
vicinity (hotels, various businesses, airports...).
Searching for points of interest (POI)
RADIO
NAV
MEDIA
NAV
TRAFFIC
Press the NAV button.
Press the NAV button again or select
the Navigation Menu function and
press OK to confirm.
ADDR
BOOK
1
4
GHI
7
SETUP
2
ABC
5
JKL
8
3
DEF
6
MNO
9
PQRS
TUV
WXYZ
*
0
#
MEDIA
NAV
TRAFFIC
ADDR
BOOK
MEDIA
NAV
TRAFFIC
ADDR
BOOK
1
4
GHI
7
SETUP
2
ABC
5
JKL
8
3
DEF
6
MNO
9
PQRS
TUV
WXYZ
*
0
#
1
4
GHI
7
SETUP
2
ABC
5
JKL
8
3
DEF
6
MNO
9
PQRS
TUV
WXYZ
*
0
#
RADIO
MEDIA
NAV
TRAFFIC
ADDR
BOOK
1
4
GHI
7
A list of cities present in the country selected can be accessed via
the LIST button on the virtual keypad.
SETUP
2
ABC
5
JKL
8
3
DEF
6
MNO
9
PQRS
TUV
WXYZ
*
0
#
POI search
Select the "POI nearby" function to
search for POIs around the vehicle.
RADIO
POI in city
RADIO
Navigation Menu
Select the "POI search" function and
press OK to confirm.
Select the "POI in city" function to
search for POIs in the city required.
Select the country then enter the
name of the city using the virtual
keypad.
Select the "POI in country" function
to search for POIs in the country
required.
RADIO
MEDIA
NAV
TRAFFIC
ADDR
BOOK
1
4
GHI
7
RADIO
MEDIA
NAV
TRAFFIC
1
4
GHI
7
SETUP
2
ABC
5
JKL
8
3
DEF
6
MNO
9
PQRS
TUV
WXYZ
*
0
#
ADDR
BOOK
SETUP
2
ABC
5
JKL
8
3
DEF
6
MNO
9
PQRS
TUV
WXYZ
*
0
#
POI in country
POI nearby
Select the "POI near destination"
function to search for POIs near the
point of arrival of the route.
POI near destination
RADIO
MEDIA
NAV
TRAFFIC
ADDR
BOOK
Select the "POI near route" function
to search for POIs near the route.
SETUP
RADIO
MEDIA
NAV
TRAFFIC
ADDR
BOOK
1
4
GHI
1
4
GHI
7
2
ABC
5
JKL
8
3
7
DEF
6
MNO
9
PQRS
TUV
WXYZ
*
0
#
SETUP
2
ABC
5
JKL
8
3
DEF
6
MNO
9
PQRS
TUV
WXYZ
*
0
#
POI near route
227
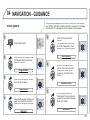
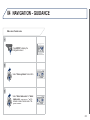
04 NAVIGATION - GUIDANCE
This icon appears when several POIs are grouped
together in the same area. Zooming in on this icon
shows details of the POIs.
List of principal points of interest (POI)
228
Service station
Airport
Cinema
LPG station
Railway station
Theme parks
Garage
Bus station
Hospital
PEUGEOT
Port
Pharmacy
Motor racing circuit
Industrial estate
Police station
Covered car park
Supermarket
School
Car park
Bank
Post office
Rest area
Vending machine
Museum
Hotel
Tennis court
Tourist information
Restaurant
Swimming pool
Risk area*
Refreshment area
Golf course
Picnic area
Winter sports resort
Cafeteria
Theatre
* According to availability in the country.
04 NAVIGATION - GUIDANCE
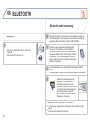
Updating POIs
Press NAV, select Navigation Menu,
then "Settings", then "Update personal
POI".
Download the "POIs" update file onto
an SD card or USB memory stick from
the Internet. This service is available at
http://peugeot.navigation.com.
RADIO
NAV
MEDIA
NAV
TRAFFIC
Navigation Menu
ADDR
BOOK
1
4
GHI
7
Settings
SETUP
2
ABC
5
JKL
8
3
DEF
6
MNO
9
PQRS
TUV
WXYZ
*
0
#
Update personal POI
The files must be copied to the root on the chosen medium.
Insert the medium (SD card or USB memory
stick) containing the POI database into the
system's SD card reader or USB port.
Select the medium ("USB" or "SD-Card")
used and press OK.
RADIO
MEDIA
NAV
TRAFFIC
ADDR
BOOK
1
4
GHI
7
SETUP
2
ABC
5
JKL
8
3
DEF
6
MNO
9
PQRS
TUV
WXYZ
*
0
#
Successful downloading is confirmed by a message.
The system restarts.
The POIs version can be found in the SETUP \ System menu.
229
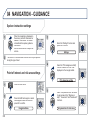
04 NAVIGATION - GUIDANCE
Spoken instruction settings
When the navigation is displayed in
the screen, press OK then select or
deselect "Voice advice" to activate
or deactivate the spoken guidance
instructions.
Use the volume button to adjust the
volume.
RADIO
MEDIA
NAV
TRAFFIC
ADDR
BOOK
SETUP
1
2
ABC
4
GHI
7
5
JKL
8
3
DEF
6
MNO
9
PQRS
TUV
WXYZ
*
0
#
Select the "Settings" function and
press OK to confirm.
RADIO
MEDIA
NAV
TRAFFIC
ADDR
BOOK
1
4
GHI
7
SETUP
2
ABC
5
JKL
8
3
DEF
6
MNO
9
PQRS
TUV
WXYZ
*
0
#
Settings
The volume of the Risk Areas POIs alert can only be adjusted
during this type of alert.
Select the "POI categories on Map"
function to select the POIs to be
displayed on the map by default.
Point of interest and risk area settings
RADIO
MEDIA
NAV
TRAFFIC
ADDR
BOOK
1
4
GHI
7
SETUP
2
ABC
5
JKL
8
3
DEF
6
MNO
9
PQRS
TUV
WXYZ
*
0
#
POI categories on Map
NAV
Press the NAV button.
RADIO
MEDIA
NAV
TRAFFIC
ADDR
BOOK
1
4
GHI
7
Press the NAV button again or select
the Navigation Menu function and
press OK to confirm.
Navigation Menu
230
RADIO
MEDIA
NAV
TRAFFIC
SETUP
2
ABC
5
JKL
8
3
DEF
6
MNO
9
PQRS
TUV
WXYZ
*
0
#
ADDR
BOOK
1
4
GHI
7
Select "Set parameters for risk areas"
to gain access to the "Display on
map", "Visual alert" and "Sound alert"
functions.
SETUP
2
ABC
5
JKL
8
3
DEF
6
MNO
9
PQRS
TUV
WXYZ
*
0
#
Set parameters for risk areas
RADIO
MEDIA
NAV
TRAFFIC
ADDR
BOOK
1
4
GHI
7
SETUP
2
ABC
5
JKL
8
3
DEF
6
MNO
9
PQRS
TUV
WXYZ
*
0
#
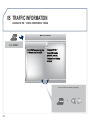
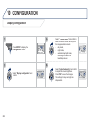
05 TRAFFIC INFORMATION
The TMC (Traffic Message Channel) messages provide information
relating to traffic and weather conditions, received in real time and
transmitted to the driver audibly and visually on the navigation map.
The guidance system can then suggest an alternative route.
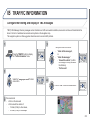
Configure the filtering and display
of TMC messages
Select the filter of your choice:
RADIO
TRAFFIC
MEDIA
NAV
TRAFFIC
ADDR
BOOK
1
Press the TRAFFIC button.
4
GHI
7
SETUP
2
ABC
5
JKL
8
3
DEF
6
MNO
9
PQRS
TUV
WXYZ
*
0
#
Messages on route
RADIO
MEDIA
NAV
TRAFFIC
ADDR
BOOK
1
4
GHI
All warning messages
7
SETUP
2
ABC
5
JKL
8
3
DEF
6
MNO
9
PQRS
TUV
WXYZ
*
0
#
Only warnings on route
All messages
The list of TMC messages appears under the Traffic Menu sorted
in order of proximity.
Select "Geo. Filter".
RADIO
MEDIA
NAV
TRAFFIC
ADDR
BOOK
1
4
GHI
7
SETUP
2
ABC
5
JKL
8
3
DEF
6
MNO
9
PQRS
TUV
WXYZ
*
0
#
Geo. Filter
Press the TRAFFIC button again or
select the Traffic Menu function and
press OK to confirm.
RADIO
MEDIA
NAV
TRAFFIC
ADDR
BOOK
1
4
GHI
7
SETUP
2
ABC
5
JKL
8
3
DEF
6
MNO
9
PQRS
TUV
WXYZ
*
0
#
Traffic Menu
Select "Select preferred list" and
press OK to confirm.
RADIO
MEDIA
NAV
TRAFFIC
ADDR
BOOK
1
4
GHI
7
SETUP
2
ABC
5
JKL
8
3
DEF
6
MNO
9
PQRS
TUV
WXYZ
*
0
#
When all of the messages on the route are selected, the addition
of a geographic filter is recommended (within a radius of 3 miles
(5 km) for example) to reduce the number of messages displayed
on the map. The geographic filter follows the movement of the
vehicle.
The filters are independent and their results are concealed.
We recommend:
a filter over 6 miles (10 km) around the vehicle in heavy traffic,
a filter over 30 miles (50 km) around the vehicle or a filter on
the route on motorway journeys.
231
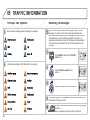
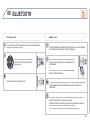
05 TRAFFIC INFORMATION
Principal TMC symbols
Black and blue triangle: general information, for example:
Weather reports
Traffic reports
Wind
Fog
Parking
Snow / ice
Receiving TA messages
-
the station transmits TA messages.
-
the station does not transmit TA messages.
-
TA messages are not activated.
The TA (Traffic Announcement) function gives priority to TA alert
messages. To operate, this function needs good reception of a radio
station transmitting this type of message. When a traffic report is
transmitted, the current audio source (Radio, CD, ...) is interrupted
automatically to play the TA message. Normal playback of the audio
source resumes at the end of the transmission of the message.
Red and yellow triangle: traffic information, for example:
RADIO
Modified signage
Narrow carriageway
Slippery surface
Accident
Delay
Roadworks
Risk of explosion
Road closed
Demonstration
Danger
No entry
232
Traffic jam
MEDIA
NAV
TRAFFIC
With the current audio source displayed
on the screen, press the dial.
ADDR
BOOK
1
4
GHI
7
SETUP
2
ABC
5
JKL
8
3
DEF
6
MNO
9
PQRS
TUV
WXYZ
*
0
#
The shortcut menu for the source appears and gives access to:
TA
Select Traffic Announcements (TA)
and press the dial to confirm and go
to the associated settings.
RADIO
MEDIA
NAV
TRAFFIC
ADDR
BOOK
1
4
GHI
7
SETUP
2
ABC
5
JKL
8
3
DEF
6
MNO
9
PQRS
TUV
WXYZ
*
0
#
The external environment (hill, building, tunnel, underground car park...)
may interfere with the reception, including in RDS station tracking mode.
This phenomenon is a normal result of the way in which radio waves are
transmitted and does not in any way indicate a failure of the audio equipment.
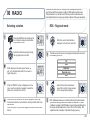
06 RADIO
Selecting a station
RADIO
RDS - Regional mode
Press the RADIO button to display the
list of stations received locally sorted
in alphabetical order.
Select the station required by turning
the ring and press to confirm.
RADIO
MEDIA
NAV
TRAFFIC
When the current radio station is
displayed on the screen, press OK.
RADIO
MEDIA
NAV
TRAFFIC
ADDR
BOOK
1
4
GHI
7
RADIO
MEDIA
NAV
TRAFFIC
ADDR
BOOK
1
4
GHI
7
SETUP
2
ABC
5
JKL
8
3
DEF
6
MNO
9
PQRS
TUV
WXYZ
*
0
#
SETUP
2
ABC
5
JKL
8
3
DEF
6
MNO
9
PQRS
TUV
WXYZ
*
0
#
The radio source short-cuts menu appears and provides access to
the following short-cuts:
TA
RDS
While listening to the radio, press buttons
and for the automatic search for a lower or
higher frequency.
When the "RADIO" screen is displayed, turn the
ring or use the 4-direction navigator to select the
previous or next station on the list.
RADIO
MEDIA
NAV
Radiotext
TRAFFIC
Regional prog.
AM
RADIO
MEDIA
NAV
TRAFFIC
ADDR
BOOK
Press one of the buttons on the numeric keypad for more than
2 seconds to store the current station. A bleep confirms that it has
been stored.
Press the button on the numeric keypad to recall the stored radio
station.
1
4
GHI
7
SETUP
2
ABC
5
JKL
8
3
DEF
6
MNO
9
PQRS
TUV
WXYZ
*
0
#
Select the function required and
press OK to confirm to gain access
to the corresponding settings.
RADIO
MEDIA
NAV
TRAFFIC
ADDR
BOOK
1
4
GHI
7
SETUP
2
ABC
5
JKL
8
3
DEF
6
MNO
9
PQRS
TUV
WXYZ
*
0
#
RDS, if displayed, allows you to continue listening to the same station
by automatic retuning to alternative frequencies. However, in certain
conditions, coverage of an RDS station may not be assured throughout
the country as radio stations do not cover 100 % of the territory. This
explains the loss of reception of the station during a journey.
233
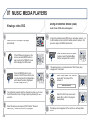
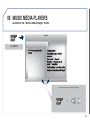
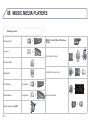
07 MUSIC MEDIA PLAYERS
CD, MP3 / WMA CD, MP3 / WMA SD card /
USB player
Information and advice
The MP3 format, an abbreviation of MPEG 1, 2 & 2.5 Audio Layer 3
and the WMA format, an abbreviation of Windows Media Audio and
the property of Microsoft, are audio compression standards which
permit the recording of several tens of music files on a single disc.
Connecting an iPod:
To play MP3 type files, connect the iPod using the USB port (limited
functions).
To play ITunes files, connect the iPod using the auxiliary socket (AUX).
In order to be able to play a recorded CDR or CDRW, when
recording it is preferable to select the ISO 9660 level 1, 2 or Joliet
standard.
If the disc is recorded in another format it may not be played
correctly.
It is recommended that the same recording standard is always
used for an individual disc, with as low a speed as possible
(4x maximum) for optimum sound quality.
In the particular case of a multi-session CD, the Joliet standard is
recommended.
In order to be read, a USB memory stick must be formatted to FAT 32.
234
The audio equipment will only play audio files with the extension
".mp3" with a speed of between 8 Kbps and 320 Kbps and the
extension ".wma" with a speed of between 5 Kbps and 384 Kbps.
It also supports the VBR (Variable Bit Rate) mode.
No other type of file (.mp4, .m3u...) can be played.
It is advisable to restrict file names to 20 characters, without using
of special characters (e.g.: " " ? ; ù) to avoid any playing and
displaying problems.
During play, exit the "SD-Card" or "USB" source before removing
the SD card or the USB memory stick from its port.
To avoid any risk of theft, remove the SD card or the USB memory
stick when you leave your vehicle with the roof open.
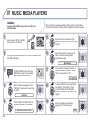
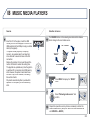
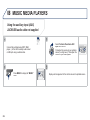
07 MUSIC MEDIA PLAYERS
Selecting / Playing
CD, MP3 / WMA CD, MP3 / WMA SD card /
USB player
Insert the audio or MP3 CD in the
player, the SD card in the card
reader or the USB peripheral
in the USB port. Play begins
automatically.
RADIO
NAV
MEDIA
ESC
ADDR
BOOK
TRAFFIC
1
4
GHI
7
MP3 CDs, SD cards or USB peripherals are the compatible sources.
SETUP
2
ABC
5
JKL
8
3
DEF
6
MNO
9
PQRS
TUV
WXYZ
*
0
#
Press the MEDIA button again or
select the "Media" Menu function and
press OK to confirm.
RADIO
MEDIA
NAV
TRAFFIC
ADDR
BOOK
1
4
GHI
7
SETUP
2
ABC
5
JKL
8
3
DEF
6
MNO
9
PQRS
TUV
WXYZ
*
0
#
"Media" Menu
The list of tracks or MP3/WMA files appears under "Media" Menu.
Select the "Select media" function
and press OK to confirm.
RADIO
MEDIA
NAV
TRAFFIC
Press this button.
When the "MEDIA" screen is
displayed, turn the ring up or down to
select the previous or next compatible
source.
1
4
GHI
7
RADIO
MEDIA
Press the MEDIA button.
NAV
TRAFFIC
5
JKL
8
3
DEF
6
MNO
WXYZ
0
#
ADDR
BOOK
7
SETUP
2
ABC
5
JKL
8
3
DEF
NAV
TRAFFIC
ADDR
BOOK
1
4
GHI
7
SETUP
2
ABC
5
JKL
8
3
DEF
6
MNO
9
PQRS
TUV
WXYZ
*
0
#
Select media
Select the music source required.
Press OK to confirm. Play begins.
RADIO
MEDIA
NAV
TRAFFIC
ADDR
BOOK
1
4
GHI
7
SETUP
2
ABC
5
JKL
8
3
DEF
6
MNO
9
PQRS
TUV
WXYZ
*
0
#
6
MNO
9
PQRS
TUV
WXYZ
*
0
#
TRAFFIC
MEDIA
9
TUV
4
NAV
2
ABC
*
GHI
MEDIA
SETUP
PQRS
1
RADIO
MEDIA
ADDR
BOOK
RADIO
The playing and displaying of an MP3/WMA compilation may
depend on the recording programme and/or the parameters used.
We recommend the ISO 9660 recording standard.
235
07 MUSIC MEDIA PLAYERS
Jukebox
When copying is in progress, switching off the ignition will interrupt the
process but it will resume directly when the ignition is switched on again.
Copying a CD, a USB memory stick or an SD card
to the hard disk
Insert an audio / MP3 CD, a USB
memory stick or an SD card.
RADIO
NAV
MEDIA
ESC
TRAFFIC
ADDR
BOOK
Select the tracks required then "Rip
selection" or select all of the tracks using
"Rip all".
SETUP
1
2
3
ABC
4
GHI
7
DEF
5
6
JKL
MNO
8
9
PQRS
TUV
WXYZ
*
0
#
Select "[New folder]" to create a new
folder or select an existing folder
(created previously).
Check that the active MEDIA source is that of the medium used
(CD, USB or SD card).
RADIO
MEDIA
NAV
TRAFFIC
ADDR
BOOK
1
4
GHI
7
RADIO
MEDIA
NAV
TRAFFIC
SETUP
2
ABC
5
JKL
8
3
DEF
6
MNO
9
PQRS
TUV
WXYZ
*
0
#
ADDR
BOOK
1
4
GHI
7
SETUP
2
ABC
5
JKL
8
3
DEF
6
MNO
9
PQRS
TUV
WXYZ
*
0
#
[New folder]
MEDIA
Press the MEDIA button. Press the
MEDIA button again or select Media
Menu and press OK to confirm.
Select "Jukebox management" then
"Add files" and press OK at each step
to confirm.
RADIO
MEDIA
NAV
"Do you want to change the names of
the tracks that will be ripped?": select
"Yes" to change them or "No".
TRAFFIC
Yes
RADIO
MEDIA
NAV
TRAFFIC
ADDR
BOOK
1
4
GHI
7
SETUP
2
ABC
5
JKL
8
3
DEF
6
MNO
9
PQRS
TUV
WXYZ
*
0
#
Add files
Select "Add files from MP3-Disc" for
example and press OK to validate.
RADIO
MEDIA
NAV
TRAFFIC
ADDR
BOOK
1
4
GHI
7
Add files from MP3-Disc
236
SETUP
2
ABC
5
JKL
8
3
DEF
6
MNO
9
PQRS
TUV
WXYZ
*
0
#
RADIO
MEDIA
NAV
TRAFFIC
ADDR
BOOK
1
4
GHI
7
SETUP
2
ABC
5
JKL
8
3
DEF
6
MNO
9
PQRS
TUV
WXYZ
*
0
#
No
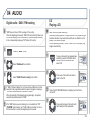
To copy an MP3 CD, then select "Real
time ripping", "Fast ripping" / "High
quality (192 kbit/sec)" or "Standard
quality (128 kbit/sec)" then select "Start
ripping".
Confirm the warning message by
pressing "OK" to start the copy.
RADIO
MEDIA
NAV
TRAFFIC
ADDR
BOOK
1
4
GHI
7
RADIO
MEDIA
NAV
TRAFFIC
2
5
JKL
8
3
DEF
6
MNO
9
PQRS
TUV
WXYZ
*
0
#
ADDR
BOOK
1
4
GHI
7
OK
SETUP
ABC
SETUP
2
ABC
5
JKL
8
3
DEF
6
MNO
9
PQRS
TUV
WXYZ
*
0
#
07 MUSIC MEDIA PLAYERS
Jukebox
Renaming or deleting an album
Playing the jukebox
Check that the active source is not the Jukebox in order to be able
to rename or delete a track / folder.
MEDIA
Activate the playing of a source other than the Jukebox (CD, radio,
etc...).
RADIO
MEDIA
MEDIA
NAV
Press the MEDIA button.
Press the MEDIA button again or
select Media Menu and press OK to
confirm.
RADIO
MEDIA
NAV
TRAFFIC
TRAFFIC
Press the MEDIA button.
Select "Jukebox management" and
press OK to confirm.
Press the MEDIA button again or
select Media Menu and press OK to
confirm.
Select "Jukebox management" and
press OK to confirm.
RADIO
MEDIA
NAV
TRAFFIC
ADDR
BOOK
1
4
GHI
7
RADIO
MEDIA
NAV
TRAFFIC
Modify content
MEDIA
NAV
TRAFFIC
SETUP
2
ABC
5
JKL
8
3
DEF
SETUP
2
ABC
5
JKL
8
3
DEF
6
MNO
9
TUV
WXYZ
*
0
#
SETUP
2
5
8
MEDIA
NAV
TRAFFIC
ADDR
BOOK
1
4
GHI
7
SETUP
2
ABC
5
JKL
8
3
DEF
6
MNO
9
PQRS
TUV
WXYZ
*
0
#
9
#
JKL
RADIO
6
WXYZ
ABC
Select "Play options" and press OK to
confirm.
Select "Folders & Files" or "Playlists"
then press OK to confirm.
MNO
0
4
4
7
9
TUV
1
1
GHI
PQRS
6
*
7
ADDR
BOOK
3
PQRS
GHI
TRAFFIC
MNO
#
ADDR
BOOK
NAV
DEF
WXYZ
4
RADIO
8
0
7
Select "Modify content" and press
OK confirm.
5
*
GHI
Jukebox management
2
JKL
TUV
1
MEDIA
SETUP
ABC
PQRS
ADDR
BOOK
RADIO
3
DEF
6
MNO
9
PQRS
TUV
WXYZ
*
0
#
Press the ESC button to return to the first file level.
Playlists can be created in the Jukebox.
Media Menu> Jukebox management> Create new playlist. Add the
tracks required one by one then save the change. The "Playlists"
play mode must then be selected.
237
07 MUSIC MEDIA PLAYERS
Using an external device (AUX)
Viewing a video DVD
Audio / Video / RCA cable not supplied
RADIO
NAV
MEDIA
ESC
TRAFFIC
Insert the DVD in the player. Play begins
automatically.
If the DVD does not appear on the
screen, press the MODE button to
gain access to the "MEDIA" screen
which displays the DVD screen.
ADDR
BOOK
Connect the portable device (MP3 player, camcorder, camera…) to
the RCA sockets (white and red for audio; yellow for video) in the
glove box using a JACK/RCA audio cable.
SETUP
1
2
3
ABC
4
DEF
5
GHI
6
JKL
7
MNO
8
9
PQRS
TUV
WXYZ
*
0
#
MEDIA
RADIO
MEDIA
NAV
TRAFFIC
ADDR
BOOK
1
4
GHI
7
SETUP
2
ABC
5
JKL
8
3
DEF
6
MNO
9
PQRS
TUV
WXYZ
*
0
#
Press the MEDIA button then press
it again or select the Media Menu
function and press OK to confirm.
RADIO
MEDIA
NAV
TRAFFIC
If the external input is not activated, select "Ext. Device (Aux)
management" to activate it.
MEDIA
Press the MEDIA button to gain
access to the DVD menu at any time,
or to the functions of the Media Menu
which adjust the video (brightness/
contrast, image format...).
RADIO
MEDIA
NAV
TRAFFIC
The 4-direction navigator and the chromed ring allow you to move
the DVD selection cursor. Change chapter by pressing the or
button.
Select the video source required ("DVD-Video", "External
device (AV)"). Press OK to confirm. Play begins.
238
Select "Select media" then "External
device (AV)" and press OK to
activate it.
RADIO
MEDIA
NAV
TRAFFIC
ADDR
BOOK
1
4
GHI
7
SETUP
2
ABC
5
JKL
8
3
DEF
6
MNO
9
PQRS
TUV
WXYZ
*
0
#
External device
Select the AUX music source and
press OK to confirm. Play begins
automatically.
RADIO
MEDIA
NAV
TRAFFIC
The display and management of the controls is via the portable
device.
ADDR
BOOK
1
4
GHI
7
SETUP
2
ABC
5
JKL
8
3
DEF
6
MNO
9
PQRS
TUV
WXYZ
*
0
#
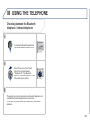
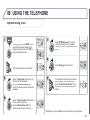
08 USING THE TELEPHONE
Choosing between the Bluetooth
telephone / internal telephone
RADIO
MEDIA
NAV
TRAFFIC
To activate the Bluetooth telephone or
the internal telephone, press PICK UP.
Select Phone menu, then "Select
phone" then choose between
"Telephone off", "Use Bluetooth
phone" or "Use internal phone". Press
OK at each step to confirm.
ADDR
BOOK
1
4
GHI
7
RADIO
MEDIA
NAV
TRAFFIC
SETUP
2
ABC
5
JKL
8
3
DEF
6
MNO
9
PQRS
TUV
WXYZ
*
0
#
ADDR
BOOK
1
4
GHI
7
SETUP
2
ABC
5
JKL
8
3
DEF
6
MNO
9
PQRS
TUV
WXYZ
*
0
#
The system can only be connected to one Bluetooth telephone and
one SIM card (Internal telephone) at the same time.
In this case, the phone book is synchronised with the Bluetooth
telephone.
239
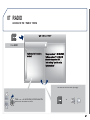
08 USING THE TELEPHONE
* The services available via the telephone depend on the network, the SIM
card and the compatibility of the Bluetooth device used. Refer to your
telephone's manual and your operator to check which services you have
access to.
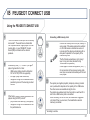
Pairing a Bluetooth telephone /
First connection
For safety reasons and because they require prolonged attention on the part
of the driver, the operations for pairing the Bluetooth mobile telephone to the
hands-free system of the PEUGEOT Connect Media Navigation (NG4 3D)
must be carried out with the vehicle stationary and the ignition on.
Visit www.peugeot.co.uk for more information (compatibility, more help, ...).
Enter the authentication code on the
telephone. The code to be entered
is displayed on the screen of the
system.
RADIO
MEDIA
NAV
TRAFFIC
Press the CALL button.
Search phone
240
TRAFFIC
ADDR
BOOK
1
4
GHI
7
RADIO
RADIO
Select "Search phone" and press OK
to confirm. Then select the name of
the telephone.
NAV
SETUP
2
ABC
3
DEF
5
6
JKL
8
MNO
9
PQRS
TUV
WXYZ
*
0
#
Once the telephone has been connected, the PEUGEOT Connect
Media Navigation (NG4 3D) can synchronise the address book and
the call list. This synchronisation may take a few minutes*.
Activate the telephone's Bluetooth function and
ensure that it is "visible to all" (refer to the telephone
instructions).
If no telephone has been paired, the
system prompts you to "Connect
phone". Select "Yes" and press OK to
confirm.
MEDIA
ADDR
BOOK
1
4
GHI
7
RADIO
MEDIA
NAV
TRAFFIC
2
5
JKL
8
3
DEF
6
MNO
9
PQRS
TUV
WXYZ
*
0
#
ADDR
BOOK
1
4
GHI
7
MEDIA
NAV
TRAFFIC
SETUP
2
ABC
5
JKL
8
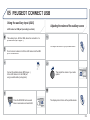
To pair another telephone, press the
TEL button, then select Phone menu,
then "Select phone" then "Connect
Bluetooth phone" then select the
telephone required.
Press OK at each step to confirm.
1
4
GHI
7
RADIO
MEDIA
NAV
TRAFFIC
MEDIA
NAV
TRAFFIC
6
MNO
9
PQRS
TUV
WXYZ
*
0
#
ADDR
BOOK
1
4
GHI
7
SETUP
SETUP
2
ABC
5
JKL
8
3
DEF
6
MNO
9
PQRS
TUV
WXYZ
*
0
#
To delete a pairing, press TEL, select "Connect phone" then
"Delete pairing".
2
ABC
5
JKL
8
3
DEF
6
MNO
9
PQRS
TUV
WXYZ
*
0
#
ADDR
BOOK
1
4
GHI
7
3
DEF
Pairing can be started from the telephone (refer to the telephone
instructions).
RADIO
ADDR
BOOK
SETUP
ABC
SETUP
2
ABC
5
JKL
8
3
DEF
6
MNO
9
PQRS
TUV
WXYZ
*
0
#
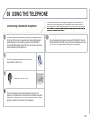
08 USING THE TELEPHONE
* The services available via the telephone depend on the network, the
SIM card and the compatibility of the Bluetooth device used. Refer to
your telephone's manual and your operator to check which services you
have access to. A list of mobile telephones which offer the best range of
services is available from dealers.
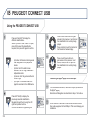
Connecting a Bluetooth telephone
For safety reasons and because they require prolonged attention
on the part of the driver, the operations for pairing the Bluetooth
mobile telephone to the hands-free system of the PEUGEOT
Connect Media Navigation (NG4 3D) must be carried out with the
vehicle stationary and the ignition on.
Once the telephone has been connected, the PEUGEOT Connect
Media Navigation (NG4 3D) can synchronise the address book and
the call list. This synchronisation may take a few minutes*.
Activate the telephone's Bluetooth function and
ensure that it is visible to all.
RADIO
MEDIA
NAV
TRAFFIC
ADDR
BOOK
Press the PICK UP button.
1
4
GHI
7
SETUP
2
ABC
5
JKL
8
3
DEF
6
MNO
9
PQRS
TUV
WXYZ
*
0
#
The list of telephones connected previously (maximum of 4)
appears in the multifunction screen. Select the telephone required
then select "Connect phone" for a new connection. Select "Delete
pairing" to cancel the connection to the telephone.
241
08 USING THE TELEPHONE
Using the internal telephone with
a SIM card
If you have declined to use the internal telephone for personal calls, you
can still connect a Bluetooth telephone to receive your calls on the vehicle's
audio system.
1
4
Extract the holder by pressing the eject button.
GHI
7
PQRS
*
2
ABC
5
JKL
8
TUV
0
3
DEF
6
MNO
9
WXYZ
Enter the PIN code on the keypad
then select OK and confirm.
NAV
TRAFFIC
ADDR
BOOK
1
4
GHI
GHI
7
#
SETUP
2
ABC
ABC
5
JKL
JKL
8
3
DEF
DEF
6
MNO
MNO
9
PQRS
PQRS
TUV
TUV
WXYZ
WXYZ
*
0
##
Remember PIN
Install the SIM card in the holder
and then insert it in the slot.
To remove the SIM card, repeat step 1.
For safety reasons and because they require prolonged attention
on the part of the driver, the SIM card installation operations must
be carried out when stationary.
242
When entering your PIN code, tick the "Remember PIN" tab to
allow use of the telephone without having to enter this code when
it is used subsequently.
The system asks "Do you want
to switch to the internal phone?",
select "Yes" if you wish to use your
SIM card for your personal calls.
Otherwise, only the emergency call
and the services will use the SIM
card.
RADIO
MEDIA
NAV
TRAFFIC
ADDR
BOOK
1
4
GHI
7
SETUP
2
ABC
5
JKL
8
3
DEF
6
MNO
9
PQRS
TUV
WXYZ
*
0
#
Once the SIM card has been installed, the system can synchronise
the address book and the call list.
This synchronisation may take a few minutes.
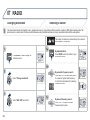
08 USING THE TELEPHONE
Operating the telephone while driving is prohibited. It is recommended
that you park safely or use in preference the steering mounted controls.
Making a call
Receiving a call
RADIO
An incoming call is announced by a ring and a superimposed
display in the screen.
Select the "Yes" tab to accept or "No"
to refuse and confirm by pressing OK.
RADIO
MEDIA
NAV
TRAFFIC
ADDR
BOOK
1
4
GHI
7
Yes
MEDIA
NAV
TRAFFIC
Press the PICK UP button.
SETUP
2
ABC
5
JKL
8
3
DEF
6
MNO
ADDR
BOOK
1
4
GHI
7
TUV
WXYZ
*
0
#
The PICK UP button accepts, the HANG UP button rejects the
incoming call.
RADIO
MEDIA
NAV
TRAFFIC
End call
Press the end of the steering mounted control to
accept the call or end the call in progress.
TRAFFIC
ADDR
BOOK
1
4
GHI
7
SETUP
2
ABC
5
JKL
8
3
DEF
6
MNO
9
WXYZ
0
#
ADDR
BOOK
1
4
GHI
Phone menu
Select "Dial number", then dial the
telephone number using the virtual
keypad.
NAV
8
TUV
*
7
MEDIA
5
PQRS
The list of the last 20 calls made and received in the vehicle
appears under Phone menu. You can select a number and press
OK to make the call.
Select the Phone menu function and
press OK to confirm.
RADIO
2
JKL
9
PQRS
No
To hang up, press the HANG UP
button or press OK and select "End
call" then confirm by pressing OK.
SETUP
ABC
3
DEF
6
MNO
RADIO
MEDIA
NAV
TRAFFIC
SETUP
2
ABC
5
JKL
8
3
DEF
6
MNO
9
PQRS
TUV
WXYZ
*
0
#
ADDR
BOOK
1
4
GHI
7
SETUP
2
ABC
5
JKL
8
3
DEF
6
MNO
9
PQRS
TUV
WXYZ
*
0
#
Dial number
9
PQRS
TUV
WXYZ
*
0
#
It is also possible to select a number from the address book. You
can select "Dial from address book". The PEUGEOT Connect
Media can record up to 4 096 entries.
It is always possible to start a call directly from the
telephone; park the vehicle as a safety measure.
Press the end of the steering mounted control for more than
two seconds to open the address book.
243
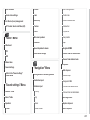
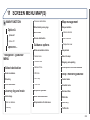
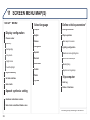
09 SCREEN MENU MAP(S)
1
2
3
3
2
MAIN FUNCTION
4
OPTION A
4
option A1
3
OPTION B…
Within 30 miles (50 km)
Read out settings
2
option A2
Within 6 miles (10 km)
3
On confirmation
Modify content
3
Edit playlist
3
Play options
3
Incoming messages
4
TMC station information
2
Create folder
3
4
1
Select preferred list
2
3
3
3
3
3
3
4
4
4
244
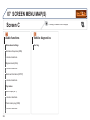
Messages on route
MEDIA
"Media" Menu
1
Select media
2
Only warnings on route
3
All warning messages
3
All messages
3
Geo. Filter
Deactivate PIN
Within 2 miles (3 km)
Within 3 miles (5 km)
3
3
2
3
Audio CD / MP3-Disc / DVD-Audio / DVD-Video
Jukebox (Folders & Files)
SD-Card
USB
External device (audio/AV)
Jukebox management
Add files
Playlists
Memory capacity
TRAFFIC
"Traffic" Menu
Folders & Files
Sound settings
2
Refer to the "Sound settings" menu details of
which are shown on the next page.
3
Video settings
2
3
3
3
4
4
4
Aspect ratio
Menu language
Display
Brightness
Contrast
Colour
3
3
2
3
AUX standard
Reset video settings
Ext. Device (Aux) management
3
3
2
2
3
AM
2
Refer to the "Sound settings"
menu below.
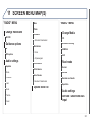
"Sound settings" Menu
1
2
2
2
3
Balance / Fader
Bass / Treble
Equalizer
Linear
4
Speed dependent volume
1
3
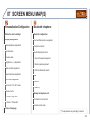
4
Destination input
2
3
4
4
4
4
Address input
Country
City
Street
House number
Intersection
City district
Geo position
Map
Stopovers
2
Abort guidance / Resume guidance
2
Save to address book
Choose from address book
3
"Navigation" Menu
Postal code
Choose from last destinations
3
NAV
Start route guidance
Navigate HOME
3
Reset sound settings
Manual tune
Sound settings
4
Loudness
2
2
4
Mute rear speakers
2
FM
4
Vocal
3
Waveband
2
4
Techno
3
"Radio" Menu
4
Rock/Pop
3
Off / Audio / Audio and Video (AV)
4
Jazz
3
RADIO
1
Classic
3
4
4
4
3
3
3
Add stopover
Address input
Navigate HOME
Choose from address book
Choose from last destinations
Rearrange route
Replace stopover
Delete stopover
245
Recalculate
3
4
4
4
4
Fast route
4
Short route
4
POI search
2
4
POI in city
3
3
"Phone" menu
1
Dial number
Avoid motorways
2
Avoid toll roads
2
Avoid tunnels
Avoid ferries
Recalculate
Dial from address book
Call lists
2
Messages
2
Select phone
2
POI in country
3
3
POI near route
3
Route options
2
Route type
3
4
4
4
4
"Address book" Menu
1
2
2
Short route
Optimized route
Subscr. service
Route dynamics
4
ADDR
BOOK
POI near destination
Settings
3
246
4
POI near destination
3
2
4
POI nearby
3
Dynamic
Avoidance criteria
3
Optimized route
Semi-dynamic
Traffic independent
2
2
2
2
Create new entry
Show memory status
Export address book
Delete all voice entries
Delete all entries
Delete folder "My Addresses"
3
3
3
Telephone off
Use Bluetooth phone
Use internal phone
Connect Bluetooth phone
Search phone
4
5
5
5
5
5
Disconnect phone
Rename phone
Delete pairing
Delete all pairings
Show details
Settings
2
3
3
3
3
3
3
3
3
3
3
3
3
3
3
3
3
3
3
Search for networks
3
Automatic answering system
PIN settings
3
Select ring tone
Change PIN
3
Phone / Ring tone volume
4
Enter mailbox number
4
Internal phone settings
Automatically accept call
Voice control
3
Activate PIN
Deactivate PIN
5
5
5
Show status
Deactivate waiting call
Call forward (?)
Show status
2
Menu language
3
4
Deactivate call forward
Set network automatically
Set network manually
5
Language & Speech
4
Select network
4
"SETUP" Menu
1
4
4
4
4
Deutsch
5
3
2
English
3
Español
3
Français
3
Basics
Examples
Tips
Speaker adaptation
SETUP
Activate call forward
Suppress own number
Tutorial
4
Signal waiting call (?)
Activate waiting call
Voice control active
4
SIM-card memory status
3
Portuguese
4
Remember PIN
3
Polski
4
New speaker adaptation
Delete speaker adaptation
Voice output volume
Date & Time
Set date & time
Date format
Time format
Italiano
Nederlands
247
2
Display
Brightness
3
4
4
4
4
4
4
4
248
4
4
Blue Flame
Day mode for map
Night mode for map
Auto. Day/Night for map
Celsius
Fahrenheit
Metric / Imperial
3
Orange Ray
Map colour
3
4
Steel
blue light (only in day mode)
Temperature
3
Colour
3
Units
2
4
2
3
3
3
km
Miles
System
Factory reset
Software version
Automatic scrolling
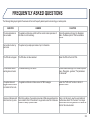
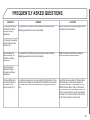
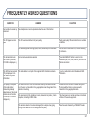
FREQUENTLY ASKED QUESTIONS
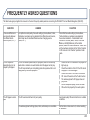
The table below groups together the answers to the most frequently asked questions concerning the PEUGEOT Connect Media Navigation (NG4 3D).
QUESTION
ANSWER
SOLUTION
There is a difference in
sound quality between
the different audio
sources (radio, CD…).
For optimum sound quality, the audio settings (Volume, Bass, Treble,
Ambience, Loudness) can be adapted to the different sound sources,
which may result in audible differences when changing source
(radio, CD…).
Check that the audio settings (Volume, Bass,
Treble, Ambience, Loudness) are adapted to
the sources listened to. It is advisable to set
the AUDIO functions (Bass, Treble, Front-Rear
Balance, Left-Right Balance) to the middle
position, select the musical ambience "Linear" and
set the loudness correction to the "Active" position
in CD mode or to the "Inactive" position in radio
mode.
The CD is ejected
automatically or is not
played by the player.
The CD is inserted upside down, is unplayable, does not contain any
audio data or contains an audio format which the player cannot play.
The CD is protected by an anti-pirating protection system which is not
recognised by the audio equipment.
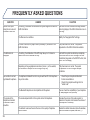
-
The CD player sound is
poor.
Check that the CD is inserted in the player the
right way up.
Check the condition of the CD: the CD cannot
be played if it is too damaged.
Check the content in the case of a recorded
CD: consult the advice in the "Audio" section.
The audio equipment's CD player does not
play DVDs.
Due to inadequate quality, certain recorded
CDs will not be played by the audio system.
The CD used is scratched or of poor quality.
Insert good quality CDs and store them in suitable
conditions.
The audio equipment settings (bass, treble, ambiences) are unsuitable.
Set the treble or bass level to 0, without selecting
an ambience.
249
QUESTION
ANSWER
SOLUTION
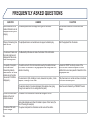
The stored stations do
not function (no sound,
87.5 Mhz is displayed…).
An incorrect waveband is selected.
Press RADIO, select Radio Menu then
"Waveband" to return to the waveband on which
the stations are stored.
The quality of reception
of the radio station
listened to gradually
deteriorates or the stored
stations do not function
(no sound, 87.5 Mhz is
displayed…).
The vehicle is too far from the transmitter used by the station listened
to or there is no transmitter in the geographical area through which the
vehicle is travelling.
Activate the "RDS" function by means of the
short-cut menu to enable the system to check
whether there is a more powerful transmitter in the
geographical area.
The environment (hills, buildings, tunnels, basement car parks…) block
reception, including in RDS mode.
This phenomenon is normal and does not indicate
a failure of the audio equipment.
The aerial is absent or has been damaged (for example when going
through a car wash or into an underground car park).
Have the aerial checked by a PEUGEOT dealer.
Sound cut-outs of 1 to
2 seconds in radio mode.
During this brief sound cut-out, the RDS searches for any frequency
permitting better reception of the station.
Deactivate the "RDS" function by means of the
short-cut menu if the phenomenon is too frequent
and always on the same route.
With the engine off, the
system switches off after
a few minutes of use.
When the engine is switched off, the system's operating time depends on
the battery charge.
The switch-off is normal: the system switches to economy mode and
switches off to prevent discharging of the vehicle's battery.
Start the vehicle's engine to increase the battery
charge.
250
QUESTION
"TA" is selected.
However, certain traffic
jams along the route are
not indicated in real time.
ANSWER
SOLUTION
On starting, it is several minutes before the system begins to receive the
traffic information.
Wait until the traffic information is being received
correctly (displaying of the traffic information
symbols on the map).
In certain countries, only major routes (motorways…) are listed for the
traffic information.
This phenomenon is normal. The system is
dependent on the traffic information available.
The time taken to
calculate a route
sometimes seems longer
than usual.
The performance of the system may slow down temporarily if a CD/DVD
is being copied onto the Jukebox at the same time as a route is being
calculated.
Wait until the CD/DVD has been copied or stop
the copying before starting the guidance function.
The "Risk areas" audible
warning does not work.
The audible warning is not active.
Activate the audible warning on Navigation Menu,
Settings, Set parameters for risk areas.
The alert volume is set to minimum.
Increase the volume of the alert when passing a
"Risk area".
Does the emergency call
function work without a
SIM card?
No, as certain national regulations impose the presence of a SIM card in
order to make an emergency call.
Insert a valid SIM card in the slot.
The altitude is not
displayed.
On starting, the initialisation of the GPS may take up to 3 minutes to
receive more than 4 satellites correctly.
Wait until the system has started up completely.
Check that there is a GPS coverage of at least
4 satellites (long press on the SETUP button, then
select "GPS coverage").
Depending on the geographical environment (tunnel…) or the weather,
the conditions of reception of the GPS signal may vary.
This phenomenon is normal. The system is
dependent on the conditions of reception of the
GPS signal.
251
QUESTION
ANSWER
SOLUTION
The route calculation is
not successful.
The exclusion criteria may conflict with the current location (exclusion of
toll roads on a toll motorway).
Check the exclusion criteria on the Navigation
Menu ("Route options" - "Avoidance criteria").
There is a long waiting
period following the
insertion of a CD.
When a new medium is inserted, the system reads a certain amount of
data (directory, title, artist, etc.). This may take a few seconds.
This phenomenon is normal.
I cannot connect my
Bluetooth telephone.
The telephone's Bluetooth function may be switched off or the equipment
may not be visible.
-
The Bluetooth telephone is not compatible with the system.
A list of compatible Bluetooth mobile telephones is
available from the dealer network.
The volume of the
telephone connected
in Bluetooth mode is
inaudible.
The volume depends both on the system and on the telephone.
Increase the volume of the PEUGEOT Connect
Media Navigation (NG4 3D), to maximum
if required, and increase the volume of the
telephone if necessary.
The system does not play
the DVD.
The region protection may not be compatible.
Insert DVDs which have compatible region
protection.
I cannot copy the CD to
the Jukebox.
The wrong source is selected.
Change the active source to CD.
The CD is copy-protected.
It is normal that a protected CD cannot be copied.
252
-
Check that your telephone's Bluetooth
function is switched on.
Check that your telephone is visible.
QUESTION
The system does not
receive SMS.
I cannot update the risk
area POIs.
ANSWER
SOLUTION
The Bluetooth mode does not permit sending of the SMS to the system.
Use your SIM card and the internal telephone.
The SIM card used is a twin card.
Use the original SIM card to receive the SMS.
The Navigation Menu - "Update personal POI" is not displayed.
Check that the medium used for the update (SD
card or USB memory stick) is inserted correctly.
An error message is displayed at the end of the procedure.
-
Start the procedure again in full.
Consult a PEUGEOT dealer if the problem
persists.
Check that the data on the MEDIUM is
supplied by an official partner of PEUGEOT.
The voice frequencies
(DTMF) are not active
when I am communicating
and I press numbers on
the keypad.
The numeric buttons on the keypad are only active for calls if the display
is in telephone mode.
To activate them, press the MODE button until the
telephone is displayed on the screen.
An risk area which
does not concern me is
displayed on the screen.
The risk areas are displayed near a point defined on the map and in
relation to a direction of travel.
The alert may be triggered when travelling under a
road or near a road which is a Risk area.
253
254
PEUGEOT Connect
onnect Navigation (RT6)
SATELLITE NAVIGATION SYSTEM
MULTIMEDIA BLUETOOTH
TELEPHONE AUDIO SYSTEM
CONTENTS
The system is protected in such a way that it will only
operate in your vehicle.
For safety reasons, the driver must only carry out
operations which require prolonged attention while the
vehicle is stationary.
When the engine is switched off and to prevent
discharging of the battery, the system switches off
following the activation of the energy economy mode.
01
02
03
04
05
06
07
08
09
10
11
First steps - Control panel
Steering mounted controls
General operation
Navigation - Guidance
Traffic information
Using the telephone
Radio
Music media players
Audio settings
Configuration
Screen menu map
Frequently asked questions
p.
p.
p.
p.
p.
p.
p.
p.
p.
p.
p.
256
p.
303
258
259
261
274
277
287
291
297
298
299
255
01 FIRST STEPS
Selection and confirmation OK dial:
Selection of an item on the screen or in a list or a menu,
then confirmation with a short press.
Other than for menus and lists, a short press displays a
contextual menu depending on the current screen.
Rotation with map displayed: zoom the map scale in
and out.
Open the
"Configuration" menu.
Long press: access
to the GPS coverage
and the navigation
demonstration mode.
Select:
the previous/next line in a list or menu.
the previous / next media folder.
step by step selection of the previous/
next radio frequency.
the previous / next MP3 folder.
Move up/down, in "Move the map" mode.
Short press without the
engine running: on / off.
Short press with the engine
running: audio source off /
restore.
Volume adjustment (each
source is independent,
including TA messages and
navigation instructions).
MODE button: Selection
of the type of permanent
display.
Long press: black
screen (DARK).
256
Access to the
"Navigation - guidance"
menu and display the
recent destinations.
Open the "Traffic
information" menu
and display the current
traffic alerts.
Abandon the current
operation, up one level
in the menu.
Long press: return to
the permanent display.
Select:
the next lower / higher radio
frequency automatically.
the previous / next CD track, MP3
track or media.
the left / right of the screen when a
menu is displayed.
Move left / right in "Move the map" mode.
01 FIRST STEPS
Access to the "RADIO" menu and
display the list of stations received.
Long press: display the audio settings
screen for the radio tuner source.
Access to the "MUSIC" menu, and display of the CD/MP3/
Apple® tracks and folders.
Long press: display the audio settings screen for the
"MEDIA (CD/USB/iPod/Streaming/AUX)" sources.
Open the "Telephone" menu
and display the list of recent
calls or accept an incoming call.
Continuous press:
reinitialisation of the system.
Short press: select pre-set radio station.
Long press: pre-set the current station.
257
02 STEERING MOUNTED CONTROLS
RADIO: change to the next radio station in the list.
Long press: automatic search for a higher frequency.
CD: select the next track.
CD: continuous press: fast forward play.
RADIO: select the previous/next preset
station.
Select the next entry in the address book.
RADIO: change to the previous radio
station in the list.
Long press: automatic search for a
lower frequency.
CD: select the previous track.
CD: continuous press: fast reverse.
Volume increase.
Volume decrease.
258
SRC/TEL button:
change the audio source,
start a call from the address book,
call/end call on the telephone,
press for more than 2 seconds: access
to the address book.
Mute: press the volume
increase and decrease
buttons simultaneously.
Restore the sound by
pressing one of the
two volume buttons.
03 GENERAL OPERATION
Press the MODE button several times in succession for access to the following displays:
"RADIO"
"MAP IN WINDOW"
(If navigation guidance in
progress)
"TELEPHONE"
(If conversation in progress)
"FULL SCREEN MAP"
SETUP: PARAMETERS
date and time, display configuration, sound, vehicle
settings.
For cleaning the screen, the use of a soft, non-abrasive cloth
(spectacles cloth) is recommended, with no additional product.
Changing the audio source:
RADIO: RADIO broadcasts.
MUSIC: playing MUSIC.
For the details of the menus, refer to the "Screen menu map"
section.
259
03 GENERAL OPERATION
Display according to context
A press on the knob gives access
to short-cut menus according to the
display in the screen.
RADIO:
1
Activate / Deactivate TA
1
Activate / Deactivate RDS
1
Change waveband
2
2
1
FM
AM
TA
1
1
1
Private mode
1
Put call on hold
260
Hang up
MUSIC MEDIA
PLAYERS, CD or USB
(according to media):
Select destination
1
2
2
2
1
Normal
1
Random
1
Random on all media
Repetition
1
Stop / Restore guidance
Directory
GPS coordinates
Divert route
1
Move the map
2
2
2
2
FULL SCREEN MAP OR
IN A NEW WINDOW:
Enter an address
1
Play modes:
1
TELEPHONE
(call in progress):
DTMF ring tones
2
1
Info. on location
Select as destination
Select as stage
Save this place (contacts)
Quit map mode
Guidance criteria
04 NAVIGATION - GUIDANCE
Access to the "Navigation" menu
To make full use of all of the
functions of your navigation
system, update the mapping
regularly. Contact a
PEUGEOT dealer or order
your mapping update at
http://peugeot.navigation.com
"Navigation - guidance"
Press NAV.
List of recent destinations.
A short press on the end of the
lighting control stalk repeats
the last navigation message.
To delete the list of recent destinations, select "Guidance
options" in the navigation menu then select "Delete last
destinations" and confirm. Select "Yes" then confirm.
Deleting just one destination is not possible.
"Select destination"
"Journey leg and route"
"Guidance options"
"Map management"
"Stop / Restore guidance"
Go from the list to the menu (left/right).
or
261
04 NAVIGATION - GUIDANCE
Selecting a destination
Towards a new destination
Press NAV to display the
"Navigation - guidance" menu.
Select "Select destination" and
confirm, then select "Enter an address"
and confirm.
Select the "Country" function then
confirm.
Select the "Town" or "Post code"
function then confirm.
Select the letters in the name of the
town or the characters in a post code
one at a time, confirming each one with
the knob.
262
Selection the town from the list offered,
then confirm.
A pre-set list (by entering the first few
letters) of the towns in the country
selected can be accessed directly by
selecting and confirming "List" in the
screen.
If possible, enter the "Road" and "N°/X"
information in the same way.
Select "Archive" to save the address entered in a contact file.
The system allows up to 400 contact files to be recorded.
Confirm "OK" to start guidance.
Select the guidance criteria: "Fastest
route", "Shortest route" or optimised
"Distance/Time", then select the
desired restriction criteria: "With tolls",
"With Ferry", or "Traffic info" then
confirm "OK".
04 NAVIGATION - GUIDANCE
Towards a recent destination
Press NAV to display the
"Navigation - guidance" menu.
Select the desired destination and
confirm to start guidance.
Towards a contact in the contacts directory
Navigation towards a contact is only possible if it has an address
entered in the audio navigation system.
Press NAV to display the
"Navigation - guidance" menu.
Delete recent destinations
Press NAV to display the
"Navigation - guidance" menu.
Select "Options" and confirm and then
"Delete recent destinations" and
confirm.
Select "Select destination" and
confirm, then select "Directory" and
confirm.
Selection the desired destination from
your contacts and confirm "OK" to start
the guidance.
263
04 NAVIGATION - GUIDANCE
Towards GPS coordinates
Press NAV to display the
"Navigation - guidance" menu.
Towards a point on the map
With the map displayed, press OK to
display the contextual menu. Select
"Move the map" and confirm.
Select "Select destination" and
confirm, then select "GPS coordinates"
and confirm.
Move the cursor using the control to
identify the desired destination.
Enter the GPS coordinates and
confirm "OK" to start the guidance.
Press OK to display the contextual
menu for "Move the map" mode.
Select "Select as destination" or
"Select as stage" and confirm.
264
04 NAVIGATION - GUIDANCE
Towards points of interest (POI)
Press NAV to display the
"Navigation - guidance" menu.
Select the "Enter an address" function
and confirm, then select Select
destination and confirm.
To select a POI close to your current
location, select "POI" and confirm, then
select "Around the current place" and
confirm.
To select a POI as a stage on the route,
select "POI" and confirm, then select "On
the route" and confirm.
To select a POI as a destination, first
enter the country and town (see "Towards
a new destination"), select "POI" and
confirm, finally select "Near" and confirm.
The points of interest (POI) indicate all of the service locations in the vicinity
(hotels, various businesses, airports...).
Select "Search by Name" to search for POIs by name and not by
proximity.
Search for POIs in the categories
suggested in the following pages.
Select the POI and confirm "OK" to start
the guidance.
265
04 NAVIGATION - GUIDANCE
This icon appears when several POIs are grouped
together in the same area. Zooming in on this icon
shows details of the POIs.
List of principal points of interest (POI)
Service station
Airport
Cinema
Garage
Railway station
Theme parks
PEUGEOT
Bus station
Hospital, Chemist,
Vet
Covered car park
Port
Police station
Car park
Industrial estate
School
Rest area
Supermarket
Town hall
Hotel
Vending machine
Post office
Restaurant
Sports complex, sports centre,
sports ground
Museum, Culture, Theatre,
Historic monument
Cafeteria
Swimming pool
Tourist information, Tourist
attraction
Bed and breakfast
Winter sports resort
Risk areas / Danger
areas*
An annual mapping update allows new points of interest to be presented to you.
You can also update the Risk areas / Danger areas every month.
The detailed procedure is available on:
http://peugeot.navigation.com.
266
* According to availability in the country.
04 NAVIGATION - GUIDANCE
Settings for risk area / danger area alerts
Press NAV to display the "Navigation guidance" menu.
These functions are only available if risk areas have been
downloaded and installed on the system.
The detailed procedure for updating risk area POIs can be found at
http://peugeot.navigation.com.
Select "Guidance options" and confirm,
then select "Set parameters for risk
areas" and confirm.
Select:
"Visual alert"
"Audible alert"
"Alert only in guidance"
"Overspeed alarm only".
The choice of time of notification defines
how long in advance that Risk area
warnings are given.
Select "OK" to confirm the screen.
267
04 NAVIGATION - GUIDANCE
Adding a stage
Press NAV to display the
"Navigation - guidance" menu.
Organising stages
To organise stages, carry out
operations 1 to 2 again, then select
"Order/delete journey legs" and
confirm.
Select "Journey leg and route" then
confirm.
Select the stage that you want to move
in the order.
Select "Add a stage" then confirm.
The address of the stage is entered as
a destination, by "Enter an address",
a contact in "Directory", or "Previous
destinations".
Select and confirm to save the
modifications.
Select "Delete" to delete the stage.
Select "Close to" a route passing
close to the stage or "Strict" for a route
passing through the stage.
Confirm "OK" to start the guidance, and
give a general indication of the guidance
route.
268
04 NAVIGATION - GUIDANCE
Route options
Calculation criteria
Press NAV to display the
"Navigation - guidance" menu.
Select "Define calculation criteria" and
confirm.
This function allows modification of:
the guidance criteria: ("Fastest
route", "Shortest route",
"Distance/Time"),
the exclusion criteria: ("With tolls"
or "With Ferry"),
traffic avoidance: ("Traffic info").
If traffic avoidance (Traffic info) is selected, the system suggests
an alternative route if there is a delay on the guidance route.
Select "Guidance options" and confirm.
Select "OK" and confirm to save the
modifications.
269
04 NAVIGATION - GUIDANCE
Map management
Selecting the points of interest displayed on the map
Press NAV to display the
"Navigation - guidance" menu.
Select "Map management" and confirm.
Select "Map details" and confirm.
270
Select from the various categories the
ones that you want to display on the
screen.
Select "Default" to have only "Filling stations, garages"
and "Risk areas" appear on the map (if installed in the system).
Select "OK" then confirm and
select "OK" again then confirm to save
the modifications.
04 NAVIGATION - GUIDANCE
Map orientation
Press NAV to display the
"Navigation - guidance" menu.
Select:
"Vehicle direction" to have the map
follow the direction of travel,
"North direction" to keep the map
always North up,
"Perspective view" to display a
perspective view.
Select "Map management" and confirm.
The colour of the map, different from the day and night mode, is
configured in the "SETUP" menu.
Select "Map orientation" and confirm.
Street names are visible on the map from the 100 m scale.
271
04 NAVIGATION - GUIDANCE
Navigation voice synthesis
Adjusting the volume / Deactivation
The volume of messages can be adjusted during the transmission
of the message using the volume adjustment control.
Select the volume graph and confirm.
The volume setting of guidance messages is also accessible via
the "SETUP" / "Voice synthesis" menu.
Press NAV to display the
"Navigation - guidance" menu.
Select "Guidance options" and confirm.
Select "Set speech synthesis" and
confirm.
272
Adjust the volume to the desired level
and confirm.
Select "Deactivate" to deactivate voice messages.
Select "OK" and press the dial to
confirm.
04 NAVIGATION - GUIDANCE
Male voice / Female voice
Press SETUP to display the
configuration menu.
Select "Voice synthesis" and confirm.
Select "Select male voice" or "Select
female voice" then confirm "Yes" to
activate a male or female voice. The
system restarts.
273
05 TRAFFIC INFORMATION
Access to the "Traffic information" menu
"Traffic information"
Press "TRAFFIC".
List of TMC messages in order
of distance from the vehicle.
"Geographic filter"
"Select TMC station"
(automatic, manual)
"Display/Do not display
messages"
Go from the list to the menu (left/right).
or
274
05 TRAFFIC INFORMATION
Configure the filtering and display of TMC messages
TMC (Traffic Message Channel) messages contain information on traffic and weather conditions, received in real time and transmitted to the
driver in the form of audible announcements and symbols on the navigation map.
The navigation system can then suggest an alternative route to avoid a traffic problem.
Press the TRAFFIC button to display
the "Traffic information" menu.
The system offers a choice of:
"Retain all the messages",
or
"Retain the messages"
- "Around the vehicle", (confirm
the mileage to modify and select
the distance),
- "On the route".
Select the "Geographic filter" function
and confirm.
Confirm "OK" to save the modifications.
We recommend:
a filter on the route and
a filter around the vehicle of:
- 12 miles (20 km) in urban areas,
- 30 miles (50 km) on motorways.
275
05 TRAFFIC INFORMATION
Principal TMC symbols
Receiving TA messages
Black and blue triangle: general information, for example:
The TA (Traffic Announcement) function gives priority to TA alert
messages. To operate, this function needs good reception of a
radio station transmitting this type of message. When a traffic report
is transmitted, the current audio source (Radio, CD, USB, ...) is
interrupted automatically to play the TA message. Normal playback
of the audio source resumes at the end of the transmission of the
message.
Weather reports
Traffic reports
Wind
Fog
Parking
Snow / ice
Press RADIO to display the "FM / AM
band" menu.
Red and yellow triangle: traffic information, for example:
276
Modified signage
Narrow carriageway
Slippery surface
Accident
Delay
Roadworks
Risk of explosion
Road closed
Demonstration
Danger
No entry
Traffic jam
Select "Guidance options" then
confirm.
Activate or deactivate "TA" then confirm.
The volume setting for TA messages can be adjusted only during the
transmission of this type of alert.
Activate or deactivate the function at any time by pressing
the button.
During a message, press the button to interrupt it.
06 USING THE TELEPHONE
Access to the "Telephone" menu
In the top bar of the permanent
display
"Telephone"
No telephone connected.
Press this button.
List of recent calls sent and
received with the telephone
connected to the system.
"Dial"
"Directory of contacts"
"Contacts management"
"Phone functions"
"Bluetooth functions"
"Hang up"
Telephone connected.
Incoming call.
Outgoing call.
Synchronisation of
contacts in progress.
Telephone call in
progress.
To make a call, select a number in the list and confirm "OK"
to start the call.
Connecting a different telephone deletes the list of
recent calls.
Go from the list to the menu (left/right).
or
277
06 USING THE TELEPHONE
Pairing a Bluetooth telephone
First connection
You can check the compatibility of your telephone
at www.peugeot.co.uk (services).
Quick procedure from the telephone
For reasons of safety and because they require prolonged attention
on the part of the driver, the operations for pairing the Bluetooth
mobile telephone to the hands-free system of the audio unit must be
carried out with the vehicle stationary.
Procedure from the system
Activate the telephone's Bluetooth function
and ensure that it is "visible to all" (telephone
configuration).
In the Bluetooth menu of your telephone, select
the name of the system from the list of devices
detected.
Press this button.
Enter a minimum 4 figure code in the telephone and
confirm.
Enter the same code in the system,
select "OK" and confirm.
278
Select "Bluetooth functions" and
confirm.
Select "Peripherals search" and
confirm.
The list of peripheral devices detected
is displayed. Wait until the "Connect"
button is available.
06 USING THE TELEPHONE
The services available depend on the network, the SIM card and the compatibility of the Bluetooth telephone used. Check the telephone
manual and with your network provider for details of the services available to you.
Select the name of the desired
peripheral from the list of devices
detected then confirm
Select "Connect" and confirm.
The system offers to connect the
telephone:
in "Hands-free mode" (telephone
only),
in "Audio" mode (streaming: playing
music files on the telephone),
or "All" (for selection of both
modes).
Select "OK" and confirm.
The "Hands-free mode" should be used in preference if
"Streaming" is not desired.
The ability of the system to connect in only one mode depends on
the telephone. The two modes may both connect by default.
Enter a minimum 4 figure code in the telephone
and confirm.
Enter the same code in the system,
select "OK" and confirm.
Then accept automatic connection on the telephone to allow the
telephone to reconnect automatically every time the vehicle is
started.
Depending on the type of telephone, the system will ask you to
accept or not the transfer of your contacts.
On return to the vehicle,the last telephone connected
automatically reconnects, within around 30 seconds after
switching on the ignition (Bluetooth activated and visible).
To modify the automatic connection mode, remove the pairing
and pair the telephone again with the desired mode.
279
06 USING THE TELEPHONE
Directory configuration / Synchronisation with the telephone
Press PHONE then select "Contacts
management" and confirm.
Select "New contact" to enter a new
contact.
Select "Sort by Name/First name" to
choose the order in which they appear.
Select "Delete all contacts" to delete
the contacts saved in the system.
280
Select "Import all the entries" to import
all the contacts in the telephone and
save them in the system.
Once imported, a contact remains visible
whatever telephone is connected.
Select "Synchronization options":
No synchronization: only the
contacts saved in the system
(always present).
Display telephone contacts: only the
contacts saved in the telephone.
Display SIM card contacts: only the
contacts saved on the SIM card.
Display all phone contacts:
contacts on the SIM card and in the
telephone.
Select "Contact mem. status" to see the
number of contacts saved in the system
or imported, and the free memory.
06 USING THE TELEPHONE
Editing, importing or deleting a contact
Press PHONE then select "Directory of
contacts" and confirm.
It is not possible to modify or delete contacts in the telephone or the
SIM card via the Bluetooth connection.
Select the desired contact and confirm.
Once the contact has been imported, the Bluetooth symbol
disappears, replaced by the telephone symbol which shows that the
contact has been saved in the system.
Select "Open" to view a contact on the
telephone or modify a contact saved in
the system.
In the "Directory of contacts" menu, the import and deletion of
contacts is done one by one.
Select "Import" to copy a contact from
the telephone to the system.
Select OK or press the back button to exit
this menu.
Select "Delete" to delete a contact
recorded in the system.
281
06 USING THE TELEPHONE
Making a call
Use of the telephone is not recommended while driving. We recommended
that you park safely or make use of the steering mounted controls.
Calling a new number
Calling a contact
Press PHONE twice.
Press TEL or twice on PHONE.
Select "Directory of contacts" then
confirm.
Select "Dial" then confirm.
Select the desired contact and confirm.
If access was via the PHONE button,
select "Call" and confirm.
Dial the telephone number using the
virtual keypad selecting each number
in turn.
Confirm "OK" to make the call.
282
Select the number and confirm to start
the call.
06 USING THE TELEPHONE
Ending a call
Calling a recently entered number
Press TEL, select "Call list" and
confirm,
Press PHONE then select "OK" to end
the call.
or
press PHONE to display the calls log.
Or make a long press on TEL at the
steering mounted controls.
Or make two short presses on TEL at
the steering mounted controls.
Select the desired number and confirm.
To erase the calls log, press PHONE twice, select "Phone
functions" and confirm then select "Delete calls log" and confirm.
It is always possible to start a call directly from the telephone; park
the vehicle as a safety measure.
Or press the MODE button, as many
times as necessary, until the telephone
screen is displayed.
Press "OK" to display the contextual
menu then select "Hang up" and confirm.
283
06 USING THE TELEPHONE
Receiving a call
An incoming call is announced by a ring and a superimposed display
on the screen.
"Yes" to accept the call is selected by
default.
Press "OK" to accept the call.
Select "No" and confirm to reject the
call.
A short press on TEL accepts an
incoming call.
A long press on TEL rejects an incoming
call.
284
06 USING THE TELEPHONE
Options during a call*
During a call, press the MODE button
several times to select display of the
telephone screen, then press "OK" to
open the contextual menu.
Or make a short press on this button.
Select "Private mode" and confirm to
take the call on the handset.
Or select "Hands-free mode" and
confirm to take the call via the vehicle's
speakers.
Select "DTMF ring tones" to use the
numerical keypad, so as to navigate
through the menu of an interactive vocal
server.
Select "Hang up" to end the call.
It is possible to hold a 3-way conference
call by making 2 calls in succession*.
Select "Conference mode call" in the
contextual menu accessible using this
button.
Select "Put call on hold" and confirm to
put the current call on hold.
Or select "Resume the call" and
confirm to resume the call on hold.
* Depending on the compatibility of the phone and your service plan.
285
06 USING THE TELEPHONE
Managing paired telephones
Press PHONE twice.
Changing the ringtone
Press PHONE twice.
Select "Phone functions" and confirm.
Select "Bluetooth functions".
Select "Ring options" and confirm.
Select "List of the paired peripherals"
and confirm.
It is possible to:
"Connect" or "Disconnect" the
selected telephone,
delete the pairing of the selected
telephone.
It is also possible to select all pairings.
286
You can adjust the volume and the type
of ringtone.
Select "OK" and confirm to save the
changes.
07 RADIO
Access to the "Radio" menu
"FM / AM band / DAB"
Press RADIO.
Alphabetical list of stations
received.
"Change waveband" ("AM / FM / DAB")
"Guidance options" ("TA, RDS, FM
alternative frequencies / DAB")
"Audio settings" (see this section)
"Update radio list"
Go from the list to the menu (left/right).
Press or or use the rotary control to select the
previous or next station in the list.
or
287
07 RADIO
Changing waveband
Selecting a station
The external environment (hill, building, tunnel, underground car park...) may interfere with the reception, including in RDS station tracking mode. This
phenomenon is a normal result of the way in which radio waves are transmitted and does not in any way indicate a fault with the audio system.
The quality of reception is represented by the number of
active waves in this symbol.
Press RADIO or OK to display the
contextual menu.
Select "Change waveband".
Select "AM / FM" and confirm.
288
By alphabetical list
Press RADIO, select the station of your
choice and confirm.
By automatic frequency search
Press or for the automatic search
for a lower or higher radio frequency.
Or turn the thumb wheel at the steering
mounted controls.
By manual frequency search
Press or to adjust the radio
frequency step by step.
07 RADIO
Presetting a station
Activate / Deactivate RDS
RDS, if activated, allows you to continue listening to the same
station by automatic retuning to alternative frequencies. However,
in certain conditions, coverage of an RDS station may not be
assured throughout the entire country as radio stations do not
cover 100 % of the territory. This explains the loss of reception of
the station during a journey.
Press RADIO.
After selecting a station, press one of the buttons on the
numerical keypad for 2 seconds to preset the current
station.
An audible signal confirms that the station has been preset.
Select "Guidance options" then
confirm.
Press the button on the numerical keypad to recall a
preset station.
Or press then turn the thumb wheel at the steering
mounted controls.
Activate or deactivate "RDS" then
confirm.
289
07 RADIO
DAB (Digital
(Digital Audio Broadcasting)
Digital radio
Digital radio - DAB/FM auto tracking
Digital radio provides a higher quality reception and also the
graphical display of information for the radio station, by selecting
"Video mode" in "Radio favourites" (Options).
The different radio multiplex services offer a choice of stations
displayed in alphabetical order.
"DAB" does not have 100% coverage of the country.
When the digital signal is weak, "DAB / FM auto tracking" allows you
to continue listening to the same station, by automatically switching
to the corresponding analogue "FM" station (if one exists).
Press "RADIO".
Select "Change band" and confirm.
Press "RADIO".
Select "Options" and confirm.
Select "FM/DAB" and confirm.
Selection "DAB" and confirm.
Change of station in the same "multiplex".
Manual search for a "multiplex".
290
If "DAB / FM auto tracking" is on, there will be a difference of a few
seconds in the programme when the system changes to analogue
"FM" radio with sometimes a variation in volume.
Display of the "DAB" band then becomes "DAB (FM)".
When the strength of the digital signal is good again, the system
automatically switches back to "DAB".
If the "DAB" station you are listening to is not available on "FM"
("DAB/FM" option greyed out), or if "DAB / FM auto tracking" is not
on, the sound will be cut when the digital signal is too weak.
08 MUSIC MEDIA PLAYERS
Access to the "Music media player" menu
"MEDIA"
Press MUSIC.
List of the current media
tracks.
"Change media"
"Eject USB device" (if USB
connected)
"Play mode" ("Normal",
"Random", "Random on all
media", "Repetition")
"Audio settings" (see this section)
"Activate / Deactivate AUX input"
Go from the list to the menu (left/right).
or
291
08 MUSIC MEDIA PLAYERS
CD, MP3 CD / USB player
Information and advice
The audio equipment will only play audio files with ".wma, .aac, .flac,
.ogg and .mp3" file extensions and with a bit rate of between 32 Kbps
and 320 Kbps.
It also supports VBR (Variable Bit Rate) mode.
No other type of file (.mp4, .m3u...) can be played.
WMA files must be of the standard wma 9 type.
The sampling rates supported are greater than 32 KHz.
It is advisable to restrict file names to 20 characters, without using of
special characters (e.g.: " " ? ; ù) to avoid any playing and displaying
problems.
In order to be able to play a recorded CDR or CDRW, when recording
it is preferable to select the ISO 9660 level 1, 2 or Joliet standard.
If the disc is recorded in another format (udf, ...), it may not be played
correctly.
It is recommended that the same recording standard is always used
for an individual disc, with as low a speed as possible (4x maximum)
for optimum sound quality.
In the particular case of a multi-session CD, the Joliet standard is
recommended.
292
The system supports USB mass storage or iPod
devices via the USB port (suitable cable not supplied).
If a partitioned USB memory key is connected to the
system, only the first partition is recognised.
Control of the peripheral device is with the audio
system controls.
The number of tracks is limited to 2000 maximum,
999 tracks per folder.
If the current consumption at the USB port exceeds
500 mA, the system goes into protection mode and
deactivates the port.
Other peripherals, not recognised on connection, must
be connected to the auxiliary socket using a Jack cable
(not supplied).
In order to be read, a USB memory stick must be formatted FAT 16
or 32.
The system does not support the operation of an Apple® player and a
USB memory stick connected at the same time.
It is recommended that official Apple® USB cables are used to ensure
correct operation.
08 MUSIC MEDIA PLAYERS
Sources
Insert the CD in the player, insert the USB
memory stick in the USB player or connect the
USB peripheral to the USB port using a suitable
cable (not supplied)
The system builds playlists (in temporary
memory), an operation which can take from
a few seconds to several minutes at the first
connection.
Reduce the number of non-music files and the
number of folders to reduce the waiting time.
The playlists are updated every time the ignition
is switched off or connection of a USB memory
stick. However, the system memorises these
lists and if they are not modified, the loading
time will be shorter.
Play starts automatically after a period which
depends on the capacity of the USB memory
stick.
Selection of source
The SOURCE button on the steering mounted controls allows a
direct change to the next media source.
"CD / CD MP3"
"RADIO"
"STREAMING"
"USB, iPod"
"AUX"
Press MUSIC to display the "MEDIA"
menu.
Select "Following media source" and
confirm.
Repeat the operation as many times as necessary to obtain the
desired media source (except for radio which is accessible either
with SOURCE or RADIO).
293
08 MUSIC MEDIA PLAYERS
Selecting a track
Previous track.
/
Next track.
/
MUSIC: List of USB or CD tracks or
folders
Up or down in the list.
/
Confirm, next menu level.
/
/
Previous folder.
Next folder.
Fast forward.
Long press
/
/
+
Fast backward.
Pause: long press on SRC.
294
Long press
/
/
Up one menu level.
/
08 MUSIC MEDIA PLAYERS
Connecting APPLE® players
Connect the Apple® player to the USB port using a suitable cable
(not supplied).
Play starts automatically.
Audio streaming
Streaming allows audio files on your telephone to be played via the
vehicle's speakers.
Control is via the audio system.
The classifications available are those of the portable device
connected (artists / albums / genres / playlists / audiobooks /
podcasts).
The default classification used is by artist. To modify the classification
used, return to the first level of the menu then select the desired
classification (playlists for example) and confirm to go down through
the menu to the desired track.
The "Shuffle tracks" mode on an iPod® corresponds to the "Random"
mode on the audio system.
The "Shuffle albums" mode on an iPod® corresponds to the "Random
all" on the audio system.
"Shuffle tracks" is restored by default on each connection.
The version of software in the audio system may not be compatible
with the generation of your Apple® player.
Connect the telephone: see "USING THE TELEPHONE".
Select "Audio" or "All" profile.
If play does not start automatically, it may be necessary to start the
audio playback from the telephone.
Control is from the peripheral device or by using the audio system
buttons.
Once connected in streaming mode, the telephone is considered to be
a media source.
It is recommended that you activate "Repeat" on the Bluetooth
peripheral.
295
08 MUSIC MEDIA PLAYERS
Using the auxiliary input (AUX)
JACK/USB audio cable not supplied
Connect the portable device (MP3, WMA
player…) to the JACK auxiliary audio socket
or USB port using a suitable cable.
Press MUSIC to display the "MUSIC"
menu.
296
Select "Activate / Deactivate AUX
input" and confirm.
First adjust the volume of your portable
device (to a high level). Then adjust the
volume of your audio system.
Display and management of the controls are via the portable device.
09 AUDIO SETTINGS
They are accessible by the MUSIC
button in the control panel or by a long
press on RADIO according to the source
in use.
-
"Equalizer" (choice of 6 musical ambiences)
"Bass"
"Treble"
"Loudness" (Activate/Deactivate)
"Distribution" ("Driver", "All passengers")
"Le-Ri balance" (Left/Right)
"Fr-Re balance" (Front/Rear)
"Auto. Volume" depending on road speed (Activate/Deactivate)
The distribution (or spatialisation using the Arkamys© system) of sound
is an audio process that allows the audio quality to be adapted to the
number of listeners in the vehicle.
The audio settings (Equalizer, Bass, Treble and Loudness) are
different and independent for each sound source.
The settings for distribution and balance are common to all sources.
On-board audio: Arkamys© Sound Staging.
With Sound Staging, the driver and passengers are immersed in an
"audio scene" recreating the natural atmosphere of an auditorium:
truly a part of the scene and its surroundings.
This new sensation is made possible by software in the audio system
which processes the digital signals from the media players (radio,
CD, MP3…) without changing the audio settings. This processing
takes account of the characteristics of the passenger compartment to
produce optimum results.
The Arkamys© software installed in your audio system processes
the digital signal from the media players (radio, CD, MP3, ...) and
recreates a natural musical scene, with harmonious placement of
instruments and voices in the space in front of passengers, level with
the windscreen.
297
10 CONFIGURATION
Display configuration
298
Press SETUP to display the
"Configuration" menu.
Select "Choose colour" and confirm to
select the screen colour harmony and
the map presentation mode:
day mode,
night mode,
automatic day/night mode,
according to whether the
headlamps are on.
Select "Display configuration" and
confirm.
Select "Adjust luminosity" and confirm
to adjust the screen brightness.
Press "OK" to save the changes.
The settings for day and night are
independent.
11 SCREEN MENU MAP(S)
MAIN FUNCTION
1
2
3
1
3
Option A
2
Option A1
2
Option A11
2
Option B...
"Navigation - guidance"
MENU
2
2
Chosen destination
2
3
3
3
3
3
Directory
3
GPS coordinates
Add a stage
Enter an address
Directory
3
3
2
2
2
3
Define calculation criteria
2
Enter an address
Journey leg and route
1
3
Guidance options
Select destination
2
2
Divert route
1
2
Fastest route
2
Shortest route
2
Distance/Time
With tolls
With Ferry
Traffic info
Set speech synthesis
Delete last destinations
Set parameters for risk areas
Map management
1
Order/delete journey legs
3
1
Previous destinations
2
Map orientation
Vehicle direction
North direction
Perspective view
Map details
Move the map
Mapping and updating
Description of risk areas database
Stop / Restore guidance
1
2
2
2
2
2
2
Fastest route
Shortest route
Distance/Time
With tolls
With Ferry
Traffic info
299
11 SCREEN MENU MAP(S)
"TRAFFIC INFORMATION"
MENU
2
Retain the messages:
2
3
3
2
2
2
1
On the route
Manual TMC
List of TMC stations
1
Directory of contacts
3
3
300
3
2
3
3
Synchronization options
2
3
Dial
3
Import all the entries
2
1
3
Delete all contacts
2
"TELEPHONE" MENU
3
Sort by First name/Name
2
2
No synchronization
Display telephone contacts
Display SIM card contacts
Display all phone contacts
Contact mem. status
List of the paired peripherals
2
New contact
2
Automatic TMC
Display / Do not display
messages
Bluetooth functions
1
Contacts management
1
Delete calls log
2
Cancel
2
Around the vehicle
Select TMC station
1
Delete
2
Ring options
2
Import
2
Retain all the messages:
Phone functions
1
Open
2
Geographic filter
1
Call
2
2
1
Connect
Disconnect
Delete
Delete all
Cancel
Peripherals search
Rename radiotelephone
Hang up
11 SCREEN MENU MAP(S)
"RADIO" MENU
1
2
Change Waveband
2
AM / FM
2
Guidance options
1
2
2
1
2
Bass
2
Treble
Loudness
3
RDS options
3
Audio settings
3
2
Equalizer
3
3
3
3
3
3
None
2
Classical
2
3
Jazz
Rock
Techno
Vocal
1
Change Media
1
2
Activated / Deactivated
2
Distribution
2
TA
"MUSIC" MENU
Driver
2
All passengers
2
Le-Ri balance
Fr-Re balance
2
Auto. Volume
2
2
Update radio list
2
1
1
Bluetooth streaming
USB/iPod
AUX
Read mode
1
Activated / Deactivated
CD
Normal
Random
Random on all media
Repetition
Audio settings
Activate / Deactivate AUX
input
301
11 SCREEN MENU MAP(S)
"SETUP" MENU
1
2
Display configuration
2
Choose colour
2
3
3
4
4
4
2
2
2
Harmony:
2
Cartography:
2
Day mode
Night mode
Auto Day/Night
Adjust luminosity
Set date and time
Select units
Speech synthesis setting
1
2
2
Select language
1
2
2
2
2
2
2
Define vehicle parameters*
1
Français
Parking assistance
2
English
Wiper operation
2
Italiano
3
Portuguese
Lighting configuration
2
Español
3
Deutsch
3
Nederlands
3
Turkish
3
Polski
Rear wiper in reverse
Guide-me-home lighting time
Directional headlamps
Mood lighting
Daytime running lamps
Trip computer
1
Русский
2
2
Alert log
Status of functions
Guidance instructions volume
Select male voice/Select female voice
* The settings vary according to the vehicle.
302
FREQUENTLY ASKED QUESTIONS
The following table groups together the answers to the most frequently asked questions concerning your audio system.
QUESTION
ANSWER
SOLUTION
The route calculation is
not successful.
The guidance criteria may conflict with the current location (exclusion of
toll roads on a toll motorway).
Check the guidance criteria on the Navigation
Menu, "Guidance options"\ "Define calculation
criteria".
I am unable to enter my
post code.
The system only accepts post codes of up to 5 characters.
The POIs do not appear.
The POIs have not been selected.
Select the POIs in the list of POIs.
The risk areas audible
warning does not work.
The audible warning is not active.
Activate audible warnings in the Guidance options
menu, "Navigation - guidance", "Set parameters
for risk areas".
The system does not
suggest a detour around
an incident on the route.
The guidance criteria do not take account of TMC messages.
Select the "Traffic info" function in the list of
guidance criteria.
I receive a Risk area alert
which is not on my route.
Other than guidance, the system announces all Risk areas positioned in a
cone located in front of the vehicle. It may provide an alert for a Risk area
located on nearby or parallel roads.
Zoom in on the map to view the exact position of
the Risk area. Select "On the route" to no longer
receive alerts other than guidance or to reduce the
time for the announcement.
303
FREQUENTLY ASKED QUESTIONS
QUESTION
Certain traffic jams
along the route are not
indicated in real time.
The altitude is not
displayed.
I am unable to connect
my Bluetooth telephone.
The volume of the
telephone connected
in Bluetooth mode is
inaudible.
304
ANSWER
SOLUTION
On starting, it is several minutes before the system begins to receive the
traffic information.
Wait until the traffic information is being received
correctly (display of the traffic information icons on
the map).
The filters are too restrictive.
Modify the "Geographic filter" settings.
In certain countries, only major routes (motorways...) are listed for the
traffic information.
This phenomenon is normal. The system is
dependent on the traffic information available.
On starting, the initialisation of the GPS may take up to 3 minutes to
receive more than 4 satellites correctly.
Wait until the system has started up completely.
Check that there is a GPS coverage of at least
4 satellites (long press on the SETUP button, then
select "GPS coverage").
Depending on the geographical environment (tunnel...) or the weather,
the conditions of reception of the GPS signal may vary.
This phenomenon is normal. The system
is dependent on the GPS signal reception
conditions.
The telephone's Bluetooth function may be switched off or the telephone
may not be visible.
-
The Bluetooth telephone is not compatible with the system.
You can check the compatibility of your telephone
on www.peugeot.co.uk (services)
The volume depends both on the system and on the telephone.
Increase the volume of the audio system, to
maximum if required, and increase the volume of
the telephone if necessary.
The ambient noise level has an influence on the quality of telephone
communication.
Reduce the ambient noise level (close the windows,
reduce the booster fan speed, slow down, ...).
-
Check that your telephone's Bluetooth
function is switched on.
Check in the telephone settings that it is
"visible to all".
FREQUENTLY ASKED QUESTIONS
QUESTION
ANSWER
SOLUTION
Some contacts are
duplicated in the list.
The options for synchronizing contacts are synchronizing the contacts
on the SIM card, the contacts on the telephone, or both. When both
synchronizations are selected, some contacts may be duplicated.
Select "Display SIM card contacts" or "Display
telephone contacts".
Contacts are not shown
in alphabetical order.
Some telephones offer display options. Depending on the settings
chosen, contacts can be transferred in a specific order.
Modify the display setting in the telephone
directory.
The system does not receive
SMS text messages.
The Bluetooth mode does not permit sending SMS text messages to the
system.
The CD is ejected
automatically or is not
played by the player.
The CD is inserted upside down, is unplayable, does not contain any
audio data or contains an audio format which the player cannot play.
The CD has been recorded in a format that is not compatible with the
player (udf, ...).
The CD is protected by an anti-pirating protection system which is not
recognised by the audio system.
-
Check that the CD is inserted in the player the right
way up.
Check the condition of the CD: the CD cannot be
played if it is too damaged.
Check the content in the case of a recorded CD:
refer to the information and advice in the "MUSIC
MEDIA PLAYERS" section.
The audio system's CD player does not play DVDs.
Some recorded CDs will not be played by the audio
system because they are not of the correct quality.
There is a long waiting
period following the insertion
of a CD or connection of a
USB memory stick.
When a new medium is inserted, the system reads a certain amount of
data (directory, title, artist, etc.). This may take from a few seconds to a
few minutes.
This phenomenon is normal.
The CD player sound is
poor.
The CD used is scratched or of poor quality.
Insert good quality CDs and store them in suitable
conditions.
The audio equipment settings (bass, treble, ambiences) are unsuitable.
Set the treble or bass level to 0, without selecting
an ambience.
305
FREQUENTLY ASKED QUESTIONS
QUESTION
ANSWER
SOLUTION
Some characters in the
media information are not
displayed correctly while
playing.
The audio system does not display some types of characters.
Use standard characters to name tracks and
folders.
Playing of streaming files
does not start.
The peripheral device connected does not support automatic play.
Start the playback from the device.
The names of tracks and
the track length are not
displayed on the screen
when streaming audio.
The Bluetooth profile does not allow the transfer of this information.
The quality of reception
of the radio station
listened to gradually
deteriorates or the stored
stations do not function
(no sound, 87.5 Mhz is
displayed...).
The vehicle is too far from the transmitter used by the station listened
to or there is no transmitter in the geographical area through which the
vehicle is travelling.
Activate the "RDS" function by means of the
short-cut menu to enable the system to check
whether there is a more powerful transmitter in the
geographical area.
The environment (hills, buildings, tunnels, basement car parks...) block
reception, including in RDS mode.
This phenomenon is normal and does not indicate
a fault with the audio system.
The aerial is absent or has been damaged (for example when going
through a car wash or into an underground car park).
Have the aerial checked by a PEUGEOT dealer.
I cannot find some radio
stations in the list of
stations received.
The name of the radio
station changes.
306
The station is not received or its name has changed in the list.
Some radio stations send other information in place of their name (the
title of the song for example).
The system interprets this information as the name of the station.
FREQUENTLY ASKED QUESTIONS
QUESTION
In changing the setting
of treble and bass the
equalizer setting is
deselected.
ANSWER
SOLUTION
The selection of an equalizer setting imposes the balance settings.
Modifying one without the other is not possible.
Modify the balance or equalizer settings to obtain
the desired musical ambience.
The selection of a distribution setting imposes the balance settings.
Modifying one without the other is not possible.
Modify the balance or distribution settings to
obtain the desired musical ambience.
For optimum sound quality, the audio settings for Volume, Bass, Treble,
Equalizer and Loudness can be adapted to the different sound sources,
which may result in audible differences when changing source (radio,
CD...).
Check that the audio settings for (Volume, Bass,
Treble, Equalizer, Loudness) are adapted to
the sources listened to. It is advisable to set the
AUDIO functions (Bass, Treble, Fr-Re balance,
Le-Ri balance) to the middle position, select the
"None", musical ambience and set the loudness
correction to the "Active" position in CD mode or
to the "Inactive" position in radio mode.
In changing the equalizer
setting, treble and bass
return to zero.
When changing the
balance settings, the
distribution setting is
deselected.
When changing an
distribution setting,
the balance setting is
deselected.
There is a difference in
sound quality between
the different audio
sources (radio, CD...).
307
FREQUENTLY ASKED QUESTIONS
QUESTION
ANSWER
With the engine off, the
system switches off after
a few minutes of use.
When the engine is switched off, the system's operating time depends on
the battery charge.
The switch-off is normal: the system switches to economy mode and
switches off to prevent discharging of the vehicle's battery.
Start the vehicle's engine to increase the battery
charge.
Playback of my USB
memory stick starts only
after a very long wait
(around 2 to 3 minutes).
Some files supplied with the memory stick may greatly slow down access
to reading the memory stick (multiplication by 10 of the catalogue time).
Delete the files supplied with the memory stick
and limit the number of sub-folders in the file
structure on the memory stick.
When I connect my
iPhone as telephone and
to the USB port at the
same time, I am unable
to play the music files.
When the iPhone connects automatically as a telephone, it forces the
streaming function. The streaming function takes the place of the USB
function which is then not useable, there is a period without sound of the
track being played with Apple® players.
Disconnect and reconnect to the USB port (the
USB function takes priority over streaming).
When I connect my
Apple® player or my
BlackBerry® to the
USB port, I have alert
messages on the current
consumption by the USB
port.
When charging, the current consumption of these smartphones is greater
than the rating of the USB port, which is 500mA.
308
SOLUTION
PEUGEOT Connect Sound (RD5)
AUDIO SYSTEM / BLUETOOTH®
CONTENTS
Your PEUGEOT Connect Sound (RD5) is coded in such
a way that it will only operate in your vehicle.
For safety reasons, the driver must only carry out
operations which require prolonged attention while the
vehicle is stationary.
When the engine is switched off and to prevent
discharging of the battery, the audio equipment may
switch off after a few minutes.
01 First steps
02 Steering mounted controls
03 Main menu
04 Audio
05 PEUGEOT Connect USB
06 Bluetooth
07 Screen menu map(s)
Frequently asked questions
p.
p.
p.
p.
p.
p.
p.
p.
310
311
312
313
317
320
323
326
309
01 FIRST STEPS
Select source:
radio, audio CD / MP3 CD, USB,
Jack connection, Streaming,
AUX.
Selection of AM / FM / DAB*
wavebands.
* Depending on model.
Audio settings: front/
rear fader, left/right
balance, bass/treble,
loudness, audio
ambiences.
Display the list of
local stations.
Long press: CD
tracks or MP3
folders (CD / USB).
Abandon the current
operation.
TA (Traffic Announcements)
on/off.
Long press: PTY* (radio
Programme TYpe) mode.
Eject CD.
* Available according to version.
Select the screen display
mode:
Date, audio functions, trip
computer, telephone.
Automatic frequency search
down/up.
Select previous/next CD, MP3
or USB track.
On/off, volume setting.
Confirm.
The DARK button changes the screen display
for improved driving comfort at night.
1st press: upper bar only illuminated.
2nd press: black screen.
3rd press: return to standard display.
310
Buttons 1 to 6:
Select a pre-set radio station.
Long press: pre-set a station.
Display main menu.
Select next frequency down/up.
Select previous/next MP3 folder.
Select previous/next folder / genre /
artist / playlist (USB).
02 STEERING MOUNTED CONTROLS
Radio: automatic search for a higher frequency.
CD / MP3 / USB: selection of the next track.
CD / USB: continuous press: fast forwards play.
Move in the list.
Radio: select the previous/next pre-set
station.
USB: select genre / artist / folder from the
classification list.
Select the previous/next item in a menu.
Change audio source.
Confirm a selection.
Call/end call on the telephone.
Press for more than 2 seconds:
telephone main menu.
Radio: automatic search for a lower
frequency.
CD / MP3 / USB: selection of the
previous track.
CD / USB: continuous press: fast
reverse.
Move in the list.
Volume increase.
Volume decrease.
Mute: press the volume
increase and decrease
buttons simultaneously.
The sound is restored
by pressing one of the
two volume buttons.
311
03 MAIN MENU
Screen C
AUDIO FUNCTIONS:
radio, CD, USB, options.
VEHICLE DIAGNOSTICS:
alert log.
TELEPHONE:
hands-free kit, pairing,
management of a call.
PERSONALISATIONCONFIGURATION:
vehicle parameters,
display, languages.
For a detailed global view of the
menus available, refer to "Screen
menu map" in this section.
312
04 AUDIO
Radio
Selecting a station
Press the SOURCE button several
times in succession and select the
radio.
Press the BAND AST button to select
a waveband: FM1, FM2, FMast, AM.
Briefly press one of the buttons to
carry out an automatic search of the
radio stations.
Press one of the buttons to carry out
a manual search up / down for radio
frequencies.
Press the LIST REFRESH button to
display the list of stations received
locally (30 stations maximum).
To update this list, press for more
than two seconds.
The external environment (hills, buildings, tunnels, basement car parks, ...) may
block reception, including in RDS mode. This is a normal effect of the way in which
radio waves are transmitted and does not indicate any failure of the audio system.
RDS
Press the MENU button.
Select AUDIO FUNCTIONS then
press OK.
Select the FM WAVEBAND
PREFERENCES function then
press OK.
Select ACTIVATE RDS then press
OK. RDS appears on the screen.
In radio mode, press OK directly to activate / deactivate RDS
mode.
The RDS, if displayed, enables you to continue listening to the same
station by automatic retuning to alternative frequencies. However, in certain
conditions, coverage of an RDS station may not be assured throughout the
country as radio stations do not cover 100 % of the territory. Under conditions
of very weak reception, the system may change to a regional station.
313
04 AUDIO
Receiving TA messages
The TA (Traffic Announcement) function gives priority to TA alert
messages. To operate, this function needs good reception of a
radio station transmitting this type of message. When a traffic
report is transmitted, the current audio source (Radio, CD, ...) is
interrupted automatically to play the TA message. Normal playback
of the audio source resumes at the end of the transmission of the
message.
DAB (Digital Audio Broadcasting)
Digital radio
Digital radio provides a superior audio quality and also additional
categories of traffic announcements (TA INFO).
The different "multiplex services" offer a choice of radio stations in
alphabetical order.
Change band (FM1, FM2, DAB, ...)
Press the TA button to activate or
deactivate traffic messages.
Change of station within the same "multiplex service".
Start a search for the next "multiplex service".
Long press: select the desired categories of
announcements from Transport, News, Entertainment
and Flash special (availability according to the station).
When the radio station is displayed in the screen, press on "OK" to
display the contextual menu.
(Frequency hopping (RDS), DAB / FM auto tracking, RadioText
(TXT) display, Information on the station, ...)
314
04 AUDIO
Digital radio - DAB / FM tracking
"DAB" does not have 100% coverage of the country.
When the digital signal is weak, "DAB / FM auto tracking" allows you
to continue listening to the same station, by automatically switching
to the corresponding analogue "FM" station (if it exists).
CD
Playing a CD
Insert circular compact discs only.
Some anti-pirating systems, on original discs or CDs copied using a
personal recorder, may cause faults which are no reflection on the
quality of the vehicle's player.
Without pressing the EJECT button, insert a CD in the player, play
begins automatically.
Press the "Menu" button.
Select "Multimedia" and confirm.
To play a disc which has already been
inserted, press the SOURCE button
several times in succession and
select CD.
Select "DAB / FM auto tracking" and confirm
Press one of the buttons to select a
track on the CD.
If "DAB / FM auto tracking" is on, there will be a difference of a few
seconds in the programme when the system changes to analogue
"FM" radio, with sometimes a variation in volume.
When the strength of the digital signal is good again, the system
automatically switches back to "DAB"
If the "DAB" station you are listening to is not available on "FM"
("DAB/FM" option barred), or if "DAB / FM auto tracking" is not on,
the sound will be cut when the digital signal is too weak.
Press the LIST REFRESH button to display the list of tracks
on the CD.
Press and hold one of the buttons for
fast forwards or fast backwards.
315
04 AUDIO
MP3 CD
Playing an MP3 compilation
MP3 CD
Information and advice
Insert an MP3 compilation in the player.
The audio equipment searches for all of the music tracks, which
may take anything between a few seconds and several tens of
seconds, before play begins.
The MP3 format, an abbreviation of MPEG 1.2 & 2.5 Audio Layer 3,
is an audio compression standard which permits the recording of
several tens of music files on a single disc.
On a single disc, the CD player can read up to 255 MP3 files
spread over 8 folder levels. However, it is advisable to keep to
a limit of two levels to reduce the access time before the CD is
played.
While the CD is being played, the folder structure is not followed.
All of the files are displayed on a single level.
To play a disc which has already
been inserted, press the SOURCE
button several times in succession
and select CD.
Press one of the buttons to select a
folder on the CD.
Press one of the buttons to select a
track on the CD.
Press the LIST REFRESH button to display the list of directories of
the MP3 compilation.
Press and hold one of the buttons for
fast forward or backward play.
316
In order to be able to play a recorded CDR or CDRW, when
recording, the ISO 9660 level 1.2 or Joliet file format is
recommended.
If the disc is recorded in another format, it may not be played
correctly.
It is recommended that the same recording format is always used
for an individual disc, with as low a speed as possible
(4x maximum) for optimum sound quality.
In the particular case of a multi-session CD, the Joliet format is
recommended.
The audio system will only play files with the extension ".mp3" with
a sampling rate of 22.05 KHz or 44.1 KHz. No other type of file
(.wma, .mp4, .m3u...) can be played.
It is advisable to restrict file names to 20 characters without using
special characters (e.g. " ? ; ù) to avoid any playing or displaying
problems.
Empty CDs are not recognised and may damage the system.
05 PEUGEOT CONNECT USB
Using the PEUGEOT CONNECT USB
Connecting a USB memory stick
This unit consists of a USB port and an auxiliary
Jack socket*. The audio files are transmitted
from a portable device - digital player or a USB
memory stick - to your PEUGEOT Connect
Sound (RD5) and heard via the vehicle's
speakers.
USB memory stick (1.1, 1.2 and 2.0) or Apple®
player of generation 5 or later:
USB memory sticks should be formatted
FAT or FAT 32 (NTFS not supported),
the Apple® player lead is essential,
navigation through the file database is also
possible by means of the steering mounted
controls.
Other Apple® players of earlier generations and
players using the MTP protocol*:
play via Jack-Jack lead only (not supplied),
navigation through the file database is from
the portable device.
Connect the memory stick to the port, directly or
using a lead. If the audio equipment is switched
on, the USB source is detected as soon as it
is connected. Play begins automatically after a
delay which depends on the capacity of the
USB memory stick.
The file formats supported are .mp3 (mpeg1
layer 3 only) and .wma (standard 9 only,
128 kbits/sec compression).
Certain playlist formats are supported (.m3u, ...)
On reconnection of the previous memory stick
used, play is resumed automatically with the last
track played.
The system puts together playlists (temporary memory) created
over a period which depends on the capacity of the USB device.
The other sources are available during this time.
The playlists are updated each time the ignition is switched off or
each time a USB memory stick is connected.
When connecting for the first time, the classification suggested
is by folder. When you reconnect, the classification selected
previously is retained.
* According to vehicle.
317
05 PEUGEOT CONNECT USB
Using the PEUGEOT CONNECT USB
Press and hold LIST to display the
different classifications.
Select by Folder / Artist / Genre / Playlist,
press OK to select the classification
required, then press OK again to confirm.
-
by Folder: all folders containing audio
files recognised on the peripheral
device.
by Artist: all of the artist names
defined in the ID3 Tags, classified in
alphabetical order.
by Genre: all of the genres defined in
the ID3 Tags.
by Playlist: in accordance with the
playlists recorded on the USB device.
Press one of these buttons to gain
access to the previous / next track on
the classification list currently being
played.
Press and hold one of the buttons for
fast forward or backward play.
Press one of these buttons to
gain access to the previous / next
Genre, Folder, Artist or Playlist on
the classification list currently being
played.
Connecting an Apple® player via the USB port
The lists available are Artist, Genre and Playlist (as defined in
the Apple® player).
Selection and Navigation are described in steps 1 to 4 above.
Press LIST briefly to display the
previously selected classification.
Navigate through the list using the left/
right and up/down buttons.
Confirm the selection by pressing OK.
318
Do not connect a hard disk or USB connection device other
than audio equipment to the USB port. This could damage your
installation.
05 PEUGEOT CONNECT USB
Using the auxiliary input (AUX)
JACK socket or USB port (according to vehicle)
Adjusting the volume of the auxiliary source
The auxiliary input, JACK or USB, allows the connection of a
portable device (MP3 player...).
First adjust the volume of your portable device.
Do not connect a device to both the JACK socket and the USB
port at the same time.
Connect the portable device (MP3 player…)
to the JACK socket or to the USB port,
using a suitable cable (not supplied).
Press the SOURCE button several
times in succession and select AUX.
Then adjust the volume of your audio
system.
The display and control is via the portable device.
319
06 BLUETOOTH
Bluetooth telephone
Screen C
(Available according to model and version)
Pairing a telephone / First connection
The first 4 telephones recognised are displayed in this window.
For safety reasons and because they require prolonged attention
on the part of the driver, the operations for pairing of the Bluetooth
mobile telephone with the Bluetooth hands-free system of your
audio equipment must be carried out with the vehicle stationary
and the ignition on.
The TELEPHONE menu permits access to the following functions
in particular: Directory*, Call list, Pairing management.
Go to www.peugeot.co.uk for more information (compatibility,
more help, ...).
Select the telephone to be connected from the list. Only one
telephone can be connected at a time.
Activate the telephone's Bluetooth function
and ensure that it is "visible to all" (telephone
configuration.
A virtual keypad is displayed in the
screen: enter a code with at least 4 digits.
Confirm by pressing OK.
Press the MENU button.
In the menu, select:
Bluetooth telephone function Audio
Bluetooth configuration
Perform a Bluetooth search
A window is displayed with a message that a search is in progress.
320
The services offered depend on the network, the SIM card and the
compatibility of the Bluetooth equipment used.
Consult your telephone's manual and your operator to find out which
services are available to you.
* If your telephone is fully compatible.
A message is displayed in the screen of the
telephone chosen. To accept the pairing, enter the
same code on the telephone, then confirm with OK.
If pairing fails, the number of attempts is not limited.
A message that the pairing has been successful appears in the
screen.
The automatic connection authorised is only active after the
telephone has been configured.
The directory and the call list can be accessed after the
synchronisation period.
06 BLUETOOTH
Receiving a call
An incoming call is announced by a ring and a superimposed
display in the vehicle's screen.
Select the YES tab on the display
using the buttons and confirm by
pressing OK.
Press this button to accept the call.
Making a call
From the Bluetooth telephone function Audio menu, select Manage
the telephone call then Call, Call list or Directory.
Press this button for more than two seconds for
access to your directory, then navigate with the
thumb wheel.
Or
To dial a number, use your telephone's keypad,
with the vehicle stationary.
The system accesses the telephone's contacts directory, depending
on compatibility, and while the Bluetooth connection with it is
maintained.
With certain telephones connected by Bluetooth you can send a
contact to the directory of the audio system.
Contacts imported in this way are saved in a permanent directory
visible to all, whatever the telephone connected.
The menu for the directory is not accessible if it is empty.
321
06 BLUETOOTH
Bluetooth audio streaming*
Ending a call
During a call, press this button for more than
2 seconds.
Confirm with OK to end the call.
Wireless transmission of music files on the telephone, played via
the audio equipment. The telephone must be able to manage the
appropriate Bluetooth profiles (Profiles A2DP / AVRCP).
Initiate the pairing between the telephone and
the vehicle. This pairing can be initiated from
the vehicle's telephone function menu or via the
telephone's keypad. Refer to the steps in "Pairing
a telephone" on the previous pages. During the
pairing phase, the vehicle must be stationary with
the key in the ignition.
Select the telephone to be connected from the telephone function
menu.
The audio system connects to a newly paired telephone automatically.
Activate the streaming source by
pressing the SOURCE button**.
The tracks to be played can be
controlled as usual via the buttons on
the audio system control panel and
the steering mounted controls***.
The contextual information can be
displayed on the screen.
* Depending on the compatibility of the telephone.
** In certain cases, playing of the Audio files must be initiated from the
keypad.
*** If the telephone supports the function.
322
07 SCREEN MENU MAP(S)
Screen C
Press the OK dial for access to short-cut menus according
to the display in the screen:
RADIO
1
1
1
activate / deactivate RDS
1
activate / deactivate REG mode
activate / deactivate radiotext
1
1
CD / MP3 CD
USB
activate / deactivate Intro
activate / deactivate track repeat (of the
current folder / artist / genre / playlist)
activate / deactivate track repeat (the
entire current CD for CD, the entire
current folder for MP3 CD)
activate / deactivate random play (the
entire current CD for CD, the entire
current folder for MP3 CD)
1
activate / deactivate random play (of the
current folder / artist / genre / playlist)
1
323
07 SCREEN MENU MAP(S)
Screen C
Audio functions
1
FM waveband settings
2
Alternative frequencies (RDS)
3
4
Regional mode (REG)
3
4
activate / deactivate
Radio-text information (RDTXT)
3
4
activate / deactivate
Play modes
2
3
4
3
4
324
activate / deactivate
Album repeat (RPT)
activate / deactivate
Track random play (RDM)
activate / deactivate
Pressing the MENU button displays:
1
2
Vehicle diagnostics
Alert log
07 SCREEN MENU MAP(S)
Personalisation-Configuration
1
Define the vehicle settings*
2
Display configuration
2
Video brightness adjustment
3
4
4
4
Bluetooth configuration
2
Connect/Disconnect an equipment
3
Telephone function
3
normal video
Audio Streaming function
3
inverse video
4
brightness (- +) adjustment
4
Date and time adjustment
3
4
4
4
4
day/month/year adjustment
hour/minute adjustment
choice of 12 h / 24 h mode
4
4
l/100 km - mpg - km/l
°Celsius / °Fahrenheit
Choice of language
Consult the paired equipment
Delete a paired equipment
Perform a Bluetooth search
Call
2
Calls list
3
4
Choice of units
3
2
Bluetooth telephone
1
2
3
3
Directory
Manage the telephone call
Terminate the current call
Activate secret mode
* The parameters vary according to vehicle.
325
FREQUENTLY ASKED QUESTIONS
QUESTION
ANSWER
SOLUTION
There is a difference in
sound quality between
the different audio
sources (radio, CD...).
For optimum sound quality, the audio settings (Volume, Bass, Treble,
Ambience, Loudness) can be adapted to the different sound sources,
which may result in audible differences when changing source (radio,
CD...).
Check that the audio settings (Volume, Bass,
Treble, Ambience, Loudness) are adapted to
the sources listened to. It is advisable to set
the AUDIO functions (Bass, Treble, Front-Rear
Balance, Left-Right Balance) to the middle
position, select the musical ambience "None" and
set the loudness correction to the "Active" position
in CD mode or to the "Inactive" position in radio
mode.
The CD is ejected
automatically or is not
played by the player.
The CD is inserted upside down, is unplayable, does not contain any
audio data or contains an audio format which the player cannot play.
The CD is protected by an anti-pirating protection system which is not
recognised by the audio equipment.
-
The message "USB
peripheral error" is
displayed on the screen.
The Bluetooth connection
is cut.
326
Check that the CD is inserted in the player the
right way up.
Check the condition of the CD: the CD cannot
be played if it is too damaged.
Check the content in the case of a recorded
CD: consult the advice in the "Audio" section.
The audio equipment's CD player does not
play DVDs.
Due to their quality level, certain writeable
CDs will not be played by the audio system.
The battery of the peripheral may not be sufficiently charged.
Recharge the battery of the peripheral device.
The USB memory stick is not recognised.
The memory stick may be corrupt.
Reformat the memory stick.
FREQUENTLY ASKED QUESTIONS
QUESTION
ANSWER
SOLUTION
I am unable to access my
voicemail.
Few telephones or service providers allow the use of this function.
The CD player sound is
poor.
The CD used is scratched or of poor quality.
Insert good quality CDs and store them in suitable
conditions.
The audio equipment settings (bass, treble, ambiences) are unsuitable.
Set the treble or bass level to 0, without selecting
an ambience.
The stored stations do
not function (no sound,
87.5 Mhz is displayed...).
An incorrect waveband is selected.
Press the BAND AST button to return to the
waveband (AM, FM1, FM2, FMAST) on which the
stations are stored.
The traffic announcement
(TA) is displayed. I do
not receive any traffic
information.
The radio station is not part of the regional traffic information network.
Tune to a radio station which broadcasts traffic
information.
The quality of reception
of the radio station
listened to gradually
deteriorates or the stored
stations do not function
(no sound, 87.5 Mhz is
displayed...).
The vehicle is too far from the transmitter used by the station listened
to or there is no transmitter in the geographical area through which the
vehicle is travelling.
Activate the RDS function to enable the system
to check whether there is a more powerful
transmitter in the geographical area.
The environment (hills, buildings, tunnels, basement car parks...) block
reception, including in RDS mode.
This phenomenon is normal and does not indicate
a failure of the audio equipment.
The aerial is absent or has been damaged (for example when going
through a car wash or into an underground car park).
Have the aerial checked by a PEUGEOT dealer.
327
FREQUENTLY ASKED QUESTIONS
QUESTION
ANSWER
SOLUTION
Sound cut-outs of 1 to
2 seconds in radio mode.
During this brief sound cut-out, the RDS searches for any frequency
permitting better reception of the station.
Deactivate the RDS function if the phenomenon is
too frequent and always on the same route.
With the engine off,
the audio equipment
switches off after a few
minutes of use.
When the engine is switched off, the audio equipment operating time
depends on the battery charge.
The switch-off is normal: the audio equipment switches to economy mode
and switches off to prevent discharging of the vehicle's battery.
Start the vehicle's engine to increase the battery
charge.
The message "the audio
system is overheated"
appears on the display.
In order to protect the installation if the surrounding temperature is too
high, the audio equipment switches to an automatic thermal protection
mode leading to a reduction of the volume or stopping of the playing of
the CD.
Switch the audio system off for a few minutes to
allow the system to cool.
328