1
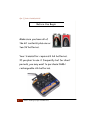
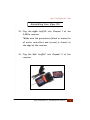
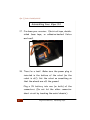
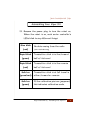
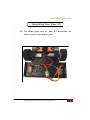
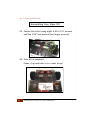
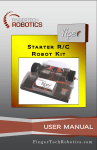
Vipe r S ta r t e r R / C Ro b o t K i t USER MANUAL FingerTechRobotics.com Viper | Starter Combat Robot Kit TABLE OF CONTENTS 2 Kit Contents 3 Tools Required 4 Safety 5 Before You Begin 8 Assembling Your Viper Kit 10 Binding Your Radio 24 Construction Tips 25 Moving Forward 27 More Ideas 29 Troubleshooting 31 Table of Contents | FingerTech Robotics Starter Combat Robot Kit | Viper KIT CONTENTS 1 2.4GHz Transmitter 1 2.4GHz Receiver and Bind Plug 1 Aluminum Chassis 2 FingerTech “Spark” Gearmotors 2 FingerTech “tinyESC” Motor Controllers 2 Foam Rubber Wheels 2 FingerTech “Lite Hubs” 1 Power Jack and Plug 1 Polycarbonate Lid 4 2-56x3/16” screws 8 4-40x1/4" screws 2 4-40 setscrews 1 0.050” hex wrench 1 1/16” hex wrench 3 Black heatshrink pieces FingerTech Robotics | Kit Contents 3 Viper | Starter Combat Robot Kit Tools Required 4 Soldering iron & solder “Helping Hands” alligator clip soldering aid Heat gun CA or Gorilla super glue Electrical tape or adhesive-backed velcro One or two 9V batteries Pliers Tools Required | FingerTech Robotics Starter Combat Robot Kit | Viper Safety The Viper kit itself does not pose much hazard beyond pinched fingers. As you surely will be adding new parts and upgrades in the future, it is important to know how to safely handle them. Batteries, motors and electronics each have their own dangers. If you are unsure how to safely handle them, ask someone who knows! Take every precaution when building your robots Have the robot's wheels off the ground before turning it on the first time. If settings are wrong the robot may drive right at you. Always make sure you have full control before doing a drive test. FingerTech Robotics | Safety 5 Viper | Starter Combat Robot Kit Safety For you combat enthusiasts: Building combat robots can be dangerous! Wear safety glasses, hearing protection, and a dust mask when necessary. Make sure a responsible adult is present when building and operating your robot. It is a fact that more builders get injured in the construction process than during the combat tournament. 6 Safety | FingerTech Robotics Starter Combat Robot Kit | Viper Safety Never test a combat robot's weapon unless it is clamped tight and unable to move. When you do activate it, stand behind a protective shield. A large sheet of wood with a polycarbonate window is best. Events must be run with strict rules to keep competitors and spectators safe, but it is up to you to keep your work area safe. Keeping yourself in the game is rule #1! 7 Viper | Starter Combat Robot Kit Before You Begin Make sure you have all of the kit contents plus one or two 9V batteries. Your transmitter requires 8 AA batteries. If you plan to use it frequently but for short periods, you may want to purchase NiMH rechargeable AA batteries. 8 Before You Begin| FingerTech Robotics Starter Combat Robot Kit | Viper Before You Begin Suggestion It is recommended to read through all of the instructions to familiarize yourself before starting. FingerTech Robotics | Assembling Your Viper Kit 9 Viper | Starter Combat Robot Kit Assembling Your Viper Kit 1. Melt a bit of solder onto each motor terminal. This is called “tinning” and makes soldering easier. tinyESC wires The come pre-tinned. 2. Solder the brown M2 wire of one tinyESC to one motor’s red terminal. Solder the red M1 wire to the motor’s second terminal. This will be the left motor. 3. Solder the red M1 wire of the other tinyESC to the right motor’s re d - do t te rm ina l. Solder the brown M2 wire to the motor’s other terminal. 10 Assembling Your Viper Kit| FingerTech Robotics Starter Combat Robot Kit | Viper Assembling Your Viper Kit 4. Tin the three terminals of the power jack. 5. Slide a heatshrink piece over the four black wires (one from each tinyESC and one from each 9V battery connector). 6. Clamp all four wires close beside each other in the “Helping Hands” alligator clip and solder them together. It helps to clamp the wires so that they naturally bunch together. Now solder them to the lead of the power jack closest to the plug. (This is the trickiest part so take your time.) FingerTech Robotics | Assembling Your Viper Kit 11 Viper | Starter Combat Robot Kit Assembling Your Viper Kit 7. Slide a heatshrink piece over the two red wires of the 9V battery connectors. Clamp them in the alligator clip and solder them together. Now solder them to the middle lead of the power jack. 8. Slide a heatshrink piece over the two red wires of the tinyESC’s. Clamp them alligator in clip the and solder them together. Now solder them to the top lead of the power jack. 12 Assembling Your Viper Kit| FingerTech Robotics Starter Combat Robot Kit | Viper Assembling Your Viper Kit 9. Use a heat gun, lighter, or soldering iron to shrink all three heatshrink pieces over the solder joints. 10. Slide the left motor into the left motor mount hole, and the right motor into the right motor mount hole. FingerTech Robotics | Assembling Your Viper Kit 13 Viper | Starter Combat Robot Kit Assembling Your Viper Kit 11. Tighten the motors into place with four 2-56x3/16” screws using the 0.050” (smaller) hex wrench. Have the motor wires angle towards the front of the robot. 12. Tighten the power jack onto the baseplate using its finger-nut. Pliers can help get it really tight. 14 Assembling Your Viper Kit| FingerTech Robotics Starter Combat Robot Kit | Viper Assembling Your Viper Kit 13. Press the Lite Hubs part-way into the wheels. If they do not fit in at all, use a 5/32” drill bit to ream out the wheel’s bore. Do not force the hubs. They have a thin wall and may snap. Put a small dab of CA or Gorilla super glue onto the shaft of one Lite Hub. Quickly turn the wheel over and press it down onto the hub. Repeat for the other wheel and hub. FingerTech Robotics | Assembling Your Viper Kit 15 Viper | Starter Combat Robot Kit Assembling Your Viper Kit 14. Slide the wheels onto the motor shafts. Use one 4-40 setscrew in each hub to lock the hubs in place on the shafts. Tighten with the 0.050” (smaller) hex wrench. Be sure that the setscrew tightens onto the flat side of the motor shaft. This will make sure the wheel cannot spin on the shaft. 16 Assembling Your Viper Kit| FingerTech Robotics Starter Combat Robot Kit | Viper Assembling Your Viper Kit 15. Plug the right tinyESC into Channel 1 of the 2.4GHz receiver. *Make sure the ground wire (black or brown for all motor controllers and servos) is closest to the edge of the receiver. 16. Plug the left tinyESC into Channel 2 of the receiver. FingerTech Robotics | Assembling Your Viper Kit 17 Viper | Starter Combat Robot Kit Assembling Your Viper Kit 17. Fix down your receiver. Electrical tape, doublesided foam tape, or adhesive-backed Velcro work well. 18. Time for a test! Make sure the power plug is inserted in the bottom of the robot (so the robot is off). Set the robot on something so that the wheels are off the ground. Plug a 9V battery into one (or both) of the connectors. (Do not let the other connector short circuit by touching the metal chassis.) 18 FingerTech Robotics | Assembling Steps Starter Combat Robot Kit | Viper Assembling Your Viper Kit 19. Remove the power plug to turn the robot on. When the robot is on, each motor controller’s LEDs blink to say different things: Slow blink (red) Rapid blink (green) Rapid blink (red) Solid on (green/red) No data coming from the radio (see troubleshooting) Transmitter stick is in the forward half of its travel Transmitter stick is in the reverse half of its travel Transmitter stick is at full travel in either forward or reverse Solid on If the calibration pins are jumpered, (green) this indicates calibration mode. FingerTech Robotics | Assembling Your Viper Kit 19 Viper | Starter Combat Robot Kit Assembling Your Viper Kit 20. With the robot facing away from you, move the right stick up. Both motors should turn forward. Moving the stick to the right should reverse the right motor and vice versa for the left. If either motor turns the wrong way, see the troubleshooting section. If the motors are spinning while not pressing the transmitter sticks, adjust the Trim levers on the transmitter (located just beside the stick) until the motors stop. Trims are for fine adjustments. 21. When everything is running correctly, turn the robot off by reinserting the power plug. Don’t forget to turn the transmitter off too. 20 Assembling Your Viper Kit| FingerTech Robotics Starter Combat Robot Kit | Viper Assembling Your Viper Kit 22. Fix down your one or two 9V batteries on either side of the power jack. Assembling Your Viper Kit| FingerTech Robotics 21 Viper | Starter Combat Robot Kit Assembling Your Viper Kit 23. Fasten the lid on using eight 4-40 x 1/4” screws and the 1/16” hex wrench (the larger wrench). 24. Your kit is complete! Power it up and take it for a test drive! 22 Assembling Your Viper Kit| FingerTech Robotics Starter Combat Robot Kit | Viper Assembling Your Viper Kit Safety Remember to Note always turn the transmitter on before powering on the robot, and always turn the transmitter off after powering down the robot. This way any spurious transmissions picked up by the receiver will not cause the robot to twitch. FingerTech Robotics | Assembling Your Viper Kit 23 Viper | Starter Combat Robot Kit Binding Your Radio This process is already done for you, but for future robots it is good to know how to bind your transmitter to more receivers. The 2.4GHz radio set included with your kit does not use crystals to pair the receiver to the transmitter like older radios. Instead they are “bound” together by programming. To bind, insert the included “bind plug” into the BATtery port of the receiver. Power on the receiver by removing the robot’s power plug. A dim red LED inside the receiver will start flashing. Holding the BIND button on the transmitter, turn on the transmitter, and wait for the red LED inside the receiver to go from flashing to solid-on. Remove the bind plug and it’s done! 24 Assembling Your Viper Kit| FingerTech Robotics Starter Combat Robot Kit | Viper Construction Tips Adding Active Devices Your radio transmitter has four channels besides the two for drive that you can use to control additional active devices. Use your imagination! You can add servos, motors, or switches that activate lights, solenoids, water pumps, electromagnets, almost anything! Some combat robot events have added “Sportsman” weight classes that require active weapons. This is defined as “a weapon or device intended for use in attacking the opponent, independent of the robot drive train.” These include but are not limited to lifters, hammers, clamps, flame weapons and spinning weapons. Contruction Tips | FingerTech Robotics 25 Viper | Starter Combat Robot Kit Construction Tips Upgrades Larger wheels, lower ratio gearmotors, and higher voltage batteries will speed up the robot. Lipoly batteries can source more current for power-hungry weapon motors and servos. Combat Armor If you are attending a combat event that features opponents with weapons (most do), you will want some extra protection against them. Aluminum makes good lightweight armor. Steel is better but heavy. Titanium is strong like steel but light like aluminum. Carbon fibre is an excellent material for its stiffness, as is garolite. Plastic such as lexan (polycarbonate) or UHMW (polyethylene) are easy to work with. Find these upgrade parts and armor materials at www.FingerTechRobotics.com 26 FingerTech Robotics | Contruction Tips Starter Combat Robot Kit | Viper Moving Forward The ROBOT FIGHTING LEAGUE Delphi Forum The where Delphi forum builders is from across the globe discuss robot designs, share progress reports, ask questions, and find out about combat robot events all over the world. Signing up for a free Delphi membership is not required, but highly recommended! http://forums.delphiforums.com/THERFL/ The ROBOT FIGHTING LEAGUE Facebook Page A more public page to see upcoming events and progress reports is the RFL facebook page. Submit your own Viper pictures! http://www.facebook.com/BotLeague FingerTech Robotics | Moving Foward 27 Viper | Starter Combat Robot Kit Moving Forward For More Information: Here is a list of some other online forums and websites dedicated to hobby robotics. Society of Robots http://www.societyofrobots.com Lets Make Robots! http://letsmakerobots.com Trossen Community http://forums.trossenrobotics.com Parallax Forums http://forums.parallax.com/forums Robots.net http://robots.net Servo Magazine Forum http://forum.servomagazine.com 28 Moving Foward | FingerTech Robotics Starter Combat Robot Kit | Viper More Ideas Race Car Wall Follower Gripper Arm Photovore Room Mapper Omnidrive Bot 29 Viper | Starter Combat Robot Kit More Ideas 30 Art Bot Bulldozer Soccer Bot Fire Fighter Sumo Robot Battlebot Starter Combat Robot Kit | Viper Troubleshooting Problem Solution Motor controller LED is blinking slowly. Check that your transmitter is on. Try re-binding the receiver to the transmitter. Motor turning the wrong direction. Re-solder the motor wires to the opposite motor leads. Motor spins slowly when not holding transmitter stick. Adjust the Trim lever of the corresponding channel. No Response with power switched on. Make sure the bind plug is out of the receiver. Try re-binding the receiver to the transmitter. Batteries heating when plugged in. The battery leads may have been soldered red-to-black and vice versa, creating a short circuit. Batteries heating when power plug removed. Make sure the ground (black) wires are soldered to the bottom lead of the power connector. 31 Hands-on Innovation Motors and Servos Motor Controllers Connectors and Switches Wheels Radio Equipment Hardware Pulleys and Belts Battery Chargers Robot Kits FingerTechRobotics.com Questions or comments regarding our products or your purchase can be directed to [email protected]