1
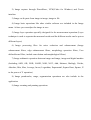
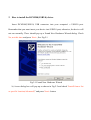
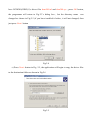
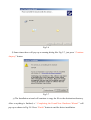
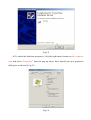
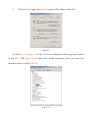
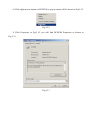
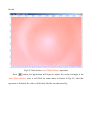
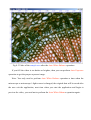
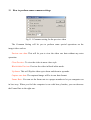
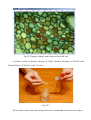
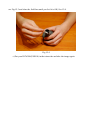
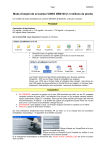
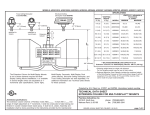
DCM300 User Manual
DCM300
DCM300 (3.0M pixels, USB2.0) Digital Camera for Microscope
1 DCM300 USB2.0
1.1 About DCM300(USB2.0)
DCM300(USB2.0) (Fig.1.1) is a digital camera professionally designed for
microscope. It works perfectly with all kinds of optical microscopes, such as biological
microscope, metallurgical microscope and stereomicroscope. The images of the
observed specimen or samples can be genuinely displayed on the computer screen. The
powerful advanced software ScopePhoto included with the camera ensures simple and
convenient operation on the images captured from microscope.
Fig.1.1 DCM300(USB2.0)
Properties
DCM300(USB2.0) Specifications
Image Sensor
1/2” Color 3M CMOS
Pixel Size
3.2µm×3.2µm
Resolution
Hardware 2048×1536
Preview Video Size 800X600, 1024X768, 1280X1024, 1600X1200, 2048X1536.
Frame Rate
Maximum 4-6f/s @2048×1536
Sensitivity
0.90V/lux-sec@550nm
Spectral response
380nm~1000nm
Exposure Method
ERS(Electronicrolling snap)
White Balances
Auto/Manual
Auto Exposure Ctrl
Auto/Manual
Image Output
USB2.0,480Mb/s
Power
USB2.0 connector
Dynamic Range
70dB
Programme Ctrl
Image size, brightness, gain, exposure time
Temperature Range
-10°C~55°C
View field
Inscribed rectangle of Ф18 mm
Usage
Ocular-tube or photo-tube on microscope
File format
BMP, TIFF, JPG, PICT, SFTL etc.
Interface
USB, hot plug and thrust, a USB cable of length 1.5m
System requirement Windows 2000 / XP; USB porte
Software
Driver,MiniSee, ScopePhoto
Weight
4.8 oz without eyepiece adapter
Camera size
Cylinder shape, Ф60 mm
Camera body
Blackened metal body of cylinder shape
1.2 Features:
DCM300 employs newly designed optical system of fully coated, based on MTF
(modulation Transfer Function) analysis, for improved image flatness and contrast. The
images are brighter and distinct even at the periphery of the field of view. It offers
excellent performance when combined with plan-achromatic objectives system.
Especially, this system is designed for microscope and matches the specific characters
of microscope, such as the field of view of eyepiece WF10X-18mm and the
parfocalization of objectives.
DCM300 has a wide field, which matches microscope’s field of view 18mm.
For any observation head from microscope, i.e. monocular head, binocular head or
trinocular head, DCM300 can be inserted directly into the ocular-tube or the photo-tube.
With the adaptor Φ30mm or the adaptor Φ30.5mm included, it is also workable on a
stereomicroscope. The operation is so simple that it can works perfectly with all kinds
of microscopes.
If the microscope adapted with DCM300 is earthed definitely, the metal body of
DCM300 ensures wonderful anti-interference.
Based on the consideration of the color temperature of microscope illumination, the
design makes it offer very good color fidelity. The captured image is available with true
color.
Note: All detailed function should refer to the software ScopePhoto, SCOPETEK
has the rights to change the function without notifications.
1.3 Introduction to ScopePhoto
ScopePhoto is an image processing software professionally designed for
SCOPETEK digital cameras, including DCM35, DCT35, DCM130, DCT130, DCM210
and DCT210, DCM300, DCT300. Except the basic image file operation and processing,
the ScopePhoto has the following characteristic specially designed for the scientific
analysis of the captured image through the camera or other image capture devices. The
main functions of the ScopePhoto are listed as follows( 9 I’s):
1) Image archival with data attachment (*.sft format, other formats are also
supported)
2) Image capture through DirectShow, VFW(Video for Window) and Twain
interface
3) Image cut & paste from image to image, image to file
4) Image basic operations like other similar software are included in the Image
menu. At here you can adjust the image at ease
5) Image layer operation specially designed for the measurement operation (Layer
technique is used to separate the measured results and the different results can be put on
different layers)
6) Image processing filter for noise reduction and enhancement (Image
enhancement filters, edge enhancement filters, morphology operation filters, User
defined kernel filter, include convolution and morphological filters)
7) Image arithmetic operation between image and image, image and digital number
(Including AND, OR, XOR, NAND, NOR, NOT, Add, Subtract, Multiply, Divide,
Absolute, Min, Max, Average, Invert, Logarithm, Exponential, Square Root, Square, X
to the power of Y operation)
8) Image pseudocolor, range, segmentation operations are also include in the
application
9) Image zooming and panning operations
2 How to install the DCM300(USB2.0) driver
Insert DCM300(USB2.0) USB connector into your computer’ s USB2.0 port.
Remember that you must insert your device into USB2.0 port; otherwise, the device will
not run normally. There should pop up a Found New Hardware Wizard dialog. Check
No, not this time and press Next>, See Fig.2.1
Fig 2.1 Found New Hardware Wizard
b) A new dialog box will pop up as shown in Fig.2.2 and check “Install from a list
or specific lacation(Advanced)” and press Next> button
Fig 2.2
c) A dialog box for “Please choose your search and installation options” will pop up
as shown in Fig.2.3 , check “Include this location in the search ”, and press “Browse”
button
Fig 2.3
d) Choose the proper directory in the “Browse For Folder” dialog box in Fig.2.4 that
have DCM300(USB2,0)’s driver files dcm300.inf and dcm300.sys , press OK button,
the programme will return to Fig.2.3’s dialog box , but the directory name
was
changed as shown in Fig.2.5 (if you have installed it before, it will not changed, then
just press Next> button
Fig 2.4
e) Press Next> button in Fig. 2.5, the application will begin to copy the driver files
to the destination folder as shown in Fig.2.6
Fig 2.5
Fig 2.6
f) Some times there will pop up a warning dialog like Fig.2.7, just press “Continue
Anyway” button
Fig 2.7
g) The Installation wizard will continue to copy the file to the destination directory.
After everything is finished, a “ Completing the Found New Hardware Wizard ” will
pop up as shown in Fig.2.8. Press “Finish” button to end the driver installation.
Fig.2.8
h) To check the hardware properties, click the right mouse button on My computer
icon and select “Properties” from the pop up menu, there should pop up a properties
dialog box as shown in Fig.2.9
Fig.2.9
i)
Click Hardware page, the Hardware page will be shown in Fig.2.10
Fig.2.10
j) Click Device Manager-> in Fig.2.10, a new dialog box will be pop up as shown
in Fig 2.11. Click Image Device fold, there should extend the device you have just
installed which is called DCM300.
Fig.2.11
k) Click right mouse button on DCM300, a pop up menu will be shown in Fig.2.12
Fig.2.12
l) Click Properties in Fig.2.12, you will find DCM300 Properties as shown in
Fig.2.13
Fig.2.13
3 How To start your DCM300(USB2.0)
a) Plug in your DCM300(USB2.0) into your computer’ s USB2.0 port. Remember
that you must insert your device into USB2.0 port, otherwise, the device will not run
normally.
b) Run ScopePhoto software you have installed.
c) Click
button on
toolbar, a video window
with black background will be shown as in Fig 3.1
Fig 3.1 Video window with black background
d) Select menu Device->DCM300 (USB2.0), this will start the video stream from
the DCM300 (USB2.0) device , then the video window will display the video for
preview as shown in Fig 3.2.
Fig 3.2 The Video stream after DCM300(USB2.0) is started
4 How to set the Preview size
The hardware resolution for DCM300 (USB2.0) is 2048X1536. The DCM300
Supports 800X600, 1024X768, 1280X1024, 1600X1200, 2048X1536. You can change
the preview video size by menu Device->Size->800X600( or
1024X768, 1280X1024,
1600X1200, 2048X1536) according to what ever you want.
How ever, for the higher resolution size, your computer screen may not be able to
display
the
whole
video
size,
thus,
we
design
a
button
on
toolbar to let you to zoom the video
window to proper size to view the whole video.
5 How to stop the video preview operation?
Select Setup->Stop submenu will stop the video preview operation and the video
window will switch to Fig 3.1
6 How to view the video in Full Screen format
a) Press ESC will enter the full screen preview operation. Press ESC again will
restore the previous preview style.
b) Select menu Setup->Full Screen will also support the full screen preview
operation.
7 How to view your DCM300 hardware properties
Select Setup->View Property will pop up a dialog shown as in Fig.7.1. This dialog
box support multiple selection and Ctrl+C copy operation.
Fig.7.1 View Property dialog box
Note: Please read this section carefully and try to practise it according to the
specified procedure.
8 How to perform Auto White Balance operation
When you insert DCM300 into the trinocular head of the mecroscope, run
ScopePhoto, and begin to preview the video, the color of the video is often not
satisfactory, to get the true image from the microscope, you need to perform Auto
White Balance operation. After this operation is finished, then you can perform other
operation such as Auto Exposure etc.
Auto White Balance operation is an important operation and we design a special
menu Setup->Auto White Balance to let the user to perform the Auto White Balance
operation. You can also perform this operation by click
button on
toolbar.
The Auto White Balance will set the best Red, Green, Blue gain automatically.
Fig.8.1 Sample for observation
To perform this operation, you first need to move the black area of the slice in Fig
8.1 to the field of view, the video will look like Fig 8.2, we can find the video is a little
bit red.
Fig 8.2 Video before Auto White Balance operation
Press
button, the application will begin to adjust, the center rectangle is the
Auto White Balance area, it will flick for some times as shown in Fig 8.3, after this
operation is finished, the video will be look like the one shown in Fig
Fig 8.3 Video in the process of Auto White Balance operation
Fig 8.4 Video after Auto White Balance operation
After the Auto White Balance operation is finished, move the sample area of the
slice to the center of the objective lens field of view, the video will be look like Fig 8.5:
Fig 8.5 Video of the sample area after the Auto White Balance operation
If you fell the video is too darker or brighter, then you can perform Auto Exposure
operation to get the proper exposure image.
Note: You only need to perform Auto White Balance operation a time when the
microscope or microscope’s light source is changed, the original data will be saved after
the user exit the application, next time when you start the application and begin to
preview the video, you need not to perform the Auto White Balance operation again.
9 How to perform the Auto Exposure operation
To ensure the exact exposure of the sensor to get the normal image, we also design a
special menu Setup-Auto Exposure to let the user to perform the auto exposure
operation. You can also perform this operation by click
toolbar.
button on
10 How to adjust the video color
Fig 10.1 Color Adjust dialog box
If you perform Auto White Balance operation, the value in the Red, Green, Blue
gain edit boxes are the best ones. Fig 10.1 shows these values in Color Adjust dialog
box
Adjust the slide bars of each Red, Green, Blue gain to get the color of your video
window what ever you want. An advance adjustment can also be performed through the
adjustment of Gamma, Red Offset, Green offset and Blue offset.
11 How to perform some common settings
Fig 11.1 Common setting for the preview video
The Common Setting will let you to perform some special operations on the
image/video such as:
Preview raw data: This will let you to view the video raw data without any extra
operation.
Clear Preview: To view the video in more clear style.
Black/white Preview: Preview the video in black/white mode.
Up down: This will flip the video up to down and down to up mode.
Capture raw data: The captured image will be in raw data format.
Frame Rate: You can set the frame rate to a proper number to let you computer run
in best way. When you feel the computer is run with heavy burden, you can decrease
the Frame Rate to the right one.
12 How to clear the DCM300(USB2.0)
It is very important to keep the camera clean. For every camera, we design the
special mechanical structure to keep it clean. We also clear the sensor thoroughly before
we install the inside lens. However, because of the specialty of the camera, there is a
field lens at the front end to let the middle image light enter into camera, see Fig.12.1 .
If there are some defects on the field lens, there will be also some defects on the video
or image, see Fig.12.2,. Here we show you how to clear the field lens step by step.
Fig.12.1
Fig.12.2 Image with the some dusts on the field lens
a) Find a bottle of hybrid solution of Ethyl Alcohol Absolute (C2H5OH) and
Diethyl Ether ( (C2H5)2O ) with 1:3 ratio,
Fig.12.3
b)Use clean cotton with stick and put the above mentioned solution on the cotton ,
see Fig.12.3 and clear the field lens until you feel it is OK, See 12.4.
Fig.12.4
c) Put your DCM300(USB2.0) in the trinocular and take the image again