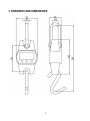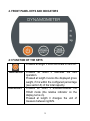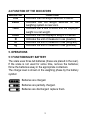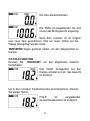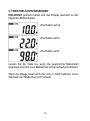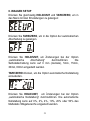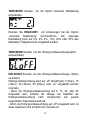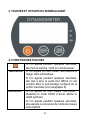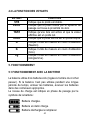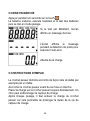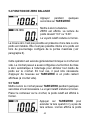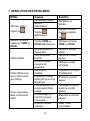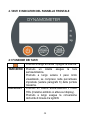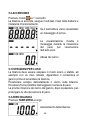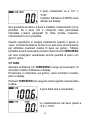
1
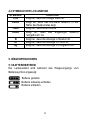
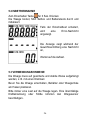
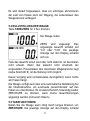
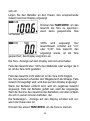
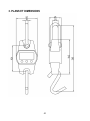
CRANE SCALES
KRANWAAGE
CROCHET PESEUR
DINAMOMETRI
DHS
USER MANUAL
BENUTZERHANDBUCH
NOTICE DE L’UTILISATEUR
MANUALE UTENTE
DHS_10.01_EN _DE_FR_IT
LANGUAGES
SPRACHEN
LANGUE
LINGUE
ENGLISH .................................................................................. 3
DEUTSCH............................................................................... 21
FRANCAIS.............................................................................. 39
ITALIANO ............................................................................... 54
2
ENGLISH
INDEX
1. INTRODUCTION................................................................... 4
2. MAIN TECHNICAL SPECIFICATIONS ................................ 6
3. DRAWINGS AND DIMENSIONS.......................................... 7
4. FRONT PANEL KEYS AND INDICATORS .......................... 8
4.1 FUNCTION OF THE KEYS ........................................... 8
4.2 FUNCTION OF THE INDICATORS ............................... 9
5. OPERATIONS....................................................................... 9
5.1 FUNCTIONING BY BATTERY ....................................... 9
5.2 START-UP .................................................................... 10
5.3 INSTRUCTIONS FOR USE.......................................... 10
5.4 SCALE ZERO................................................................11
5.5 TARE ............................................................................ 12
5.6 HOLD FUNCTION........................................................ 13
5.7 UNIT SWITCH .............................................................. 14
6. SETTINGS .......................................................................... 15
7. TROUBLE-SHOOTING ...................................................... 17
RECYCLING INSTRUCTION ................................................. 18
DECLARATION OF CONFORMITY ....................................... 18
WARRANTY ........................................................................... 19
3
1. INTRODUCTION
Before you use the scale, please read this manual through
carefully, and keep it properly for future use.
The DHS scales are portable crane scales which allow for a
precise, quick and versatile use.
All the keys are mechanical and the LCD display allows for an
easy reading of the data; the functions include zero, tare, unit of
measure switch, hold.
PRECAUTIONARY MEASURES
For good performance and precise measurement, be careful with daily operation
and maintenance. Note the following instructions:
Do not allow the scale body to receive knocks. If not in use, keep the scale in a
dry and ventilated place, away from heat sources.
In order to ensure the safety of the scale structure, do not rotate the crane scale
with the suspended loads.
Do NOT overload the scale. This will damage the loadcell and void the
warranty.
Do NOT leave load hung on the scale for long. This will decrease the scale’s
accuracy and shorten the loadcell’s life.
Inspect shackle and hook before using.
When the scale runs out of power, replace the battery with full ones.
Do NOT use the scale under thunder or rain.
4
Do NOT attempt to repair the scale yourself. Contact your local representative.
It is forbidden to halt or transit under the suspended load.
5
2. MAIN TECHNICAL SPECIFICATIONS
Model
DHS15K
DHS30K
DHS60K
DHS150K
DHS300K
Display
Operative
Temperature
Relative
humidity
Power supply
Zero range
Auto zero at
start-up
Zero tracking
Capacity kg
15
30
60
150
300
Min Cap. kg
0.1
0.2
0.5
1.0
2.0
Division g
5
10
20
50
100
LCD with 5 digit
-10°C - 40°C
≤ 90% at 20°C
3pcs 1,5V AA battery. Low energy
consumption, designed for lengthening the
battery life (150 battery life). “Auto-off”
function after the set time (see section 6): 0,
5, 15, 30, 60 min.
Within the configured percentage (see
section 6): ± 0, 2, 4, 10, 20, 50 % of max
load capacity.
Within the configured percentage (see
section 6): ± 0, 2, 4, 10, 20, 50 % of max
load capacity.
0.5e/s
6
3. DRAWINGS AND DIMENSIONS
7
4. FRONT PANEL KEYS AND INDICATORS
4.1 FUNCTION OF THE KEYS
Pressed at length it turns the scale on and off.
TARE/ZERO
HOLD/UNIT
Pressed an istant it executes the tare
operation.
Pressed at length it zeros the displayed gross
weight, if it is within the configured percentage
(see section 6) of the total capacity.
Pressed an istant it enables/disables the
HOLD mode (the relative indicator on the
display turns on).
Pressed at length it changes the unit of
measure between kg/lb/N.
8
4.2 FUNCTION OF THE INDICATORS
INDICATOR
FUNCTION
STB
Indicates that the weight detected is stable.
ZERO
Indicates that the weight detected on the
weighing system is near zero.
TARE
Indicates that a tare is active and the displayed
weight is a net weight.
HOLD
Indicates that the displayed weight is freezed.
N
Indicates the unit of measure in use (newton).
lb
Indicates the unit of measure in use (kilogram).
kg
Indicates the unit of measure in use (pounds).
5. OPERATIONS
5.1 FUNCTIONING BY BATTERY
The scale uses three AA batteries (these are placed in the rear).
If the scale is not used for some time, remove the batteries;
throw the batteries away in the appropriate containers.
The charge level is shown in the weighing phase by the battery
symbol:
Batteries are charged.
Batteries are partially charged.
Batteries are discharged: replace them.
9
5.2 START-UP
Press key for 1 second.
The scale boots up, self-tests, battery tests and initializes.
If power-on test is failed, error
message will display.
The screen shows detection
message while scale detects its
load and auto-zero itself.
Waits for load.
5.3 INSTRUCTIONS FOR USE
The scale must be hanged in a secure and stable way, for
example with a wire rope.
Place container or pan on the hook before you turn the scale on.
Always put a load on the scale gently. Shocks or access force
may damage the weight sensor.
It is suggested to remove the load from the hook immediately
after the weigh, it will prolong the lifetime of the weight sensor.
5.4 SCALE ZERO
Press TARE/ZERO at length:
10
Zero the scale. ZERO is shown.
Weight reading turns “0.0” or “0.00”.
The relative indicator on the
display turns on.
If weight is tared, or not stable, zero is not allowed.
If weight is within the configured percentage (see section 6) of
F.S., zero is not allowed.
This operation is generally made when the hook is empty.
The scale also has an automatic zero at start-up to eliminate any
eventual weight residues on the hook. In any case it may be
necessary to press again ZERO/TARE if small weight quantities
remain displayed (with empty hook).
5.5 TARE
Clear the scale with ZERO/TARE at length if necessary. The
relative indicator on the display turns on.
Put the container on the hook; the relative weight will be shown
on the display.
Press TARE/ZERO to store weight as tare, when there’s no tare
stored.
TARE is shown.
Weight reading turns “0.0” or “0.00”.
The weight which was displayed is
stored as a tare, the display shows
zero.
The tare indicator on the display will
turn on.
11
If weight is over 100%F.S., or less than 0, tare is not allowed.
If weight is not stable, tare is not allowed.
Tare will reduce the apparent overloading range of the scale. If
weight is added, it will be shown on the display. When the
container is removed, the negative weight is displayed. If the
container was full, the displayed value will be the sum of the
weight of the container and the all the articles inside it. The zero
scale indicator on the display will turn on since the hook is empty.
Press again TARE/ZERO to clear the tare.
Restore the tare.
TARE is hidden. Weight reading
returns to that in gross mode.
After clearing it will be possible to carry out a new tare if a new
article needs to be added on the scale.
Press TARE/ZERO at length to clear the display.
5.6 HOLD FUNCTION
Press HOLD/UNIT, to lock the weight reading:
The HOLD indicator on the display
turns on, the weight is locked.
12
To return to the normal functioning press HOLD again:
HOLD is hidden. Weight reading is
unlocked.
5.7 UNIT SWITCH
Keep pressed HOLD/UNIT, the display switch the following
measuring unit:
Switch to kg.
Switch to lb.
Switch to N.
Release the key when the desired unit of measure is displayed,
the new unit will be enabled.
If scale is tared or is in hold, unit switching is not allowed.
13
6. SETTINGS
Press HOLD/UNIT and TARE/ZERO simultaneously to enter
Setting Mode:
Press TARE/ZERO to enter Auto-Off option.
Press HOLD/UNIT to change Auto-Off option. Auto-Off can be
set to 0min (never), 5min, 15min, 30min, 60min.
Press TARE/ZERO to enter Auto-Zero option.
Press HOLD/UNIT to change Auto-Zero option. Auto-Zero can
be set to 0%F.S., 2%F.S., 4%F.S., 10%F.S., 20%F.S., 50% F.S.
Press TARE/ZERO to enter Manual-Zero option.
14
Press HOLD/UNIT to change Manual-Zero option. Manual -Zero
can also be set to 0%F.S., 2%F.S., 4%F.S., 10%F.S., 20%F.S.,
50% F.S.
Press
TARE/ZERO
to
enter
Backlight
option;
Press HOLD/UNIT to change Backlight option.
Backlight can be set to off (disabled), 5 (5sec), 15 (15sec), 30
(30sec), 60 (60sec), on (never).
- When Backlight is set to 5, 15, 30, or 60, scale turns off
backlight in corresponding seconds after it is stable.
- When Backlight is set to off, backlight is disabled, and never
turns on.
- When Backlight is set to on, scale never turns off backlight, no
matter it is stable or not.
Press TARE/ZERO to exit the Settings Mode.
15
7. TROUBLE-SHOOTING
Symptom
blank display when
is pressed
no action taken
after TARE or
HOLD is pressed
Possible Causes
discharged battery
defective battery
defective
key
defective TARE or
HOLD key
scale in motion
unstable readings
reading is not zero
without load
large error in
weight reading
scale is damped
dust on PCB board
unstable system
power
load-cell stressed
too much or too
long
scale is not zeroed
before loading
re-calibration
needed
improper unit
16
Solution
replace battery
press
long
key for
clean TARE
HOLD key
or
stabilize the load
and scale
dry the scale
clean PCB board
longer warm-up
time
hang the scale in
storage
keep the scale
unload and reboot
re-calibrate
the
scale
switch to proper
unit
RECYCLING INSTRUCTION
The crossed-out wheeled bin on the product
means that at the product end of life, it must be
taken to separate collection or to the reseller
when a new equivalent type of equipment is
purchased. The adequate differentiated refuse
collection in having the product recycled,
helps to avoid possible negative effects on the environment and
health and supports the recycling of the materials of which the
equipment is made. The unlawful disposal of the product by the
user will entail fines foreseen by the current regulations.
DECLARATION OF CONFORMITY
This device conforms to the essential standards and norms
relative to the applicable European regulations. The Declaration
of conformity is available in the web site www.scalehouse.it.
17
WARRANTY
The TWO-YEAR warranty period begins on the day the instrument is delivered.
It includes spare parts and labour for repairs at no charge if the INSTRUMENTS
ARE RETURNED prepaid to the DEALER’S PLACE OF BUSINESS. Warranty
covers all defects NOT attributable to the Customer (such as improper use) and
NOT caused during transport.
If on site service is requested (or necessary), for any reason, where the
instrument is used, the Customer will pay for all of the service technician’s costs:
travel time and expenses plus room and board (if any).
The customer pays for shipping costs (both ways), if the instrument is shipped to
the DEALER or manufacturer for repair.
The WARRANTY is VOIDED if faults occur due to work done by unauthorised
personnel or due to connections to equipment installed by others or incorrect
connection to the power supply.
This warranty DOES NOT provide for any compensation for losses or damages,
direct or indirect, incurred by the Customer due to complete or partial failure of
instruments or systems sold, even during the warranty period.
AUTHORISED SERVICE CENTRE STAMP
18
DEUTSCH
INHALT
1. EINLEITUNG ...................................................................... 20
2. TECHNISCHE DATEN........................................................ 22
3. GEHÄUSE UND ABMESSUNGEN .................................... 23
4. TASTEN UND ANZEIGEN AUF DEM FRONTPANEEL..... 24
4.1 TASTENFUNKTIONEN ................................................ 24
4.2 SYMBOLE DER LCD ANZEIGE................................... 25
5. WÄGEOPERATIONEN....................................................... 25
5.1 BATTERIEBETRIEB..................................................... 25
5.2 INBETRIEBNAHME ..................................................... 26
5.3 VERWENDUNGSHINWEISE ....................................... 26
5.4 NULLSTELLUNG DER WAAGE .................................. 27
5.5 TARA FUNKTIONEN .................................................... 28
5.6 HOLD FUNKTION ........................................................ 29
5.7 WECHSELN DER MAßEINHEIT.................................. 30
6. WAAGEN SET-UP .............................................................. 31
7. FEHLERBEHEBUNG ......................................................... 34
RECYCLINGHINWEIS............................................................ 35
KONFORMITÄTSERKLÄRUNG ............................................ 35
GARANTIE ............................................................................. 36
19
1. EINLEITUNG
Diese Beschreibung erklärt Ihnen den Einsatz und die
Funktionen der DHS Kranwaage.
Die DHS Waage ist eine tragbare Kranwaage für einen genauen,
schnellen und vielseitigen Gebrauch.
Alle Tasten sind mechanisch und das LCD-Display ermöglicht
ein einfaches Ablesen der Daten. Die Funktionen beinhalten
Zero (Nullung), Tara, Wechseln der Maßeinheit, sowie HOLD.
HINWEISE
Für eine gute Arbeitsleistung und ein präzises Messen vorsichtig bei der täglichen
Verwendung und Wartung umgehen. Beachten Sie folgende Hinweise:
Keine Schläge auf den Waagenkörper zulassen. Wenn die Waage nicht in
Gebrauch ist; an einem trockenen gelüfteten Ort abseits von Hitzequellen
lagern.
Um die Sicherheit der Waage zu gewähren, die Last nicht verdrehen.
Die Waage nicht überlasten damit die Wägezelle nicht beschädigt wird.
Keine Lasten für längere Zeit an der Waage hängen lassen. Dies würde die
Genauigkeit der Waage verringern und die Laufzeit der Wägezelle reduzieren.
Kontrollieren Sie Schäkel und Haken vor dem Gebrauch.
Wenn die Batterien der Waage sich entladen, diese mit neuen, voll
aufgeladenen Batterien austauschen.
Bei Gewitter im Freien Waage, sofort die Waage abschalten.
20
Versuchen Sie nicht die Waage eigenhändig zu reparieren. Kontaktieren Sie
Ihren zuständigen Händler.
Der Aufenthalt unter hängenden Lasten ist verboten.
21
2. TECHNISCHE DATEN
Min kg
0.1
0.2
0.5
1.0
2.0
Version
Wägebereich kg
DHS15K
15
DHS30K
30
DHS60K
60
DHS150K
150
DHS300K
300
Umgebungstemperatur
Display
Umgebungstemperatur
Relative
Luftfeuchtigkeit
Stromversorgung
Nullstellbereich
Nullstellung beim Start:
Null- Nachführung
Ziffernschritt g
5
10
20
50
100
LCD mit 5 Ziffern
-10°C - 40°C
≤ 90% at 20°C
3 Batterien 1,5 V / Typ AA.
Laufzeit: ca. 150 Stunden;
Selbstabschaltungsfunktion bei
längerer Nichtbenutzung (siehe
Kap. 6): 0, 5, 15, 30, 60 Min.
± 0, 2, 4, 10, 20, 50 % (siehe Kap.
6) des Max. Wägebereich.
± 0, 2, 4, 10, 20, 50 % (siehe Kap.
6) des Max. Wägebereich.
0.5e/s
22
3. GEHÄUSE UND ABMESSUNGEN
23
4. TASTEN UND ANZEIGEN AUF DEM FRONTPANEEL
4.1 TASTENFUNKTIONEN
Netztaster.
TARE/ZERO
HOLD/UNIT
Bei kurzem Drücken wir das halbautomatische
Taragewicht ausgeführt oder der Tarawert wird
gelöscht, wenn das Bruttogewicht 0 ist.
Bei langem Drücken wird das angezeigte
Bruttogewicht gelöscht wenn es innerhalb des
im SETUP eingegebenen Prozentsatzes liegt
(Siehe Kap. 6).
Durch Drücken dieser Taste wird die HOLD
Funktion
aktiviert/deaktiviert
(das
entsprechende Symbol im Display erscheint).
Durch längeres Drücken wechselt die
Maßeinheit zwischen kg, lb und N
24
4.2 SYMBOLE DER LCD ANZEIGE
SYMBOLE
FUNKTION
STB
Zeigt an, dass die Waage stabil ist.
ZERO
Zeigt an, dass das ermittelte Gewicht in der
Nähe des Nullpunktes liegt.
TARE
Zeigt an, dass tariert wurde.
HOLD
Zeigt an, dass das angezeigte Gewicht
“eingefroren” ist.
N
Zeigt an, dass die Anzeige in Newton ist.
lb
Zeigt an, dass die Anzeige in Pfund ist.
kg
Zeigt an, dass die Anzeige in Kilogramm ist.
5. WÄGEOPERATIONEN
5.1 BATTERIEBETRIEB
Der Ladezustand wird während des Wiegevorgangs vom
Batteriesymbol angezeigt.
Batterie geladen
Batterie teilweise entladen.
Batterie entladen.
25
5.2 INBETRIEBNAHME
für 3 Sek. Drücken
Zum Einschalten Taste
Die Waage bootet, führt Selbst- und Batterietests durch und
initialisiert.
Falls der Einschalttest scheitert,
wird
eine
Error-Nachricht
angezeigt.
Die Anzeige zeigt während der
Gewichtsermittlung eine Nachricht
an,
Wartet auf die Auflast.
5.3 VERWENDUNGSHINWEISE
Die Waage muss auf gesicherte und stabile Weise aufgehängt
werden, z. B. mit einen Drahtseil.
Bevor Sie die Waage einschalten, Behälter oder Waagschale
am Haken platzieren.
Bitte immer eine Last auf die Waage legen. Eine übermäßige
Krafteinwirkung oder Stöße könnten den Wiegesensor
beschädigen..
26
Es wird darauf hingewiesen, dass ein sofortiges abmontieren
der Last vom Haken nach der Wägung, die Lebensdauer des
Wiegesensors verlängert.
5.4 NULLSTELLUNG DER WAAGE
Taste TARE/ZERO für 3 Sec drücken:
Die Waage nullen.
ZERO wird angezeigt. Das
angezeigte Gewicht schaltet auf
“0.0” oder “0.00”. Die jeweilige
Anzeige auf den Display schaltet
sich ein.
Falls das Gewicht tariert wird oder nicht stabil ist, ist das Nullen
nicht erlaubt. Wenn das Gewicht nicht innerhalb der
eingestellten Prozentsätze des maximalen Wägebereichs liegt
(siehe Abschnitt 6), ist die Nullung nicht möglich.
Dieser Vorgang wird normalerweise durchgeführt, wenn nichts
am Haken hängt.
Die Waage verfügt auch über eine automatische Nullstellung bei
der Inbetriebnahme, um eventuelle „Gewichtsreste“ auf den
Haken zu unterdrücken. Es ist wahrscheinlich notwendig wieder
ZERO/TARE zu drücken, wenn kleine Gewichtsmengen
angezeigt werden (mit leeren Haken).
5.5 TARAFUNKTIONEN
Nullen Sie die Waage wenn nötig durch langes Drücken von
ZERO/TARE. Die jeweilige Anzeige auf den Display schaltet
27
sich ein.
Legen Sie den Behälter an den Haken; das entsprechende
Gewicht wird am Display angezeigt.
Drücken Sie TARE/ZERO, um das
Gewicht als Tara zu speichern,
wenn keine gespeicherte Tara
vorhanden ist.
TARA wird angezeigt.
Gewichtswert schaltet auf
oder “0.00”. Das Gewicht,
angezeigt wurde, ist als
gespeichert; das Display zeigt Zero an.
Der
“0.0”
das
Tara
Die Tara –Anzeige auf dem Display wird sich einschalten.
Falls das Gewicht über 100% des Maßstabs oder weniger als 0
ist, ist die Tara nicht gestattet.
Falls das Gewicht nicht stabil ist, ist die Tara nicht möglich.
Die Tara reduziert scheinbar den Wägebereich der Waage. Falls
Gewicht hinzugefügt wird, wird dies auf den Display angezeigt.
Wenn der Behälter entfernt wird, wird ein negatives Gewicht
angezeigt. Falls der Behälter gefüllt war, stellt der angezeigte
Wert die Summe des Gewichts des Behälters und allen Artikeln
die sich in seinen Inneren befinden, dar.
Die Nullwaagen - Anzeige auf den Display schaltet sich ein,
wenn der Haken leer ist.
Drücken Sie erneut TARE/ZERO, um die Tara zu löschen.
28
Die Tara wiederherstellen.
Die TARA ist ausgeblendet. Es wird
erneut das Bruttogewicht angezeigt.
Nach dem Löschen ist es möglich
eine neue Tara auszuführen, falls ein neuer Artikel auf der
Waage hinzugefügt werden muss.
TARE/ZERO länger gedrückt halten, um den Displayinhalt zu
löschen.
5.6 HOLD FUNKTION
Drücken Sie HOLD/UNIT, um das abgelesene Gewicht
festzuhalten:
Das HOLD Anzeigefeld auf den
Display schaltet sich ein; das Gewicht
ist blockiert.
Um in den normalen Funktionsmodus zurückzukehren, drücken
Sie wieder HOLD:
HOLD
ist
ausgeblendet.
Gewichtslesefunktion ist entsperrt .
29
5.7 WECHSELN DER MAßEINHEIT
HOLD/UNIT gedrückt halten und das Display wechselt zu den
folgenden Maßeinheiten:
Umschalten auf kg.
Umschalten auf lb.
Umschalten auf N.
Lassen Sie die Taste los, wenn die gewünschte Maßeinheit
angezeigt wird. Die neue Maßeinheit wird anschließend aktiviert.
Wenn die Waage tariert wird oder sich in “Hold” befindet, ist ein
Wechseln der Maßeinheit nicht erlaubt
30
6. WAAGEN SETUP
Drücken Sie gleichzeitig HOLD/UNIT und TARE/ZERO, um in
das Menü mit den Einstellungen zu gelangen:
Drücken Sie TARE/ZERO, um in die Option der automatischen
Abschaltung zu gelangen.
Drücken Sie HOLD/UNIT, um Änderungen bei der Option
„automatische
Abschaltung“
durchzuführen.
Die
Selbstabschaltung kann auf 0 min (niemals), 5min, 15min,
30min, 60min eingestellt werden.
TARE/ZERO drücken, um die Option automatische Nullstellung
einzustellen..
Drücken Sie HOLD/UNIT, um Änderungen bei der Option
„automatische Nullstellung“ durchzuführen. Die automatische
Nullstellung kann auf 0%, 2%, 4%, 10%, 20% oder 50% des
Maßstabs /Wägebereichs eingestellt werden.
31
TARE/ZERO drücken, um die Option manuelle Nullstellung
einzustellen.
Drücken Sie HOLD/UNIT, um Änderungen bei der Option
„manuelle Nullstellung“ durchzuführen. Die manuelle
Nullstellung kann auf 0%, 2%, 4%, 10%, 20% oder 50% des
Maßstabs / Wägebereichs eingestellt werden.
TARE/ZERO drücken, um die Hintergrundbeleuchtungsoption
einzuschalten;
HOLD/UNIT drücken, um die Hintergrundbeleuchtungs- Option
zu ändern.
Hintergrundbeleuchtung kann auf „off“ (deaktiviert), 5 (5sec), 15
(15sec), 30 (30sec), 60 (60sec) oder „on“ eingestellt werden
(niemals).
- Wenn die Hintergrundbeleuchtung auf 5, 15, 30, oder 60
eingestellt wird, schaltet die Waage bei Stabilität die
Hintergrundbeleuchtung nach Verstreichen der jeweils
eingestellten Sekundenanzahl ab.
- Wenn die Hintergrundbeleuchtung auf „off“ eingestellt wird, ist
diese deaktiviert und schaltet sich niemals ein.
32
- Wenn die Hintergrundbeleuchtung auf “on” eingestellt wird,
schaltet die Waage diese niemals ab, ganz gleich ob diese stabil
ist oder nicht.
Drücken Sie TARE/ZERO, um den Einstellungsmodus zu
verlassen.
33
7. FEHLERBEHEBUNG
Auftretender
Mögliche
Fehler
Ursachen
entladene Batterie
Leeres Display,
defekte Batterie
wenn die
Taste
gedrückt wird.
Keine Reaktion
nachdem TARE
oder HOLD
gedrrückt wurde
Defekte
Taste
Defekte
TARE
oder HOLD Taste
Waage bewegt sich
Nicht stabile
Ablesewerte
Lesewert ist nicht
Null bei fehlender
Last
Erheblicher Fehler
in der
Gewichtsermittlung
Waage ist feucht
Staub auf PCB
Board
unstabile
Systemspannung
Wägezelle wird zu
sehr oder zu lange
beansprucht.
Waage wurde nicht
genullt vor der
Beladung
Neukalibrierung
erforderlich
Nicht angemessene
Maßeinheit
34
Lösung
Batterie wechseln
Taste
Die
länger gedrückt
halten.
Die TARE oder
HOLD Taste
reinigen
Die Last auf der
Waage stabilisieren
Die Waage
trocknen
Das PCB Board
säubern
Längere
Warmlaufzeit
Die Waage
ablagern
Die Waage
unbeladen lassen
und neu booten
Neukalibrierung der
Waage
Zur richtigen
Maßeinheit
wechseln
ANWEISUNGEN ZUM RECYCLING
Die durchgestrichene Mülltonne auf dem
Produkt bedeutet, dass Altgeräte separat
entsorgt werden müssen oder bei Kauf eines
Neugerätes dem Händler zurückgegeben
werden können. Die entsprechende Zuführung
zum Recyclingprozess hilft negative Folgen für
die Umwelt und Gesundheit zu vermeiden und
unterstützt die Wiederverwertung der Materialien aus denen das
Gerät besteht. Das widerrechtliche Entsorgen des Produkts
durch den Benutzer wird durch entsprechende gesetzliche
Regulierungen geahndet.
KONFORMITÄTSERKLÄRUNG
Dieses Gerät entspricht den Anforderungen und Normen der
zuständigen EU Richtlinien. Die Konformitätserklärung befindet
sich auf der Website www.scalehouse.it.
35
GARANTIE
Die ZWEIJÄHRIGE Garantiezeit beginnt mit dem Tag der Lieferung des Gerätes.
Sie beinhaltet kostenlose Ersatzteile und Arbeitszeiten für Reparaturen, wenn
das GERÄT FREI HAUS AN DEN SITZ DES VERKÄUFERS
ZURÜCKGESENDET WIRD. Die Garantie deckt alle Defekte ab, die NICHT auf
den Kunden zurückgeführt werden können (z.B. unsachgemäße Handhabung)
und NICHT auf dem Transport verursacht wurden.
Falls aus irgendeinem Grund Vor-Ort-Service angefordert wird (oder notwendig
ist), übernimmt der Kunde alle Kosten für die Servicetechniker: Reisezeit und
Reisekosten plus Unterbringung und Verpflegung (wenn notwendig).
Der Kunde übernimmt die Transportkosten (Hin und Zurück), wenn das Gerät
zur Reparatur an den HÄNDLER oder HERSTELLER gesendet wird.
Die GARANTIE ist NICHTIG, wenn es sich um einen Defekt handelt, der dadurch
verursacht wurde, dass unautorisiertes Personal Arbeiten am Gerät
durchgeführt hat, dass Geräte angeschlossen wurden, die durch andere
installiert wurden oder dass Anschlüsse an die Stromversorgung nicht korrekt
waren.
Diese Garantie KOMMT NICHT für Entschädigungen für direkte oder indirekte
Verluste oder Schäden auf, die dem Kunden durch den vollständigen oder
teilweisen Ausfall von verkauften Geräten oder Systemen entstehen, auch nicht
während der Garantiezeit.
STEMPEL DER KUNDENDIENSTSTELLE
36
FRANCAIS
INDEX
1. INTRODUCTION................................................................. 38
2. CARACTERISTIQUES TECHNIQUES PRINCIPALES...... 40
3. PLANS ET DIMENSIONS................................................... 41
4. TOUCHES ET VOYANTS DU PANNAU FRONTAL........... 42
4.1 FONCTION DES TOUCHES ....................................... 42
4.2 FONCTION DES VOYANTS ........................................ 43
5. FONCTIONS ....................................................................... 43
5.1 FONCTIONNEMENT AVEC LA BATTERIE.................. 43
5.2 MISE EN MARCHE ...................................................... 44
5.3 INSTRUCTIONS POUR L’UTILISATION...................... 44
5.4 FONCTION DE ZERO BALANCE ................................ 44
5.5 FONCTION DE TARE .................................................. 45
5.6 FONCTION DE BLOCAGE DU POIDS (HOLD)........... 46
5.7 CONVERSION DE L’UNITE DE MESURE................... 47
6. PARAMETRES ................................................................... 48
7. SOLUTIONS AUX PROBLEMES ...................................... 50
INSTRUCTIONS POUR L’EVACUATION .............................. 51
DECLARATION DE CONFORMITE ....................................... 51
GARANTIE ............................................................................. 52
37
1. INTRODUCTION
Avant d’utiliser la balance, lisez cette notice avec beaucoup
d’attention et conservez-la correctement pour une utilisation
future.
Les balances série DHS sont des crochets peseurs portables et
précis pour peser dans tous les milieux.
Toutes les touches sont mécaniques et l’afficheur LCD permet
une lecture facile des données. Les fonctions sélectionnables
sont : zéro, tare, conversion de l’unité de mesure, gel du poids
(HOLD).
AVVERTISSEMENT
Pour de bonnes performances et de mesures précises, prêter beaucoup d’attention
à l’entretient quotidien.
Suivre les instructions suivantes :
IL EST INTERDIT de permettre que la balance reçoive des coups. Lorsqu’elle
n’est pas utilisée, placer la balance dans des endroits secs, aéré et loin de
source de chaleur.
IL EST INTERDIT de tourner le crochet peseur avec de charges suspendues,
afin d’assurer la sécurité de la structure de la balance.
IL EST INTERDIT de surcharger le crochet peseur. Cela pourrait causer des
dommages permanents et d’annuler la garantie.
IL EST INTERDIT de surcharger la balance. Cela pourrait endommager le
capteur de charge et annuler la garantie.
38
Tester la manille et le crochet avant l’emploi.
Lorsque le crochet peseur a la batterie faible, remplacer les piles.
IL EST INTERDIT d’utiliser la balance pendant le tonnerre et la pluie.
IL EST INTERDIT de tenter de réparer la balance par une personne non
habilitée. Contacter le représentant local.
IL EST INTERDIT de s’arrêter ou de passer sous la charge suspendue.
39
2. PRINCIPALES CARACTERISTIQIES TECHNIQUES
Modèle
DHS15K
DHS30K
DHS60K
DHS150K
DHS300K
Max portée en Min pesée en Division en g
kg
kg
15
0.1
5
30
0.2
10
60
0.5
20
150
1.0
50
300
2.0
100
Afficheur
Température de
fonctionnement
Humidité relative
Alimentation
Plage de zéro
Mise
à
zéro
automatique
à
l’allumage
Zéro suiveur
LCD à 5 digits
-10°C 40°C
≤ 90% à 20°C
3 batteries AA de 1,5V. Basse
consommation d’énergie, conçu pour
allonger la vie utile des batteries (150
heures d’autonomie). Fonction d’arrêt
automatique après le temps configuré
(voir paragraphe 6) : 0, 5, 15, 30, 60
minutes.
Dans le pourcentage configuré (voir
paragraphe 6) : ± 0, 2, 4, 10, 20, 50 %
de la portée maximale.
Dans le pourcentage configuré (voir
paragraphe 6): ± 0, 2, 4, 10, 20, 50 %
de la portée maximale.
0.5e/s
40
3. PLANS ET DIMENSIONS
41
4. TOUCHES ET VOYANTS DU PANNEAU AVANT
4.1 FONCTION DES TOUCHES
TARE/ZERO
HOLD/UNIT
Si l’on appuie pendant quelques secondes,
elle met en marche / arrêt le crochet peseur.
Si l’on appuie un court instant, elle exécute le
tarage semi automatique.
Si l’on appuie pendant quelques secondes,
elle met à zéro le poids brut affiché s’il est
compris dans le pourcentage configuré de la
portée maximale (voir paragraphe 6).
Si l’on appuie un court instant, elle active /
désactive le mode HOLD (L’écran affiche le
relatif symbole).
Si l’on appuie pendant quelques secondes,
elle exécute la conversion de l’unité de mesure
entre kg/lb/N.
42
4.2 LA FONCTION DES VOYANTS
VOYANT
STB
ZERO
TARE
HOLD
N
lb
kg
FONCTION
Indique que le poids est stable.
Indique que le poids relevé par le système de
pesage se trouve à proximité du zéro.
Indique qu’une tare est active et que la valeur
affichée est un poids net.
Indique que le poids affiché est un poids bloqué.
Indique l’unité de mesure en cours d’utilisation
(Newton)
Indique l’unité de mesure en cours d’utilisation
(livre).
Indique l’unité de mesure en cours d’utilisation
(kilogramme).
5. FONCTIONNEMENT
5.1 FONCTIONNEMENT AVEC LA BATTERIE
La balance utilise trois batteries AA (logées à l’arrière du crochet
peseur). Si la balance n’est pas utilisée pendant une longue
période de temps, enlever les batteries, évacuer les batteries
dans des conteneurs appropriés.
Le niveau de charge est indiqué en phase de pesage par le
symbole de la batterie:
Batterie chargée.
Batterie en demi charge.
Batterie déchargée à remplacer.
43
5.2 MISE EN MARCHE
Appuyer pendant un seconde sur la touche .
La balance s’allume, exécute l’autotest et le test des batteries
puis se met en mode pesage.
Si le test est défaillant, l’écran
affiche un message d’erreur.
L’écran affiche le message
pendant la détection du poids pour
exécuter l’auto zéro.
Attente de la charge.
5.3 INSTRUCTIONS D’EMPLOI
Le crochet peseur doit être accroché de façon sûre et stable par
exemple par un câble.
Accrocher le crochet peseur avant de sa mise en marche.
Placer la charge sur le crocher peseur toujours délicatement. Un
choc peut endommager le capteur de charge.
Après chaque pesage, il faut enlever la charge du crochet
peseur car cela permettra de prolonger la durée de la vie du
capteur de charge.
44
5.4 FONCTION DE ZERO BALANCE
Appuyer
pendant
quelques
secondes sur TARE/ZERO :
Mettre à zéro la balance.
ZERO est affiché. La lecture du
poids devient “0.0” ou “0.00”.
Le voyant relatif s’allume à l’écran.
La mise à zéro n’est pas possible en présence d’une tare ou si le
poids est instable. Elle n’est pas possible même si le poids est
hors du pourcentage configuré de la portée maximale (voir
paragraphe 6).
Cette opération est exécute généralement lorsque le crochet est
vide. Le crochet peseur a aussi configurée une fonction de mise
à zéro automatique à l’allumage pour éliminer tout résidu de
poids sur le crochet. En tout cas, il peut être nécessaire
d’appuyer de nouveau sur TARE/ZERO si un poids restent
affichées (à crochet vide).
5.5 TARE
Mettre à zéro le crochet peseur TARE/ZERO pendant quelques
secondes s’il est nécessaire. Le voyant relatif s’allume à l’écran.
Placer le conteneur sur le crochet, le poids relatif est affiché à
l’écran.
Appuyer sur TARE/ZERO pour
exécuter la tare quand il n’y a pas de
tare actives. L’écran affiche le poids
45
de tare. La lecture du poids devient
“0.0” ou “0.00”. Le poids, qui a été
affiché, est stocké comme une tare,
l’écran affiche zéro. Le voyant de tare
s’allume à l’écran.
Si le poids est supérieur au 100% de la portée maximale, ou
inférieur à 0, la tare n’est pas possible. Même si le poids est
instable, la tare n’est pas possible. La tare réduit la portée du
crochet peseur.
Si le poids est ajouté, il sera montré sur l’écran. Lorsque le
conteneur est retiré, l’écran affiche le poids avec un signe
négatif. Si le conteneur était plein, la valeur affichée sera la
somme du poids du conteneur et l’ensemble des articles à
l’intérieur. Le voyant de zéro balance s’allume sur l’écran dès
que le crochet est vide.
Appuyer sur TARE/ZERO pour
effacer la tare. Rétablir la tare.
Le voyant de la TARE est désactivé.
Le poids affiché à l’écran est le poids
brut. Après l’effacement, il est
possible d’exécuter de nouveau la
tare si un nouveau produit doit être
ajouté sur la balance.
5.6 FONCTION DE BLOCAGE DE POIDS (HOLD)
Appuyer sur HOLD/UNIT, pour
bloquer le poids affiché à l’écran.
Le voyant HOLD sur l’écran s’allume,
le poids est bloqué.
46
Pour revenir au fonctionnement
normal appuyer de nouveau sur
HOLD/UNIT.
Le voyant HOLD est désactivé. Le
poids affiché est débloqué.
5.7 CONVERSION DE L’UNITE DE MESURE
Appuyer pendant quelques secondes sur HOLD/UNIT, l’écran
alterne l’affichage des unités de mesure suivantes :
kg.
lb.
N.
Relâcher la touche lorsque l’unité de mesure souhaitée est
affichée, la nouvelle unité de mesure est activée.
Si la tare ou le mode de HOLD sont actifs, la conversion de
l’unité de mesure n’est pas permise.
47
6. PARAMETRES
Appuyer simultanément sur HOLD/UNIT et sur TARE/ZERO
pour entrer dans l’installation technique :
Appuyer sur
automatique.
TARE/ZERO pour configurer le temps d’arrêt
Appuyer sur HOLD/UNIT pour changer la configuration du
temps d’arrêt automatique. Le temps d’arrêt automatique peut
être configuré à 0 (désactivé), 5, 15, 30 ou 60 minutes.
Appuyer sur TARE/ZERO pour configurer la plage de zéro
automatique.
Appuyer sur HOLD/UNIT pour changer la configuration du zéro
automatique. La plage du zéro automatique peut être configurée
à 0%, 2%, 4%, 10%, 20% ou 50% de la portée du crochet
peseur.
Appuyer sur TARE/ZERO pour configurer la plage de zéro
manuel.
48
Appuyer sur HOLD/UNIT pour changer la configuration du zéro
manuel.
La plage du zéro manuel peut être configurée à 0%, 2%, 4%,
10%, 20% ou 50% de la portée du crochet peseur.
Appuyer sur TARE/ZERO pour configurer le rétro éclairage.
Appuyer sur HOLD/UNIT pour changer la configuration du rétro
éclairage.
Le rétro éclairage peut être réglé à OFF (désactivé), 5 (5sec), 15
(15sec), 30 (30sec), 60 (60sec), ON (toujours activé).
- Lorsque le rétro éclairage est réglé à 5’’, 15’’, 30’’ ou 60’’, il est
désactivé par le crochet peseur après que les secondes
correspondants sont passés dès que le poids résulte stable.
- Lorsque le rétro éclairage est réglé à OFF, il est désactivé et ne
s’active jamais.
- Lorsque le rétro éclairage est réglé à ON, il est toujours activé.
Appuyer sur TARE/ZERO pour quitter la programmation
technique.
49
7. RESOLUTION DES PROBLEMES
Effets
Causes
Solution
Afficheur vide à
Batterie déchargée.
Batterie
défectueuse.
Remplacer la
batterie.
l’appui sur
.
Aucune activité à
l’appui sur TARE ou
HOLD.
Poids instable.
Poids affiché n’est
pas 0 même sans
une charge.
Erreur importante
dans la lecture du
poids.
Touche
défectueuse.
Appuyer pendant
quelques instants
sur
.
Touche TARE ou
HOLD défectueuses.
Nettoyer la touche
TARE ou HOLD.
Crochet peseur en
mouvement.
Crochet peseur
humide.
Carte principale
couverte de
poussière.
Alimentation
instable.
Capteur de charge
employé trop ou trop
longtemps.
Crochet peseur non
à zéro avant d’être
chargé.
Réétalonnage du
crochet à peseur
nécessaire.
Unité de mesure
impropre.
Rendre la charge
stable.
Sécher le crochet
peseur.
50
Nettoyer la carte
principale.
Augmenter le temps
d’initialisation
Stocker le crochet
peseur.
Décharger et mettre
à zéro le crochet
peseur.
Etalonner le crochet
peseur.
Saisir l’unité
convenable.
INSTRUCTIONS POUR L’EVACUATION
Le symbole de la poubelle sur roues barrée
d’une croix signifie que ce produit doit faire
l’objet d’une collecte sélective en fin de vie, ou
être rendu au revendeur au moment de son
remplacement avec un produit équivalent.
Une bonne collecte sélective contribue à
éviter des effets nuisibles à l’environnement et
à la santé et aide le recyclage des matériels. L’élimination
abusive de ce produit par l’utilisateur comporte l’application des
sanctions administratives prévues par la législation en la
matière.
DÉCLARATION DE CONFORMITÉ
Ce dispositif est conforme aux standards et aux normes et
règlements européens à appliquer. La Déclaration de
Conformité
est
disponible
à
l’adresse
Internet
www.scalehouse.it
51
GARANTIE
La garantie est de DEUX ANS à compter de la date de livraison de l'instrument
et couvre gratuitement la main d'œuvre et les pièces de rechange éventuelles
pour des INSTRUMENTS RENDUS FRANCO SIEGE DU VENDEUR et en cas
de pannes NON imputable au Client (par exemple en cas d'utilisation impropre)
et ni au transport.
Si, pour une raison quelconque, l'intervention est demandée (ou nécessaire)
sur les lieux d'utilisation, les frais de déplacement du technicien et
éventuellement de ses nuitées et repas seront à la charge du Client.
Si l'instrument est expédié par courrier, les frais de transport (a/r) seront à la
charge du Client.
La GARANTIE EST NULLE en cas de pannes dues à des interventions
effectuées par un personnel non autorisé ou de connexions à des appareils
appliqués par des tiers ou en cas de branchement défectueux au réseau
d'alimentation.
Aucune indemnisation ne sera due en cas d’endommagements, directs ou
indirects subis par le Client par l'absence de fonctionnement ou par le
fonctionnement partiel de l'instrument ou de l'installation en sa possession,
même pendant la période couverte par la garantie.
TAMPON DU CENTRE D'ASSISTANCE AUTORISE
52
ITALIANO
INDICE
1. INTRODUZIONE................................................................. 54
2. PRINCIPALI CARATTERISTICHE TECNICHE.................. 56
3. DISEGNI E DIMENSIONI.................................................... 57
4. TASTI E INDICATORI DEL PANNELLO FRONTALE ........ 58
4.1 FUNZIONE DEI TASTI ................................................ 58
4.2 FUNZIONE DEGLI INDICATORI.................................. 59
5. OPERAZIONI...................................................................... 59
5.1 FUNZIONAMENTO A BATTERIA................................. 59
5.2 ACCENSIONE.............................................................. 60
5.3 ISTRUZIONI PER L’USO ............................................. 60
5.4 ZERO BILANCIA .......................................................... 60
5.5 TARA ............................................................................ 61
5.6 FUNZIONE HOLD ........................................................ 62
5.7 CONVERSIONE UNITA’ DI MISURA ........................... 63
6. IMPOSTAZIONI .................................................................. 64
7. RISOLUZIONE PROBLEMI ............................................... 66
ISTRUZIONI PER LO SMALTIMENTO .................................. 67
DICHIARAZIONE DI CONFORMITA’ ..................................... 67
GARANZIA ............................................................................. 68
53
1. INTRODUZIONE
Prima di usare la bilancia, leggere il presente manuale
attentamente e custodirlo accuratamente per uso futuro.
La bilance serie DHS sono dinamometri portatili che consentono
un uso preciso rapido e versatile.
Tutti i tasti sono meccanici e il display LCD consente una facile
lettura dei dati; le funzioni includono zero, tara, conversione
unità di misura, congelamento del peso.
MISURE PRECAUZIONALI
Per un ottimale funzionamento e precise misurazioni, prestare attenzione alle
operazioni giornaliere e di mantenimento.
Seguire le seguenti istruzioni:
Non permettere che il corpo della bilancia riceva colpi. Se non in uso,
conservare la bilancia in luogo asciutto, ventilato e lontano da fonti di calore.
Al fine di assicurarsi l’incolumità della struttura della bilancia, non ruotarla con
carichi sospesi.
Non sovraccaricare la bilancia. Questo danneggia la cella di carico e fa
decadere la garanzia.
NON lasciare il carico appeso sulla bilancia a lungo. Ciò diminuisce la
precisione della bilancia e riduce la vita della cella di carico.
Controllare il grillo e il gancio prima dell'uso.
Quando si scaricano le batterie, sostituirle.
NON utilizzare la bilancia sotto tuoni e pioggia.
54
NON tentare di riparare la bilancia da soli. Rivolgersi al proprio rivenditore.
È vietato sostare o transitare sotto il carico sospeso.
55
2. PRINCIPALI CARATTERISTICHE TECNICHE
Modello
Portata kg
DHS15K
DHS30K
DHS60K
DHS150K
DHS300K
15
30
60
150
300
Display
Temperatura di
funzionamento
Umidità relativa
Alimentazione
Range di Zero
Auto-zero
all’accensione
Inseguimento di
Zero
Pesata
Minima kg
0.1
0.2
0.5
1.0
2.0
Divisione g
5
10
20
50
100
LCD a 5 cifre
-10°C - 40°C
≤ 90% a 20°C
3 batterie AA da 1,5V. Basso consumo
energetico, progettato per allungare la vita
utile delle batterie. (150 ore di autonomia).
Funzione di auto-spegnimento dopo il
tempo impostato (vedere paragrafo 6): 0,
5, 15, 30, 60 minuti.
Nella percentuale impostata (vedere
paragrafo 6): ± 0, 2, 4, 10, 20, 50 % della
portata massima.
Nella percentuale impostata (vedere
paragrafo 6): ± 0, 2, 4, 10, 20, 50 % della
portata massima.
0.5e/s
56
3. DISEGNI E DIMENSIONI
57
4. TASTI E INDICATORI DEL PANNELLO FRONTALE
4.1 FUNZIONE DEI TASTI
Premuto a lungo accende / spegne la bilancia.
TARE/ZERO
HOLD/UNIT
Premuto un istante esegue la tara
semiautomatica.
Premuto a lungo azzera il peso lordo
visualizzato, se compreso nella percentuale
impostata (vedere paragrafo 6) della portata
massima.
Premuto un istante abilita/disabilita il modo
HOL (il relativo simbolo si attiva sul display).
Premuto a lungo esegue la conversione
dell’unità di misura tra kg/lb/N.
58
4.2 FUNZIONE DEGLI INDICATORI
INDICATORE
FUNZIONE
STB
Indica che il peso rilevato è stabile.
ZERO
Indica che il peso rilevato è vicino allo zero.
TARE
Indica che è attiva una tara e il peso visualizzato
è un peso netto.
HOLD
Indica che il peso visualizzato è un peso
congelato.
N
Indica l’unità di misura in uso (Newton)
lb
Indica l’unità di misura in uso (chilogrammo).
kg
Indica l’unità di misura in uso (libbre).
5. OPERAZIONI
5.1 FUNZIONAMENTO A BATTERIA
La bilancia utilizza tre batterie AA (il vano si trova nel retro). Se
non si utilizza la bilancia per diverso tempo, togliere le batterie;
smaltire le batterie negli appositi contenitori.
Il display a LCD il livello di carica è indicato in fase di pesatura
dal simbolo della batteria:
batterie cariche.
batterie parzialmente cariche.
batterie scariche: sostituirle.
59
5.2 ACCENSIONE
Premere il tasto per 1 secondo.
La bilancia si accende, esegue il self-test, il test delle batterie e
inizializza il funzionamento.
Se il test fallisce viene visualizzato
un messaggio di errore.
La visualizzazione mostra il
messaggio durante la rilevazione
del peso per l’esecuzione
dell’auto-zero.
Attesa del carico
5.3 ISTRUZIONI PER L’USO
La bilancia deve essere sospesa in modo sicuro e stabile, ad
esempio con un cavo robusto. Appendere il contenitore al
gancio prima di accendere la bilancia.
Posizionare sempre delicatamente il carico sulla bilancia.
Eccessiva forza potrebbe danneggiare il sensore di peso.
La pronta rimozione del carico dal gancio, dopo la pesatura, può
prolungare la vita del sensore di peso.
5.4 ZERO BILANCIA
Premere TARE/ZERO a lungo:
Azzeramento della bilancia.
60
Il peso visualizzato va a “0.0” o
“0.00”.
Il relativo indicatore di ZERO viene
attivato sul display.
Se è presente una tara o il peso è instabile, l’azzeramento non è
possibile. Se il peso non è compreso nella percentuale
impostata (vedere paragrafo 6) della portata massima,
l’azzeramento non è possibile.
Questa operazione si esegue solitamente quando il gancio è
vuoto. La bilancia dispone anche di un auto-zero all’accensione
per eliminare eventuali residui di peso sul gancio. Tuttavia
potrebbe essere necessario premere ulteriormente TARE/ZERO
nel caso rimangano visualizzate piccole quantità di peso (con
gancio vuoto).
5.5 TARA
Azzerare la bilancia con TARE/ZERO a lungo se necessario. Si
accende il relativo indicatore a display.
Posizionare il contenitore sul gancio, viene mostrato il relativo
peso a display.
Premere TARE/ZERO per eseguire la tara quando nessuna tara
è attiva.
Il peso della tara è visualizzato.
La visualizzazione del peso passa a
“0.0” o “0.00”.
61
Il peso che era visualizzato è memorizzato come tara, il display
visualizza zero. L’indicatore di tara si accende a display.
Se il peso è superiore al 100% della portata massima, o inferiore
a 0, la tara non è possibile.
Se il peso è instabile, la tara non è possibile.
La tara reduce apparentemente la portata della bilancia.
Se viene aggiunto del peso, questo verrà visualizzato dal display.
Quando il contenitore viene rimosso, viene visualizzato il peso
negativo. Se il contenitore era pieno, il valore visualizzato sarà la
somma fra il peso del contenitore e di tutti i prodotti contenuti in
esso. L’indicatore di zero bilancia si accederà a display in quanto
il gancio è vuoto.
Premere TARE/ZERO per cancellare la tara
Ripristino della tara.
L’indicatore TARE è disattivato, il
peso lordo ritorna ad essere
visualizzato.
Dopo la cancellazione è possibile effettuare nuovamente la tara
se deve essere aggiunto un nuovo prodotto sulla bilancia.
5.6 FUNZIONE HOLD
Premere HOLD/UNIT, per congelare il peso visualizzato:
L’indicatore HOLD viene attivato sul
display, il peso è congelato.
62
Per tornare al funzionamento normale premere nuovamente
HOL/UNIT:
L’indicatore HOLD viene disattivato. Il
peso visualizzato è sbloccato.
5.7 CONVERSIONE UNITA’ DI MISURA
Tenere premuto HOLD/UNIT, il display alterna la visualizzazione
delle seguenti unità di misura:
kg.
lb.
N.
Rilasciare il tasto quando l’unità di misura desiderata è
visualizzata, la nuova unità viene attivata.
Se è attiva una tara o il modo HOLD, la conversione dell’unità di
misura non è permessa.
63
6. IMPOSTAZIONI
Premere HOLD/UNIT e TARE/ZERO contemporaneamente per
entrare nel setup:
Premere TARE/ZERO per impostare il tempo di autospegnimento.
Premere HOLD/UNIT per cambiare l’impostazione. Il tempo può
essere settato a 0 (disabilitato), 5, 15, 30, 60 minuti.
Premere TARE/ZERO per impostare il range di Auto-Zero.
Press HOLD/UNIT per cambiare l’impostazione. Il range può
essere settato a 0%, 2%, 4%, 10, 20, 50% del F.S.
Premere TARE/ZERO per impostare il range di Zero Manuale.
64
Premere HOLD/UNIT per cambiare l’impostazione.
Il range può essere settato a 0%, 2%, 4%, 10, 20, 50% del F.S.
Premere TARE/ZERO per impostare la retroilluminazione.
Premere HOLD/UNIT per cambiare l’impostazione.
La retroilluminazione può essere settata a off (disabilitata), 5
(5sec), 15 (15sec), 30 (30sec), 60 (60sec), on (sempre attiva).
- Quando è impostata a 5, 15, 30, o 60, la bilancia spegne la
retroilluminazione dopo che sono trascorsi i secondi impostati
dopo che il peso risulta stabile.
- Quando è impostata a off, la retroilluminazione è disabilitata, e
non si accende mai.
- Quando è impostata a on, la retroilluminazione è sempre
abilitata.
Premere TARE/ZERO per uscire dal setup.
65
7. RISOLUZIONE PROBLEMI
Sintomo
Display vuoto
quando si preme
.
Nessuna azione
alla pressione di
TARE o HOLD.
Peso instabile.
Peso non a zero
senza carico.
Errore elevato
nella lettura del
peso.
Possibili Cause
Batterie scariche.
Batterie difettose.
Soluzione
Sostituire le
batterie.
Tasto
difettoso.
Premere
lungo.
Tasto TARE o
HOLD difettoso.
Pulire il tasto
TARE o HOLD.
Bilancia in
movimento.
Stabilizzare il
carico.
Asciugare la
bilancia.
Pulire la scheda
madre.
Aumentare il
tempo di partenza
Bilancia umida.
Polvere sulla
scheda madre.
Alimentazione
instabile.
Cella di carico
utilizzata troppo o
troppo a lungo.
La bilancia non è
azzerata prima del
caricamento.
La bilancia deve
essere ricalibrata.
Unità di misura
impropria.
66
a
Depositare la
bilancia.
Scaricare e
azzerare.
Ricalibrare la
bilancia.
Selezionare l’unità
appropriata
ISTRUZIONI PER LO SMALTIMENTO
Il simbolo del cassonetto barrato riportato sul
prodotto, indica che il prodotto alla fine della
propria vita utile deve essere conferito agli
idonei centri di raccolta differenziata, oppure
riconsegnato al rivenditore al momento
dell’acquisto di un nuovo prodotto equivalente.
L’adeguata raccolta differenziata per l’avvio
successivo del prodotto al riciclaggio, contribuisce ad evitare
possibili effetti negativi sull’ambiente e sulla salute e favorisce il
riciclo dei materiali. Lo smaltimento abusivo del prodotto da
parte dell’utente comporta l’applicazione delle sanzioni
amministrative previste dalla legge.
DICHIARAZIONE DI CONFORMITA’
Il presente dispositivo è conforme agli standard essenziali e alle
altre normative pertinenti dei regolamenti europei applicabili. La
Dichiarazione di Conformità è disponibile all'indirizzo internet
www.scalehouse.it
67
GARANZIA
La garanzia è di 2 ANNI dalla consegna dello strumento e consiste nella
copertura gratuita della manodopera e dei ricambi per STRUMENTI RESI
FRANCO SEDE della VENDITRICE. La garanzia è valida in caso di guasti NON
imputabili al Committente (ad es. uso improprio) e NON imputabili al trasporto.
Se, per qualsiasi ragione, l'intervento è richiesto (o é necessario) presso il luogo
di utilizzo, saranno a carico del Committente le spese per la trasferta del tecnico:
tempi e spese di viaggio ed eventualmente vitto e alloggio.
Se lo strumento è spedito a mezzo corriere, le spese di trasporto (a/r) sono a
carico del Committente.
La GARANZIA DECADE nel caso di guasti dovuti ad interventi di personale non
autorizzato o di collegamenti ad apparecchiature applicate da altri o per errato
inserimento alla rete di alimentazione.
E' ESCLUSO qualsiasi indennizzo per danni, diretti o indiretti, provocati al
Committente dal mancato o parziale funzionamento degli strumenti od impianti
venduti, anche se durante il periodo di garanzia.
TIMBRO CENTRO ASSISTENZA AUTORIZZATO
68