1
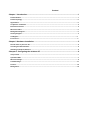
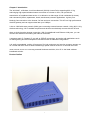
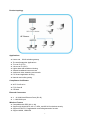
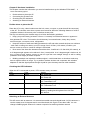
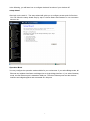
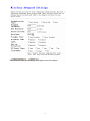
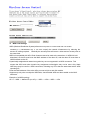
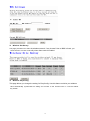
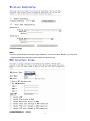
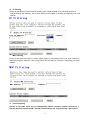
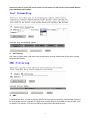
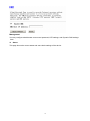
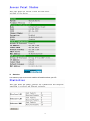
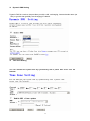
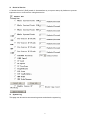
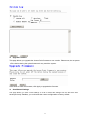
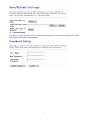
WL354AP User manual Ver: 1.0 Content Chapter 1 Introduction...............................................................................................................1 Product Outline.......................................................................................................................................................1 Product topology....................................................................................................................................................2 Applications............................................................................................................................................................2 Compliance Certificates: .......................................................................................................................................2 External Connectors ..............................................................................................................................................2 Wireless Feature.....................................................................................................................................................2 Management Support.............................................................................................................................................2 Security Support.....................................................................................................................................................3 OS Support...........................................................................................................................................................3 Environment............................................................................................................................................................3 Chapter 2 Hardware Installation ...............................................................................................5 Decide where to place the AP................................................................................................................................5 Checking the LED Indicators.................................................................................................................................5 Attaching an External Antenna..............................................................................................................................5 Charpter 3 Configuring the wireless AP ..................................................................................6 setup wizard............................................................................................................................................................7 Operation Mode ......................................................................................................................................................7 Wireless Settings....................................................................................................................................................8 TCP/IP Settings.....................................................................................................................................................14 Firewall ..................................................................................................................................................................15 Management..........................................................................................................................................................18 Chapter 1 Introduction The WL354AP, a Wireless Local Area Network (WLAN) Access Point supporting 802.11 b/g and bringing high-speed wireless Internet connection to a home or office, can provide the transmission of broadband data service. It is tailored to a wide range of both residential (in-home) and commercial (offices, apartments, hotels, warehouses) network applications. It gives you a blazingly fast connection to the internet, far fast and more convenient. This AP is a high-performance wireless gateway and can support data rate up to 54Mbps. It has a 100M wide area network (WAN) port connecting external Internet network. Using 802.11 b/g wireless technology, Wi-Fi enabled computers and devices can wirelessly connect with this AP and share a single incoming Internet connection. With four additional local Ethernet LAN ports, you can connect four different PCs sharing the Internet connection. It supports static IP, Dynamic IP, as well as PPPoE connections, and works with applications such as online gaming and VPN transparent connections with no additional configuration. It is easily upgradeable, making it future-proof for both end-users and service providers. Whether it's for a home user who wants to share wireless high-speed Internet access or for a small office that needs Internet access for conducting essential business activities, this AP is the ideal wireless broadband solution. Product Outline 1 Product topology Applications Home and SOHO wireless gateway The small enterprise Applications TV over IP (IPTV) Voice over IP (VoIP) Higher data rate broadband sharing Shared broadband internet access Audio and video streaming and transfer PC file and application sharing Network and online gaming Compliance Certificates: Wi-Fi Certification FCC Class B CE Mark External Connectors 4 10/100M local Ethernet Ports (RJ-45) 1 100M WAN port Wireless Feature Compatible with IEEE 802.11 b/g Support 64/128-bit WEP, 802.1x, WPA, and WPA2 for wireless security Support RTS/CTS, Fragmentation and Defragmentation function Support WMM , WMM-PS 2 Support Multiple BSSID Hardware WEP, TKIP, AES Engines Support WDS Hide SSID Support MAC Access/Deny List WMM support WPA1/2 - PSK (WPA Home), WPA1/2 - 802.1x (WPA Enterprise) EAP - TLS, TTLS, LEAP, PEAP Roaming Wireless Frequency Range, 2.4 ~ 2.4835GHz ISM Band. Radio and Modulation Type. IEEE 802.11b: DQPSK, DBPSK, DSSS, and CCK ; IEEE 802.11 g: BPSK, QPSK, 16QAM, 64QAM ; Transmission distance. 300 meters Outdoors, 100 meters Indoors coverage area(It's limited in an environment.) Antenna 2dBi Transmission power:802.11b: Typ.18dBm @Normal Temp Range; 802.11g:Typ.15dBm @ Normal Temp Range Management Support Device Configuration, Management and Update Web based GUI Localization support Embedded web server Download image via HTTP, TFTP client, TFTP server Command Line Interface via serial port, telnet, or ssh Menu-driven CLI via serial port or telnet Universal Plug and Play (UPnP) Internet Gateway Device (IGDv1.0) SNMP v1/v2c agent, SNMP MIBs;802.11 b/g MIBs; PSI configuration file upload and download Date/time update from SNTP Internet Time Server Security Support Three level login including local admin, local user and remote technical support access Service access control based on incoming interface: WAN or LAN Service access control based on source IP addresses Protect DOS attacks from WAN/LAN: SYN flooding, IP surfing, ping of Death, fragile, - UDP ECHO (port 7), teardrop, land. PAP (RFC1334), CHAP (RFC1994), MSCHAP for PPP session. IP filter, Parental control. OS Support Linux kernel 2.4/2.6 Environment Operating temperature: 0℃ to 40℃ Storage temperature: -20℃ to 70℃ 3 Operating Humidity: 10%~95% no freezing Storage humidity: 5%~95% no freezing 4 Chapter 2 Hardware Installation This chapter contains the information you need to install and set up the Wireless RTL8186AP. It covers the following topics: Decide where to place the AP Connecting the Access Point Checking the LED indicators Attaching an External Antenna Decide where to place the AP Place the AP in a dry, clean location near the hub, switch, computer or printer that will be connected to the AP. The location must have a power source and be within the following distance of a Wi-Fi compliant wireless LAN access point or wireless access point. The key to maximizing the wireless range is to follow these basic guidelines: Keep your product away (at least 3-6 feet or 1-2 meters) from electrical devices or appliances that generate RF noise. The location should be away from transformers, heavy-duty motors, fluorescent lights, microwave ovens, refrigerators. Keep the number of walls and ceilings between the AP and other network devices to a minimum - each wall or ceiling can reduce your AP's range from 3-90 feet (1-30 meters.) Position your devices so that the number of walls or ceilings is minimized. Be a ware of the direct line between network devices. A wall that is 1.5 feet thick (0.5 meters), at a 45-degree angle appears to be almost 3 feet (1 meter) thick. At a 2-degree angle it looks over 42 feet (14 meters) thick! Position devices so that the signal will travel straight through a wall or ceiling (instead of at an angle) for better reception. Building materials can impede the wireless signal - a solid metal door or aluminum studs may have a negative effect on range. Try to position wireless devices and computers with wireless adapters so that the signal passes through drywall or open doorways and not other materials. Checking the LED Indicators When the AP is connected to power, LEDs indicate activity as follows: LED Color Activity Power Green On: Power On Off: Power Off WAN Green On: sending/receiving data from WAN Port Off: Transmitter is off WLAN Green Blinking: sending/receiving data Off: Transmitter is off LAN Green On: Good Link Blinking: sending/receiving data from LAN Port Off: No link Attaching an External Antenna This AP comes with an antenna. It is external removable monopole signal-band 2.4 GHz antenna. It can be rotated over 90 degrees and is omni-directional with a gain of less than 2dBi. You can change a 5dBi high gain antenna for creates a superior far-reaching wireless network 5 Chapter 3 Configuring the wireless AP If the default AP configuration does not meet your network requirements, or if you want to customize the settings for your own network, you can directly connect to the device through it's Ethernet port or wireless to change the configuration. There are two typical applications: 1. Networks with a DHCP Server If your network has a DHCP server, an IP address is automatic ally assigned to the AP. It takes between one and two minutes for the Access Point to determine if there is a DHCP server on the network. After you determine the AP's IP address, you can enter that IP address into a web browser on a computer on the same subnet to view the Access Point's system status or change its configuration 2. Networks without a DHCP Server If your network does not have a DHCP server, the Access Point uses a factory assigned IP address (192.168.1.254). You can use that IP address to configure the Access Point, or you can assign a new IP address to the Access Point. To verify that the Access Point is using the default IP address assigned at the factory: Connect a computer directly to the Access Point using the supplied standard Category 5 UTP Ethernet cable. Enter the Access Point's default IP address (192.168.1.254) into the computer's web browser. If the Configuration Management System starts, the Access Point is using the factory assigned IP address. You can configure the Access Point with the Web interface: Username, type admin (case sensitive) Password, type admin Click ok. 6 In the following, you will learn how to configure the basic functions of your wireless AP. setup wizard After login on the web UI,The setup wizard will guide you to configure access point for first time. You can follow the setup wizard step by step or choose Status and Statistics to view information about the AP. Operation Mode You may configure the operation mode suitable for you environment. If you select Bridge mode, all Ethernet and wireless interfaces are bridged into a single bridge interface. If you select Gateway mode, the first Ethernet port is treated as WAN port. The other Ethernet ports and the wireless interface are bridged together and are treated as LAN ports. 7 Click Cancel to close without saving, click Apply to save the settings. Wireless Settings Basic Wireless Settings You could configure the minimum number of Wireless settings for communication, such as Network Name (SSID) and Channel. The Access Point can be set simply with only the minimum setting items. Band 8 The RTL8186AP supports 11b, 11g, and 11b/g mixed mode. You can configure the suitable network mode. Mode The RTL8186AP supports AP, Client,WDS,AP+WDS mode, you can select one from the list. SSID Service Set Identifier. This is the assigned name for a wireless Wi-Fi network. Stations must use this unique identifier to communicate with an Access Point. The SSID can be any alphanumeric entry up to a maximum of 32 characters. Channel / Frequency Select the channel for your wireless LAN in Channel/Frequency block. The default setting is Smart Select it selects the channel which provides the best transmission quality. The frequencies available vary depending which wireless mode you select. Advanced Wireless Settings Use the Advanced Setup page to make detailed settings for the Wireless. Advanced Setup includes items that are not available from the Basic Setup page, such as Beacon Interval, Control Tx Rates and Basic Data Rates. Authentication Type Select between open system, shared key and auto. Fragment threshold The maximum packet size is used for fragmentation. Packets larger than the size programmed in this field will be fragmented. The Fragment Threshold value must be larger than the RTS Threshold value. The default is 2346. RTS Threshold Request to send threshold. The packet size that is used to determine if it should use the CSMA/CA mechanism or the CSMA/CD mechanism, the default is 2347. Beacon Interval The interval time between 20ms and 1024ms for each beacon transmission. The default is 100ms. Basic Data Rate Choose between the following data rates 1, 2, 5.5, 11, 6, 9 , 12, 18, 24, 36, 48,54 and auto. Default is auto. 9 Click Cancel to close without saving, click Apply to save the settings. 10 Security This page allows you setup the wireless security. Turn on WEP or WPA by using Encryption Keys could prevent any unauthorized access to your wireless network. For example, when you select Security mode, you should config the Radius Sever information. Click Cancel to close without saving, click Apply to save the settings. Access Control If you choose 'Allowed Listed', only those clients whose wireless MAC addresses are in the access control list will be able to connect to your Access Point. When 'Deny Listed' is selected, these wireless clients on the list will not be able to connect the Access Point. 11 WDS Link Settings WDS (Wireless Distribution System) allows access points to communicate with one another wirelessly in a standardized way. It can also simplify the network infrastructure by reducing the amount of cabling required. the same time. Basically the access points will act as a client and an access point at WDS is incompatible with WPA. Both features cannot be used at the same time. A WDS link is bidirectional, so the AP must know the MAC address of the other AP, and the other AP must have a WDS link back to the AP. Dynamically assigned and rotated encryption key are not supported in a WDS connection. This means that WPA and other dynamic key assignment technologies may not be used. Only Static WEP keys may be used in a WDS connection, including any STAs that are associated with a WDS repeating AP. Enter the MAC address of the other APs you want to link to and click enable. Supports up to 8 point to multipoint WDS links, check Enable WDS and then enable on the MAC addresses. Example of a WDS topology: AP1 <-- WDS --> Master AP (our AP) <-- WDS --> AP3<-- WDS --> AP4 12 Wireless Site Survey This page provides tool to scan the wireless network. If any Access Point or IBSS is found, you could choose to connect it manually when client mode is enabled. Wireless EasyConfig This page allows you change the setting for EasyConfig. Use this feature could let your wireless client automatically synchronizes its setting and connect to the Access Point in a minute without any hassle. 13 TCP/IP Settings WAN You may choose different connection type suitable for your environment. Besides, you may also configure parameters according to the selected connection type. 14 Click Cancel to close without saving, click Apply to save the settings. LAN You may enable/disable networking functions and configure their parameters as your wish. Click Cancel to close without saving, click Apply to save the settings. Firewall This section mainly introduces some ways to protect you through the following configuration. Port Filtering Entries in this table are used to restrict certain types of data packets from your local network to Internet through the Gateway. Use of such filters can be helpful in securing or restricting your local network. 15 IP Filtering Entries in this table are used to restrict certain types of data packets from your local network to Internet through the Gateway. Use of such filters can be helpful in securing or restricting your local network. MAC Filtering Entries in this table are used to restrict certain types of data packets from your local network to Internet through the Gateway. Use of such filters can be helpful in securing or restricting your local network. Port Forwarding Entries in this table allow you to automatically redirect common network services to a specific machine behind the NAT firewall. These settings are only necessary if you wish to 16 host some sort of server like a web server or mail server on the private local network behind your Gateway's NAT firewall. URL Filtering URL filter is used to deny LAN users from accessing the internet. Block those URLs which contain keywords listed below. DMZ A Demilitarized Zone is used to provide Internet services without sacrificing unauthorized access to its local private network. Typically, the DMZ host contains devices accessible to Internet traffic, such as Web (HTTP) servers, FTP servers, SMTP (e-mail) servers and DNS servers. 17 Management You may configure administrator account and password, NTP settings, and Dynamic DNS settings here. Status This page shows the current status and some basic settings of the device. 18 Statistics The Statistics page shows all the statistics information about your AP. 19 Dynamic DNS Setting Dynamic DNS is a service, that provides you with a valid, unchanging, internet domain name (an URL) to go with that (possibly ever-changing) IP-address. Time Zone Setting You can maintain the system time by synchronizing with a public time server over the Internet. 20 Denial of Service A "denial-of-service" (DoS) attack is characterized by an explicit attempt by hackers to prevent legitimate users of a service from using that service. System Log This page can be used to set remote log server and show the system log 21 Upgrade Firmware This page allows you upgrade the Access Point firmware to new version. Please note, do not power off the device during the upload because it may crash the system. Click Reset to clear the firmware, click Apply to upgrade the firmware. Save/Reload Settings This page allows you save current settings to a file or reload the settings from the file which was saved previously. Besides, you could reset the current configuration to factory default. 22 Password Setup This page is used to set the account to access the web server of Access Point. Empty user name and password will disable the protection. 23