1
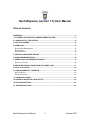
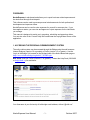
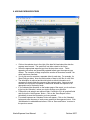
UNIVERSITY OF LETHBRIDGE
ONLINE
PERSONAL REIMBURSEMENT SYSTEM
USER MANUAL
-1-
NechoExpense (version 7.5) User Manual
Table of Contents
FOREWORD ............................................................................................................................... - 3 1. ACCESSING THE PERSONAL REIMBURSEMENT SYSTEM ............................................. - 3 2. LOGGING OUT OF THE SYSTEM ......................................................................................... - 4 3. POP-UP BLOCKERS.............................................................................................................. - 4 4. HOME PAGE........................................................................................................................... - 5 EDITING USER PREFERENCES .................................................................................................... - 5 NOTIFICATIONS .......................................................................................................................... - 6 SAVED REPORTS ....................................................................................................................... - 6 5. CREATING AN EXPENSE REPORT ..................................................................................... - 7 6. ADDING EXPENSE ENTRIES................................................................................................ - 8 7. SUBMITTING YOUR COMPLETED REPORT ....................................................................... - 9 REPORT VIOLATIONS ............................................................................................................... - 10 8. IMPORTING TRANSACTIONS FROM YOUR AMEX CARD .............................................. - 11 9. SPLIT ALLOCATION........................................................................................................... - 12 10. VIEW DOCUMENTS TO APPROVE .................................................................................. - 12 QUICK APPROVAL .................................................................................................................... - 13 DETAILED APPROVAL ............................................................................................................... - 13 11. ASSIGNING A PROXY ....................................................................................................... - 14 12. REVIEW CLAIM HISTORY AND STATUS......................................................................... - 14 13. FIELD DESCRIPTIONS ...................................................................................................... - 15 14. INFORMATION ICONS...................................................................................................... - 16 -
NechoExpense User Manual
-2-
October 2007
FOREWORD
NechoExpense is web-based and allows you to report business related expenses and
be reimbursed through direct deposit.
This software can be used to process personal reimbursements for both professional
development and expense claims.
NechoExpense can be used to enter expenses for yourself or someone else. If you
have approver status, you can view and approve or reject expenses for the individuals
you manage.
This manual is designed to assist you in preparing, submitting and approving claims.
You can also refer to the ‘Consult Help’ link located near the top right-hand corner of the
application.
1. ACCESSING THE PERSONAL REIMBURSEMENT SYSTEM
The online claim system can be accessed through the Bridge using the web browsers
Internet Explorer (version 6.0 or greater) or Firefox (version 1.5 or greater). Use the
‘Login to the Bridge’ link located on the left-hand side of the Notice Board web page or
https://www.uleth.ca/bridge/twgkwbis.P_WWWLogin.
Mac Users must use Firefox (version 1.5 or greater). Contact the Help Desk (329-2490
or [email protected]) for assistance.
Your Username is your University of Lethbridge email address, without “@uleth.ca”.
NechoExpense User Manual
-3-
October 2007
Once you are logged in, make the following selections to navigate to the personal
reimbursement software;
Financial Services,
Personal Reimbursements,
Online Expense Claim,
Continue.
At this point you should see the NechoExpense welcome screen appear.
2. LOGGING OUT OF THE SYSTEM
When you are ready to exit the software, select the ‘Logout’ indicator located in the top
right-hand corner of the application page. Click ‘Exit’ to log out of the Bridge. If others
have access to the machine you are using, close your browser (e.g. Quit Firefox) to
protect your privacy. You should always logout of the software prior to closing your
browser window.
If you have any unsaved changes, NechoExpense asks if you wish to “Discard
changes?” To return to the document, click on the ‘No’ button. Otherwise, click on the
‘Yes’ button to log out of the application.
3. POP-UP BLOCKERS
Certain actions may cause the following message to appear indicating the Internet
Explorer pop-up blocker feature is turned on.
Click on the ‘OK’ button and right click on the information bar. Select ‘Always Allow Popups from This Site’. A second message box appears asking “Would you like to allow
pop-ups from .online.uleth.ca”? Click ‘Yes’.
NechoExpense User Manual
-4-
October 2007
•
The steps to disable a Pop-up Blocker will vary depending on the type (Google,
Yahoo, etc.) Contact the Help Desk (329-2490 or [email protected]) or click here for
assistance.
TIPS:
•
A symbol within a circle is an information icon. Place your cursor over the icon to
display a message. Click here to see examples of information icons.
•
For assistance, contact the system administrator at [email protected].
•
Click here to view frequently asked questions.
4. HOME PAGE
The NechoExpense home page is where you will access the expense reporting
functions.
On the left-hand side of the home page is the navigation pane and on the right-hand side
is the Inbox Items pane. The navigation pane is where you can perform various actions
such as;
•
•
•
•
•
•
Create an expense report.
Import transactions to an expense report from your corporate AMEX card.
Review your claim history.
Edit user preferences (set your default financial codes, and set a proxy for
submitting claims on your behalf or approving claims when you are away).
Approve claims, if applicable.
Quick Link to policies, manuals, FAQ’s, etc.
Editing User Preferences
By editing user preferences a default financial code can be set, however you have the
option of changing from the default financial code when entering expenses.
•
•
•
•
•
Click on ‘Edit User Preferences’ located under Personal Actions in the top lefthand side of the home page.
Click on the ‘Defaults’ tab.
If the Charge to Department field is blank, click on the arrow to the right of
Charge to Department and click on the department to select. Only one Charge to
Department is available to each user.
Click on the arrow to the right of Financial Code and select a code from the list.
Note: Financial codes which include “- Director”, “- PI”, “- VP”, etc. are for use by
these specific individuals only. Research codes generally begin with the
researcher’s initials. “PI” or “Princ Inv” stands for principal investigator of the
research grant.
Click ‘Save’ and ‘Close’ to return to the home page.
NechoExpense User Manual
-5-
October 2007
Notifications
The right-hand side of the page is your NechoExpense notification box on top, and
previously saved, but unsubmitted (or rejected) claims showing on the bottom.
You can see more information on your notifications by clicking on the plus symbol
located to the left of the notification. A red information icon will appear to the right of a
new notification regarding a rejected claim.
To delete the notifications, select the checkbox to the right of the item in question, and
click on the ‘Remove’ button located underneath the notifications.
Saved Reports
If you start on an expense claim report, and save it without submitting it, the report will
be saved to the ‘Select Document to Complete’ area located underneath the Review
Notifications.
To bring up an uncompleted report or to edit a report that was rejected, click on the
document in the ‘Select Document to Complete’ area.
This will take you to the ‘Edit’ screen where you can make changes to the uncompleted
report by clicking on the expense item in question.
If you wish to delete a report, check the box to the right of the document on the home
page and then click on the ‘Delete’ button. The system will ask you to confirm the delete
action.
If part of the document is still in the approval cycle the checkbox will be greyed out and
you will be unable to delete the document.
NechoExpense User Manual
-6-
October 2007
5. CREATING AN EXPENSE REPORT
Click on ‘Create an Expense Report’ located under Personal Actions in the top left-hand
side of the home page. The Expense Report header page appears.
•
•
•
•
•
•
•
Enter a name for the expense claim in the ‘Report Name’ field. Choose a name
that is unique to this report and reflects the reason for the claim. The name you
choose may be used in the future to identify the report from a list of several. See
Frequently Asked Questions for examples of report names.
‘From’ and ‘To’ dates are optional. To select a date range for your expense
report, click on the calendar to the right of the ‘From’ and ‘To’ fields.
Do not enter dates in the future.
To keep a report private, making it unavailable to your submitter proxy, click in
the ‘Mark as Private’ checkbox.
The default allocation section displays the ‘Charge to Department’ and the
‘Financial Code’. Click on ‘Change Default’ if you wish to change the allocation
to a different financial code. If applicable, select an activity code. Click on ‘Done’
to return to the report.
Note: you can change the financial code for each individual expense rather than
choosing it using the ‘Change Default’ button on the report header page.
Click on the ‘Continue’ button to move on to adding expense entries.
NechoExpense User Manual
-7-
October 2007
6. ADDING EXPENSE ENTRIES
•
•
•
•
•
•
•
Click on the calendar icon to the right of the date field and select the date the
expense was incurred. The system will not allow a date in the future.
Select the appropriate expense type from the drop down menu. Fields
appearing on-screen are dynamically updated based upon the expense type
chosen. For example, mileage requires the number of kilometers traveled. Car
rental requires a merchant.
You do not need to complete a separate claim for each day. For example, for
‘Meal (Daily per diem)’ enter the total number of days in the ‘Nbr of units’ field.
The description is required and should include as much information as is
necessary to clearly state the purpose of the expense claim. Approvers and
auditors will require this information to determine whether the expense is an
appropriate use of University funds.
If you indicated the allocation on the header page of the report, you do not have
to go into the ‘Allocation’ unless you wish to change your selection.
Fields with a red asterisk are required fields. Continue to fill in all required fields
and click on the ‘Add Expense’ button. Click on the ‘Save Report’ button
periodically to save the information you have entered.
For certain expenses an ‘Attendee’ button will appear. Click on the ‘Attendee’
button and enter the name of each person present at the expensed event. Click
‘Add Attendee’ to add additional names. Click on ‘Save and Return’ to return to
the previous screen.
NechoExpense User Manual
-8-
October 2007
•
•
•
Click on TAX INFO to display the GST/PST calculated based on the region
selected. If the GST calculated does not agree to your receipt, enter the correct
amount. Click on TAX INFO again to close this screen.
To delete a transaction after you click on the ‘Add Expense’ button, select the
checkbox to the right of the item in question, and click on the ‘Delete’ button.
To remove an expense before you click on the ‘Add Expense’ button, click on the
‘Clear’ button, and then click on ‘Yes’ to discard changes.
Click here to view field descriptions.
7. SUBMITTING YOUR COMPLETED REPORT
Once you have added all of your expense items to your expense report,
•
•
Click on the ‘Save Report’ button. You may end your session at this point if you
wish to complete the report at a later time. The report will be saved as ‘Draft’.
When you are ready to submit your report, click on ‘Complete Report’.
(Note: Your report is not submitted until you click on ‘Submit’, described below).
Clicking on ‘Complete Report’ will take you to the ‘View Summary’ tab.
•
•
•
Click on the ‘Print’ button if your department requires a printed summary.
Financial Services does not require a printed copy of your expense report.
Next, click on the ‘Submit’ button. The system will notify you that your claim has
been successfully submitted. Your claim number is the last four digits of the
document number at the top right-hand side of the screen.
If you have receipts to submit, put the receipts into a receipt submission
envelope and record the claim number (the last four digits of the document
number) on the outside of the envelope. Click the ‘Close’ button.
NechoExpense User Manual
-9-
October 2007
•
Where applicable, the envelope containing the receipts is to be given to the
individual within your department who normally collects receipts and reviews
claims (financial officer or administrative support personnel). This individual will
forward the receipts to Financial Services after reviewing the claim. In all other
cases, forward the envelope containing your receipts directly to Financial
Services.
•
Reimbursement cannot take place until the receipts have been received in
Financial Services and all approvers have gone into the system and
approved your claim.
•
The most common reason claims are rejected is unacceptable supporting
documentation. Include original receipts indicating proof of payment. Credit card
statements and invoices without proof of payment are not acceptable. Refer to
Frequently Asked Questions for more information.
Report Violations
Errors will cause a report violations message to appear after you click on the ‘Submit’
button and a red information icon will appear to the left of the expense that is in error.
Close the message box and click on the expense to edit it. Click on POLICY INFO to
see a message regarding the error. Click on POLICY INFO again to return to the ‘Edit
Screen’. Click on ‘Save Changes’ when done, and then click on ‘Submit’.
NechoExpense User Manual
- 10 -
October 2007
8. IMPORTING TRANSACTIONS FROM YOUR AMEX CARD
NechoExpense has the ability to import information from your corporate American
Express card. The transactions are fed directly into the system on a daily basis.
To include AMEX transactions in a new expense report,
•
•
•
•
•
•
•
•
•
•
•
•
•
Click on ‘View Transactions to Include’ from the Home Page.
Using the checkbox to the left of each transaction, select the transactions you
wish to include and click on the ‘Include’ button located bottom right.
To select all transactions, check the box to the left of Transaction Date and click
on ‘Include’.
To remove transactions you do not want to include, check the box and click on
the ‘Mark as Personal’ button.
From the ‘Show’ drop down arrow choose ‘Business’. Transactions marked as
personal will not be displayed.
Fill in the required fields on the report header page. Click on ‘Change Default’ to
change the default financial code if necessary and then click on ‘Done’.
Click on the ‘Continue’ button.
You will now be back at the ‘View Summary’ tab.
Click anywhere on the transaction to go to ‘Expense View’.
Fill in the rest of the required information, (Expense type, Region, Receipt,
Description).
Click on ‘Save Changes’ to return to the ‘Edit’ screen.
Repeat the process for any additional transactions.
Follow the instructions in Section 7 above for “Submitting Your Completed
Report”.
NechoExpense User Manual
- 11 -
October 2007
To include AMEX transactions in an existing report:
•
•
•
•
•
•
Open the existing report and click on the ‘Include Transactions’ tab.
Select the transactions you wish to include on your expense report and click on
the ‘Include’ button located bottom right.
Click on the ‘View Summary’ tab.
Click anywhere on the transaction to go to the ‘Expense View’.
Fill in the rest of the required information.
Click on ‘Save Changes’.
Note: If you do not currently have a corporate American Express card and would like
one, contact Financial Services at (403)329-2206.
9. SPLIT ALLOCATION
To split an expense between more than one financial code, enter each share as a
separate expense item.
For example, to charge 40% of an expense to one financial code and 60% to another,
create the expense, entering only 40% of the total as the spent amount. Click on the
‘Allocation’ button to select the financial code. Create an identical expense, entering the
remaining 60% of the total as the spent amount. Again, click on the ‘Allocation’ button to
select the financial code.
10. VIEW DOCUMENTS TO APPROVE
If you have approver status, you may also have documents requiring your approval. You
will be notified by email when a document is ready to be reviewed.
•
From the home page click on ‘View Documents to Approve’.
NechoExpense User Manual
- 12 -
October 2007
The top portion of the screen lists the documents awaiting your approval. You have two
options for approving documents: Quick Approval or Detailed Approval.
Quick Approval
For a ‘Quick Approval’ of the document and all expenses related to it, click on the
document under ‘Approval Items’. The report name appears on the ‘Included Expenses’
tab. Place your cursor over the information icons for additional information about the
expense, such as the financial code. Select the check box to the left of the document in
the Approval Items frame, and then click on the ‘Approve’ or the ‘Reject’ button. Enter a
comment in the dialogue box (comments are required for rejected claims, optional for
approved claims) and click on ‘Done’.
Detailed Approval
For a Detailed Approval (recommended) click on the document under ‘Approval Items’.
The report name appears on the included expenses tab. Click on the ‘Open’ button.
•
•
•
•
Click on the checkbox to select one of the expenses, click on the ‘Approve’ or
‘Reject’ button and enter a comment.
Alternatively, click on the expense, review the details and then click on the
‘Approve’ or ‘Reject’ button on the ‘View Expense’ screen.
Click on previous and next above the description field to scroll through the
expenses.
Click on ‘Edit Comment’ to enter a comment and then click on the ‘Done’ button.
NechoExpense User Manual
- 13 -
October 2007
•
To close the View Expense screen click on the ‘Done’ button, and then click on
‘Complete Approval’. Click on the ‘Submit’ button and then on ‘Back to Home’.
When reviewing expenses in detail, approvers have the ability to overwrite a claim to
make corrections, such as to change the financial code allocation or amount. Click on
an expense to view the details. Click on the ‘Overwrite’ button, make the necessary
changes and click on the ‘Approve’ button. Click on ‘Done’ to close the ‘Expense View’
window. NOTE: Once an expense has been overwritten, it must be approved.
If an expense is ineligible, overwrite the amount to zero and then approve it, rather than
rejecting it which will send the claim back to the preparer.
11. ASSIGNING A PROXY
If another individual will be submitting your expense reports on your behalf, you may
designate this individual as your proxy submitter. When the proxy submitter logs in, he
or she will see a section called ‘Act on behalf of’ at the top left side of the Home Page
and will use the drop down arrow to select the individual the claim is being prepared for.
(See the figure on page 12).
If you are going to be away, you may assign a proxy submitter and/or approver. The
proxy approver you assign should be of an equivalent or higher level of authority,
following the one-over-one hierarchy for approval.
•
•
•
•
On the Home Page under Personal Actions, click on ‘Edit User Preferences’.
On the Proxies tab, click on the arrow to the right of the submitter field. Type the
last name in the search field, choose last name from the drop down list to the
right, and then click on the ‘Search’ button. Click on the name to return to the
proxy tab.
To select a date range for your assignment, click on the calendar to the right of
the ‘Start Date’ and ‘End Date’ fields.
Do the same to select a proxy to approve claims in your absence. Click on
‘Save’ and then ‘Close’.
12. REVIEW CLAIM HISTORY AND STATUS
A previously submitted claim can be viewed on-line in the claim history, making printed
copies unnecessary. To review the history and status of an expense report:
•
•
•
•
From the Home Page click on ‘Review History’.
Under Review Expense Reports, click on the document you wish to review.
Click on the ‘Event History’ tab.
Click on the ‘+’ to display detailed information about the status of a claim.
Approvers can review the history of approved claims by clicking on ‘View Documents to
Approve’ on the Home Page, then clicking on the ‘Approval History’ tab.
NechoExpense User Manual
- 14 -
October 2007
13. FIELD DESCRIPTIONS
Back
Note: fields with a red asterisk beside them are required fields
Fields used for ‘Creating an Expense Report’
Report Name
The name given to the expense report. Should be meaningful and unique,
and should reflect the reason for the claim. The name you choose may be
used in the future to distinguish the report from a list of several reports.
Include the name of the event and the location for travel, the title or subject
for books, or a description for goods or services. See Frequently Asked
Questions for examples of report names.
From/To
Date range encompassing the dates the expenses being claimed were paid.
Mark as private
When this box is checked, your proxy is unable to access this report.
Fields used for ‘Adding Expense Items’
Date
Date expense was paid. Click the calendar to the right of the date field to
select, or enter in format dd/mm/yy.
Expense Type
Select the type of expense from the drop down menu.
Merchant
The name of the business the expense item was purchased from.
Region
The geographical area where the expense was incurred. The taxes are
calculated based on the region selected.
Area
Not required.
Nbr of days/kms/
units
Depending on the expense, enter the total number of days, kilometers, or
units expensed for business or professional development.
Unit Amt
Field will populate automatically when applicable.
Spent Amt
First field: enter the total amount paid (including GST and taxes). Second
field: select the currency denomination from the drop down list. For
expenses which are per diem, the spent amount will populate automatically
once the number of days, kilometers or units has been entered.
NechoExpense User Manual
- 15 -
October 2007
Exchange rate
Field will populate with a default exchange rate. Rate can be overridden if
the actual rate at the time the expense was paid is known to the submitter.
Payment method
Defaults to Cash for expenses you have entered or AMEX for American
Express transactions you have included in the report. Leave as the default.
Receipt
Choose the type of receipt from the drop down list. For items that are GST
exempt, choose non-GST receipt included. Receipts are not required for
per diem amounts or mileage.
Description
Describe how the expense relates to University business or your
professional development. The description should include as much
information as is necessary to clearly state the purpose of the expenditure.
Approvers need this information to ensure the expense is an appropriate
use of University funds.
Fields used for ‘Importing Transactions from Your Amex Card’
Search For
To search for a specific AMEX transaction. Choose the search criteria from
the drop down menu, click on the calendar or type a date directly into the
field and click on ‘Search’. Click on ‘Reset’ to return to the original screen.
Show
To select which transactions will show on the include transactions tab.
Select ‘All’, ‘Business’, or ‘Personal’ from the first drop down list and ‘All’,
‘Non- disputed’ or ‘Disputed’ from the second drop down list.
Select Report
To select the report in which the transactions will be included. This may be
a new report or a report previously created and saved.
14. INFORMATION ICONS
Transaction has been marked as personal
Transaction has been marked as disputed
Attention is required e.g. to correct an error in a transaction or to edit and
resubmit a rejected claim
Indicates the transaction has been edited by an approver
Additional information about the transaction
NechoExpense User Manual
- 16 -
October 2007