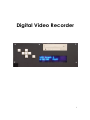
1
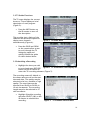
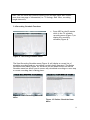
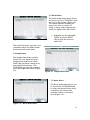
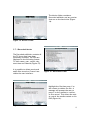
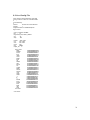
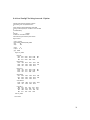
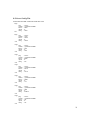
Digital Video Recorder
1
ELEX 290
Camosun College
Digital Video Recorder
USER MANUAL
Prepared for
Alan Duncan
Joe Benge
Prepared by
Kyle Weston
Paul Leslie
Rob MacNeill
Daria Wilcox
2
Table of Contents
1.0 Overview .......................................................................................................................1
2.0 Installation ...................................................................................................................1
2.1 Minimum Hardware Requirements ........................................................................1
2.2 Software Requirements...........................................................................................1
2.3.0 Installation .............................................................................................................2
2.3.1 Compiling the Kernel .......................................................................................3
2.3.2 Adding a Lilo Option for the New Kernel......................................................5
2.3.3 Changing the Default Runlevel.......................................................................6
2.4.0 Extras ......................................................................................................................6
2.4.1 Useful Commands .............................................................................................6
2.4.2 Speeding up the Boot Process ........................................................................7
3.0 Operation ......................................................................................................................9
3.1 Main Menu..................................................................................................................9
3.2 TV Guide Functions ................................................................................................ 10
3.3 Scheduling a Recording ......................................................................................... 10
3.4 Recording Schedule Functions ............................................................................. 11
3.5 Audio Menu .............................................................................................................. 12
3.6 Image Menu ............................................................................................................. 12
3.7 Movie Menu .............................................................................................................. 12
3.7.1 Recorded Movies ............................................................................................. 13
4.0 Line Switching ........................................................................................................... 14
5.0 Keypad......................................................................................................................... 15
6.0 LIRC Troubleshooting .............................................................................................. 15
7.0 Conclusion .................................................................................................................. 17
8.0 Appendices................................................................................................................. 18
8.1 Remote functions ...................................................................................................18
8.2 Bttv Cardlist ............................................................................................................ 20
8.3 Lircd Config File ..................................................................................................... 21
8.4 Lircd Config File Using irrecord –f Option .......................................................... 22
8.5 Lircrc Config File .................................................................................................... 23
3
1.0 Overview
Installing and operating the Digital Video Recorder (DVR) requires that you
follow some important procedures.
This manual deals with the installation details for turning a PC into a DVR and
describes the operation by remote control once the system is functional. The
installation has been simplified to running a single install script which automates
much of the install process.
2.0 Installation
2.1 Minimum Hardware Requirements
§
§
§
§
§
500 MHz Pentium II or equivalent
128 MB of RAM
100 MB of Hard Disk space
4x CD-ROM drive
bttv video card with video capture capability (see appendix for card list )
2.2 Software Requirements
You must have Red Hat Linux 8.0 installed with the following packages:
§
§
§
§
§
§
§
X Window System
− XFree86-xdm
− Authconfig -gtk
− Firstboot
KDE Desktop Environment
Sound and Video
− Xawtv
− Xmms
Development Tools
X Software Development
Network Servers
− Rsh-server
− telnet-server
Kernel Development
− Tk
1
2.3.0 Installation
The installation of Freevo and all of its software components can be quite
tedious and lengthy explanation would be required if you were to install each
package separately. To simplify the install process (and to save paper) the
entire Freevo package can be downloaded from
http://[email protected]/DVRSystems/freevo.tgz. This site is
only open to Camosun College students and Faculty since there is a password
required.
§ Make sure you are running Linux and download the package to your root
directory (you will have to be logged in as root to do this).
§ Unzip the package by typing tar xvzf freevo.tgz.
§ Begin installation by typing ./freevo_install.
The install process can take anywhere from 20 minutes to over an hour
depending on the speed of your computer. The process is as follows:
§
You will be prompted to recompile the Linux kernel.
This is a required step since video4linux is not enable by default in the kernel
and will have to be enabled. Also, the serial port driver will have to be
installed as a module since it could conflict with LIRC (Linux Infrared
Controller), see section 2.3.1 ‘Compiling the Kernel’ for instructions on how
to do this. The install script has automated much of this process but it may
still be useful to know the details in case you need to do it again.
§
§
§
lilo.conf will be updated to include the new kernel
Freevo will be configured and installed.
XMLTV (the program that updates the channel listings) will be installed
and configured.
Note: After choosing which channels to include in the listings you will have
to make sure that you update the TV_CHANNELS in the local_conf.py file
in /usr/local/freevo to reflect the channel list in /root/.xmltv/tvgrabna.
§
§
§
MPlayer and MP3Lame will be installed.
Runlevel 4 will be configured to boot directly into Freevo.
LIRC will be installed
You will see a configuration screen like the one shown below. If you have a
homebrew IR module then all you will have to do here is select ‘Save
configuration & run configure.’
2
Figure 1: LIRC configuration menu.
When the installation is finished you will need to change the default runlevel to
runlevel 4, see section 2.3.3 for instructions on how to do this.
2.3.1 Compiling the Kernel
Recompiling the kernel can be a good idea since there are a lot of programs are
loaded into it that are rarely or never used and can slow performance. Also
some programs need to look at the Makefile for the compiled kernel to
determine the configuration of your system. The LIRC module is one example.
If you are running the Freevo install script then all you will have to do is click on
‘Load Configuration from File’ when the ‘xconfig’ menu comes up (Figure 1) and
type config-2.4.18-14. This loads the configuration needed to run Freevo.
You might want to make sure that you have the correct drivers installed for your
hardware. Pay particular attention to the ‘Processor Type and Features’ menu
shown in Figure 2 and make sure that it matches your hardware. When you are
satisfied click ‘Save and Exit’ and the installer will take care of the rest.
If you are not running the Freevo installer and want to recompile the kernel
then here are the steps that you should follow:
§
§
§
Change the directory containing the source code from the current kernel.
Type ‘make mrproper’ to clean up any previous attempt at building the
kernel
Type ‘make xconfig ’ to bring up a menu with all of the kernel options (see
figure 1) and select the options that you want to include in the new
kernel. When you are finished click ‘Save and Exit.’
3
Figure 2: The xconfig menu.
Beside each option in the submenus there are three radio buttons labeled y,m
and n (see Figure 2). Select y to install the option, n not to install the option
and m to install the option as module. This means it is only added into the
kernel when needed. If you don’t know what an option is for you can click on
the ‘Help’ button to the right.
Figure 3: An xconfig submenu.
§
§
§
§
Type ‘make dep’ to build the dependencies.
Type ‘make clean; make bzImage; make modules’ to compile the kernel.
Copy the System.map file from the linux source directory to /boot.
Copy the bzImage file from the arch/i386/boot directory to /boot and
rename vmlinuz-<version> where <version> is the version number of the
kernel.
Caution: Make sure you name it something different than the
one that is already there in case you need to boot into the old
kernel.
4
§
§
Change back to the kernel source directory and type ‘make
modules_install’ to install the kernel modules.
Type ‘make install’ to install the kernel.
Hint: To see if the kernel installed properly you can look in
the /boot directory. If there is a file called initrd<version>.img, where <version> is the same name you gave to
the bzImage file then the installation was successful.
Once the new kernel is compiled you will have to add an entry in the
/etc/lilo.conf file so that you can boot into it. See section 2.3.2 ‘Adding a Lilo
Option for the New Kernel’ for instructions on how to do this.
2.3.2 Adding a Lilo Option for the New Kernel
§
§
Open the lilo.conf file from /etc.
Copy and paste the boot options for the current kernel and change them
to fit the new one (see example below).
prompt
timeout=50
default=linux-custom
boot=/dev/hda
map=/boot/map
install=/boot/boot.b
message=/boot/message
compact
image=/boot/vmlinuz-2.4.18-14
label=linux
initrd=/boot/initrd-2.4.18-14.img
read-only
append="root=LABEL=/"
image=/boot/vmlinuz-2.4.18-14custom
label=linux-custom
initrd=/boot/initrd-2.4.18-14custom.img
read-only
append="root=LABEL=/"
§
§
Type ‘lilo’ to install the new lilo configuration.
Type ‘lilo –v’ to write the new configuration to the boot sector.
5
2.3.3 Changing the Default Runlevel
To change the runlevel your system boot into, open the inittab file found in
/etc. There should be a line that looks like this:
Id:5:initdefault:
Manually change the number in the second column the number of the runlevel
you wish to boot into.
Caution: Do not change the runlevel to 0 or 6 as this will make the system
unbootable.
If you make a mistake here you can switch to another runlevel to fix it when the
system boot by type CTRL-X at the LILO prompt, followed by the kernel name
and the runlevel you wish to boot with. For example: If I had a kernel called
Linuxcustom and I wanted to boot into runlevel 3 I would type ‘linuxcustom init
3’.
2.4.0 Extras
2.4.1 Useful Commands
Here is a list of commands that should help you install freevo and or if you need
to do some troubleshooting.
ls
man
– displays the contents of a directory.
– display a help file on how to use a particular command (example:
man ls will bring up a help file on the ‘ls’ command.
locate
– finds a particular file or folder.
top
– displays a list of currently running processes. To kill a process type
‘kill’ followed by the process identification number (PID) of the
process you wish to kill.
tar
– a command for archiving and extracting files. To extract a .tar.gz or
a .tgz file use the command ‘tar xvzf’ followed by the filename.
lsmod
– displays a list of currently installed kernel modules.
modprobe – installs a kernel modules along with its dependencies.
rmmod – removes a currently installed kernel module.
ln
– creates a link to a file (similar to a shortcut). To create a symbolic
link to a file type ‘ln –s’ followed by the destination filename and the
name you wish to give to the link.
6
2.4.2 Speeding up the Boot Process
If you ever get tired of waiting for your computer to boot then here is how you
can speed it up by getting rid of the unnecessary time wasters.
First it might help to give a quick explanation of the boot process:
§
§
§
§
§
When the system boots it looks for the init script, first in /etc and then in
/sbin.
init runs /etc/rc.d/rc.sysinit.
rc.sysinit does a bunch of necessary things and then runs rc.serial (if it
exists).
init runs all the scripts for the default runlevel.
init runs rc.local
There are 7 runlevels, 5 of which you can use as default:
§
§
§
§
§
§
§
0–
1–
2–
3–
4–
5–
6–
Halt (do not use as default)
Single user mode
Multiuser
Full multiuser
Unused
X11
reboot (do not use as default)
For each of these runlevels there is a folder containing a list of symbolic links.
Each symbolic link points to a script in /etc/rc.d/init.d. These folders are found
in /etc/rc.d.
Here are the contents of the folder for runlevel 4.
K05saslauthd
K20nfs
K74ntpd
S09isdn
S10network
S13portmap
S14nfslock
S17keytable
S28autofs
S55sshd
S56xinetd
S90crond
S91Lirc
S95anacron
S98local
S99xfreevo
The scripts the scripts that start with a K are sent a ‘stop’ command and the
scripts that start with an S are sent a ‘start’ command. The numbers determine
the order in which the scripts are run.
This is where you can speed things up by carefully removing the scripts that you
don’t need.
Note: Removing a symbolic link does not remove the original script. If you
end up deleting something that you shouldn’t have you get copy the link
from the folder for another runlevel or you recreate it.
7
Before removing a link you should read the script that the link points to and
determine if it is necessary to load the script. You can list the links with there
pointers by typing ‘ls-l’. You can usually remove at least half of these.
8
3.0 Operation
3.1 Main Menu
Freevo’s Main Menu gives you the option to enter the TV, Movie, Music and
Images submenus by highlighting the submenu and pressing the SELECT (OK)
button on either the IR remote or the keypad. The Main Menu also allows the
DVR unit to be shutdown directly.
§
§
Press SELECT to enter the submenu that is currently highlighted.
Press EXIT to return to the last submenu you had previously visited.
Figure 4: Freevo Main Menu
9
3.2 TV Guide Functions
The TV menu displays the current
shows on TV and displays a brief
description of each program
(Figure 5).
§
Press the INFO button on
the IR remote to turn off
the description.
This provides just a listing of the
channels and allows the system to
display more channels
simultaneously (Figure 6).
§
Figure 5: TV Guide Menu
Press the PGUP and PGDN
on the remote allow a user
to scroll through the TV
listings by pages and
quickly browse the guide
for their desired shows.
3.3 Scheduling a Recording
§
Highlight the show you wish
Figure 6: TV Guide Menu with display off
to record and press RECORD
button on the IR remote to
enter the TV recording submenu (Figure 7).
The recording name will default to
the shows name as well as the start
time and date. The quality may be
selected to be low, medium or high
quality. The start time may be
selected from 00:00h to 24:00h in
10 min increments. The recording
length may also be selected in 10
min increments.
§
Highlight Schedule recording
and press SELECT (OK) on the
IR remote to schedule the
recording.
Figure 7: TV Schedule Record Menu
10
Hint: Use the PGUP and PGDN to quickly scroll through pages that contain
more than one page of information (i.e. TV listings, start time, recording
length time etc).
3.4 Recording Schedule Functions
§
Press INFO on the IR remote
while in the TV schedule
recording menu (Figure 7) to
display the recording
schedule (Figure 8).
Figure 8: Recording Schedule Menu
The View Recording Schedule menu (Figure 9) will display a current list of
schedule recordings and any recordings currently being executed. The Delete
Scheduled Item menu (Figure 10) will show you the same files as the Record
Schedule menu but allows you to remove any scheduled recordings or even stop
a current recording that is taking place.
Figure 9: View Recording Schedule
Menu
Figure 10: Delete Scheduled Item
Menu
11
3.5 Audio Menu
The Audio main menu allows direct
access to any CD or DVD-ROM’s that
are used in the system (Figure 10).
The system detects whether the
disc in the drive is a video CD
(VCD), a super video compact disc
(SVCD) or digital video disc (DVD).
§
Figure 11: Audio Main Menu
Highlight the disc identifier
(SVCD) and press SELECT
(OK) to play the movie or
audio disc.
The audio files (wav, mp3 etc.) are
contained within the Audio folder
inside the Audio main menu.
3.6 Image Menu
The Images main menu contains
folders for your digital pictures
(Images) and slide shows (Slide
Show) that you have created from
your digital still pictures. The
CD/DVDrom may also be accessed
from the Image main menu (Figure
12).
Figure 12: Images Main Menu
3.7 Movie Menu
The Movie main menu allows you
to access the CD/DVD-ROM and
to enter the Movies folder which
contains all the movies and
recorded videos on the hard
drive (Figure 13).
Figure 13: Movie Main Menu
12
The Movies folder contains a
Recorded subfolder and any movies
that are on the hard drive (Figure
14).
Figure 14: Movies Folder
3.7.1 Recorded Movies
The Recorded subfolder contains all
the TV shows that have been
previously recorded. The files are
displayed in the following format:
TV show name, year, month, day,
start time and channel (Figure 15).
It is possible to delete movie and
audio files stored on Freevo from
within the user interface.
Figure 15: Recorded Folder
Highlight the file then press C on
the remote to delete the file. A
message will prompt the user to
press C on the remote to confirm,
or B to cancel. This allows the user
to control the media content on his
DVR (Figure 16).
Figure 16: File Delete Confirmation
13
4.0 Line Switching
The DVR allows recording and
playback from 4 composite line
inputs located on the back panel of
the DVR. These inputs are switched
by the remote control TV_VCR
button.
NOTE: The remote must be in
TV mode to switch inputs.
Figure 17: DVR multiple line inputs
Freevo selects the input video source when any TV channel is selected from within the TV
guide menu. The DVR will either choose to capture from the coaxial cable input if ‘Cable’
is displayed on the Vacuum Fluorescent Display (VFD) or from composite inputs if Line1,
Line2, Line3 or Line4 (Figure 17) is displayed on the VFD before any TV channel is
selected for viewing.
Figure 18: VFD line input display
14
5.0 Keypad
1.
2.
3.
4.
5.
6.
7.
POWER
LEFT
SELECT (OK)
DOWN
UP
RIGHT
EXIT
Figure 19: Keypad Layout
§
Hold EXIT and POWER simultaneously to perform a hard shutdown (cutting
power) if the system freezes and a normal POWER button key press does
not turn off the system.
The keypad on the front display of the DVR contains all of the necessary
buttons to control Freevo.
6.0 LIRC Troubleshooting
LIRC (Linux Infrared Remote Control) was previously installed by the script ran
earlier.
First we must ensure that your IR detector is working correctly. We must stop
the LIRC daemon (server) to test this.
§
Type ‘/etc/rc.d/init.d/lirc.redhat stop’
This will stop the daemon.
§
Type ‘mode2’
§
Press a button on the remote.
You should see a series of pulses and spaces like the ones shown below if your IR
detector is operating correctly.
pulse 93
space 4965
pulse 108
space 4969
pulse 93
space 7496
pulse 93
space 7489
pulse 93
15
If you do not see any pulses or spaces you may need to ensure that it is receiving
valid serial data and is passing it through to the DCD (Data Carrier Detect) pin on
com1 of the serial port.
When the IR detector is operating correctly, you may move on to the next part
of the configuration.
§
Check http://lirc.sourceforge.net/remotes for your remote control.
§
Download the appropriate config file for your remote to the /etc
directory.
If your remote control does not seem to be supported, you may generate your
own config file for your remote using the irrecord program.
§
Switch to the /etc directory.
§
Type ‘irrecord <your_remote_name_here> ‘
The irrecord program will prompt you to press the buttons repeatedly to try and
figure out the gap length. The program identifies the protocol that the remote is
using and finishes recording the keys and saves it to the remote name you gave
it previously. (Appendix 8.3)
§
Use the ‘irrecord –f’ option if something goes wrong to force the program
to record each individual pulse or space (1 or 0) in the IR stream for each
button pressed.
When using t he –f option you will need to manually map each key you wish to
use on your remote control. (Appendix 8.4)
§
Rename your config file generated to lircd.conf.
When you have a valid config file in the /etc directory, you can rename it to
lircd.conf.
§
Select ‘yes’ to overwrite the old lircd.conf file
We must now test to ensure the lircd daemon (server) is able to distinguish valid
key presses from your remote control.
§
Type /etc/rc.d/init.d/lirc.redhat start to start the lircd daemon
§
Type ‘irw’
16
You should see valid key presses for your remote.
0000000000f40bf0
0000000000f40bf0
0000000000f40bf0
0000000000f40bf0
0000000000f40bf0
0000000000f40bf0
0000000000748bf0
0000000000748bf0
0000000000748bf0
00 1_DOWN your_remote_name_here
01 1_DOWN your_remote_name_here
02 1_DOWN your_remote_name_here
03 1_DOWN your_remote_name_here
04 1_DOWN your_remote_name_here
05 1_DOWN your_remote_name_here
00 1_UP
your_remote_name_here
01 1_UP
your_remote_name_here
02 1_UP
your_remote_name_here
The first column displays the IR serial command. The second column displays the
number of times the pulse was repeated. The third column displays the button
that was pressed and the forth column shows the name of the remote that was
decoded.
When you receive valid key presses like the ones displayed above, you may
proceed onto the next section of configuring.
Next you need to create a “lircrc” config file in the /etc/freevo directory to
allow the lircd daemon to communicate with Freevo. Follow the example in
Appendix 8.3 for each button you wish to map in Freevo.
NOTE: ensure all commands are in upper-case as Freevo is case
sensitive.
The LIRC infrared remote control setup has now been completed.
7.0 Conclusion
Thank you for choosing DVR Systems Inc. You are using the easiest most user
configurable DVR player on the market. In case of problems don’t hesitate to
call us at 1-800-DVR-2003.
17
8.0 Appendices
8.1 Remote functions
Figure 2 Shaw IR Remote Control
18
1.
POWER
Turns the DVR power on or off (Must be in TV
mode)
16.
STOP
Stops a video currently playing (EXIT also stops
currently playing file)
17.
REC
Opens the Schedule Recording Menu, to configure
the recording, when a TV show is highlighted in
the TV guide
2.
CABLE
Selects CABLE mode to control all Freevo options
18.
3.
TV
Selects TV mode to turn on the DVR (POWER) or
to switch line inputs (TV_VCR)
PLAY
Plays the highlighted file
19.
REW
Rewinds 10s
CHANNEL UP
Increments to the next channel while watching TV
20.
A
Ejects the CD/DVDrom
CHANNEL DOWN
Decrements to the next channel while watching TV
21.
EXIT
Exits the current menu and reloads the previous
menu
RIGHT
Moves the cursor position to the right in Freevo
Fast forwards 60s while viewing a movie file
PGUP
Scrolls up one page to the next page of information
(TV guide etc)
22.
INFO
Turns show description on or off while in the TV
guide menu
Enters the View Recording Schedule menu when
pressed in the TV Schedule Recording menu
SELECT (OK)
Selects the current highlighted item (enter a menu,
play a file or confirm a response)
23.
DOWN
Moves the cursor position down in Freevo
Rewinds 600s while viewing a movie file
MENU
Loads the main menu
24.
PGDN
Scrolls down one page to the next page of
information (TV guide etc)
LEFT
Moves the cursor position to the left in Freevo
Rewinds 60s while viewing a movie file
25.
UP
Moves the cursor position up in Freevo
Fast forwards 60os while viewing a movie file
26.
VOL+
Turns the volume down in Freevo
27.
VOLTurns the volume up in Freevo
28.
MUTE
Mutes the volume in Freevo
4.
5.
6.
7.
8.
9.
10.
11.
C
Deletes a currently highlighted file
12.
B
Cancels a file deletion when prompted
13.
FF
Fast forwards 10s
14.
PAUSE
Pauses the current playing video
15.
TV_VCR
Switches the line inputs to the DVR (Must be in
TV mode)
19
8.2 Bttv Cardlist
MIRO PCTV
Hauppauge (bt848)
STB
Intel
Diamond DTV2000
AVerMedia TVPhone
MATRIX-Vision MV-Delta
FlyVideo II (Bt848) LR26
IXMicro TurboTV
Hauppauge (bt878)
MIRO PCTV pro
ADS Technologies Channel Surfer TV
AVerMedia TVCapture 98
Aimslab Video Highway Xtreme (VHX)
Zoltrix TV-Max
Pixelview PlayTV (bt878)
Leadtek WinView 601
AVEC Intercapture
LifeView FlyKit w/o Tuner
CEI Raffles Card
Lucky Star Image World ConferenceTV
Phoebe Tv Master + FM (CPH050)
Modular Technology MM205 PCTV, bt878
[many vendors] CPH05X/06X (bt878)
Terratec/Vobis TV-Boostar
Newer Hauppauge WinCam (bt878)
MAXI TV Video PCI2
Terratec TerraTV+
Imagenation PXC200
FlyVideo 98
iProTV
Intel Create and Share PCI
Terratec TerraTValue
Leadtek WinFast 2000
Flyvideo 98 (LR50Q) / Chronos Video Shuttle II
Flyvideo 98FM (LR50Q) / Typhoon TView TV/FM
Tuner
PixelView PlayTV pro
TView99 CPH06X
Pinnacle PCTV Studio/Rave
STB2
AVerMedia TVPhone 98
ProVideo PV951
Little OnAir TV
Sigma TVII-FM
MATRIX-Vision MV-Delta 2
Zoltrix Genie TV/FM
Terratec TV/Radio+
Dynalink Magic TView
GV-BCTV3
Prolink PV-BT878P+4E / PixelView PlayTV PAK /
Lenco MXTV-9578 CP
Eagle Wireless Capricorn2 (bt878A)
Pinnacle PCTV Studio Pro
Typhoon TView RDS + FM Stereo / KNC1 TV
Station RDS
Lifetec LT 9415 TV (LR90 Rev.F)
BESTBUY Easy TV (CPH031)
FlyVideo '98/FM
GrandTec 'Grand Video Capture' (Bt848)
Phoebe TV Master Only (No FM) CPH060
TV Capturer (CPH03X)
Modular Technology MM100PCTV
AG Electronics GMV1
BESTBUY Easy TV (bt878)
ATI TV-Wonder
ATI TV-Wonder VE
FlyVideo 2000S
Terratec TValueRadio
GV-BCTV4/PCI
3Dfx VoodooTV FM (Euro), VoodooTV 200 (USA)
Active Imaging AIMMS
PV-BT878P+
Flyvideo 98EZ (capture only)
Prolink PV-BT878P+9B
(PlayTV Pro rev.9B FM+NICAM)
Sensoray 311
RemoteVision MX (RV605)
Powercolor MTV878/ MTV878R/ MTV878F
Canopus WinDVR PCI (COMPAQ Presario 3524JP,
5112JP)
GrandTec Multi Capture Card (Bt878)
AOPEN VA1000
20
8.3 Lircd Config File
# this config file was automatically generated
# using lirc-0.5.5 on Wed Jun 5 07:33:26 2002
#
# contributed by
#
# brand:
General Instrument/Motorola
# model:
?
# supported devices: dct2000 settop box
begin remote
name gi-motorola -dct2000
bits
16
flags SPACE_ENC|CONST_LENGTH
eps
30
aeps
100
header
9036 4424
one
556 2185
zero
556 4424
ptrail
556
gap
100025
repeat_bit
0
begin codes
HELP
POWER
MUTE
EXIT
PGUP
LOCK
PGDN
INFO
UP
DOWN
LEFT
RIGHT
OK
GUIDE
MENU
VOLUP
VOLDN
LAST
CHUP
CHDN
A
B
C
ENTER
STOP
PAUSE
PLAY
REW
REC
FWD
end codes
0x000000000000B3F2
0x000000000000AFF9
0x0000000000000FF7
0x000000000000B7F4
0x000000000000A3F3
0x00000000000097F6
0x00000000000023FB
0x00000000000033FA
0x000000000000D3F6
0x00000000000053FE
0x00000000000093F1
0x00000000000013F9
0x00000000000077F8
0x000000000000F3F4
0x00000000000067F9
0x0000000000004FF3
0x0000000000008FFB
0x00000000000037FC
0x0000000000002FF5
0x000000000000CFFD
0x00000000000017FE
0x0000000000001BF1
0x000000000000EBF9
0x000000000000F7F0
0x00000000000063FD
0x00000000000007FF
0x000000000000E3F5
0x00000000000087F7
0x00000000000073FC
0x00000000000047FB
end remote
21
8.4 Lircd Config File Using irrecord –f Option
# Please make this file available to others
# by sending it to <[email protected]>
#
# this config file was automatically generated
# using lirc-0.6.6(serial) on Tue Mar 4 15:27:12 2003
#
# contributed by
#
# brand:
keypad
# model no. of remote control:
# devices being controlled by this remote:
begin remote
name keypad
flags CONST_LENGTH|RAW_CODES
eps
30
aeps
100
ptrail
0
repeat 0 0
gap 66561
begin raw_codes
name UP
830 832
832 831
832 831
2497
2497
2497
1665
1666
1665
832
831
name DOWN
1664 832
1665 832
1666 831
1663 1665 1663
1663 1665 1664
1663 1666 1663
832
831
1663
1663
1664
name LEFT
2496 831
2497 832
2497 831
832
831
831
1665
1666
1666
1664
1663
1663
831
832
name RIGHT
833 1663
834 1663
834 1663
1663
1663
1663
1665
1665
1666
1663
1663
1663
832
832
name SELECT
4159 1663 1665 832
1666 831 4160 1663
4160
1666
1663
name EXIT
830 832
1663 836
834 1663
832 831
831 832 834 1663
833 828 831 832
1663 834 832 831
834 1663 1663
end raw_codes
end remote
22
8.5 Lircrc Config File
#GI -MOTOROLA-DCT2000" CONFIG KEYS FROM LIRCD.CONF
begin
end
begin
end
begin
end
begin
end
prog
remote
button
repeat
config
= freevo
= gi-motorola -dct2000
= HELP
=0
= HELP
prog
remote
button
repeat
config
= freevo
= mute
= MUTE
=0
= MUTE
prog
remote
button
repeat
config
= freevo
= gi-motorola -dct2000
= EXIT
=0
= EXIT
prog
remote
button
repeat
config
= freevo
= gi-motorola -dct2000
= PGUP
=0
= CH+
prog
remote
button
repeat
config
= freevo
= gi-motorola -dct2000
= LOCK
=0
= LOCK
prog
remote
button
repeat
config
= freevo
= gi-motorola -dct2000
= PGDN
=0
= CH-
prog
remote
button
repeat
config
= freevo
= gi-motorola -dct2000
= INFO
=0
= DISPLAY
prog
remote
button
repeat
config
= freevo
= gi-motorola -dct2000
= UP
=0
= UP
begin
end
begin
end
begin
end
begin
end
23